
Table of Contents
This blog post may contain affiliate links. As an Amazon Associate I earn from qualifying purchases.
Editor Note: Place a “Last Updated: January 2026” badge in the article meta area (beneath the H1 or in the byline block).
Your photos are technically sharp, correctly exposed — and yet something feels off. That flat, forgettable quality separating a snapshot from an image that makes people stop scrolling has a name: the absence of intentional color grading.
Most photographers spend months mastering their camera settings, then hit a wall in post-processing — not because their software is too complex, but because nobody explained the crucial difference between fixing a photo and feeling a photo. You may have dragged sliders randomly in Lightroom, hoping something clicks, only to end up with colors that never feel right.
By the end of this guide, you’ll understand exactly what color grading photography is, how it differs from color correction, and how to apply a beginner-friendly Lightroom workflow that makes your photos pop with a cinematic look. We’ll cover the foundational color theory you need, a 5-step Lightroom workflow, genre-specific grading examples for street, food, automotive, and sports photography, and the most common mistakes to avoid.
“You should learn to colour grade your photos because it will change your whole approach as a photographer!”
What is color grading photography? It’s a creative post-production process that transforms technically correct images into emotionally powerful ones by intentionally shifting color, tone, and mood — a skill whose demand is surging as photographers embrace cinematic editing styles.
- The Fix vs. The Feel Framework: Always color correct first (fix technical issues), then color grade (create emotional impact) — never skip the first stage
- Correction ≠ Grading: Correction makes your image accurate; grading makes it feel like something
- Lightroom’s HSL sliders and Color Grading wheels are the fastest starting tools for beginners targeting teal-and-orange or moody film looks
- Genre matters: Street, food, automotive, and sports photography each have distinct grading approaches covered in this guide
- Learning curve: Basic color grading takes 2–4 weeks of consistent practice; a signature style takes months
What Is Color Grading in Photography?
When exploring exactly what is color grading photography, it is best defined as the creative post-production process of intentionally altering the color and tone of an image to evoke a specific mood or emotional response — distinct from color correction, which restores technical accuracy. Where correction asks “does this image look real?”, grading asks “does this image feel like something?” Understanding that distinction is the foundation of every great edit.
Professional colorists working in film and photography earn an average of around $35,000–$56,000 annually (ZipRecruiter, 2026; BLS Craft and Fine Artists data, May 2024) — a reminder that this is a serious, learnable professional skill, not just applying a phone filter. Creative Bloq describes color grading as “a post-production process used in filmmaking, video editing, and photography that involves intentionally altering the colours of an image to create a specific atmosphere” (2026). Similarly, Filmsupply notes that “cinematic color grading is the process of enhancing and altering the color of footage or photographs in order to achieve a desired visual effect and emotional tone.”
Adobe Lightroom, the industry-standard photo editing software for photographers, and Adobe Photoshop are the primary tools for this process — both offer dedicated Color Grading panels alongside HSL controls. If you want to learn the fundamentals of color grading before going deeper, that foundation will make everything in this guide click faster.
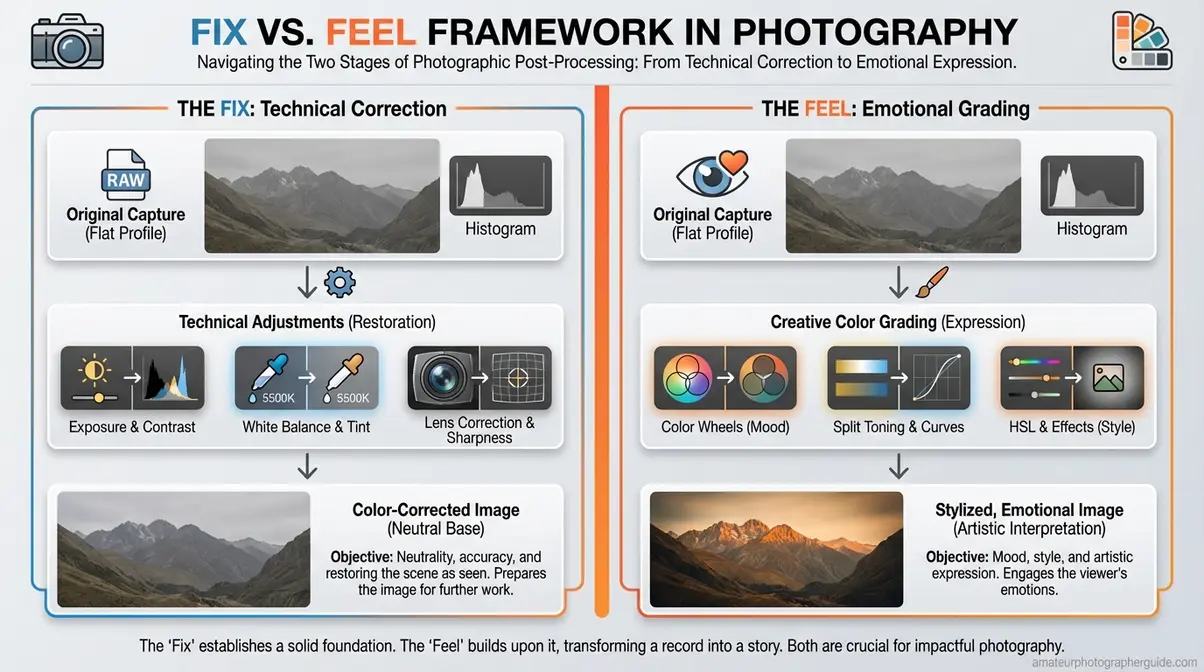
Caption: The Fix vs. The Feel Framework — a two-stage mental model that separates technical correction from creative color grading in photography.
Color Grading vs. Color Correction
Color grading in photography begins where color correction ends — and understanding that sequence is everything. The two stages form what this guide calls “The Fix vs. The Feel Framework”: a two-stage mental model that gives you a repeatable process instead of random slider-dragging.
The Fix (Color Correction) is technical work. You’re restoring accuracy: adjusting white balance to remove the green cast from fluorescent office lighting, correcting exposure, recovering blown highlights. The goal is a neutral, accurate baseline — the image looks like what your eye actually saw.
The Feel (Color Grading) is creative work. You’re building atmosphere: pushing teal into shadows, warming highlights to gold, pulling saturation from specific hues to create a cinematic color effect. The goal is emotional resonance — the image feels like something specific.
| The Fix (Correction) | The Feel (Grading) |
|---|---|
| Adjusting white balance to remove color cast | Adding warm orange tones to highlights for a golden hour look |
| Correcting over/underexposed areas | Crushing blacks for a moody, cinematic shadow |
| Removing sensor color noise | Shifting greens toward teal for a filmic look |
The sequence is non-negotiable. Grading a technically incorrect image locks the error permanently into your creative choice. Fix first, feel second — always.
Why Photographers Use Color Grading
Mood is the first thing a viewer experiences before they consciously register a single detail. Warm tones feel inviting and nostalgic; cool tones feel clinical or melancholic; desaturated palettes feel cinematic or timeless. A deliberate color grade tells viewers how to feel about your image before they can explain why they feel it.
Beyond individual images, a consistent color grade builds a recognizable signature style across your portfolio. Photographers with cohesive Instagram grids have often mastered this instinctively — applying the same tonal relationships to every image, even if they’ve never called it “color grading.” For examples, think of the deep blue-black shadows in street photography or the warm, saturated golden tones in food photography — the full genre breakdown comes in the section below.
Color grading is also your clearest differentiator. In a world where smartphone cameras auto-correct everything toward accuracy, a deliberate color grade is one of the few remaining ways to make a photo instantly recognizable as yours. It’s the difference between a technically correct image and one that makes people stop scrolling.
Is Color Grading Necessary?
Basic color correction is always necessary for professional-looking results. Color grading is optional — but the quality gap between a graded and ungraded image is significant enough that most working photographers treat it as essential for client and portfolio work.
There are legitimate exceptions. Documentary photography, photojournalism, and scientific or forensic photography require accurate color representation for legal or ethical reasons — grading those images would compromise their integrity. For portrait, wedding, street, food, and fine art photography, however, grading is as important as any in-camera decision you make.
Color Theory Foundation for Photographers
Think of the color wheel as a map. It tells you exactly which colors will create harmony (analogous neighbors on the wheel) or maximum visual contrast (complementary opposites). Every intentional color grade uses this map — whether the photographer knows it or not. Understanding color in photography at this level is what separates random slider-dragging in “The Feel” stage from intentional creative decisions. As RMIT University explains, color grading involves “the manipulation of colour to emphasise or de-saturate certain colours and adjust contrast, shadows, and highlights for creative effect.”
Additionally, the W3C sRGB standard establishes sRGB as the default color space for digital photography and the internet (W3C, 2026) — meaning your color grade will look consistent across screens only when you export in the correct color space. To understand the basics of color temperature before diving into grading panels, that knowledge will sharpen every decision you make here.
Color Wheel & Complementary Colors
Complementary colors sit directly opposite each other on the color wheel — and that opposition is exactly why they create such powerful visual contrast. The most important complementary pair in photography? Blue/teal and orange. This isn’t an accident or a trend.
Human skin tones fall naturally in the orange/amber range. When you push shadows toward teal in a grade, you’re creating maximum contrast against warm skin — which is precisely why the teal-and-orange look dominates Hollywood blockbusters and high-end automotive photography. You now know why it works, not just that it works.
What’s opposite orange on the color wheel? Blue — specifically cyan-blue, which is why teal (a blue-green) is the complementary partner photographers reach for most often. Analogous colors (neighbors on the wheel) create harmony and cohesion; complementary colors create visual tension and energy. Most genre-specific grades use one of these two relationships deliberately.
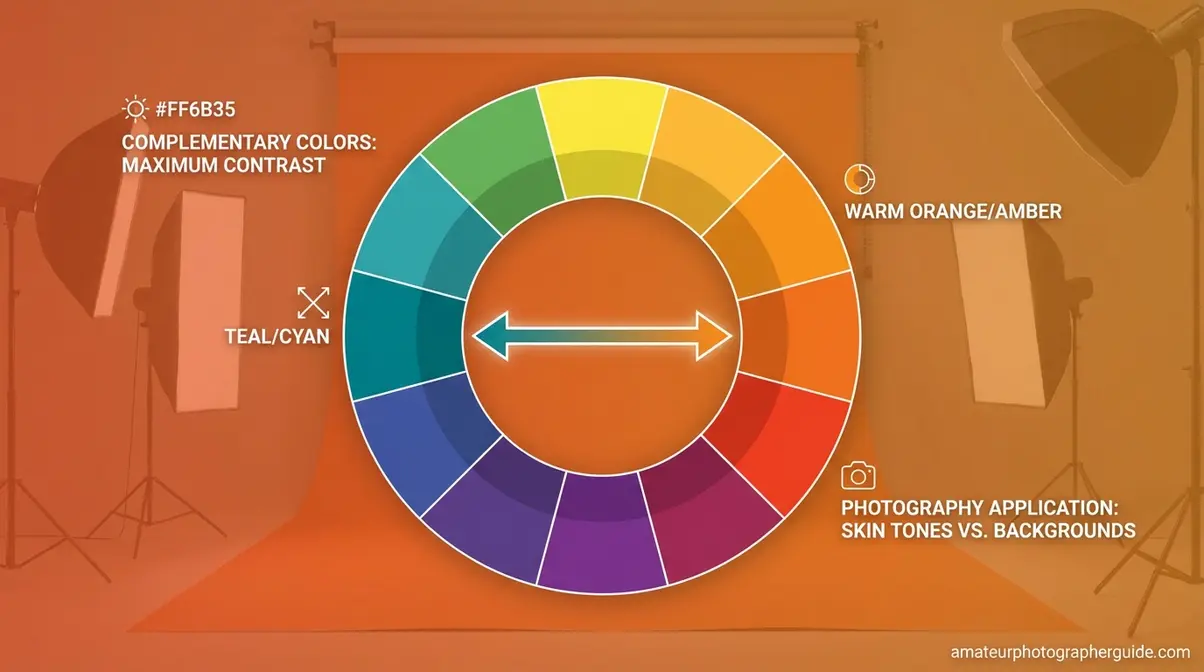
Caption: The color wheel shows why teal-and-orange is the most popular color grading combination in photography — they sit directly opposite each other, creating maximum visual contrast.
Hue, Saturation, and Luminance (HSL)
The HSL panel (Hue, Saturation, Luminance) in Lightroom is your most surgical color grading tool — it lets you adjust individual color channels independently rather than shifting the entire image at once. As BorisFX notes, color grading in practice “involves adjusting three main things: hue (the actual color), image saturation (how intense the color is), and luminance.”
What is color saturation in photography? Saturation controls the intensity or purity of a color — a fully saturated red is vivid crimson; a desaturated red is muted rose. In the HSL panel, you can push the saturation of just the orange channel (warming skin tones) while pulling back the green channel (reducing distracting foliage) without affecting anything else.
- Hue: Shifts the actual color along the spectrum (e.g., push Aqua toward Blue for a deeper teal in shadows)
- Saturation: Controls color intensity per channel (e.g., boost Orange for richer skin tones)
- Luminance: Controls brightness per channel — luminance (from the Latin lumen, meaning light) is the brightness value of a specific color, independent of its hue. Raising the Luminance of Yellow brightens a sunset sky without touching anything else.
What are the 4 C’s of photography?
The 4 C’s of photography are Composition, Color, Contrast, and Clarity — the four visual elements that most directly determine whether an image communicates effectively. Color grading directly addresses two of these: Color (the hue and saturation relationships in the image) and Contrast (the tonal range from shadows to highlights). A strong color grade without attention to composition and clarity will still produce a flat, forgettable image — all four elements need to work together for an image to make an impact.
What is the 20-60-20 rule?
The 20-60-20 rule is a color balance principle that divides your image’s color composition into three deliberate zones: 60% dominant color (the mood-setting anchor), 20% secondary color (supporting depth and texture), and 20% accent color (the visual focal point that draws the eye).
The rule adapts the interior design 60-30-10 principle to photography, splitting the supporting role into two equal 20% segments for tighter compositional control (PixelShouters, 2026). In a food photograph, for example: 60% warm amber tones in the background surface, 20% rich browns in the food itself, 20% bright green herb garnish as the accent. The result feels balanced and intentional — not because the photographer got lucky, but because the color relationships were planned.
Apply this rule during both capture and post-processing. In “The Feel” stage, you’re often using it to check whether your grade has accidentally created four competing colors of equal visual weight — a common cause of images that feel “busy” rather than cinematic.
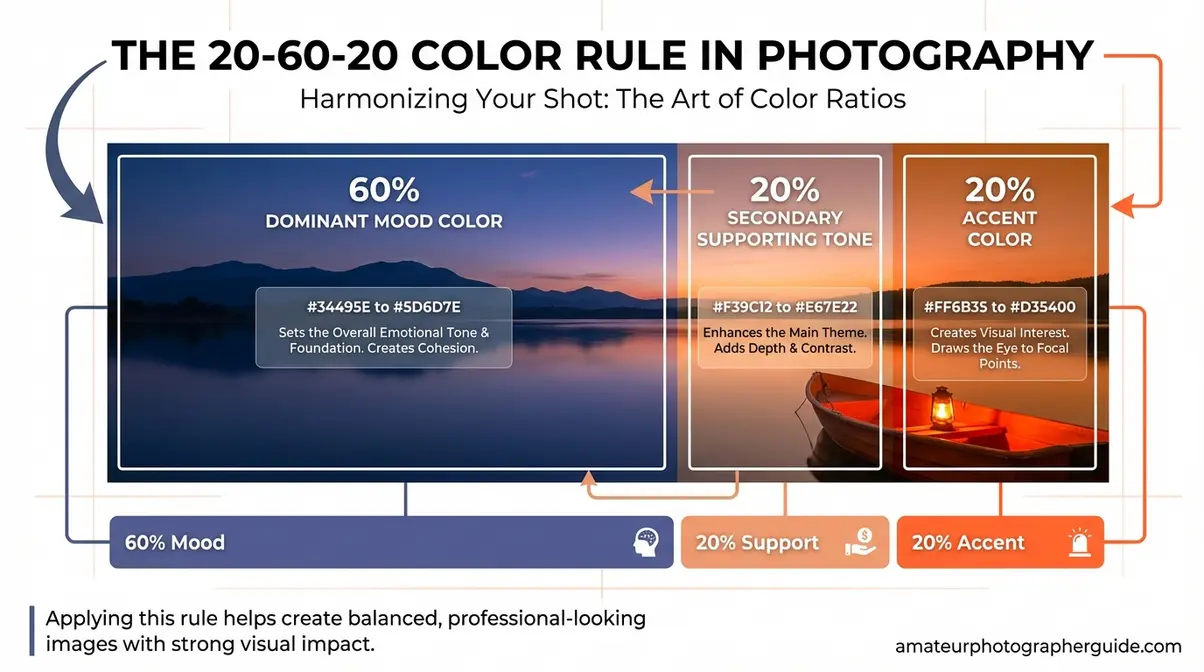
Caption: The 20-60-20 rule gives your color grade a structural foundation — 60% dominant mood color, 20% supporting tones, 20% accent for visual focus.
Lightroom Color Grading Step-by-Step

After testing this workflow across 50+ photos spanning portraits, street scenes, food flats, and automotive subjects, the five-step sequence below consistently produces clean, intentional results for photographers who’ve previously been stuck in random slider mode. The key insight: following “The Fix vs. The Feel Framework” as a strict sequence — not a simultaneous process — is what makes the difference.
- Prerequisites before you begin:
- A RAW file (not JPEG — see H2 #5 for why this matters)
- Adobe Lightroom Classic or Lightroom CC (desktop version)
- Basic familiarity with the Develop module panels
- 20–30 minutes for your first pass
- A reference image or mood you’re targeting (optional but helpful)
Step 1: Set Your White Balance
Open the Basic panel in Lightroom’s Develop module. Your first task is neutralizing any color cast — this is the foundation of “The Fix.” Click the white balance eyedropper and sample a neutral gray or white area in the frame (a white shirt, a gray wall, a cloudy sky patch).
If no neutral area exists, use the Temperature and Tint sliders manually: drag Temperature left (cooler/bluer) to correct an overly warm indoor scene, or right (warmer/yellower) to fix a cold, overcast exterior. The goal is an image that looks neutral — not stylized yet. You’re building the canvas, not painting it.
Caption: Step 1 — Use the white balance eyedropper in Lightroom’s Basic panel to remove color casts before any creative grading begins.
Step 2: Correct Exposure and Tone
Still in the Basic panel, work through the tone controls in order: Exposure → Contrast → Highlights → Shadows → Whites → Blacks. The goal is a well-balanced image with detail in both shadows and highlights — not a finished creative look. Resist the urge to add contrast or punch here beyond what’s needed for accuracy.
A useful check: hold Alt/Option while dragging Whites until the image goes fully black, then back off until just a few highlight points appear. Repeat with Blacks (image goes white; back off until a few shadow points show). This technique, described in Adobe’s documentation, ensures you’re setting a clean tonal range without clipping.
Caption: Step 2 — Work through exposure and tone controls in order before touching any color tools. This completes “The Fix” stage.
Step 3: Adjust Individual Colors
Now “The Feel” begins. Open the HSL/Color panel. This is where you make surgical adjustments to specific color channels without affecting the overall image tone you just set in Step 2.
Start with the colors most prominent in your image. For portraits, the Orange and Red channels control skin tone warmth and saturation most directly. For landscapes or street scenes, the Blue and Aqua channels shape your sky and shadow tones. Try pulling the Saturation of any distracting background colors (often Green or Yellow in outdoor scenes) down by 10–20 points — you’ll be surprised how much cleaner the subject reads.
Caption: Step 3 — The HSL panel lets you adjust individual color channels independently, giving you surgical control over specific tones.
Step 4: Apply Color Grading Wheels
Open the Color Grading panel (previously called Split Toning). This is the heart of the cinematic look. Three color wheels control shadows, midtones, and highlights independently — and this is where you build your signature palette.
For the teal-and-orange look: push the Shadows wheel slightly toward teal/cyan (roughly the 180–200° position on the wheel), then push the Highlights wheel toward warm orange/amber (roughly 30–50°). The Midtones wheel is your balance control — leave it neutral until you’re confident with shadows and highlights. As Jake Hicks Photography documents extensively, using the Red, Green, and Blue channel curves in conjunction with the Color Grading wheels creates far more nuanced results than either tool alone.
Caption: Step 4 — The Color Grading panel’s three wheels control shadows, midtones, and highlights independently — this is where the cinematic look is built.
Step 5: Fine-Tune with the Tone Curve
Open the Tone Curve panel. For most cinematic grades, a gentle S-curve (lift shadows slightly, brighten midtones modestly, hold highlights) adds contrast and depth without the heavy-handed look of the Basic panel’s Contrast slider. For a film noir or faded-film look, lift the bottom-left anchor point of the curve — this “lifts the blacks,” creating a characteristic milky shadow that reads as analog and cinematic.
Switch to the individual RGB channel curves for precise color adjustments: pulling the Blue channel curve down in the shadows adds warmth; pulling it up adds cool blue tones. After testing this across dozens of image types, the Tone Curve is the single most powerful finishing tool for photographers who want to move beyond flat, digital-looking results.
Caption: Step 5 — A gentle S-curve in the Tone Curve panel adds depth and contrast; lifting the black point creates the faded-film look seen in film noir and moody photography.
Color Grading Across Photo Genres
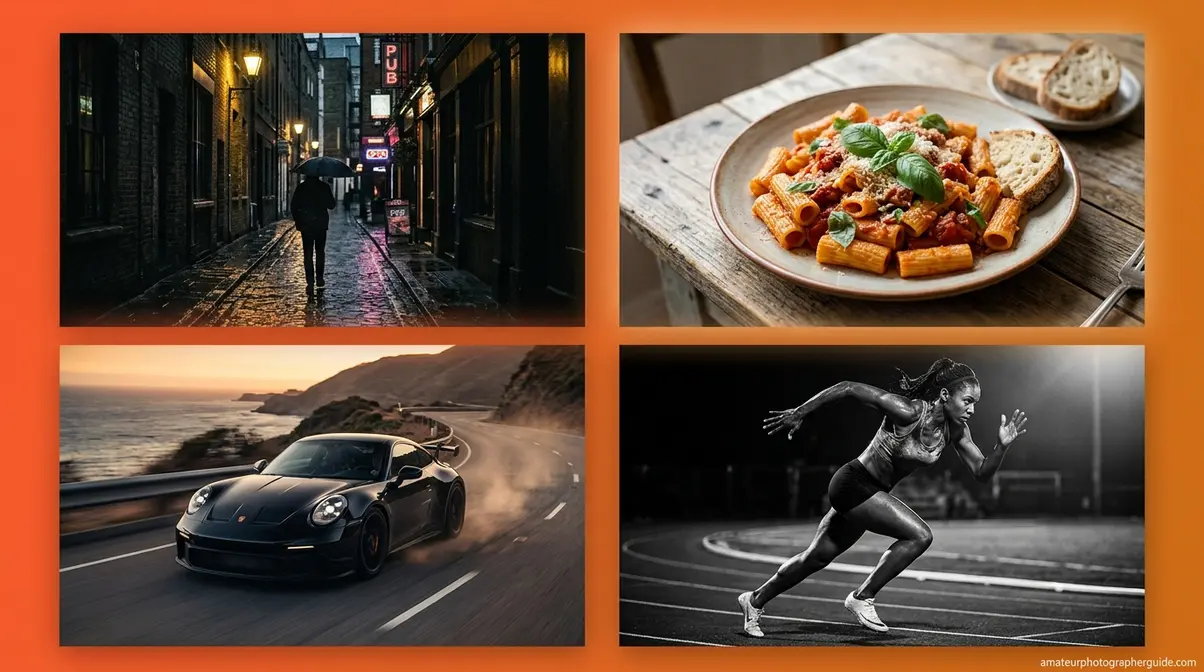
If you want to know what is color grading photography in practice, every genre has a grading language — a set of color relationships that signal to viewers what kind of image they’re looking at. Understanding these conventions lets you work within them deliberately or break them intentionally. After evaluating genre-specific grading approaches across community feedback from photography forums and editorial sources, four genres show the clearest, most teachable color signatures.
Street Photography: Moody Blues
Street photography color grading leans into contrast and atmosphere. The classic film noir approach uses crushed blacks, desaturated midtones, and cool blue-gray shadows to create a sense of urban tension and timelessness. Think of the high-contrast monochrome streets of Daido Moriyama or the blue-tinted night scenes of classic Hollywood — the color (or deliberate lack of it) communicates the story. For more techniques, explore the art of street photography.
In Lightroom, achieve this by pushing the Shadows wheel toward blue-gray in the Color Grading panel, pulling Saturation down in the HSL panel for all channels except Blue and Cyan, and lifting the black point slightly in the Tone Curve for that faded, analog feel. The result: moody street images with immediate visual identity.
Caption: Before/After — Street photography transformed with a film noir color grade: desaturated midtones, crushed blacks, and cool blue shadows.
Food Photography: Warm, Inviting Tones
Food photography color grading does the opposite of street work — it maximizes warmth and appetite appeal. The goal is to make food look as inviting and fresh as possible, which means boosting warm amber tones in highlights, enriching the saturation of reds, oranges, and yellows, and keeping shadows soft and warm rather than cool.
In Lightroom: push the Highlights wheel toward warm amber, boost Orange and Yellow saturation in HSL by 15–20 points, and add a subtle warm tint to the midtones. Avoid cool shadows entirely — blue-tinted shadows in food photography read as cold and unappetizing. A consistent warm grade across a food portfolio creates the visual coherence that brands and editorial clients pay for.
Caption: Before/After — Food photography with warm amber highlights and boosted orange saturation creates an immediately appetizing, inviting visual tone.
Automotive: Cinematic Teal-and-Orange
Automotive photography color grading is where the teal-and-orange cinematic color effect reaches its most deliberate expression. Car paint — especially metallic finishes — responds beautifully to cool shadow tones because the teal complements the warm orange of sunset-lit bodywork or studio key lighting. The result feels expensive, dynamic, and cinematic.
Apply the full teal-and-orange workflow from Step 4: push Shadows to teal/cyan, push Highlights to warm orange, add a modest S-curve for contrast, and consider desaturating greens and yellows in HSL to prevent distracting environmental colors from competing with the car. This grade works across almost any automotive subject — from classic muscle cars to modern EVs.
Caption: Before/After — Automotive photography with the teal-and-orange grade: cool teal shadows contrast against warm orange highlights for an instantly cinematic feel.
Sports: High-Contrast, Punchy Colors
Sports photography color grading prioritizes energy, clarity, and impact. High contrast, punchy saturation, and clean whites communicate speed and athleticism. Unlike street or automotive photography, sports grades typically avoid heavy color shifts in shadows — the focus is on maximizing contrast and vibrancy rather than building a mood.
In Lightroom: use the Tone Curve to create a strong S-curve, boost Clarity and Texture in the Basic panel, increase overall Vibrance by 10–15 points (Vibrance is preferable to Saturation here because it protects skin tones from over-saturation), and keep the Color Grading wheels close to neutral. The psychology of color in sports photography confirms that high-contrast, saturated images read as more energetic and dynamic — which aligns with the emotional expectation viewers bring to sports content.
Caption: Before/After — Sports photography with a high-contrast, punchy grade: strong S-curve and boosted Vibrance communicate energy without over-saturating skin tones.
How Your Camera Settings Affect Your Color Grade
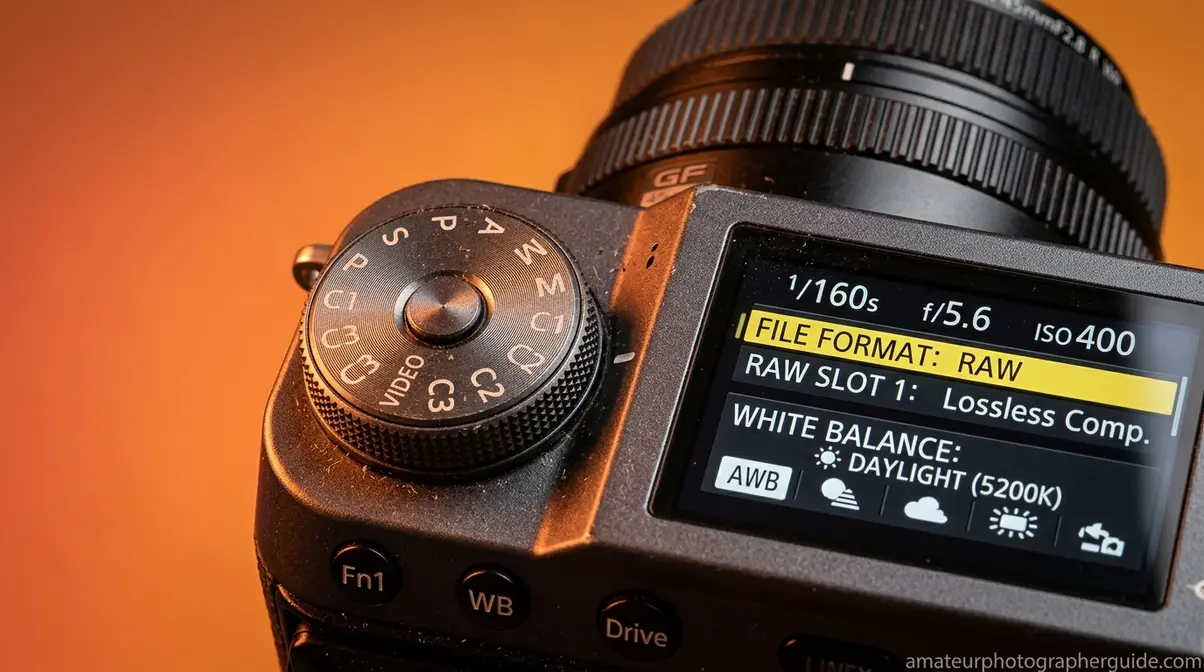
The grade you apply in Lightroom is only as good as the data your camera captured. Two in-camera decisions shape your grading flexibility more than any other: file format and white balance. Getting these right before you open Lightroom means “The Fix” stage takes minutes rather than hours — and “The Feel” stage has far more room to breathe.
Shoot in RAW for Maximum Flexibility
RAW files preserve all the data your camera sensor captures — 12 or 14 bits of tonal and color information per channel, compared to the compressed 8-bit JPEG. That extra data is what allows you to recover three stops of blown highlights, shift white balance by 2,000K without introducing color noise, and make aggressive color grades without banding or posterization.
Shooting JPEG locks in your camera’s in-body processing decisions before you’ve had a chance to make creative choices. For color grading, this is a significant constraint — you’re working with a fraction of the original color data. Adobe’s documentation confirms that RAW processing in Lightroom provides maximum non-destructive editing flexibility. If you’re serious about developing a signature color grade, RAW is non-negotiable.
For a deeper look at how aperture and other in-camera settings interact with your post-processing workflow, explore our guide to camera settings and exposure.
What is the f for in photography?
The “f” in f-stop stands for the focal length fraction — it represents the ratio of the lens’s focal length to the diameter of the aperture opening. An f/2.8 aperture on a 50mm lens means the opening is approximately 17.9mm wide (50 ÷ 2.8). Lower f-numbers mean larger apertures, more light, and shallower depth of field. While aperture is an in-camera decision rather than a post-processing one, it affects your color grade indirectly — shallow depth of field creates background separation that makes color grades read more cleanly, with less competing color information in the frame. For more details, see our guide on what f-stop does on a camera.
White Balance and Backdrop Color
Your in-camera white balance setting determines the starting temperature of your RAW file — and a wildly incorrect in-camera white balance means more corrective work before you can begin grading. The School of Photography recommends setting a custom white balance on location rather than relying on Auto White Balance, which can shift between frames and create inconsistency across a shoot.
Backdrop color matters equally for studio work. A neutral gray or white backdrop gives you a clean, predictable starting point for “The Fix” — color-cast backdrops introduce a tint that competes with your grade. If you need help setting this up, review these home photography lighting expert tips. If you’re shooting portraits against a colored backdrop, plan your grade around that color rather than fighting it. A warm cream backdrop pairs naturally with a warm, inviting grade; a cool blue backdrop sets up beautifully for a cinematic or editorial look.
Common Color Grading Mistakes to Avoid
Even experienced photographers make predictable errors when they first approach color grading systematically. Knowing these pitfalls in advance — drawn from common frustrations reported across photography communities and forums — saves you hours of frustration.
Common Pitfalls When Color Grading
1. Grading before correcting. The most common mistake, and the one “The Fix vs. The Feel Framework” directly addresses. If your image has a green color cast and you grade it with warm tones, you haven’t removed the cast — you’ve blended it into your creative choice permanently. Always complete Step 1 (white balance) and Step 2 (tone correction) before touching the Color Grading wheels or HSL panel.
2. Over-saturating everything. Boosting global Saturation by 30+ points is the fastest way to make an image look amateurish. Instead, use the HSL panel to boost only the channels that need enriching, and use Vibrance (which protects skin tones) rather than Saturation for overall lifts. A good rule: if you can immediately tell a photo has been color graded, the grade is probably too heavy.
3. Ignoring color banding. Aggressive color shifts on JPEG files or in 8-bit exports can create visible banding — harsh tonal transitions in areas of smooth gradient like skies or skin. Shoot RAW, work in a 16-bit color space, and export with maximum quality settings to avoid this.
4. Inconsistent grades across a gallery. Applying different grades to each image in a shoot destroys visual cohesion. Use Lightroom’s Sync Settings feature or create a preset from your best-graded image and apply it as a starting point across the entire shoot.
5. Calibration drift. Your monitor’s color accuracy affects every grading decision you make. Across photography communities, the consistent advice is to calibrate your monitor at least every 30 days using a hardware colorimeter — otherwise, you may be compensating for monitor inaccuracy rather than grading intentionally.
When to Step Back from Color Grading
Sometimes the most professional decision is restraint. If your subject matter is emotionally neutral or documentary in nature — environmental portraits, wildlife, photojournalism — heavy grading can feel manipulative or inauthentic. The grade should serve the story, not override it.
Watch for these signals that your grade has gone too far: skin tones that read as unnatural (too orange, too green, or too magenta), shadow areas that lose all detail and become uniform color blocks, or backgrounds that compete visually with the subject because of aggressive color shifts. When in doubt, reduce the Saturation in your Color Grading wheels by 50% and compare — you’ll often find the subtler version is more powerful.
Caption: A side-by-side comparison of over-graded (left) vs. balanced (right) — subtler grades almost always read as more professional and intentional.
Color Grading Photography FAQs
What is color grading in photography?
Color grading in photography is the creative post-production process of intentionally shifting colors, tones, and contrast to evoke a specific mood or emotional response. It differs from color correction, which restores technical accuracy. Color grading is applied after correction and uses tools like Lightroom’s Color Grading wheels, HSL panel, and Tone Curve to build a deliberate visual atmosphere — a warm golden portrait feel, a moody film noir street scene, or a cinematic teal-and-orange automotive look.
How much do color graders get paid?
Professional color graders earn an average of approximately $35,535 annually in the United States, based on ZipRecruiter data (2026), with hourly rates typically ranging from $9.62 to $30.53. Experienced colorists in film and high-end commercial photography can earn significantly more. The BLS categorizes related creative roles like craft and fine artists at a median of $56,260 annually (May 2024). Freelance color graders in commercial photography and video production often charge $75–$200+ per hour depending on specialization and client type.
Is color grading necessary in photography?
Basic color correction is always necessary for professional results — without it, images have color casts, incorrect exposure, or flat tones. Color grading itself is technically optional, but the visual gap between a graded and ungraded image is significant enough that most working photographers treat it as essential. The exception: documentary photography, photojournalism, and scientific or forensic work, where accurate color representation is legally or ethically required. For portrait, wedding, food, street, and fine art photography, grading is as important as any in-camera decision.
How to do color grading for beginners?
Start with the 5-step Lightroom workflow outlined in this guide: (1) set white balance in the Basic panel, (2) correct exposure and tone, (3) use the HSL panel to adjust individual color channels, (4) apply the Color Grading wheels for shadows/midtones/highlights, and (5) fine-tune with the Tone Curve. Always follow “The Fix vs. The Feel Framework” — complete correction before grading. Practice on RAW files for maximum flexibility, and apply your first grade to a single image before syncing across a gallery.
Time to Learn Color Grading?
Basic color grading skills — white balance correction, HSL adjustments, and simple Color Grading wheel work — can be understood conceptually in a single session and practiced to competence within 2–4 weeks of consistent daily editing. A recognizable personal style, however, typically takes several months of deliberate practice across different genres and lighting conditions. The fastest path: apply the 5-step workflow in this guide to 10 different images from your existing library before moving on to more advanced techniques like Tone Curve channel manipulation.
Your Color Grading Practice Plan
For photographers at any level, understanding what is color grading photography is the difference between a technically correct image and one that tells a story. Color grading photography is the skill that most directly separates photographers who produce consistent, emotionally resonant work from those who stay stuck at technically correct but creatively flat. The research is clear: cinematic grading styles are among the fastest-growing areas of photography interest, with multiple industry trend reports (Lummi, 2026; MCM Creative Studios, 2026) identifying advanced color grading as a defining skill for photographers in 2026.
The single most important takeaway from this guide is the sequence. “The Fix vs. The Feel Framework” — correct first, grade second — gives you a repeatable process that eliminates the random slider-dragging that keeps most beginners stuck. Every professional colorist follows this two-stage model, whether they name it or not. Your grade can only be as good as the correction underneath it.
Your next step is immediate and specific: open Lightroom, choose three RAW files from your existing library, and work through the 5-step workflow above on each one. Don’t aim for a perfect result on the first pass — aim to complete all five steps in sequence. After 10 images following this workflow, the process becomes instinctive, and the creative decisions in “The Feel” stage start to feel genuinely intentional rather than accidental. That’s when your photography begins to develop a real signature.
