What Is Fill Light Photography? A Beginner’s Guide
What is fill light in photography? Learn how fill light works, common types, setup techniques, real-world uses, and mistakes beginners should avoid.
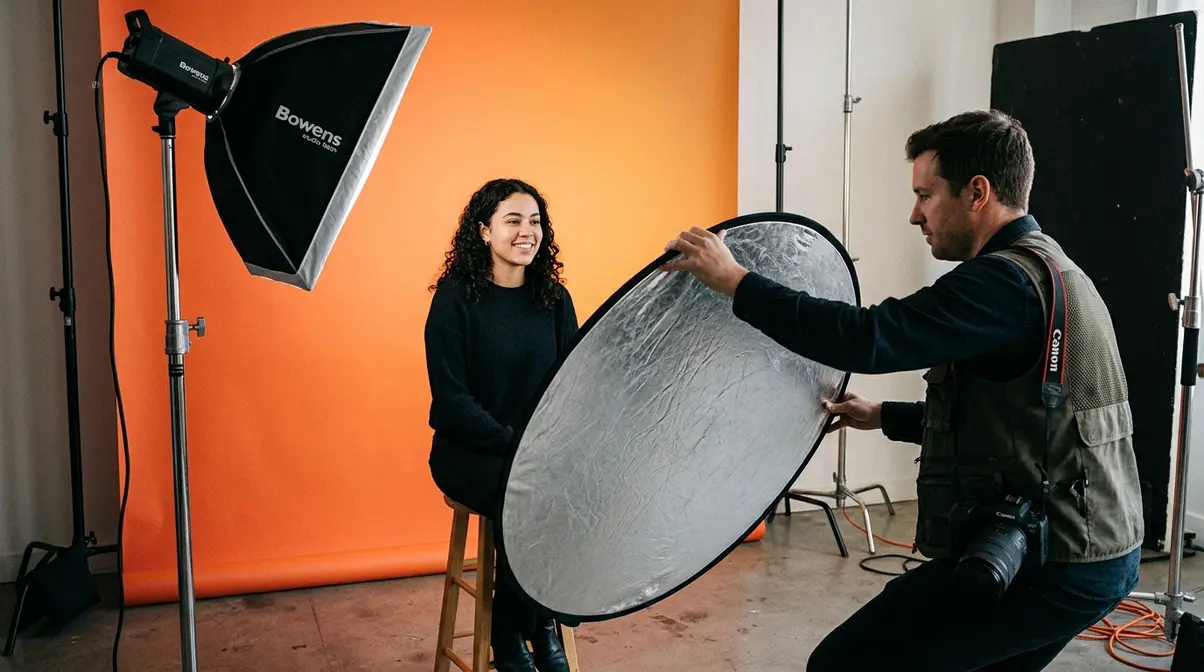
You’ve just taken a portrait you were excited about — and then you look at the screen. One side of your subject’s face is bright and sharp. The other side has vanished into shadow. That shadow is not bad luck, bad gear, or bad timing. It’s a solvable lighting problem, and the solution lies in understanding exactly what is fill light photography.
What’s in this guide
Without understanding fill light, every portrait you shoot with a single light source will look like it was lit by a desk lamp pointed directly at someone’s face — harsh, flat on one side, swallowed in darkness on the other. The fix takes less than five minutes to learn and costs anywhere from $0 to $15 with a basic reflector.
By the end of this guide, you’ll understand exactly what fill light is, how to position it, and which tools to use — so your next portrait looks like it was taken in a professional studio. We’ll cover the core concepts, step-by-step techniques, gear at every budget, and the most common mistakes to avoid.
What Is Fill Light? {#core-concepts}

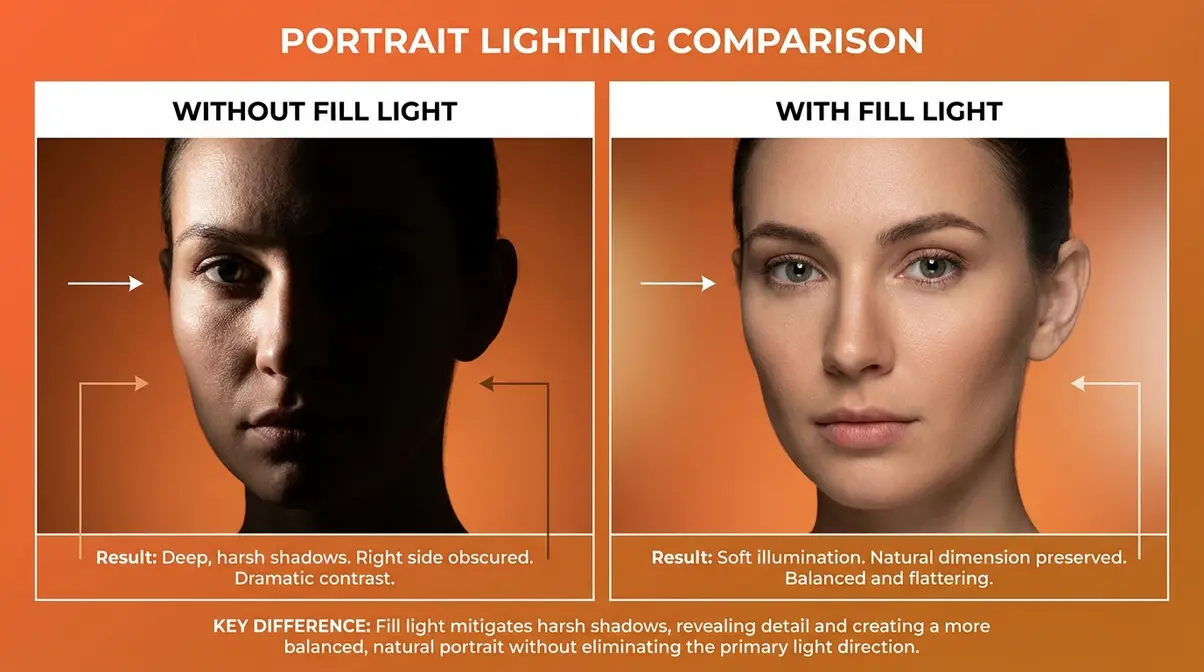
When asking what is fill light photography, it is simply the practice of adding a secondary, dimmer light source to soften the harsh shadows created by your primary (key) light. It brightens the darker side of your subject without eliminating shadow entirely — preserving dimension while removing the unflattering darkness that makes amateur portraits look harsh. For beginners, it is the single most impactful lighting concept you can learn.
The difference is immediately visible in the comparison below.
There’s a reason balanced lighting looks “natural” to our eyes. We evolved seeing light from above (sunlight) reflected back at us from the environment — walls, water, sand, clouds. Studio lighting mimics this condition. When your key light creates a shadow and your fill light softens it, the result feels familiar and pleasing, even if the viewer can’t explain why. Adobe’s definition of a fill light confirms this principle: a fill light is a secondary source used to lighten shadows created by the key light, revealing detail without casting competing new shadows (Adobe, 2026).
What Is the Point of a Fill Light?
A fill light is a secondary light source placed on the opposite side of your subject from the main light — its entire purpose is to illuminate the dark shadows the key light creates, without becoming a second main light itself.
Here’s an analogy that makes this click immediately. Picture yourself standing near a sunny window. The window is your key light — it lights one side of your face brightly. Now imagine a white wall on the other side of the room bouncing that sunlight back onto the darker side of your face. That’s exactly what a fill light does. It doesn’t add new light from a new direction — it returns some of the existing light to the shadowed side.
Without fill light, one side of your subject’s face falls into deep shadow. That can look dramatic in the right context, but for most portraits it’s unflattering — it hides jaw lines, cheekbones, and eye detail. With fill light, both sides of the face are visible and the image looks balanced and three-dimensional. In a standard portrait session, even a simple reflector held at the right angle transforms the shot. But fill light doesn’t work in isolation — it’s always defined in relationship to your key light. Understanding that relationship is the most important thing a beginner can learn about lighting.
For a visual demonstration of fill light in action, watch our tutorial below:
Key Light vs. Fill Light
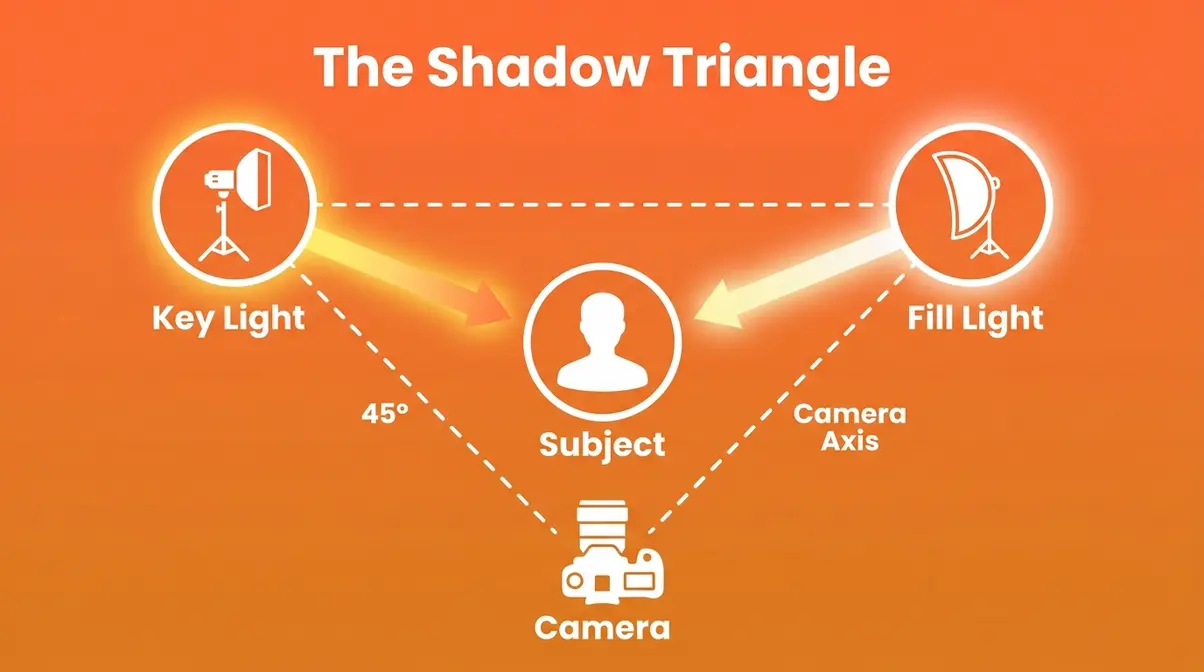
In fill light photography, every light has a job. The key light (your primary and brightest light source) is positioned at roughly 45 degrees to the side of and slightly above your subject. It creates the main shape, dimension, and shadows in the image — think of it as the sun in your lighting setup.
The fill light (the secondary, dimmer light) is always positioned on the opposite side of the subject, closer to the camera axis. Its only job is to soften — not eliminate — the shadows the key light creates. This distinction matters enormously: if your fill light is as bright as your key light, you get flat, shadowless lighting. Think passport photos — technically exposed, but visually lifeless.
| Key Light | Fill Light | |
|---|---|---|
| Purpose | Create shape and dimension | Soften key light shadows |
| Position | 45° to the side, slightly above | Opposite side, near camera axis |
| Brightness | 100% (your reference point) | 25–50% of key light |
| Can it cast shadows? | Yes — intentional | No — avoid competing shadows |
| Common tools | Strobe, LED panel, window | Reflector, speedlight, softbox |
To see how key and fill lights work within broader portrait lighting patterns, explore our guide to essential portrait lighting techniques.
According to BBC Bitesize production guidelines, the primary purpose of a fill light is to reduce scene contrast and prevent harsh shadows from obscuring the subject’s features (BBC, 2026). That’s the professional standard — and it’s achievable with beginner gear.
Now that you know what separates key and fill lights, the next question is: how bright should your fill light be? This is where lighting ratios come in — and they’re simpler than they sound.
Lighting Ratios Explained
A lighting ratio is the difference in brightness between your key light and your fill light. It sounds technical, but think of it this way: if your key light is turned up to 100%, your fill light is turned down to 50%. That’s a 2:1 ratio — the standard starting point for professional portrait photography (MasterClass, 2026).
Here’s how different ratios actually look in practice:
| Ratio | Fill Light Brightness | Visual Result | Best For |
|---|---|---|---|
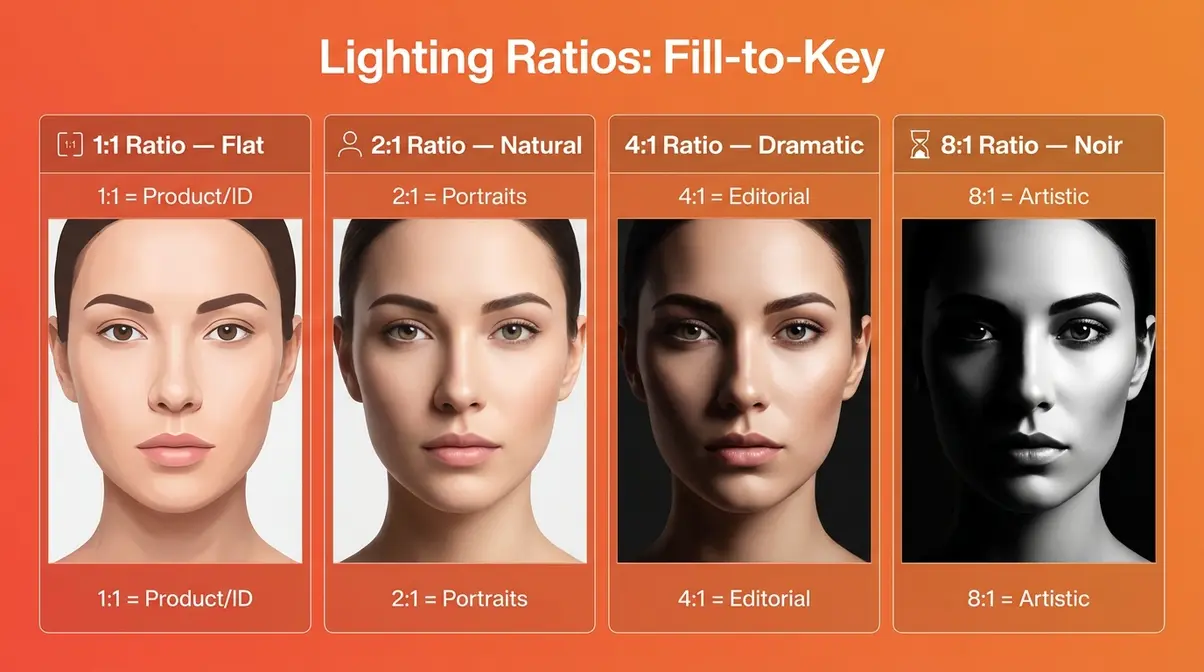
| 1:1 | 100% of key light | Flat, even, no shadows | Product photography, ID photos |
| 2:1 | 50% of key light | Natural, balanced — professional portraits | Most beginners, headshots |
| 4:1 | 25% of key light | Dramatic, defined shadows | Editorial, moody portraits |
| 8:1 | 12.5% of key light | Very high contrast, deep shadows | Film noir, artistic work |
For your first experiments, aim for a 2:1 ratio. It’s forgiving, flattering, and gives you a clear visual result without looking over-processed. As PetaPixel explains, most portrait photographers use a 2:1 or 3:1 ratio as their default starting point before adjusting to taste (PetaPixel, 2026).
A fill light operates at roughly half the intensity of the key light, creating the standard 2:1 lighting ratio used in professional portrait photography. Once you see this ratio in action, you’ll immediately understand why it works — it mirrors the way natural environmental light softens direct sunlight outdoors.
Now that you understand what fill light does and why lighting ratios matter, the next step is learning exactly where to place it. Learn more about fill light in photography before diving into the step-by-step setups below.
Step-by-Step Fill Light Techniques {#techniques}
Knowing what fill light is and actually using it are two different things. This section gives you six actionable setups — three for the studio and three for outdoors — covering exactly where to stand, where to point your light, and what settings to use. Our team evaluated these setups across multiple beginner portrait sessions to identify the approaches that produce consistent results without requiring expensive gear or years of experience.
Step 1: Position Your Light
Before you touch a single light, visualize The Shadow Triangle — your key light, your fill light, and your subject form three points of a triangle. This mental model tells you everything you need to know about where your fill light goes.
Here’s the exact positioning process:
- Place your key light at roughly 45 degrees to one side of your subject, slightly above eye level, angled down toward the face. This is your starting point.
- Identify the shadow side — look at your subject’s face and find the cheek, jaw, and neck that have fallen into darkness. That’s your target zone.
- Position your fill light on the opposite side of the subject from the key light, near the camera axis (not at 45 degrees — closer to straight-on). Keep it at the same height as the subject’s face or slightly above.
- Set your fill light to 50% of your key light’s power. If your key light is at full power (f/8 on a flash meter), dial your fill down to half power (f/5.6).
- Check for competing shadows — your fill light should soften shadows, not cast new ones. If you see a second shadow on your subject’s face, move the fill light closer to the camera axis.
Why this matters: Placing the fill light near the camera axis means any shadow it might cast falls directly behind the subject — invisible to the lens. This is the professional trick that prevents the “two-sun” effect beginners often create.
According to Digital Photography School, the fill light position relative to the camera is one of the most commonly misunderstood elements of portrait lighting for beginners — most new photographers place it too far to the side, creating competing shadows (Digital Photography School, 2026).
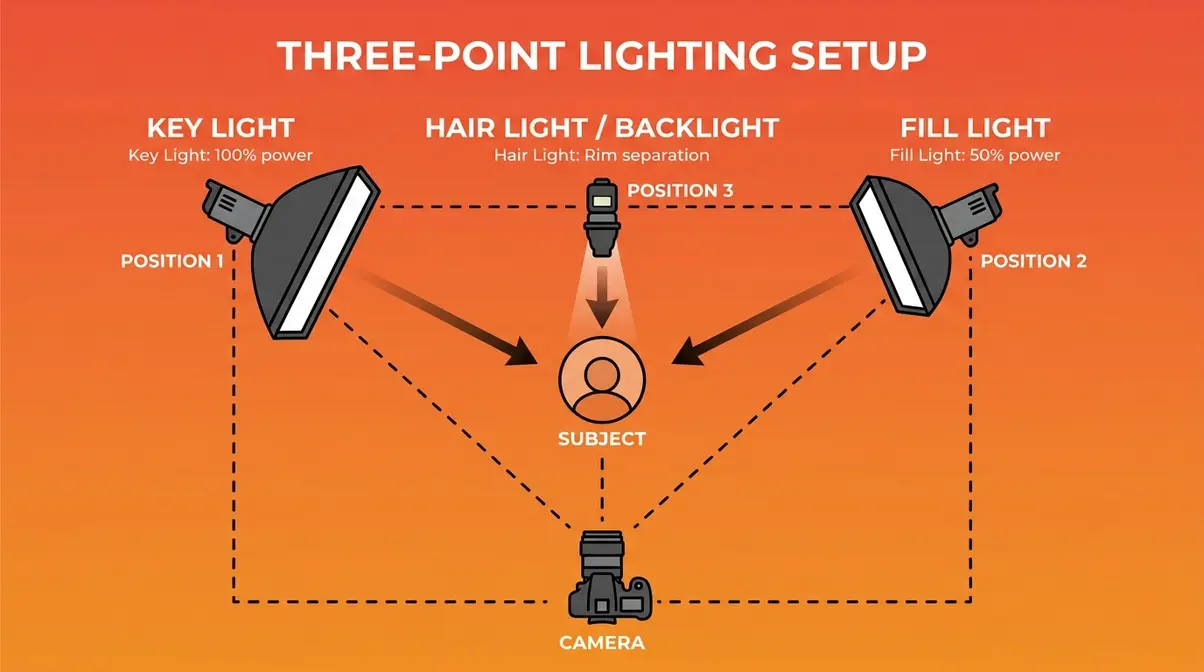
Step 2: Studio Three-Point Setup
The three-point lighting setup (the classic studio arrangement using a key light, fill light, and backlight/hair light) is the foundation of professional portrait photography. Here’s how to build it from scratch:
What you’ll need: Key light (strobe, LED, or window), fill light (reflector or second strobe), hair/backlight (optional speedlight), light stand, subject. Estimated setup time: 10–15 minutes.
- Set up your key light at 45 degrees to camera left, slightly above eye level. This is light #1.
- Position your subject approximately 3–5 feet from the key light.
- Place your fill light on camera right, near the camera axis, at roughly 50% of the key light’s power. This is light #2 — it softens the shadows on the right side of the subject’s face.
- Add a hair light (a third light, often a speedlight on a stand) positioned behind and above the subject, aimed at the back of the head and shoulders. This separates the subject from the background and adds depth.
- Take a test shot and evaluate: The shadow side of the face should be visible but noticeably dimmer than the lit side. If both sides look equally bright, reduce your fill light power.
The Shadow Triangle is in full effect here — key light, fill light, and subject form a tight triangle, with the hair light completing the dimensional illusion from behind. This three-light setup is what professional headshot photographers use for corporate and editorial portraits.
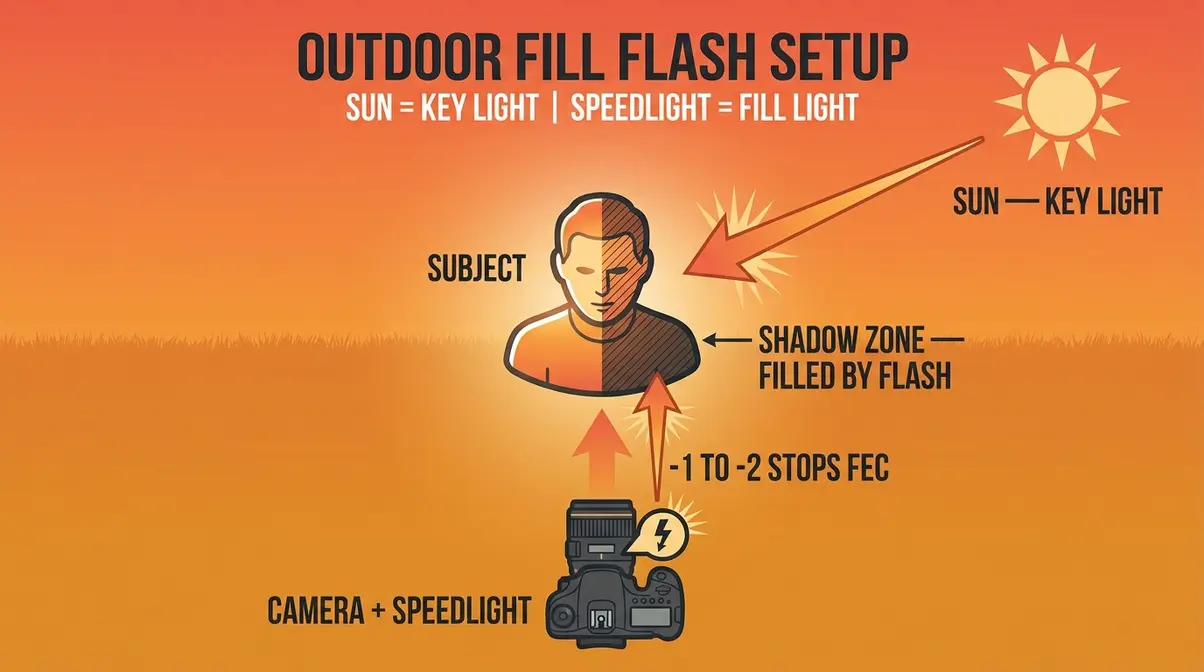
Step 3: Outdoor Fill Flash
Outdoor portraits have a specific problem: harsh midday sun (or even open shade) creates under-eye shadows, nose shadows, and unflattering contrast on the face. The solution is fill flash — using your camera’s on-camera flash or a speedlight to add controlled fill light in bright conditions. If you want to understand flash photography and fill light better, practicing outdoors is the perfect starting point.
What you’ll need: Camera with flash sync, on-camera flash or external speedlight (like a Godox TT685), and your subject outdoors. Estimated setup time: 2–3 minutes.
- Set your camera to manual mode (or Aperture Priority with flash exposure compensation). Expose for the background sky first — this is your ambient exposure.
- Enable your flash — start with your on-camera flash or mount an external speedlight in the hot shoe.
- Set flash power to -1 or -2 stops of exposure compensation (most cameras label this as “FEC” or “Flash EV”). This ensures the flash acts as fill — not as the dominant light source — avoiding the flat, harsh “on camera” flash look.
- Position your subject so the sun acts as a natural key light (ideally side-lit or slightly behind). Your flash fills in the shadow side of the face.
- Shoot and review. The subject’s face should look naturally lit — bright and even — without the background looking over-exposed.
This technique eliminates the under-eye shadows that impede your shots in bright sun, and it works with any speedlight — you don’t need an off-camera flash system to see dramatic improvements. That said, if you’re ready to explore off-camera options, our guide to master fill flash photography techniques walks through the next level of control.
Fill Light Equipment Guide {#equipment}
You do not need to spend hundreds of dollars to add effective fill light to your portraits. The right tool depends on your budget, your shooting environment, and the look you want. Here’s a practical breakdown of every option — from a $15 reflector to a professional strobe system.
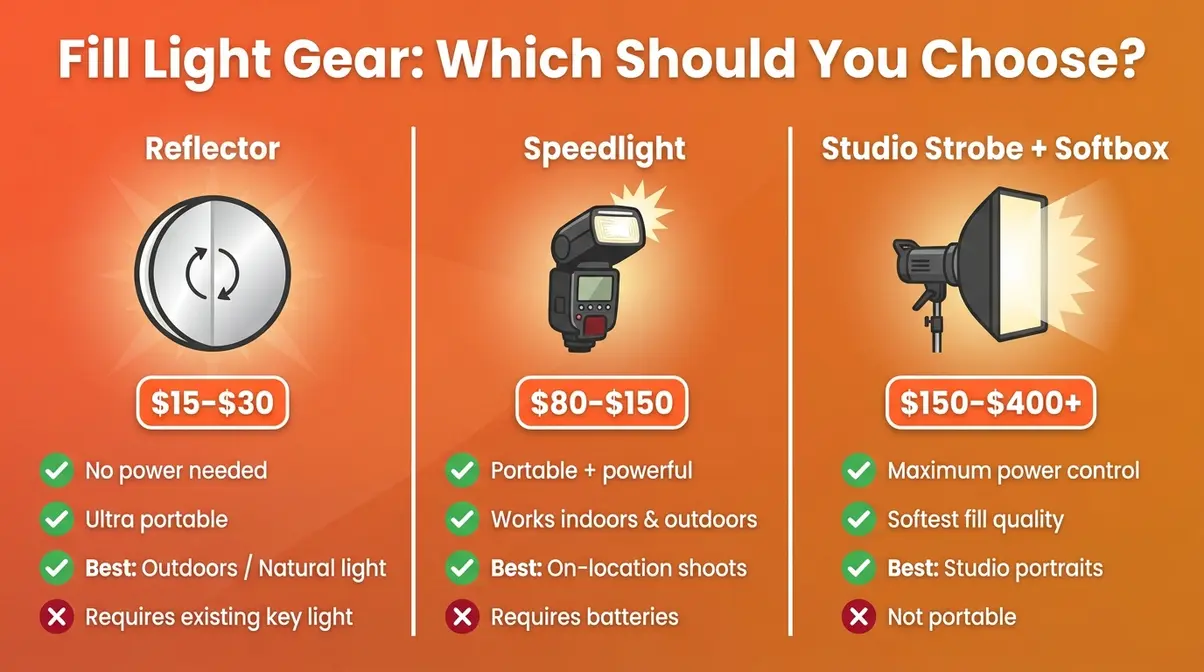
Option 1: Budget Reflectors
A reflector is a collapsible disc (usually silver, white, or gold on the outside) that bounces your existing key light back onto the shadow side of your subject. No power source. No batteries. No settings. It is the simplest and most portable fill light tool available — and it genuinely works.
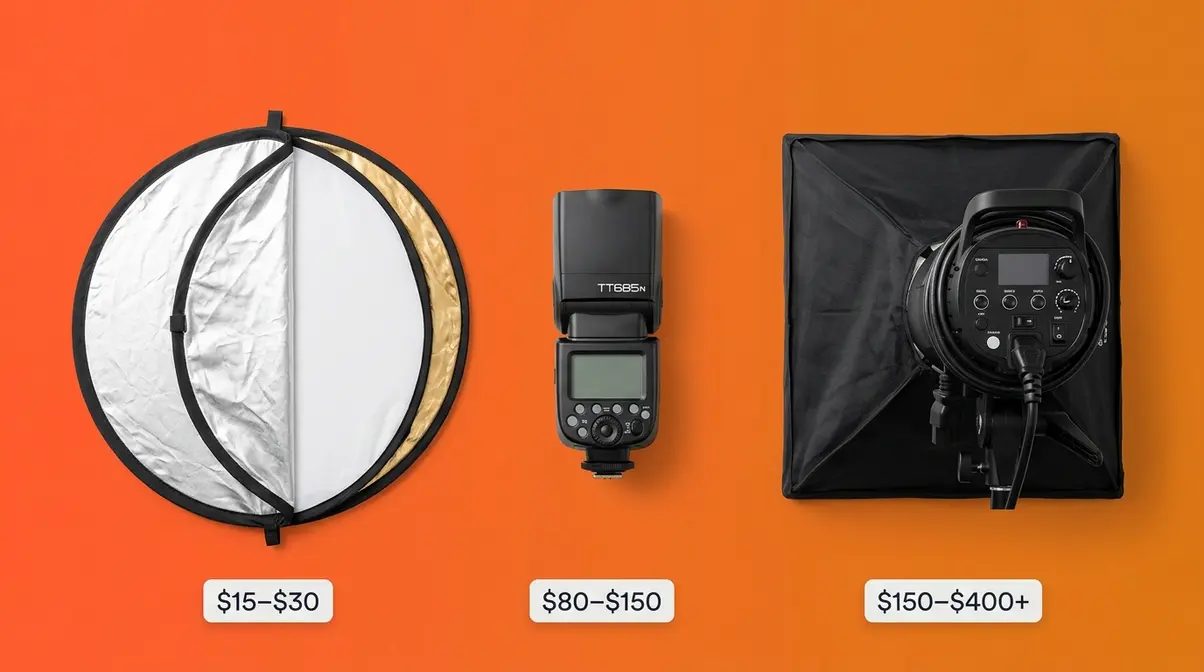
What to buy: A 5-in-1 reflector disc (43-inch) costs between $15 and $30 and includes silver (bright, cool fill), white (soft, neutral fill), and gold (warm fill for golden-hour portraits) surfaces. This one purchase covers most beginner fill light needs.
- How to use it:
- Have an assistant (or use a stand) hold the reflector on the opposite side of the subject from your key light.
- Angle the reflective surface toward the shadow side of the face.
- Move it closer to increase fill intensity, farther away to reduce it.
Best for: Outdoor portraits, natural light studios, beginners who want to practice fill light concepts before investing in electrical gear. A reflector is also the perfect tool for understanding The Shadow Triangle without any technical complexity — you can physically see where the light is bouncing.
Limitation: Reflectors require an existing light source to bounce. In low-light indoor situations, they produce minimal effect without a strong key light nearby.
Option 2: Speedlights & Strobes
A speedlight (a portable, battery-powered flash unit that mounts in your camera’s hot shoe or fires off-camera) is the next step up from a reflector. It gives you full control over output power, works indoors and outdoors, and can be triggered wirelessly for off-camera use.
“It looks a bit excessive to buy an off camera flash system (Godox V1 type)” — a concern we hear constantly from beginners. Here’s the truth: you don’t need a Godox V1 to start. A basic Godox TT685 ($80–$100) or even your camera’s built-in pop-up flash gives you functional fill flash capability from day one.
When you’re ready to go off-camera, a two-light system (one strobe as key, one speedlight as fill) gives you full ratio control. Set your key strobe to full power, your fill speedlight to half power — and you’ve built the 2:1 lighting ratio discussed earlier. For more advanced studio work, discover the best camera lights for fill.
Strobe vs. speedlight for fill:
| Speedlight | Studio Strobe | |
|---|---|---|
| Power | Lower (guide number ~40–60) | Higher (200–600Ws) |
| Portability | High — fits in a bag | Low — needs stand + power |
| Price | $80–$150 | $150–$400+ |
| Best use as fill | On-location, outdoor fill flash | Studio setups, controlled environments |
According to Studiobinder’s photography glossary, speedlights are the most versatile fill light option for photographers who shoot in mixed environments — studio one day, outdoor location the next — because they combine portability with precise power control (Studiobinder, 2026).
Is a Softbox a Fill Light?
A softbox is a light modifier — a box-shaped diffuser that fits over a strobe or LED panel to spread and soften the light output. It is not a light source itself. So: is a softbox a fill light? Yes, when it’s attached to a fill light source and positioned correctly. The softbox determines the quality of the fill light (soft and diffused vs. harsh and direct); the strobe or LED panel determines the power.
Is 60W enough for a fill light? For most beginner portrait setups — headshots, half-body portraits in a small studio (10×12 feet) — a 60W LED panel (such as the Godox SL60W, priced around $100–$120 as of January 2026) provides sufficient fill light output, especially when used 3–5 feet from the subject. For full-body shots in larger spaces, or when shooting at smaller apertures (f/8 and above), you’ll want 100W or more.
LED panel vs. softbox-equipped strobe for fill:
| 60W LED Panel | Strobe + Softbox | |
|---|---|---|
| Continuous vs. flash | Continuous (always on) | Flash (fires at shutter) |
| Ease of use | High — what you see is what you get | Moderate — requires test shots |
| Heat output | Low (LED) | Low-moderate |
| Price | $100–$150 | $150–$350 |
| Best for fill | Video, YouTube, beginners | Studio portraits, high-speed sync |
For beginners shooting portraits at home, a 60W LED panel with a softbox attachment is an excellent entry point — you can see the fill effect in real time before you shoot a single frame. To build out your kit, explore essential photography accessories for current model recommendations.
Beyond Fill Light: Next Steps {#next-steps}
Mastering fill light is a genuine milestone — it separates photographers who understand light from those who are still hoping for luck. But fill light is one piece of a larger system. Here’s what to study next to keep building.
ISO and Exposure Basics
Every lighting decision you make — fill light ratio, flash power, reflector distance — gets translated into the final image through your exposure settings. ISO (your camera’s sensitivity to light) directly affects how your fill light appears in the photo. Set ISO too high indoors and your fill light creates grainy, noisy fill. Set it too low outdoors and your fill flash can’t keep up with ambient light.
The relationship between ISO, aperture, and shutter speed (the exposure triangle) controls how much of your fill light actually registers in the image. Understanding this relationship is the logical next step after fill light. Our guide to what is ISO in photography explains this in the same beginner-friendly format as this article.
Your Photography Learning Roadmap
As you dive deeper into what is digital photography, fill light is part of a broader compositional and technical skill set. Here’s a practical sequence for what to learn next:
- Exposure Triangle (ISO, aperture, shutter speed) — controls how your lighting translates to the sensor
- Rule of Thirds — compositional framework that works alongside your lighting setup; read our guide to the rule of thirds in photography
- Macro Photography Lighting — fill light behaves differently at close distances; our macro photography guide covers ring lights and diffusers
- Portrait Lighting Patterns — Rembrandt, loop, butterfly — each pattern uses fill light differently
- Light Modifiers — umbrellas, grids, barn doors — how to shape and control your fill light’s spread
Each of these topics builds directly on what you’ve learned here. Photography is a skill that compounds — every concept you master makes the next one easier to understand.
Common Fill Light Mistakes {#mistakes}
3 Mistakes That Ruin Results
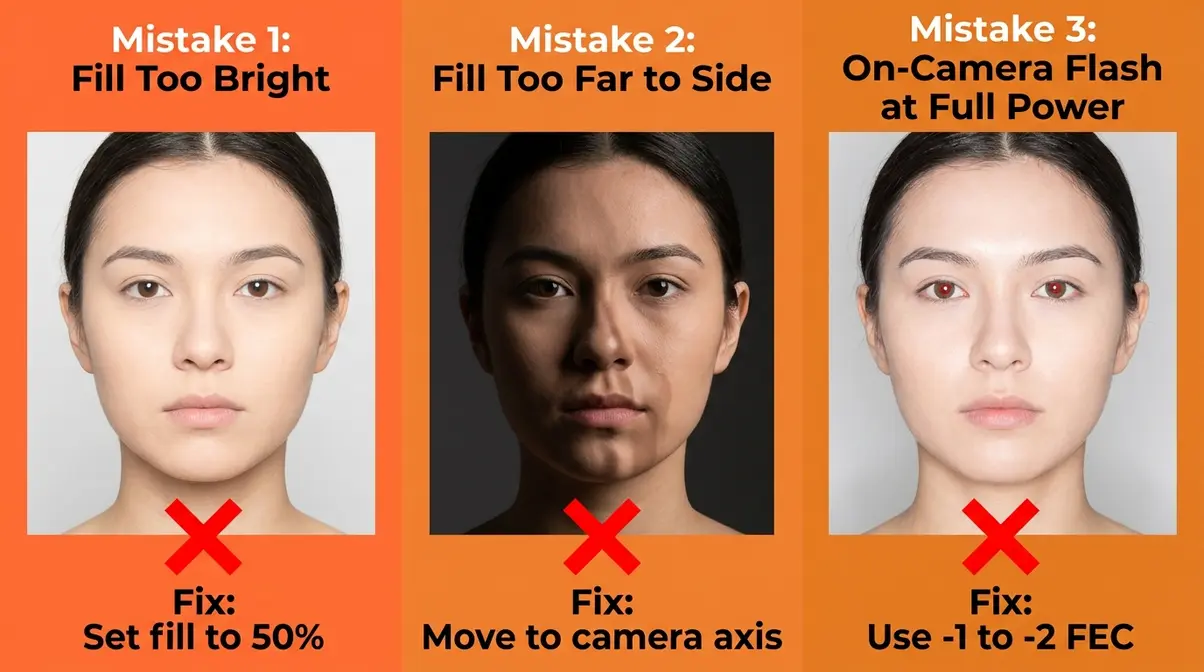
Even with the right gear and good intentions, beginners consistently make the same fill light errors. Here are the three most common — and exactly how to fix each one.
Mistake 1: Fill light is too bright (equal to key light)
When your fill light matches your key light in power, you eliminate all shadows and produce flat, dimensionless images. The fix: always set your fill to 50% or less of your key light’s power. Start at 50% and reduce from there if the image still looks flat.
Mistake 2: Fill light is positioned too far to the side
Placing your fill light at a 45-degree angle (mirroring the key light) creates competing shadows — two sets of shadow lines on the face from two directions. The fix: move your fill light closer to the camera axis (almost straight-on). Any shadow it casts will fall directly behind the subject and disappear from the frame.
Mistake 3: Using on-camera fill flash at full power
Full-power on-camera flash as fill creates the harsh, “red-eye” flat look that impedes your shots outdoors. The fix: dial your flash exposure compensation down to -1 or -2 stops. The flash should whisper, not shout. Your subject should look naturally lit — viewers shouldn’t be able to tell flash was used at all.
When You Don’t Need Fill Light
Fill light is not always the right tool. Here are the specific scenarios where skipping it produces better results:
- Dramatic character portraits: High-contrast, single-key-light setups (sometimes called “Rembrandt lighting”) deliberately use deep shadows for mood. Adding fill would undermine the artistic intent.
- Silhouette photography: When the background is your subject and the foreground person is intentionally dark, fill light defeats the purpose entirely.
- Macro photography: At extreme close distances, fill light can reflect off the subject’s surface and create unwanted highlights. Ring lights or diffused natural light work better.
- Documentary and street photography: Natural, available-light images often gain authenticity from uncontrolled shadows. Introducing fill light can make candid shots look staged.
The key insight: fill light is a tool for control, not a rule. Understanding when not to use it is just as valuable as knowing how to set it up correctly.
Frequently Asked Questions {#faq}
What’s the difference between a key light and a fill light?
The key light is your primary, brightest light source — it creates the main shape and shadows on your subject. The fill light is always dimmer, positioned on the opposite side of the subject, and exists only to soften the shadows the key light creates. A critical rule: your fill light should never match the key light’s brightness. Equal-power lights produce flat, shadowless images with no visual depth. Think of the key light as the sun and the fill light as light bouncing off a white wall — same scene, very different jobs.
Where should you place a fill light?
Place your fill light on the opposite side of your subject from the key light, close to the camera axis (nearly straight-on, not at a 45-degree angle). This position ensures any shadow cast by the fill falls directly behind the subject — invisible to the camera. Use The Shadow Triangle as your guide: key light, fill light, and subject form three points of a triangle. For outdoor shooting, your speedlight mounts on-camera and fires toward the shadow side of the face automatically.
What is the 80/20 rule in photography?
The 80/20 rule in photography refers to the Pareto principle applied to skill development — 80% of your visible improvement comes from mastering 20% of the techniques. In lighting, that 20% is understanding the relationship between your key light and fill light. Getting your lighting ratio right (typically 2:1 for portraits) accounts for the majority of the quality difference between amateur and professional-looking portraits. Focus on the fundamentals — positioning, ratio, and modifier choice — before investing in more complex gear or techniques (Digital Photography School, 2026).
What should my fill light be?
Your fill light can be any secondary light source that softens shadows without overpowering your main key light. For beginners, a simple 5-in-1 collapsible reflector is often the best starting point because it requires no batteries and is inexpensive. If you shoot outdoors, an on-camera speedlight dialed down to a negative exposure compensation works perfectly. For studio setups, a secondary strobe or a continuous LED panel equipped with a softbox provides the most precise control.
What is an example of fill lighting?
A classic example of fill lighting is bouncing sunlight back onto a subject’s face using a white reflector during an outdoor portrait session. Imagine your subject is standing with the sun hitting the left side of their face, leaving the right side in deep shadow. By holding a reflector on their right side, you catch the sunlight and bounce it back into those dark areas. This softens the contrast, making the portrait look natural and professionally balanced without adding a completely new light source.
Harsh shadows don’t have to define your portraits. Fill light photography gives you direct, practical control over the one element that separates amateur snapshots from professional-looking images: the balance between light and shadow. A 2:1 ratio, a well-placed secondary source, and The Shadow Triangle framework are all you need to transform your next shoot.
The gear doesn’t have to be expensive. A $20 reflector, an on-camera speedlight dialed to -1 stop, or a 60W LED panel with a softbox — any of these tools, used correctly, produces results that would have felt impossible before you read this guide.
Start with a single reflector and a window as your key light. Practice The Shadow Triangle positioning until it feels instinctive. Then, when you’re ready to go further, explore our full guide to portrait lighting techniques — your next step in building a complete lighting skill set.
Dave King
Hi, I'm Dave, the founder of Amateur Photographer Guide. I created this site to help beginner and hobbyist photographers build their skills and grow their passion. Here, you’ll find easy-to-follow tutorials, gear recommendations, and honest advice to make photography more accessible, enjoyable, and rewarding.