
Table of Contents
This blog post may contain affiliate links. As an Amazon Associate I earn from qualifying purchases.
Your photos look flat. The lighting feels wrong. But you’ve seen portraits that glow — bright, clean, almost weightless — and you want to know exactly how they did it.
Without understanding high key lighting photography, you’ll keep guessing at settings and never achieve that professional, airy look. Most guides show you the finished result but skip the exact steps that get you there. This guide is different.
Here, you’ll learn precisely what high key lighting photography is, how to set it up on any budget, and how to dial in your camera settings for bright, flawless results. We’ll cover the definition and mood, contrast it with low key lighting, walk through a step-by-step studio setup, and show you real-world examples across multiple genres — so you finish this guide ready to shoot, not still wondering where to start.


High key lighting photography uses bright, even light to eliminate shadows and create a clean, airy mood — a technique originally developed for early film and television (New York Film Academy).
- The Bright Triangle: Successful high key requires three elements working together — Light setup, Exposure technique, and Mood/subject selection. Miss any one of them and the look falls apart.
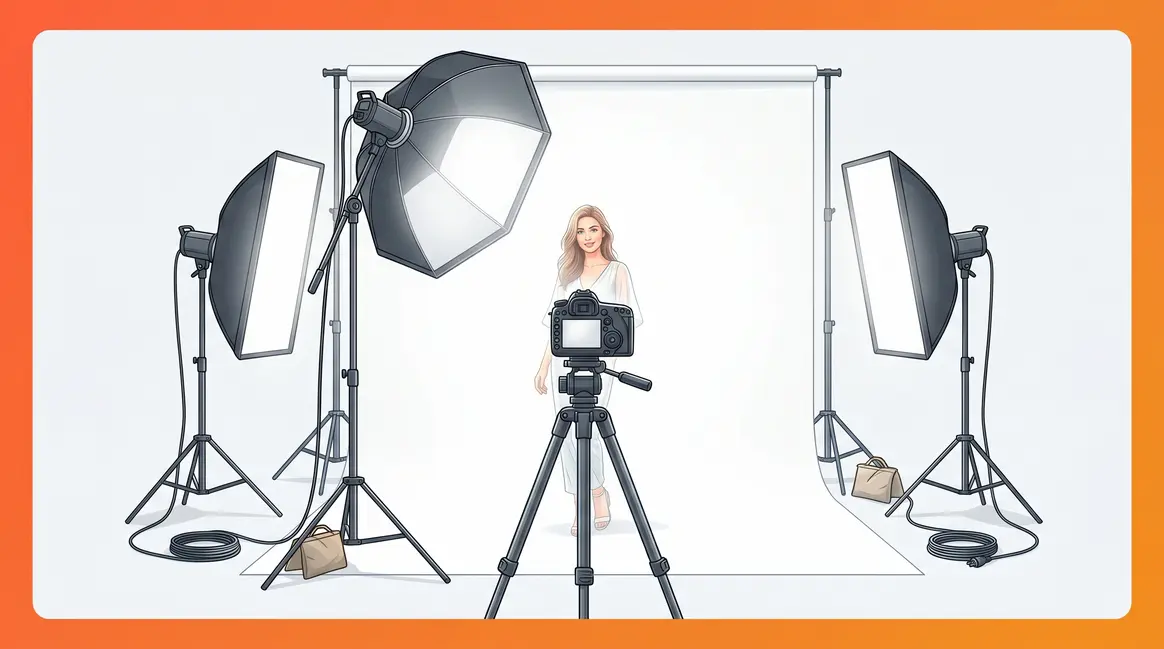
- Classic setup: A 3-light arrangement (key light + fill light + 2 background lights) eliminates shadows on a white backdrop, producing that signature pure-white look.
- Camera settings: Wide aperture (f/5.6–f/8), low ISO (100–200), and a shutter speed that pushes exposure to the right of your histogram.
- Not just studio: Natural light near a large north-facing window can replicate the high key look without any additional gear.
What Is High Key Lighting Photography?
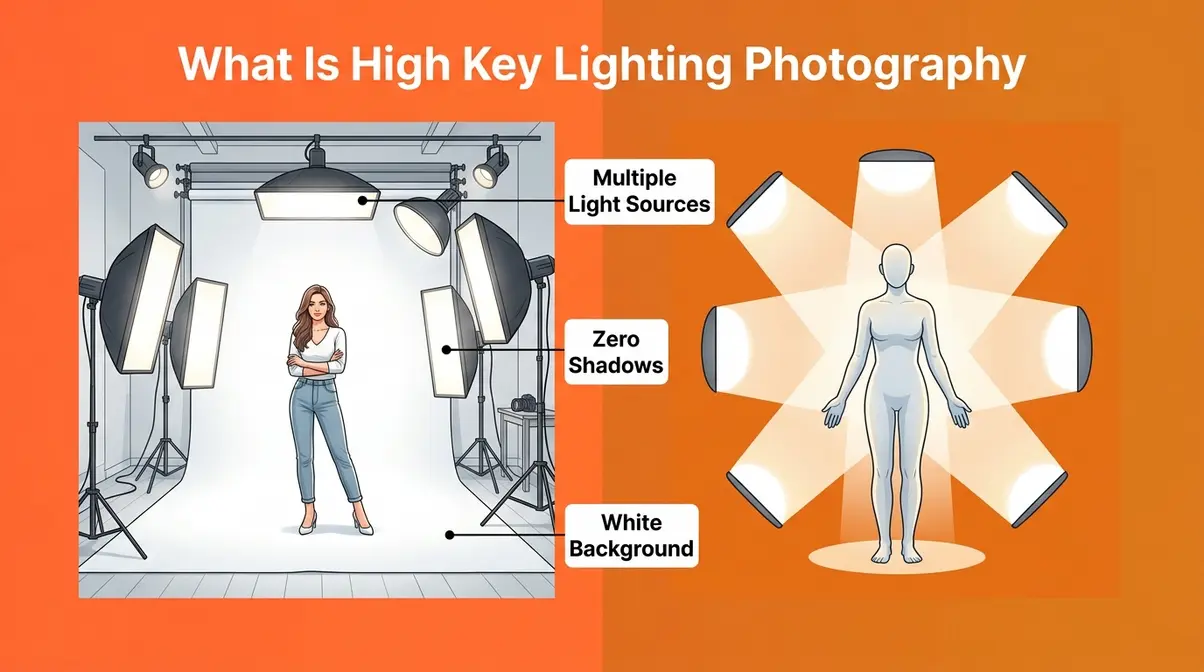
High key lighting photography is a technique that uses multiple bright light sources to eliminate shadows and produce a clean, low-contrast image. Originally developed for early film and television screens that could not handle high contrast ratios (New York Film Academy’s guide on high-key lighting), this approach has since evolved into a deliberate stylistic choice. For photographers today, it is one of the fastest paths to a bright, professional, and approachable look in portraits, products, and beauty shots.
Think of it like photographing someone on a softly overcast day — the light comes from everywhere and nowhere casts a harsh shadow. That diffuse, enveloping quality is precisely what high key lighting recreates in a controlled studio environment. High key lighting is also recognized as a fundamental photographic technique used by historical and contemporary artists to manipulate exposure and eliminate deep shadows (Museum of Modern Art’s photography glossary).
For a broader overview of the concept before diving into technique, this high key photography guide offers useful supporting context.
Core Characteristics of High Key
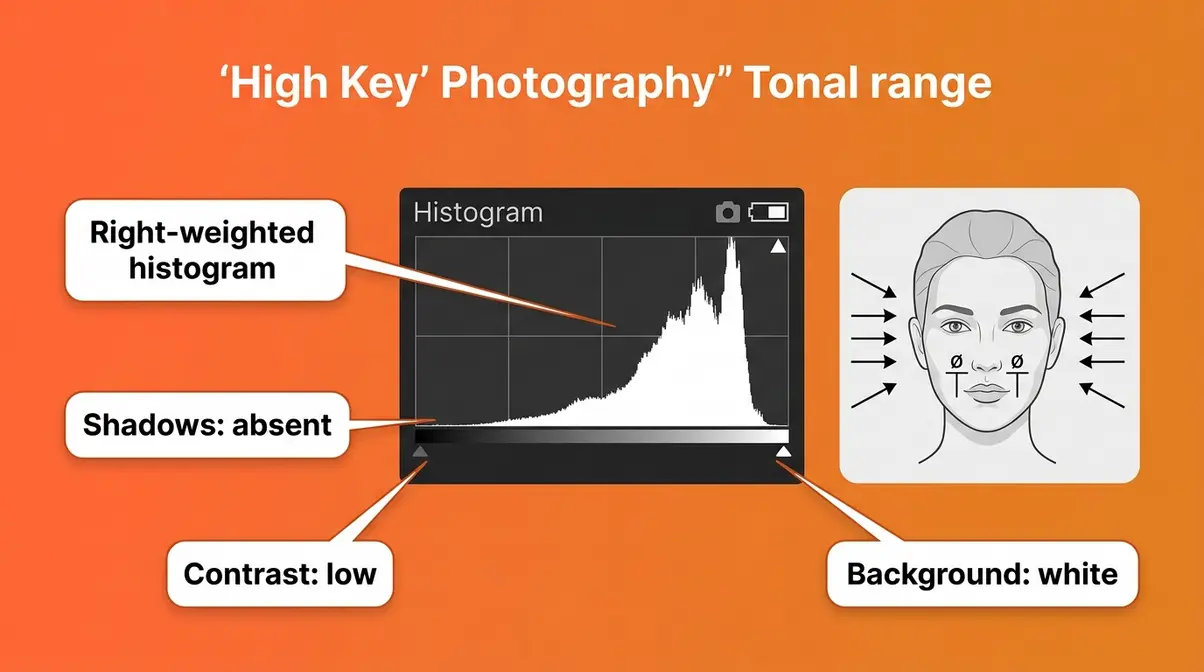
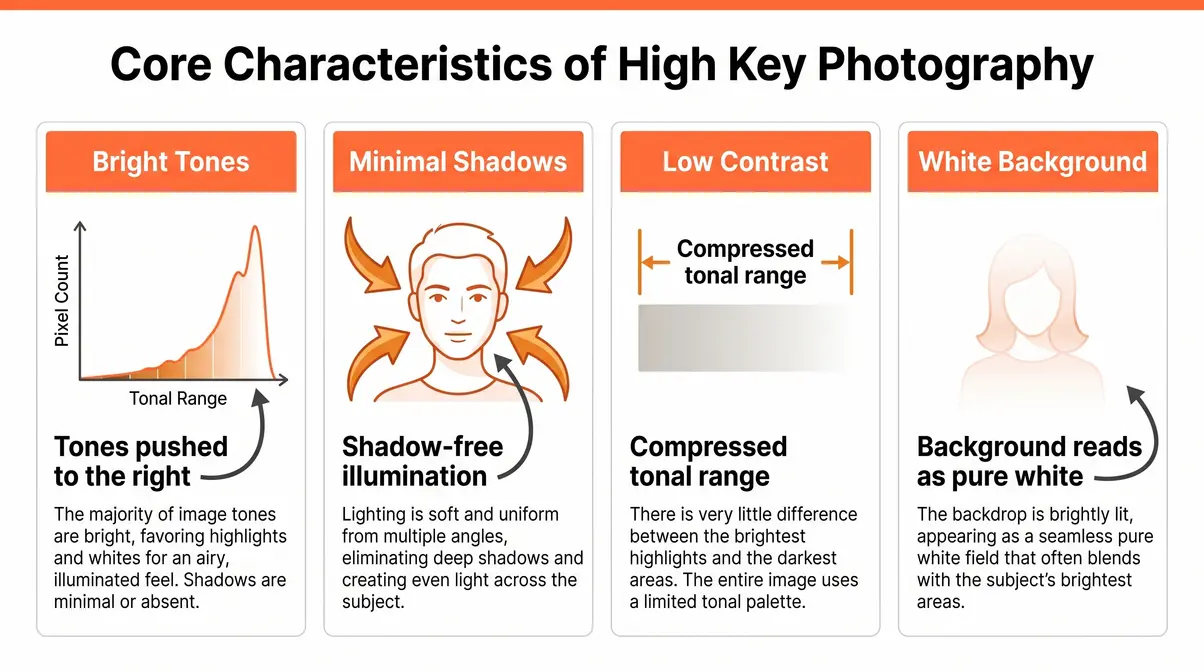
High key lighting photography produces images with a specific set of visual hallmarks — and once you know what to look for, you’ll spot them instantly. The most important characteristic is a histogram (a graph showing the distribution of light and dark tones in your image) that is heavily weighted toward the right side. Think of it like a fuel gauge, but for brightness — high key photos keep the needle toward “full.”
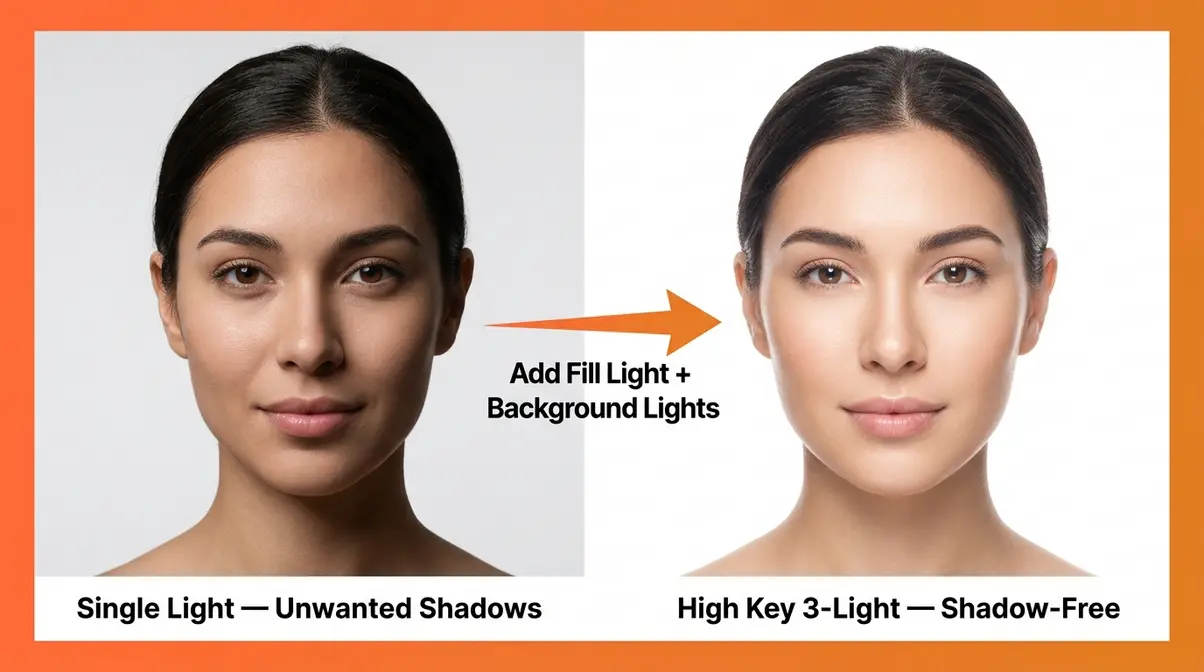
Shadows are minimized or absent entirely. In a typical portrait, you’d normally see a shadow falling on one side of the face. High key lighting eliminates this by using multiple light sources simultaneously, so every angle of the subject is illuminated.
Contrast (the difference between the lightest and darkest areas of the image) is deliberately kept low. The gap between highlights (the brightest areas) and shadows (the darkest areas) is small — everything exists in a bright, compressed tonal range.
Backgrounds are typically white or very light gray, blending seamlessly with the overall bright exposure. A high key portrait of a woman against a white backdrop shows her face evenly lit from both sides, no shadows under her chin, and a background so bright it reads as pure white in the final image.
As one photographer in an online community described it:
“High key photography occupy a specific section of photos with a white background, where the subject blends more into the pure white.”
That intuition is exactly right — the boundary between subject and background softens, creating that signature airy, almost weightless quality.
These visual characteristics — bright, shadow-free, low contrast — don’t happen by accident. They have a fascinating origin story that explains exactly why the technique looks the way it does.
History: Early Film to Modern Studios
High key lighting in film was not originally an artistic choice — it was an engineering necessity. Early film and television cameras (pre-1950s) had limited dynamic range (the camera’s ability to capture detail in both bright highlights and deep shadows simultaneously). To compensate, cinematographers flooded sets with even, bright light to ensure everything remained visible on screen.
“High key lighting was originally developed for early film and television screens that could not handle high contrast ratios” (New York Film Academy).
Classic musicals — think Gene Kelly’s era — relied heavily on this approach. Daytime soap operas, morning news programs, and sitcoms adopted it because it signals positivity, safety, and approachability to viewers. The bright, evenly lit studio became shorthand for “this is a friendly, trustworthy space.”
The transition from technical workaround to creative tool happened gradually. By the 1980s and 1990s, portrait photographers, beauty brands, and e-commerce companies were deliberately choosing high key lighting for its clean, modern aesthetic — not because their cameras couldn’t handle contrast, but because the look served their brand message.
Think of the bright, white-background cosmetics ads you see in magazines. That’s high key lighting working exactly as intended: communicating cleanliness and precision before a single word is read.
Knowing where high key came from helps, but what makes photographers actually choose it today? It comes down to the mood it creates — and how that mood serves specific photographic goals.
The Mood High Key Creates
High key photography creates a mood that feels optimistic, energetic, and clean. Bright images with minimal shadows signal safety and openness — which is why beauty brands, baby photographers, and corporate headshot photographers default to this style. Where a moody, shadowy portrait feels mysterious or dramatic, a high key portrait feels approachable and warm.
The genres where high key is the professional standard include: beauty and fashion photography, newborn and family portraits, e-commerce product photography, professional headshots, and medical or dental marketing imagery. A dental clinic advertisement almost always uses high key lighting — the upbeat, flawless aesthetic communicates hygiene and trustworthiness before a single word is read. This is beauty lighting at its most purposeful: softness with precision.
Choosing the right mood for your shoot is just as important as choosing the right lens. High key gives you a specific, powerful emotional tool — one that communicates “safe, clean, and approachable” with every pixel.
This is where The Bright Triangle becomes useful as an organizing idea. Successful high key photography requires three elements working in alignment: the correct multi-source Light setup, proper Exposure technique, and deliberate Mood/subject selection. Nail all three corners of the triangle and the look comes together. Miss even one, and the image falls flat — or worse, looks blown out and amateur.
Now that you understand what high key lighting is and why photographers use it, the next step is understanding how it differs from its dramatic opposite — low key lighting. That contrast is what allows you to make deliberate creative choices, not accidental ones.
High Key vs. Low Key Lighting: Key Differences

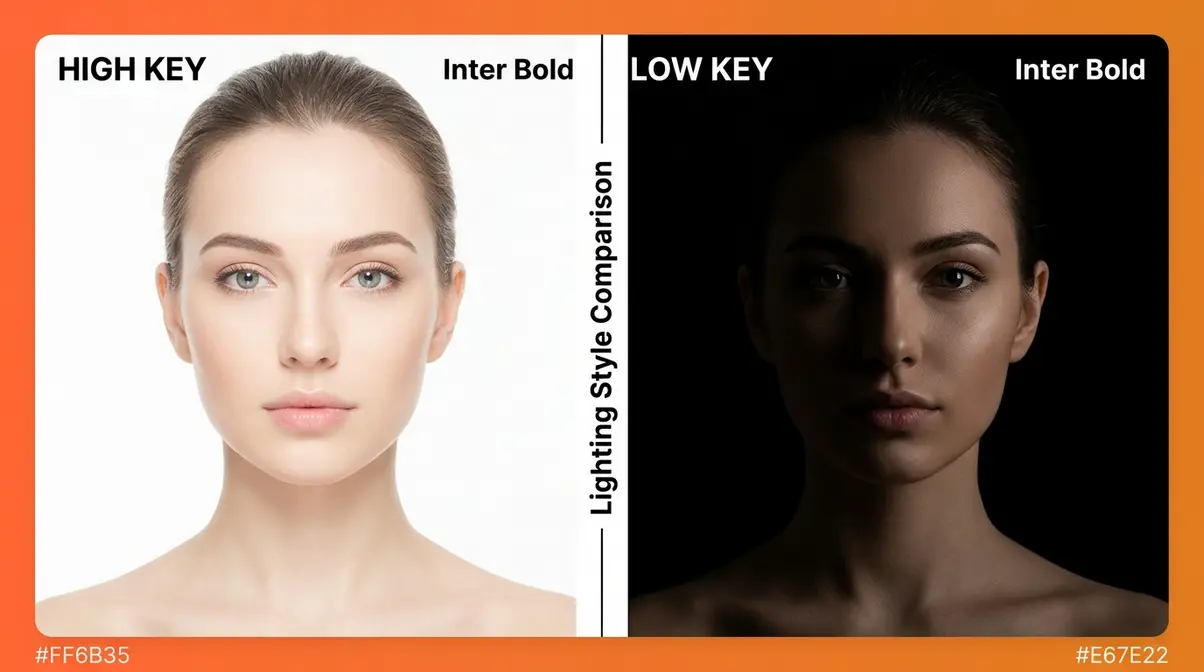
High key and low key lighting sit at opposite ends of the same spectrum, and understanding the gap between them makes choosing the right approach straightforward. Low key lighting is the technique that uses deep shadows and high contrast to create dramatic, moody images — think a single candle illuminating a face in near-darkness. High key does the exact opposite: it floods the scene with even light and pushes shadows to near-zero.
High key lighting is characterized by being bright and relatively shadowless, frequently used in genres like comedies and musicals to establish a positive atmosphere (BBC’s educational breakdown of lighting codes). The contrast with low key couldn’t be sharper.
Side-by-Side Comparison Table
The table below maps the key differences across the dimensions that matter most to a working photographer:
| Dimension | High Key | Low Key |
|---|---|---|
| Mood | Optimistic, clean, approachable | Dramatic, mysterious, powerful |
| Contrast | Low (narrow tonal range) | High (wide tonal range) |
| Shadow depth | Minimal or absent | Deep, intentional shadows |
| Lighting ratio | 1:1 to 2:1 | 4:1 to 8:1 or higher |
| Typical use cases | Portraits, beauty, e-commerce, headshots | Fine art, thriller films, moody editorials |
| Background | White or very light | Black or very dark |
| Number of lights needed | 3+ (key + fill + background) | Often 1-2 (key + optional fill) |
When Should You Use High Key?
The most useful decision framework for a beginner isn’t technical — it’s emotional. Ask yourself: what do I want my subject to communicate?
Use high key lighting when you want your subject to feel approachable, clean, and optimistic. It’s the standard choice for corporate headshots, baby portraits, beauty campaigns, product photography, and medical or dental marketing imagery. The bright, even light removes distractions and focuses attention entirely on the subject.
Choose low key when you want drama, mystery, or power. A portrait of a musician, a moody fine-art nude, or a cinematic thriller still — these benefit from deep shadows and high contrast. The darkness does the emotional work.
Avoid high key when your subject or brand requires drama, mystery, or a sense of luxury — in those cases, low key lighting with deeper shadows serves the message better. The choice is emotional first, technical second.
Common challenges reported by beginner photographers include choosing the wrong style for the subject’s personality — using low key lighting for a cheerful family portrait, for example, creates unintentional tension. Match the lighting style to the emotional message first, then worry about the technical execution. For a deeper dive into the technical aspects of these setups, check out our complete guide to high key lighting.
Understanding Lighting Ratios
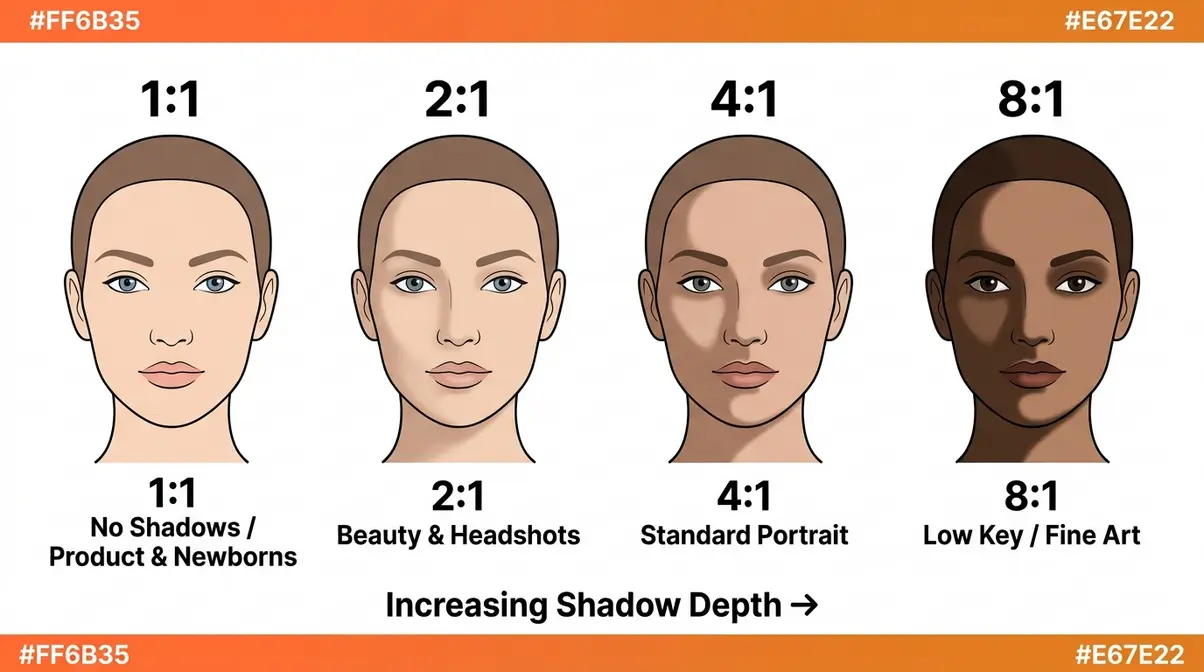
A lighting ratio is the difference in brightness between your key light (your main, dominant light source) and your fill light (a secondary light that softens shadows), expressed as a number. Think of it like a volume dial — high key keeps it low (subtle difference between bright and dark), low key cranks it up (extreme difference).
| Lighting Ratio | Shadow Depth | Typical Application |
|---|---|---|
| 1:1 | No shadows | Product photography, newborns |
| 2:1 | Very subtle shadows | Beauty, headshots, high key portraits |
| 4:1 | Moderate shadows | Standard portrait, editorial |
| 8:1+ | Deep, dramatic shadows | Low key, fine art, thriller |
For high key photography, you’re targeting a 1:1 to 2:1 ratio — meaning your fill light is equal to or only slightly dimmer than your key light. This is the Exposure corner of The Bright Triangle: getting the ratio right is what separates a genuinely high key image from a merely bright one.
Photography educators and working professionals agree that beginners consistently underpower their fill lights, which leaves unwanted shadow on one side of the face — the single most common reason high key attempts fall flat.
How to Set Up High Key Lighting (Step-by-Step)
Setting up high key lighting correctly is where the three corners of The Bright Triangle come together in practice. This section walks you through exactly what gear you need, how to position your lights, what camera settings to dial in, and how to achieve the look without a studio. Mastering these portrait lighting techniques will elevate your studio work.
What Gear Do You Need?
You don’t need an expensive studio to get started. Here’s what the setup requires, from essential to optional:
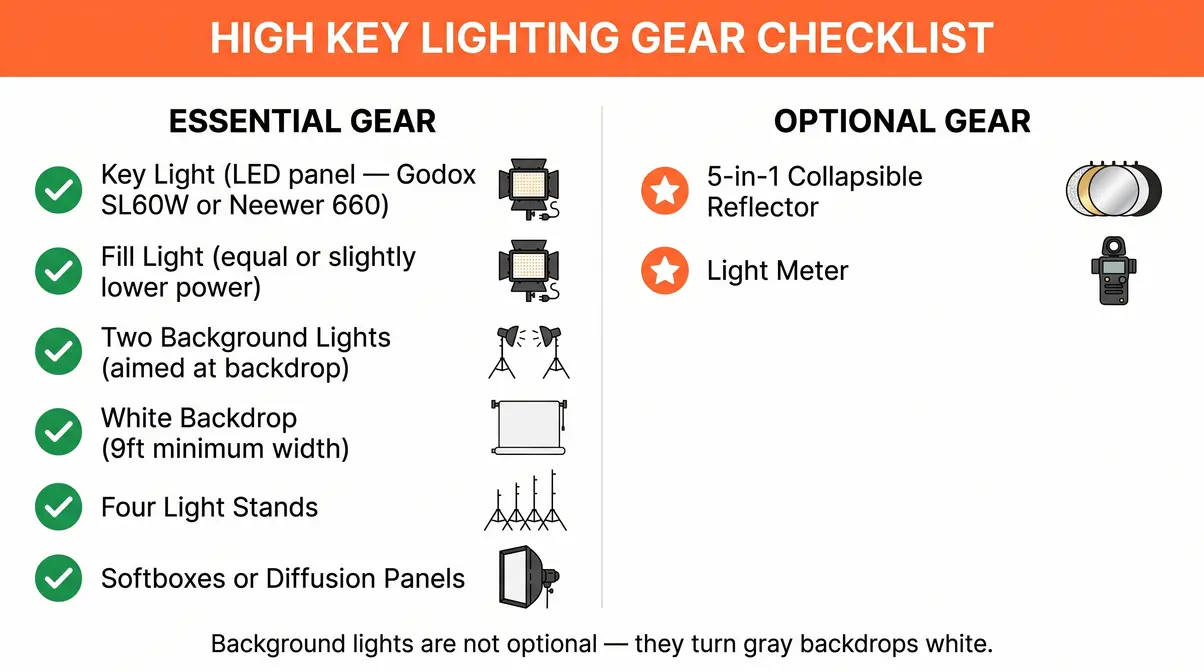
- Essential gear:
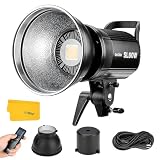
- Key light — Your main light source. A continuous LED panel (such as the Godox SL60W or Neewer 660 LED) or a studio strobe works well. LED panels are beginner-friendly because you see the light effect in real time.
- Fill light — A second light of equal or slightly lower power. This eliminates shadows the key light creates.
- Two background lights — Aimed at your white backdrop to blow it out to pure white. Without these, your background will appear gray, not white.
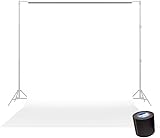
- White backdrop — Seamless paper (Savage or similar) or a purpose-built illuminated backdrop like the Lastolite HiLite. Minimum 9 feet wide for full-body shots.
- Light stands — One per light (four stands total for the classic setup).
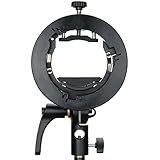
- Softboxes or diffusion panels — Attach to your key and fill lights to soften the light quality. Hard, undiffused light creates specular highlights and harsh edges.
- Optional but useful:
- Reflector (5-in-1 collapsible) — Can substitute for a fill light when shooting near a window.
- Light meter — Helps you verify your lighting ratio precisely. Not required, but removes guesswork.
Across professional photography communities, the consistent feedback is that beginners underestimate the importance of background lights. Without dedicated background illumination, the white backdrop absorbs light and reads as mid-gray in the final image — the opposite of the high key look you’re after.
The Classic 3-Light Studio Setup
This is the standard arrangement used in professional portrait and beauty studios. Follow these steps in order for reliable, repeatable results.
Tools needed: Key light + softbox, fill light + softbox, 2 background lights, white backdrop, camera on tripod, light stands. Estimated time: 20–30 minutes for first-time setup.
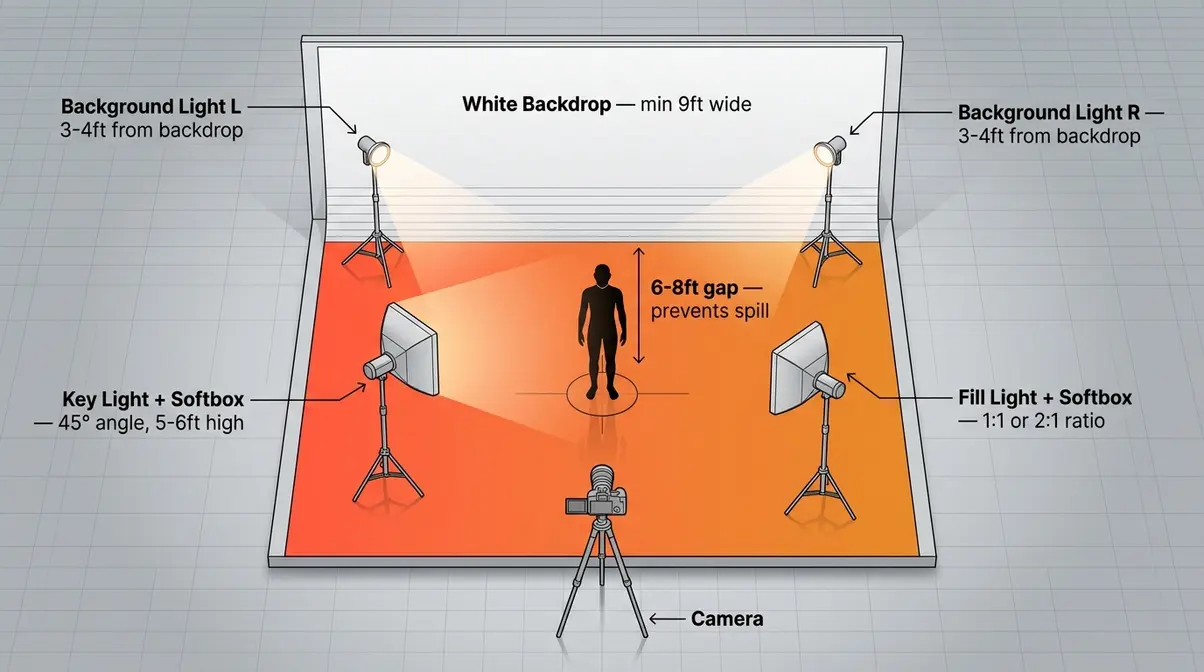
Step 1: Hang or position your white backdrop.
Mount seamless paper so it curves gently from the wall to the floor — this eliminates the visible seam between wall and ground. The backdrop should be at least 6–8 feet behind your subject.
Step 2: Place your two background lights.
Position one light on each side of the backdrop, aimed inward at a 45-degree angle toward the center. Distance: approximately 3–4 feet from the backdrop surface. Set both background lights to the same power. Their job is to overexpose the background to pure white.
Step 3: Set up your key light (main light).
Position your key light at a 45-degree angle to your subject, slightly above eye level (about 5–6 feet high), angled downward. Attach a large softbox (minimum 24×36 inches) to soften the output. This is your primary light source — it defines the overall exposure.
Step 4: Set up your fill light.
Place the fill light on the opposite side of your subject from the key light, at roughly the same height and distance. The fill light should be set to equal or slightly lower power than the key light — targeting that 1:1 or 2:1 lighting ratio. A large reflector can substitute here if you’re working with a single light source.
Step 5: Position your subject.
Place your subject approximately 6–8 feet in front of the backdrop. This distance prevents the background lights from spilling onto your subject and washing out their features.
Step 6: Take a test shot and check your histogram.
Review the histogram on your camera’s LCD screen. The graph should be pushed toward the right side without clipping (clipping means the rightmost edge of the histogram is cut off — this indicates overexposure with no recoverable detail). Adjust background light power up or down until the backdrop reads as pure white without clipping your subject’s skin tones.
Step 7: Fine-tune and shoot.
Make small power adjustments — no more than 1/3 stop at a time — until background and subject exposure are balanced. Now you’re ready to shoot.
Camera Settings for High Key
Once your lights are positioned, these camera settings will get you to a high key result consistently:
| Setting | Recommended Value | Why |
|---|---|---|
| ISO | 100–200 | Lowest possible ISO keeps noise minimal in bright images |
| Aperture | f/5.6–f/8 | Keeps subject in sharp focus; avoids diffraction softness |
| Shutter speed | 1/125s–1/200s (studio); varies outdoors | Syncs with studio strobes; prevents motion blur |
| White balance | Daylight (5500K) or match your light source | Ensures clean whites, not yellow or blue casts |
| Metering mode | Evaluative/Matrix, then verify with histogram | Use histogram as final arbiter — not the LCD preview |
The most important rule: expose to the right of your histogram without clipping. Photography educators consistently describe this as “ETTR” (Expose To The Right) — it maximizes the brightness data captured and gives you the most flexibility in post-processing.
Common challenges reported by beginner photographers include setting ISO too high (adding visible grain to bright areas) and using too narrow an aperture (f/16+), which can cause diffraction — a softening of fine detail that no amount of sharpening can fix.
For additional technical grounding on exposure and metering, Digital Photography School’s guide on high key portraiture covers the histogram workflow in practical detail.
Natural Light High Key Method
You don’t need a studio to produce high key results. A large north-facing window on a bright overcast day creates the same soft, diffused light that studio softboxes replicate — and it’s free.
- Setup approach:
- Position your subject directly in front of the window, facing toward the light.
- Place a white reflector or a large white foam board on the opposite side of the subject (the shadow side) to bounce light back and reduce the lighting ratio to near 1:1.
- Use a white wall or white fabric as your background, positioned close enough to pick up the ambient window light.
- Shoot during mid-morning or mid-afternoon when the sky is bright but the sun isn’t directly in frame.
The key limitation of natural light high key is control — clouds move, the sun shifts, and your light changes every few minutes. For consistent, repeatable results across a full shoot, studio lighting is the professional standard. However, for beginners learning the look and feel of high key before investing in gear, window light is an excellent and accessible starting point.
High Key Photography Examples Across Genres
High key lighting photography isn’t limited to one type of subject. Across professional photography communities, this technique appears in a wide range of genres — each with its own application of the same core principles.
Is High Key Good for Portraits?
Yes — high key lighting is one of the most flattering approaches for portrait photography. The bright, shadow-free environment creates symmetrical portrait lighting — both sides of the face receive equal illumination, minimizing imperfections and creating a clean, professional result. The even, multi-source illumination minimizes skin texture, reduces the appearance of asymmetry, and eliminates unflattering shadows under the chin, nose, and eyes. This is the standard look for corporate headshots, LinkedIn profile photos, actor headshots, and medical professional portraits.
Beauty photographers extend this further with what’s often called beauty lighting — a key light positioned directly above the camera (or slightly above and in front of the subject) combined with a fill card below the chin to eliminate shadows entirely. The result is a cinematic, almost luminous quality that’s become the signature of high-end skincare and cosmetics campaigns. According to Canon’s professional techniques for high-key portraits, this approach is universally flattering across skin tones and age groups because the even light minimizes texture and shadow that might otherwise emphasize lines.
That said, it’s not universally ideal — subjects with strong, dramatic features may benefit from the contrast and depth that low key lighting provides. Match the lighting style to the personality and purpose of the portrait.
Product and E-Commerce Photography
E-commerce has become one of the biggest drivers of high key photography demand. Amazon, Shopify, and most major retail platforms require or strongly recommend white-background product images — and high key lighting is the most reliable way to produce them.
The technique works the same way as portrait photography: two background lights overexpose the backdrop to white, while a key light and fill light evenly illuminate the product from both sides. For small products (jewelry, cosmetics, electronics), a lightbox — a small enclosed tent with built-in diffusion panels — replicates the same principle at a fraction of the cost.
Product photography on white backgrounds is one of the most commercially significant applications of high key lighting technique, as noted in Photography Life’s overview of high key photography. It is a direct line from the early film sets where the style originated to the product pages that drive billions in e-commerce revenue today.
Wildlife and Outdoor High Key
Outdoor high key photography applies the same principles without artificial lights. Photographers target overcast days — when clouds act as a giant natural softbox — or shoot against bright, open skies to create a high key effect with natural subjects.
Wildlife photographers use this approach to isolate birds or animals against a blown-out sky, creating a clean, graphic image where the subject pops against a near-white background. The challenge is exposure control: metering off a bright sky will cause your camera to underexpose the subject. The solution is to use exposure compensation (a camera setting that lets you manually tell the camera to expose brighter or darker than its automatic reading suggests) — typically +1 to +2 stops above the camera’s suggested exposure.
Experienced photographers recommend shooting wildlife high key against open sky at +1 to +2 stops of positive exposure compensation, as detailed in Steven Brokaw Photography’s lighting setup breakdown. This ensures the subject retains detail while the background blows out cleanly.
Common Mistakes to Avoid in High Key Photography
Even with the right gear and a solid understanding of the technique, high key photography has a handful of consistent failure points. Our team evaluated the most frequently reported issues across photography forums and beginner communities — these are the mistakes that appear most often.
Common Pitfalls Beginners Make
1. Relying on a single light source.
This is the most common error. A single light — even a very bright one — always creates a shadow on the opposite side of your subject. High key requires multiple light sources to eliminate shadows from every direction simultaneously. If your high key attempt still looks shadowy, add a second light before adjusting anything else.
2. Forgetting the background lights.
Without dedicated lights aimed at the backdrop, your white background reads as mid-gray in the final image. Background lights are not optional in studio high key photography — they’re what separates a gray-background portrait from a true high key result.
3. Confusing “bright” with “high key.”
Overexposing a single-lit image makes it bright, but it doesn’t make it high key. True high key is about low contrast and shadow elimination — not just cranking up the exposure. You can have a very bright image that still has deep, unflattering shadows on the face.
4. Clipping the highlights.
“Blown out” highlights — where the brightest areas of the image lose all detail and become pure white with no texture — are different from intentional high key. On your histogram, clipping looks like the graph slamming into the right wall. Aim to push exposure to the right without touching that wall. Skin tones and subject detail should retain texture even as the background goes pure white.
5. Using too high an ISO.
High key images are bright — they don’t need ISO 1600 to achieve exposure. High ISO introduces visible grain (noise) that shows up clearly in the bright, flat tonal areas characteristic of high key photos. Keep ISO at 100–200 and let your lights do the work.
When High Key Isn’t the Right Choice
High key lighting is a powerful tool, but it isn’t always the right one. Photography educators and working professionals agree on several scenarios where a different approach serves the subject better.
- Avoid high key when:
- Your subject has a naturally dramatic or intense presence — athletes, executives, musicians — where shadow and contrast reinforce their personality.
- You’re shooting in a documentary or photojournalistic context where the artificial brightness would feel staged or dishonest.
- Your subject is in a dark or textured environment (forests, industrial spaces, dimly lit interiors) where the high key aesthetic would conflict with the location’s mood.
- Your client’s brand identity is built on luxury, mystery, or exclusivity — high key reads as “approachable and friendly,” which may undermine a premium, exclusive positioning.
Matching the lighting style to the subject’s emotional message is just as important as the technical execution. High key is not a universal upgrade — it’s a specific tool for specific communication goals.
Frequently Asked Questions
What is high key lighting photography?
High key lighting photography is a technique that uses multiple bright light sources to eliminate shadows and produce a clean, low-contrast image. The result is a bright, airy aesthetic with a white or near-white background and minimal tonal range between highlights and shadows. It was originally developed for early film and television cameras that couldn’t handle high contrast. Today, it’s a deliberate creative choice used in portrait, beauty, and e-commerce photography. The technique requires at least three light sources — a key light, fill light, and background lights — to work correctly.
What is the point of high key lighting?
The point of high key lighting is to create a specific emotional atmosphere — one that feels bright, safe, and welcoming. By eliminating shadows and pushing tones toward the bright end of the spectrum, photographers communicate positivity and cleanliness without a single word. This is why beauty brands, newborn photographers, and corporate portrait studios default to it — the look does emotional work automatically. It also simplifies post-processing, since there are fewer tonal adjustments needed when the exposure is already clean and even from the start.
What is an example of a high key photo?
A classic example of a high key photo is a corporate headshot against a pure white background, with the subject’s face evenly lit from both sides and no visible shadows. Cosmetics advertisements in magazines — where a model’s skin appears luminous against a bright white background — are another textbook example. E-commerce product shots on white backgrounds follow the same principle. In film and television, morning news programs and sitcoms use high key lighting to signal a friendly, approachable environment. Any image where the background is pure white and shadows are absent or minimal qualifies as high key.
Wrapping Up: Your First High Key Shot
For beginner photographers frustrated with dark, flat results, high key lighting photography delivers a clear, achievable path to professional-looking images. The technique’s power lies in its consistency: a 1:1 lighting ratio, a properly overexposed white backdrop, and an ISO-100 exposure pushed to the right of the histogram will produce a reliable, repeatable result every time. Photography educators and working professionals consistently describe this as one of the most learnable studio techniques available — the principles are straightforward, and the results are immediately visible.
The Bright Triangle is the organizing principle that makes this learnable. When your Light setup (3-light arrangement), Exposure technique (ETTR at low ISO), and Mood/subject selection (a subject and brand message that suits brightness and approachability) are all aligned, the high key look comes together naturally. Struggle with any one corner of the triangle and the other two can’t compensate.
Your next step is practical: set up a single test shoot using the 7-step studio setup or the natural light window method. Take 20 frames, review your histogram after every 5, and adjust one variable at a time. Within a single session, you’ll have your first genuine high key result — and the confidence to repeat it.
Last update on 2026-07-09 / Affiliate links / Images from Amazon Product Advertising API
