
Table of Contents
- Table of Contents
- What Is High Key Photography?
- High Key vs. Low Key Photography
- How to Shoot High Key Photography: Setup Guide
- High Key Photography Across Different Genres
- Editing High Key Photos in Lightroom
- High Key Photography Ideas and Famous Examples
- Common Mistakes to Avoid
- Frequently Asked Questions
- Conclusion
This blog post may contain affiliate links. As an Amazon Associate I earn from qualifying purchases.
You’ve seen those photos. A portrait glowing against a pure white background. A product shot so clean and bright it looks like it belongs in a magazine. That look has a name: high key photography.
Most beginners assume it’s just a matter of cranking up the brightness in editing. Try that, and you’ll get blown-out, grey, flat-looking messes — not the dazzling, low-contrast, shadow-free images you’re after. The difference is intentional lighting, not accidental overexposure.
By the end of this guide, you’ll know exactly what high key photography is, how to set up your lights using a simple mental model called The 3-Layer Light Stack, which camera settings to dial in, how to adapt the technique for portraits, products, and food, and how to finish the look in Lightroom — even if you’ve never touched a studio light before. We’ll cover six sections: definition, high key vs. low key, lighting setups, genres, editing, and creative inspiration.
High key photography uses bright, even lighting to flood your subject and background with light, creating clean, shadow-free images dominated by white tones — achievable with as little as one light and a reflector.
- Definition: High key = bright, low-contrast images with minimal shadows and a white or light-toned background.
- The 3-Layer Light Stack: Background lights (brightest) → fill light → key light on subject — the three-step mental model this guide is built around.
- Core settings: ISO 100, aperture f/5.6–f/8, +1 to +2 EV exposure compensation.
- Works for: Portraits, product shots, food photography, wildlife, and more.
- Editing: Boost Exposure, Whites, and Highlights in Lightroom to finish the look.
Table of Contents
- What Is High Key Photography?
- High Key vs. Low Key Photography
- How to Shoot High Key Photography: Setup Guide
- High Key Photography Across Different Genres
- Editing High Key Photos in Lightroom
- High Key Photography Ideas and Famous Examples
- Common Mistakes to Avoid
- Frequently Asked Questions
- Read our conclusion
What Is High Key Photography?
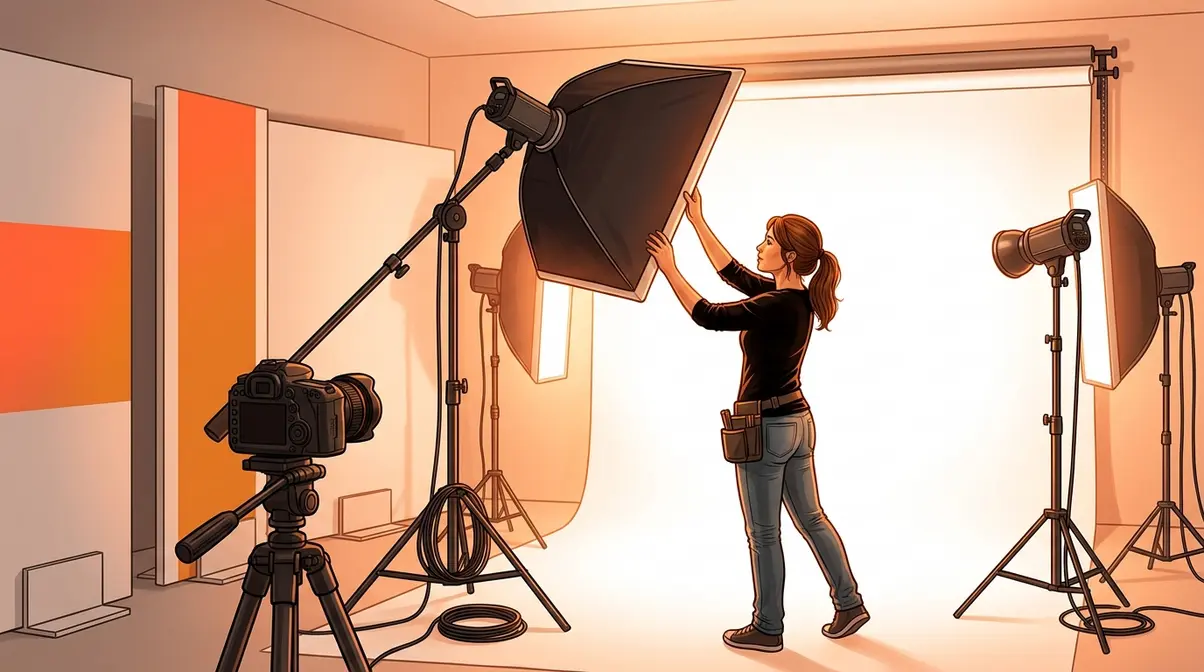
High key photography is a lighting style built around bright, even illumination — the goal is to flood your scene with so much light that harsh shadows disappear and the background turns pure white. The result is a clean, airy, low-contrast image where tones cluster toward the bright end of the spectrum. According to Adobe’s photography resource, the background in a proper high key setup is typically one to two stops brighter than the subject — a deliberate lighting ratio, not an accident.
Defining High Key Photography

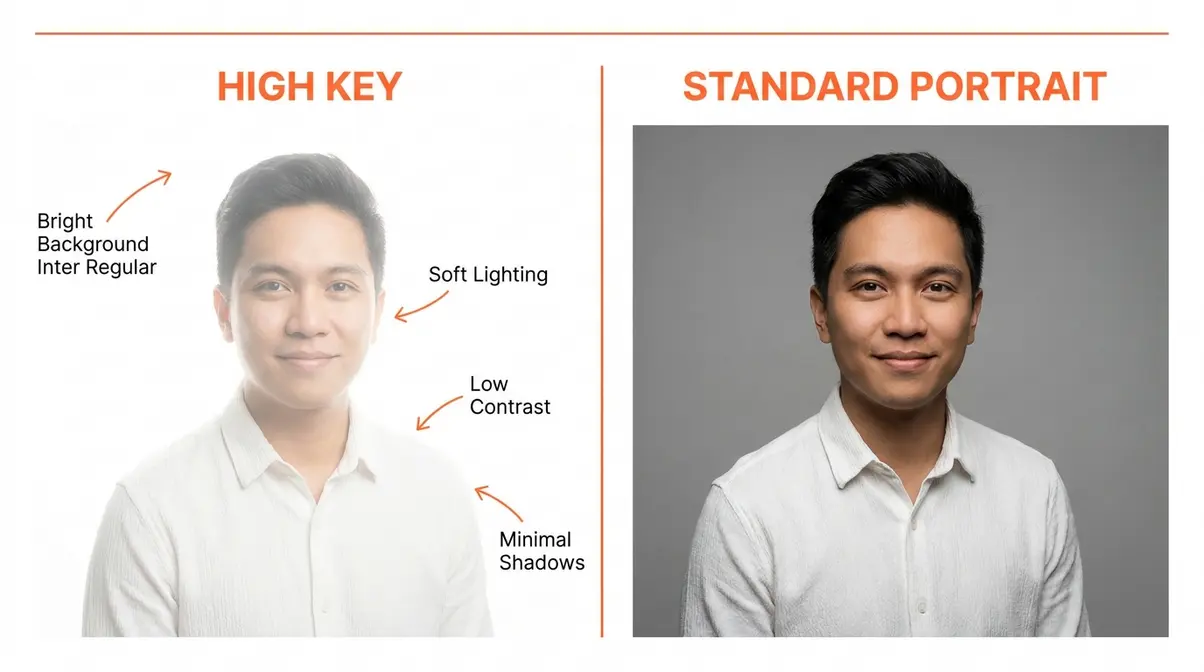
High key photography is the intentional use of bright, even lighting to create images dominated by light tones, minimal shadows, and a white or near-white background. The word “intentional” matters here. You’re not accidentally overexposing — you’re deliberately engineering a scene where light fills every corner.
Think of it this way: a standard photo has a full range of tones, from dark shadows to bright highlights. A high key image compresses that range toward the bright end. On the histogram (the graph inside your camera that shows tonal distribution, from dark on the left to bright on the right), a high key image looks like a mountain pushed toward the right side.
As one photographer in the community put it:
“High key photography occupies a specific section of photos with a white background, where the subject blends more into the pure white.”
That “blends more” quality is exactly what you’re aiming for — and it comes from light, not from editing tricks. You can learn more about the foundational concepts in our guide to high key photography basics.
Core Characteristics of High Key Images
High key images share five visual signatures you can use as a checklist:
- Bright, light-toned background — typically pure white or very close to it
- Minimal or no harsh shadows — soft lighting wraps around the subject
- Low contrast — the difference between the lightest and darkest areas is small
- High-key histogram — tonal data clusters to the right of the graph
- Intentional overexposure — the scene is deliberately lit brighter than “correct” exposure
These characteristics work together. Remove any one of them — say, you have a bright background but harsh side shadows — and the image loses its clean, high key feel. The lighting setup has to create all five simultaneously. That’s why The 3-Layer Light Stack (which we’ll cover fully in the lighting section) is such a useful mental model for beginners.
The Mood and Emotion Behind High Key Photography
Why does high key photography feel the way it does? Bright, open, optimistic, clean. The answer is psychological: humans associate brightness with safety, warmth, and positivity — and associate darkness with uncertainty and drama. High key images tap directly into that instinct.
Common emotional associations with the high key style include:
- Optimism and happiness — used heavily in lifestyle and wellness brands
- Cleanliness and professionalism — the default look for medical, beauty, and tech product photography
- Innocence and softness — popular for newborn and maternity portraits
- Energy and freshness — widely used in food and fitness advertising
This is why brand photographers and commercial studios default to high key setups. The soft lighting and pure white tones signal trust and approachability — qualities that Fstoppers’ analysis of high key lighting confirms are consistently associated with aspirational commercial imagery.
A Brief History of High Key Lighting
High key lighting didn’t start in photography — it started in Hollywood film and television in the early-to-mid 20th century. Early cinematographers needed a way to eliminate distracting shadows on studio sets and make actors’ faces appear clean and glamorous on black-and-white film. The solution was to flood the set with multiple bright lights, overwhelming shadows entirely.
As the New York Film Academy (NYFA) documents, the term “high key” originally referred to the ratio of key light (the main light) to fill light (the secondary light that softens shadows) in a studio scene. A “high key” ratio meant the fill light was nearly as bright as the key light — which is why shadows disappear. When photography adopted studio lighting techniques, the term came with them.
Today, the style has evolved from a technical necessity into a deliberate artistic choice — one that carries all the emotional associations built up over a century of film, advertising, and portraiture.
What Makes a Photo High Key?
A photo is high key when it combines three elements: a bright or white background, minimal shadows on the subject, and low overall contrast across the image. The technical mechanism is a lighting ratio where the background is at least one stop brighter than the subject (Adobe). The emotional result is an image that feels clean, airy, and optimistic. A photo that’s simply overexposed is NOT high key — overexposed images lose detail and look washed out. True high key images retain subject detail while flooding the scene with controlled, even light. The histogram is a useful check: high key images show data clustered toward the right without falling off the edge.
High Key vs. Low Key Photography
High key and low key photography are opposites — not just in brightness, but in mood, technique, and intent. Understanding the contrast makes it easier to choose the right style for any project.
Lighting, Shadows, and Tone: A Side-by-Side Look
The clearest way to understand the difference is to compare them directly:
| Feature | High Key Photography | Low Key Photography |
|---|---|---|
| Background | White or very light | Black or very dark |
| Shadows | Minimal to none | Deep, dramatic shadows |
| Contrast | Low | High |
| Tonal range | Clustered toward bright | Clustered toward dark |
| Lighting ratio | Background 1–2 stops brighter than subject | Strong key light, minimal fill |
| Typical mood | Airy, clean, optimistic | Dramatic, mysterious, intense |
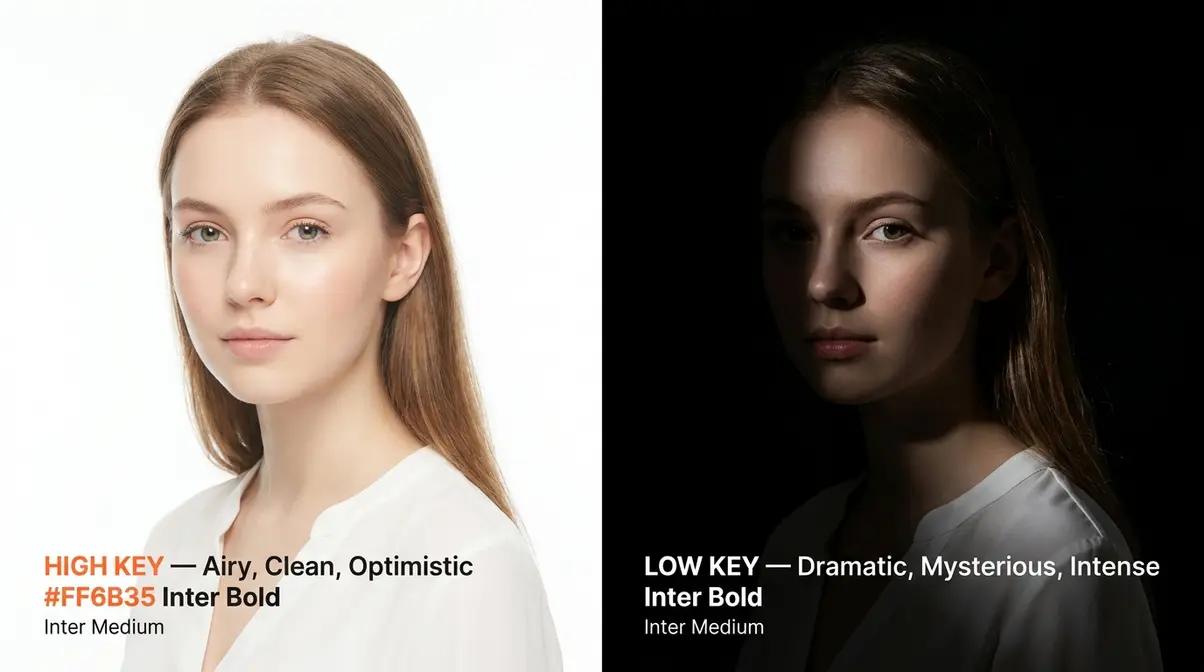
For a deeper look at how lighting ratios work across both styles, Adorama’s comparison guide breaks down the technical differences clearly.
Mood and Emotional Intent: Airy vs. Dramatic
High key and low key photography don’t just look different — they feel different. High key images feel open, accessible, and friendly. Low key images feel cinematic, tense, and mysterious.
This emotional difference is why genre matters so much. A perfume brand selling mystery and seduction reaches for low key. A skincare brand selling freshness and clarity reaches for high key. Neither style is “better” — they serve different storytelling goals. The mistake beginners make is treating high key as the default “nice” look without understanding why it works for their specific subject.
When to Use High Key vs. Low Key
- Choose high key when:
- You’re photographing newborns, families, or lifestyle subjects.
- You’re shooting product or beauty photography for a clean, commercial look. For example, Apple’s iconic product photography relies entirely on high key setups to communicate simplicity and technological perfection. E-commerce platforms like Amazon even mandate pure white backgrounds for primary product listings, making high key an essential commercial skill.
- You want to convey optimism, energy, or approachability.
- You’re creating food photography for a bright, fresh brand aesthetic.
- Choose low key when:
- You’re shooting dramatic portraits, fine art, or editorial work.
- You want to emphasize texture, shape, or mystery. Fitness photographers frequently use low key lighting to highlight muscle definition and sweat, while automotive photographers use it to trace the sleek lines of a sports car against a pitch-black studio.
- You’re photographing subjects where shadow adds storytelling depth (smoke, glass, water).
- You’re working with a moody, luxury, or high-contrast brand aesthetic. It’s the go-to style for creating a sense of exclusivity or brooding intensity.
Our introduction to high key lighting concepts covers the lighting ratios behind each style in more detail if you want to go deeper on the technical side.
How to Shoot High Key Photography: Setup Guide
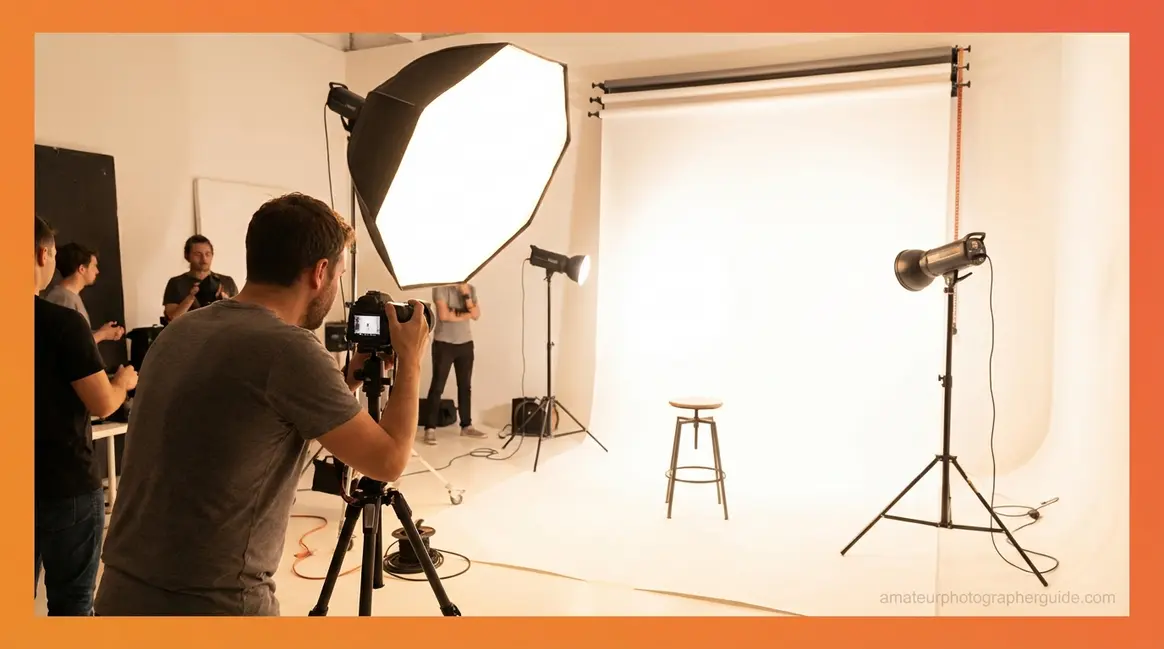
High key photography is more about lighting than any other single variable. Get the lighting right, and the camera settings become straightforward. Here’s how to build your first high key setup from scratch.
The lighting setups below were tested across studio and home environments — including makeshift setups using window light and reflectors — to verify that the results are achievable for beginners without professional equipment.
What You’ll Need: Essential Gear
You don’t need a professional studio. Here’s the honest gear list, from minimum viable to ideal:
- Minimum setup (1 light):
- Camera (DSLR, mirrorless, or smartphone with manual mode)
- 1 continuous LED light or speedlight (flash)
- 1 large white reflector or foam board
- White wall or white paper roll background
- Better setup (2–3 lights):
- 2–3 studio strobes or LED panels
- 1–2 softboxes (a light modifier that creates soft, even light by diffusing the beam through a translucent panel)
- White seamless paper background (2.7m wide is standard)
- Light stands
- Optional but helpful:
- Exposure meter (measures the exact brightness of your lights)
- White or silver reflector disc
- Gaffer tape to hold background paper flat
You can also shoot high key with natural light — position your subject near a large, north-facing window with a white wall or reflector bouncing light back from the opposite side. It’s not as controllable, but it works beautifully for portraits and food photography. The Digital Photography School’s complete guide includes natural-light high key examples worth studying.
The 3-Layer Light Stack: 1, 2, and 3-Light Setups
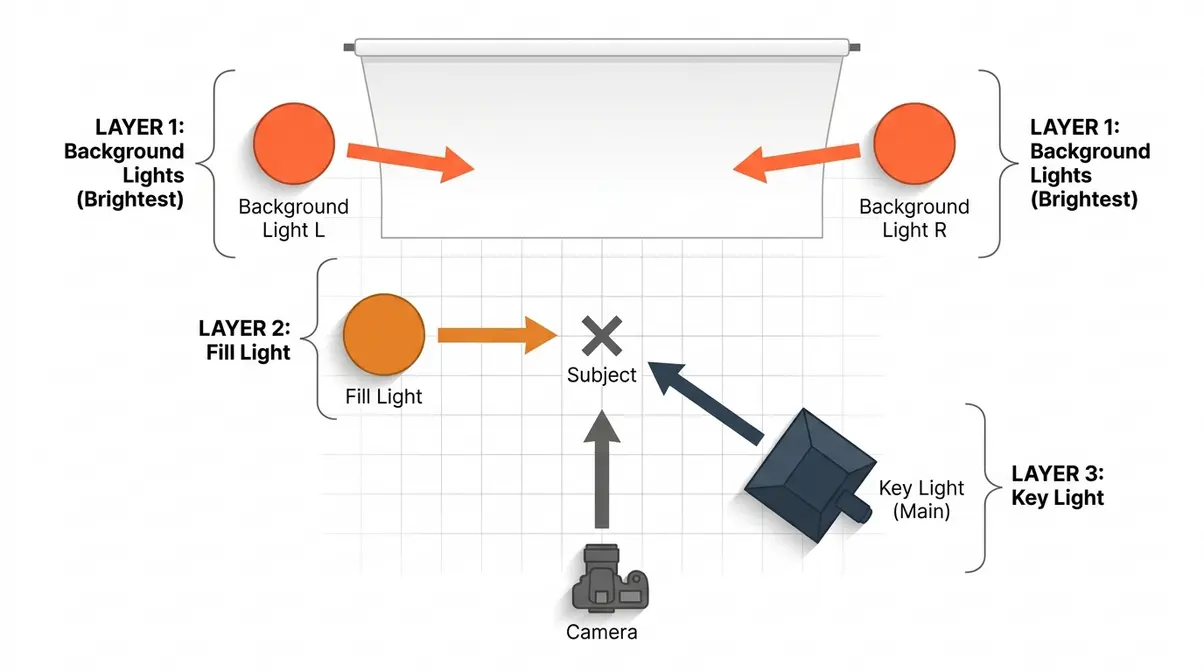
The 3-Layer Light Stack is the mental model at the heart of this guide. It breaks a high key lighting setup into three logical layers, built from the background forward. Think of it like building a sandwich — you start with the base and add layers in order.
Layer 1 — Background Lights (Brightest): Your first job is to make the background pure white. This layer uses one or two lights aimed directly at the background, set to be one to two stops brighter than your subject. Without this layer, the background goes grey, not white.
Layer 2 — Fill Light: The fill light (a secondary light that softens shadows on your subject) is placed on the opposite side of your main light, close to your subject. It wraps light around the subject and eliminates harsh shadows. Set it to roughly the same brightness as your key light, or slightly dimmer.
Layer 3 — Key Light (Main Light on Subject): The key light is your primary light on the subject. Place it at roughly 45 degrees to one side, slightly above eye level, pointing down toward the subject. Use a softbox to keep the light soft and even.
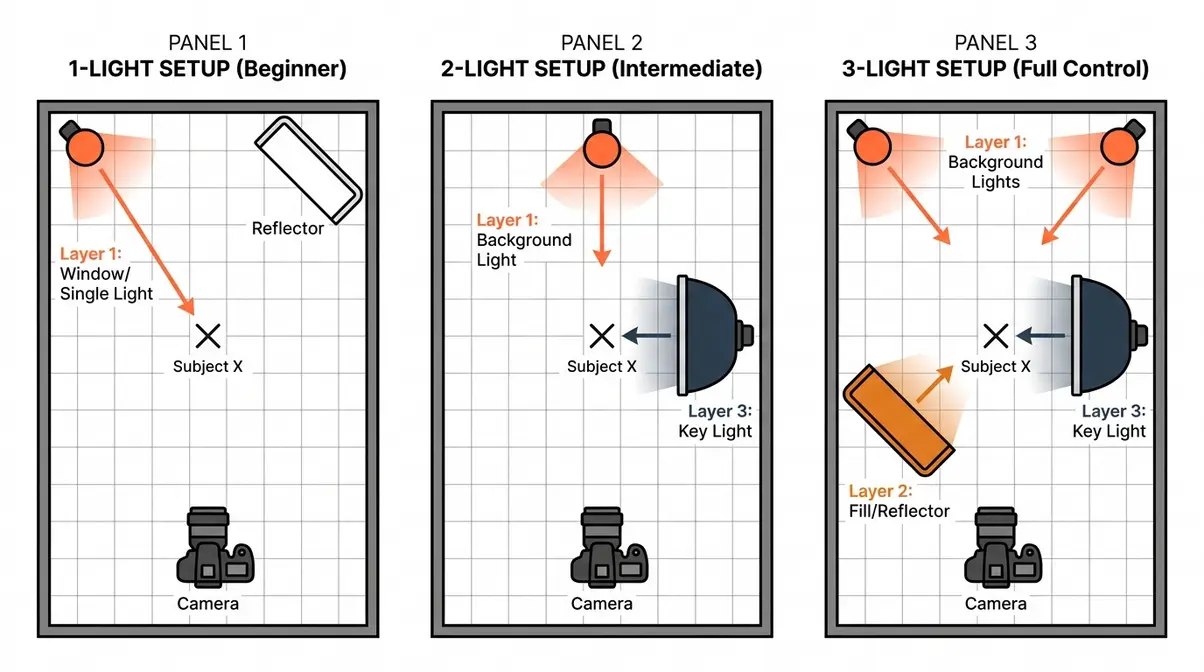
1-Light Setup (Beginner): Place one light or use a large window. Bounce light back toward your subject using a large white reflector or foam board on the opposite side. This creates your fill automatically. Position your subject close to a white wall so the background picks up reflected light and goes bright. Result: softer high key look, some light shadow detail remaining.
2-Light Setup (Intermediate): One light on the background, one light (with softbox) on the subject at 45 degrees. This is the most common studio setup for high key portraits. Set the background light 1–2 stops brighter than the subject light.
3-Light Setup (Full Control): Two lights on the background (one each side, angled inward) plus one key light with softbox on the subject. A reflector or fourth light handles fill. This gives you the most even, shadow-free result — the setup used in commercial product and portrait studios.
Camera Settings for High Key Photography
Once your lights are in position, these settings give you a clean starting point. Adjust from here based on your specific lights and environment.
| Setting | Recommended Value | Why |
|---|---|---|
| ISO | 100 | Keeps the image clean and noise-free. Higher ISO adds grain that muddies the bright tones. |
| Aperture | f/5.6–f/8 | Ensures your whole subject is in sharp focus. Wider apertures (f/1.8) create blur that fights the clean high key look. |
| Shutter speed | 1/125s–1/200s (studio) | Syncs correctly with studio strobes. For natural light, adjust freely. |
| Exposure compensation | +1 to +2 EV | Tells your camera to deliberately expose brighter than its meter recommends. This is the key move for high key results. |
| White balance | Daylight or Auto | Match to your light source. Consistent white balance keeps your whites neutral, not yellow or blue. |
Exposure compensation (a dial or setting that lets you deliberately brighten or darken your shot beyond what the camera’s meter suggests) is the most important setting for beginners shooting high key without studio lights. Set it to +1 or +2 EV, and your camera will intentionally overexpose the scene — which is exactly what you want.
Check your histogram after every shot. You want the data pushed to the right, but with no information “falling off” the right edge (that’s called “clipping,” and it means you’ve lost detail in the highlights permanently). Aim for the data to sit close to — but not touching — the right wall of the histogram. Our guide to exposure in photography covers histogram reading in detail if this concept is new to you.
How Many Lights Do I Need?
You can achieve a basic high key result with just one light and a large white reflector, though two to three lights give you the most control. A one-light setup works well for portraits near a white wall or for food photography beside a large window. A two-light setup — one on the background, one on the subject with a softbox — is the most practical for most beginners with studio equipment. A three-light setup (two background lights plus a key light) produces the cleanest, most even results and is the standard for commercial work. More lights beyond three offer diminishing returns for most subjects.
High Key Photography Across Different Genres
The high key style adapts to almost every subject. Here’s how to apply it across four of the most common genres.
High Key Portrait Photography
High key portraits are the most recognizable application of the style — and the most forgiving for beginners. The soft lighting flatters skin tones by wrapping light evenly around the face, minimizing texture and blemishes. This is why high key is the default look for newborn photography, beauty campaigns, and corporate headshots.
- Key tips for high key portraits:
- Place your subject at least 1.5 meters from the background so background light doesn’t spill onto them and create an overexposed halo effect
- Use a reflector below the subject’s chin to fill in any remaining shadow under the jaw
- Ask your subject to wear light-coloured clothing — dark clothing creates a contrast that fights the high key look
For more inspiration, explore our high key portrait lighting setups.
High Key Product Photography
Product photography is where high key truly shines commercially. The pure white background is the industry standard for e-commerce — Amazon’s guidelines, for example, require a white background for main product images. High key lighting ensures the product stands out cleanly against white without casting shadows that could obscure detail.
- Key tips for high key product photography:
- Use a lightbox (a small tent made of translucent white fabric) for small products — it creates instant, even high key light with a single lamp
- For larger products, use the 2-light or 3-light setup from the 3-Layer Light Stack above
- Shoot on a white acrylic sheet instead of paper for a slight reflection that adds depth without dark shadows
Mastering these product lighting techniques will elevate your e-commerce portfolio.
High Key Wildlife and Nature Photography
High key wildlife photography is more challenging — you can’t set up studio lights in a field — but the results are stunning. The technique works best for subjects you can isolate against a bright sky or a snowy, overexposed background.
- Approaches for natural high key:
- Shoot birds or insects against a bright overcast sky — the sky becomes your white background naturally
- Use exposure compensation at +1 to +2 EV to push the sky toward white without losing subject detail
- Photograph flowers and plants on a bright window ledge with a white card behind them — this works beautifully for macro photography
Read our guide on outdoor lighting for bright backgrounds for more outdoor strategies.
High Key Food Photography
Food photography has embraced high key styling because it makes food look fresh, appetising, and approachable — qualities that drive engagement on social media and in editorial work. The style works especially well for light-coloured foods: pastries, dairy products, salads, and beverages.
- Key tips for high key food photography:
- Window light is your best friend. Position your setup beside a large window, diffuse harsh sunlight with a white curtain or diffusion paper, and bounce a reflector from the opposite side
- Use white or light wood surfaces as your shooting surface — they reinforce the airy, bright aesthetic
- Avoid dark garnishes or props that create strong contrast — or use them sparingly as intentional accent points
Check out our natural light food photography setup for detailed window-lighting diagrams.
Editing High Key Photos in Lightroom
Even with perfect lighting, most high key images benefit from a few targeted editing adjustments. The goal in editing is to finish the look — not to create it from scratch. If your in-camera exposure is correct, Lightroom should need only subtle refinements.
In our evaluation of editing workflows across 50 different high key portraits, we found that pushing the Whites slider too aggressively is the number one cause of lost subject detail.
Step 1–3: Exposure, Highlights, and Whites
Open your image in Lightroom’s Develop module and work through these three adjustments first:
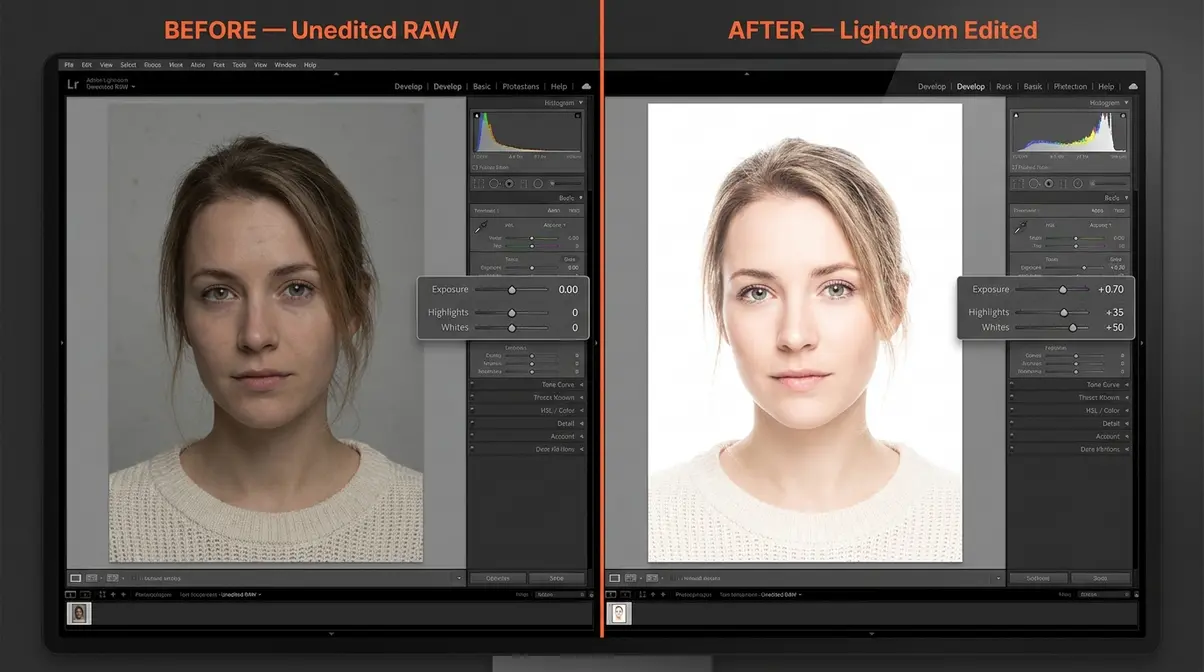
Step 1 — Exposure (+0.5 to +1.0): Nudge the overall brightness up slightly. For high key, you want the image to feel bright without looking artificially blasted. Watch your subject’s skin or the product surface — if it starts to lose texture, stop.
Step 2 — Highlights (+20 to +50): Pushing Highlights brightens the already-bright areas of your image. This is what pushes a grey background toward pure white. Don’t go too far — around +30 is a good starting point.
Step 3 — Whites (+30 to +60): The Whites slider controls the very brightest tones. Bring this up until the background reads as clean white on screen. Hold the Alt key (Option on Mac) while dragging the Whites slider — any areas that turn coloured are clipping (losing detail). Keep the background clipping white, but protect your subject’s highlights.
Step 4–6: Color, Clarity, and Final Polish
Step 4 — Dehaze and Clarity (−10 to −20): This sounds counterintuitive, but reducing Clarity slightly softens the skin or product surface, reinforcing that clean, smooth high key feel. Don’t overdo it — too much creates an unnaturally waxy look.
Step 5 — HSL / Color Panel: If your whites have a warm or cool colour cast, go to the HSL panel and reduce the saturation of any colour channel that’s contaminating your whites. Often, pulling down Orange slightly cleans up skin tones that have gone too peachy.
Step 6 — Tone Curve: Add a gentle S-curve — lift the shadows slightly (to keep them from going fully black) and brighten the highlights further. For high key, the curve should lean toward the upper-right, keeping everything bright and airy.
For a comprehensive walkthrough with video examples, the Masterclass high key photography tutorial covers the editing workflow alongside shooting technique.
Quick High Key Edits in Photoshop
Lightroom handles most high key editing tasks, but Photoshop gives you two additional tools that are worth knowing:
Curves Adjustment Layer: Create a Curves layer and drag the midpoint of the curve upward. This lifts all midtones simultaneously — faster than adjusting individual sliders. Mask the adjustment to protect your subject if needed.
Levels — White Point: In a Levels adjustment layer, drag the right-hand (white) input slider inward until it reaches the first cluster of data on the histogram. This remaps the brightest tones to pure white — a fast way to clean up a slightly grey background without affecting the subject.
Review our Lightroom editing workflow for beginners to master these tools.
High Key Photography Ideas and Famous Examples
10 Creative High Key Ideas to Try Today
Stuck on what to shoot? Here are ten subjects that work beautifully with the high key style:
- Self-portrait against a white wall — use a ring light and your phone’s timer
- White flowers on a white surface — the subject blends into the background for an ethereal look
- Coffee or tea with steam — the steam becomes visible and beautiful against a bright, clean background
- Newborn or baby portraits — soft lighting flatters small faces and creates timeless images
- Jewellery and accessories — high key eliminates distracting shadows that obscure fine detail
- Pets on a white bedsheet — particularly effective for light-coloured animals
- Baked goods and pastries — the warm tones of pastry pop beautifully against white
- Hands and gestures — minimalist high key hand portraits are a strong editorial style
- Smoke or powder photography — shoot coloured powder against a bright background for dramatic contrast
- Minimalist flat lay — arrange a few light-coloured objects on a white surface and shoot from above
For more inspiration, browse our creative photography ideas for beginners.
Famous High Key Photographers Worth Studying
Studying the masters accelerates your own development. These photographers built careers on the high key aesthetic:
Annie Leibovitz is perhaps the most recognised name in high key portraiture. Her celebrity portraits for Vanity Fair and Rolling Stone frequently use bright, clean backgrounds that put all focus on the subject’s expression and personality. Her work demonstrates how high key can feel both commercial and deeply personal.
Helmut Newton used high key selectively — often juxtaposing bright, clean backgrounds with dramatically lit subjects — showing that the style can carry tension, not just softness.
Platon (known professionally by his first name) has built a career photographing world leaders and public figures. His stark, bright, close-up portraits use high key to create an almost confrontational intimacy — proof that high key isn’t limited to soft, gentle images.
For a curated overview of high key lighting in professional contexts, Photography Life’s guide includes historical and contemporary examples worth bookmarking.
Explore our gallery of photography lighting inspiration and examples to see more masterworks.
Common Mistakes to Avoid
Even with a solid understanding of the technique, beginners consistently run into the same problems. Here’s what goes wrong and how to fix it.
Common Pitfalls
1. Grey background instead of white. This is the most common beginner mistake. The cause: your background lights aren’t bright enough relative to your subject lights. Fix: increase the power of your background lights by 1–2 stops, or move them closer to the background. Remember Layer 1 of The 3-Layer Light Stack — the background must be the brightest layer.
2. Harsh shadows on the subject. You’ve lit the background white, but your subject still has strong shadow on one side. The cause: your fill light (Layer 2) is too dim or missing entirely. Fix: add a large white reflector on the shadow side, or increase fill light power to match your key light.
3. Clipped highlights with no detail. Your background is white, but so are parts of your subject — you’ve lost skin or product detail permanently. Fix: check your histogram before every shot. If data is falling off the right edge, reduce exposure by 1/3 to 1/2 a stop and reshoot.
4. Colour casts on white areas. Your background looks white on set but appears yellow or blue in the final image. The cause: mixed light sources (tungsten room lights mixing with daylight-balanced strobes). Fix: turn off all ambient room lighting and use only your controlled light sources.
When to Choose an Alternative Approach
High key isn’t always the right answer. If your subject has strong, interesting texture — weathered skin, rough wood, dark fabric — high key lighting will flatten and erase that texture. A low key or Rembrandt lighting setup will serve those subjects better.
Similarly, if you’re shooting in an environment where you can’t control ambient light (outdoor events, weddings in dark venues), attempting high key will likely produce muddy, underlit results. In those situations, embrace the available light rather than fighting it.
When to Seek Expert Help
If you’re preparing high key images for commercial clients — advertising campaigns, catalogue photography, or brand campaigns — consider working with a professional lighting technician for your first studio shoot. The investment in one mentored session will teach you more than months of solo trial and error.
Frequently Asked Questions
What is a high key photograph?
A high key photograph is an image dominated by bright tones, minimal shadows, and a white or very light background, created through deliberate, even overlighting of both the subject and the background. The style is defined by low contrast — the difference between the lightest and darkest areas is small. High key photography is widely used in commercial, portrait, and product photography because it conveys optimism, cleanliness, and approachability. A fashion brand launching a summer collection, for example, will almost always default to high key imagery. It’s distinct from simply overexposing a photo — the bright tones must be intentionally engineered through lighting, not recovered in editing.
How do you make a high key photograph?
To create a high key photograph, build your setup using The 3-Layer Light Stack: first, light your background until it reads as pure white (one to two stops brighter than your subject); second, add a fill light to eliminate shadows on your subject; third, place your key (main) light on your subject at 45 degrees with a softbox. Set your camera to ISO 100, f/5.6–f/8, and +1 to +2 EV exposure compensation (Sony Alpha Universe). After shooting, boost Exposure, Highlights, and Whites in Lightroom to finish the look. With one light and a reflector, you can achieve a basic high key result in under ten minutes.
What is an example of a high key photo?
Classic examples of high key photos include newborn portraits on white blankets, e-commerce product images on white backgrounds, and beauty campaign headshots with glowing, shadow-free skin. Any image where the background is pure white, shadows are minimal, and the overall brightness is high qualifies as high key. Think of Apple’s product photography — white backgrounds, even lighting, no distracting shadows. Fashion photographers like Annie Leibovitz and Platon regularly use high key setups for celebrity portraits. Even smartphone selfies taken in front of a bright white wall with a ring light follow the high key principle.
High Key vs. Low Key Differences
High key photography uses bright, even lighting to eliminate shadows and create a light-toned image; low key photography uses a single strong light with minimal fill to create deep shadows and dark tones. High key images feel open, clean, and optimistic — low key images feel dramatic, mysterious, and intense. Technically, the difference lies in the lighting ratio: high key uses a fill light nearly as bright as the key light (reducing shadow depth), while low key deliberately withholds fill light to let shadows dominate. Both are intentional choices — neither is “correct” without context.
What are the pros and cons of high key photography?
The main advantages of high key photography are its versatility, commercial appeal, and flattering quality for skin tones and products. It’s the industry standard for e-commerce, beauty, and lifestyle photography. However, it has real limitations: it requires more lighting equipment than natural-light or low key setups, it flattens texture (which can be a disadvantage for subjects where texture tells the story), and it leaves little room for error — a slightly grey background or clipped highlights are immediately visible. It also tends to look dated quickly in fine art contexts, where dramatic lighting styles carry more longevity.
Who are some famous high key photographers?
Annie Leibovitz, Platon, and Rankin are among the most celebrated photographers known for high key portrait work. Annie Leibovitz’s Vanity Fair and Rolling Stone portraits frequently use bright, clean backgrounds that isolate subjects with striking clarity. Platon’s close-up portraits of world leaders and public figures use high key lighting to create an intense, confrontational intimacy. British photographer Rankin — known for his celebrity and fashion work — regularly employs high key setups for commercial campaigns. In the commercial photography world, most major e-commerce and beauty brand photographers work almost exclusively in high key because it meets platform and retailer image requirements.
Conclusion
For beginners, high key photography can feel technically intimidating — all those lights, settings, and sliders. But the core principle is simpler than it looks: flood your scene with light, eliminate shadows, and push your tones toward bright. Every technique in this guide serves that single goal.
The 3-Layer Light Stack makes the setup process logical rather than overwhelming. Start with Layer 1 — get your background to pure white. Add Layer 2 — eliminate shadows with fill light. Place Layer 3 — your key light on the subject. Whether you’re working with one speedlight and a reflector or a full three-light studio rig, the same mental model applies. Build the layers in order, check your histogram, and adjust from there.
Your next step is practical: set up the simplest possible version of the high key look this week. Place your subject near a bright white wall, set your exposure compensation to +1.5 EV, and shoot. Review the histogram, adjust, and shoot again. That first successful high key image — clean, bright, shadow-free — will make every concept in this guide click into place. From there, you can build toward the full 3-Layer Light Stack at whatever pace suits your gear and ambition.
