
Table of Contents
This blog post may contain affiliate links. As an Amazon Associate I earn from qualifying purchases.
Struggling with photos that look too dark in a Paris street or washed out during an Arizona sunset? Every photographer faces confusing lighting that trips up their camera’s auto settings. Metering modes are your tool for taking control, letting you decide which part of your image matters most for exposure. Understanding metering modes helps you avoid blown-out highlights and muddy shadows, so you capture scenes the way your eyes see them—no matter where you shoot.
Key Takeaways
| Point | Details |
|---|---|
| Understanding Metering Modes | Metering modes determine how your camera measures light, directly impacting exposure accuracy. Mastering these modes grants better control over image outcomes. |
| Choosing the Right Mode | Select a metering mode based on your scene’s lighting and subject positioning. Matrix for even lighting, Center-weighted for centered subjects, and Spot for high contrast situations yield optimal results. |
| Common Mistakes to Avoid | Avoid metering on the wrong subjects or using inappropriate modes for specific scenes to prevent exposure errors. Always meter first, then lock exposure before composing your shot. |
| Practical Application | Experiment with different metering modes in identical lighting conditions to understand their effects on exposure. Hands-on practice is essential for mastering camera exposure. |
What Metering Mode Is in Photography
Metering mode is how your camera measures light in a scene to determine the correct exposure. Your camera evaluates the brightness across the frame and decides whether to use more or less light. This directly impacts whether your photos appear too dark, too bright, or perfectly exposed.
Think of your camera’s light meter like your eye adjusting to a dark room. Your pupils dilate to let in more light, or constrict in bright sunlight. Metering modes work similarly—they analyze light and set exposure accordingly. Without a metering mode, your camera would struggle to know what exposure settings to use.
Metering modes become critical when you’re working with tricky lighting situations. A sunset over water, a person backlit by a window, or a snow-covered landscape all confuse automatic metering. Different modes handle these scenarios differently, giving you control over which parts of the frame matter most.
Here’s what metering mode actually does:
- Reads brightness values across different areas of your frame
- Calculates an exposure value your camera should use
- Works alongside shutter speed and aperture to create proper exposure
- Adapts based on which metering pattern you select
- Influences whether highlights blow out or shadows go black
Your camera likely offers between three and five metering modes. Each one reads light differently, which means the same scene could result in different exposures depending on which mode you choose. Understanding these differences transforms your ability to nail exposure in any lighting condition.
Metering mode determines what your camera “sees” when measuring light—mastering it gives you control over exposure instead of leaving it to chance.
When exploring how different camera settings work together, understanding camera modes helps you see how metering integrates with aperture priority, shutter priority, and manual modes. Each mode lets you control metering in different ways.
The relationship between metering and exposure is straightforward: metering measures light, then your camera uses that information to calculate shutter speed, aperture, or ISO. Without proper metering, your images lack detail in highlights or shadows—or both.
Pro tip: Start by shooting in your camera’s default metering mode for a week, then switch to another mode with the same lighting and compare results. You’ll quickly see how different metering patterns affect your exposures.
Types of Metering Modes Explained
Most cameras offer three to five metering modes, each reading light in fundamentally different ways. Knowing which mode does what helps you choose the right one for any lighting challenge. Let’s break down the most common modes you’ll encounter.
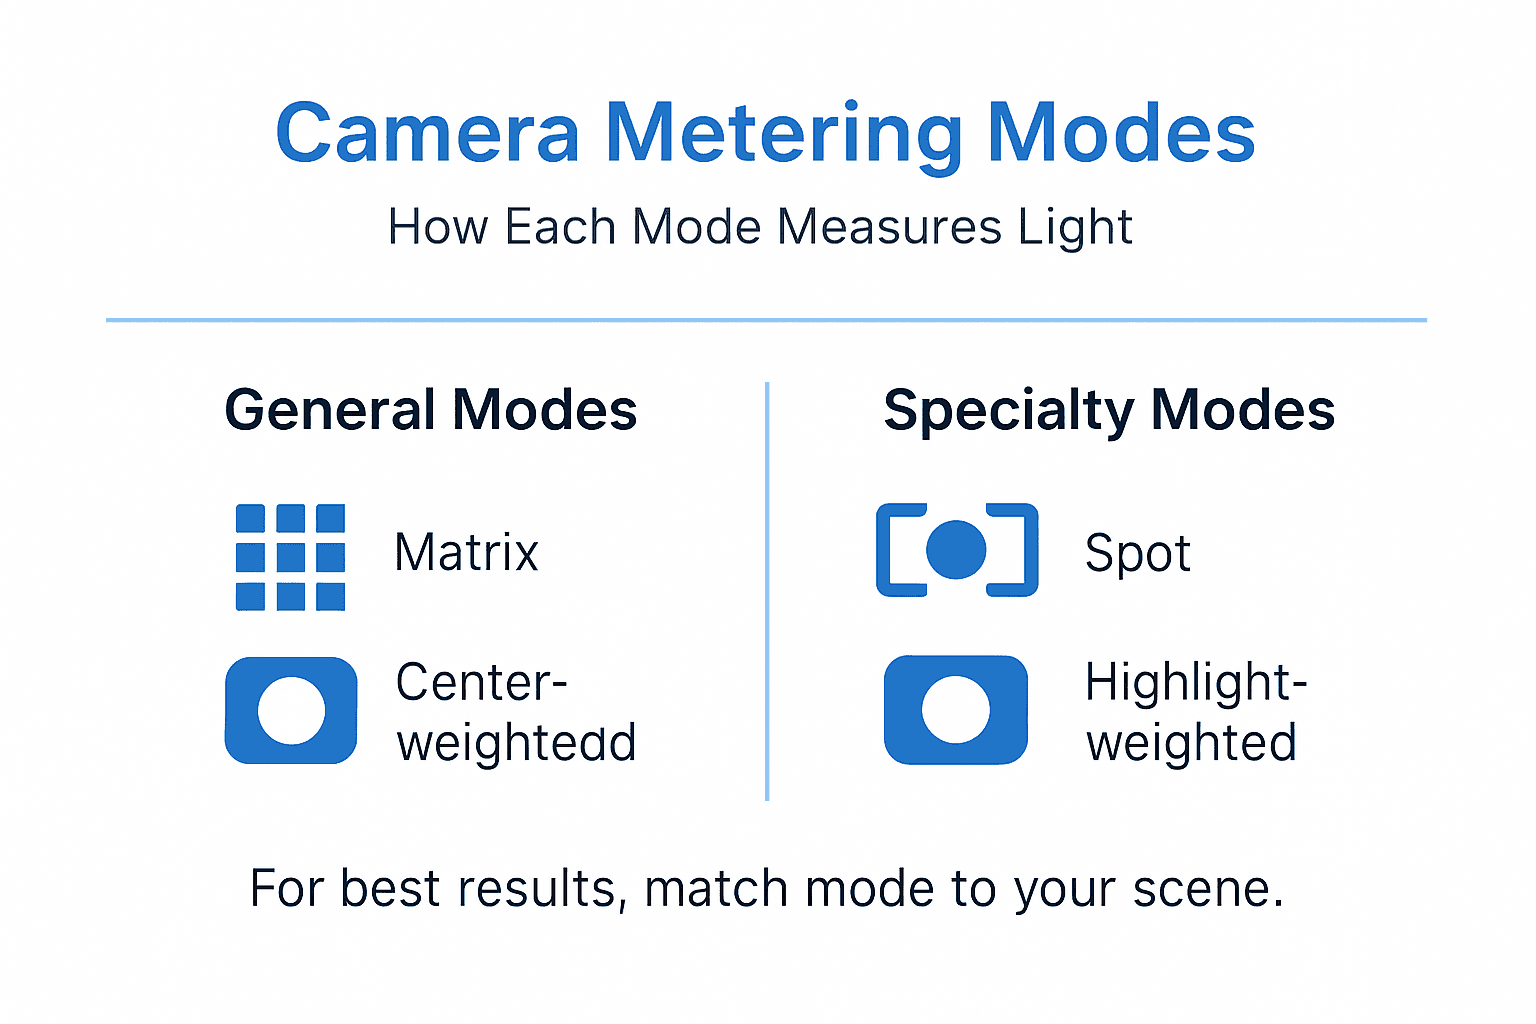
Matrix or Evaluative Metering analyzes the entire frame and divides it into zones. Your camera then balances exposure across all these zones to find a middle ground. This mode works well for general shooting where light is relatively even across the scene.
Center-weighted Metering prioritizes the center of your frame while still considering the edges. Your camera assumes the most important subject is in the middle, so it meters mainly for that area. This mode shines for portraits and situations where your subject sits in the center.

Spot Metering measures light from a tiny area, often where you’ve focused. This mode ignores most of the frame and exposes only for that small spot. Spot metering gives you surgical precision when dealing with extreme contrast or backlit subjects.
Partial Metering falls between center-weighted and spot modes. It meters a larger area than spot but smaller than center-weighted. Some cameras offer this as an alternative when you need more control than center-weighted provides.
Highlight-weighted Metering prioritizes protecting bright areas from blowing out. Your camera exposes to preserve detail in highlights, even if shadows go darker. This mode works best for high-contrast scenes like sunsets or backlit subjects.
Here’s how to match modes to your shooting:
Here’s a quick comparison of common metering modes and their ideal usage scenarios:
| Metering Mode | Best For | Area Measured | Typical Challenge Solved |
|---|---|---|---|
| Matrix/Evaluative | Landscapes, group photos | Entire frame in zones | Balancing overall exposure |
| Center-weighted | Portraits, centered subjects | Center with edge influence | Keeping main subject properly exposed |
| Spot | Backlit, high-contrast scenes | Small focus area | Precise exposure on critical detail |
| Partial | Wildlife, off-center subjects | Moderate area near center | Control with creative flexibility |
| Highlight-weighted | Sunsets, bright backgrounds | Brightest areas prioritized | Preserving highlight detail |
- Matrix: landscapes, general photography, even lighting
- Center-weighted: portraits, posed subjects, centered composition
- Spot: backlit subjects, extreme contrast, precise control needed
- Partial: wildlife, subjects slightly off-center
- Highlight-weighted: sunsets, bright skies, preventing blown highlights
Different metering modes read light differently—choosing the right one prevents bad exposures before they happen.
Your camera likely has a dedicated metering mode button or menu option. Experimenting with each mode in the same lighting condition shows you exactly how each one interprets exposure differently. This hands-on approach beats reading about it.
Pro tip: Use center-weighted metering for portraits and spot metering for backlit subjects—these two modes alone solve 80% of exposure problems amateur photographers face.
How Metering Modes Affect Exposure
Your metering mode choice directly controls which camera settings your camera selects. When you press the shutter button halfway, your camera measures light using your selected metering mode, then calculates the shutter speed, aperture, and ISO needed for proper exposure. Change the metering mode, and you change that entire calculation.
Here’s the real impact: spot metering on a bright subject protects detail in that highlight area, sometimes leaving the rest of the frame darker. Matrix metering evaluates the whole scene and tries to balance bright and dark areas equally. Same subject, same lighting, completely different results depending on which mode you choose.
Wrong metering mode choices lead to predictable problems. Spot metering on a dark subject in a bright room overexposes the entire image. Center-weighted metering on a backlit subject underexposes your main subject because the bright background influences the meter. Understanding these pitfalls helps you avoid them.
Metering modes influence exposure in three ways:
- They determine which parts of your frame the camera prioritizes
- They guide shutter speed, aperture, and ISO calculations
- They prevent the camera from being fooled by unusual lighting situations
When you understand how exposure fundamentals work with metering, you realize the two work together. Metering reads the light, then exposure settings deliver the result. Without proper metering, even perfect exposure settings won’t save a bad meter reading.
Matrix metering works best when light distribution is relatively even. Your camera samples the entire frame and creates a balanced exposure. But if you have extreme contrast—like a sunset over a dark foreground—matrix metering splits the difference and you lose detail everywhere.
Spot metering solves extreme contrast problems by ignoring everything except your chosen focus point. You meter for the most important part of your image, then lock that exposure before composing. This approach gives you precise control but requires intentional metering technique.
The scene’s contrast ratio determines how much metering mode matters. Low-contrast scenes look similar regardless of mode. High-contrast scenes reveal huge differences between modes, making your choice critical for success.
Metering mode determines what your camera meters for—choosing correctly prevents exposure disasters before you press the shutter.
Pro tip: When shooting high-contrast scenes, spot meter on the area with the most important detail, then use exposure compensation if needed to recover shadow or highlight detail.
Choosing and Using the Right Mode
Selecting the right metering mode starts with assessing your scene. Ask yourself three questions: Is the subject centered or off to the side? Is the lighting even or does extreme contrast exist? Do you want overall exposure balance or precise control over one area?
Matrix or evaluative metering handles general situations where light distribution is reasonably even. This mode analyzes multiple zones across your frame and balances them for overall exposure. Use it for landscapes, architecture, group photos, and any scene without extreme contrast.
Center-weighted metering works when your subject sits in the frame’s center and you prioritize its exposure. Portraits, posed subjects, and centered compositions benefit from this mode. Your camera meters primarily for the center while considering the edges, preventing edge elements from throwing off your main subject’s exposure.
Spot metering gives you surgical control for high-contrast scenes. Use it when you have extreme differences between bright and dark areas, backlit subjects, or when you need to expose precisely for one small area. Meter on the most important detail, lock that exposure, then recompose.
Choosing your mode involves these decisions:
- Even lighting across frame = Matrix metering
- Subject centered, normal contrast = Center-weighted metering
- High contrast or off-center subject = Spot metering
- Bright areas need protection = Highlight-weighted metering
- Subject slightly off-center = Partial metering (if available)
Once you select your mode, use it intentionally. In auto mode, you don’t control metering directly. But in aperture priority, shutter priority, and manual modes, you choose and change your metering mode at will.
Practice switching modes with the same subject in different lighting. Shoot matrix, then center-weighted, then spot. Compare the resulting exposures. This hands-on approach builds intuition faster than memorizing rules.
Metering technique matters as much as mode choice. When using spot metering, aim at your most important detail before half-pressing the shutter. Hold that half-press to lock exposure, then recompose and shoot. This process gives you precise control.
Picking the right metering mode transforms how you control exposure—making it deliberate rather than leaving it to chance.
Pro tip: Start with matrix metering for everything, then graduate to center-weighted for portraits and spot metering for tricky lighting. Master these three and you’ll handle 95% of real-world shooting situations.
Common Metering Mistakes to Avoid
Most exposure problems stem from metering mistakes, not camera limitations. Understanding what goes wrong helps you spot problems before they ruin your shots. The good news: these mistakes are predictable and preventable.
Forgetting to meter before composing ranks as the most common error. You point your camera, compose, and shoot without checking your meter reading. By then, your subject has moved or the light has changed. Always meter first, lock exposure, then compose.
Using matrix metering for everything works until you encounter high-contrast scenes. Matrix metering compromises between bright and dark areas, leaving you with flat exposures where you lose detail in both highlights and shadows. These situations demand spot or center-weighted metering instead.
Metering on the wrong subject happens constantly with off-center compositions. You meter on a bright background while your actual subject sits in shadow. Always meter on your most important detail, not whatever happens to be in the metering area.
Ignoring extreme contrast leads to disaster. A person backlit by a window, a sunset over a dark foreground, or snow with dark trees all have extreme contrast. Matrix metering can’t handle these. Spot metering on your subject’s face solves this immediately.
These mistakes cause predictable problems:
This table summarizes the typical mistakes photographers make with metering modes and the recommended prevention strategies:
| Mistake Type | Common Scenario | Resulting Problem | Prevention Strategy |
|---|---|---|---|
| Metering after composing | Moving subjects | Missed accurate exposure | Meter first, then compose |
| Wrong metering mode chosen | High-contrast landscapes | Blown highlights or shadows | Select mode for lighting |
| Metering on background | Portraits with windows | Underexposed main subject | Meter directly on subject |
| Ignoring contrast extremes | Sunsets or snow scenes | Lost detail in key areas | Use spot metering when needed |
- Metering on bright areas = underexposed images
- Metering on dark areas = overexposed images
- Wrong metering mode for the scene = blown highlights or crushed shadows
- Not locking exposure before recomposing = exposure shifts unexpectedly
- Assuming your camera knows what matters most = exposure for the wrong thing
When shooting portraits, avoid metering on background elements like windows or walls. Meter directly on your subject’s face. The background doesn’t matter for exposure if your subject is properly exposed.
Landscape photographers often meter on the sky, then wonder why their foreground goes black. Meter on the foreground instead, or use exposure compensation to recover shadow detail. Understanding common photography mistakes helps you recognize metering errors early.
One habit prevents most metering disasters: meter, lock, compose, shoot. This sequence puts you in control instead of leaving exposure to chance. When you interrupt this sequence or skip steps, exposure problems follow.
Metering mistakes happen when you meter on the wrong thing or use the wrong mode for your scene—prevention beats fixing bad exposures later.
Pro tip: Before every shot, ask: “What part of this scene matters most for exposure?” Then meter directly on that area and lock it. This single habit eliminates 80% of metering mistakes.
Master Exposure with Confidence by Understanding Metering Modes
Struggling to get your photos perfectly exposed comes down to mastering metering modes. The challenge lies in choosing the right mode for tricky lighting situations like sunsets, backlit subjects, or snow scenes. Your camera’s meter decides where to measure light which directly impacts shutter speed, aperture, and ISO settings. Without this crucial knowledge, you risk overexposed highlights or underexposed shadows.
Unlock your potential with expert tips and practical advice at Amateur Photographer Guide. Explore our Exposure Fundamentals and learn how to pair metering modes with proper camera settings. Ready to take control? Visit Amateur Photographer Guide now and start capturing images with precise, confident exposure every time.
Frequently Asked Questions
What is metering mode in photography?
Metering mode is how your camera measures light in a scene to determine the correct exposure. It evaluates brightness across the frame, which affects whether photos are too dark, too bright, or perfectly exposed.
How do different metering modes affect exposure?
Different metering modes prioritize various areas of the frame, which impacts the camera’s calculation of shutter speed, aperture, and ISO. For instance, spot metering focuses on a small area, while matrix metering evaluates the entire scene for balanced exposure.
When should I use spot metering?
Use spot metering when dealing with high-contrast scenes or when specific details are crucial to the photo, like a backlit subject. It allows for precise exposure measurement on the most important part of the image.
What are the common metering mistakes to avoid?
Common mistakes include forgetting to meter before composing, using matrix metering in high-contrast situations, and metering on the wrong part of the scene. Always meter on your subject and lock the exposure before changing your composition.