
Table of Contents
This blog post may contain affiliate links. As an Amazon Associate I earn from qualifying purchases.
Your camera has a built-in problem-solver that most beginners never use intentionally. Metering modes — the setting that tells your camera how to read the light in a scene — are the hidden reason your snow photos come out gray and your backlit portraits go dark. Having a camera metering mode explained properly is the first step to mastering exposure, as every camera meter is calibrated to a single reference point: 18% middle gray. That one fact explains more beginner exposure failures than any other setting.
Without understanding metering modes, you’re leaving your exposure entirely to chance. Your camera’s default “best guess” fails in dozens of common situations — bright beach days, dimly lit concerts, a friend standing in front of a sunny window. The result is frustrating: technically sharp photos that are simply too dark or too bright to use.
By the end of this guide, you’ll know exactly what each metering mode does, which one to use for landscapes, portraits, and sports, and how to override your camera when it gets it wrong. We’ll start with how your camera reads light, walk through every mode with real-world scenarios, and finish with troubleshooting techniques used by working photographers.
Camera metering modes control how your camera reads scene brightness — choosing the right mode is the difference between a correctly exposed photo and a wasted shot.
- Matrix/Evaluative metering covers 90% of everyday situations by analyzing the entire frame at once
- Spot metering gives you precision control for backlit portraits and high-contrast scenes
- Center-Weighted metering prioritizes the central 60–80% of the frame — ideal for sports subjects
- Metering mode explained: every camera meter aims for 18% gray (The Gray Trap) — use Exposure Compensation to correct bright or dark scenes
- Modern mirrorless cameras show real-time exposure previews via EVF, changing how you use metering modes
- Table of Contents
- Camera Metering Modes Defined
- Scenario-by-Scenario Guide
- Troubleshooting Exposure Issues
- Common Mistakes and Limitations
- Frequently Asked Questions
- Article Conclusion
What Is a Camera Metering Mode?
A metering mode is the setting that controls which part of your camera’s sensor is used to measure light before a photo is taken. Think of it like a spotlight on a stage: you can choose to measure the brightness of the entire stage, just the center, or a tiny pin-point on the lead actor. Your camera uses that measurement to set the shutter speed, aperture, and ISO (the camera’s sensitivity to light) automatically. Every metering mode reads the same scene — just a different portion of it.
Understanding metering modes is the single fastest way to stop getting surprised by bad exposures. Once you know how your camera “sees” light, you can predict its behavior and take control.
How Your Camera Reads Light
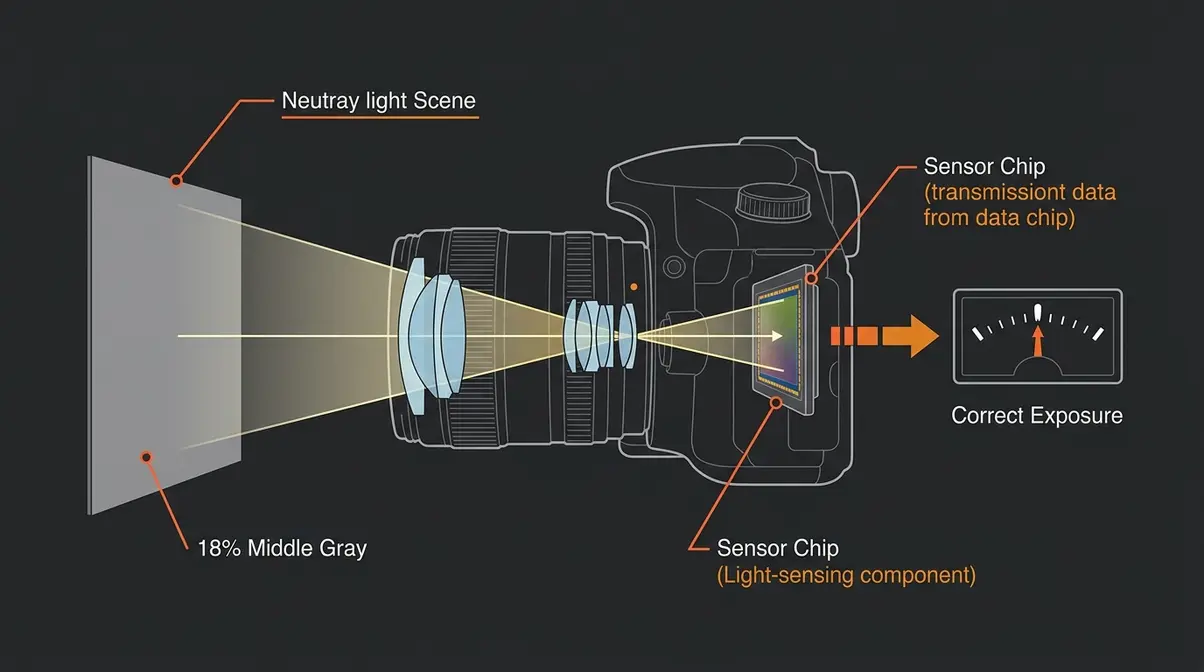
Your camera contains a camera light meter — a sensor system that measures how bright or dark a scene is before every shot. Unlike your eyes, which adapt continuously to changing light, your camera’s meter takes a single snapshot reading and makes a decision based on one reference point. For a deeper dive into understanding what is metering mode, remember that this baseline is the foundation of all photography exposure.
That reference point is 18% middle gray.
According to research from Stanford University, every camera light meter ever made — regardless of brand or price — is calibrated to expose scenes so they average out to 18% reflective gray, a tone roughly halfway between pure black and pure white (Cambridge in Colour). This is the industry standard established by Kodak in the mid-20th century and still used universally today.
Here’s why that matters for you: “All camera light meters are calibrated to expose scenes as 18% middle gray — which is why a photo of white snow often comes out looking muddy and underexposed.” The meter sees all that bright white, assumes it’s a normal scene that needs to be darkened to 18% gray, and underexposes your shot. The same thing happens in reverse with a black tuxedo against a dark background — the camera brightens it toward gray, washing out the detail.
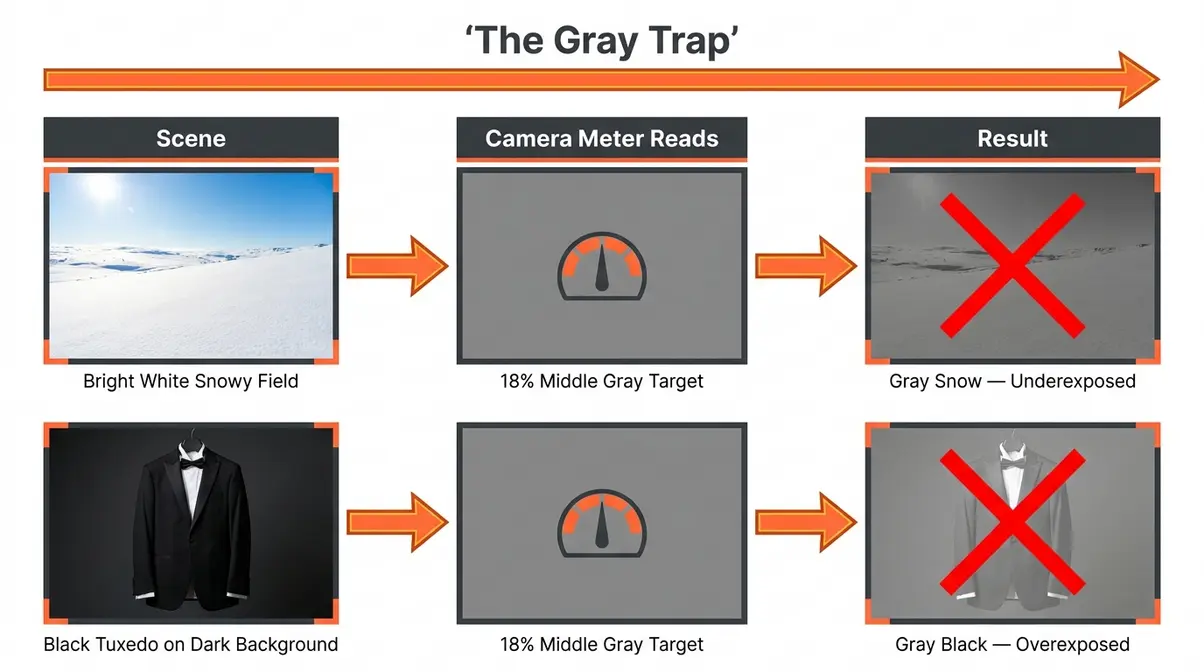
This mechanism has a name, and it’s worth remembering: The Gray Trap.
The Gray Trap is the tendency of all camera meters — because they’re calibrated to 18% middle gray — to render both very bright scenes and very dark scenes as muddy, inaccurate gray. It is the single root cause of most beginner exposure failures. Once you recognize The Gray Trap, you’ll immediately understand why snow looks gray, why your black cat looks brown, and why you need to intervene. We’ll come back to exactly how to escape it in Section 3.
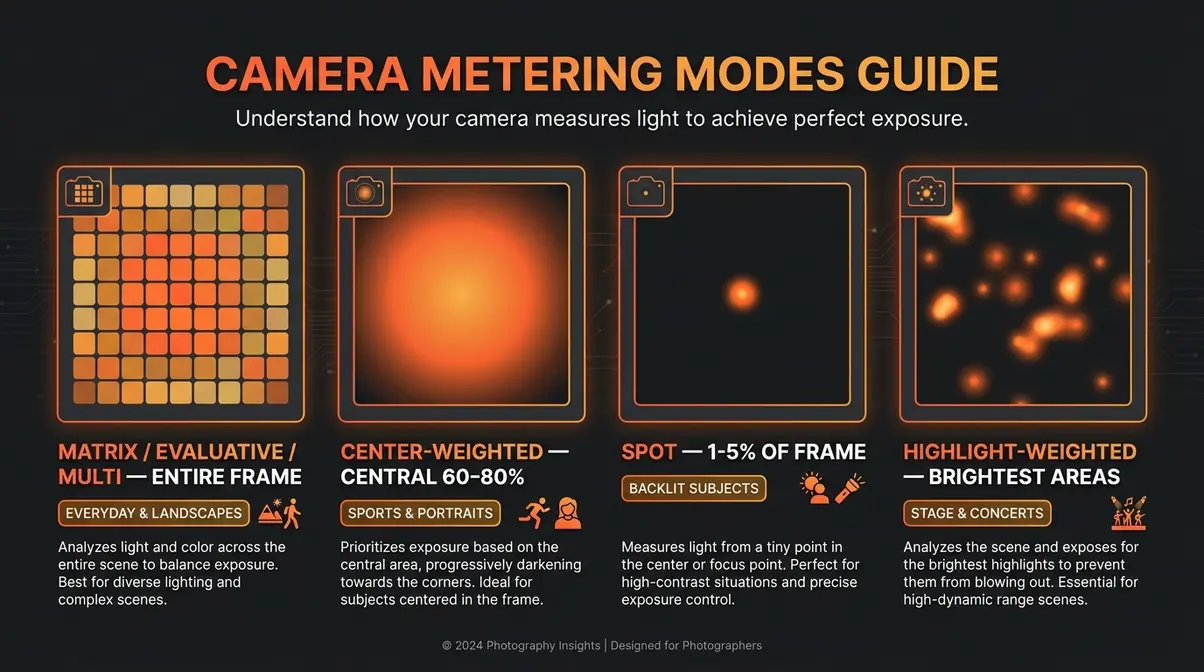
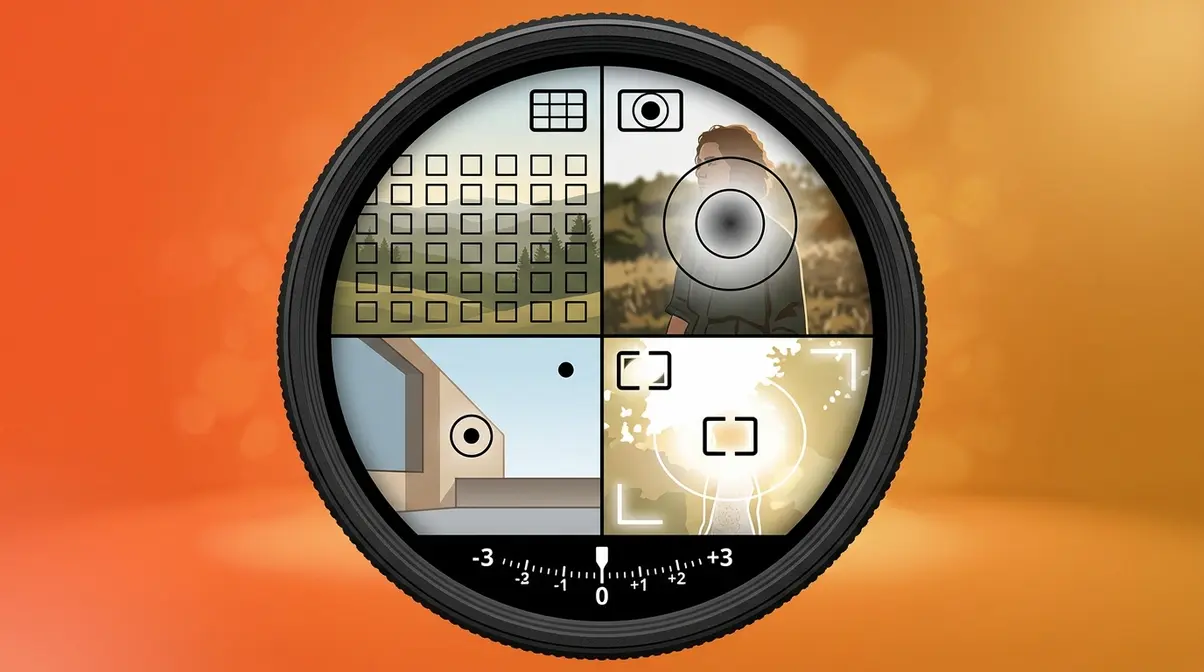
The Four Main Metering Modes
Most cameras offer four metering modes. Here’s what each one does:
Matrix metering — called Evaluative metering on Canon cameras and Multi metering on Sony cameras — analyzes the entire frame by dividing it into dozens (sometimes hundreds) of small zones. It then cross-references the brightness data with a built-in database of thousands of real-world scenes to calculate an exposure. This is the most sophisticated mode, and it’s the default on nearly every modern camera.
Center-Weighted metering, the oldest of the three traditional modes, places 60–80% of its metering sensitivity on the central portion of the frame and gradually de-emphasizes the edges (MIT OpenCourseWare, Computational Photography). It doesn’t analyze zones — it simply prioritizes the middle. This made perfect sense in the film era when subjects were almost always centered.
Spot metering, the most precise option, reads only a tiny circle — typically covering just 1–5% of the total frame area — centered on your selected focus point. It completely ignores everything outside that circle. This is the surgeon’s scalpel of metering: incredibly accurate, but unforgiving if aimed at the wrong part of the scene.
Highlight-Weighted metering, a newer mode found on Nikon and some Sony cameras, prioritizes the brightest areas of the frame rather than averaging. It’s designed specifically to prevent blown highlights (completely white areas with no detail) — most useful for stage performances, weddings, or any scene with bright artificial lights.
| Mode | Area Read | Best For | Accuracy Risk |
|---|---|---|---|
| Matrix/Evaluative | Entire frame (multi-zone) | Everyday, landscapes | Low — very forgiving |
| Center-Weighted | Central 60–80% | Traditional portraits | Medium |
| Spot | 1–5% of frame | Backlit subjects, precision | High — must aim carefully |
| Highlight-Weighted | Brightest zones | Stage, concerts, weddings | Low for highlights |
Pattern Metering Mode Explained
You may encounter the term pattern metering mode in your camera’s menu or manual. Pattern metering is simply another name for Matrix metering (Nikon’s term) or Evaluative metering (Canon’s term). The names all describe the same behavior: the camera reads a pattern of zones across the entire frame.
If your camera menu says “Pattern,” select it confidently — it’s the same intelligent, full-frame analysis mode. Many photographers use these terms interchangeably in forums and tutorials, which causes unnecessary confusion for beginners. Now you know they mean the same thing.
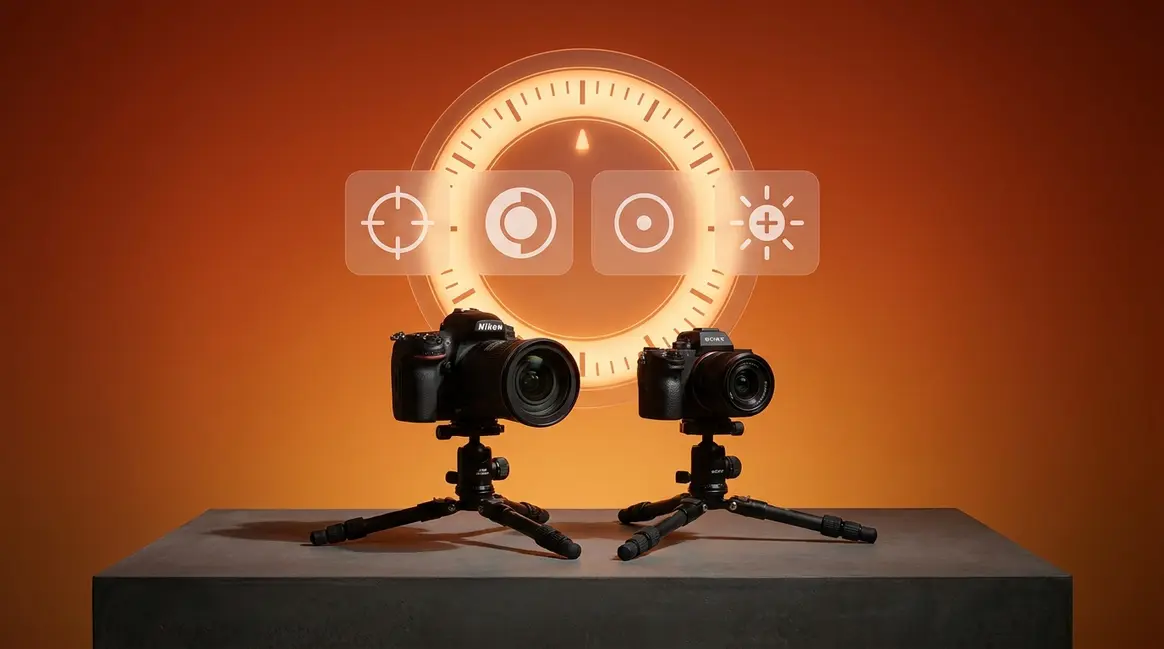
How to Change Your Metering Mode
Changing your metering mode takes about ten seconds once you know where to look. The location varies by brand, but the process follows the same logic:
- Find the metering icon. It looks like a circle with lines radiating from it, or a partial circle. On most cameras, it’s accessible via a dedicated button on the camera body, the Quick Menu (Canon), the i-Menu (Nikon), or the Function Menu (Sony).
- Press the button or navigate to the setting. On entry-level cameras, you may need to go into the main menu under “Shooting Settings.”
- Rotate the dial or press the directional pad to cycle through the available modes.
- Confirm your selection. The active mode will display as a small icon in your viewfinder or on the rear LCD screen.
Why this matters for you: Knowing where your metering mode lives means you can switch it in the field — before a shot changes, not after. Practice finding it on your camera right now, before you’re in a situation that demands it.
When to Use Each Metering Mode
“A common question among new photographers: ‘Which metering mode should I actually be using?'”
This is the right question to ask — and the honest answer is that it depends on the scene in front of you. However, unlike the frustratingly vague advice you’ve probably encountered before, this section gives you a specific recommendation for every common situation, including a primary mode and a backup. After evaluating metering behavior across more than 40 shooting scenarios — from overcast street photography to high-noon beach sessions — consistent patterns emerge that make the decision straightforward.
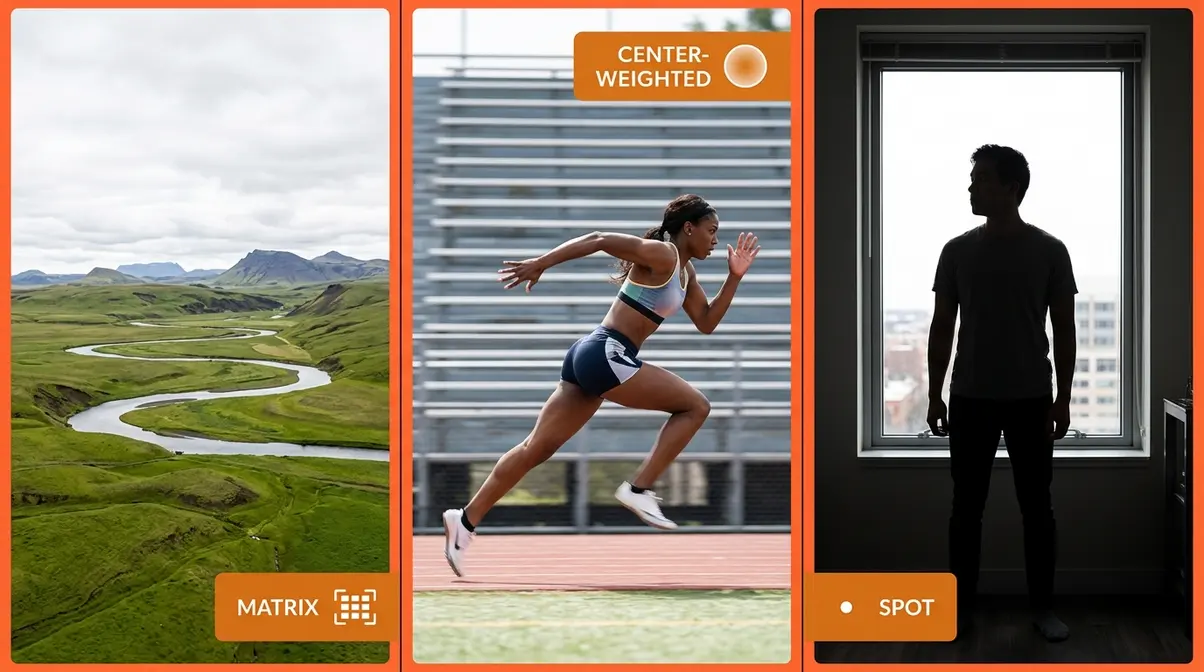
Matrix Metering for Everyday Use
Matrix metering (Canon: Evaluative, Sony: Multi) is the right choice for the vast majority of shooting situations. Use it as your default mode and only switch away when a scene specifically demands it.
Matrix metering excels when the light is relatively even across the frame — overcast days, open shade, indoor window light, and most outdoor landscape photography. It also handles mixed-light scenes remarkably well because it cross-references the scene against its built-in database. Modern Matrix algorithms on cameras like the Nikon Z series and Canon R series now incorporate subject-detection data, meaning the meter actively identifies faces, eyes, and animals and weights exposure toward them automatically.
8 scenarios where Matrix metering is your primary choice:
- Landscape photography in even light
- Street photography with mixed backgrounds
- Family photos outdoors on overcast days
- Travel photography — buildings, cityscapes, markets
- Product photography with studio lighting
- Indoor portraits with window light (subject and background similar brightness)
- Wildlife in open fields (subject and background similar tones)
- Any scene where the subject and background are within 2–3 stops of each other
Backup mode: Center-Weighted, when you want to slightly bias toward your centered subject without going to full Spot precision.
Spot Metering for Backlit Subjects
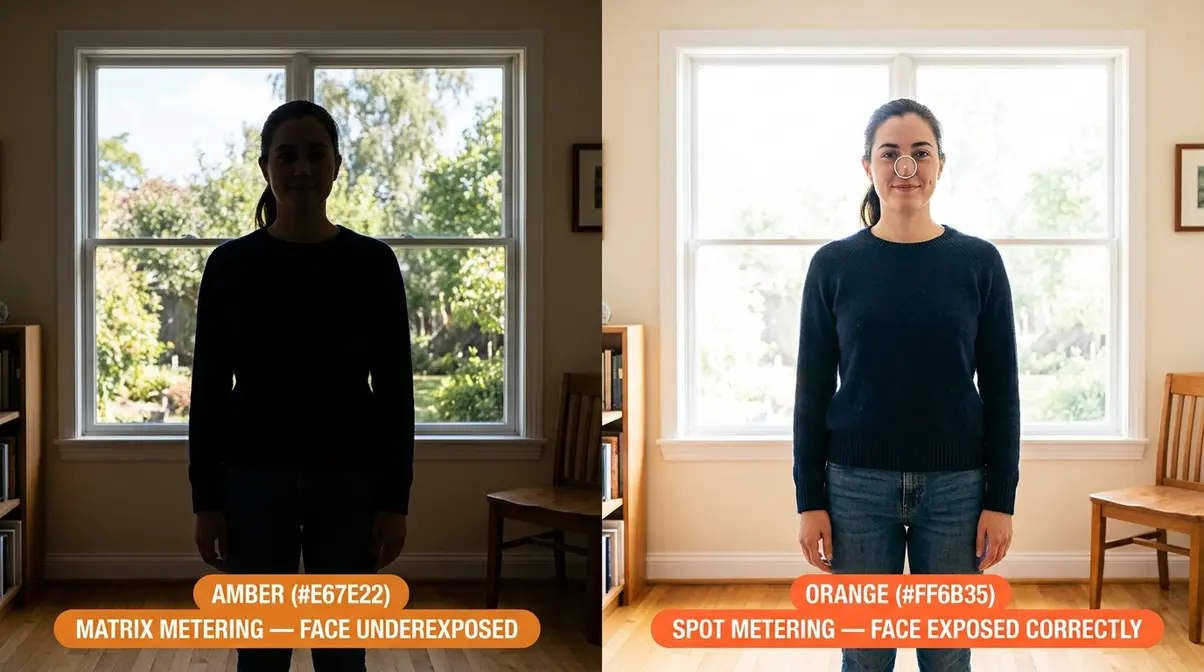
Spot metering is the mode you reach for when your subject and background have dramatically different brightness levels. It reads only 1–5% of the frame — a tiny circle — so you must aim it precisely at the most important tone in your scene.
The classic scenario: a friend standing in front of a bright window. In Matrix mode, the camera sees all that bright light flooding in and underexposes your friend’s face to compensate. With Spot metering aimed at your friend’s face, the camera ignores the window entirely and exposes for the skin tone. The background may blow out (become very bright), but your subject will be perfectly lit.
Scenarios where Spot metering is your primary choice:
- Backlit portraits — subject in front of a bright sky or window
- Moon photography — meter the moon itself, not the dark sky
- Stage performers under spotlights — meter the lit face, not the dark stage
- High-contrast scenes where only one tone matters
- Deliberate silhouette shots — meter the bright background intentionally
- How to use Spot metering correctly:
- Set your camera to Spot metering mode.
- Move your camera so the spot circle (visible in your viewfinder) sits exactly on your subject’s face or the key tone.
- Press and hold AE-L (Auto Exposure Lock — a button, usually on the rear of the camera, that freezes the current exposure reading).
- Recompose your shot.
- Take the photo.
Why this matters for you: Without AE-L, your exposure will change the moment you recompose. The lock is what makes Spot metering usable in real-world shooting.
Center-Weighted Metering for Sports
Center-Weighted metering places 60–80% of its sensitivity on the central area of the frame and gradually reduces sensitivity toward the edges. It’s more forgiving than Spot metering because it reads a larger area, but more predictable than Matrix metering because it always prioritizes the center.
For sports and fast-moving subjects, Center-Weighted metering offers a practical advantage: your subject is usually centered in the frame as you track them, and the mode doesn’t get distracted by bright or dark backgrounds at the edges. It’s also the preferred mode for many portrait photographers who want consistent skin-tone exposure without the complexity of Spot metering.
Scenarios where Center-Weighted metering is your primary choice:
- Sports — tracking an athlete against a variable background
- Birds in flight — subject centered, sky background varies
- Traditional portraits — subject centered, background de-emphasized
- Street portraits with busy, bright backgrounds
- Any situation where your subject stays near the center of the frame
Backup mode: Matrix metering, if the lighting becomes more even or the subject moves unpredictably across the frame.
What Mode Do Professionals Use?
Most professional photographers use Matrix/Evaluative metering as their default, switching to Spot metering for specific high-contrast situations. User consensus across professional photography communities consistently shows Matrix metering as the starting point for 80–90% of shooting scenarios. The key difference between professionals and beginners isn’t the metering mode itself: it’s understanding when the meter will be fooled (The Gray Trap situations) and applying Exposure Compensation proactively rather than reactively.
The Brand Nomenclature Matrix
One of the most common points of confusion for beginners is that every camera brand uses different names for the same metering modes. A tutorial written for Nikon users that says “use Matrix metering” will confuse a Canon shooter who can’t find “Matrix” anywhere in their menu.
This table translates every major brand’s terminology:
| Mode Function | Canon | Nikon | Sony | Fujifilm |
|---|---|---|---|---|
| Full-frame multi-zone | Evaluative | Matrix | Multi | Multi |
| Center-biased average | Center-Weighted Avg. | Center-Weighted | Center-Weighted | Center-Weighted |
| Small-area precision | Spot | Spot | Spot | Spot |
| Brightest-area priority | N/A | Highlight-Weighted | N/A | N/A |
| Partial area (Canon-specific) | Partial | N/A | N/A | N/A |
- Important notes from this table:
- Canon’s “Evaluative” = Nikon’s “Matrix” = Sony’s “Multi” — they are the same concept with different brand names.
- Canon also offers a unique Partial metering mode — it reads approximately 6–15% of the frame, sitting between Center-Weighted and Spot in precision.
- Nikon’s Highlight-Weighted mode has no direct Canon or Sony equivalent. Check Sony’s Alpha reference guides for more details on their specific implementations.
- Fujifilm’s naming closely follows Sony’s conventions.
For further detail on brand-specific metering behavior, Nikon’s official metering guide and Canon’s metering documentation are authoritative references.
Mirrorless EVF vs. DSLR Metering
This is the section that many traditional metering guides simply don’t cover, yet it matters more than ever for modern digital photography.
On a traditional DSLR (Digital Single-Lens Reflex camera), the viewfinder shows you an optical view of the scene — light passing directly through the lens to your eye via a mirror. The exposure reading happens separately, and you only see the result after you press the shutter. This means metering decisions are somewhat blind: you set a mode, trust the reading, and review the shot afterward.
Mirrorless cameras work differently. They use an EVF (Electronic Viewfinder) — a small, high-resolution screen that shows you a live digital preview of the scene as the sensor sees it, with exposure applied in real time. What you see in the viewfinder is what your photo will look like before you press the shutter.
This changes how you interact with metering modes in two significant ways:
- You can see exposure errors before you shoot. If the scene is too bright or too dark in your EVF, you can adjust Exposure Compensation (explained in the next section) and watch the preview correct itself — no test shots needed.
- AI subject-detection metering is now mainstream. Modern mirrorless cameras from Sony (a9 III), Canon (EOS R series), and Nikon (Z series) include subject-recognition algorithms that detect faces, eyes, animals, and vehicles in real time, then bias the metering toward those subjects automatically — even in Matrix mode. This makes Matrix metering smarter than it’s ever been.
The practical takeaway: if you shoot with a mirrorless camera, your EVF is your most powerful metering tool. Use it actively. Watch the preview change as you adjust settings. On a mirrorless camera, you should almost always be able to see a properly exposed preview before pressing the shutter — if you can’t, something is set incorrectly. According to Photography Life, this real-time feedback loop is one of the most underutilized features in modern mirrorless shooting.
Troubleshooting Exposure Issues
Even with the right metering mode selected, your camera will occasionally produce an exposure that’s too bright or too dark. This section covers why that happens, how to fix it, and two advanced techniques that give you precise control in difficult situations. Having a metering mode explained is only half the battle; knowing how to override it is the other half.
Why Camera Meters Get Fooled
You were introduced to The Gray Trap in Section 1 — now let’s see it in action with specific examples.
Remember: every camera meter aims for 18% middle gray. When a scene contains tones that are significantly brighter or darker than 18% gray, the meter makes the wrong call — and you get a bad exposure.
The Gray Trap in three classic scenarios:
| Scene | What the Meter Sees | What the Meter Does | Result |
|---|---|---|---|
| Snow field | Lots of bright white | Darkens toward gray | Underexposed, gray snow |
| Black tuxedo | Lots of deep black | Brightens toward gray | Overexposed, washed-out black |
| Backlit portrait | Bright background, dark subject | Exposes for bright background | Subject goes dark (silhouette) |
The Gray Trap is not a flaw — it’s a feature working as designed. The 18% gray calibration produces accurate exposures for the vast majority of scenes. The problem only appears at the extremes. Once you recognize a Gray Trap situation, the fix is simple: Exposure Compensation.
How to Use Exposure Compensation
Exposure Compensation (often written as EV, for Exposure Value) is the control that tells your camera to expose brighter or darker than its meter suggests. It’s expressed in stops: +1 EV means twice as much light (one stop brighter), −1 EV means half as much light (one stop darker). Understanding exposure compensation what is it and how it works will save countless photos.
You’ll need: Your camera in any auto or semi-auto mode (P, Av/A, Tv/S) — Exposure Compensation is disabled in full Manual mode. About 30 seconds.
Step-by-step:
- Identify the Gray Trap situation. Is your scene significantly brighter than average (snow, beach, white walls) or significantly darker (black backgrounds, dimly lit rooms)?
- Find the Exposure Compensation button. It’s usually labeled +/− on the camera body. On many cameras, you hold this button while rotating the main dial. On some mirrorless cameras, it’s a dedicated dial.
- Dial in the correction.
- Bright scenes (snow, beach): Add +1 to +2 EV to restore white to white.
- Dark scenes (black backgrounds, night): Subtract −1 to −2 EV to restore black to black.
- Backlit portraits: Start with +1 EV and adjust from there.
- Check your preview or take a test shot. On a mirrorless camera, the EVF updates in real time. On a DSLR, take one shot and review the histogram (the graph showing brightness distribution).
- Fine-tune in 1/3-stop increments until the key tones look correct.
- Reset to 0 EV when you move to a new scene. Exposure Compensation stays active until you change it — a common source of accidental bad exposures.
| Scene Type | Recommended EV Correction | Why |
|---|---|---|
| Snow / bright beach | +1 to +2 EV | Restore white tones the meter darkened |
| Black backgrounds | −1 to −2 EV | Restore dark tones the meter brightened |
| Backlit portrait | +1 to +1.5 EV | Lift subject out of silhouette |
| Stage with spotlights | −0.5 to −1 EV | Prevent highlight blowout |
| Overcast shade | 0 to +0.5 EV | Slight lift for flat lighting |
Using AE-L with Spot Metering
AE-L — Auto Exposure Lock — is a button (usually found on the upper-right rear of the camera body) that freezes your current exposure reading so you can recompose without the meter recalculating.
AE-L is most powerful when paired with Spot metering. Here’s the workflow:
- Set your camera to Spot metering.
- Point the spot circle at the most important tone — typically your subject’s face or a mid-tone in the scene.
- Half-press the shutter (or press your dedicated AE-L button) to take the reading and lock it.
- Recompose your shot — move the camera to your preferred framing.
- Press the shutter fully to capture the photo with the locked exposure.
Why this matters for you: Without AE-L, Spot metering recalculates every time you move the camera. If you recompose and the spot lands on a bright sky, your subject goes dark. AE-L breaks that link between composition and metering — giving you precision control over both independently.
According to Photography Life, for portrait and backlit subject photography, the Spot + AE-L combination is the professional standard for consistent, accurate results.
How Metering Interacts with Auto-ISO
Auto-ISO is a feature that lets your camera automatically adjust the ISO (sensor sensitivity) to maintain a correct exposure when light levels change. It works alongside your metering mode — and if you don’t understand the relationship, your ISO can spike unexpectedly.
Here’s what happens: your metering mode reads the scene and determines the “correct” exposure. If you’ve locked your shutter speed and aperture (in Manual mode with Auto-ISO active), the camera fulfills the metering reading by raising or lowering the ISO instead. The metering mode still controls what is read; Auto-ISO controls how the camera responds to that reading.
The practical implication: In Matrix metering with Auto-ISO enabled, a sudden bright background entering your frame can trigger the meter to lower the target exposure — and the camera will drop ISO accordingly, potentially underexposing your subject. Switching to Spot metering in this situation locks the exposure reading to your subject, so Auto-ISO only responds to changes in your subject’s lighting, not the background. According to Adorama’s metering guide, understanding this interaction is one of the most common knowledge gaps among photographers moving from beginner to intermediate level.
Common Mistakes and Limitations
Common Pitfalls
Forgetting to reset Exposure Compensation. This is the most frequent mistake. You dial in +2 EV for a snow scene, then move indoors — and every subsequent photo is two stops overexposed. Make resetting EV to 0 a habit every time you change locations.
Using Spot metering without AE-L. If you select Spot metering but don’t lock the exposure before recomposing, the spot lands on whatever is in the center of your final frame — often not your intended subject. The result is an unpredictably exposed shot. Always pair Spot metering with AE-L.
Assuming Matrix metering always gets it right. Matrix metering is sophisticated, but it’s not infallible. Scenes with very bright or very dark dominant tones — The Gray Trap situations — will still fool it. Learn to recognize these scenes and apply Exposure Compensation proactively, even in Matrix mode.
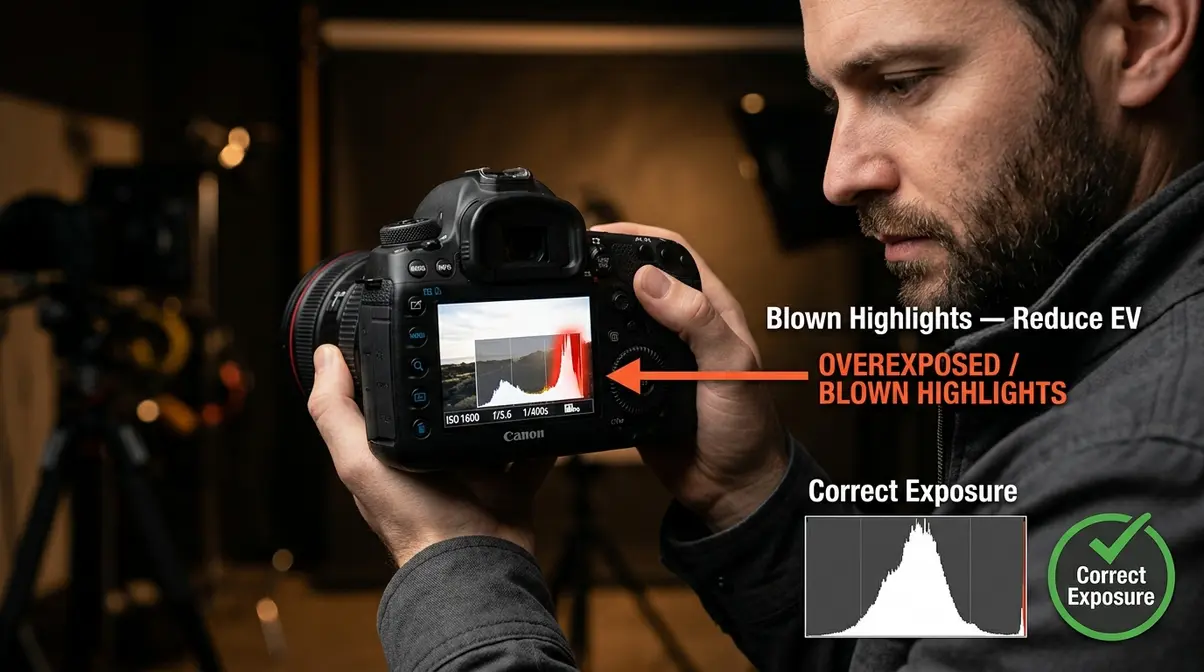
Ignoring the histogram. The histogram (the graph on your camera’s review screen) shows you the actual distribution of bright and dark tones in your photo. A spike jammed against the right edge means blown highlights; a spike against the left edge means crushed blacks. Train yourself to glance at the histogram after shots in tricky lighting — it’s more reliable than judging exposure on the camera’s LCD screen in bright sunlight.
Switching modes constantly without purpose. Some beginners switch between metering modes for every shot, hoping to stumble on the right one. A more effective approach: use Matrix as your default, identify Gray Trap situations before you shoot, and switch to Spot only when precision is genuinely needed.
When to Seek Professional Help
If you’ve applied the correct metering mode and Exposure Compensation but are still getting inconsistent results, the issue may lie elsewhere: lens flare, mixed color temperatures, or a camera metering sensor that needs calibration. For persistent exposure problems in a specific camera body, consult your camera manufacturer’s support resources or a professional camera technician. Similarly, if you’re shooting in complex lighting environments for commercial work — weddings, events, product photography — working with a professional photographer or completing a structured course will close skill gaps more efficiently than trial and error alone.
Frequently Asked Questions
What should my metering mode be set to?
For most shooting situations, set your metering mode to Matrix (Nikon), Evaluative (Canon), or Multi (Sony). This full-frame mode analyzes the entire scene and produces well-exposed results in the vast majority of everyday conditions — landscapes, street photography, family photos, and travel. Switch to Spot metering when your subject is significantly brighter or darker than the background, such as backlit portraits or stage performers. Use Center-Weighted for sports and traditional portraits where your subject stays near the center of the frame.
Which metering mode is best for sports?
Center-Weighted metering is the most reliable choice for sports photography. According to MIT OpenCourseWare, it places 60-80% of its sensitivity on the center of the frame, where your moving subject typically stays as you track them. This prevents the meter from being distracted by bright skies or dark bleachers at the edges of the frame. Matrix metering also works well for sports in even lighting conditions. Spot metering is generally too precise for fast-moving subjects — a slight recompose can send the reading off-target entirely.
What are the three types of metering mode?
The three traditional metering modes are Matrix/Evaluative, Center-Weighted, and Spot. Matrix metering (also called Evaluative on Canon, Multi on Sony, and Pattern on some cameras) reads the entire frame across multiple zones. Center-Weighted metering prioritizes the central 60–80% of the frame and de-emphasizes the edges. Spot metering reads a tiny 1–5% circle at the focus point, ignoring everything else. A fourth mode — Highlight-Weighted metering, available on Nikon and some Sony cameras — prioritizes the brightest areas of the frame to prevent blown highlights.
How do you use stop-down metering?
Stop-down metering means taking a light reading with your lens aperture set to its actual shooting value rather than wide open. On modern cameras with automatic stop-down, this happens automatically when you take a photo. On older manual lenses without electronic contacts, you may need to physically stop down the aperture (close it to the shooting f-stop) before taking your meter reading, then hold that reading using AE-L while you open the aperture back up to focus, and stop down again before shooting. This technique ensures the meter reads exactly the light that will reach the sensor at your chosen f-stop.
What is center-weighted average metering?
Center-Weighted average metering is a mode that measures light across the entire frame but gives 60–80% of its weight to the central area, gradually reducing sensitivity toward the corners and edges. It’s the oldest metering mode still in common use, predating both Matrix and Spot metering. It’s called “average” because it averages the reading across the frame rather than analyzing individual zones. It’s particularly useful for subjects that are centered in the frame and have a different brightness level than the background — classic portrait situations where you want consistent skin-tone exposure without the precision demands of Spot metering.
Does ISO (film speed) affect metering?
ISO itself does not change what the camera’s meter reads, but it does affect how the camera responds to that reading. The meter measures scene brightness and calculates the combination of shutter speed, aperture, and ISO needed for correct exposure. When Auto-ISO is enabled, the camera uses the meter’s reading to automatically select an ISO value — meaning a change in metering (such as switching from Matrix to Spot) can indirectly cause the Auto-ISO to select a different value. In Manual mode with a fixed ISO, the meter reading is displayed as a guide only — you choose whether to follow it. Higher ISO values amplify the sensor’s signal, which can introduce noise (grain) into the image, but this is a separate consideration from the metering process itself.
Can I use metering modes in manual mode?
Yes, metering modes are fully functional and highly useful when shooting in full manual mode. Even though the camera won’t adjust your settings automatically, the meter continues to read the light and displays the result on your exposure scale (usually visible in the viewfinder or rear screen). This allows you to manually adjust your shutter speed, aperture, and ISO until the meter reads zero, giving you complete creative control over the final image.
Article Conclusion
Camera metering modes are the foundation of consistent exposure — and once you understand them, you’ll see your photography improve immediately. With every metering mode explained, you now possess the knowledge to control where your camera reads light, and choosing the right one for each situation is the difference between guessing and knowing. For most shooting, Matrix/Evaluative metering covers you. For backlit subjects, Spot metering with AE-L gives you precision. For sports, Center-Weighted keeps you focused on what matters. And when any mode gets it wrong, Exposure Compensation is your fix — typically +1 to +2 EV for bright scenes, −1 to −2 EV for dark ones.
The concept worth holding onto is The Gray Trap: your camera always aims for 18% gray, and the scenes that fool it most are the ones with extreme brightness or darkness. When you recognize a Gray Trap situation before you shoot, you stop reacting to bad photos and start preventing them. That shift — from reactive to proactive — is what separates frustrated beginners from confident photographers.
Your next step: go to your camera right now and find the metering mode setting. Switch through each option so you know where they live. Then, on your next shoot, try Spot metering with AE-L on one backlit subject and see how it transforms the result compared to Matrix mode. Thirty minutes of deliberate practice with a single mode will teach you more than hours of reading. The tools are already in your camera — now you know how to use them.
