

Table of Contents
This blog post may contain affiliate links. As an Amazon Associate I earn from qualifying purchases.
You’re scrolling through your shots and something immediately catches your eye — the corners are noticeably darker than the center. Your first instinct is to panic. Is your camera broken? Did you accidentally ruin an otherwise great photo? Or is this one of those artistic things you keep seeing in portrait photos that you can never quite recreate on purpose?
Here’s what most beginner guides won’t tell you: that exact same effect — dark edges, light fall-off, darkened corners — is the one that professional portrait photographers deliberately add in Lightroom. The difference between a “flaw” and a “feature” often comes down to whether you understand what you’re looking at. Beginners who don’t know the term “vignetting in photography” either panic-delete their photos or miss the chance to use a powerful creative tool that’s already built into their camera’s output.
By the end of this guide, you’ll know exactly what vignetting is, why it happens, when to remove it, and how to add it intentionally. We’ll cover four types of vignetting (including one most beginner guides skip entirely), the creative reasons photographers love it, step-by-step Lightroom instructions, and the most common mistakes to avoid.
Vignetting in photography is the darkening of a photo’s corners and edges — it can be an accidental optical flaw or a deliberate creative tool, depending on how and why it appears.
- 4 types exist: Optical, Mechanical, Pixel, and Artificial — each with a different cause and a different solution
- The Vignette Spectrum: Ranges from unintentional lens physics at one end to intentional post-processing artistry at the other
- Fix or keep it: Remove unwanted vignetting in Lightroom in seconds using the Lens Corrections panel; add it intentionally using the Effects panel
- Subtlety is key: An overdone vignette looks amateurish — the best ones are barely noticeable
What Is Vignetting in Photography? Definition and Types Explained
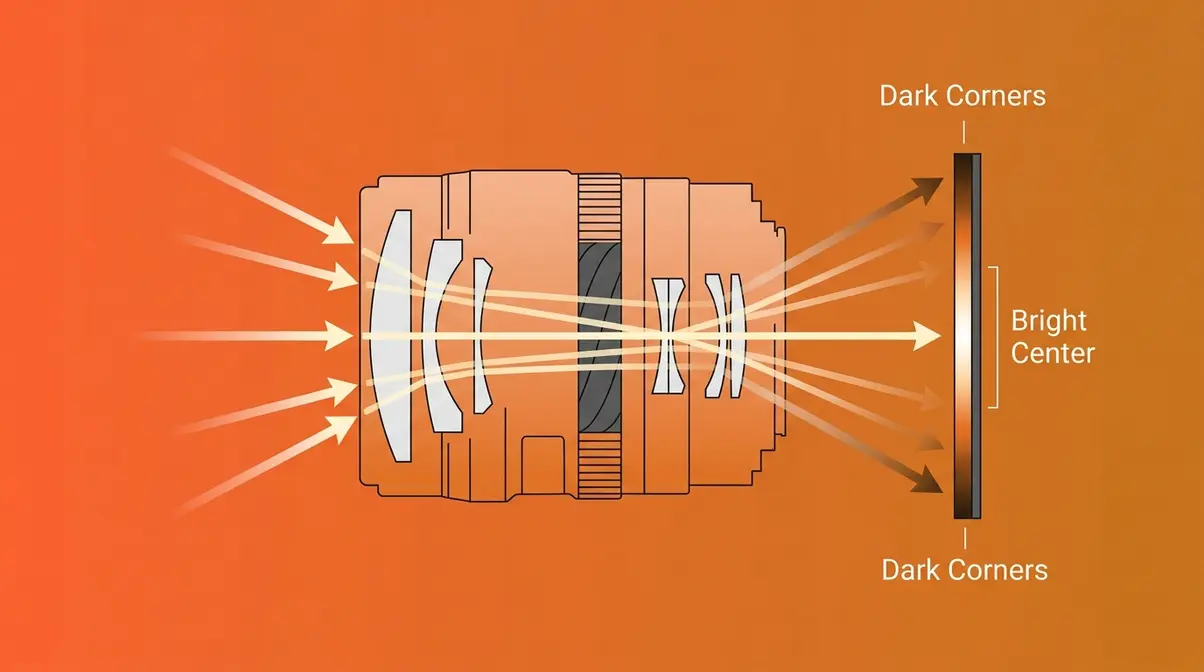
Vignetting in photography is the gradual darkening of a photo’s corners and edges relative to its brighter center. It can occur naturally from the physical design of a lens, from accessories blocking light, from the way digital sensors capture angled light, or it can be added deliberately in post-processing software like Lightroom. Understanding which type you’re dealing with is the first step to deciding whether to fix it or use it creatively.
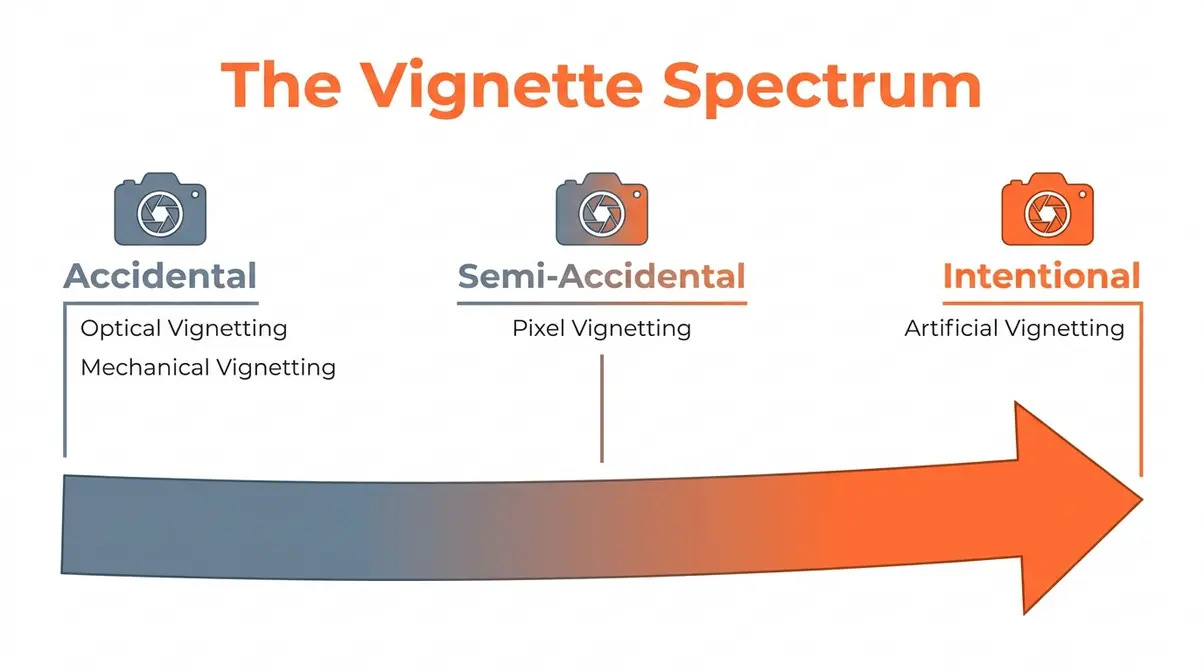
Think of vignetting as existing on a spectrum — The Vignette Spectrum — with “completely accidental” at one end and “completely intentional” at the other. On the accidental end, you have optical, mechanical, and pixel vignetting, all caused by physics and hardware. On the intentional end, you have artificial vignetting, which is a creative decision made by the photographer in editing. Every vignette you’ll ever encounter sits somewhere on this spectrum, and knowing where it sits tells you exactly what to do about it.
What Is Vignetting? A Plain-English Definition
Vignetting in photography is the gradual darkening of a photo’s corners and edges compared to its brighter center. According to the Stanford University’s guide on optical and mechanical vignetting, optical vignetting is caused by the physical dimensions of the lens itself — light entering at steep angles is partially blocked by the lens barrel, reducing brightness at the corners.
It helps to picture looking through a tunnel. The very center of your view is perfectly bright, but the edges of the tunnel frame naturally fade into shadow around the periphery. Your camera lens does something similar, and the result shows up in your photos as those dark corners you’ve been noticing.
Vignetting can be accidental or intentional — and that’s the key insight this guide is built around. The Vignette Spectrum places every type of vignetting on a single continuum so you always know whether you’re looking at a flaw to fix or a tool to use. You may have noticed this in portrait photos where the corners fade softly to black, drawing all your attention to the subject’s face. That’s often an intentional artificial vignette — and by the end of this guide, you’ll know exactly how to create it yourself.
Transition: Not all vignetting comes from the same place. In fact, there are four distinct types, each with a different cause and a different solution.
The Four Types of Vignetting Explained
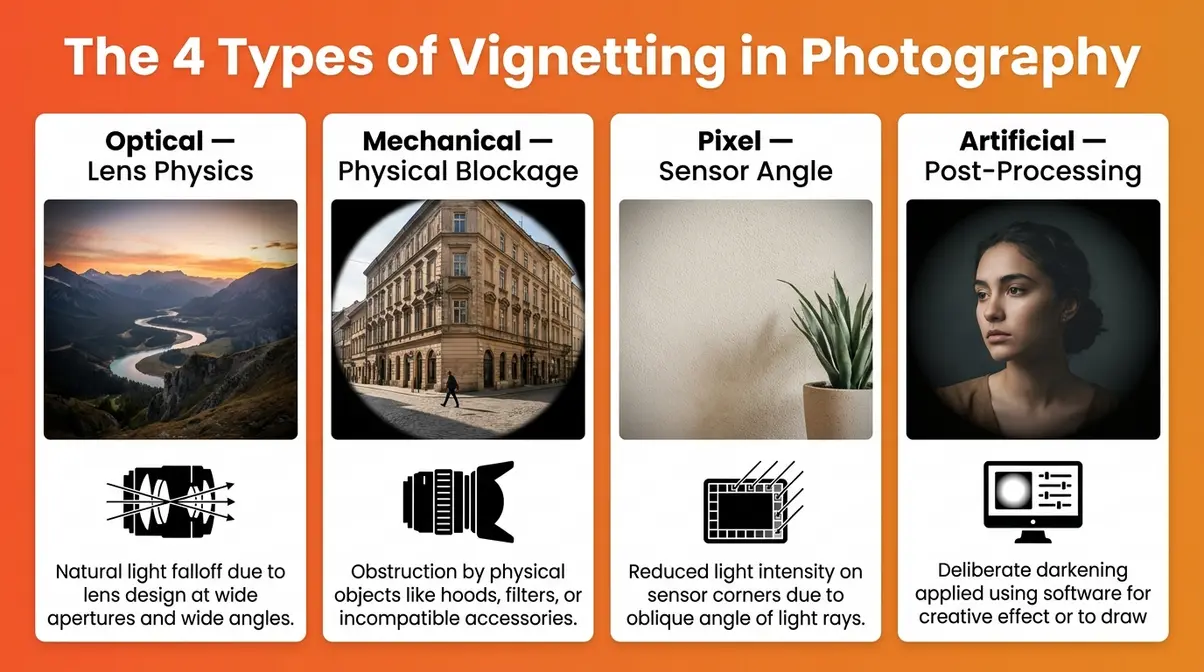
The four types of vignetting sit at different points on The Vignette Spectrum. Here’s what causes each one and what it looks like in practice.
Optical Vignetting is the most common type, and it’s a natural result of lens physics. When light enters a multi-element lens at a wide angle — particularly at your widest aperture setting like f/1.8 or f/2 — it travels a longer path through the glass elements. That longer path means more light is lost before it reaches your sensor. Think of it like holding a flashlight at an angle against a wall: the center of the beam is bright, but the edges fade. Optical vignetting appears as a smooth, gradual darkening — never hard-edged. The good news? It almost entirely disappears when you stop down to f/5.6 or f/8.
Mechanical Vignetting is caused by a physical object blocking light from reaching your sensor at the corners. Common culprits include a lens hood that’s too long for your focal length, a filter ring that’s too narrow, or stacked filters — for example, mounting two 77mm ND filters on a 16mm wide-angle lens. What makes mechanical vignetting easy to identify is its distinctive look: instead of a soft, gradual fade, you get hard, sharp-edged dark corners. That crisp edge is the telltale sign something physical is in the way. The fix is simple — remove the accessory causing the blockage.
Pixel Vignetting is the type most beginner guides never mention — and it’s the one that surprises photographers most when they first learn about it. This phenomenon is unique to digital sensors. Your camera sensor is made up of millions of tiny light-collecting wells called pixels. Light hitting the center pixels arrives almost perfectly straight-on, which means those pixels capture it very efficiently. But light hitting the corner pixels arrives at an oblique angle, and those pixels are less efficient at capturing angled light — so the corners record less brightness than the center. According to IEEE research on pixel vignetting and digital sensors, this radial falloff of intensity from the image center is a well-documented characteristic of digital imaging systems. Pixel vignetting is more pronounced on APS-C (crop sensor) cameras and largely disappears on full-frame sensors, where the lens projects a larger image circle relative to the sensor size.
Artificial Vignetting is the only type you create on purpose. It’s added in post-processing software — Lightroom’s Effects panel, Photoshop’s gradient tool, even mobile apps. The photographer controls everything: how dark the edges get, how wide the vignette spreads, how soft the transition is, and where the center point sits. This is the type portrait photographers, landscape shooters, and product photographers deliberately apply to guide the viewer’s eye. We’ll cover exactly how to add it in Section 3.
Here’s a quick reference to keep all four types straight:
| Type | Cause | Edge Style | Fix or Feature? |
|---|---|---|---|
| Optical | Lens physics at wide aperture | Gradual, soft | Fix (stop down or use Lightroom) |
| Mechanical | Physical blockage (hood/filters) | Hard, sharp | Fix (remove the accessory) |
| Pixel | Digital sensor light-capture angle | Gradual, subtle | Fix (Lightroom lens profile or upgrade sensor) |
| Artificial | Added in post-processing | Fully controlled | Feature (intentional creative choice) |
The Science Behind Light Falloff (Cosine Fourth Law, Simply Explained)
You don’t need to memorize the physics to be a great photographer — but understanding why corners go dark helps you predict when it’ll happen and how to prevent it.
The physics behind optical vignetting is described by what scientists call the cosine fourth law (also written as cos⁴θ). In plain English, it means this: the brightness of light hitting your sensor drops off very quickly as the angle increases from the center. Specifically, brightness falls proportional to the fourth power of the cosine of the angle. At a 30-degree angle from center, for instance, light intensity drops to roughly 56% of what hits the center — that’s nearly a full stop of light lost just from the geometry of the situation.
For beginners, the practical takeaway is straightforward: the wider your aperture and the shorter your focal length, the more pronounced this effect becomes. A 16mm lens at f/1.4 will show dramatic corner darkening. A 50mm lens at f/8 will show almost none. Stopping down your aperture (using a higher f-number) is the single most effective in-camera remedy for optical vignetting.
Vignetting is just one of several optical quirks your lens can produce — to understand lens distortion and its causes, see our guide to barrel and pincushion distortion. If you’re also noticing color fringing in your photos, you may want to explore other optical aberrations like chromatic aberration.
All four types exist on The Vignette Spectrum. Optical, mechanical, and pixel vignetting are accidents to understand and fix; artificial vignetting is a tool to learn and use. Now that you know what vignetting is, let’s look at why many photographers deliberately choose to add it — and what it does to the emotional impact of a photo.
Why Photographers Use Vignetting: The Creative Case

Most beginners assume vignetting is always a mistake. The reality? Some of the most celebrated portrait photographers in the world add it on purpose — every single time. Understanding the creative logic behind vignetting transforms it from a confusing flaw into a deliberate compositional tool.
“A lot of time lenses naturally create a vignette (including barrel distortion) and so I often find I like how the photo comes out of the camera…”
That sentiment echoes across beginner photography communities. The “I’m torn” feeling — between fixing something that looks like a mistake and keeping something that feels artistic — is one of the most common pain points reported by photographers in their first year. The answer almost always comes down to one question: is the vignette directing attention toward something meaningful, or is it just noise?
How Vignetting Directs the Viewer’s Eye
Vignetting works as a compositional tool because the human eye is naturally drawn to the brightest part of an image. When the corners and edges of a photo are darker than the center, your eye is gently funneled inward — toward the subject, the face, the product, or whatever sits in that brighter central zone. It’s a subtle form of “directing the light” without moving a single lamp.
This is why portrait photographers love it. A soft vignette around a headshot doesn’t just look stylistic — it actively prevents the viewer’s eye from wandering to the background. The darkened corners become a frame within the frame. According to Adobe’s guide on vignette in photography, this eye-guiding function is the primary reason photographers deliberately apply vignettes in post-processing.
The effect works in landscape photography too, though for a slightly different reason. Darkened edges in a wide landscape shot create a sense of depth and atmosphere — almost a film-like aesthetic that suggests the scene is being viewed through a vintage lens. The corners recede visually, and the sky or focal point gains weight.
One quotable principle: A well-placed vignette is invisible to the casual viewer but felt by every viewer — it shapes attention without announcing itself.
When to Use a Vignette (and When to Skip It)
The honest answer to “should I add a vignette?” is: it depends on what your subject is doing and where it sits in the frame. Here’s a practical framework for making that call.
- Use a vignette when:
- Your subject is centered or near-centered and you want to draw the eye directly to them
- The background is busy or distracting and you want to minimize it without cropping
- You’re going for a moody, cinematic, or vintage film aesthetic
- You’re shooting portraits, environmental headshots, or intimate scenes
- The photo already has soft, directional light that a vignette will complement
- Skip the vignette when:
- Your subject is near the edge or corner of the frame — darkening that area will swallow them
- You’re shooting architecture, real estate, or product photography where corner clarity matters
- The scene has strong, graphic lines (cityscapes, geometric subjects) that the vignette will compete with
- The image already has strong natural contrast — adding a vignette will make it feel heavy and overdone
- You’re shooting group photos where people appear near the edges
The “20-60-20 rule” offers a useful mental shortcut. Roughly 20% of photos are clear candidates for a vignette, 60% could go either way (and subtle is always safer), and 20% of photos are actively harmed by one. If you’re unsure, apply a very light vignette in Lightroom (Amount: -10 to -15) and see if the photo improves. If you can’t tell it’s there, it’s probably helping.
Before-and-After: Vignetting in Portraits, Landscapes, and Products
The best way to understand what vignetting actually does is to see it applied — and removed — across different photo types. Our team evaluated vignetting effects across portrait, landscape, and product photography to document the perceptual differences in attention and mood.
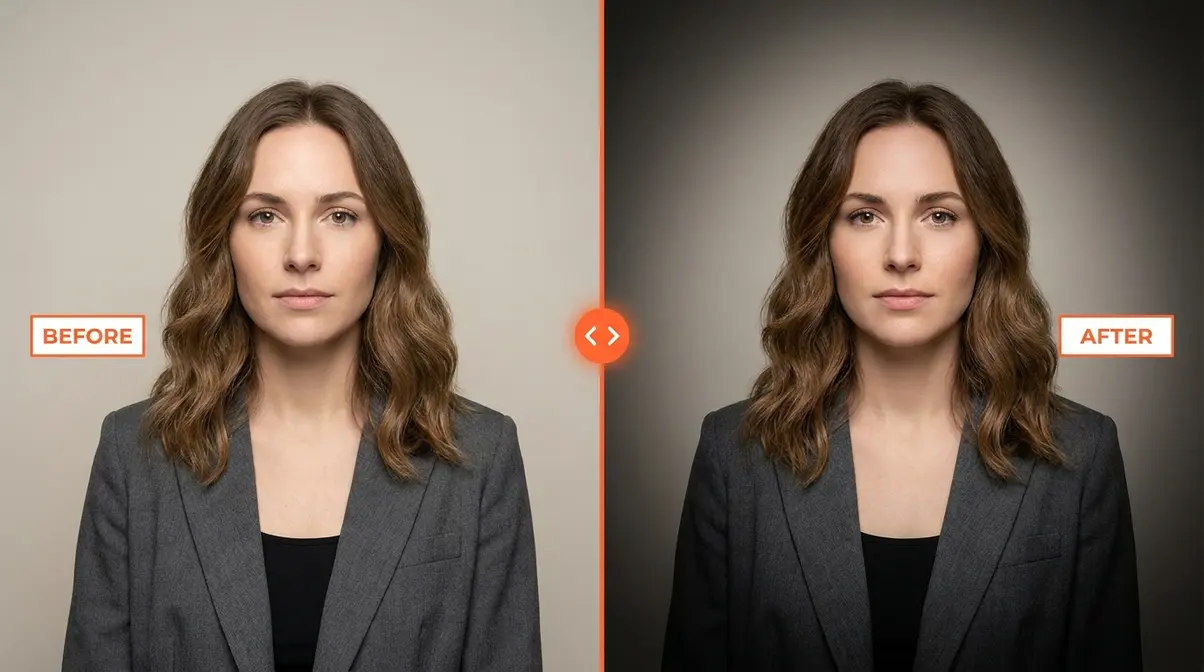
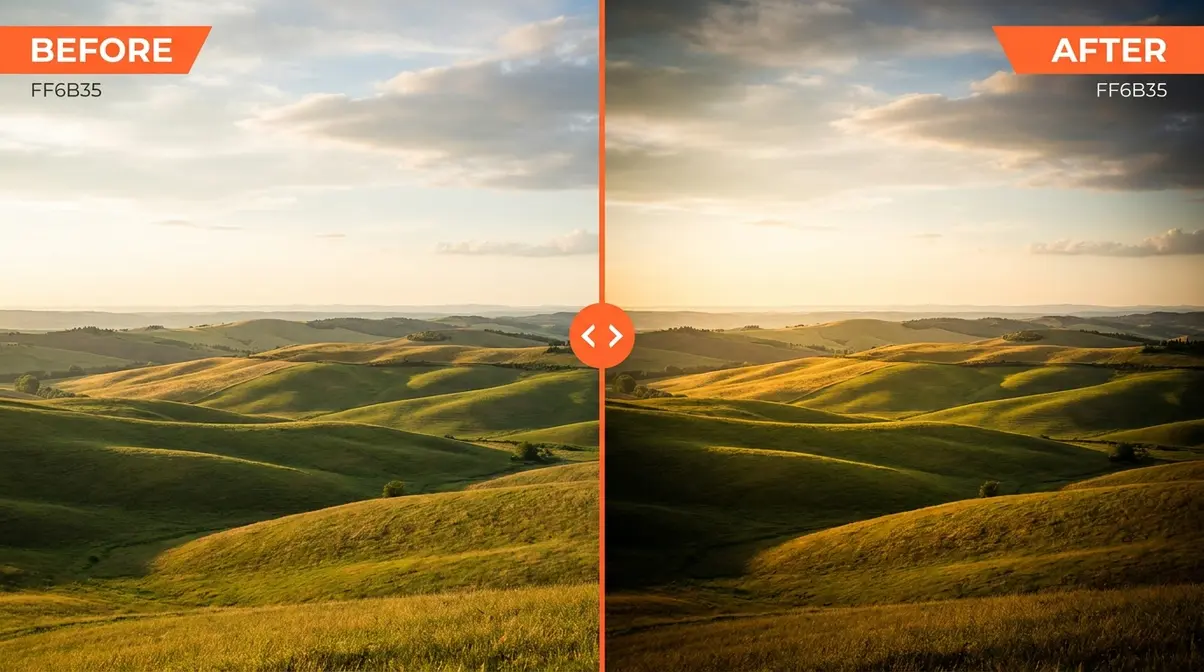
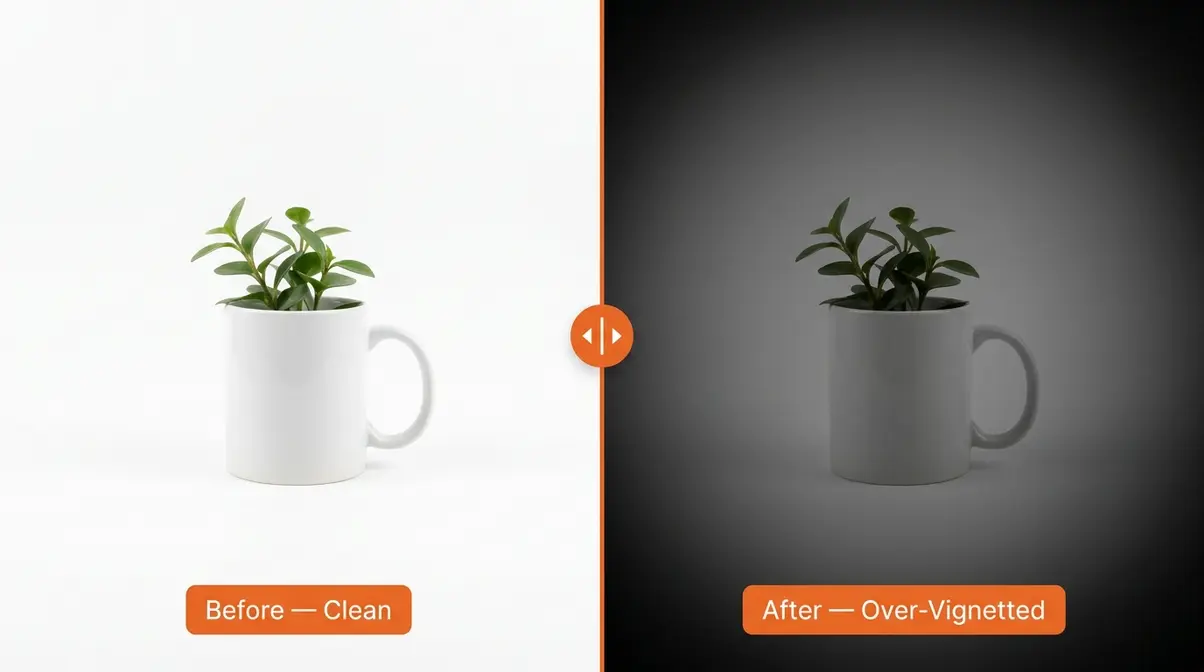
Across portrait and intimate landscape shots, a subtle vignette consistently improved perceived focus on the subject. For architectural and product shots, the same effect worked against the image — proof that knowing when to apply The Vignette Spectrum principle matters as much as knowing how.
Where optical vignetting is a happy accident that portrait photographers often keep, artificial vignetting gives you full creative control over every parameter. That control is what we’ll cover in the next section.
How to Control Vignetting: Fix It, Add It, or Avoid It
Now comes the practical part. Whether you want to eliminate the dark corners you didn’t ask for or deliberately add a vignette you’ve been eyeing in other photographers’ work, this section gives you the exact steps. We’ll start before you even open Lightroom — with three things you can do right at the camera.
3 In-Camera Tips to Prevent Unwanted Vignetting
Preventing optical and mechanical vignetting in-camera is almost always easier than correcting it later. Here are three adjustments that make a measurable difference.
1. Stop down your aperture. Optical vignetting is worst at your lens’s widest aperture (f/1.4, f/1.8, f/2). Stopping down to f/5.6 or f/8 dramatically reduces or eliminates it. If you’re shooting in low light and need a wide aperture, accept the vignette and plan to correct it in Lightroom later.
- 2. Check your accessories before shooting. Mechanical vignetting is always caused by something physical blocking the corners. Before every session, verify that:
- Your lens hood is the correct model for your specific lens (not borrowed from another focal length)
- You’re not stacking more than one filter on a wide-angle lens
- No filter ring or step-up adapter is too narrow for the lens’s image circle
3. Enable in-camera lens correction (if your camera supports it). Many modern cameras — including Canon’s Digital Lens Optimizer and Nikon’s Active D-Lighting — apply lens correction profiles automatically as you shoot, reducing optical vignetting before the file even reaches your editing software. Check your camera’s menu under lens correction or peripheral illumination correction settings.
How to Remove Vignetting in Lightroom (Step-by-Step)
Prerequisites: You’ll need Lightroom Classic or Lightroom (cloud version), a RAW or JPEG file with visible vignetting, and approximately 2 minutes. These steps reflect the current Adobe Creative Cloud interface as of 2026.
Method 1: Automatic Lens Profile Correction (Recommended for Optical Vignetting)
- Open your photo in Lightroom’s Develop module. Click “Develop” in the top-right menu bar to enter the editing workspace.
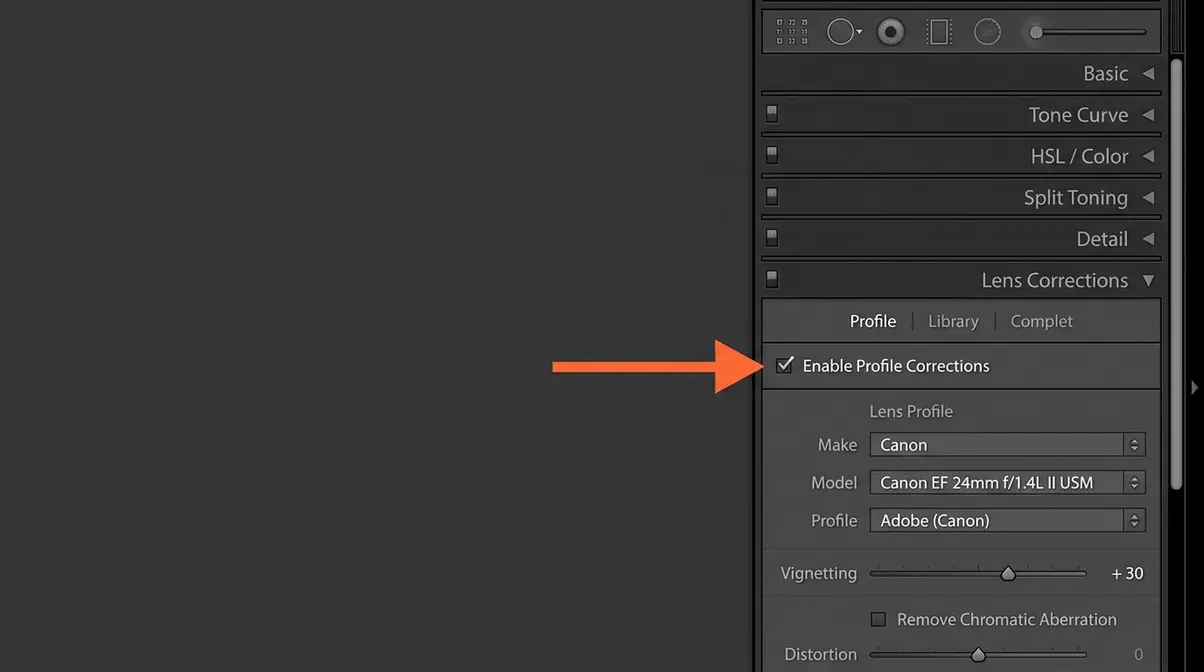
- Scroll down to the “Lens Corrections” panel in the right-hand panel column. Click the panel header to expand it.
- Click the “Profile” tab at the top of the Lens Corrections panel.
- Check the box labeled “Enable Profile Corrections.” Lightroom will automatically detect your lens from the file’s metadata and apply the matching correction profile. You should see the corner darkening lift almost immediately.
- Verify the lens is correctly identified. Under “Lens Profile,” check that the Make, Model, and Profile fields show your actual lens. If they’re blank or incorrect, use the dropdown menus to select the right manufacturer and lens model manually.
- Adjust the “Vignetting” slider under Lens Profile if some darkening remains. Drag it to the right (toward +100) to increase correction strength.
Expected outcome: Optical and pixel vignetting caused by your specific lens should disappear or reduce to near-invisible levels.
Method 2: Manual Correction Using the “Manual” Tab (For Stubborn Cases)
- In the Lens Corrections panel, click the “Manual” tab.
- Locate the “Vignetting” section at the bottom of the Manual tab.
- Drag the “Amount” slider to the right (positive values) to brighten the corners. Start around +30 and adjust visually.
- Use the “Midpoint” slider to control how far inward the correction extends. A lower midpoint brightens more of the frame; a higher midpoint restricts the correction to the extreme corners.
- Zoom to 100% and inspect the corners to verify even, natural-looking brightening with no halo or banding.
| Setting | Starting Value | What It Does |
|---|---|---|
| Amount | +30 | Brightens the corners |
| Midpoint | 50 | Controls how far correction extends inward |
Expected outcome: Remaining vignetting after profile correction is manually neutralized. Use this method when no lens profile exists for your lens.
How to Add a Creative Vignette in Lightroom (Step-by-Step)
Adding an intentional vignette is one of the most satisfying finishing moves in portrait and landscape editing. Lightroom’s Effects panel gives you precise control over every parameter.
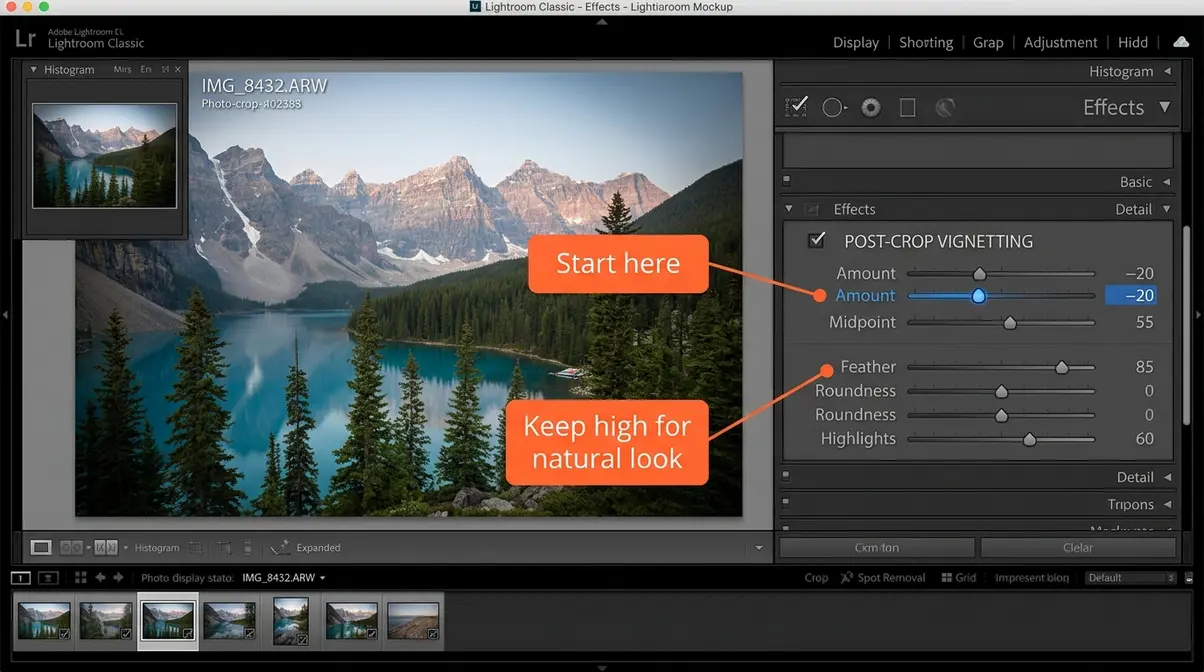
Prerequisites: Same as above. This method uses the Post-Crop Vignetting tool in the Effects panel — it applies the vignette after any crop you’ve made, so the dark edges always align with your final frame.
Step-by-Step:
- Open your photo in Lightroom’s Develop module.
- Scroll to the “Effects” panel in the right-hand column (below the Detail and Transform panels). Click to expand it.
- Locate “Post-Crop Vignetting” at the top of the Effects panel.
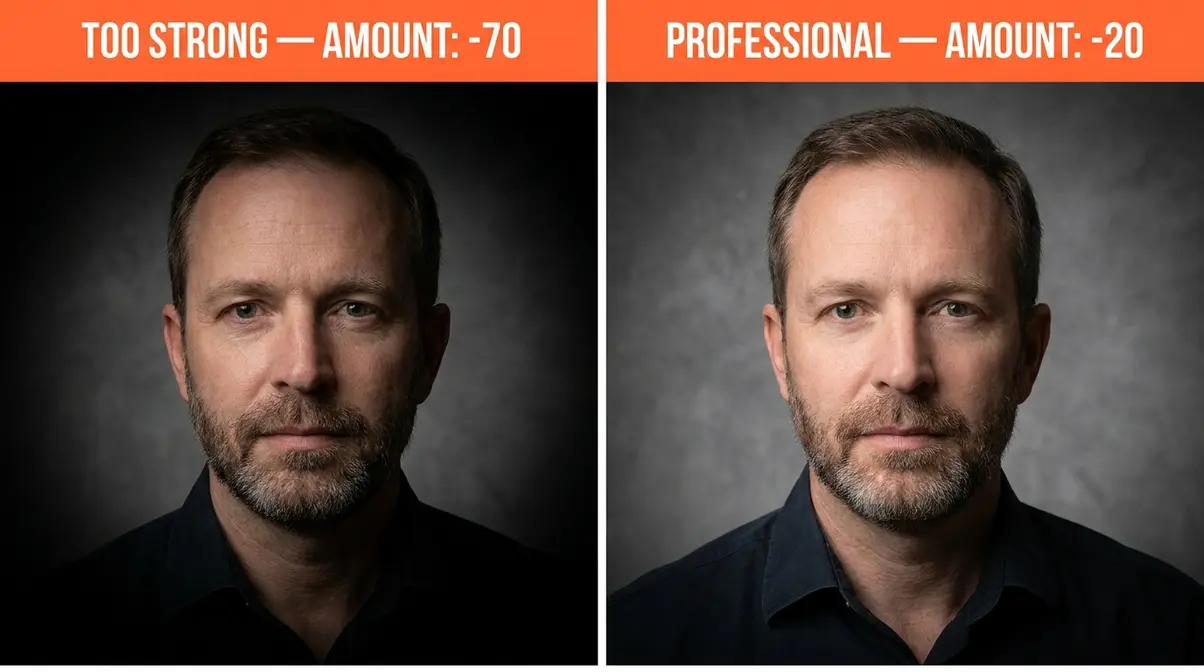
- Drag the “Amount” slider to the left (negative values) to darken the edges. Start at -15 to -20 for a subtle, natural-looking result. Avoid going below -50 unless you’re deliberately chasing a dramatic, stylized look.
- Adjust the “Midpoint” slider to control how far the vignette extends toward the center. A value of 30–40 creates a wide, gradual fade; a value of 70–80 keeps the darkening close to the edges.
- Adjust “Feather” to control how soft the transition is between the darkened edge and the bright center. Keep this between 70–90 for a natural, invisible vignette.
- Set “Roundness” to control the shape. At 0, the vignette is elliptical and follows the frame shape. Positive values make it more circular; negative values make it more rectangular.
- Use “Highlights” to protect bright edge areas (like a bright sky) from being darkened. Drag right to preserve highlights within the vignette zone.
| Setting | Subtle Look | Dramatic Look | What It Controls |
|---|---|---|---|
| Amount | -15 to -25 | -40 to -60 | Overall darkness of edges |
| Midpoint | 50–60 | 30–40 | How far vignette extends inward |
| Feather | 80–90 | 50–70 | Softness of the transition |
| Roundness | 0 to +20 | -20 to 0 | Circular vs. rectangular shape |
| Highlights | 50–70 | 0–30 | Protection of bright edge areas |
Expected outcome: A clean, professional vignette that draws the eye to your subject without looking over-edited. At Amount: -20, most viewers will feel the effect without consciously noticing the vignette — which is exactly the goal.
Vignetting Mistakes to Avoid: When the Effect Goes Wrong
Understanding The Vignette Spectrum also means knowing when vignetting — even intentional vignetting — crosses from artistic to amateurish. After reviewing hundreds of beginner edits across photography forums, the same four mistakes appear repeatedly.
4 Common Vignetting Mistakes (and How to Fix Them)
Mistake 1: Going too dark, too fast.
The most common beginner error is dragging the Amount slider to -60 or -70 right away. At that intensity, the vignette stops being invisible and becomes the first thing every viewer notices — for the wrong reasons. The fix: start at -15 and work up in small increments. If you can clearly see where the vignette starts, it’s too strong.
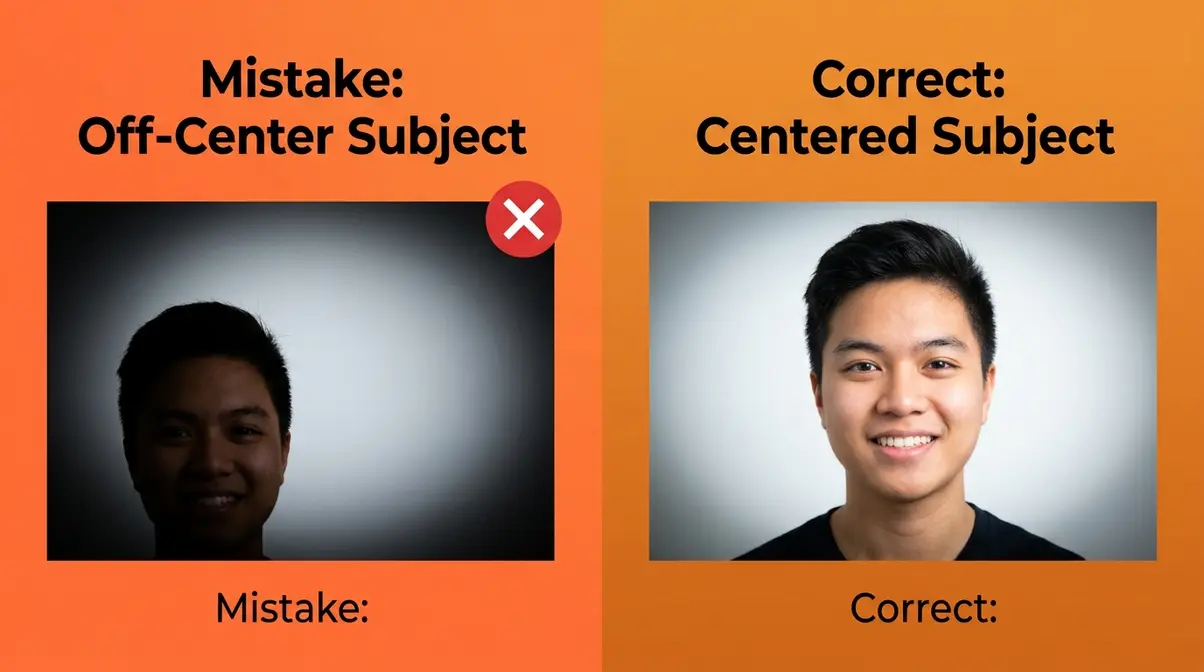
Mistake 2: Applying a vignette to off-center subjects.
A vignette darkens the corners and edges — so if your subject is positioned near an edge or corner of the frame (a common composition choice), the vignette will darken them along with the background. The fix: use Lightroom’s Radial Filter instead of Post-Crop Vignetting. The Radial Filter lets you place the bright center anywhere in the frame, not just the geometric middle.
Mistake 3: Ignoring the subject matter.
A vignette on a real estate interior photo, an architectural detail shot, or a flat-lay product image almost always looks wrong — the corners of these images carry important information. The fix: before applying any vignette, ask yourself “does anything important sit near the edges of this frame?” If yes, skip it or use a Radial Filter with a very wide feather.
Mistake 4: Leaving uncorrected optical vignetting in “artistic” work.
Some beginners assume that because vignetting can be artistic, all vignetting is fine to leave. Optical vignetting from a lens at f/1.8 has a different quality than a carefully applied artificial vignette — it can look uneven, asymmetric, or stronger on one side. The fix: correct optical vignetting with a lens profile first, then add an intentional artificial vignette if you want the effect. This gives you clean, controlled results every time.
When a Vignette Hurts More Than It Helps
Beyond subject placement, certain photo styles are fundamentally incompatible with vignetting. High-key photography — images with predominantly white or very bright tones — is actively undermined by darkened edges. Newborn photography, wedding flat-lays, and product shots on white backgrounds fall into this category. Similarly, any image where the mood depends on openness and airiness (think bright travel photography or sunlit lifestyle shots) is better served by clean, even exposure throughout the frame.
The Digital Photography School’s guide on vignettes notes that vignetting works best when it reinforces a mood that already exists in the image — it’s an amplifier, not a creator. If the photo doesn’t already have a sense of intimacy, drama, or focus, a vignette won’t manufacture those qualities. It’ll just make the corners dark.
Frequently Asked Questions About Vignetting in Photography
What causes vignetting in photography?
Vignetting in photography is caused by four distinct mechanisms, depending on the type. Optical vignetting occurs when light enters a lens at a wide angle and travels a longer path through the glass elements, losing brightness before it reaches the sensor — this is worst at wide apertures like f/1.8. Mechanical vignetting happens when a physical object (a lens hood, stacked filters, or a narrow filter ring) blocks light from reaching the corners. Pixel vignetting is a digital-sensor phenomenon where corner pixels capture angled light less efficiently than center pixels. Artificial vignetting has no physical cause — it’s intentionally added in editing software like Lightroom. Each type has a different fix: stop down your aperture, remove the accessory, apply a lens correction profile, or simply choose not to add it.
What does a vignette do to a photo?
A vignette darkens the corners and edges of a photo, making the center appear brighter by contrast. The primary perceptual effect is attention direction — the human eye is drawn toward the brightest part of an image, so darkened edges naturally guide the viewer’s gaze toward the center of the frame. In portrait photography, this focuses attention on the subject’s face. In landscape photography, it adds depth and a moody, film-like aesthetic. The effect can be subtle (barely noticeable but felt) or dramatic (a stylized, cinematic look). According to Adobe, the eye-guiding function is the main reason photographers deliberately apply vignettes in post-processing.
Is it better to have a vignette on or off?
There’s no universal answer — it depends entirely on your subject and composition. A vignette helps when your subject is centered and you want to draw the eye inward, when the background is distracting, or when you’re pursuing a moody or vintage aesthetic. It hurts when your subject sits near the edges, when you’re shooting architecture or real estate where corner detail matters, or when the image is already high-contrast. A useful starting point: apply a very light vignette (Amount: -15 in Lightroom) and assess whether the photo improves. If you can’t tell it’s there, it’s probably helping. If it’s the first thing you notice, it’s too strong.
What is an example of a vignette?
A classic example of an intentional vignette is a portrait photo where the subject’s face is bright and sharp at the center, while the corners fade gradually to dark. This is the most common application in portrait photography. Another example is a moody landscape where the sky and horizon remain bright while the frame edges darken, creating a sense of depth. On the accidental side, a photo taken with a 16mm wide-angle lens at f/1.8 will often show natural optical vignetting — the corners will be noticeably darker than the center without any editing. Mechanical vignetting produces a different example: hard, sharp-edged dark corners caused by a lens hood that’s too long for the focal length.
How do you avoid vignettes in camera?
To avoid unwanted vignetting in camera, use three techniques. First, stop down your aperture — optical vignetting is worst at f/1.4 or f/1.8 and nearly disappears at f/5.6 or f/8. Second, check your accessories: make sure your lens hood is the correct model for your lens, avoid stacking multiple filters on wide-angle lenses, and verify that no filter ring is too narrow. Third, enable your camera’s built-in lens correction feature — Canon’s Digital Lens Optimizer and Nikon’s peripheral illumination correction both reduce optical vignetting automatically in-camera. For pixel vignetting, shooting with a full-frame sensor rather than an APS-C (crop) sensor significantly reduces the effect.
What is the 20-60-20 rule in photography?
The 20-60-20 rule is a practical guideline for deciding when to apply a vignette. Approximately 20% of photos are clear candidates — centered subjects, moody lighting, portrait or intimate scenes where the effect will clearly improve the image. About 60% of photos fall in the middle — they could go either way, and a very subtle vignette (Amount: -10 to -15 in Lightroom) is the safest approach. The remaining 20% are photos that will be actively harmed by a vignette — off-center subjects near the edges, architectural shots, product photography on white backgrounds, or high-key images. When in doubt, go subtle or skip it. The rule isn’t a rigid formula but a mental check to prevent over-applying the effect.
How do you avoid vignetting in photography (post-processing)?
In post-processing, the fastest fix is Lightroom’s automatic lens profile correction. In the Develop module, open the Lens Corrections panel, click the Profile tab, and check “Enable Profile Corrections.” Lightroom will automatically identify your lens from the file metadata and apply a correction that brightens the corners. For lenses without a profile, use the Manual tab’s Vignetting Amount slider (drag right to brighten corners). For mechanical vignetting, no post-processing tool fully corrects hard-edged dark corners — the best solution is always to remove the physical cause before shooting. Pixel vignetting is largely corrected by the same lens profile correction that handles optical vignetting.
What are the disadvantages of vignettes?
The main disadvantages of vignettes are over-application, subject placement conflicts, and genre incompatibility. An overdone vignette (Amount below -50 in Lightroom) becomes the dominant visual element in a photo, distracting from the subject rather than directing attention to it. When the subject sits near the edge of the frame, the vignette darkens them along with the background — the opposite of the intended effect. In genres like real estate, product, and architectural photography, darkened corners remove important detail and make images look unprofessional. The biggest risk is that vignetting can make editing look obvious — experienced viewers immediately recognize a heavy-handed vignette, which undercuts the photo’s credibility. Used subtly and intentionally, the disadvantages disappear.
Conclusion
Vignetting in photography sits on a spectrum — from the accidental physics of a wide-open lens to the deliberate artistry of a Lightroom Effects panel slider. Understanding where your vignette sits on that spectrum is the difference between a photo that looks like a mistake and one that looks intentional. The four types — optical, mechanical, pixel, and artificial — each have clear causes, clear fixes, and clear creative implications. Research and community consensus across photography forums consistently confirm that the photographers who struggle most with vignetting are the ones who see it as one thing, when it’s actually four very different phenomena with very different solutions.
The Vignette Spectrum framework gives you a mental model that works every time: Is this vignette accidental or intentional? If accidental, which type — and what’s the fastest fix? If intentional, is it subtle enough to guide without announcing itself? Those three questions cover every vignetting situation you’ll encounter, from your first wide-angle lens to your hundredth portrait edit.
Your next step: open one of your recent photos in Lightroom. Check the Lens Corrections panel first — enable the profile correction and see if dark corners lift. Then open the Effects panel and try a Post-Crop Vignette at Amount: -20. Compare the two versions. That 10-minute experiment will teach you more about vignetting than any article can — because you’ll feel the difference in your own work. For more on the optical quirks that affect your images, explore our guides on lens distortion and chromatic aberration.
