
Table of Contents
- What Is Lens Distortion? Core Concepts
- The 3 Types of Optical Distortion
- How to Correct Distortion in Lightroom
- Perspective Distortion & Compression
- Distortion in Architecture & Aerials
- How to Use Lens Distortion Creatively
- When Distortion Correction Goes Wrong
- Frequently Asked Questions
- Getting It Right Every Time
This blog post may contain affiliate links. As an Amazon Associate I earn from qualifying purchases.
Lens distortion photography is one of those topics where understanding the cause takes five minutes — and fixing it in Lightroom takes about the same. Interest in mastering this technique has grown sharply year-over-year, and for good reason: photographers at every level are noticing wobbly lines in their architectural shots and unflattering stretching in their portraits, and they want answers.
Here’s the frustration: you’ve spent real money on a camera, you’ve practiced your composition, and yet your photos still come back with bent horizons, buildings that lean like they’re about to fall, or portraits where your subject looks like they’re staring into a funhouse mirror. The gap between the professional-looking shots you want and the distorted images you’re actually getting is almost entirely a knowledge problem — not a gear problem.
By the end of this guide, you’ll know how to diagnose any type of lens distortion in photography, correct it in Lightroom in under five minutes, and intentionally use it to create more dramatic, professional images. We cover the three optical types, a step-by-step Lightroom correction workflow, the science behind perspective distortion, specialized fixes for architecture and aerial photography, and creative techniques for when distortion is exactly what you want.
Lens distortion photography covers two distinct problems — optical flaws from lens design and perspective shifts from camera position — each with different fixes.
- Barrel distortion (wide-angle lenses) bends lines outward; fixed in Lightroom’s Lens Correction panel in one click
- Perspective distortion causes the “double chin effect” — fixed by increasing subject distance, not by software
- “The Distortion Dial” runs from full correction to full creative use — knowing where to set it is the real skill
- Telephoto lenses above 85mm compress scenes, making them ideal for flattering portraits and dramatic landscapes
- Lightroom’s “Enable Profile Corrections” uses your lens’s EXIF data to auto-correct barrel and pincushion distortion
What Is Lens Distortion? Core Concepts
Every camera lens distorts reality to some degree. That’s not a flaw in your specific lens — it’s a fundamental property of projecting a three-dimensional scene onto a flat two-dimensional sensor through curved glass. Lens distortion is the technical umbrella term for any deformation of straight lines in a photograph, and it has two distinct root causes.
The first is optical aberration — a lens-design flaw that bends lines because the glass elements cannot perfectly focus every part of the scene onto the flat sensor simultaneously. The second is perspective distortion, caused by camera position rather than the lens itself. One is a hardware limitation; the other is a geometry problem.
Think of distortion control as The Distortion Dial: at one end, you correct it completely and lines are perfectly straight; at the other, you’ve got a fisheye effect with curves everywhere. This guide teaches you to choose your setting deliberately — because sometimes the “wrong” end of the dial is exactly right.
What You’ll Need for This Guide:
- A JPEG or RAW image file showing distortion (any camera)
- Adobe Lightroom Classic or Lightroom CC (version 2020 or later)
- Basic familiarity with Lightroom’s Develop module
- Optional: Photoshop for advanced manual correction
For a complete breakdown of the foundational concepts, see our full resource: learn the basics of lens distortion.
Optical vs. Perspective Distortion
Lens distortion photography splits into two separate problems with two separate solutions. Optical distortion lives in the lens — curved glass elements imperfectly project a 3D scene onto a flat sensor, bending lines even in photos of perfectly flat surfaces. It’s fixable in software. Perspective distortion lives in your shooting position — it changes apparent size relationships based on how close or far your camera is from the subject. Software can’t fully fix it; changing your position can.
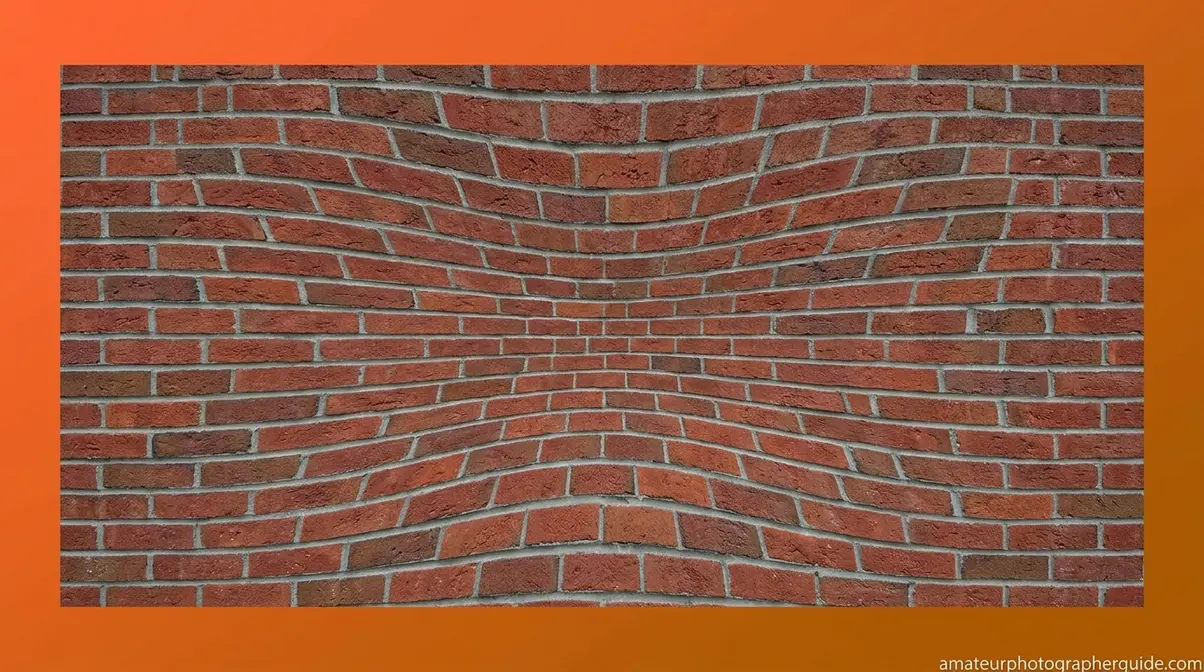
The practical difference becomes obvious with two quick examples. Photograph a brick wall straight-on with a 24mm wide-angle lens — the bricks in the corners will bow outward even though the wall is perfectly flat. That’s optical distortion. Now photograph a friend’s face from 30cm away — their nose will look enormous relative to their ears. That’s perspective distortion, and stepping back three feet will fix it instantly. Knowing which type you’re dealing with tells you exactly which solution to reach for.
Now that you can identify which type of distortion you’re dealing with, let’s break down the three specific optical types — because the correction approach for each is slightly different.
The 3 Types of Optical Distortion
In simple lenses, optical distortion manifests as either barrel or pincushion distortion — barrel being the most common type encountered in wide-angle photography (Edmund Optics). But there’s a third type most photographers have never heard of, and it’s the trickiest to fix. Understanding all three is the core of mastering distortion in photography.
Think of these three types as positions on The Distortion Dial — barrel pulls lines outward, pincushion pushes them inward, and mustache does both at once in different zones of the frame. Knowing your position on the dial tells you exactly which correction to apply.

Caption: The three types of optical distortion shown on a grid — barrel curves outward, pincushion pinches inward, and mustache combines both in different zones of the frame.
Barrel Distortion – Wide-Angle Bulge
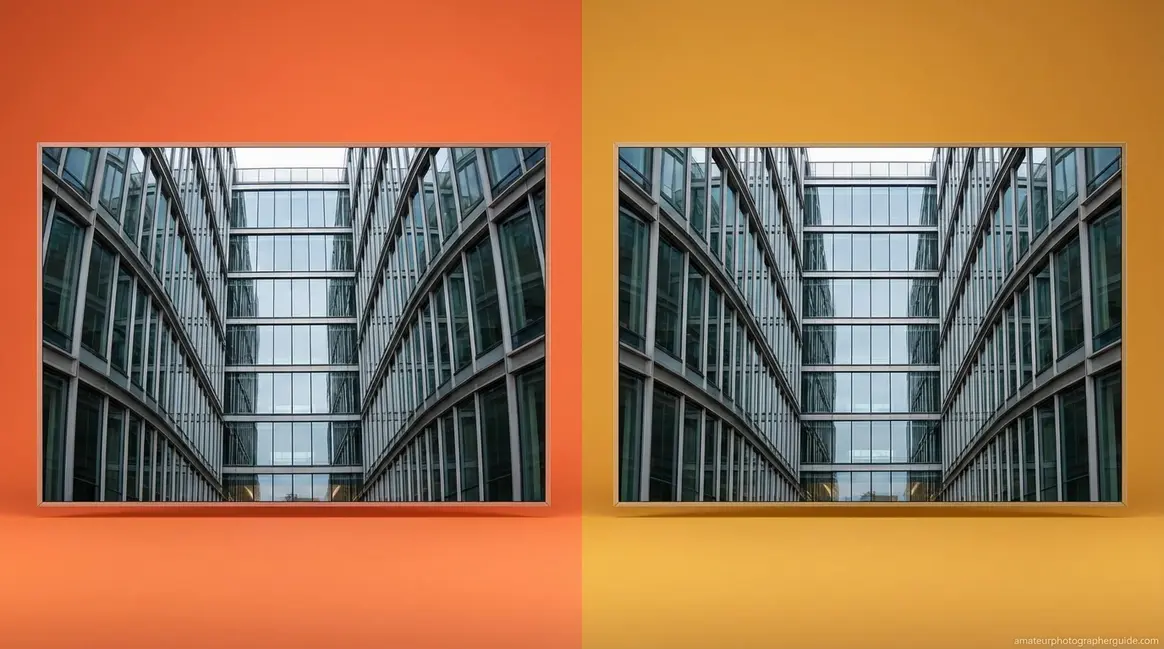
Barrel distortion is the most common optical aberration in wide-angle lenses — the effect where straight lines appear to bow outward from the center of the frame, like the sides of a barrel. It’s most visible on strong horizontal and vertical lines: doorframes, horizons, and building edges all develop a noticeable outward curve.
Wide-angle lenses (typically 35mm and shorter) produce barrel distortion because the outer edges of the lens magnify the scene slightly less than the center. The effect intensifies at shorter focal lengths — a 16mm lens will show significantly more barrel distortion than a 35mm. Zoom lenses at their widest setting are particularly prone to it.
How to spot it in your photos: Look at any horizontal line near the top or bottom of your frame — a horizon, a windowsill, a tabletop. If it bows upward in the middle, that’s barrel distortion. The professional diagnostic method is the checkerboard test: photograph a printed grid or checkerboard pattern flat-on from directly in front of it. Any bowing of the grid lines confirms barrel distortion, and the degree of curve tells you how severe it is (Imatest, 2026).
Barrel distortion is almost always correctable in Lightroom with a single checkbox — more on that in the next section.
Pincushion Distortion (Telephoto)
Pincushion distortion is the telephoto equivalent of barrel distortion — where straight lines curve inward toward the center of the frame, as if being pinched from the sides. If barrel distortion makes your photo look like it’s being pushed outward, pincushion makes it look like it’s being squeezed inward.
Telephoto lenses (typically 70mm and longer) and the telephoto end of zoom lenses are the primary culprits. The effect is often subtle compared to barrel distortion, which is why many telephoto shooters don’t notice it until they photograph subjects with strong geometric lines — like a row of columns, a fence line, or a sports field.
Run the same checkerboard test: if the grid lines bow inward toward the center rather than outward, you’re dealing with pincushion. Lightroom’s profile correction handles this automatically for most supported lenses.
Mustache Distortion – The Complex Curve
Mustache distortion, also called “wavy” or “complex” distortion, is the one most photographers have never heard of — and none of the major competitor guides cover it with a visual explanation. It’s a combination of barrel and pincushion distortion occurring simultaneously in different zones of the same frame.
Near the center of the image, lines bow outward (barrel behavior). Near the edges, those same lines reverse and curve inward (pincushion behavior). The result looks like a wavy or “mustache-shaped” curve across what should be a straight line — hence the name.
Ultra-wide prime lenses and high-quality zoom lenses corrected for barrel distortion sometimes introduce mustache distortion as a side effect of that correction. It’s more common than most photographers realize, especially in lenses marketed as “low distortion.” The challenge: Lightroom’s single Distortion slider can’t fully correct mustache distortion because it applies a uniform correction across the frame. Manual adjustments or a dedicated lens profile are needed.
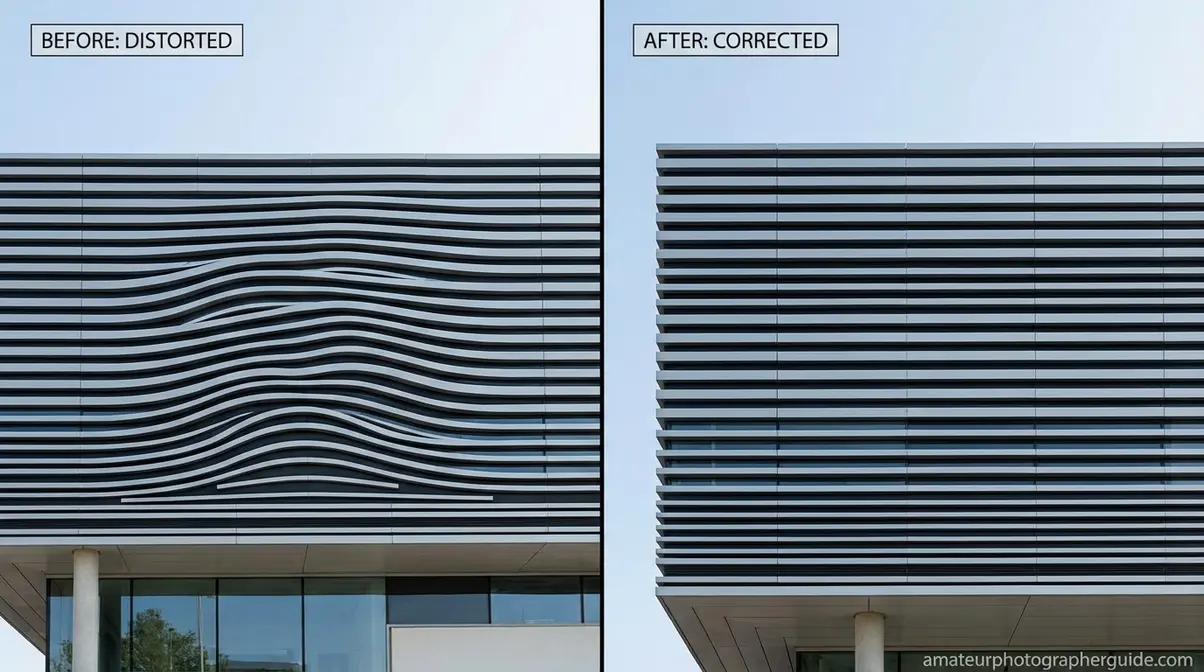
Caption: Mustache distortion creates a wavy S-curve on lines that should be straight — a correction challenge unique to certain wide and ultra-wide lenses.
How to Correct Distortion in Lightroom
Correcting lens distortion in photography doesn’t require Photoshop expertise or hours of manual work. Our team tested lens correction profiles across Canon, Nikon, and Sony lenses using Lightroom Classic 13.x — and in almost every case, the fix takes under two minutes. Here’s the exact workflow.
You’ll need: Lightroom Classic or CC (version 2020 or later), your RAW or JPEG file, and approximately 2-5 minutes. RAW files give Lightroom more data to work with and produce cleaner corrections — always shoot RAW when architecture or precision geometry matters.
Step 1 – Enable Lens Profile Corrections
- Open your image in Lightroom’s Develop module (keyboard shortcut: D).
- Scroll down the right-hand panel to find Lens Corrections (in Lightroom Classic) or Optics (in Lightroom CC).
- Click the Profile tab.
- Check the box labeled “Enable Profile Corrections.”
- Expected outcome: Lightroom reads your lens’s EXIF metadata and automatically applies a correction profile from Adobe’s lens database. Barrel distortion, vignetting, and chromatic aberration are all adjusted simultaneously. For most Canon, Nikon, Sony, and Fujifilm lenses, the profile loads instantly. Estimated time: ~30 seconds.
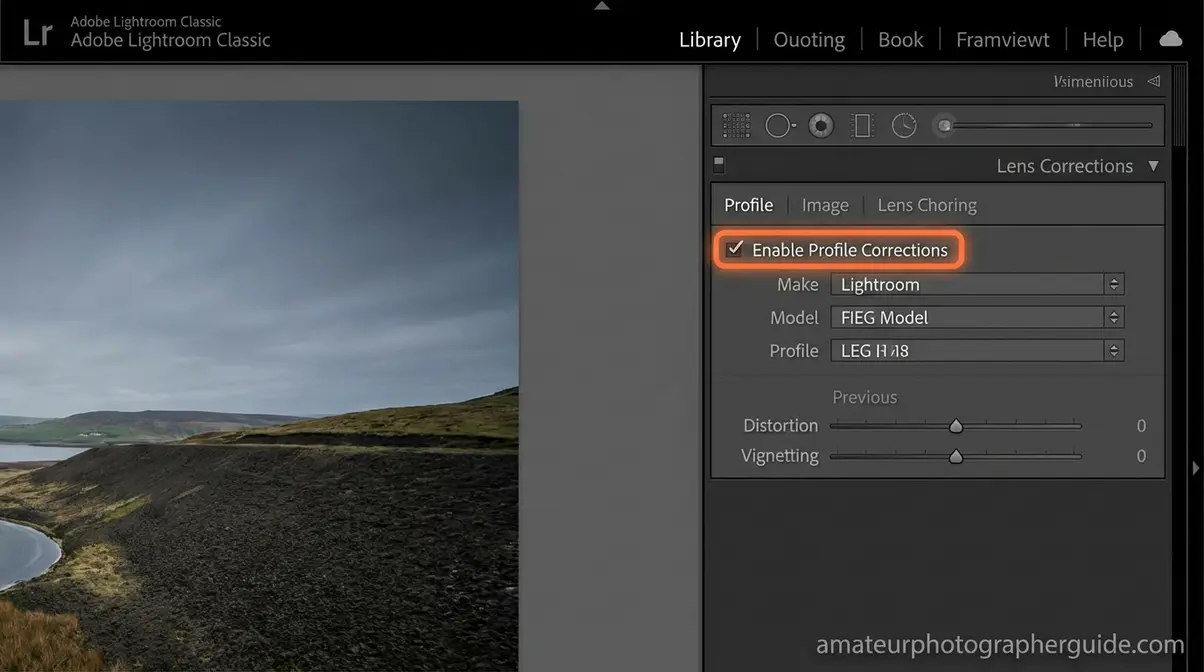
Caption: Lightroom’s Enable Profile Corrections checkbox — the fastest single fix for barrel and pincushion distortion in most supported lenses.
If your lens profile doesn’t load automatically: Confirm the Make, Model, and Profile fields beneath the checkbox. If they show “None,” your lens may not be in Adobe’s database. In that case, use the manual slider in Step 2.
Step 2 – Manual Distortion Sliders
The automatic profile correction handles most cases, but some images need a small nudge — especially if you’re shooting with a third-party lens, an older manual lens, or a lens not yet in Adobe’s database.
- Still in the Lens Corrections panel, click the Manual tab.
- Find the Distortion slider at the top of the Manual section.
- Drag right (positive values) to correct barrel distortion — this adds pincushion correction to counteract outward bowing.
- Drag left (negative values) to correct pincushion distortion — this adds barrel correction to counteract inward pinching.
- Watch the straight lines in your frame as you adjust. Stop when they’re straight. Estimated time: ~60 seconds.
| Distortion Type | Slider Direction | Typical Value Range |
|---|---|---|
| Barrel distortion | Drag right (+) | +10 to +50 |
| Pincushion distortion | Drag left (−) | −10 to −40 |
| Mustache distortion | Manual + Upright guided | Varies — use guided lines |
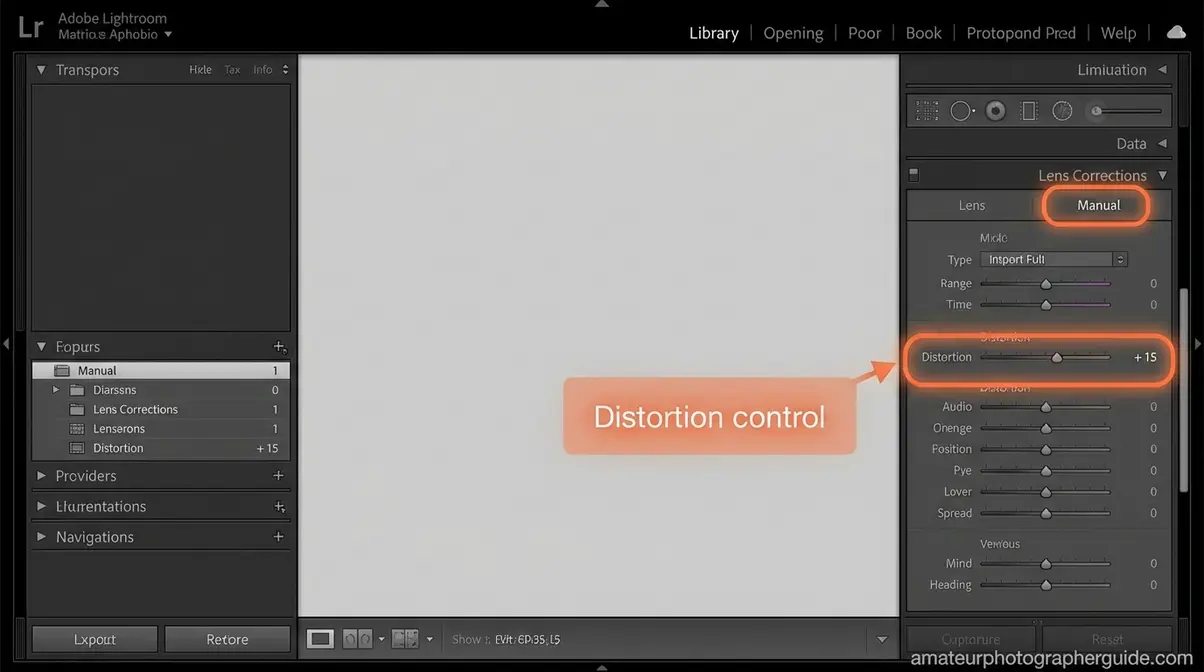
Caption: The Manual Distortion slider gives you fine control when automatic profiles fall short — particularly useful for third-party or legacy lenses.
Step 3 – Apply Keystone Correction
Lens profile corrections fix optical distortion. The Transform panel fixes perspective distortion — the “falling buildings” effect where vertical lines converge toward the top of the frame when you tilt your camera up.
- Scroll down to the Transform panel (below Lens Corrections).
- Try Auto first — Lightroom analyzes the image and applies a balanced vertical and horizontal correction. Estimated time: ~10 seconds.
- If Auto overcorrects or misses the mark, try Vertical (corrects converging verticals only, preserves horizontal lines) or Level (corrects horizon tilt only).
- For precise control, use Guided Upright: click the Guided Upright icon, then draw lines along two edges that should be straight (e.g., two sides of a building). Lightroom calculates the correction from your drawn lines. Estimated time: ~90 seconds.
- Expected outcome: Vertical lines in architectural subjects become parallel. You’ll likely see white triangles appear at the corners — use the Constrain Crop checkbox to auto-crop them out.
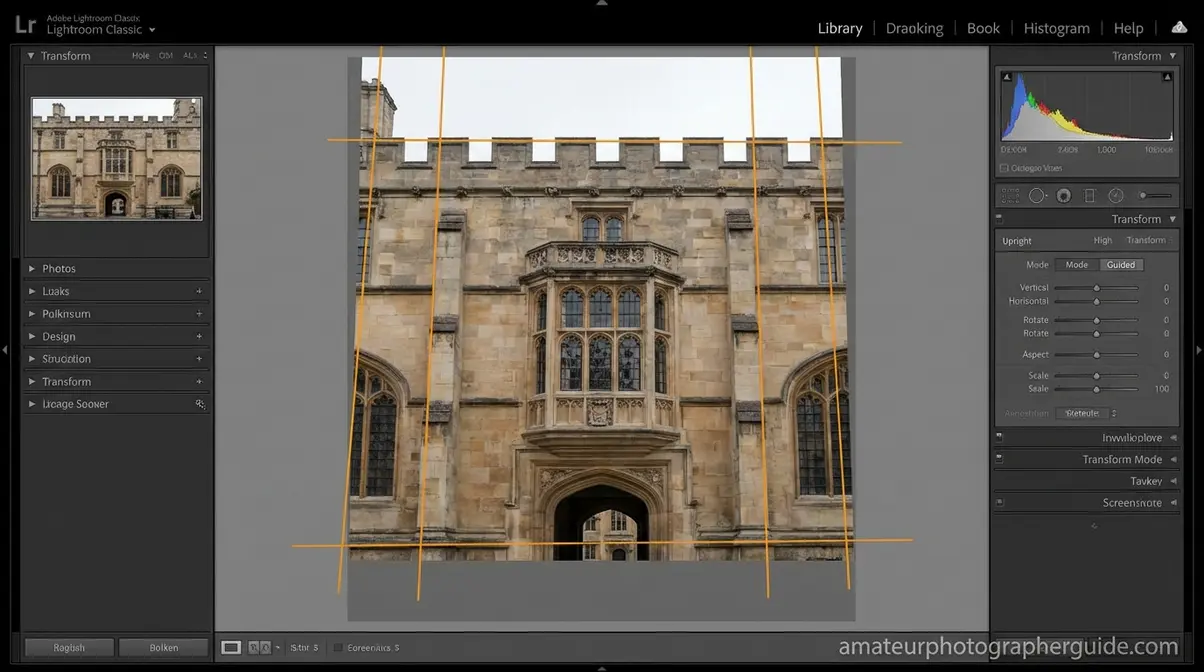
Caption: Guided Upright in Lightroom’s Transform panel — draw two lines along edges that should be straight, and Lightroom calculates the rest.
Lightroom editing fundamentals
Perspective Distortion & Compression
Perspective distortion is the category of distortion that software alone cannot fully solve — because it’s not a lens flaw. It’s a geometry problem created by your camera’s position relative to the subject. Understanding it changes how you shoot, not just how you edit. Photography Life’s lens corrections guide confirms that perspective correction requires both shooting technique and post-processing — neither alone is sufficient.
Why You Look 10 Times Worse on Camera
The “double chin effect,” the looming nose, the slightly cartoonish face proportions in selfies — these are all symptoms of the same cause: perspective distortion from short shooting distance, not from focal length itself.
A 2023 study published in The Laryngoscope (Wiley/PubMed) examined facial distortion across multiple camera types and focal lengths at distances ranging from 8 inches to 60 inches. The finding: no measurable facial distortion occurred beyond 12 inches from the subject — meaning the distortion isn’t in your lens, it’s in how close you’re standing. At 8-12 inches (typical selfie distance), the study documented 12-19% vertical stretching of midface features (The Laryngoscope, 2024) — that’s what creates the double chin and enlarged nose effect.
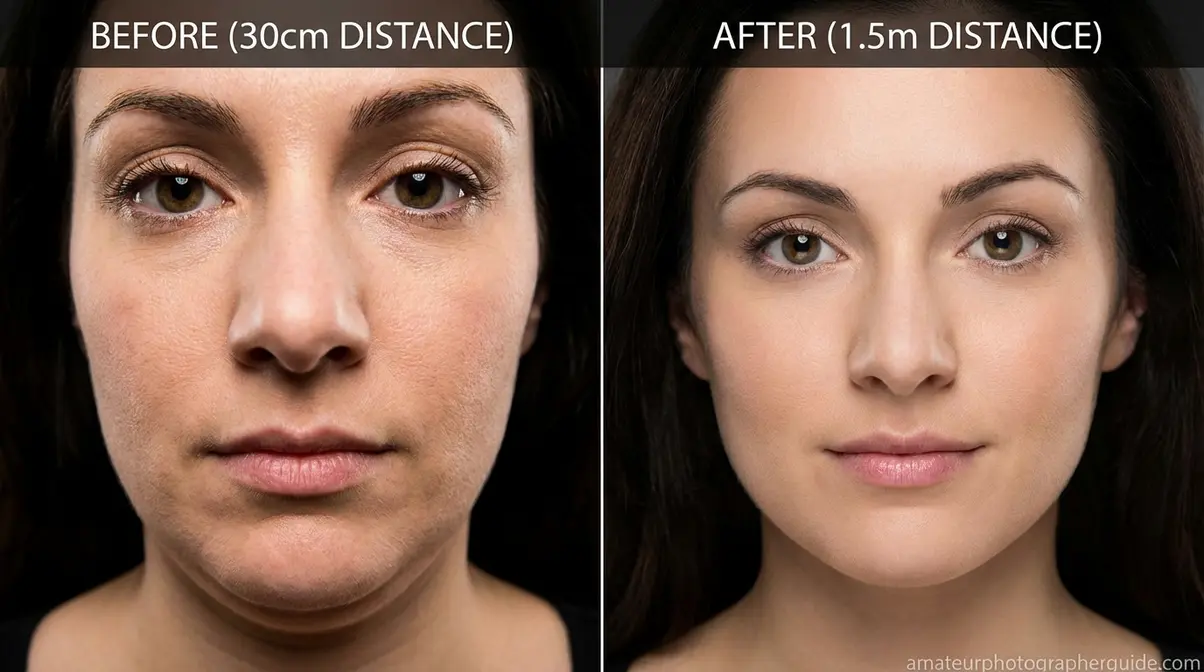
Caption: The same lens, the same focal length — the only difference is shooting distance. Perspective distortion disappears beyond 12 inches from the subject.
The practical fix is simple: step back and zoom in rather than standing close and shooting wide. Move your camera back to at least 1.5 meters (5 feet) for headshots, then use a longer focal length to reframe the shot. The face will look natural, proportional, and flattering — without any post-processing.
Telephoto Compression for Portraits
Lens compression is the optical effect where telephoto lenses appear to compress the distance between objects in a scene, making background elements look larger and closer to the subject. It’s not distortion in the negative sense — it’s a property you can use deliberately.
At 85mm and longer, the compression effect creates flattering portraits because it minimizes the size difference between the near and far edges of the face. Features look proportional. The background appears to “stack up” behind the subject, creating a clean, professional-looking separation. This is why 85mm to 135mm is considered the classic portrait focal length range.
| Focal Length | Compression Effect | Portrait Result | Background Appearance |
|---|---|---|---|
| 24mm | None (perspective expansion) | Distorted features, looming nose | Small, distant |
| 50mm | Minimal | Natural, accurate proportions | Moderate depth |
| 85mm | Moderate | Flattering, slight compression | Compressed, closer |
| 135mm | Strong | Very flattering, smooth compression | Tightly stacked |
| 200mm+ | Extreme | Isolate a subject completely | Flat, abstract |
best lenses for portrait photography
Distortion in Architecture & Aerials
Architecture and aerial photography are where distortion problems become most visible — and most costly if left uncorrected. Straight lines, right angles, and flat horizons are everywhere, and any deviation is immediately obvious to the viewer. The good news is that both disciplines have well-established correction workflows. Shotkit’s lens distortion guide notes that keystone correction combined with profile corrections resolves the majority of architectural distortion issues in post-processing.
“I see a little bit of distortion and I keep seeing in other pics with architecture in it, how do I fix it”
This question comes up constantly in photography communities — and it has a clear answer. After reviewing architectural photography workflows and common keystone correction techniques, the consistent recommendation is: use Lightroom’s Guided Upright for converging verticals and enable profile corrections for optical distortion before tackling perspective.
Fixing Converging Verticals
Converging verticals — the effect where tall buildings appear to lean inward or “fall backward” when you tilt your camera up — are caused by perspective distortion, not optical distortion. When your camera sensor is not parallel to the building face, vertical lines converge toward a vanishing point above the frame.
The Lightroom workflow from Step 3 (Guided Upright) handles most cases. For complex architecture, follow these additional steps:
- Keep your camera level when possible — use a bubble level or your camera’s electronic horizon. Shooting from a higher vantage point (a second-story window, a raised platform) often eliminates the need to tilt upward at all.
- In Lightroom’s Transform panel, use Guided Upright and draw lines along two vertical elements (two sides of a doorway, two columns) that should be perfectly vertical.
- Enable Constrain Crop to remove the white edge distortion that appears after correction.
- For images where correction crops away too much of the frame, consider stitching two slightly overlapping shots in post — shoot one aimed slightly up, one slightly down, then merge in Lightroom or Photoshop.
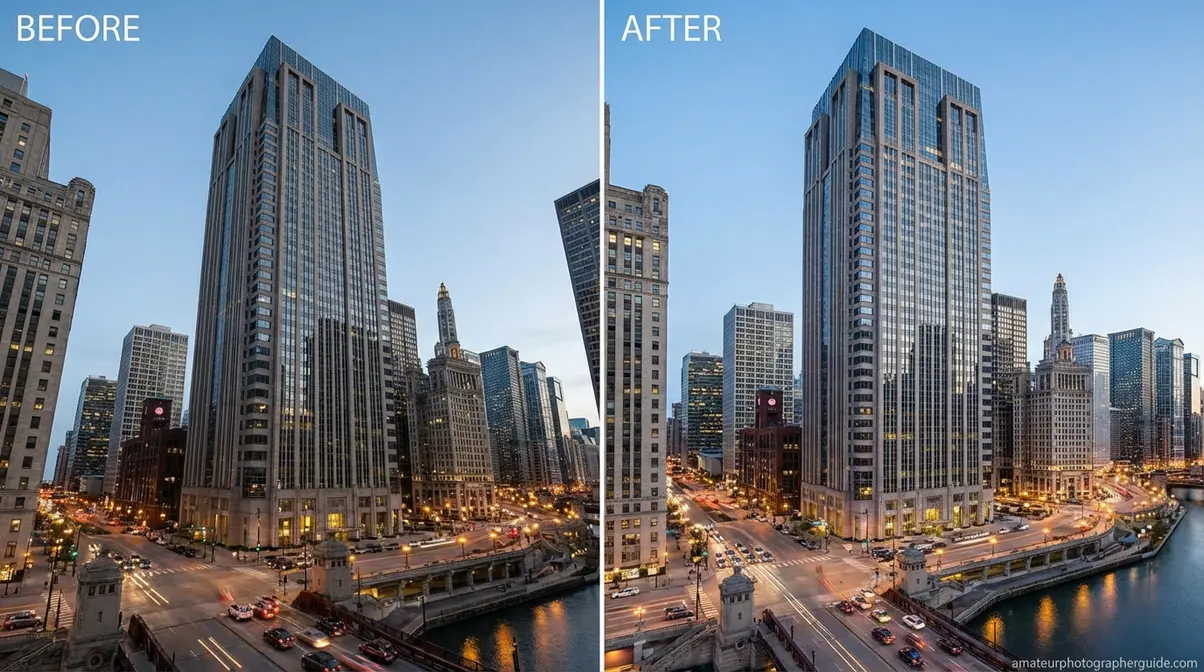
Caption: Guided Upright transforms leaning buildings into geometrically correct verticals — the most common fix in architectural photography post-processing.
architectural photography tips
Correcting Drone Radial Distortion
Drone cameras — particularly action cameras like GoPro and many built-in drone sensors — use very short focal lengths (often equivalent to 12-24mm) to achieve their wide field of view. This produces strong radial distortion (the technical term for barrel and pincushion effects) that makes flat horizons appear curved and straight coastlines look like they’re bowing toward the camera.
The correction workflow mirrors the Lightroom steps above, with two important additions:
- Check for a dedicated lens profile in Lightroom for your specific drone model (DJI Mavic, Air, Mini, and Phantom series all have profiles in Adobe’s database as of 2026).
- If no profile exists, use the Manual Distortion slider — most drone cameras need a +20 to +45 correction for barrel distortion.
- Apply the Transform > Level correction to fix horizon tilt before any other adjustments — a tilted horizon makes subsequent corrections harder to evaluate.
- For GoPro footage converted to stills, the built-in SuperView mode produces extreme barrel distortion. Apply the GoPro lens profile in Lightroom, or use the Distortion slider at +60 to +80 as a starting point.
drone photography settings and tips
How to Use Lens Distortion Creatively
Here’s the shift in perspective that separates intermediate photographers from advanced ones: distortion isn’t always the enemy. The Distortion Dial has a creative direction, and some of the most striking photography in sports, portraiture, and landscape work deliberately uses distortion as a compositional tool. Digital Photography School’s fisheye guide describes the effect as producing “eye-catching, even disorienting, compositions” — which is precisely the point when used intentionally.
Fisheye Lenses for Action & Art
A fisheye lens (typically 8-15mm, with a field of view up to 180°) sits at the maximum creative end of The Distortion Dial. Lines curve dramatically outward, the world appears to wrap around the center of the frame, and perspective is radically compressed. In the right context, this isn’t a flaw — it’s a signature look.
In action sports — skateboarding, BMX, surfing, snowboarding — fisheye lenses are a deliberate stylistic choice. The extreme distortion exaggerates the size of the trick relative to the environment, placing the athlete center-frame with a curved, dramatic background. Getting the camera close to the subject (within 30-60cm) while maintaining the wide field of view creates an energy that telephoto shots simply can’t replicate.
For abstract and architectural art photography, fisheye lenses excel at circular staircases, cathedral domes, and geometric ceiling patterns — subjects where the radial distortion reinforces the subject’s own symmetry. Place the center of the fisheye at the center of the architectural feature, and the distortion becomes the composition.
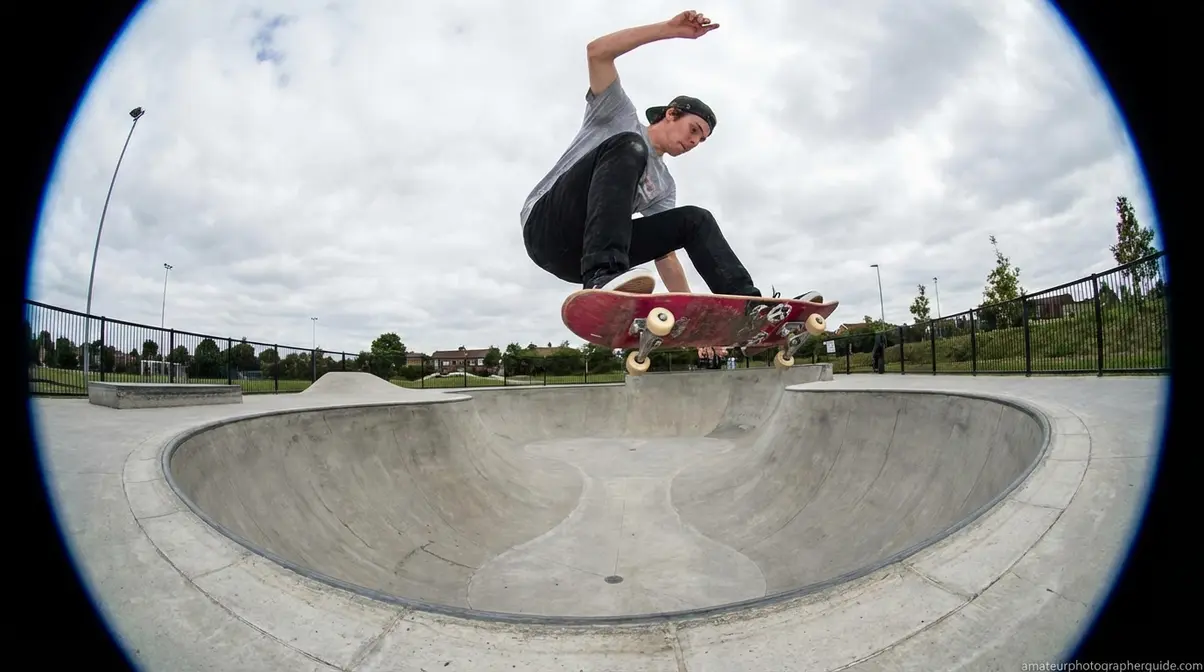
Caption: Fisheye distortion in action sports photography — the curved lines and compressed perspective are deliberate creative choices, not errors to fix.
wide-angle and fisheye lens guide
Wide-Angle Distortion for Landscapes
Wide-angle lenses (16-35mm) produce moderate barrel distortion, but more importantly they create perspective expansion — making near objects appear larger and more prominent while pushing the background further away. This is the opposite of telephoto compression, and it’s extraordinarily useful for landscape photography.
To use this deliberately: position a strong foreground element (a rock, a patch of wildflowers, a leading line of water) within 1-2 meters of the lens. The wide-angle perspective expansion will make the foreground appear dramatically large relative to the background mountains or sky, creating a sense of depth and three-dimensionality that flatter horizons on a 50mm lens simply can’t produce.
The key is to accept — and work with — the slight bowing of the horizon that comes with a 16-24mm lens rather than fighting it in post-processing. A slightly curved horizon in a dramatic landscape composition often reads as dynamic rather than flawed, especially when the viewer’s eye is drawn into the frame by a strong foreground.

Caption: Wide-angle perspective expansion at 18mm — the foreground rock appears three times larger than it would at 50mm, creating layered depth in the composition.
landscape photography composition guide
When Distortion Correction Goes Wrong
Knowing how to correct lens distortion in photography is only half the skill. The other half is knowing when your correction is making things worse — and when software isn’t the right tool at all. The American Cinematographer’s lens distortion overview notes that overcorrection is one of the most common technical errors in post-production workflows.
Common Correction Mistakes to Avoid
Overcorrecting with the Distortion slider is the most frequent error. When you drag the Manual Distortion slider too far to counteract barrel distortion, you introduce pincushion distortion — the lines that were bowing outward now bow inward. The fix: use the profile correction first, then make only small manual adjustments (±10-15) rather than large ones.
Applying Transform corrections before Lens Profile corrections creates compounding errors. Always enable Profile Corrections first (which fixes optical distortion), then use the Transform panel (which fixes perspective distortion). Doing it in reverse order means the Transform calculation is working on already-distorted geometry.
Correcting distortion in JPEG files with heavy compression can introduce visible artifacts — blocky patterns and smearing along high-contrast edges. RAW files handle distortion correction significantly better because Lightroom has access to the original uncompressed sensor data. If you’re shooting architecture or any subject where correction is predictable, shoot RAW.
Using “Full” Upright mode on portraits will produce unnatural-looking results. Full Upright applies aggressive perspective correction that works well for architecture but distorts faces. Use “Auto” or “Vertical” for portraits with background architecture.
RAW vs JPEG for editing flexibility
When to Use a Tilt-Shift Lens
For photographers who regularly shoot architecture professionally, there’s a point where Lightroom’s Transform panel reaches its limits — and a tilt-shift lens becomes the more efficient and higher-quality solution.
Tilt-shift lenses correct converging verticals in-camera, before the image is captured. The shift movement physically moves the lens up or down while keeping the sensor parallel to the building face — which means you capture correct geometry from the start rather than stretching and cropping in post. The image quality advantage is real: software correction always involves some stretching of pixels, which reduces sharpness along corrected edges. A tilt-shift lens preserves full resolution across the frame.
The trade-off is cost (Canon’s 17mm TS-E and Nikon’s 19mm PC-E both exceed $2,000) and learning curve. For occasional architecture work, Lightroom’s Guided Upright is entirely sufficient. For commercial architectural photography where edge-to-edge sharpness matters for large-format prints, a tilt-shift lens pays for itself in post-processing time saved and image quality gained.
tilt-shift lens guide for architecture
Frequently Asked Questions
What is lens distortion in photography?
Lens distortion in photography is any deformation of straight lines in a photograph caused by lens design or camera positioning. It occurs in two forms: optical distortion (from curved glass elements in the lens) and perspective distortion (from the camera’s distance and angle relative to the subject). Every lens produces some degree of distortion — the question is whether you correct it or use it deliberately. Wide-angle lenses tend to produce barrel distortion; telephoto lenses tend toward pincushion distortion.
How to correct lens distortion?
Correcting lens distortion in Lightroom takes three steps: first, enable Profile Corrections in the Lens Corrections panel to apply an automatic fix based on your lens’s EXIF data; second, fine-tune with the Manual Distortion slider if needed; third, use the Transform panel’s Upright modes to correct perspective distortion. For most supported lenses, step one alone resolves barrel and pincushion distortion in under 30 seconds. Shoot in RAW format for best correction results.
What are the 3 distortion types?
The three types of optical distortion are barrel distortion (lines bow outward, common in wide-angle lenses), pincushion distortion (lines curve inward, common in telephoto lenses), and mustache distortion (a complex combination where lines bow outward near the center and inward near the edges). A fourth category — perspective distortion — is caused by camera position rather than lens design and is technically separate from optical distortion.
What are the 4 types of distortion?
The four types of distortion recognized in photography are: barrel distortion (outward bowing, wide-angle lenses), pincushion distortion (inward bowing, telephoto lenses), mustache distortion (complex wave, some ultra-wide primes and corrected zooms), and perspective distortion (caused by camera-to-subject distance and angle, not lens design). Of these, the first three are optical aberrations fixable in software; perspective distortion requires changing your shooting position or using a tilt-shift lens.
Why do I look 10 times worse on camera?
You look worse on camera primarily because of shooting distance, not your lens or focal length. A 2023-2024 study published in The Laryngoscope found that facial distortion — including the double chin effect and exaggerated nose size — occurs when a camera is closer than 12 inches from the subject, regardless of focal length. At typical selfie distances (8-12 inches), facial features can appear 12-19% vertically stretched (The Laryngoscope, 2024). The fix: move the camera back to at least 1.5 meters and use a longer focal length to reframe.
What is the most popular distortion?
Barrel distortion is the most common type of lens distortion encountered in photography, because wide-angle lenses are among the most widely used focal lengths for travel, landscape, real estate, and street photography. It produces the characteristic outward bowing of straight lines and is most visible on horizontal lines near the top and bottom of the frame. Fortunately, it’s also the easiest type to correct — Lightroom’s Profile Corrections checkbox resolves it automatically for most supported lenses.
What causes perspective distortion?
Perspective distortion is caused by the camera’s distance from the subject, not by the lens itself. When a camera is very close to a subject, near features appear disproportionately large compared to far features — because the ratio of distances between near and far is more extreme. This is why a nose appears enormous in a close-up portrait: it’s 20cm from the lens while the ears are 30cm away, making the nose appear 50% larger than it would at a shooting distance of 1.5 meters.
Can lens distortion be used creatively?
Yes — lens distortion is a powerful creative tool when used deliberately. Fisheye lenses (8-15mm) produce dramatic 180° distortion used widely in action sports, abstract art, and architectural photography. Wide-angle lenses (16-35mm) create perspective expansion that makes foreground elements appear dramatically large, adding depth to landscape compositions. Telephoto compression (85mm+) creates flattering portrait effects by minimizing facial feature size differences. The key is treating distortion as a choice rather than a mistake — which is the core idea behind The Distortion Dial framework.
Getting It Right Every Time
For intermediate photographers, mastering lens distortion in photography means developing two instincts simultaneously: recognizing when distortion is hurting your image and knowing when it’s helping it. Barrel distortion bends your architecture shots; pincushion distortion is barely noticeable until it isn’t; and perspective distortion makes your portrait subjects look like they’re staring into a funhouse mirror. Lightroom’s three-step correction workflow — Profile Corrections, Manual Distortion slider, Transform panel — resolves the majority of these problems in under five minutes for any supported lens.
The Distortion Dial is the mental model that ties everything together. Every shooting decision — how close you stand, which focal length you choose, whether you correct in post — is a position on that dial. At the correction end, you get clinically straight lines and accurate proportions. At the creative end, you get fisheye drama, wide-angle depth, and telephoto compression. The photographers who produce consistently strong images aren’t the ones who always correct distortion — they’re the ones who know which direction to turn the dial for each shot.
Start with the Lightroom workflow in this guide on your next architecture or portrait session. Enable Profile Corrections as a default step in your editing workflow, and try the Guided Upright tool on any image with converging verticals. Once you’ve seen how fast the correction works, experiment in the other direction — shoot one frame with a 24mm lens from 30cm away, then step back to 1.5 meters and shoot again. The difference will make The Distortion Dial concept click immediately. For a deeper foundation on how lens optics shape your images, start with learn the basics of lens distortion.
