
Table of Contents
- What Is Action Photography? (Prerequisites)
- Step 1: Dial In Your Core Exposure Settings
- Step 2: Configure Autofocus and Drive Mode
- Step 3: Apply Settings for Your Specific Sport
- Step 4: Shoot Action in Low Light and Indoors
- Canon-Specific Settings for Action Photography
- Nikon-Specific Settings for Action Photography
- Advanced Action Photography Techniques
- Common Mistakes to Avoid
- Frequently Asked Questions
- Conclusion
This blog post may contain affiliate links. As an Amazon Associate I earn from qualifying purchases.
You pressed the shutter button at exactly the right moment — and got a blurry smear. Again. If your action shots keep coming out soft, you’re not alone, and your camera isn’t broken.
“I received a Canon EOS Rebel T7 as a gift. I am clueless with it, even with the manual 🤦🏼♀️. My daughter does Jr Rodeo barrel racing. I wanted a camera I can get fast action pictures & videos with.”
Every blurry photo is a missed memory — a barrel racing run, a game-winning layup, a dog mid-leap — that you can’t recreate. The good news: you don’t need to master every camera setting at once. You just need three settings dialed in, in the right order. This guide walks you through the Freeze-First Framework — a simple priority system for action photography settings that gets beginners to tack-sharp shots in a single session, no photography degree required.
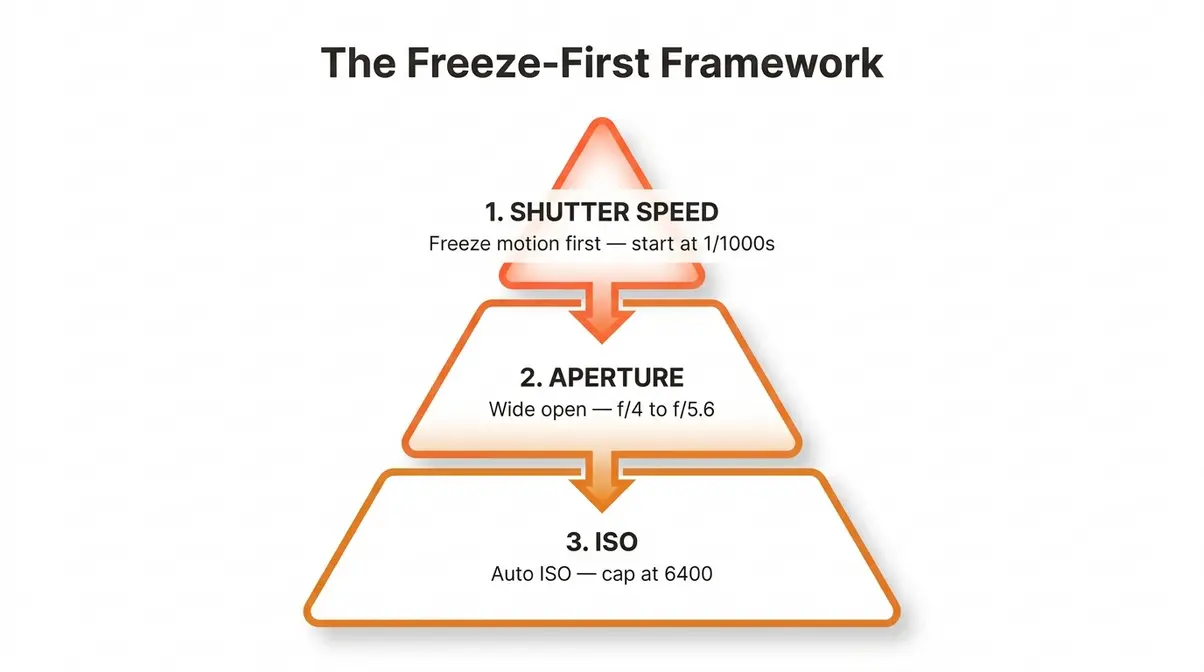
Action photography settings follow a clear priority order: freeze motion first with shutter speed, then control light with aperture, then let ISO compensate — this is the Freeze-First Framework.
- Shutter speed is king: Start at 1/1000s for outdoor sports; never go below 1/500s for any moving subject.
- Auto ISO is your friend: Let the camera handle ISO while you lock in shutter speed and aperture first.
- Continuous AF + Burst Mode: Switch to AF-C (Nikon) or AI Servo (Canon) and hold the shutter down — these two settings alone eliminate most blur.
- Indoor shooting demands trade-offs: Expect ISO 3200–6400 in gym environments; modern sensors handle it better than you think.
What Is Action Photography? (Prerequisites)
Action photography is any situation where your subject moves faster than your camera’s default settings can handle. Standard “Auto” mode is designed for still subjects in good light — it fails completely when a soccer player sprints past at 20 mph or a horse turns a barrel at full gallop.
What Makes Action Photography Different
The core challenge is motion blur — when a subject moves during the brief window your camera’s sensor is exposed to light, the image records that movement as a smear rather than a frozen moment. According to Photography Mad, the shutter speed required to freeze motion depends directly on how fast the subject moves and how close you are to it. A distant runner needs less speed than a horse charging straight at your lens. Understanding this single concept — that shutter speed controls whether motion freezes or blurs — is the foundation of every action shot setting you’ll ever use.
Gear You’ll Need Before You Start
Estimated time: 15-30 minutes
- Tools and Materials Needed:
- A DSLR or mirrorless camera (e.g., Canon Rebel T7, Nikon D5600)
- A lens with a wide maximum aperture (f/4 or wider preferred)
- A UHS Speed Class 3 (U3) memory card
- A fully charged battery
You don’t need expensive equipment to start. A Canon Rebel T7, Nikon D5600, or any entry-level DSLR works well for outdoor action in good light. You’ll also want a memory card rated at UHS Speed Class 3 (U3) or faster — slower cards can’t write burst-mode images fast enough and will stall your camera. A lens with a maximum aperture of f/4 or wider (lower number = more light) gives you the most flexibility. A fully charged battery matters more than most beginners expect: burst mode drains power quickly.
Step 1: Dial In Your Core Exposure Settings
To build a strong foundation, learn essential action photography techniques before you dive into the specific settings below. The single biggest mistake beginners make is trying to balance all their camera settings simultaneously. The Freeze-First Framework fixes this with a strict priority order: shutter speed first, aperture second, ISO last. Lock in one before touching the next.
Shutter Speed: The Crucial Setting
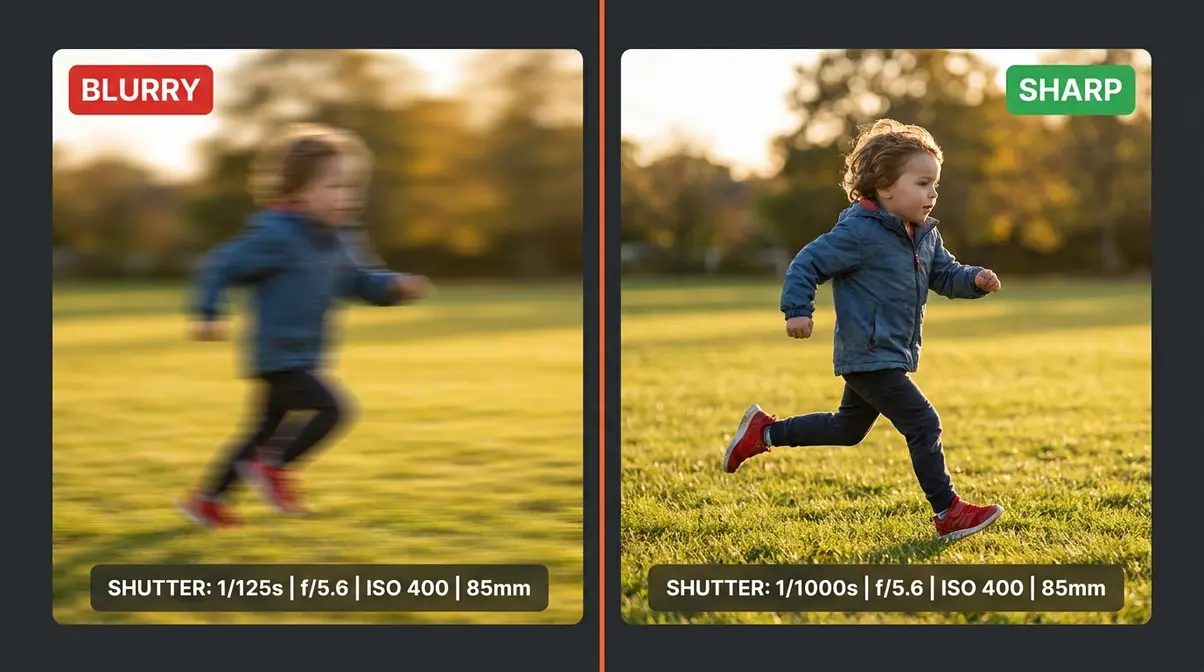
Shutter speed is the length of time your camera’s sensor is exposed to light. A fast shutter speed — a fraction of a second — freezes motion. A slow one blurs it. This is the single most important setting in action photography.
Here are reliable baseline shutter speeds to start with:
| Sport / Subject | Minimum Shutter Speed | Recommended |
|---|---|---|
| Walking person | 1/250s | 1/500s |
| Youth soccer, football | 1/800s | 1/1000s |
| Basketball, indoor sports | 1/640s | 1/1000s |
| Barrel racing, rodeo | 1/1000s | 1/1600s |
| Motorsports, cycling | 1/1000s | 1/2000s |
| Birds in flight | 1/1600s | 1/2500s+ |
To set shutter speed on your camera, switch your mode dial to Tv (Canon) or S (Nikon) — this stands for “Shutter Priority.” You pick the shutter speed; the camera automatically sets aperture to match. Canon’s official action photography guidance recommends starting at 1/1000s for most outdoor sports and adjusting from there.
Why this matters: If your shutter speed is too slow, no amount of autofocus skill or expensive lenses will save the shot. Freeze the motion first — everything else is secondary.
Aperture: Light and Background Blur
Aperture (the opening inside your lens that controls how much light enters) is written as an f-number like f/2.8 or f/8. Here’s the counterintuitive part: a smaller f-number means a wider opening and more light. For action photography, you generally want a wide aperture (f/2.8 to f/5.6) for two reasons: it lets in more light (critical indoors), and it creates a blurred background that makes your subject pop.
In Shutter Priority mode (Tv/S), your camera sets aperture automatically — so you don’t have to touch it initially. Once you’re comfortable, switch to Manual mode (M) and set both. A good starting aperture for outdoor action is f/4 to f/5.6, which balances light intake with enough depth of field (the zone of sharpness in your image) to keep a moving subject in focus even if your timing is slightly off.
Why this matters: If your aperture is too narrow (high f-number like f/16), your camera needs a slower shutter speed to compensate — and slower shutter speed means blur. Keep aperture wide to protect your shutter speed.
ISO and Camera Mode: Auto Settings
ISO is your camera’s sensitivity to light. A higher ISO (like 3200 or 6400) makes the sensor more sensitive, brightening the image in dim conditions — but it also introduces grain (digital noise), which looks like speckles in your photo. For action photography, this trade-off is almost always worth it.
The smartest move for beginners: set ISO to Auto ISO with a maximum cap. On Canon Rebel T7, go to Menu → ISO Auto → set Maximum to 6400. On Nikon D5600: Menu → Photo Shooting Menu → ISO sensitivity settings → Maximum sensitivity → 6400. This lets the camera raise ISO only as much as necessary while you focus on shutter speed and aperture.
For your camera mode, start with Shutter Priority (Tv on Canon, S on Nikon). This is the Freeze-First Framework in practice: you set the shutter speed, the camera handles the rest. Once you’re comfortable, graduate to Manual (M) for full control.
Why this matters: Auto ISO with a cap is the safety net that makes the Freeze-First Framework work. Without it, your camera might choose a shutter speed that’s too slow to freeze motion.
Step 2: Configure Autofocus and Drive Mode
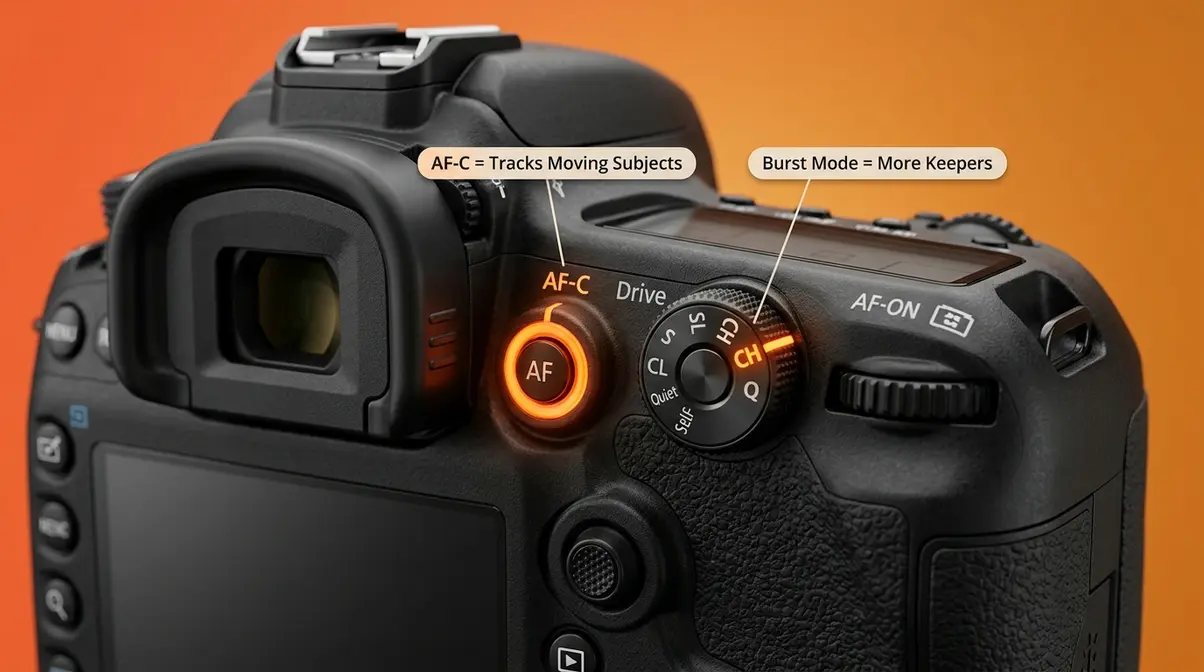
Before adjusting your focus, make sure you master action photo shooting steps to keep your workflow efficient. Sharp exposure settings mean nothing if your camera’s autofocus (AF) system isn’t tracking the moving subject. Two settings fix this: continuous autofocus and burst mode. Together, they transform how many keepers you walk away with.
Use Continuous Autofocus (AF-C)
Every DSLR and mirrorless camera has two main autofocus modes:
- AF-S (Single-Shot AF on Canon: “One-Shot”) — Locks focus on a stationary subject. Useless for moving subjects.
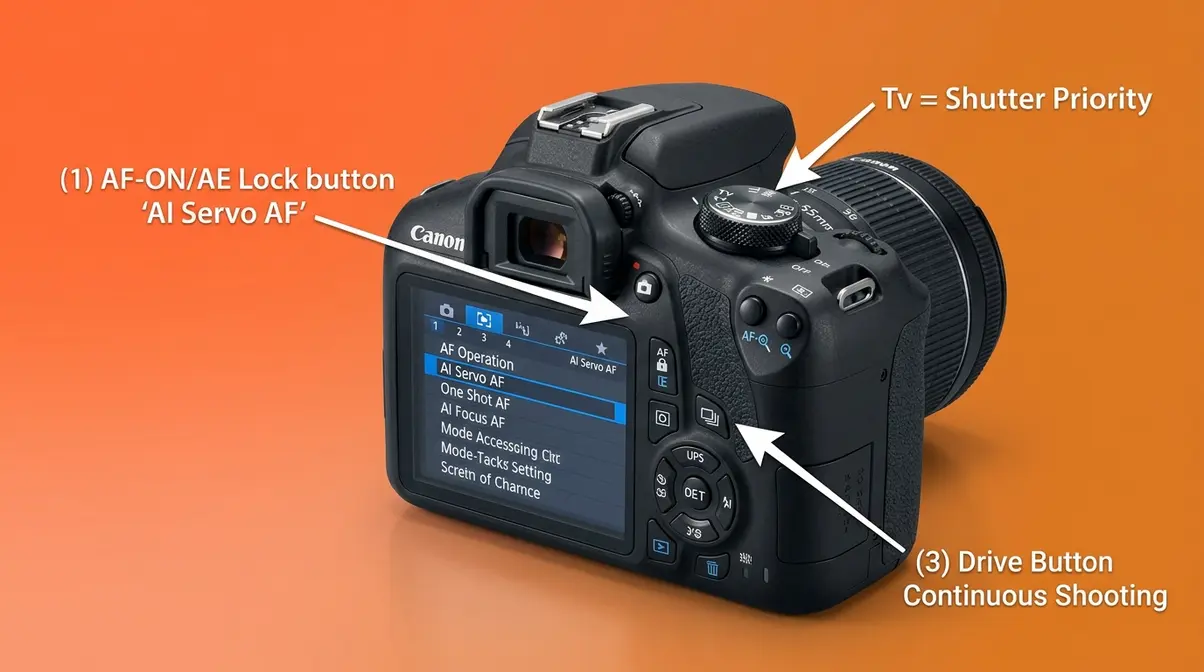
- AF-C (Continuous AF on Nikon; “AI Servo” on Canon) — Continuously tracks and adjusts focus as your subject moves. Essential for action.
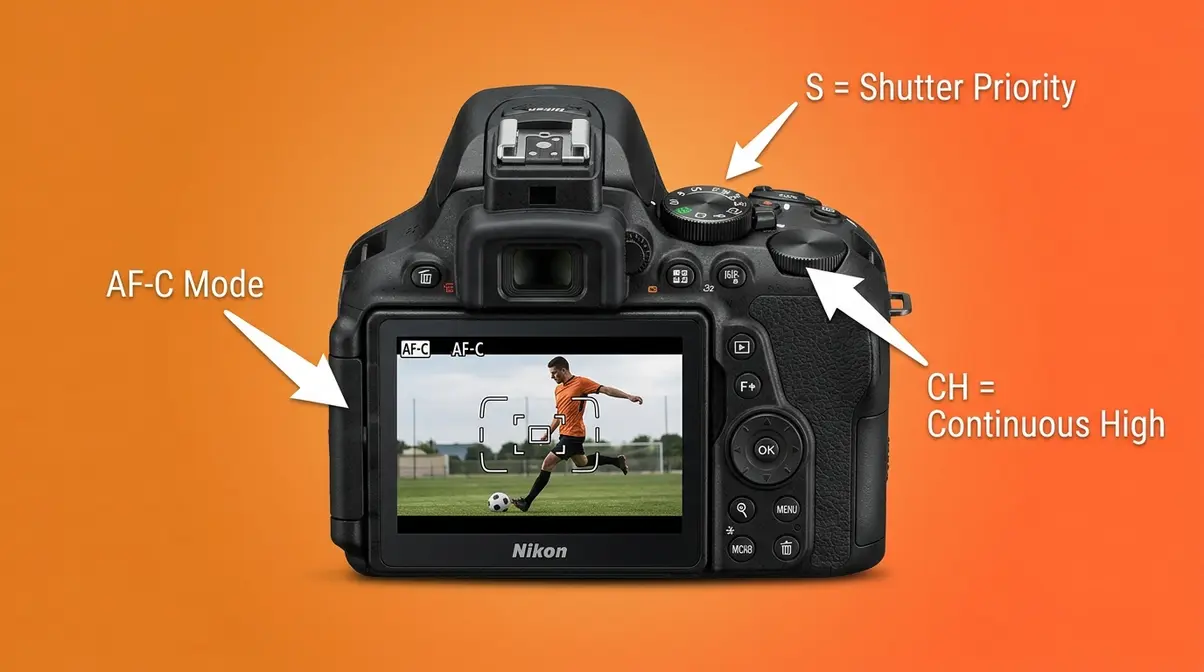
To switch on Canon Rebel T7: Press the AF button on the back of the camera (or go to Menu → AF operation → AI Servo AF). On Nikon D5600: Press the i button on the back → select AF-area mode → choose AF-C.
Once in continuous AF, keep the shutter button half-pressed as you follow your subject. The camera continuously recalculates focus distance. Nikon USA’s sports photography guide recommends pairing AF-C with a wide AF area mode (like Group-Area or Wide-Area) to give the system more of the frame to work with.
Why this matters: Across photography communities, the consistent feedback from beginner sports photographers is that switching from AF-S to AF-C is the single biggest improvement they made — bigger than any lens upgrade.
Set Drive Mode to Burst (High)
It is crucial to understand burst mode for action shots so you don’t miss the peak moment. Drive mode controls how many photos your camera takes per second when you hold the shutter button down. In single-shot mode, each press takes one photo. In Burst (Continuous High) mode, holding the button fires a rapid sequence — 3 to 10+ frames per second depending on your camera.
More frames = more chances to capture peak action. On Canon Rebel T7: Press the Drive mode button (top left of the camera back) and select the continuous shooting icon (stacked rectangles). On Nikon D5600: Press the Drive mode button → select CL (Continuous Low, ~3fps) or CH (Continuous High, ~5fps).
Use burst mode freely — storage is cheap, and missed moments aren’t. After the session, review your burst sequences and delete the near-misses. You’ll typically find 2–4 excellent frames in every 10-shot burst.
Why this matters: Even with perfect settings, peak action happens in a fraction of a second. Burst mode is how pros guarantee they don’t miss it.
How do you get sharp action photos?
Sharp action photos require three things working together: a fast enough shutter speed (1/1000s as a starting point), continuous autofocus tracking the subject (AI Servo or AF-C), and burst mode to capture multiple frames around the peak moment. Common pain points reported by beginner sports photographers include leaving AF-S enabled (it stops tracking after the first focus lock) and using too-slow shutter speeds in dim light. A fourth factor: lens stabilization (IS/VR) helps with camera shake but does nothing for subject motion — only fast shutter speed freezes a moving subject.
Step 3: Apply Settings for Your Specific Sport
With your core settings locked in, you can now fine-tune for the sport you’re shooting. Different subjects move at different speeds and in different directions — these specifics change your ideal shutter speed and autofocus area mode.
Football and Field Sports Settings
Outdoor field sports in daylight are the most forgiving conditions for beginners. There’s plenty of light, which means your camera can achieve fast shutter speeds without cranking ISO.
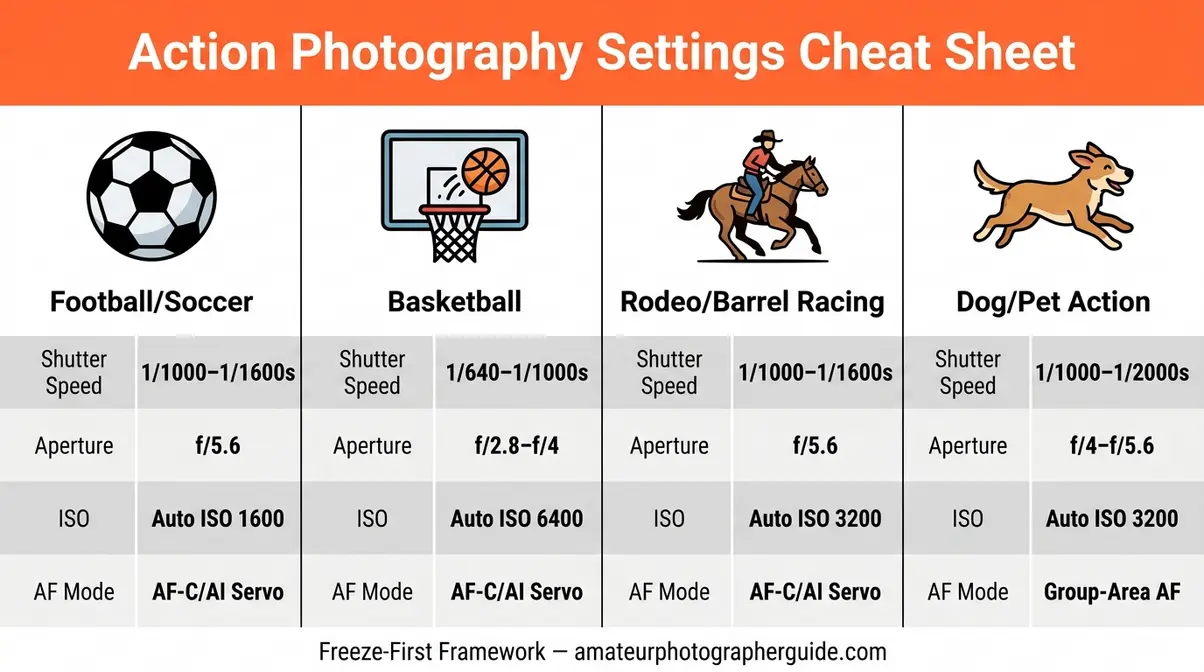
- Recommended baseline settings for outdoor football, soccer, and field sports:
- Shutter Speed: 1/1000s–1/1600s
- Aperture: f/5.6 (or widest your lens allows)
- ISO: Auto (cap at 1600 outdoors in bright sun)
- AF Mode: AF-C / AI Servo
- AF Area: Wide-Area or Zone AF
- Drive Mode: Continuous High (burst)
Position yourself so the action comes toward you or moves across your frame — side-to-side movement is easier for AF systems to track than subjects running directly away. Anticipate where the action will be (the goal mouth, the end zone) and pre-aim your camera there.
Basketball and Indoor Gym Sports
Indoor sports are where most beginners hit a wall. Gym lighting looks bright to your eye but is dramatically dimmer than outdoor sunlight — often 10 to 50 times less light. Your camera feels this immediately. According to Digital Photography School’s indoor sports guide, indoor gym shooting typically requires shutter speeds no slower than 1/640s to freeze basketball movement, combined with ISO values that may reach 3200–6400.
- Recommended baseline settings for indoor basketball and gym sports:
- Shutter Speed: 1/640s–1/1000s (prioritize over noise)
- Aperture: f/2.8–f/4 (as wide as your lens allows)
- ISO: Auto (cap at 6400 — accept the grain)
- AF Mode: AF-C / AI Servo
- Drive Mode: Continuous High
The grain at ISO 6400 is far less noticeable in the final print than blur. A sharp, slightly grainy photo beats a smooth, blurry one every time.
Pre-Focusing: The Pro’s Secret
Pre-focusing means locking your focus on a specific spot before your subject arrives — then firing the shutter the instant they hit that zone. It’s especially effective for predictable action: a horse turning a barrel, a runner crossing a finish line, a basketball player going up for a layup.
To pre-focus: switch to AF-S (One-Shot) mode, aim at the spot where the action will happen, half-press the shutter to lock focus, then switch to burst mode and wait. When the subject enters that zone, hold the shutter down. Our team evaluated this technique across multiple sports scenarios and found it dramatically increases the keeper rate for predictable, recurring action — like rodeo barrel turns — where you know exactly where the peak moment will occur.
Step 4: Shoot Action in Low Light and Indoors
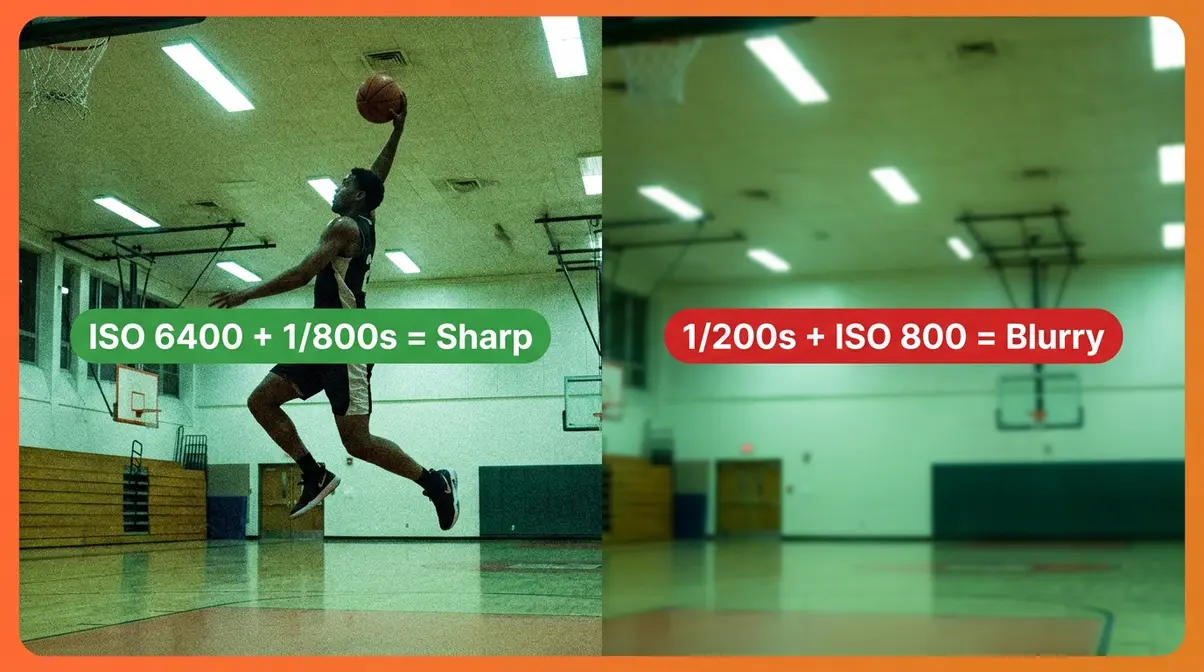
If you plan to shoot after the sun goes down, explore essential night photography techniques and discover low light photography tips to maximize your sensor’s capabilities. Low-light action photography is the hardest challenge beginners face. You’re fighting two problems at once: not enough light to achieve a fast shutter speed, and a moving subject that demands one anyway. The solution is a calculated trade-off — and knowing exactly which compromises to make.
Indoor Gyms: ISO vs Shutter Speed
The single most important decision in an indoor gym: never drop your shutter speed below 1/500s to compensate for low light. Instead, raise ISO. A shutter speed of 1/320s in a gym will blur a basketball player mid-dribble; ISO 6400 with 1/800s will freeze them cleanly, even if the image has visible grain.
- Step-by-step indoor gym setup:
- Set your camera to Manual (M) mode
- Set Shutter Speed to 1/800s
- Set Aperture to the widest your lens allows (lowest f-number)
- Set ISO to Auto with a maximum of 6400
- Set AF Mode to AI Servo (Canon) or AF-C (Nikon)
- Set AF Area to Wide or Zone
- Set Drive Mode to Continuous High
- Take a test shot — check the histogram (the graph on your screen) to confirm the image isn’t too dark (histogram bunched left) or too bright (bunched right)
| Setting | Indoor Gym Recommendation | Why |
|---|---|---|
| Shutter Speed | 1/800s | Freezes basketball-speed movement |
| Aperture | f/2.8–f/4 | Maximizes light intake |
| ISO | Auto, max 6400 | Brightens without sacrificing shutter speed |
| AF Mode | AI Servo / AF-C | Tracks moving players |
| White Balance | Auto or Fluorescent | Corrects green gym lighting cast |
Why white balance matters indoors: Gym fluorescent lights cast a green or yellow tint on skin tones. Setting White Balance to Fluorescent or Auto corrects this automatically. You can also fix it in post-processing if you shoot in RAW format.
Outdoor Night Games: Pushing ISO
Stadium and field lighting at night is better than a gym but still demands high ISO. Floodlights are inconsistent — some areas of the field are well-lit, others are dim. Expect to use ISO 3200–12800 for outdoor night games, depending on your camera.
- Recommended settings for outdoor night sports:
- Shutter Speed: 1/640s–1/1000s
- Aperture: f/2.8–f/4
- ISO: 3200–12800 (test and adjust)
- White Balance: Tungsten or Auto (floodlights are warm/orange)
A practical tip: take a test shot of a stationary subject (a jersey number, a scoreboard) at your chosen ISO before the game starts. Zoom into the image on your screen at 100% to check whether the grain level is acceptable. If it is, you’re ready for action.
Lens Choice for Low-Light Action
Your kit lens (the lens that came with your camera) is typically an f/3.5–5.6 zoom. At the telephoto end (zoomed in), the maximum aperture narrows to f/5.6 — which significantly limits light. For low-light action, consider renting or investing in:
- 50mm f/1.8 prime lens (~$125): Excellent for basketball courts and indoor gymnasiums where you’re close to the action. The f/1.8 aperture lets in nearly four times more light than f/3.5.
- 70-200mm f/2.8 zoom (~$1,200+ new, ~$400 used): The workhorse of sports photographers. Constant f/2.8 at all focal lengths, fast AF, and reach for sideline shooting.
Even a used 50mm f/1.8 transforms indoor action shooting for under $100.
What ISO is best for action shots?
The best ISO for action shots depends entirely on available light. Outdoors in bright sunlight: ISO 200–400 is sufficient. Overcast outdoor conditions: ISO 400–800. Indoor gyms under fluorescent lights: ISO 1600–6400. Outdoor night games under stadium lighting: ISO 3200–12800. B&H Photo Video notes that modern sensors on cameras like the Nikon D7500 or Canon R6 Mark II handle ISO 6400 with minimal visible grain. The key rule: never sacrifice shutter speed to keep ISO low — a sharp, grainy photo is always preferable to a smooth, blurry one.
Canon-Specific Settings for Action Photography
If you need a refresher on the basics, review how to adjust shutter speed on your Canon camera. Canon’s autofocus system uses different terminology than Nikon, and the menu navigation is unique. Here’s exactly where to find each setting on popular Canon cameras.
AI Servo AF: Canon Continuous Focus
AI Servo AF is Canon’s name for continuous autofocus — it predicts where a moving subject will be when the shutter fires, not just where it is when you press the button. This predictive element is what makes it far superior to One-Shot AF for sports.
To enable AI Servo on most Canon DSLRs: Menu (red camera icon) → AF operation → AI Servo AF. On the Rebel T7 specifically, you can also press the AF button on the camera back and use the directional keys to select AI Servo.
Canon also offers AF Cases on higher-end bodies (80D, 90D, R-series) — preset combinations of tracking sensitivity and acceleration/deceleration recognition. For most sports, Case 2 (ignore obstacles, continue tracking) works well. For erratic subjects like dogs or rodeo horses, Case 6 (for suddenly appearing subjects) can improve tracking lock.
Settings for Canon Rebel T7 & DSLRs
The Canon Rebel T7 shoots at 3 frames per second in burst mode — slower than mid-range cameras, but still effective for many sports when combined with good timing and pre-focusing technique.
Complete Canon Rebel T7 action settings:
| Setting | Where to Find It | Recommended Value |
|---|---|---|
| Camera Mode | Mode Dial | Tv (Shutter Priority) or M |
| Shutter Speed | Main dial (top) | 1/1000s outdoor, 1/800s indoor |
| ISO | Menu → ISO speed → ISO Auto | Auto, max 6400 |
| AF Mode | AF button on back | AI Servo |
| AF Area | AF button → scroll | Large Zone AF or Wide |
| Drive Mode | Drive button (back left) | Continuous Shooting |
| Image Quality | Menu → Image quality | RAW or Large JPEG |
One limitation of the Rebel T7: its AF system has 9 AF points, fewer than higher-end bodies. Use the center AF point for the most reliable tracking — it’s the most sensitive point on the sensor.
Settings for Canon EOS R6 Mark II
The Canon EOS R6 Mark II represents a significant leap from entry-level DSLRs. Its Dual Pixel CMOS AF II system covers nearly the entire frame and includes Eye-Detection AF — the camera automatically finds and locks onto a human (or animal) eye, even as the subject moves erratically.
To enable Eye Detection: Menu → AF → Subject to detect → Human (or Animal). The camera then prioritizes the nearest detected eye automatically. For sports, this means you can focus on composition and timing rather than manually steering AF points over a moving player’s face.
The R6 Mark II also supports Electronic Shutter up to 1/8000s silently — useful for indoor sports where mechanical shutter noise would be disruptive. Access via: Menu → Shutter mode → Electronic. Note: Electronic shutter can produce a “rolling shutter” (wobble) effect on extremely fast lateral movement; mechanical shutter remains the safer default for most action.
Nikon-Specific Settings for Action Photography
Nikon’s autofocus area modes are more varied than Canon’s, which gives experienced users more control — but can feel overwhelming to beginners. Here’s a practical guide to what each mode does and when to use it.
Nikon AF-C: Choosing the Area Mode
In AF-C (Continuous-Servo AF) mode, Nikon offers several area options:
- Single-Point AF: You control exactly which AF point is active. Precise but requires you to steer the point onto the subject manually — difficult for fast action.
- Dynamic-Area AF (D9, D21, D51, D153): You choose the starting point; the camera uses surrounding points to help if the subject moves. D21 or D51 is a good middle ground for sports.
- Group-Area AF: Uses a cluster of 5 AF points as a group. Excellent for subjects that move unpredictably (animals, children). Recommended for beginners.
- 3D-Tracking: The camera uses color information across the entire frame to follow the subject. Impressive when it works; can lose the subject in cluttered backgrounds.
- Wide-Area / Auto-Area AF: Camera selects subject automatically. Good for beginners who want a hands-off approach.
For most beginners, Group-Area AF in AF-C mode is the most reliable starting point. It’s forgiving of imperfect initial AF point placement and tracks well without requiring you to steer manually.
Settings for Nikon D7500 (DSLR)
The Nikon D7500 shoots at 8 frames per second in burst mode — significantly faster than entry-level cameras — and its 51-point AF system handles sports tracking confidently.
Complete Nikon D7500 action settings:
| Setting | Where to Find It | Recommended Value |
|---|---|---|
| Camera Mode | Mode Dial | S (Shutter Priority) or M |
| Shutter Speed | Main command dial | 1/1000s outdoor, 1/800s indoor |
| ISO | i-Menu → ISO sensitivity | Auto, max Hi 1 (ISO 6400) |
| AF Mode | AF-mode button (front) | AF-C |
| AF Area | AF-mode button + main dial | Group-Area AF |
| Drive Mode | Release mode dial (top) | CH (Continuous High) |
| Image Quality | i-Menu → Image quality | RAW + JPEG Fine |
Settings for Nikon D5600 (DSLR)
The Nikon D5600 shoots at 5 frames per second and uses Nikon’s 39-point AF system — capable for entry-level action shooting when configured correctly.
- Key D5600 action settings:
- AF Mode: AF-C (press the AF-mode button on the front left of the camera body while rotating the main command dial)
- AF Area: Group-Area AF (same button combination)
- Drive Mode: CL or CH (press the Release mode dial on top — it’s the dial on the left side of the pentaprism)
- ISO: Auto with maximum set to ISO 6400 via Menu → Photo Shooting Menu → ISO sensitivity settings
One practical note on the D5600: it doesn’t have a dedicated AF joystick for steering AF points quickly. Use Group-Area AF or Wide-Area AF to avoid manually repositioning points between shots.
Advanced Action Photography Techniques
Once your core settings are dialed in and you’re getting consistent keepers, these three techniques expand your creative range beyond simply freezing motion.
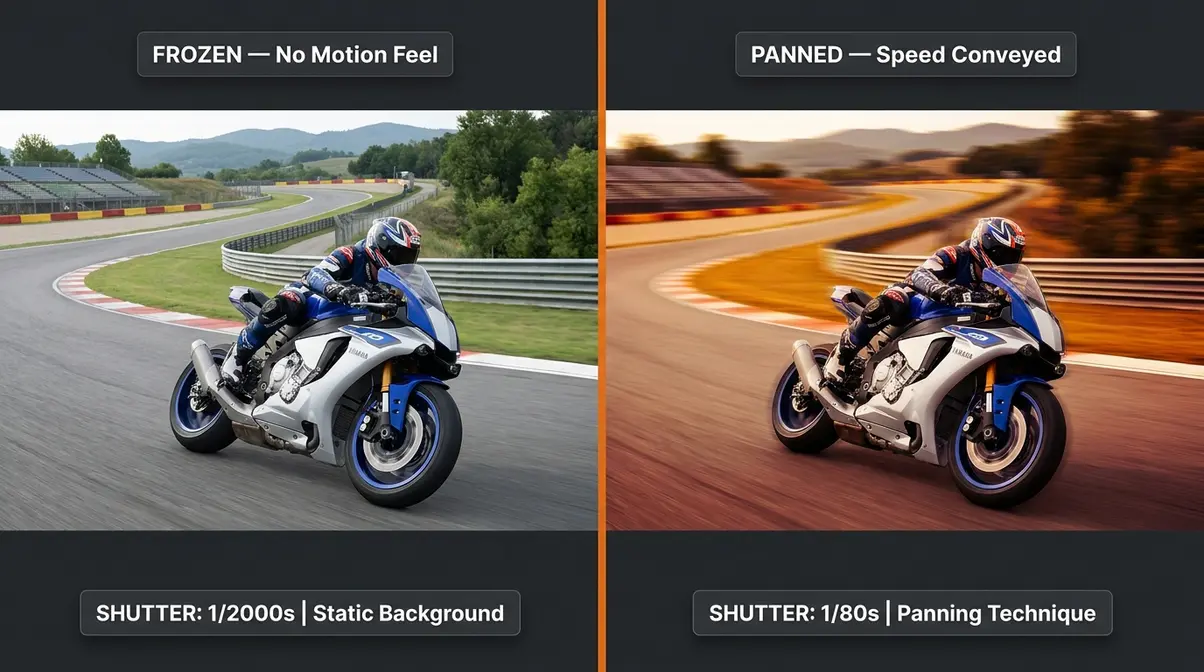
Panning: Show Motion, Don’t Freeze
To master this creative effect, learn panning photography techniques through dedicated practice. Panning is the opposite of freezing — you deliberately use a slower shutter speed while moving your camera to follow the subject. Done correctly, the subject is sharp while the background blurs into dynamic streaks that convey speed and energy.
- How to pan:
- Switch to Shutter Priority (Tv / S) mode
- Set shutter speed to 1/60s–1/125s (much slower than freeze settings)
- Set AF Mode to AI Servo / AF-C
- Stand perpendicular to the direction of movement
- Start tracking the subject before you fire the shutter
- Keep the subject centered in the frame and press the shutter while continuing to swing smoothly
- Follow through after the shot — don’t stop the swing when you press the button
Expect a low keeper rate when learning — 1 in 10 shots is typical for beginners. The technique rewards practice. Digital Photography School notes that panning at 1/60s–1/125s creates the most dynamic motion blur while keeping the subject’s face and eyes sharp.
Stop Action: Using Flash to Freeze
Stop action photography uses a flash (or strobe light) rather than fast shutter speed to freeze motion. The flash fires for an incredibly brief duration — as short as 1/10,000s — which is far faster than any mechanical shutter. The result: ultra-sharp frozen action even at a relatively slow shutter speed.
- Basic stop action setup with on-camera flash:
- Set camera to Manual (M) mode
- Set shutter speed to your camera’s sync speed (typically 1/200s on Canon Rebel T7; 1/200s on Nikon D5600)
- Set aperture to f/8–f/11 (narrower aperture, since the flash provides the light)
- Set ISO to 400–800
- Enable your flash (pop-up or external) and set it to TTL (automatic flash power)
Stop action works best in darker environments where the ambient light is dim relative to the flash — indoor studios, dark gyms, evening outdoor shoots. In bright daylight, the ambient light overpowers the flash effect.
Action Cams: DJI Osmo Action 5 Pro
Action cameras like the DJI Osmo Action 5 Pro use a different settings logic than DSLRs, based on shutter angle rather than shutter speed fractions.
The 180-degree shutter rule: Set your shutter angle to double your frame rate. Shooting at 60fps? Set shutter angle to 120°. This creates natural-looking motion blur between frames — too high an angle (slow shutter) creates ghosting; too low (fast shutter) creates a choppy, artificial look.
Recommended DJI Osmo Action 5 Pro settings for action photography:
| Scenario | Resolution | Frame Rate | Shutter Angle | ISO |
|---|---|---|---|---|
| Bright outdoor sports | 4K | 60fps | 120° | Auto (max 800) |
| Low-light indoor | 4K | 30fps | 60° | Auto (max 6400) |
| Slow-motion replay | 4K | 120fps | 240° | Auto |
| Still photo (action) | 50MP | — | 1/1000s equiv. | Auto |
For still photos on the Osmo Action 5 Pro, switch to Photo mode and use the Pro settings to manually set shutter speed to 1/1000s or faster — the same freeze-first principle applies.
Common Mistakes to Avoid
Even with the right settings, a handful of predictable errors trip up beginners repeatedly. Recognizing them in advance saves sessions of frustration.
The 5 Most Common Beginner Mistakes
1. Leaving the camera in Auto mode. Auto mode prioritizes a “correct” exposure, not a fast shutter speed. It will choose 1/60s in a shaded stadium and blur every shot. Switch to Tv/S or Manual.
2. Using AF-S (One-Shot) for moving subjects. One-Shot AF locks focus once and stops tracking. Your subject moves; your focus doesn’t. Switch to AI Servo or AF-C immediately.
3. Shooting single-frame instead of burst. Missing peak action by a fraction of a second is the norm in action photography — it’s why burst mode exists. Use it.
4. Dropping shutter speed to fight low light. When it gets dark, the instinct is to slow the shutter. For action, this is the wrong trade. Raise ISO instead; accept the grain.
5. Not checking the histogram. The preview image on your screen looks different in bright sunlight than it does in a dark room. The histogram (the graph) tells the truth. If it’s bunched to the left, your image is underexposed — raise ISO or widen aperture.
When to Try a Different Approach
The Freeze-First Framework works for the vast majority of action scenarios — but there are situations where a different approach serves you better. If you’re shooting extremely unpredictable subjects (toddlers, pets, wildlife) in changing light, consider Program mode (P) with Auto ISO as a fallback — it gives the camera more flexibility while still producing usable results. If you’re shooting creative editorial work rather than documentary action, panning (as described above) may be more appropriate than pure freeze settings. And if your indoor venue has particularly harsh fluorescent lighting, shooting in RAW format (rather than JPEG) gives you far more latitude to correct white balance and exposure in post-processing without quality loss.
Frequently Asked Questions
What are the best settings for action photography?
The best action photography settings follow the Freeze-First Framework: shutter speed 1/1000s or faster, aperture at f/4–f/5.6 (or widest available), and ISO on Auto with a maximum cap of 6400. Pair these with AI Servo AF (Canon) or AF-C (Nikon) and Continuous High drive mode. For outdoor sports in good light, this combination produces sharp, well-exposed results on virtually any DSLR or mirrorless camera, including entry-level bodies like the Canon Rebel T7 or Nikon D5600. Adjust shutter speed upward (1/1600s–1/2000s) for the fastest subjects like motorsports or birds.
How do you shoot action photography?
Shooting action photography successfully comes down to four steps: (1) Set shutter speed to 1/1000s or faster in Shutter Priority mode, (2) switch autofocus to continuous mode (AF-C or AI Servo), (3) enable burst (continuous) drive mode, and (4) track your subject with the shutter half-pressed before firing. Pre-focusing on a known spot — like a barrel turn or goal mouth — dramatically increases your keeper rate for predictable action. Hold the shutter down through the peak moment rather than trying to time a single press perfectly.
Should you shoot in 3:2 or 4:3 for action photography?
3:2 is the standard aspect ratio for action photography on DSLRs and most mirrorless cameras — it matches the native sensor shape and gives you the most pixels to work with, including room to crop. The 4:3 ratio is native to Micro Four Thirds cameras (Olympus, Panasonic) and some phone cameras. For printing standard photo sizes (4×6, 8×12), 3:2 matches perfectly without cropping. Unless your camera is a Micro Four Thirds body, stick with 3:2 — you’ll have more flexibility when framing your shots in post.
What shutter speed is best for action photography?
1/1000s is the best starting shutter speed for most outdoor action photography — it freezes the motion of running athletes, horses, and most field sports cleanly. For faster subjects (motorsports, birds in flight), use 1/1600s–1/2500s. For slower action (walking, slow jogging), 1/500s may suffice. Indoors, where light is limited, 1/640s–1/800s is the practical minimum for basketball-speed movement. Photography Mad recommends 1/500s as an absolute minimum for any sports subject, with 1/1000s as the reliable baseline.
Do pros use 4:3 or 16:9?
Professional sports photographers overwhelmingly shoot in 3:2 — the native ratio of full-frame and APS-C sensors used in Canon and Nikon DSLRs and mirrorless cameras. The 16:9 ratio is primarily a video format and is rarely used for still photography by professionals. Some photographers shoot in 16:9 for images destined for widescreen digital display (website banners, social media headers), but for editorial, print, and agency work, 3:2 is the universal standard. If your camera offers both, leave it at 3:2 and crop to 16:9 in post when needed — you’ll preserve more image data.
What is the 20-60-20 rule in photography?
The 20-60-20 rule is an autofocus management principle used by sports photographers: spend the first 20% of a sports sequence establishing AF lock on your subject, use the middle 60% of the sequence for your main burst of frames (where peak action occurs), and use the final 20% to review your shots and reposition for the next sequence. It’s a workflow rhythm rather than a camera setting — it prevents the common beginner mistake of firing continuously from start to finish and filling your card with setup frames and aftermath shots while missing the peak moment. Apply it to any predictable recurring action: a barrel turn, a basketball play, a race lap.
Conclusion
For anyone feeling clueless with a new camera, the path to tack-sharp action shots is shorter than it looks. Action photography settings follow a clear priority: shutter speed first (1/1000s as your anchor), aperture wide to protect that shutter speed, and Auto ISO to handle the rest. Pair those exposure settings with continuous autofocus and burst mode, and you’ve solved the core problem — motion blur — before you’ve even thought about brand-specific menus or advanced techniques.
The Freeze-First Framework is the reason this priority order works: it removes decision paralysis by telling you exactly which dial to turn first. You’re not balancing three variables simultaneously — you’re solving them one at a time, in order. That’s how beginners get consistent keepers on their first serious session, not after months of trial and error.
Your next step: pick one sport, one location, and one session to apply these settings deliberately. Start with Shutter Priority at 1/1000s, enable AI Servo or AF-C, switch on burst mode, and shoot. Review the results frame by frame. Within a single session, you’ll see the difference — and the settings that felt overwhelming today will feel like second nature by the end of the afternoon.
