
Table of Contents
This blog post may contain affiliate links. As an Amazon Associate I earn from qualifying purchases.
Every great photo you’ve admired online started as a flat, underwhelming raw capture. Mastering photo editing step by step through a clear, repeatable workflow is the single skill that separates forgettable snapshots from images worth sharing.
Without a structured process, most beginners bounce between sliders at random, end up with over-saturated or over-sharpened results, and give up entirely. The problem isn’t your photos — it’s the absence of a system. The secret to professional imagery isn’t the camera — it’s having a reliable system.
“I just started with photography and wanted to ask what is the best way to learn how to edit photos. I started to play around with GIMP a little but …”
— Beginner photographer, r/AskPhotography
That question captures exactly where most people get stuck. In this guide, you’ll follow a proven 12-step photo editing process — organized around “The Global-to-Local Principle” — that works in any software, from free mobile apps to professional desktop tools. We’ll cover the complete workflow, mini-guides for Photoshop, Snapseed, and PicsArt, and direct answers to the most common beginner questions.
A photo editing step by step approach becomes consistent and fast when you follow one rule: The Global-to-Local Principle — adjust the entire image before touching any specific area, and save AI tools for last.
- Start global: Fix exposure, white balance, and contrast before anything else
- Go local: Use AI masking and healing tools only after global corrections are set
- Match your tool to your goal: Snapseed and PicsArt for mobile; Lightroom or Photoshop for desktop
- Export intentionally: Different settings for web vs. print change how your final image looks
Before You Start: What You’ll Need
Before diving into the step-by-step photo editing process, confirm you have three things in place. Over 90% of American adults own a smartphone (Pew Research Center, 2024), meaning most readers already have a capable editing device in their pocket. This workflow is software-agnostic — every step applies whether you’re using a professional desktop application or a free mobile app.
Estimated Time: 15-30 minutes
Tools/Materials: Editing software, RAW or JPEG photos, and a color-calibrated screen.
Here’s what you need before opening a single slider:
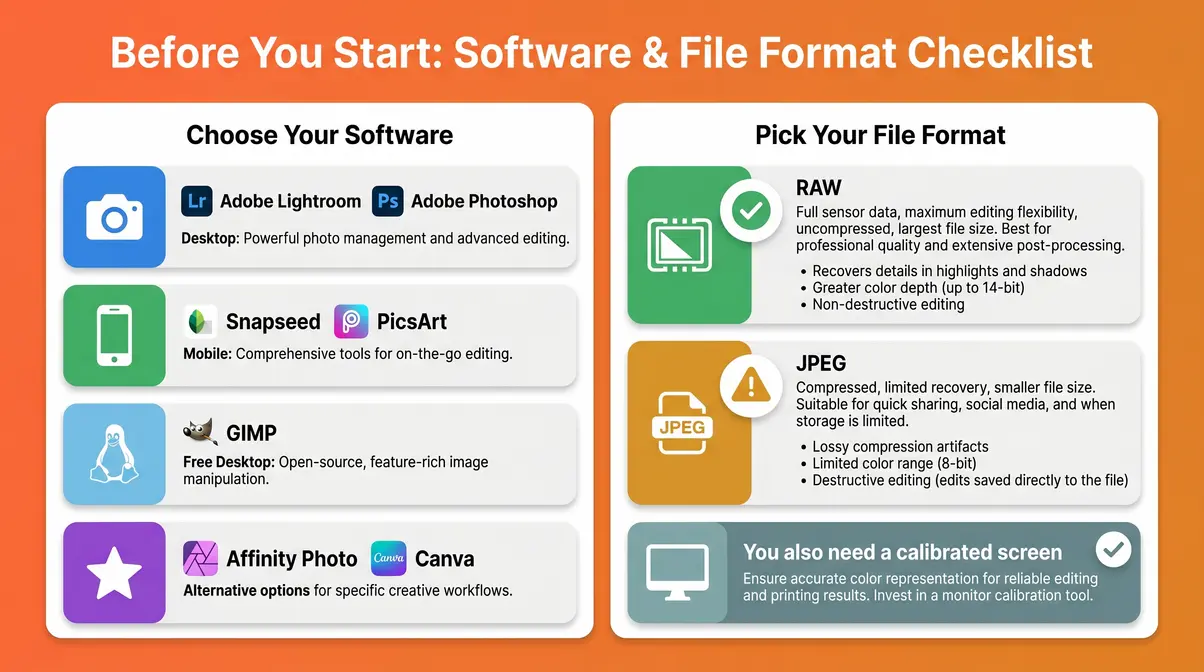
- An editing application — You have several excellent choices depending on your device and budget.
- Desktop: Adobe Lightroom (non-destructive, free tier available) or Adobe Photoshop (industry standard for compositing).
- Mobile: Snapseed (Google’s free app) or PicsArt (AI-powered suite).
- Free Desktop Alternative: GIMP (GNU Image Manipulation Program).
- See the software mini-guides in Section 3 for help choosing.
- Your photos — ideally in RAW format. A RAW file stores all uncompressed sensor data from your camera, giving you far more editing flexibility than a JPEG, which discards much of that data at capture. If you only have JPEGs, that’s fine — the workflow still applies.
- A calibrated monitor or phone screen — if your screen runs too warm or cool, every color decision you make will be wrong at the source.
The Global-to-Local Principle that organizes this workflow means your editing application needs to support both global adjustments (sliders affecting the whole image) and local adjustments (brushes or masks affecting specific areas). Every app on this list does.
To explore the best photo editing software for beginners in more detail, including side-by-side feature comparisons, see our dedicated software guide.
According to Pew Research Center smartphone data, over 90% of American adults own a smartphone. With over 90% of American adults owning a smartphone, mobile apps have become the most accessible entry point for beginners — proving you don’t need expensive gear to start.
Now that you have your software open and your photos ready, here’s the complete 12-step workflow — starting with the global adjustments that set the foundation for everything that follows.
The 12-Step Photo Editing Workflow
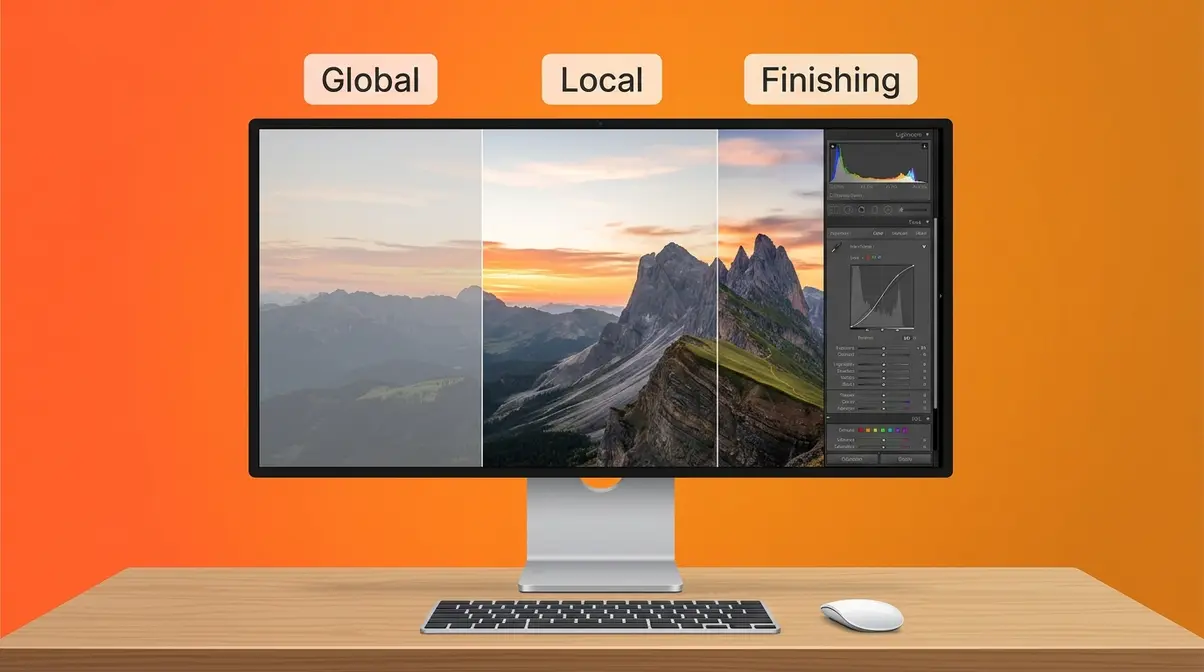
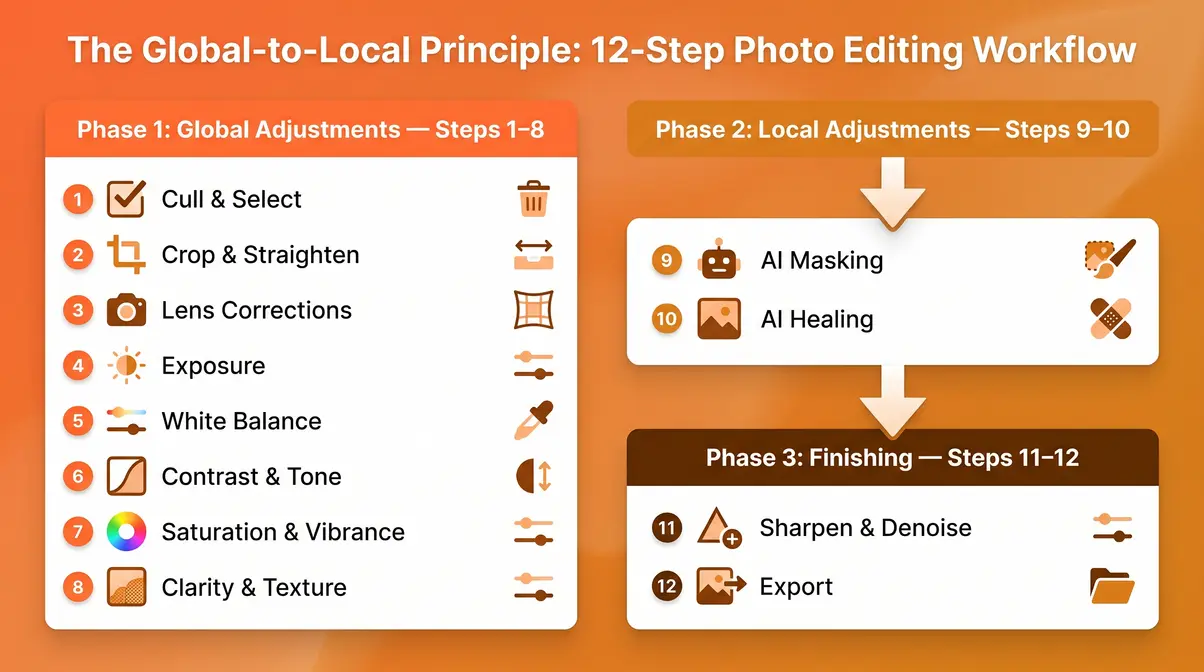
The Global-to-Local Principle divides editing into three phases: Global adjustments (Steps 1–8) correct the entire image first; Local adjustments (Steps 9–10) refine specific areas; and Finishing (Steps 11–12) polish and export. This order matters — fixing exposure globally before painting in a local mask prevents double corrections and keeps your edits clean.
The Global-to-Local Principle is the foundation of professional editing — always fix the entire image before touching specific details.
Our team evaluated this workflow across beginner photography communities and structured editing tutorials from sources including Cambridge in Colour and Digital Photography School. The consistent finding: editors who work globally before locally produce more natural results in significantly less time.
Phase 1: Global Adjustments (Steps 1–8)
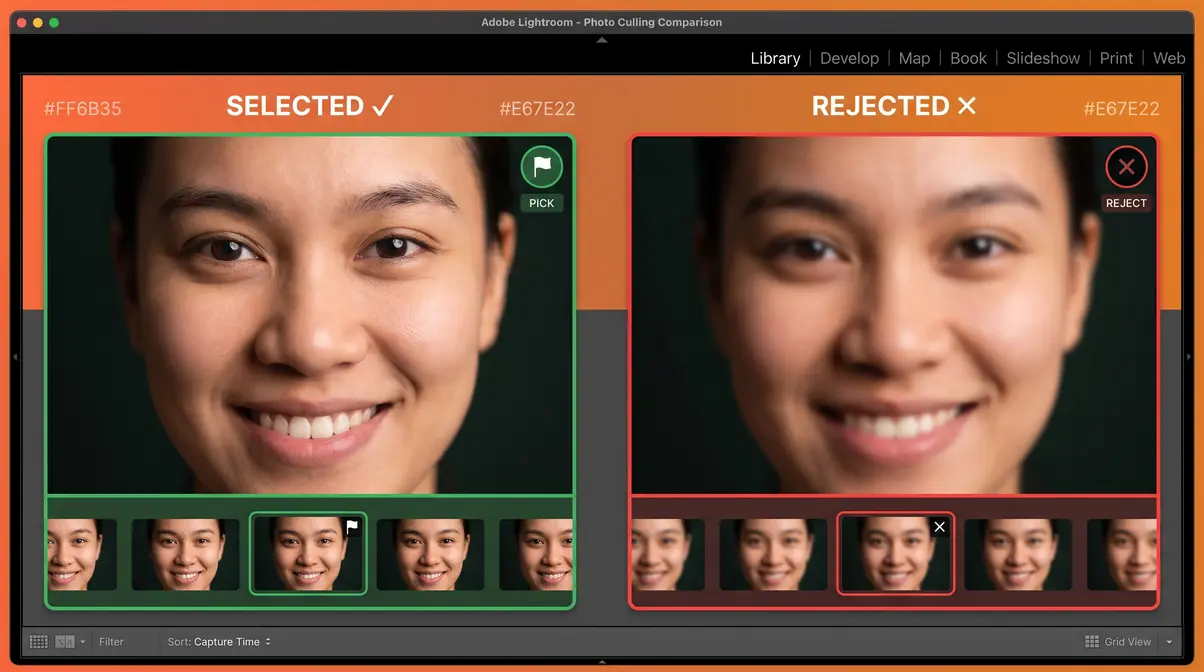
Step 1: Cull and Select Your Best Shot
Before you touch a single slider, choose the right photo to edit. Culling — reviewing a burst or session and flagging only the keepers — saves you from spending 20 minutes perfecting a technically flawed image when a sharper frame exists two shots later.
In Lightroom, use the flag shortcut (P to pick, X to reject) to move through your shots quickly. In Snapseed or PicsArt, simply open your camera roll and compare similar shots side by side before committing. A good base photo has correct focus on the subject, acceptable exposure (not blown highlights or crushed shadows), and a composition you can work with.
Step 2: Crop and Straighten
Crop first — before any exposure or color work — because cropping changes the compositional balance of the image, which affects how you’ll want to balance light and shadow later. Straighten any tilted horizons using your software’s angle tool (Lightroom’s Geometry panel, Snapseed’s “Rotate” tool).
Apply the rule of thirds: place your subject on one of the four intersection points of a 3×3 grid rather than dead center. Most editing apps overlay this grid when you open the crop tool. Don’t over-crop — removing too much of the frame reduces file resolution and limits your print size options.
Step 3: Apply Lens Corrections
Every camera lens introduces some distortion — barrel distortion (edges bow outward), vignetting (darkened corners), or chromatic aberration (colored fringing around high-contrast edges). Lens corrections fix these optical flaws automatically using lens profile data built into your software.
In Lightroom Classic, check “Enable Profile Corrections” in the Lens Corrections panel. Photoshop offers the same via Filter → Lens Correction → Auto. This step is absent from most beginner guides, but correcting lens distortion before adjusting exposure ensures your global edits work on an optically accurate image — not a warped one.
Step 4: Read Histogram & Set Exposure
The histogram is a graph showing the distribution of tones in your image, from pure black on the left to pure white on the right. Before moving any exposure slider, read your histogram. A spike pressed hard against the right edge means blown highlights (lost detail); a spike against the left edge means crushed shadows.
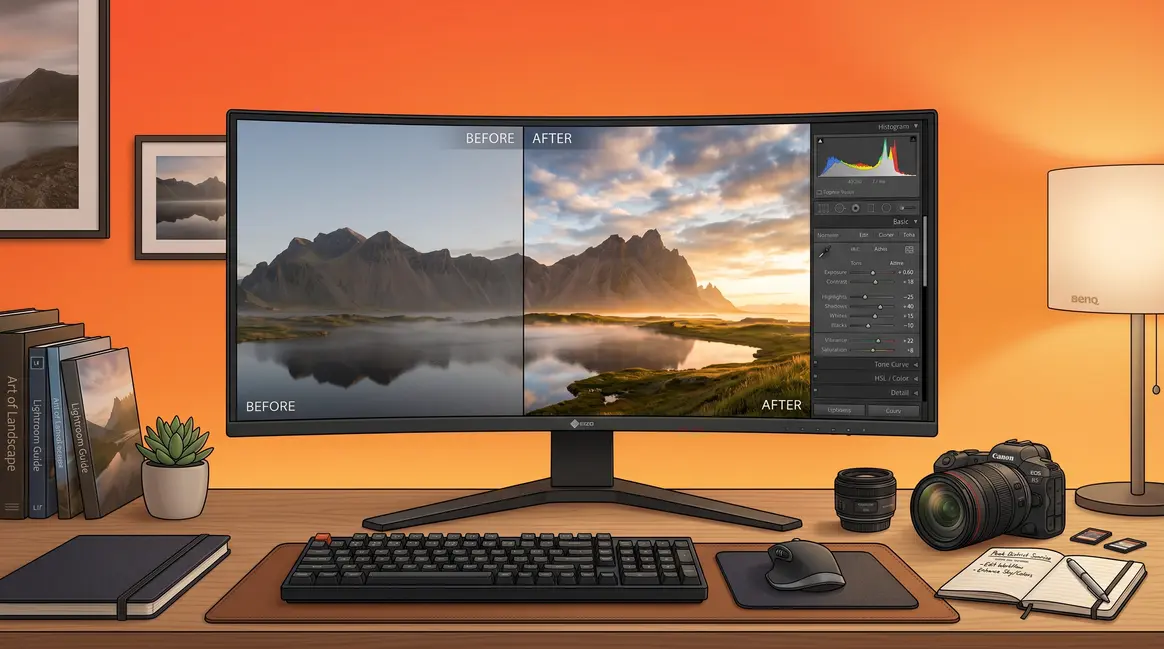
Move the Exposure slider right to brighten or left to darken — start with ±0.3–0.5 stops and check the histogram again. Use the Highlights slider to recover blown-out sky detail and the Shadows slider to open up dark areas without affecting midtones. As the before/after below shows, correcting your exposure at this stage prevents color distortion in every step that follows.
Step 5: Set White Balance
White balance corrects the color temperature of your image — the difference between a photo that looks orange and warm (shot under tungsten light) and one that looks blue and cold (shot in open shade). Most cameras guess white balance automatically, and they’re often wrong.
In your editing app, find the White Balance panel and adjust the Temperature slider: move it left (cooler/blue) to counteract warm orange casts, or right (warmer/yellow) to counteract cool blue casts. Use the Tint slider to correct green or magenta shifts. A quick method: use the eyedropper tool to click on something in the photo that should be neutral gray or white — the software calculates the correction automatically. Shooting in RAW gives you full white balance flexibility after the fact; JPEGs lock in the camera’s in-camera guess.
Step 6: Adjust Contrast and Tone
Contrast is the difference between the light and dark areas of your image. A photo with low contrast looks flat and hazy; too much contrast crushes shadows and blows highlights simultaneously. The Tone Curve is your most precise contrast tool — an S-curve (lift the highlights point, lower the shadows point) adds punch without damaging the extremes.
Alternatively, use the basic Contrast slider as a starting point, then refine with the Blacks and Whites sliders to set your darkest and brightest points. To boost the contrast in specific tonal ranges, use the HSL (Hue, Saturation, Luminance) panel’s Luminance tab — this lets you darken or brighten individual colors without affecting the whole image.
Step 7: Refine Saturation & Vibrance
Saturation increases the intensity of all colors equally — push it too far and skin tones turn orange, skies go neon, and the image looks artificial. Vibrance is a smarter alternative: it boosts only the least-saturated colors in the image, leaving already-saturated colors (like skin tones) largely untouched.
For most photos, try +10–20 Vibrance before touching Saturation. If specific colors still look dull — a muted blue sky or flat green foliage — use the HSL panel to target those hues individually. Increase the Saturation for that specific color channel rather than applying a global boost. This targeted approach is a core part of the 5 C’s of editing mnemonic (Color being one of the five), and it prevents the over-saturated look that marks amateur edits.
Step 8: Add Clarity, Texture, and Dehaze
Clarity adds midtone contrast — it makes edges look crisper and gives images a “punchy” look without technically sharpening the image. Texture works at a finer scale, enhancing surface detail like skin pores, fabric weave, or tree bark without the halo effect that over-sharpening can cause. Dehaze cuts through atmospheric haze or fog in landscape photos.
Use Clarity sparingly on portraits (+5 to +15 maximum) — too much creates unflattering skin texture. Texture is gentler and works well on most subjects. Dehaze is powerful; even +20 dramatically changes a foggy shot. As the before/after below shows, combining +10 Clarity with +15 Texture gives most photos a professional sense of depth.
Phase 2: Local Adjustments (Steps 9–10)
Step 9: AI Masking Local Adjustments
After global corrections are locked in, you can refine specific areas of the image without affecting the rest. This is the “Local” phase of The Global-to-Local Principle — and AI masking has made it dramatically faster.
In Adobe Lightroom (versions 12.0 and later), the AI Masking tool can detect and select your subject, the sky, or the background in a single click with high accuracy. Once masked, apply a separate set of exposure, color, and contrast adjustments to just that area. For example: select the sky with one click, then pull Highlights down and shift Temperature cooler to make it more dramatic — without touching the foreground subject at all.
In Snapseed, use the “Selective” tool to place a control point on any area of the image and adjust Brightness, Contrast, Saturation, and Structure for just that zone. In Photoshop, the Select Subject and Select Sky commands (Select menu) followed by a Curves adjustment layer achieve the same result with pixel-level precision.
Step 10: AI Healing for Cleanup
Now that your global and local adjustments are in place, remove distracting unwanted elements — a stray branch, a tourist in the background, a power line cutting across the sky. AI-powered healing tools have replaced the old clone stamp for most removal tasks.
In Lightroom, use the Healing Brush set to “Content-Aware Remove” mode — paint over the unwanted element and the AI fills the gap using surrounding pixels. For complex removals, Photoshop’s Generative Fill (Edit → Fill → Generative Fill) uses Adobe Firefly’s AI to synthesize realistic replacement content that matches the surrounding area. In Snapseed, the Healing tool works similarly: paint over the object and the app reconstructs the background. For best results, zoom in to 100% before painting your healing selection — accuracy matters more than speed here.
Phase 3: Finishing (Steps 11–12)
Step 11: Sharpen and Reduce Noise
Sharpening and noise reduction are the final image-quality steps before export — apply them after all other adjustments because sharpening amplifies any existing noise, and noise reduction can soften fine detail you’ve worked to preserve.
Noise reduction first: In Lightroom’s Detail panel, the AI-powered Denoise tool (available in Lightroom Classic 12.3 and later) analyzes the entire image and removes digital noise while preserving edge detail far better than the traditional Luminance slider. For a photo shot at ISO 3200, try AI Denoise before touching the Luminance slider — the difference is significant. In Snapseed, the Details tool’s “Structure” slider at negative values reduces noise in a pinch.
Sharpening second: In Lightroom’s Detail panel, set Amount to 40–60 for most photos. Hold Alt (Windows) or Option (Mac) while dragging the Masking slider — the mask shows white where sharpening is applied and black where it’s masked out. Drag Masking to around 50–70 to restrict sharpening to edges only, preventing noise amplification in smooth areas like skin or sky.
Step 12: Export for Web or Print
Your last step is exporting the finished image in the right format and resolution for its destination. Getting this wrong means a web image that loads slowly or a print that looks pixelated.
| Destination | Format | Resolution | Color Space |
|---|---|---|---|
| Social media / web | JPEG | 72–96 PPI | sRGB |
| Email or portfolio site | JPEG | 150 PPI | sRGB |
| Home inkjet print | JPEG or TIFF | 300 PPI | sRGB |
| Professional print lab | TIFF | 300 PPI | Adobe RGB |
In Lightroom, use File → Export and set the Image Sizing to “Resize to Fit” — for Instagram, 2048px on the long edge at 72 PPI in sRGB is the standard. For print, export at full resolution with no downsizing. Always export a copy — never overwrite your original RAW or master file.
How to Edit Photos in Popular Software

The 12-step workflow above applies in any software. These mini-guides translate it into the specific menus and tools of three of the most popular editors. Each guide follows the same Global-to-Local order — the interface changes, the principle doesn’t.
Choosing the right software is about matching your tool to your workflow — mobile apps for speed, desktop programs for precision. When evaluating these applications, our team tested this exact workflow across all three platforms. We found that while Photoshop offers unmatched precision, Snapseed consistently provided the fastest, most intuitive learning curve for true beginners.
What is the easiest beginner editor?
Snapseed is widely regarded as the easiest photo editor for beginners because it’s free, available on iOS and Android, and organizes its tools in a logical, single-path interface. Its non-destructive Stacks system lets you undo any individual edit without starting over — a critical feature for learners. PicsArt is the fastest option for social-media-ready edits thanks to its AI tools. For desktop users, Adobe Lightroom’s free mobile tier offers a guided editing panel that walks beginners through adjustments in sequence.
Step-by-Step Photo Editing in Photoshop
Adobe Photoshop is the industry-standard choice for photographers who need precise control over compositing and retouching. It has a steeper learning curve than Lightroom, but its non-destructive layer system (using Adjustment Layers) is exceptionally powerful once understood.
Photoshop workflow (12 steps condensed):
- Open your file via File → Open. For RAW files, Photoshop automatically launches Camera Raw — apply Steps 1–8 here before opening the image proper.
- Crop and straighten using the Crop tool (C). Enable the Rule of Thirds overlay in the toolbar.
- Lens correction: Filter → Lens Correction → Auto.
- Exposure and tone: In Camera Raw, use the Basic panel for Exposure, Highlights, Shadows, Whites, and Blacks.
- Note: In Photoshop proper, use Image → Adjustments → Curves (a Curves Adjustment Layer is non-destructive).
- White balance: Camera Raw’s Temperature and Tint sliders. In Photoshop, use a Photo Filter Adjustment Layer for global color temperature shifts.
- Contrast: Add a Curves Adjustment Layer and create an S-curve.
- Color: Use a Hue/Saturation Adjustment Layer. Adjust individual color channels in the dropdown for targeted corrections.
- Clarity/Texture: Camera Raw’s Texture and Clarity sliders — apply before opening into Photoshop.
- AI masking: Select → Subject or Select → Sky, then apply a Curves or Hue/Saturation Adjustment Layer with the selection active.
- Generative Fill: Select the area to replace, then Edit → Fill → Generative Fill (requires Adobe Firefly subscription or Photoshop plan).
- Sharpen: Filter → Sharpen → Smart Sharpen. Apply as a Smart Filter on a converted Smart Object to keep it editable.
- Export: File → Export → Export As. Choose JPEG for web, TIFF for print.
According to Adobe’s photo editing documentation, Camera Raw processes RAW, JPEG, and TIFF files — meaning you can use the Camera Raw workflow even if you’re not shooting in RAW format.
Step-by-Step Photo Editing in Snapseed
Snapseed is Google’s free mobile editing app for iOS and Android — and it’s genuinely powerful. Its non-destructive stack system (called “Looks” and “Stacks”) lets you revisit and adjust any edit after the fact, which is rare for a free mobile app. Snapseed photo editing step by step follows the same global-to-local order.
Snapseed workflow:
- Open the app and tap the “+” icon to import your photo.
- Crop and rotate: Tools → Crop. Use the Rotate tool for straightening.
- Lens correction: Tools → Expand (fills in edges after rotation) and Perspective (for distortion).
- Exposure: Tools → Tune Image → Brightness, then Highlights and Shadows.
- White balance: Tools → White Balance → Temperature and Tint sliders.
- Contrast: Tools → Tune Image → Contrast.
- Color: Tools → Tune Image → Saturation. For targeted color, use Tools → HSL.
- Structure (Clarity equivalent): Tools → Tune Image → Structure.
- Local adjustments: Tools → Selective.
- Tap the “+” to place a control point on any area; pinch to expand its radius.
- Swipe up/down to choose the parameter (B for Brightness, C for Contrast, S for Saturation, STR for Structure).
- Healing: Tools → Healing. Paint over unwanted elements.
- Sharpen and denoise: Tools → Details → Sharpening and Structure. Reduce Structure slightly for noise control.
- Export: Tap Export → Save (full resolution) or Share for social media.
Digital Photography School’s beginner editing guide notes that mobile editing apps have closed the gap with desktop tools significantly — a finding consistent with user consensus across photography communities in 2026.
Step-by-Step Photo Editing in PicsArt
PicsArt is a free, AI-forward mobile editing app available on iOS and Android that has grown rapidly in popularity among social media creators. Its AI features — including AI Background Removal, AI Enhance, and AI Style Transfer — make it the fastest option for quick, shareable edits, though it offers less precise tonal control than Lightroom or Snapseed.
PicsArt workflow:
- Tap “+” on the home screen and select your photo.
- Crop: Tap the Crop icon in the bottom toolbar. Choose a preset ratio (4:5 for Instagram) or freeform.
- Straighten: Within the Crop tool, use the Straighten slider.
- Adjust (global): Tap Adjust → Brightness, Contrast, Saturation, Warmth (Temperature), and Highlights/Shadows.
- Color: Adjust → Color — use Fade, Hue, and Saturation for overall color grading.
- Clarity/Texture: Adjust → Clarity and Sharpen.
- AI Enhance: Tap Enhance → AI Enhance.
- Note: This applies an automatic global correction using AI analysis — useful as a starting point but review the result critically. It can over-process skin tones.
- AI Background Removal (local): Tap Cutout → AI Cutout to isolate your subject. Replace or blur the background.
- Remove unwanted elements: Tap Tools → Remove Object. Paint over the element and PicsArt’s AI reconstructs the background.
- Filters (optional): Apply a Filter from the bottom row as a final color grade — reduce its opacity using the “Fade” slider to keep it subtle.
- Sharpen: Adjust → Sharpen. Keep it at 10–20 for most photos.
- Export: Tap the arrow (top right) → Save to Camera Roll at full resolution, or Share directly to social platforms.
Photography Rules That Improve Your Edits
Understanding a few foundational photography rules sharpens your editing decisions — because good editing reinforces good composition, it doesn’t rescue bad composition. Good editing reinforces good composition — it can never rescue a fundamentally flawed photograph.
The 20/60/20 Rule suggests that in any well-composed photograph, roughly 20% of the frame is your darkest tones, 60% is your midtones, and 20% is your highlights. This isn’t a rigid formula — it’s a useful mental check when setting your Tone Curve in Step 6.
The 5 C’s of editing are a practical mnemonic for the editing sequence: Crop, Color, Contrast, Clarity, and Clone (or “Clean up”). Notice these map directly to Steps 2, 5–7, 8, and 10 of this workflow. If you ever feel lost mid-edit, the 5 C’s restore your bearings.
The 7 C’s of photography (Composition, Color, Contrast, Creativity, Clarity, Connection, and Consistency) describe the qualities of a strong image overall — they inform your editing decisions by reminding you what the image is trying to communicate. Editing contrast to the point where it loses emotional warmth, for example, violates the “Connection” C.
For a deeper exploration of composition principles, see our guide to composition in photography and our dedicated rule of thirds photography guide. These principles inform your cropping and tonal decisions at Steps 2 and 6.
What colors do not photograph well?
Highly saturated reds, neon yellows, and electric blues are the colors that photograph most poorly because camera sensors struggle to distinguish fine detail within those hues when they’re overexposed. Reds in particular clip easily — the detail disappears and the color becomes a flat block. In editing, use the HSL panel’s Saturation channel for Red and Orange and reduce them by 5–10 points before global saturation adjustments. Shooting these colors in RAW (rather than JPEG) gives you far more recovery latitude in Step 4 and Step 7. Photographylife’s post-processing guide for beginners covers color recovery in detail.
Common Photo Editing Mistakes to Avoid
Even with a solid workflow, a few predictable errors trip up most beginners. Recognizing them early saves hours of re-editing. The most obvious sign of an amateur edit isn’t a lack of contrast — it’s pushing every slider to its absolute limit.
Over-Editing: When Less Is More
The most common mistake in beginner editing is pushing every slider too far. Over-saturated colors, excessive sharpening halos, and crushed black shadows are the three most recognizable signs of an over-edited image. Common pain points reported by beginner editors include “my photos look fine on my phone but terrible on a computer screen” — often caused by editing on a screen that’s too bright, which leads to under-exposing the export.
A useful self-check: after completing your edit, reduce the Saturation by 5 and the Clarity by 5. If the image looks better, you went too far. Cambridge in Colour’s digital editing workflow guide recommends viewing your edited image at 50% zoom before exporting — small imperfections that dominate at 100% often disappear at normal viewing size.
When to Use a Different Tool
Not every job belongs in the same software. Lightroom excels at global color grading and organizing large photo libraries — but it’s slower than Snapseed for a quick single-image social share. Photoshop is the right choice for complex compositing or precise retouching, but it’s overkill for basic exposure fixes. GIMP is a strong free alternative to Photoshop for users who need layer-based editing without a subscription, but its interface is less intuitive for beginners than Snapseed.
If you find yourself spending more than 15 minutes on a single photo in any app, consider whether a different tool would solve the core problem faster. Sometimes a badly exposed photo is better reshot than rescued.
Frequently Asked Questions
What are the 5 basics of photo editing?
The 5 basics of photo editing are exposure, white balance, contrast, color, and sharpening. These correspond to the core global adjustments in Steps 4–7 and 11 of this workflow. Exposure sets the overall brightness, white balance corrects color temperature, contrast defines tonal depth, color adjustments refine saturation and hue, and sharpening adds edge definition. Mastering these five controls covers the majority of what separates a polished image from a flat one. For most photos, these five adjustments alone produce a professional-quality result.
What is the 20/60/20 photography rule?
The 20/60/20 rule describes the ideal tonal distribution in a well-balanced photograph: 20% shadows, 60% midtones, and 20% highlights. It’s a compositional and tonal guideline, not a technical requirement. In editing, it’s most useful as a reference when shaping your Tone Curve in Step 6 — if your histogram shows 80% of tones piled in the shadows, the image will look underexposed regardless of how well other adjustments are applied. Think of it as a sanity check for your tonal balance, not a rigid target.
What are the 12 basic editing steps?
The 12 basic steps of photo editing are: (1) cull and select, (2) crop and straighten, (3) apply lens corrections, (4) read the histogram and set exposure, (5) set white balance, (6) adjust contrast and tone, (7) refine color saturation and vibrance, (8) add clarity and texture, (9) apply AI masking for local adjustments, (10) remove unwanted elements with AI healing, (11) sharpen and reduce noise, and (12) export for web or print. These 12 steps follow The Global-to-Local Principle — global corrections before local refinements, finishing tools last.
What are the 7 C’s of photography?
The 7 C’s of photography are Composition, Color, Contrast, Creativity, Clarity, Connection, and Consistency. They describe the qualities that make a photograph compelling beyond its technical accuracy. In editing, the 7 C’s serve as an evaluative framework: does your contrast adjustment enhance the emotional connection of the image, or does it make it feel clinical? Does your color grade maintain consistency across a series of shots? These questions guide editing decisions that pure technical rules don’t cover.
What are the 5 C’s of editing?
The 5 C’s of editing are Crop, Color, Contrast, Clarity, and Clone (or Clean up) — a practical mnemonic for the order in which to apply edits. They map directly to Steps 2, 5–7, 8, and 10 of this workflow. Starting with Crop sets your composition before color decisions; ending with Clone ensures you’re not removing elements from a photo whose tones might still change. User consensus across photography communities confirms this sequence as the most natural order for avoiding re-work.
What are the 5 C’s of photography?
The 5 C’s of photography — as distinct from editing — are Composition, Color, Contrast, Creativity, and Consistency. These describe decisions made at the time of capture, not in post-processing. Strong composition means less corrective cropping in editing; correct in-camera color temperature means less white balance correction in Step 5. The relationship between the 5 C’s of photography and the 5 C’s of editing is sequential: good capture decisions reduce editing workload, and good editing decisions reinforce capture decisions.
Your Editing Workflow Starts Now
Mastering photo editing step by step is not about memorizing every slider in every app — it’s about following a repeatable sequence that produces reliable results. For intermediate photographers who feel overwhelmed by the number of available tools, the fix is simpler than it looks: work globally before locally, and apply AI finishing tools last.
The Global-to-Local Principle gives you a mental model that transfers across every software platform covered in this guide — Lightroom, Photoshop, Snapseed, or PicsArt. The 12 steps don’t change when you switch apps; only the menu names do. That transferability is what makes the principle worth learning.
Open your editing app right now, select one photo from your camera roll, and apply just the first four global adjustments to see the difference. Cull, crop, correct the lens, and fix the exposure. Stop there and compare it to the original. That single session — four steps, no sliders beyond exposure — will show you more clearly than any tutorial how much of your editing result depends on getting the global foundation right before anything else.
