
Table of Contents
This blog post may contain affiliate links. As an Amazon Associate I earn from qualifying purchases.
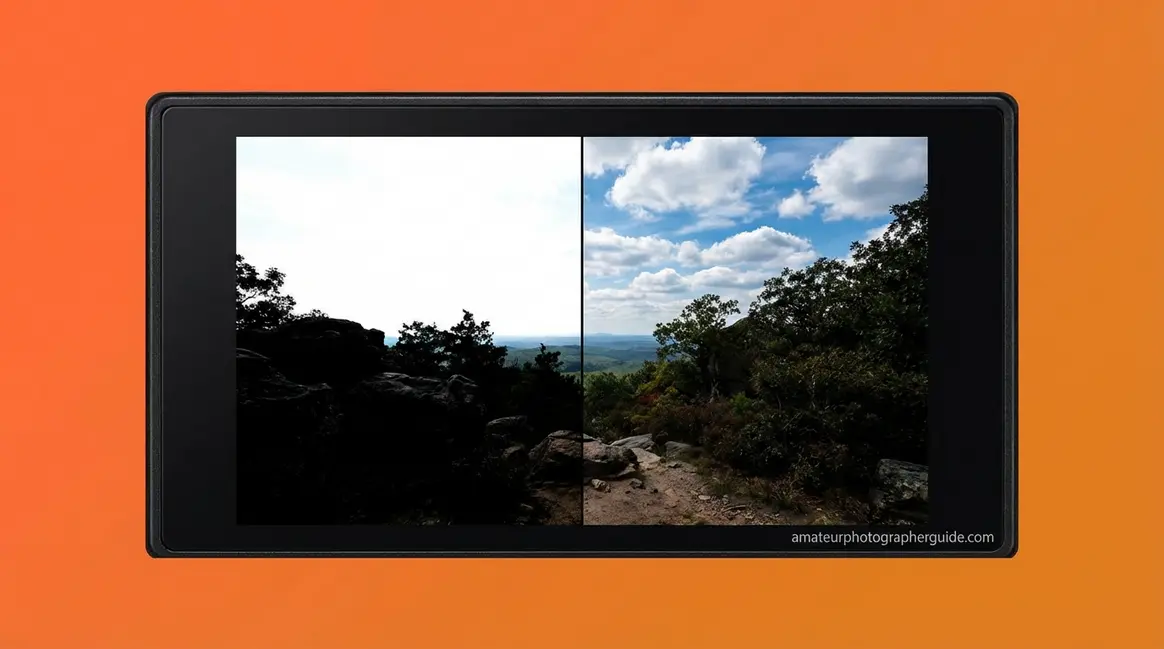
You’ve done it — you frame a perfect golden-hour scene, the sky is glowing, the foreground is richly shadowed, and you press the shutter. You review the image and feel that familiar sinking feeling: the sky is a featureless white blob, and the ground is pure black. That gap between what your eyes saw and what your camera captured has a name: dynamic range in photography.
Most beginner guides either skip the explanation entirely or bury it in physics equations. Neither approach helps you take better photos tomorrow.
In this guide, you’ll learn exactly what dynamic range is, how it’s measured in real numbers, and how to use that knowledge to rescue high-contrast scenes — starting with your very next shoot. We’ll cover the core concept, why it matters, how to read camera specs, and five practical techniques — including a step-by-step exposure bracketing tutorial — that you can apply right away.
Dynamic range in photography describes how wide a gap your camera can capture between the brightest highlight and the darkest shadow — and understanding it directly prevents blown-out skies and crushed shadows.
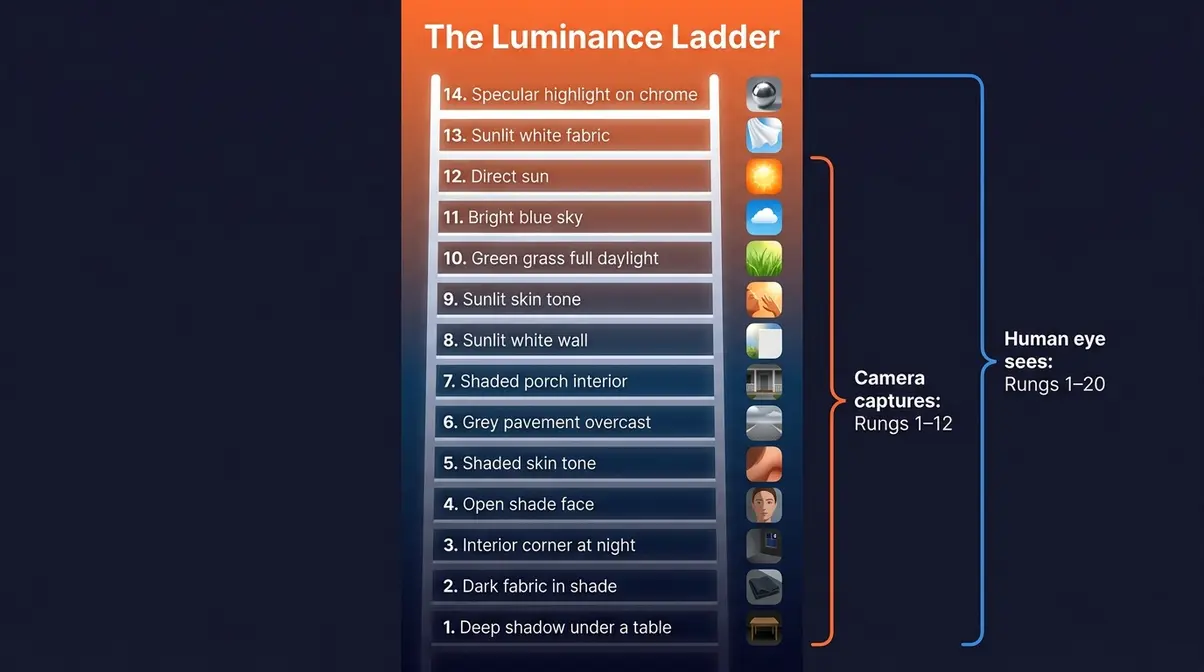
- The Luminance Ladder: Think of stops of dynamic range as rungs on a ladder — each rung doubles the brightness your camera can see, from the deepest shadow to the brightest highlight
- 12–15 stops is the modern benchmark for good camera dynamic range (DxOMark)
- High DR always wins: More stops = more detail you can recover in post-processing
- RAW format + exposure bracketing are the two most effective techniques for high-contrast scenes
- Smartphones now compete: Apple’s Smart HDR and Sony’s overlapping HDR close the gap with mirrorless cameras
What Is Dynamic Range in Photography?
The definition of dynamic range in photography centers on the measurement of how wide a gap your camera sensor can record between the brightest highlight and the darkest shadow in a single image. The real world contains brightness ratios exceeding 100,000:1, while standard camera sensors typically capture just 1,000:1 to 4,000:1 — roughly 10 to 12 stops of dynamic range (Stanford University Graphics Lab, 2010). That gap is precisely why your photos of sunsets, bright windows, and outdoor portraits so often disappoint you.
Before going further, here’s a perspective from the photography community that puts it plainly:
“Think of dynamic range as the resolution for luminance — or ‘brightness’. It will generally affect your image quality a lot. It’s real.”
That single observation is worth sitting with. You already understand image resolution — more megapixels means more fine detail. Dynamic range is the same idea applied to brightness. More stops means more gradations between black and white, and more of those gradations your camera can actually record.
What is dynamic range in simple terms?
Dynamic range is the ratio between the maximum and minimum light intensities a camera sensor can record simultaneously in one shot. Think of it as your camera’s “brightness vocabulary.” A camera with a narrow vocabulary only knows “bright” and “dark.” A camera with a wide vocabulary can describe every subtle gradation between a candlelit corner and a sunlit window in the same frame.
The word dynamic is key here. It doesn’t mean movement. It means range — the spread from the quietest whisper of light to the loudest shout. When photographers talk about a camera “having good dynamic range,” they mean it can hold detail in both the bright sky and the dark ground at the same time, without either going completely white (called blown-out highlights — areas so bright they lose all detail) or completely black (called crushed shadows — areas so dark they lose all detail).
Why does this matter for your photos? Because every high-contrast scene — a sunny outdoor portrait, a room with a bright window, a beach at noon — tests your camera’s dynamic range. When the scene’s contrast exceeds what your sensor can record, something gets sacrificed. Usually it’s the sky, the windows, or the shadow detail in your subject’s face.
Your Camera vs. Your Eyes: The Key Difference
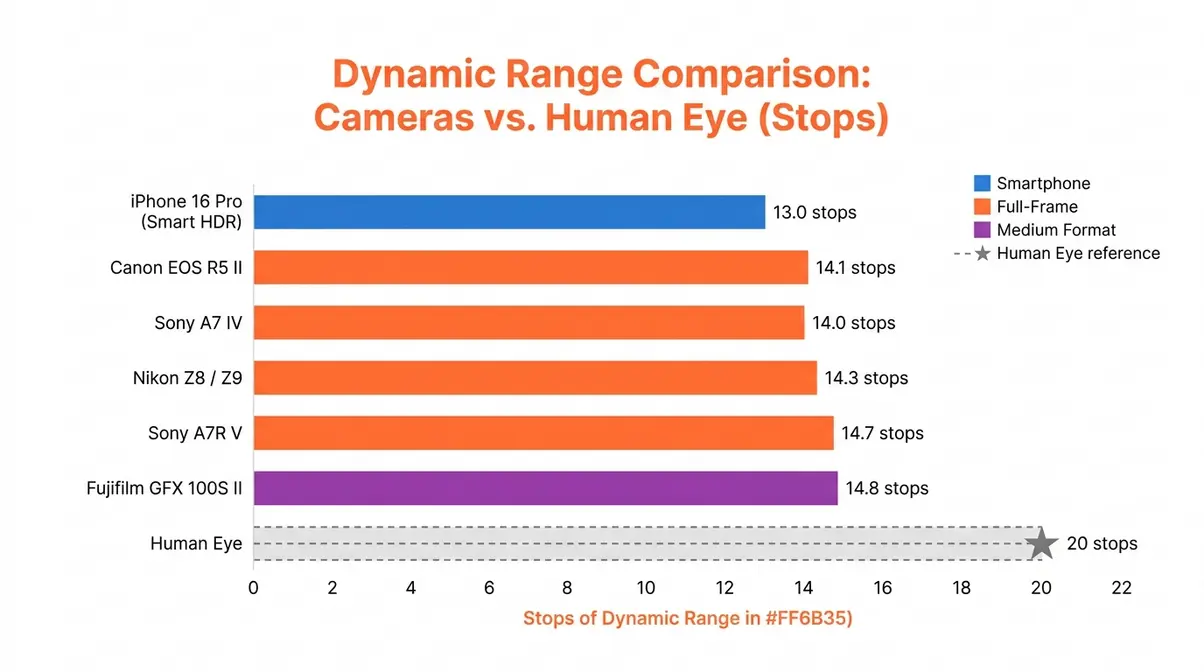
Your eyes are extraordinary instruments. The human visual system can adapt to perceive approximately 20 stops of dynamic range across a scene — far more than any camera currently available. Even the best modern mirrorless cameras top out around 14–15 stops. Your smartphone manages roughly 10–13 stops with computational assistance.
Here’s the practical consequence: when you stand in a doorway and look outside, your eyes effortlessly adjust so you can see both the dark interior details and the bright outdoor scene. Your camera cannot do this with a single exposure. It must choose — expose for the bright outdoor scene (and the interior goes black), or expose for the dark interior (and the outdoor scene blows out to white).
This is not a flaw in your camera. It is simply the physical reality of sensor technology. Understanding it is the first step toward working around it. Photographers who know their camera’s dynamic range limits make better decisions about where to stand, when to shoot, and which techniques to use. Those who don’t know spend hours wondering why their photos look “washed-out” or “overly contrasty” compared to what they saw with their own eyes.
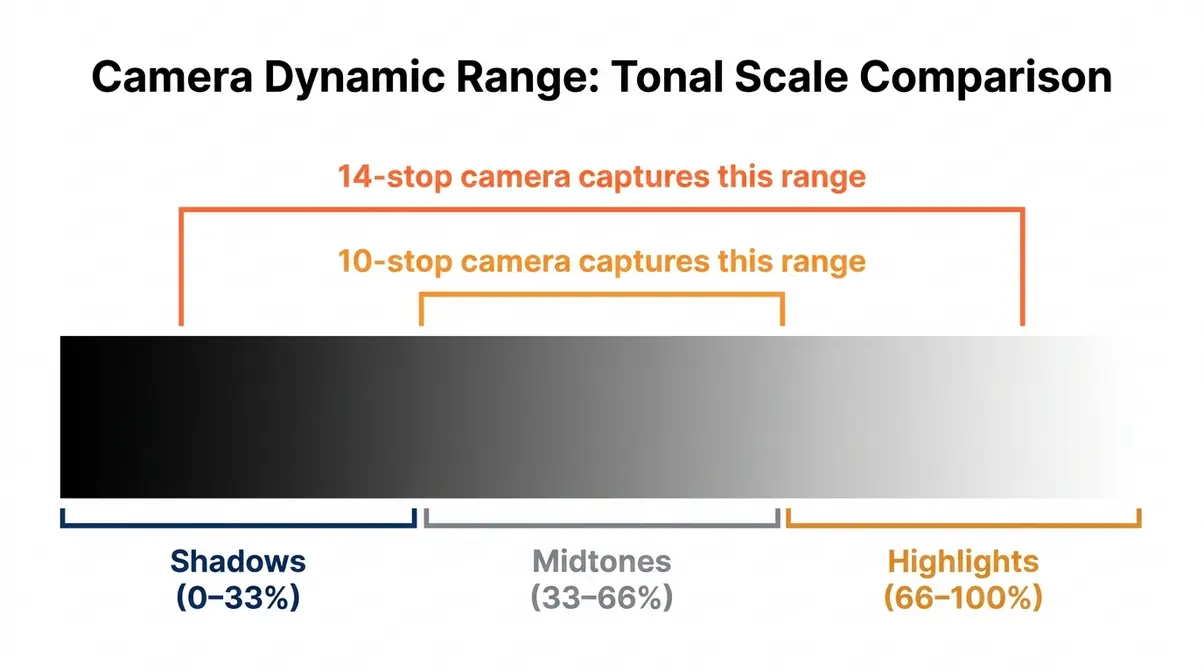
Highlights, Shadows, and Midtones: The Tonal Scale
Every photograph is made up of three tonal regions:
- Highlights — the brightest areas in your image. Think: sky, sunlit surfaces, lamp reflections, white fabric. When highlights are overexposed, they become pure white with zero detail — photographers call this “clipping the highlights.”
- Shadows — the darkest areas in your image. Think: interior corners, the underside of a hat brim, deep forest shade. When shadows are underexposed, they become pure black with no recoverable detail.
- Midtones — everything in between. Human skin tones, green grass, grey pavement. This is where most of the visual interest in a photograph lives.
Dynamic range determines how much of this tonal scale your camera can record at once. A camera with 10 stops of dynamic range captures a narrower slice of the full brightness spectrum. A camera with 14 stops captures a wider slice — meaning more sky detail, more shadow detail, and more flexibility in post-processing.
What Is High Dynamic Range (HDR) in Photography?
High dynamic range (HDR) photography is any technique that captures or displays a wider brightness range than a single standard exposure can record. The term covers everything from in-camera HDR modes (where your camera automatically blends multiple exposures) to manual exposure bracketing merged in software, to the Log or RAW video profiles used in cinema.
This is also where The Luminance Ladder framework becomes useful. Picture a ladder with rungs representing stops of light. Your camera can only “hold onto” a certain number of rungs at once — let’s say 12. The scene in front of you might span 16 rungs, from deep shadow at the bottom to blazing highlight at the top. HDR techniques are essentially ways to capture more rungs — either by taking multiple shots at different exposure levels and combining them, or by using a sensor advanced enough to record more rungs in a single shot.
The goal of HDR is not to make photos look artificially glowing or over-processed (the “HDR look” that became popular in the late 2000s). The goal is natural-looking images where the sky still has clouds, the shadows still have texture, and the scene looks the way your eyes actually experienced it.
Why Dynamic Range Matters for Your Photos
Understanding dynamic range in the abstract is one thing. Seeing its consequences in your actual images is another — and that’s where most beginner photographers have their first real “aha” moment.
Blown-Out Highlights and Crushed Shadows: The Real Cost
Blown-out highlights and crushed shadows are not just aesthetic annoyances. They represent permanent data loss. Once a pixel in your image is recorded as pure white (255 in an 8-bit file) or pure black (0 in an 8-bit file), there is no detail to recover — not in Lightroom, not in Photoshop, not anywhere. The data simply was never recorded.
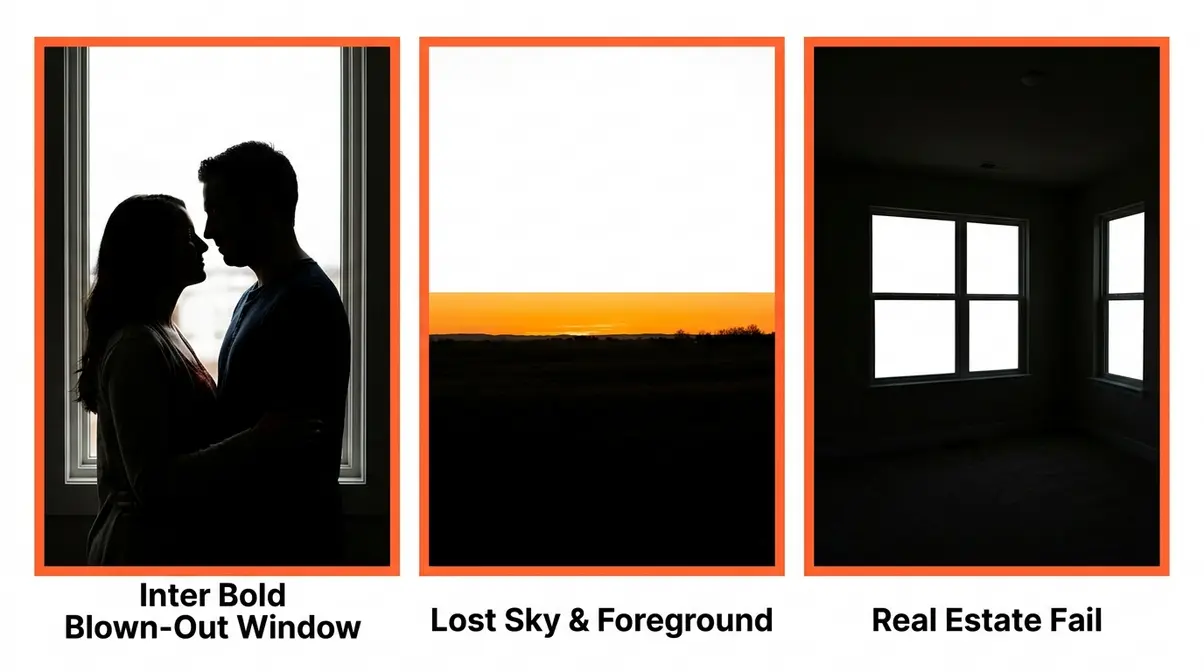
Common pain points reported by photographers across photography communities include: shooting a couple in front of a bright window (faces go dark or window blows out), photographing a landscape at golden hour (sky turns white or foreground turns black), and capturing a real estate interior (rooms look either cave-dark or the windows are featureless white rectangles).
Each of these scenarios shares the same root cause: the scene’s dynamic range exceeded the camera’s capacity. The scene had more rungs on The Luminance Ladder than the sensor could hold.
The good news is that modern RAW files — especially from cameras with 13+ stops of dynamic range — give you significant recovery room. Lightroom and Capture One can pull back highlights by 2–3 stops and lift shadows by 2–4 stops if you shot in RAW. If you shot JPEG, that recovery room shrinks dramatically, because JPEG processing has already discarded much of that tonal information.
Is High or Low Dynamic Range Better?
High dynamic range is almost always better for photographers. More stops of dynamic range means more detail available in both the brightest and darkest parts of your scene — and more flexibility to make creative decisions in post-processing.
A camera with low dynamic range forces you to make hard choices in the field: expose for the sky and lose the foreground, or expose for the foreground and lose the sky. A camera with high dynamic range gives you options. You can expose conservatively, knowing you can lift the shadows later without introducing excessive noise.
The one situation where lower dynamic range might seem “better” is if you’re shooting JPEG and want straight-out-of-camera images with high contrast and punchy colors. Some photographers prefer the look of cameras that apply more aggressive in-camera tone curves. But that’s an aesthetic preference, not a technical advantage — you’re simply having the camera make the creative decisions for you, rather than making them yourself in post.
Across photography communities, the consistent feedback is this: shoot RAW, use a high-dynamic-range camera, and make your tonal decisions in post-processing. That workflow gives you the full power of DR on every frame.
How Dynamic Range Is Measured: Stops and Specs
Understanding how dynamic range is measured in stops — and what those numbers mean for your shooting — is far more useful than just knowing that a camera has “good dynamic range.”
What is a stop of light in photography?
A stop is the fundamental unit of measurement for light in photography. One stop represents a doubling (or halving) of light. This applies to exposure settings (aperture, shutter speed, ISO) and to dynamic range.
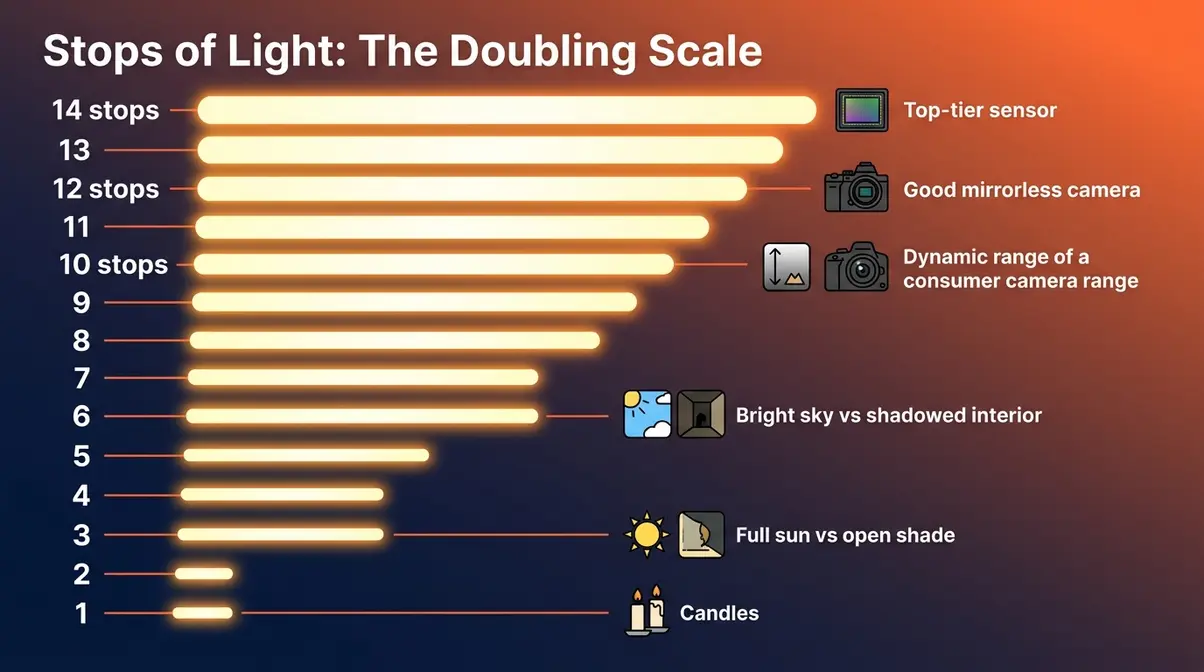
Here’s a simple table that makes stops intuitive:
| Stops | Brightness Ratio | Real-World Equivalent |
|---|---|---|
| 1 stop | 2:1 | Twice as bright |
| 3 stops | 8:1 | Full sun vs. open shade |
| 6 stops | 64:1 | Bright sky vs. shadowed interior |
| 10 stops | 1,024:1 | Typical consumer camera range |
| 12 stops | 4,096:1 | Good mirrorless camera range |
| 14 stops | 16,384:1 | Top-tier sensor (DxOMark) |
| 20 stops | 1,048,576:1 | Human eye (full scene adaptation) |
Each rung on The Luminance Ladder represents one stop. Moving up one rung doubles the brightness. Moving down one rung halves it. When you hear that a camera “has 14 stops of dynamic range,” you now know that means it can simultaneously record a brightness ratio of 16,384:1 — from the darkest shadow detail to the brightest highlight, in a single exposure.
Why does this matter for your photos? Because stops are also how you communicate exposure adjustments. When you dial in +1 stop of exposure compensation, you’re doubling the light hitting the sensor. When your camera’s histogram shows clipping at the top, you’re one or more stops over the sensor’s maximum — and no recovery is possible for those clipped pixels.
What Does 14 Stops of Dynamic Range Mean?
Fourteen stops of dynamic range means your camera can hold detail across a brightness ratio of 16,384:1 — that’s the difference between the darkest shadow your sensor can distinguish from pure black, and the brightest highlight it can distinguish from pure white (DxOMark measurement methodology).
To make that concrete, picture The Luminance Ladder with 14 rungs:
- Rungs 1–3 (Deep Shadows): The underside of a table in a room lit by a single lamp. The texture of dark fabric in shade. The detail in a person’s hair against a dark background.
- Rungs 4–7 (Shadow-to-Midtone Transition): Open shade on a face. A grey pavement on an overcast day. The inside of a shaded porch.
- Rungs 8–11 (Midtone-to-Highlight Transition): Sunlit skin. A white wall in indirect sun. Green grass in full daylight.
- Rungs 12–14 (Highlights): A bright blue sky. Sunlit white fabric. Specular reflections on water or chrome.
A camera with 14 stops can hold all of those simultaneously. A camera with 10 stops might clip at rung 11 (bright sky turns white) and lose detail below rung 4 (deep shadows go black). That’s the practical difference between a high-end mirrorless and a budget compact camera — not in megapixels, but in the number of rungs it can hold.
What Is a Good Dynamic Range for a Camera?
For most photographers, 12 stops of dynamic range is a practical minimum for comfortable post-processing flexibility. At 12 stops, you can recover 2–3 stops of highlights and lift shadows significantly without introducing destructive noise.
Here’s a practical benchmark guide:
| Dynamic Range | Camera Tier | What It Means for You |
|---|---|---|
| Under 10 stops | Entry-level compacts, older smartphones | Limited recovery; shoot JPEG carefully |
| 10–12 stops | Entry-level DSLRs, mid-range smartphones | Decent recovery in RAW; avoid extreme contrast |
| 12–13 stops | Mid-range mirrorless, modern smartphones with HDR | Good flexibility; most scenes manageable in RAW |
| 13–14 stops | Full-frame mirrorless (Sony, Nikon Z, Canon R) | Excellent recovery; comfortable with high contrast |
| 14+ stops | Top-tier full-frame and medium format | Professional-grade; handles nearly any scene |
Modern smartphone computational HDR (Apple Smart HDR, Google HDR+) can simulate 12–13 stops of effective dynamic range by blending multiple exposures in real time — making them competitive with entry-level mirrorless cameras for many everyday scenes.
Which Cameras Have the Best Dynamic Range?
Based on DxOMark sensor evaluations, the highest-performing cameras for dynamic range as of 2026 include:
| Camera | Sensor Type | Dynamic Range (DxOMark) | Best For |
|---|---|---|---|
| Sony A7R V | Full-frame BSI CMOS | ~14.7 stops | Landscape, studio |
| Nikon Z8 / Z9 | Full-frame BSI CMOS | ~14.3 stops | Landscape, wildlife |
| Canon EOS R5 II | Full-frame CMOS | ~14.1 stops | Hybrid photo/video |
| Sony A7 IV | Full-frame BSI CMOS | ~14.0 stops | All-around |
| Fujifilm GFX 100S II | Medium format BSI CMOS | ~14.8 stops | Commercial, fine art |
| iPhone 16 Pro (Smart HDR) | 1/1.28″ CMOS + computational | ~13.0 stops (effective) | Everyday, travel |
CMOS sensor technology has advanced significantly — modern CMOS sensors now exceed 120 dB of dynamic range in specialized configurations (IEEE Xplore, 2014 foundational research; current commercial sensors approach this). For most beginners, the practical takeaway is: any modern full-frame mirrorless camera from Sony, Nikon, or Canon will give you more than enough dynamic range. Your technique matters more than the last half-stop of sensor performance.
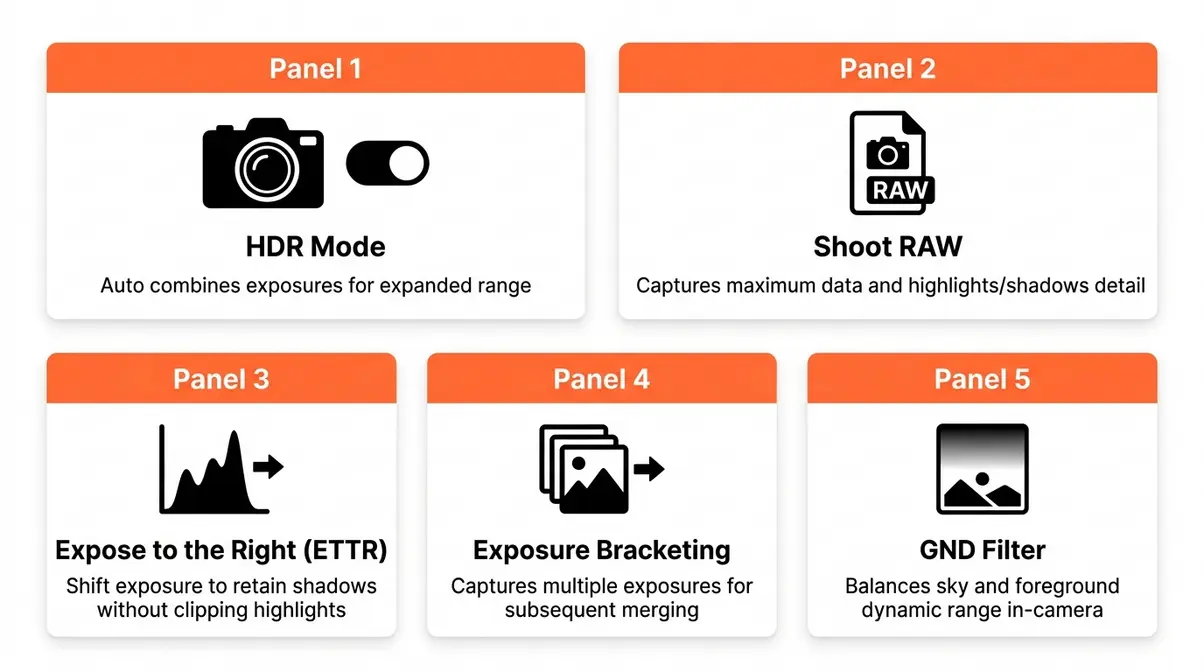
How to Maximize Dynamic Range in Your Photos
Now that you understand what dynamic range is and how it’s measured, it’s time to put that knowledge to work. This section covers five ways to master practical HDR photography techniques — from simple in-camera settings to step-by-step exposure workflows.
Before You Start — What You’ll Need:
- A camera that shoots in RAW format (most DSLRs and mirrorless cameras do; check your menu)
- A tripod (required for exposure bracketing; helpful for GND filter work)
- A photo editing app that handles RAW files (Adobe Lightroom, Capture One, or even free options like RawTherapee)
- Optional: a graduated neutral density (GND) filter for landscape work
If you’re shooting with a smartphone, most of these techniques still apply — your phone handles some steps automatically, but understanding them helps you make better creative decisions.
Should You Use In-Camera HDR Settings?
In-camera HDR modes automatically take 2–3 exposures in rapid succession and blend them into a single image, all within the camera. They’re convenient, but come with trade-offs worth understanding.
- When in-camera HDR helps:
- Casual shooting where you want a single processed file without editing
- Scenes with moderate contrast (not extreme)
- Situations where a tripod isn’t practical
- When to turn in-camera HDR off:
- When shooting moving subjects (the multiple exposures create ghosting — blurry duplicates of anything that moved)
- When shooting RAW for manual post-processing (in-camera HDR usually forces JPEG output)
- When you want full creative control over the final tone mapping
The short answer to “should I turn dynamic range on or off?” is: turn it off when shooting RAW, and use it selectively when shooting JPEG. For serious work, manual exposure bracketing (covered below) gives you far more control than any in-camera HDR mode.
Across photography communities, photographers consistently report that in-camera HDR produces acceptable results for social media sharing but falls short for large prints or professional work — the tone mapping algorithms vary widely between camera brands and rarely match what skilled manual blending achieves.
Shoot in RAW Format for Maximum Recovery
RAW format is the single most impactful change a beginner photographer can make for dynamic range. A RAW file is the unprocessed data directly from your camera’s sensor — no sharpening applied, no noise reduction, no permanent tone adjustments. It’s the digital equivalent of a film negative.
A typical JPEG file contains 8 bits of tonal information per channel — 256 possible brightness levels. A RAW file contains 12–14 bits per channel — up to 16,384 possible brightness levels. That extra tonal depth is where your shadow and highlight recovery lives.
In practical terms: a RAW file shot on a Sony A7 IV (14 stops of dynamic range) allows you to recover highlights by 3–4 stops and lift shadows by 4–5 stops in Adobe Lightroom before noise becomes objectionable. The same scene shot as JPEG might give you 1 stop of recovery in either direction before the image starts to look degraded.
To enable RAW shooting: go to your camera’s Image Quality menu (sometimes called “File Format” or “Quality”) and select RAW or RAW+JPEG. The RAW+JPEG option saves both — a processed JPEG for quick sharing and a RAW file for editing.
Expose to the Right (ETTR): The Smart Exposure Trick
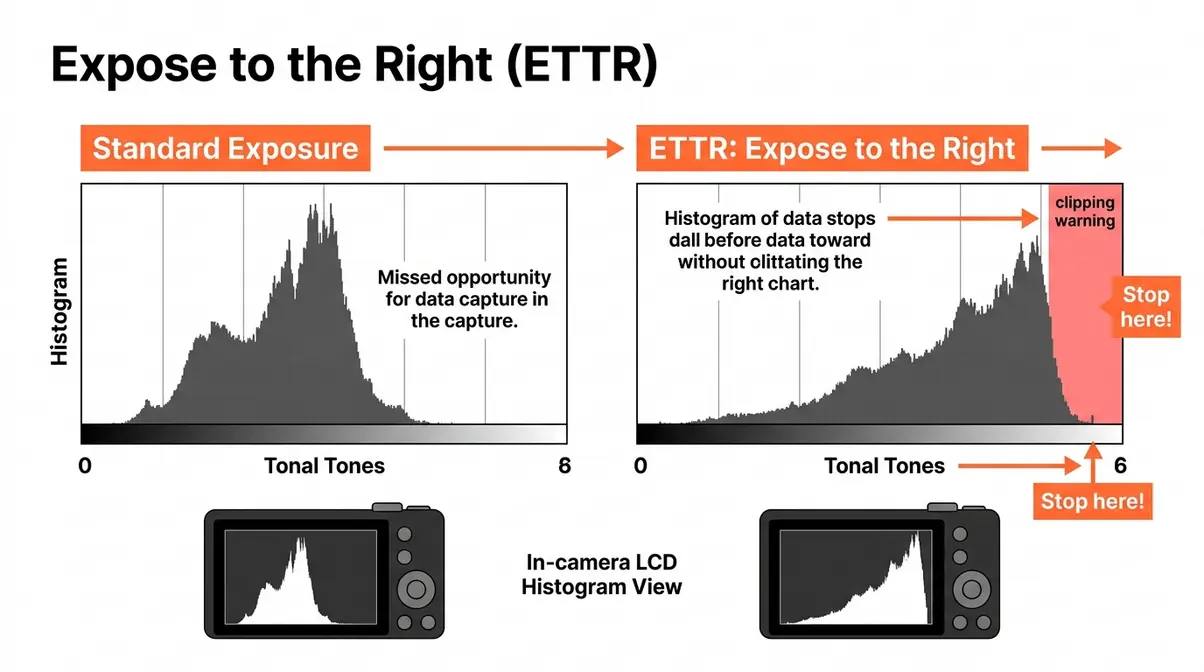
Expose to the Right (ETTR) is a technique where you intentionally expose your image slightly brighter than “correct” — pushing the histogram toward the right side — without clipping the highlights. The name comes from the histogram display: you’re moving the tonal data toward the right edge without pushing it over.
Why does this help dynamic range? Because the right side of the histogram (bright tones) contains more tonal gradations in a digital sensor than the left side (dark tones). By exposing brighter, you capture more tonal data overall — and then darken the image in post-processing to reach the desired brightness. The result is less noise in the shadows and more detail throughout.
- How to apply ETTR:
- Enable your camera’s highlight warning (also called “blinkies” — overexposed areas flash on your LCD).
- Increase exposure (via shutter speed, aperture, or ISO) until the histogram shifts right.
- Stop just before highlights start blinking — that’s your ETTR sweet spot.
- In Lightroom, drag the Exposure slider left to bring the image back to the correct brightness.
The key caution: ETTR only works well in RAW. In JPEG, overexposing clips highlights permanently. And it doesn’t work when the scene has very bright, specular highlights (like the sun itself) — those will always clip, and that’s acceptable.
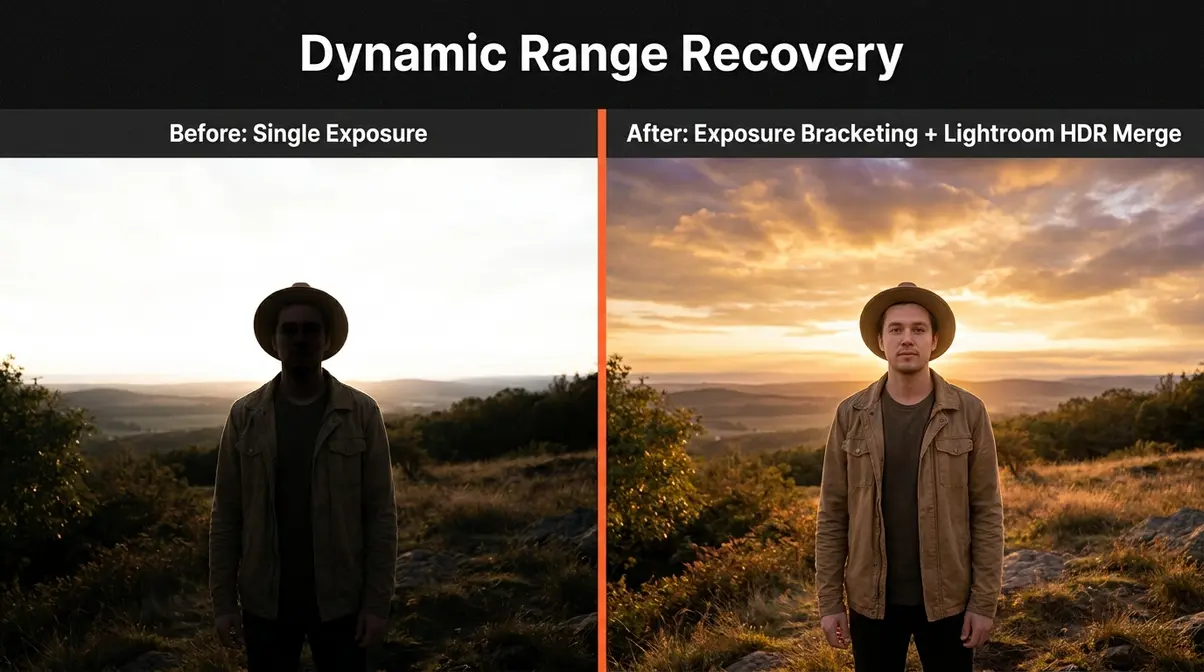
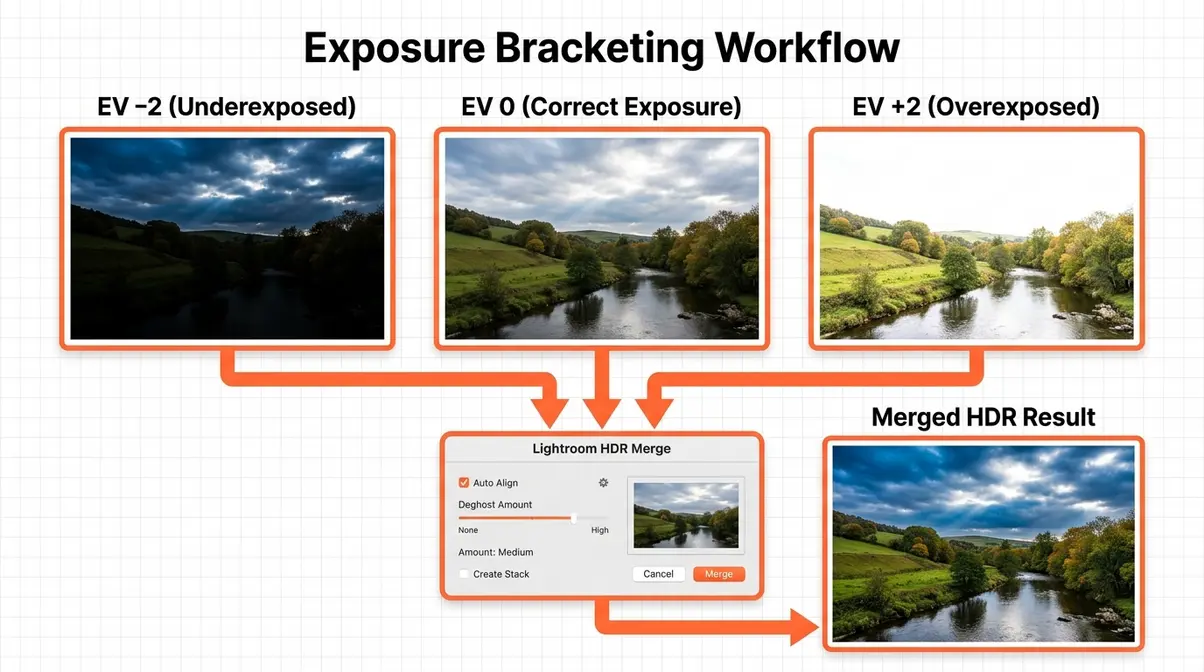
Exposure Bracketing: A Step-by-Step Guide
Exposure bracketing is the technique of taking multiple shots of the same scene at different exposure levels, then blending them in post-processing to create a final image with detail in both highlights and shadows. It’s the most reliable method for handling scenes where the contrast genuinely exceeds your camera’s dynamic range.
What you’ll need: Camera on a tripod, RAW shooting enabled, Adobe Lightroom or Photoshop (or free alternatives like Luminance HDR), approximately 10–15 minutes of editing time.
Step 1: Set up your camera on a tripod.
Any movement between shots creates misalignment in the merged image. Even slight camera shake ruins the blend. Tighten all tripod joints before shooting.
Step 2: Enable Auto Exposure Bracketing (AEB) in your camera menu.
Look for “AEB,” “BKT,” or “Bracketing” in your camera’s shooting menu. Set the bracket interval to ±2 stops — this means your camera will take three shots: one at your metered exposure, one 2 stops darker, and one 2 stops brighter. For extreme contrast (bright noon sun with deep shade), use ±3 stops.
Step 3: Set your camera to Continuous Shooting mode.
In continuous mode, holding the shutter button takes all three bracketed shots in rapid succession — reducing the time between frames and minimizing any subject movement.
Step 4: Choose your base exposure.
Meter for the midtones — typically the most important subject in your frame. Let the bracketing handle the extremes. Use Aperture Priority (Av/A mode) so the camera only changes shutter speed between shots, keeping depth of field consistent.
Step 5: Take the bracketed set.
Press and hold the shutter (or use a remote release for zero vibration). Your camera fires three shots automatically.
Step 6: Import and merge in Lightroom.
Select all three bracketed images in Lightroom. Right-click → Photo Merge → HDR. Check “Auto Align” (corrects minor tripod movement) and set Deghost Amount to “Low” for still scenes or “High” for scenes with moving elements (leaves, water, people). Click Merge.
Step 7: Edit the merged HDR DNG file.
Lightroom creates a merged .DNG file with the combined dynamic range of all three exposures. Now use the Highlights, Shadows, Whites, and Blacks sliders to craft your final tone. You have significantly more latitude than a single RAW file.
Step 8: Export your final image.
Export as JPEG (sRGB, 100% quality) for sharing, or TIFF for print. Your merged image now contains detail in both the sky and the foreground — the full power of DR, captured and preserved.
Using Graduated ND Filters for High-Contrast Scenes
A graduated neutral density (GND) filter is a piece of optical glass (or resin) that is dark at the top and gradually transitions to clear at the bottom. You attach it to your lens and position the dark portion over the bright sky — physically reducing the light from the sky before it hits your sensor. This compresses the scene’s dynamic range at the point of capture, rather than in post-processing.
- GND filters are particularly effective for:
- Landscape photography with a clear horizon line (seascapes, open plains, mountain ridges)
- Architecture photography where a building interior is lit and the exterior sky is bright
- Situations where you want a single RAW file rather than a bracketed merge
The practical limitation: GND filters work best when the horizon between bright and dark areas is a clean, straight line. When trees, buildings, or irregular terrain interrupt the horizon, the filter’s gradient causes unnatural darkening of those elements. In those cases, exposure bracketing or selective Lightroom masking is a better tool.
Hard-edge GND filters have a sharp transition between dark and clear — best for seascapes with a clean horizon. Soft-edge GND filters have a gradual transition — better for scenes where the bright/dark boundary is irregular or the transition zone is wide.
Genre-Specific Examples
Understanding dynamic range in the abstract is one thing. Seeing how it applies to the specific type of photography you actually do is where the concept clicks. Here are three before/after scenarios that photographers encounter regularly.
Landscape Photography — The Golden Hour Sky:
The problem: You’re shooting a sunset. The sky is brilliant orange and pink. The foreground — rocks, grass, water — is in deep shadow. Your camera can’t hold both. You expose for the sky, and the foreground goes black. You expose for the foreground, and the sky blows out.
The solution: Use a 3-shot bracket at ±2 stops. Expose the “correct” shot for the foreground, knowing the sky will be overexposed. The −2 stop shot captures sky detail. Merge in Lightroom HDR. Alternatively, use a soft-edge GND filter (3-stop) positioned over the sky to balance the exposure in a single shot.
What changes: The final image shows cloud texture in the sky AND rock/grass detail in the foreground — matching what your eyes actually saw.
Portrait Photography — The Bright Window:
The problem: You’re photographing a person near a large window. The window light is beautiful, but the background outside the window is 5–6 stops brighter than your subject’s face. Expose for the face, and the window becomes a white rectangle.
The solution: First, try repositioning — move your subject closer to the window and face them toward it, reducing the contrast between face and window. If repositioning isn’t possible, use a 2-shot bracket: one exposed for the face, one for the window. Blend manually in Lightroom using the Masking tool (paint the darker exposure only over the window area).
What changes: The subject’s face is correctly exposed, and the view outside the window retains detail — trees, buildings, or sky instead of a blank white hole.
Real Estate Photography — The Dark Room with Bright Windows:
The problem: You’re photographing a living room. The room interior is 4–5 stops darker than the windows. Every single window in the room becomes a blown-out white rectangle, destroying the sense of the space.
The solution: Professional real estate photographers use a technique called “flambient” — a blend of ambient (natural light) and flash exposures. Take one shot with ambient light (exposing for the windows), one shot with flash (exposing for the interior). Blend the two in Lightroom or Photoshop, painting the flash-lit interior onto the ambient-exposed background. Alternatively, use a 5-shot bracket at ±2 stops for maximum flexibility.
What changes: The room looks bright and inviting, windows show the outdoor view, and the space feels the way it does in person — not like a cave with white rectangles on the walls.
Dynamic Range in Film and Audio
Dynamic range is not a concept unique to still photography. Understanding how it applies in other visual and audio contexts deepens your grasp of the principle — and helps when you move between photo, video, and audio work.
Dynamic Range in Film and Video
In cinematography and video production, dynamic range refers to the same fundamental concept: the range of light intensities a camera or film stock can record from deepest shadow to brightest highlight. Film stocks like Kodak Vision3 can capture approximately 13–14 stops of dynamic range, while modern cinema cameras like the ARRI Alexa 35 claim up to 17 stops in Log-C4 recording mode.
Video and cinema cameras typically record in Log format (Log-C, S-Log3, V-Log) — a flat, low-contrast picture profile that compresses the tonal range into a smaller digital space, preserving more shadow and highlight information. The footage looks washed-out straight from the camera and requires color grading in post-production to restore a natural appearance. The trade-off is worth it: Log footage gives colorists far more flexibility to craft the final look.
For beginner videographers, the practical takeaway is: if your camera has a Log or Flat picture profile, use it when shooting high-contrast scenes and learn basic color grading. If you’re shooting casual video for social media, the standard picture profile is fine — the extra dynamic range in Log is only useful if you’re going to grade the footage.
Dynamic Range in Audio
In audio, dynamic range describes the difference between the quietest sound a recording system can capture above the noise floor and the loudest sound it can record before distortion. The unit of measurement is decibels (dB) rather than stops, but the underlying concept is identical: more range means more information preserved between the quietest and loudest moments.
A standard audio CD has a theoretical dynamic range of about 96 dB. Professional 24-bit audio recording extends that to approximately 144 dB — wider than the range of human hearing. In practice, audio dynamic range matters most in music production, film sound design, and gaming audio (where the difference between a whispered conversation and an explosion must be preserved without either being inaudible or distorted).
The photography-to-audio parallel is direct: just as blown-out highlights are the photographic equivalent of audio clipping, crushed shadows are equivalent to a signal buried in the noise floor. Both represent permanent information loss at opposite ends of the dynamic range.
Common Pitfalls When Managing Dynamic Range
Even photographers who understand dynamic range well make consistent mistakes. Recognizing these patterns — documented repeatedly across photography communities — helps you avoid them from the start.
3 Mistakes That Destroy Your Dynamic Range
Mistake 1: Shooting JPEG in High-Contrast Scenes
JPEG processing permanently discards tonal information. When your camera converts a RAW capture to JPEG, it applies a tone curve and compresses the file, throwing away much of the shadow and highlight data. In a high-contrast scene, this means you lose the recovery latitude you paid for in your camera’s sensor. The fix is straightforward: switch to RAW for any scene with significant contrast between bright and dark areas. Keep JPEG for flat-light situations where recovery latitude isn’t needed.
Mistake 2: Ignoring the Histogram
The camera’s LCD preview is unreliable for judging exposure — screen brightness settings, ambient light, and the small display size all make it hard to judge whether highlights are actually clipped. The histogram is objective. A spike jammed against the right edge means clipped highlights. A spike jammed against the left means crushed shadows. Photographers who shoot by LCD preview alone regularly discover clipped skies that looked fine on the small screen. Enable the histogram display on your camera (usually found in the display settings menu) and check it after every shot in high-contrast situations.
Mistake 3: Over-Processing HDR Merges
The “HDR look” — heavily tone-mapped images with glowing halos, surreal colors, and excessive local contrast — comes from pushing the HDR tone mapping sliders too far. Modern Lightroom HDR merges produce natural-looking results when you use the Highlights, Shadows, and Tone Curve tools subtly. Common pain points reported by photographers learning HDR: halo artifacts around tree lines, unnaturally dark skies, and skin tones that look orange or plastic. The solution is restraint — bring highlights down just enough to show sky detail, lift shadows just enough to see texture, and leave the midtones largely untouched.
When to Use Alternatives Instead of HDR
HDR is not always the right tool. Recognizing when to use a different approach demonstrates the kind of nuanced understanding that separates developing photographers from beginners.
- Use a single RAW exposure instead of HDR when:
- Your scene has 3–4 stops of contrast or less (most overcast-day scenes, shaded interiors, flat-light portraits) — a single RAW file gives you all the recovery latitude you need
- Your subject is moving — bracketing creates ghosting artifacts that are difficult or impossible to remove cleanly
- You want a natural, unmanipulated aesthetic — single-exposure RAW files have a tonal quality that merged HDR sometimes can’t replicate
- Use fill flash instead of HDR when:
- You’re photographing a person in front of a bright background — a small on-camera flash or off-camera strobe can raise the subject’s exposure to match the background, eliminating the contrast problem entirely without any post-processing
- You’re shooting events where a tripod isn’t practical
- Use a reflector instead of GND filters when:
- The “dark” area is a person’s face in shade — a collapsible reflector redirects ambient light onto the face, reducing the contrast between subject and background naturally
Dynamic Range Photography FAQs
What is a good dynamic range for a camera?
A good dynamic range for a camera is 12 stops or higher, which is what most modern mirrorless cameras and high-end smartphones deliver. At 12 stops, you can recover 2–3 stops of blown-out highlights and lift shadows significantly in RAW editing without objectionable noise. For professional landscape or real estate work, 13–14 stops is the benchmark — cameras like the Sony A7R V (approximately 14.7 stops per DxOMark) and Nikon Z8 (approximately 14.3 stops) represent the current ceiling for production cameras. Entry-level cameras with 10–11 stops are workable but require more careful exposure discipline.
What does 14 stops of dynamic range mean?
14 stops of dynamic range means your camera can record a brightness ratio of 16,384:1 in a single image — from the deepest shadow detail to the brightest highlight (DxOMark). Think of The Luminance Ladder with 14 rungs: each rung represents a doubling of brightness. A 14-stop camera can hold detail from a dimly lit interior corner all the way up to a bright blue sky in the same frame. In practical terms, it means extensive latitude to recover highlights and lift shadows in post-processing. A 10-stop camera, by comparison, captures a ratio of only 1,024:1 — significantly less flexibility.
Should I turn dynamic range on or off?
Turn in-camera dynamic range (or HDR) off when shooting RAW — the in-camera processing is redundant and often forces JPEG output, which limits your editing flexibility. Turn it on when shooting JPEG in high-contrast scenes where you want a single processed file without editing. Most cameras label this setting “D-Range Optimizer” (Sony), “Active D-Lighting” (Nikon), or “Auto Lighting Optimizer” (Canon). These tools can improve JPEG results noticeably. For RAW shooters, manual exposure bracketing and Lightroom HDR merging provide far more control and better results than any in-camera dynamic range mode.
Is it better to have low or high dynamic range?
High dynamic range is almost always better for photographers. More stops of dynamic range means more tonal detail captured simultaneously — more sky detail, more shadow texture, and more flexibility to make creative decisions in post-processing rather than being forced into them by your sensor’s limitations. The only scenario where lower dynamic range might suit some photographers is if they shoot JPEG and prefer high-contrast, punchy straight-out-of-camera images — but that’s a stylistic preference, not a technical advantage. For any serious work — landscapes, portraits, real estate, events — higher dynamic range gives you more options and better results.
Which camera has the best dynamic range?
Among production cameras, the Fujifilm GFX 100S II and Sony A7R V consistently lead DxOMark rankings, with approximately 14.8 and 14.7 stops respectively (DxOMark). Among full-frame cameras under $4,000, the Sony A7 IV, Nikon Z8, and Canon EOS R5 II all deliver 14+ stops — enough for virtually any photographic scenario. For smartphone users, the iPhone 16 Pro with Apple’s Smart HDR achieves approximately 13 stops of effective dynamic range through computational blending. The practical advice: any modern full-frame mirrorless camera gives you more than enough dynamic range for professional work. Your technique and your RAW editing skills matter more than the last 0.5-stop difference between brands.
Is 300,000 shutter count high?
Yes, 300,000 shutter actuations is extremely high — most DSLR and mirrorless shutter mechanisms are rated for 150,000 to 500,000 cycles depending on the model. A camera at 300,000 actuations has used 60–100% of its rated shutter life and carries meaningful risk of shutter failure. Cameras with very high shutter counts often show in used-market listings as a price-reduction factor. If you’re considering buying a used camera with 300,000+ actuations, factor in the potential cost of a shutter replacement (typically $200–$400 for a professional service center). For most photographers, a camera under 50,000 actuations is considered low-mileage.
Why is DSLR being discontinued?
Camera manufacturers are discontinuing DSLRs because mirrorless technology has surpassed them in autofocus performance, dynamic range, video capability, and size. Nikon officially ended new DSLR development in 2022. Canon’s last flagship DSLR (the 1D X Mark III) has not been succeeded by a new DSLR model. Sony exited the DSLR market years earlier with its Alpha mirrorless lineup. The mirror box mechanism in DSLRs — which bounced light to an optical viewfinder — added size, weight, and mechanical complexity without improving image quality. Modern mirrorless sensors, including those with the best dynamic range scores, do not use mirror boxes. DSLRs remain excellent cameras and will continue working indefinitely, but new development has shifted entirely to mirrorless.
Are photos better with HDR on or off?
It depends on your workflow and output goal. For JPEG shooters who want straight-out-of-camera files, in-camera HDR (when used in high-contrast scenes) often produces more balanced, natural-looking results than a single exposure — the sky retains detail, and shadows open up. For RAW shooters who edit in Lightroom or Capture One, turning HDR off and controlling the process manually produces better results — you have more control over tone mapping, and the merged HDR DNG file gives you more editing latitude. For moving subjects, HDR (whether in-camera or bracketed) creates ghosting artifacts — a single well-exposed RAW frame is always the better choice in that scenario.
Conclusion
Dynamic range in photography is one of the most practical concepts a beginner can master — because it directly explains the gap between what your eyes see and what your camera records. The real world contains brightness ratios exceeding 100,000:1, while even the best camera sensors capture 14–15 stops at most (Stanford University Graphics Lab, 2010). That gap is permanent, but its consequences are manageable once you understand the tools available. Shooting RAW, using exposure bracketing for high-contrast scenes, and learning to read your histogram are the three habits that will transform your results faster than any gear upgrade.
The Luminance Ladder framework makes this tangible: every stop of dynamic range is a rung, every rung doubles what your camera can see, and every technique in this guide is a way to capture more rungs — or to work creatively within the rungs you have. Whether you’re shooting landscapes at golden hour, portraits near bright windows, or real estate interiors with blown-out windows, the same principles apply. The scene has more rungs than your sensor can hold, and your job is to decide which rungs matter most — or find a technique to capture them all.
Start with one change on your next shoot: switch to RAW format if you haven’t already, and enable your histogram display. Those two steps alone will immediately show you where your camera’s dynamic range is being tested — and give you the recovery latitude to do something about it. For deeper practice, try a 3-shot exposure bracket at your next high-contrast scene and merge it in Lightroom. The difference between a single frustrated exposure and a fully realized image is often just a matter of understanding how many rungs your camera can hold. By mastering these techniques, you will consistently capture stunning images that perfectly reflect the beauty of the scenes you experience in person.
