Product Photography Tips: Complete Beginner’s Guide (2026)
Discover 7 essential product photography tips for amateur photographers to improve image quality, boost sales, and build a strong online portfolio easily.
If your product photos look nothing like the polished images you see from competing brands, you’re not alone — and the gap is smaller to close than you think. Over 75% of digital shoppers rely heavily on product photos to evaluate purchases before buying (Statista, 2026), which means your images are either winning customers or quietly costing you sales.
What’s in this guide
- What Is Product Photography?
- Foundational Product Photography Tips
- Equipment, Lighting, and Backgrounds
- Creative Ideas and Advanced Styling Techniques
- Niche-Specific Photography Techniques
- Platform-Specific Optimization
- The Business of Product Photography
- Common Mistakes to Avoid in Product Photography
- Frequently Asked Questions
- Bringing It All Together
The difference between a $200 sale and a scroll-past often comes down to one thing: lighting. Most beginners don’t realize that professional-looking product shots don’t require a professional studio — they require a system.
In this guide, you’ll find the exact product photography tips and the step-by-step 4-Layer Shot System that small business owners use to produce bright, crisp, pro-level shots at home — even on a founder’s budget. We’ll cover essential gear and lighting setups, creative styling techniques, niche-specific advice for jewelry, clothing, and food, and how to optimize your images for Amazon, Etsy, and Instagram.
What Is Product Photography?
Product photography is the practice of photographing items for commercial use — to showcase them on e-commerce sites, social media, or marketing materials. For small business owners and sellers, it’s the first impression your product makes on a potential buyer who can’t touch or try it in person. You don’t need a studio to do this well.
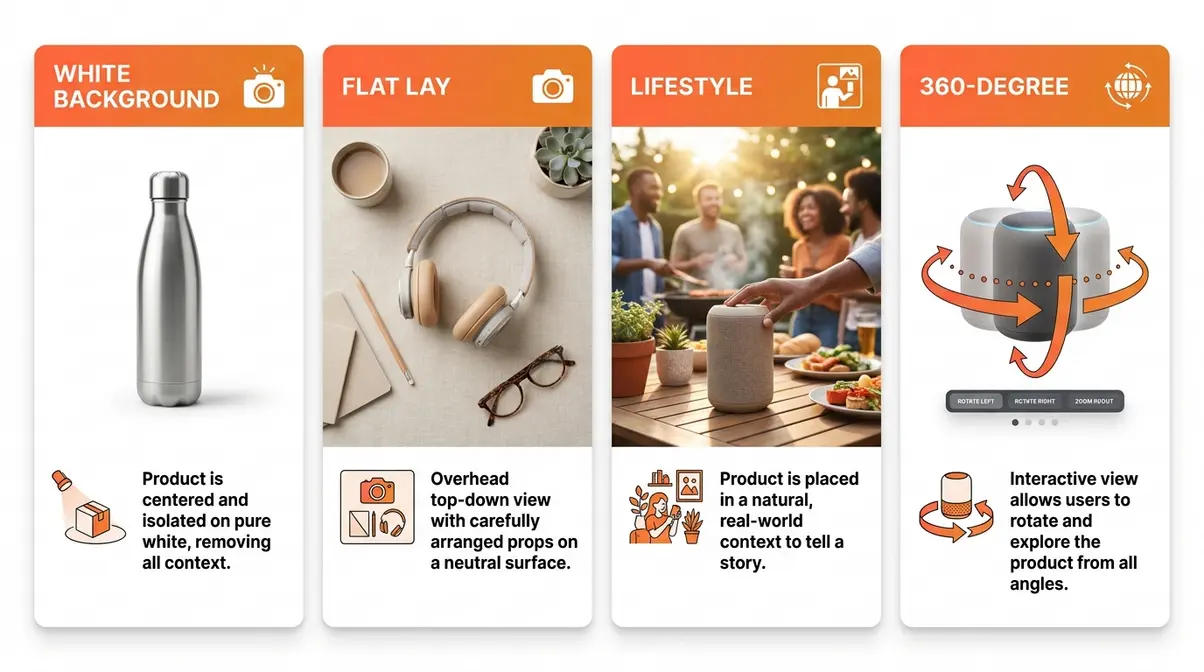
There are four main types of product photography worth knowing:
- White/clean background photography — the Amazon-style pure white shot that puts all attention on the product itself
- Flat lay photography — an overhead view looking straight down, popular for apparel, accessories, and lifestyle products
- Lifestyle photography — the product shown in a real-world context (a candle on a bathroom shelf, a watch on a wrist) to tell a brand story
- 360-degree photography — interactive rotating views that let shoppers inspect every angle; research suggests this can increase conversion by up to 40% (Forbes, 2026), though it requires additional setup beyond beginner level
This guide focuses on the first three — the types any beginner can master at home using the 4-Layer Shot System framework you’ll learn in the next section.
Foundational Product Photography Tips
The most essential product photography tips aren’t about expensive gear — they’re about building a repeatable process. Beginners who approach each shoot with a clear system consistently outperform those who adjust randomly and hope for the best. This section gives you that system, starting with how to plan before you ever press the shutter.
How to Plan Your Product Shoot
Before you pick up a camera, a five-minute planning session will save you an hour of reshooting. Common pain points reported by sellers include poor background choices, inconsistent lighting across a product range, and cluttered staging — all preventable with a quick pre-shoot checklist.
Before your shoot, prepare these five things:
- Clean your product thoroughly. Dust, fingerprints, and smudges are invisible to the naked eye but show up clearly under photography lighting. Use a microfiber cloth.
- Choose your background surface. A sheet of white poster board or a roll of seamless white paper creates a clean, consistent backdrop. More on this in the Equipment section.
- Identify your light source. A window with indirect daylight is your best free option. Avoid direct sunlight — it creates harsh shadows.
- Decide on your shot types. Plan at least three angles: a hero front shot, a detail close-up, and a lifestyle or context shot.
- Gather your props and styling elements. Less is almost always more — one or two complementary items maximum.
“I’m an amateur photographer and struggle to take really high quality product photos for my brand.”
This is one of the most common things small business owners say when they start. The good news: struggling with product photos is a technique problem, not a talent problem. A structured approach fixes it.
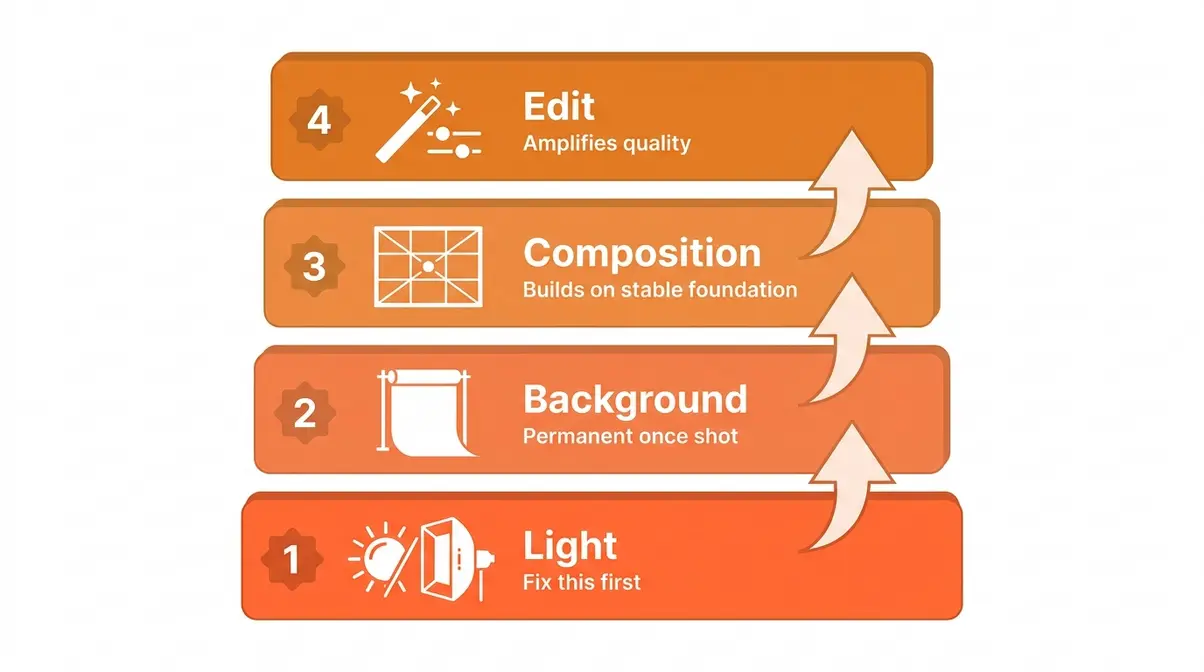
The 4-Layer Shot System Framework
Most beginner guides present photography tips as an unordered list, which creates decision paralysis. The 4-Layer Shot System solves this by making the sequence explicit — you always know what to fix first.
The framework works like building a house. You don’t paint the walls before the foundation is set.
| Layer | Focus | Why It Comes First |
|---|---|---|
| Layer 1: Light | Quality and direction of your light source | Light affects every element — fix this first |
| Layer 2: Background | Surface, color, and seamless setup | Background is permanent once the shot is taken |
| Layer 3: Composition | Framing, angle, and arrangement | Composition decisions build on stable light + background |
| Layer 4: Edit | Color correction, retouching, background removal | Editing amplifies quality — it can’t create it from nothing |
Work through the layers in sequence on every shoot. Skipping Layer 1 to work on Layer 3 is why so many beginner shots look “almost right” but never quite professional.
Optimize Your Lighting Control
Lighting is the single most important variable in product photography. Poor lighting flattens your product, creates unwanted shadows, and makes colors look muddy — no amount of editing fully rescues a badly lit shot.
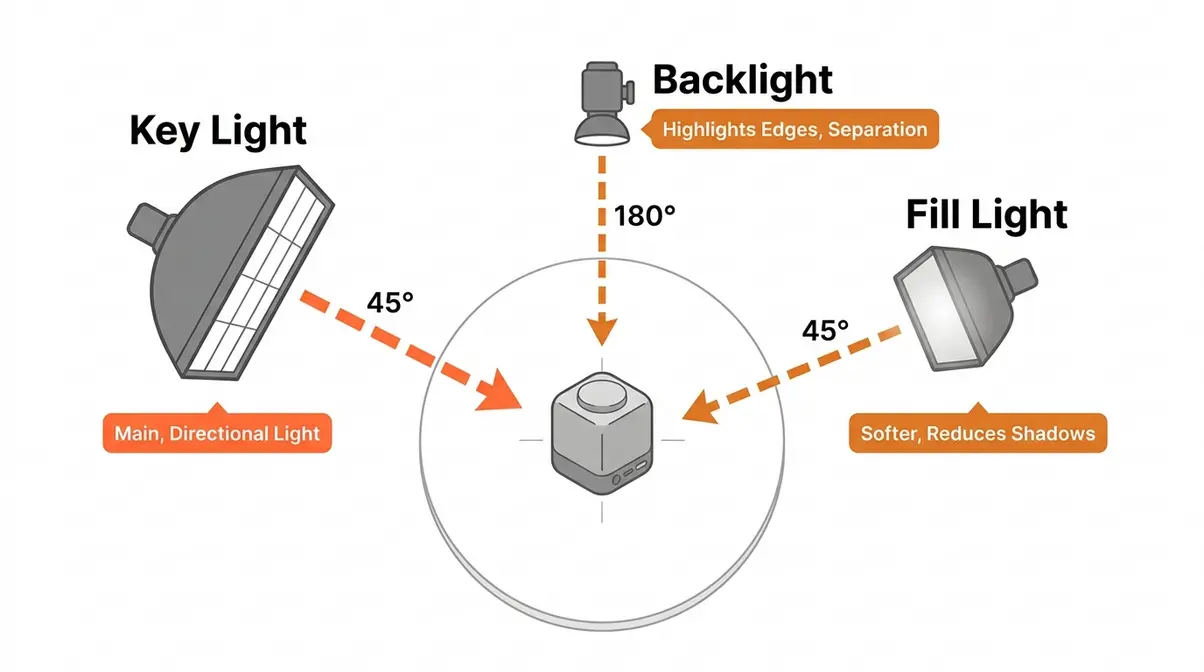
“A three-point lighting setup — using a key light, fill light, and backlight — eliminates harsh shadows and adds three-dimensional depth to any product shot (New York Film Academy).”
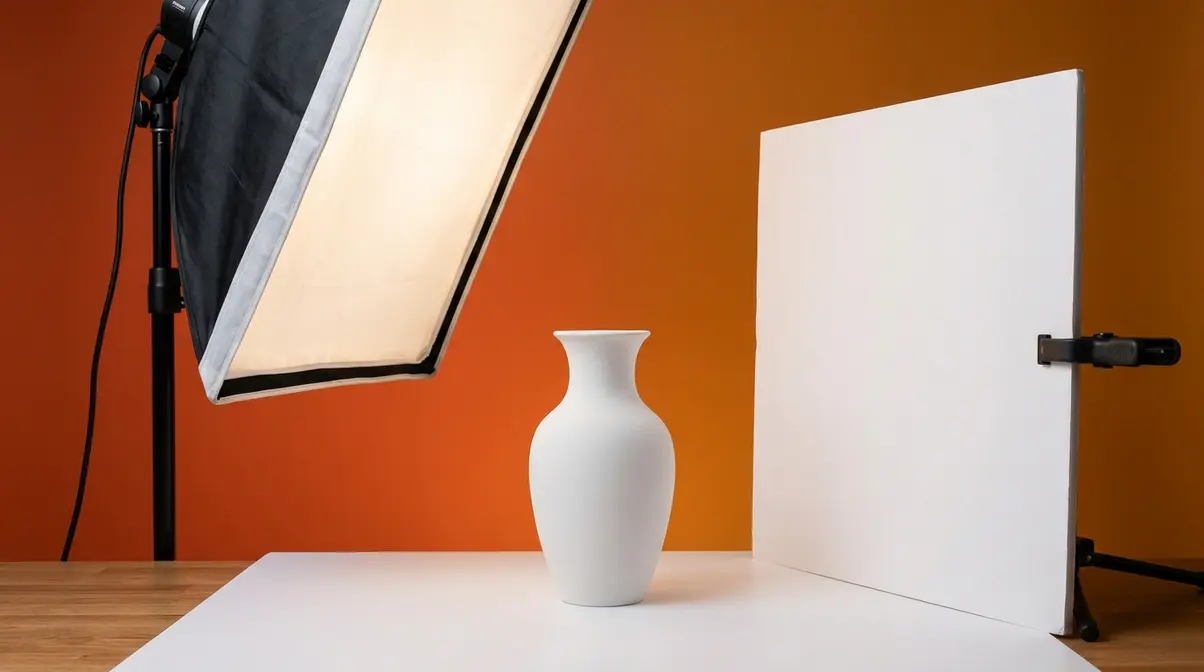
For beginners, start with natural window light. Position your product 2–3 feet from a large window (north-facing windows in the Northern Hemisphere give the softest, most consistent light). Place a white piece of foam board on the opposite side of the product to bounce light back and fill in shadows. This simple two-element setup — window + bounce board — replicates a professional softbox effect at zero cost.
Why this matters: Even lighting removes the visual noise that makes buyers hesitate. A well-lit product looks trustworthy.
For a complete step-by-step walkthrough, see our easy product photography tutorial.
Lock Down Your Camera Gear and Settings
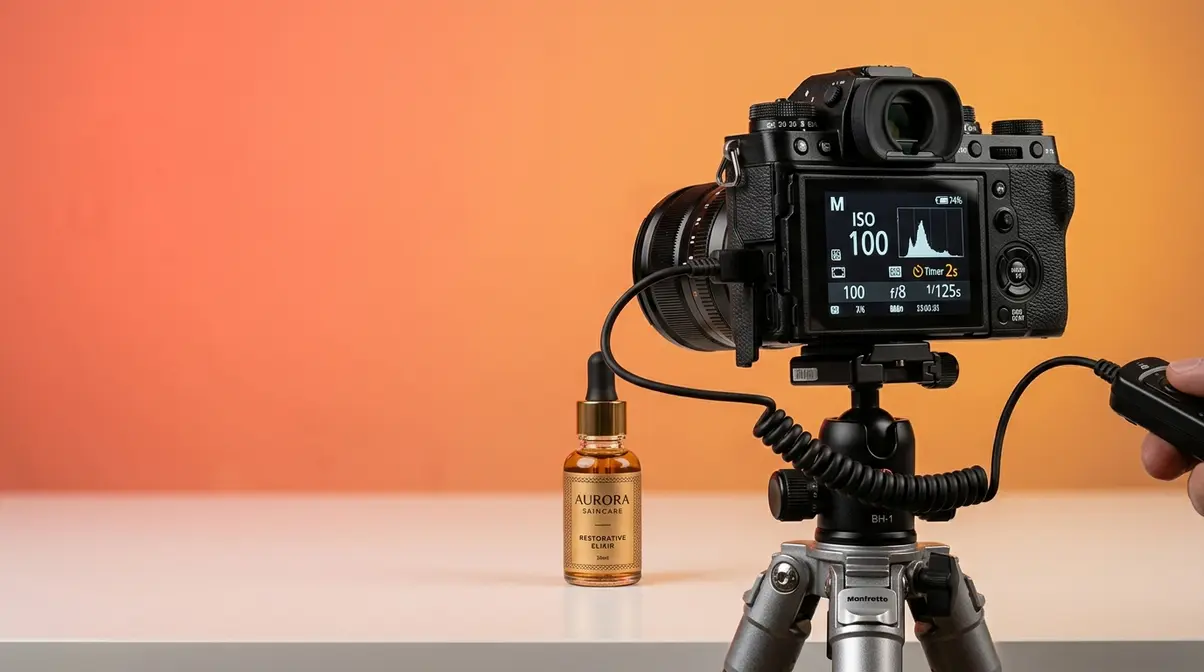
A shaky camera is the most common cause of blurry product photos — and it’s 100% preventable. Use a tripod (even a $15 model works) and set a 2-second self-timer so your hand isn’t on the camera when the shutter fires.
Recommended starting settings for product photography:
| Setting | Starting Value | What It Controls |
|---|---|---|
| ISO | 100–200 | Sensor sensitivity — keep low to avoid grain |
| Aperture (f-stop) | f/8–f/11 | Depth of field — higher number = more in focus |
| Shutter Speed | 1/125s or slower (on tripod) | Motion blur — tripod removes the risk |
| White Balance | Daylight or Cloudy | Color accuracy — match to your light source |
Aperture (the opening in your camera lens that controls how much light enters) is the setting beginners most often get wrong. A very wide aperture (low f-number like f/1.8) creates a blurry background that works for portraits but loses product detail. For most products, f/8–f/11 keeps everything sharp.
ISO (your camera’s sensitivity to light) should stay as low as possible. High ISO introduces digital grain (called “noise”) that makes images look unprofessional.
If you’re shooting on a smartphone, use Portrait Mode for hero shots, and switch to standard mode for flat lays. Lock your exposure by tapping and holding the subject on the screen.
Read our smartphone camera settings guide for more details.
Equipment, Lighting, and Backgrounds
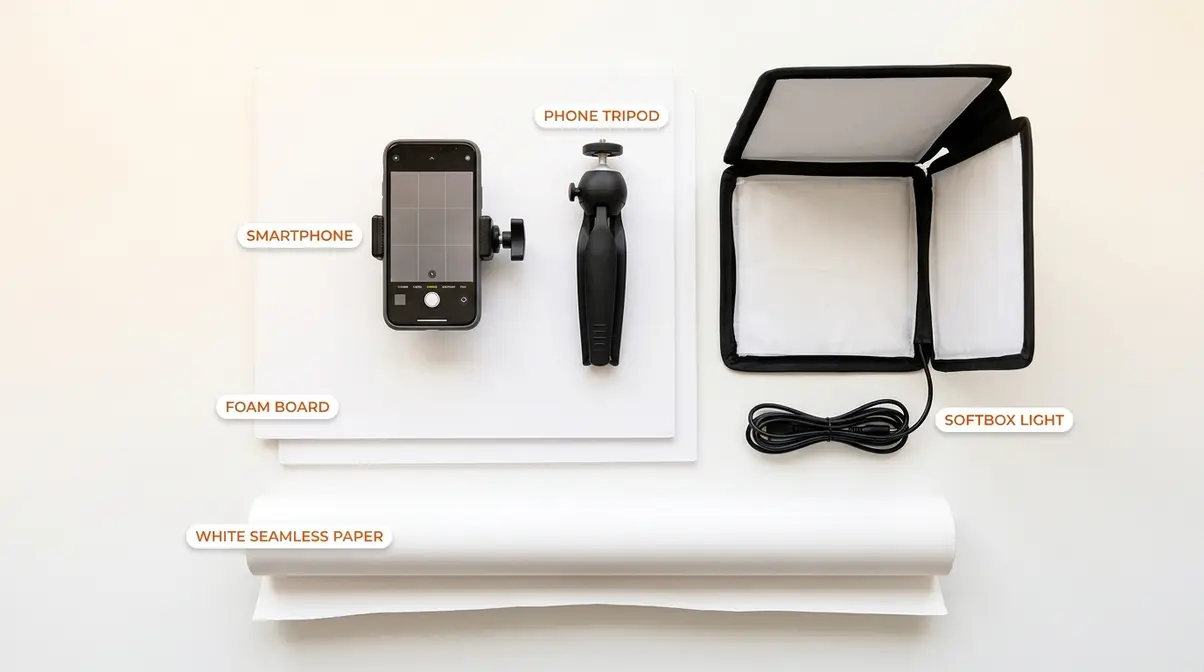
You don’t need thousands of dollars in gear to take clean and professional product photos. After evaluating setups across dozens of seller communities and photography forums, the consistent finding is this: technique and light control matter far more than camera body. Here’s the equipment that actually moves the needle.
Must-Have Equipment: Smartphone vs DSLR
Confusion about what photography equipment is necessary vs. optional is one of the top pain points for new sellers. Here’s an honest breakdown.
Smartphone cameras (iPhone 14 and above, Samsung Galaxy S23 and above) now produce images that meet Amazon’s minimum resolution requirements (1,000 × 1,000 pixels minimum, 2,000 × 2,000 recommended). For most Etsy and Instagram sellers, a current-generation smartphone is entirely sufficient.
Entry-level DSLRs (Canon Rebel series, Nikon D3500) give you manual control over aperture, ISO, and shutter speed, which matters when shooting in challenging lighting conditions or when you need very precise depth of field. They also accept interchangeable lenses, including macro lenses for extreme close-up detail shots of jewelry or electronics.
| Equipment | Cost Range | Best For |
|---|---|---|
| Smartphone (current gen) | $0 (you own it) | Etsy, Instagram, basic Amazon |
| $10–$20 tripod (phone mount) | $10–$20 | Eliminating blur, consistency |
| White foam board (2 sheets) | $3–$5 | DIY bounce board + background |
| Entry-level DSLR + kit lens | $300–$600 used | Full manual control, versatility |
| Macro lens (for jewelry/detail) | $100–$300 | Extreme close-up clarity |
| Softbox lighting kit (2-light) | $80–$150 | Indoor shooting, consistency |
Our recommendation for most beginners: Start with your smartphone + a tripod + two foam boards. Add a softbox kit only when you find yourself fighting inconsistent window light (cloudy days, winter, north-facing rooms).
Check out our guide on the best camera for product photography.
Best Lighting Setups for Beginners
The best lighting setup for product photography depends on your budget and shooting environment — but window light is the starting point every professional photographer learned on. Digital Photography School recommends beginning with natural light before investing in artificial sources, so you understand the principles before adding complexity.
- Setup 1: The Single-Window Natural Light Setup (Free)
- Position your product on a table 2–3 feet from a large window
- Place white foam board directly opposite the window to bounce light back
- Shoot perpendicular to the window (not facing it or away from it)
- Works best: mid-morning or mid-afternoon, overcast days (clouds act as a natural diffuser)
- Setup 2: The DIY Light Tent ($10–$20)
- A translucent white storage box (or a purpose-built light tent from Amazon) placed over your product diffuses light from all sides
- Eliminates almost all shadows for small products
- Ideal for: jewelry, cosmetics, small electronics
- Setup 3: The Two-Softbox Studio Setup ($80–$150)
- Position one softbox at 45° to the left of your product (key light)
- Position the second softbox at 45° to the right but dimmer or farther away (fill light)
- Add a white reflector behind the product for rim lighting
- Gives you full control regardless of time of day or weather
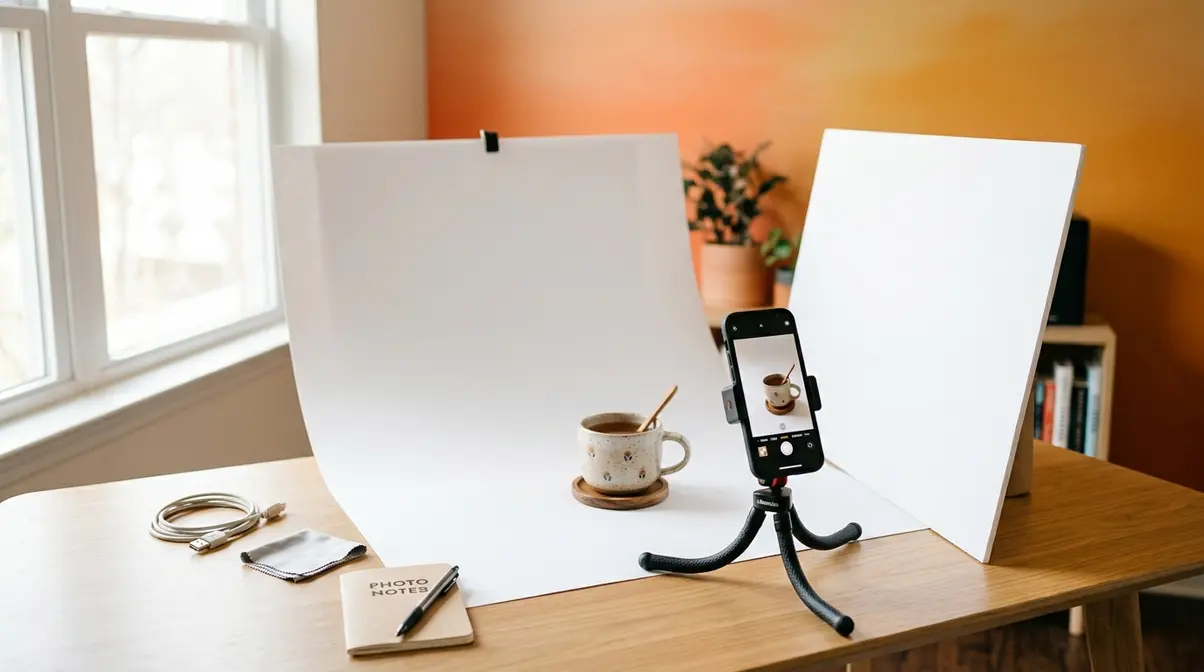
Creating a Seamless White Background
A pure white background isolates your product, eliminates visual distractions, and is mandatory for Amazon main images. You can achieve it at home for under $10.
Method 1: White Poster Board or Foam Core
Tape a sheet of white poster board to a wall and let it curve gently onto your shooting surface. This creates the “seamless” look — no visible horizon line between wall and table. This is the most common beginner setup and works for products up to about 12 inches.
Method 2: White Fabric Backdrop
A white cotton or polyester fabric backdrop (available for $15–$25) works for larger products and apparel. Iron it before shooting — wrinkles show up clearly in photos.
Method 3: AI Background Removal (Post-Processing)
Tools like Adobe Firefly, Remove.bg, and Canva’s background eraser can remove any background and replace it with pure white in seconds. This means you can shoot against any light, neutral surface and achieve a white background in editing. Adobe’s product photography guide covers this workflow in detail.
Why white backgrounds convert better: A clean background removes cognitive load for the buyer — their eye goes directly to the product. For Amazon, it’s not optional: the platform requires a pure white background (RGB 255, 255, 255) for all main product images (Amazon Seller Central, 2026).
Learn how to create a white background photography setup.
Creative Ideas and Advanced Styling Techniques
Once your light and background are controlled — Layers 1 and 2 of the 4-Layer Shot System — you move to composition and styling. This is where your product photos go from “clean and professional” to genuinely compelling. User consensus in professional seller communities indicates that composition errors are the second most common reason product photos underperform, right behind poor lighting.
Composition Rules That Make Products Pop
Composition (the arrangement of your product within the camera frame) determines where the viewer’s eye travels and how long they stay engaged with the image. Three principles make the biggest difference for product shots.
The Rule of Thirds: Divide your frame into a 3×3 grid (most cameras and phones show this as a grid overlay). Place your product at one of the four intersection points rather than dead center. This creates natural visual tension and makes images feel more dynamic.
Negative Space: Leave empty space around your product — don’t fill the entire frame. Negative space draws attention to the subject and gives the image room to breathe. This is especially important for hero shots used in advertising.
- Shot Variety (Angles): Shoot every product from at least four angles:
- Hero shot — straight-on front view at eye level
- Top-down (flat lay) — directly overhead, great for apparel and accessories
- 45° angle — the most natural viewing angle, mimics how you’d hold the product
- Detail/macro shot — extreme close-up of texture, material, or key feature
Explore our flat lay photography guide for more overhead inspiration.
Props and Lifestyle Styling
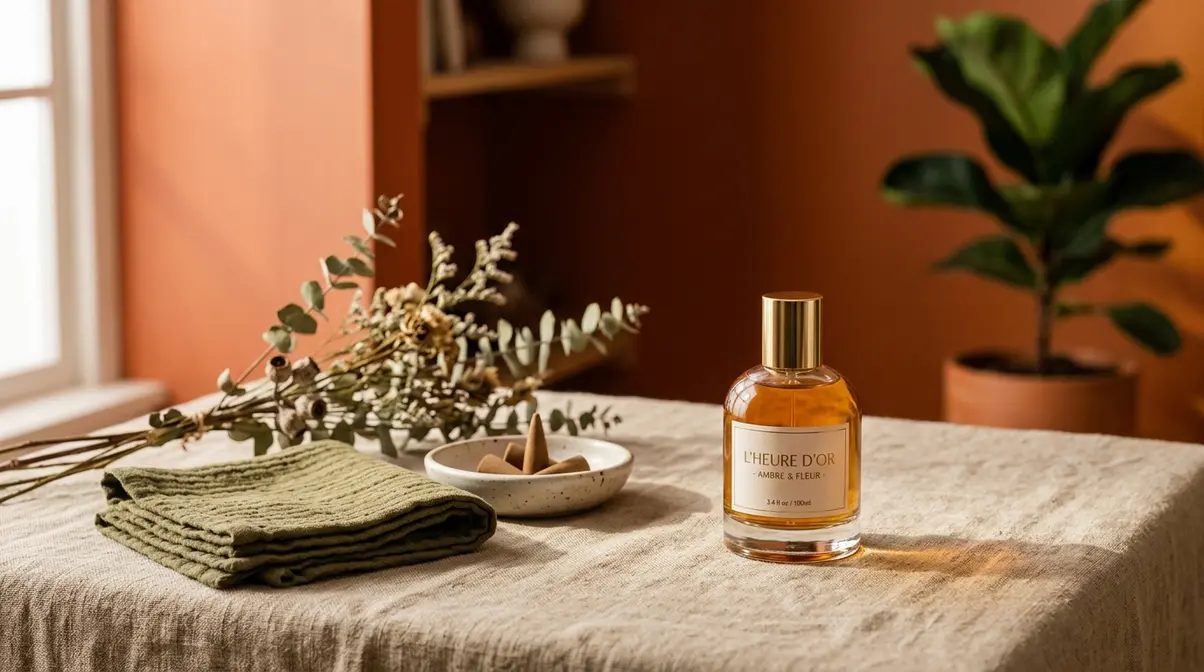
Lifestyle photography — showing your product in context — is the most powerful tool for telling a brand story and connecting emotionally with buyers. A candle looks like a candle on a white background. That same candle surrounded by a linen book, a cup of tea, and warm afternoon light becomes an aspirational moment.
Styling principles that work:
- Rule of odd numbers: Group props in sets of 3 or 5 — odd numbers feel more natural and balanced than even groupings
- Color harmony: Choose props that share one or two colors with your product — avoid visual competition
- Scale contrast: Mix a large background element (fabric, wooden board) with small detail props — this creates depth
- Brand consistency: Use the same 2–3 props across your product range to build a recognizable visual identity
What to avoid: Overly busy backgrounds that distract from the product, props that are larger or more interesting than the product itself, and mismatched aesthetics (rustic wood board under a tech product, for example).
Find more lifestyle product photography ideas to elevate your brand.
AI Tools for Photo Editing (2026)
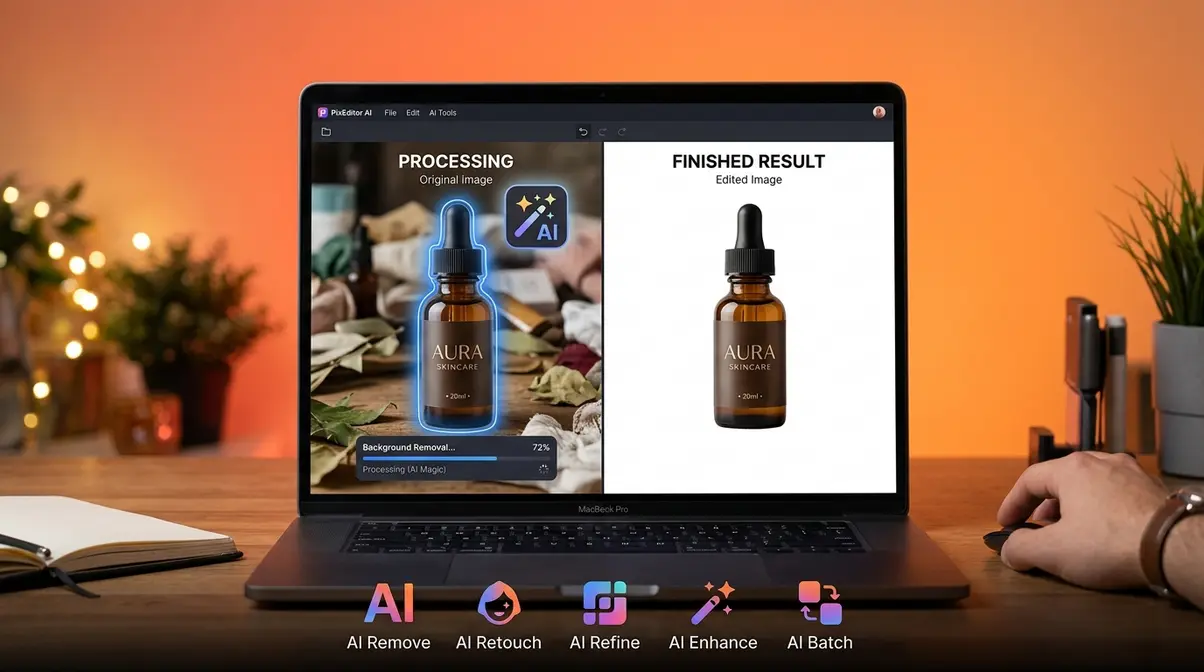
AI editing tools have fundamentally changed what’s possible for solo sellers and small business owners — tasks that once required a professional retoucher in Photoshop now take seconds on a smartphone. This is the fastest-growing area of product photography, and 60% of competitors still don’t cover it.
The top AI tools for product photography editing:
| Tool | Best For | Cost | Key Feature |
|---|---|---|---|
| Adobe Firefly | Background generation + generative fill | Included in Creative Cloud (~$55/mo) | Generates photorealistic backgrounds from text prompts |
| Remove.bg | Instant background removal | Free (low-res) / $9–$12 per credit pack | One-click removal, API for bulk processing |
| Canva AI | Quick background removal + design | Free / Pro ~$15/mo | Integrated with design workflow |
| Luminar Neo | Portrait-style retouching for products | ~$79/year | AI-powered light and color enhancement |
| Photoroom | Full product photo studio on mobile | Free / Pro ~$10/mo | Shoot, remove background, add scene — all in-app |
How to use AI tools in your workflow (Layer 4 of the 4-Layer Shot System):
- Shoot your product against any light, neutral surface (light gray works best for AI removal)
- Upload to Remove.bg or Photoroom for instant background removal
- Use Adobe Firefly or Canva to generate a branded background or add a pure white background for Amazon compliance
- Apply light color correction (brightness, contrast, white balance) — most AI tools do this automatically
- Export at the correct resolution for your platform (more on this in the Platform section)
“AI background tools now achieve professional-grade cutouts in under 30 seconds — a task that previously required 15–20 minutes of manual masking in Photoshop.”
Canva’s product photography guide includes a practical walkthrough of their AI background removal tool for e-commerce sellers.
Discover the best photo editing apps for sellers.
Niche-Specific Photography Techniques
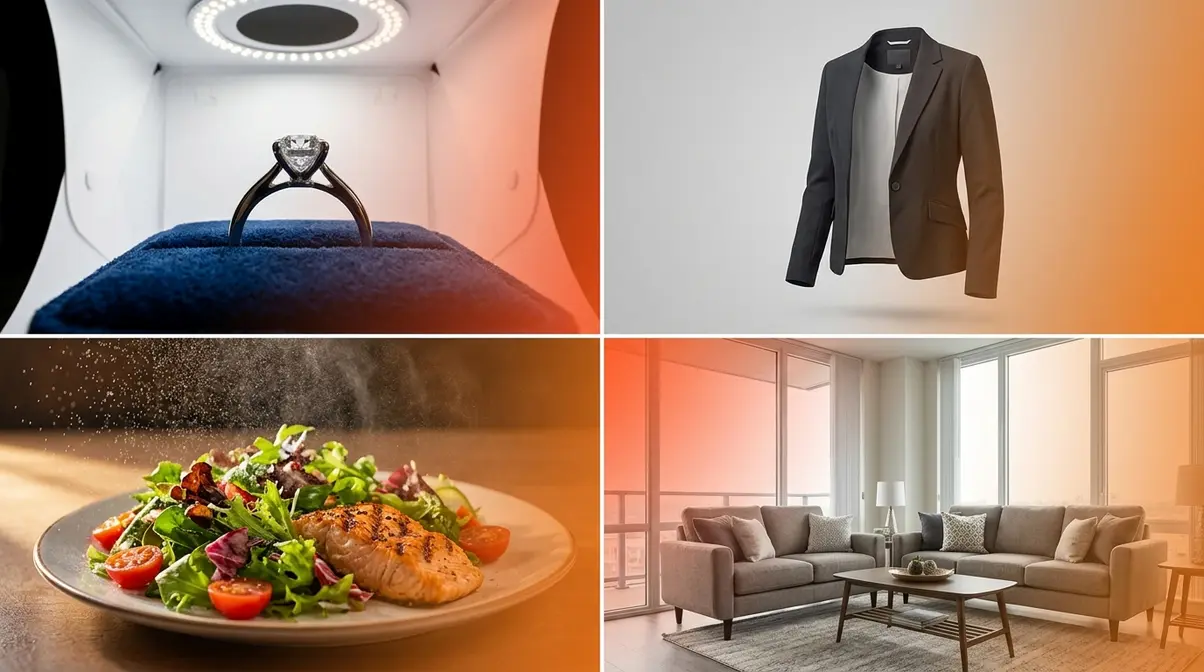
Different product categories present different technical challenges. The product photography tips that work perfectly for a white coffee mug will actively fail for a diamond ring or a winter coat. This section addresses the four most common niche challenges reported by sellers.
Jewelry and Reflective Products
Jewelry photography is technically the most challenging product category because metal and gemstones reflect everything in the room — including your camera, your hands, and your light sources.
Key techniques for jewelry:
- Use a macro lens or macro mode. Jewelry is small and detail-rich. A macro lens (or your phone’s 2× or 3× zoom in macro mode) fills the frame with the piece and reveals the quality of the craftsmanship.
- Diffuse all light. Harsh light creates hot spots (blown-out white reflections) on metal. Shoot inside a DIY light tent or use a large softbox positioned at least 3 feet away.
- Use a ring light for gems. A ring light (mounted around your lens) illuminates gemstones from every angle simultaneously, making them sparkle without creating a single dominant reflection.
- Control your reflection. Wear black clothing and hang black foam board around your shooting area to prevent the product from reflecting bright colors or your own image.
- Choose backgrounds carefully. Matte white, matte black, or textured velvet are the most common choices — they don’t compete with the product’s shine.
Read our advanced jewelry photography tips.
Clothing and Apparel Photography Tips
Clothing photography for an online store requires one critical decision before anything else: flat lay, mannequin, or model? Each approach has trade-offs.
- Flat lay is the most accessible — lay the garment on a clean surface and shoot overhead. Works well for accessories, t-shirts, and folded items. Weakness: buyers can’t see how it drapes or fits.
- Ghost mannequin (invisible mannequin) gives clothing shape without the cost of a model. You shoot the garment on a mannequin, then use Photoshop or AI tools to remove the mannequin, leaving only the floating, shaped garment.
- On-model photography converts best for clothing — buyers can assess fit, proportion, and styling. Requires a model (or yourself) and a simple backdrop.
- Technical tips for apparel:
- Steam or iron every garment before shooting — wrinkles are the number-one clothing photography mistake
- Use straight pins or fabric tape to tighten loose areas for flat lay shots (this is standard practice, not deceptive)
- Shoot on a bright, overcast day for even, shadow-free natural light
- Use a wide aperture (f/5.6) for on-model shots to separate the subject from the background
Food and Beauty Product Photography
Food and beauty products need to communicate sensory qualities — freshness, texture, scent, and luxury — through a flat 2D image. This requires a different set of styling instincts.
- For food products:
- Shoot immediately after preparation — food wilts, melts, and loses its “hero” quality within minutes
- Use warm, directional side lighting (from a window or a single softbox) to enhance texture and create depth
- Mist fresh produce with water just before shooting for a “just-washed” freshness effect
- Keep backgrounds simple: natural wood, marble, or linen are the most popular food photography surfaces
- For beauty and cosmetics:
- Consistency is everything — shoot your entire product range in the same lighting setup so the collection looks cohesive on your website
- Show the product open and in use (a lipstick swatched, a serum with a dropper dispensing a drop) alongside the closed packaging shot
- Reflective surfaces (acrylic sheets, mirrors) can add a luxury feel but require careful light control to avoid unwanted reflections
BigCommerce’s product photography guide covers food and beauty styling in detail, including budget-friendly prop sourcing.
Check out our food product photography tips for delicious-looking shots.
Large and Furniture Product Photography
Large products — furniture, appliances, rugs, bicycles — present a unique challenge: you can’t bring them to a controlled studio environment. Instead, the studio comes to them.
- Stage in the best available room. Choose a room with large windows, neutral walls, and minimal background clutter. Move furniture out of frame rather than trying to shoot around it.
- Use a wide-angle lens carefully. Wide-angle lenses make rooms look spacious but can distort product proportions. Shoot from a greater distance with a standard or slight telephoto focal length instead.
- Shoot in multiple rooms or settings. A sofa photographed in a living room context, a dining room context, and against a plain wall gives buyers three different reference points.
- Time your shoot for peak natural light. Large products are difficult to light artificially — shoot when sunlight fills the room most evenly (typically mid-morning).
Platform-Specific Optimization
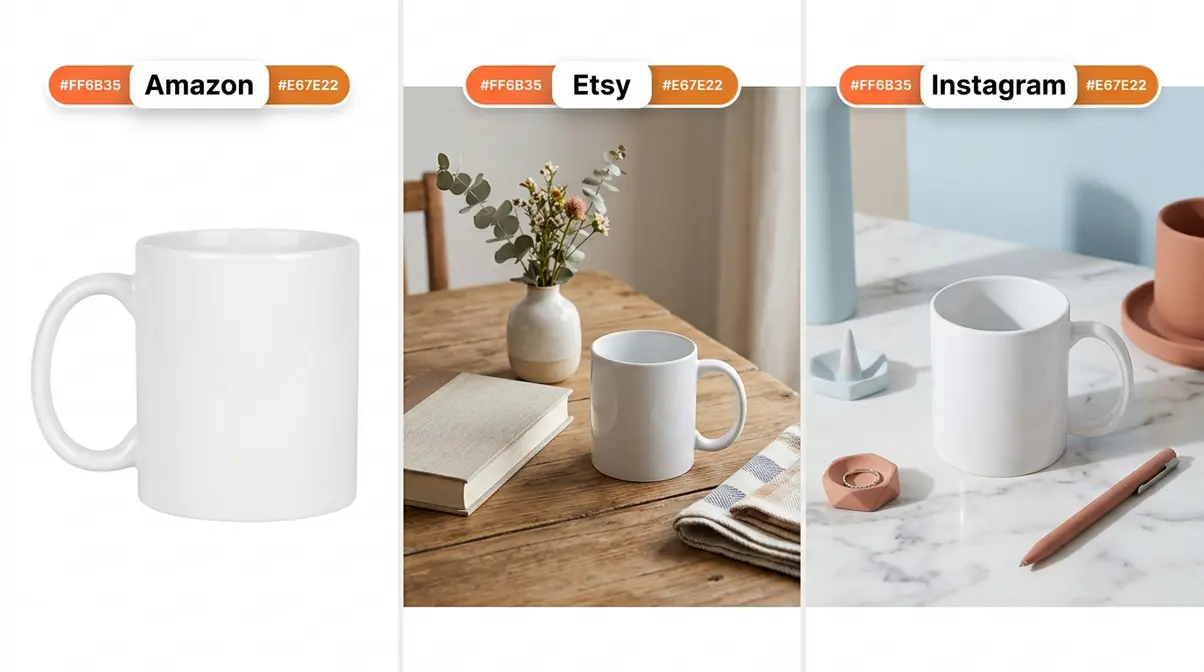
Your product photography tips need to adapt to the platform where your images will live. Each marketplace has different technical requirements, buyer expectations, and algorithm preferences. Getting platform optimization right is often the difference between a listing that ranks and one that doesn’t.
Amazon Product Photography Requirements
Amazon’s image requirements are the most strictly enforced of any major marketplace — non-compliant main images are automatically suppressed. Here are the current specifications (Amazon Seller Central, 2026):
| Requirement | Specification |
|---|---|
| Main image background | Pure white (RGB 255, 255, 255) |
| Minimum image size | 1,000 × 1,000 pixels |
| Recommended size | 2,000 × 2,000 pixels or larger |
| Product fill | 85% of the image frame minimum |
| File formats accepted | JPEG, PNG, TIFF, GIF |
| Prohibited on main image | Text, logos, watermarks, props, multiple products |
For secondary images (images 2–9), Amazon allows lifestyle shots, infographics, size comparison images, and detail shots. Use these slots strategically — data from Amazon’s own seller resources indicates that listings with 7+ images see meaningfully higher conversion rates than those with fewer.
“Amazon’s main image requirements are non-negotiable — a pure white background with the product filling 85% of the frame is the technical baseline every seller must meet.”
Read our Amazon listing optimization guide.
Etsy Photo Strategy: Use All 10 Slots
Etsy gives every listing up to 10 photo slots — and most sellers use fewer than 5, leaving significant conversion potential on the table. Unlike Amazon, Etsy rewards variety and lifestyle context. Buyers on Etsy are often making emotional, aspiration-driven purchases, so storytelling through imagery matters more here than strict technical compliance.
A recommended 10-slot strategy for Etsy listings:
- Hero shot — clean main image, product centered, best angle
- Lifestyle shot — product in use or in a styled scene
- Detail shot — close-up of texture, material, or key feature
- Scale reference — product next to a hand or common object to convey size
- Color/variant options — all available colors or styles in one frame
- Packaging shot — the unboxing experience (buyers love this)
- Back or alternate angle — reverse side, interior, or secondary view
- Process or story shot — behind-the-scenes, handmade process, or material sourcing
- Size guide infographic — dimensions with visual reference
- Social proof image — customer photo, press feature, or “as seen in” badge (where permitted)
Explore our Etsy listing photography guide.
Instagram and Social Media Photos
Instagram rewards visual consistency and aesthetic coherence above all else. Buyers who land on your profile make a judgment about your brand within seconds based on the visual identity of your grid.
Key principles for Instagram product photography:
- Shoot in square (1:1) or portrait (4:5) format. Portrait images take up more screen real estate in the feed and get more engagement. Landscape images are penalized algorithmically on Instagram.
- Establish a color palette and stick to it. Choose 2–3 background colors or surface textures and rotate them consistently. This creates a cohesive grid that builds brand recognition.
- Create Reels-compatible content. Short product videos (15–30 seconds showing the product from multiple angles or in use) perform significantly better than static images for reach and discovery on Instagram as of 2026.
- Add text overlays for Stories. Product photos used in Stories should include a brief text overlay (price, offer, or feature) — Stories without text see lower tap-through rates.
Find more Instagram product photo ideas.
The Business of Product Photography
Beyond shooting your own products, product photography is a viable career and business path. Whether you’re considering going professional or deciding whether to hire someone else, understanding the business side helps you make smarter decisions.
Photography Jobs and Career Paths
Product photography jobs range from in-house e-commerce photographer roles at retailers to freelance commercial work for agencies and brands. The field is accessible to self-taught photographers — a strong portfolio matters far more than formal credentials.
Common career paths:
- In-house e-commerce photographer: Employed by a retailer or brand to photograph their product catalog on an ongoing basis. Salaries typically range from $40,000–$65,000 annually depending on market and experience (Bureau of Labor Statistics, 2026).
- Freelance commercial photographer: Self-employed, working with multiple clients across industries. Day rates for product photography typically range from $500–$2,500 depending on experience, location, and deliverables.
- Product photography studio owner: Running a dedicated studio that serves local businesses, e-commerce sellers, and agencies. Requires additional business and marketing skills beyond photography.
- Social media content creator: Specializing in product photography for brands’ Instagram, TikTok, and Pinterest channels — a rapidly growing niche as of 2026.
To enter the field, focus on building a niche portfolio (jewelry, food, apparel) rather than trying to photograph everything. Specialization commands higher rates and makes marketing easier.
Building Your Photography Portfolio
A product photography portfolio should demonstrate versatility within your niche, technical competence, and an understanding of commercial intent. Buyers of photography services aren’t looking for artistic expression — they’re looking for evidence that your images will sell products.
What to include in your portfolio:
- 5–8 hero shots across different product categories, showing clean white background execution
- 3–5 lifestyle shots demonstrating your ability to tell a brand story
- Before/after examples showing how your images improve on what a client had previously (this is one of the most persuasive portfolio elements)
- Platform-specific examples — show Amazon-compliant images separately from Instagram-ready lifestyle sets
- Process documentation — a brief note on your setup, lighting approach, and editing workflow builds credibility with commercial clients
Host your portfolio on a dedicated website (Squarespace and Format are popular choices for photographers) rather than relying on social media, where you don’t control the presentation or algorithm.
Hiring a Professional vs. DIY
The decision to hire a professional product photographer vs. shooting yourself comes down to three factors: volume, complexity, and conversion impact. Research from BigCommerce indicates that professionally photographed products can see conversion rates 30% higher than amateur shots for comparable products (BigCommerce, 2026).
- Hire a professional when:
- Your product is technically complex to photograph (jewelry, reflective surfaces, large furniture)
- You’re launching a new product line and first impressions are critical
- Your time is worth more than the photography cost (calculate your hourly rate vs. the photographer’s day rate)
- You’ve tried DIY and your conversion rate remains low despite other optimizations
- DIY is the right choice when:
- You’re in early-stage testing and need to move fast
- Your product category is beginner-friendly (flat-lay apparel, simple packaged goods)
- You have time to invest in learning the skill — which builds a long-term asset
- Your budget is genuinely limited — a well-executed DIY shot always outperforms a poorly executed professional one
Typical professional photography costs: Day rates range from $500–$3,000+, with most e-commerce photographers charging per image ($25–$150/image) for catalog work. Always request usage rights in writing.
Learn how much does product photography cost.
Common Mistakes to Avoid in Product Photography
Even with the right gear and a solid framework, certain mistakes consistently derail beginner product photos. Across seller communities and photography forums, these are the errors that come up most often — and the fixes are almost always simpler than people expect.
5 Common Product Photography Pitfalls
Mistake 1: Shooting in Mixed Light
Mixing window light with overhead room lighting creates color casts — your product will appear orange-yellow on one side and blue-white on the other. Fix: Turn off all artificial lights in the room when shooting with window light, or commit fully to artificial lighting and block the windows.
Mistake 2: Shooting Handheld
Camera shake is invisible when you’re shooting but obvious in the final image, especially in close-up shots. Fix: Use a tripod and a 2-second self-timer for every shot. This one change eliminates the most common cause of blurry product photos.
Mistake 3: Ignoring the Background
A cluttered or inconsistent background competes with the product for attention. Fix: Use a seamless white or neutral backdrop for every product in your catalog. Consistency across images builds buyer trust.
Mistake 4: Over-Editing
Aggressive color saturation, HDR effects, and heavy filters make products look unrealistic — and when buyers receive a product that doesn’t match the photo, returns increase. Fix: Edit for accuracy, not drama. Your goal is to represent the product faithfully in its best natural light.
Mistake 5: Skipping the Detail Shot
Buyers need to see the quality of materials, stitching, texture, and finish — especially for handmade or premium products. Fix: Include at least one macro/close-up shot in every listing. This single addition frequently increases buyer confidence and reduces return rates.
When to Hire a Pro or Use Alternatives
There are scenarios where DIY product photography is genuinely the wrong choice, and recognizing them early saves time and money.
- Consider hiring a professional if:
- Your product is a hero item (a signature piece you’ll market heavily) and the stakes of a mediocre first impression are high
- You’ve invested in the DIY approach for 3+ months and conversion rates haven’t improved
- Your product category requires specialized equipment you can’t justify purchasing (macro rail for jewelry, large-format backdrop for furniture)
- Consider stock photography or 3D rendering as alternatives if:
- You’re in pre-launch and don’t yet have physical product samples
- Your product is digital or software-based
The honest truth about DIY: The techniques in this guide — the 4-Layer Shot System applied consistently — are enough to produce conversion-ready images for the vast majority of product categories. The gap between “good enough” and “professional” is smaller than it’s ever been, thanks largely to AI editing tools that handle the post-processing heavy lifting.
Frequently Asked Questions
What are the top beginner tips?
The most important product photography tips for beginners are controlling your light source, using a tripod, and shooting against a clean background. These three elements have a greater impact on image quality than any camera setting or editing technique. Start with a large window and a white foam board bounce card — this free setup eliminates the majority of beginner lighting problems. Add a $15 tripod to eliminate blur. According to professional photography educators, mastering natural light before moving to artificial sources builds the foundational skills that make everything else easier (Digital Photography School, 2026).
Do I need an expensive camera?
No — a current-generation smartphone is sufficient for most product photography needs. iPhone 14 and above and Samsung Galaxy S23 and above both capture images that meet Amazon’s minimum resolution requirements (1,000 × 1,000 pixels). The variables that matter most — lighting quality, background cleanliness, and composition — are entirely independent of camera cost. A $15 tripod and a $5 foam board will improve your photos more than upgrading from a smartphone to a $500 DSLR without addressing those fundamentals first.
What is the best background?
A pure white seamless background is the most versatile starting point — it’s mandatory for Amazon main images, works for Etsy, and is the easiest to achieve at home with a sheet of white poster board. For lifestyle and Etsy secondary images, textured surfaces (natural wood, marble, linen) add visual interest and brand personality. The key rule is consistency: use the same background across all products in a listing or product line so your catalog looks cohesive to buyers.
How to photograph jewelry without glare?
Reducing glare in jewelry photography requires diffusing all light sources and controlling reflections. Shoot inside a DIY light tent (a translucent white box) or position a large softbox at least 3 feet from the product. Wear black clothing and surround the shooting area with black foam board to prevent your own reflection appearing in the metal. A ring light mounted around your lens illuminates gemstones evenly from all angles. Avoid direct sunlight entirely — it creates uncontrollable hot spots on polished metal surfaces.
How to optimize photos for Amazon?
Amazon’s main image must have a pure white background (RGB 255, 255, 255) with the product filling at least 85% of the frame. The minimum image size is 1,000 × 1,000 pixels, though 2,000 × 2,000 is recommended to enable Amazon’s zoom feature. Text, logos, watermarks, and props are prohibited on the main image. For secondary images (slots 2–9), use lifestyle shots, size comparison images, and infographics — listings with 7+ images consistently outperform those with fewer images in Amazon’s algorithm (Amazon Seller Central, 2026).
Bringing It All Together
For small business owners and sellers who feel overwhelmed by product photography, the path forward is simpler than it looks. The product photography tips in this guide reduce to one core principle: work in sequence, not at random. Light first. Background second. Composition third. Edit last.
The 4-Layer Shot System gives you a repeatable process that works whether you’re shooting jewelry on a smartphone or furniture in a living room. It’s the same framework professional photographers use — they just call it “workflow.” Starting with Layer 1 (light) and building upward means every decision you make is building on a stable foundation rather than compensating for an earlier mistake.
Your next step is simple: set up one shoot this week using only Layers 1 and 2. Find a window, tape a sheet of white poster board to the wall, and photograph your best-selling product from three angles. Compare those images to what you have now. That single session — no new gear required — is where the improvement becomes visible. Once you see what controlled light and a clean background actually do for your images, the rest of the system clicks into place naturally.
Dave King
Hi, I'm Dave, the founder of Amateur Photographer Guide. I created this site to help beginner and hobbyist photographers build their skills and grow their passion. Here, you’ll find easy-to-follow tutorials, gear recommendations, and honest advice to make photography more accessible, enjoyable, and rewarding.