7 Photography Styles for Beginners: Find Your Niche
Explore 7 examples of photography styles with easy tips. Learn about portrait, landscape, macro, and more to boost your skills and creativity today.
“Hi! I’m new to planning and am trying to understand all the photography terms… editorial, documentary, etc… so that I know what to look for and what I may like. Any photographer can do a basic explanation of the different styles for me please?”
What’s in this guide
- Table of Contents
- What Every Beginner Photographer Needs to Know First
- 7 Best Photography Styles for Beginners to Try
- How to Find Your Photography Style: The Style Compass Framework
- Books, Contests, and Communities to Accelerate Your Growth
- Common Mistakes to Avoid When Choosing Your Style
- Frequently Asked Questions
- Your Next Shot Starts Now
If that quote sounds like something you could have written yourself, you’re in exactly the right place. Being brand spanking new to photography is exciting — but it’s also genuinely overwhelming. Terms like “aperture,” “rule of thirds,” “street vs. portrait,” and “documentary vs. editorial” get thrown around constantly, and most guides assume you already know what they mean.
Here’s the truth: most beginners spend weeks reading about photography styles for beginners without ever actually picking up their camera — because no one gave them a clear, honest starting point. That stops today.
In this guide, you’ll discover the 7 most beginner-friendly photography styles, learn the exact camera settings to try each one, and walk away with a simple 5-step framework — The Style Compass Framework — to find your personal niche with confidence, not guesswork. We’ll start with the fundamentals you need, move through each style, and finish with the resources and community that will accelerate your growth.
Table of Contents
- What Every Beginner Photographer Needs to Know First
- 7 Best Photography Styles for Beginners to Try
- How to Find Your Photography Style: The Style Compass Framework
- Books, Contests, and Communities to Accelerate Your Growth
- Common Mistakes to Avoid When Choosing Your Style
- Frequently Asked Questions
- Your Next Shot Starts Now
What Every Beginner Photographer Needs to Know First
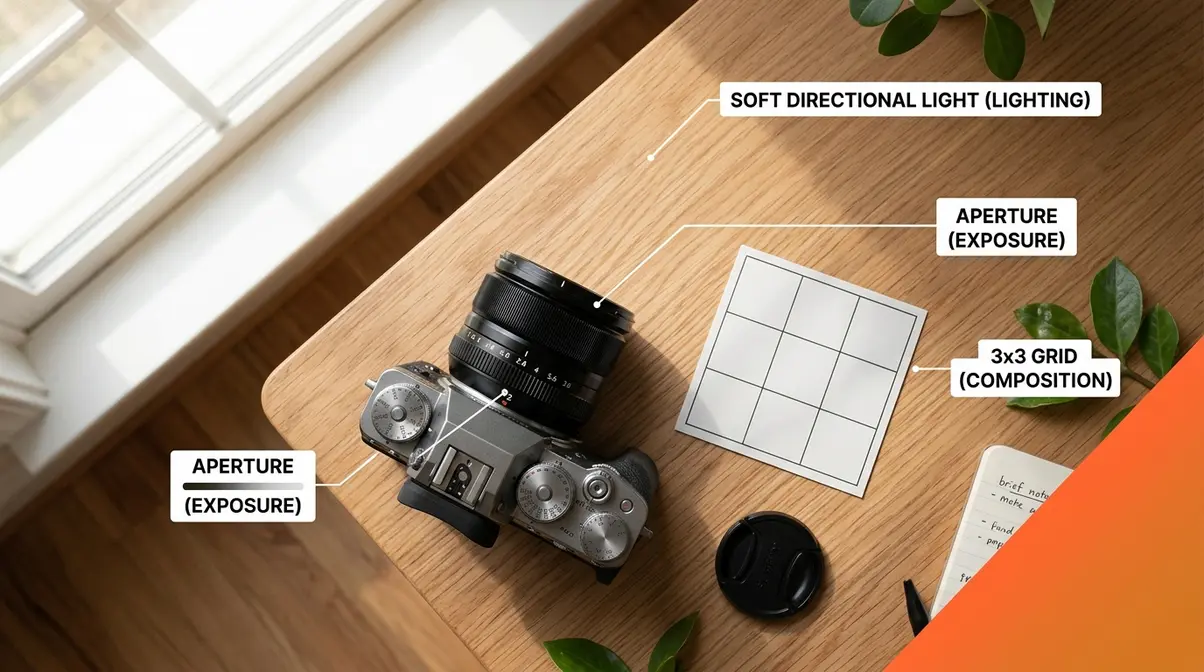
Before choosing a photography style, every beginner needs three things: an understanding of the exposure triangle, one composition rule, and a basic grasp of light. These aren’t obstacles — they’re the creative controls that separate a snapshot from a photograph. The 7 basics of photography are:
- Composition — how you arrange elements in the frame
- Exposure — how bright or dark your image is
- Lighting — the quality, direction, and color of light
- Focus — what’s sharp and what’s blurred
- Perspective — where you stand and how you angle the camera
- Color — tone, temperature, and mood
- Storytelling — the emotion or narrative your image conveys
Penn State Extension’s photography guide confirms that mastering the exposure triangle is the foundational first step for any beginner learning photography (2024). These fundamentals are also the first dimension of the Style Compass Framework you’ll meet in Section 3 — so the time you spend here pays dividends across every style you try.
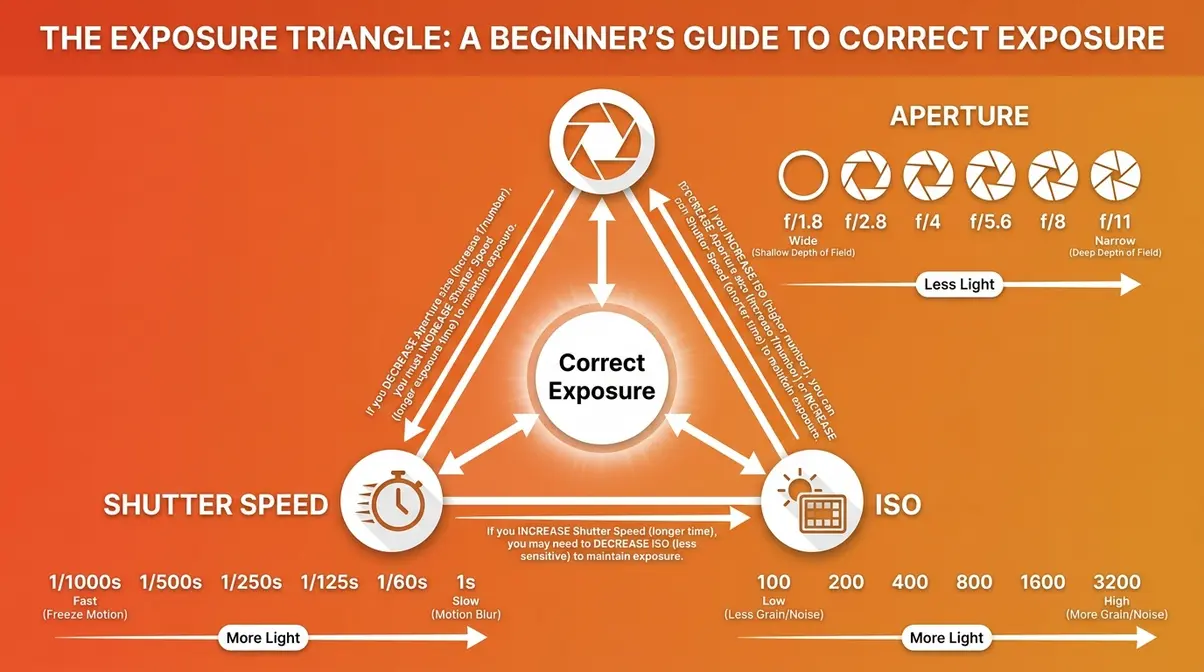
The diagram above shows how these three elements interact. Change one, and you affect the others. Once you understand that relationship, you’re no longer guessing — you’re making creative choices.
The Exposure Triangle: Aperture, Shutter Speed, and ISO
Good beginner photography tips always start with the exposure triangle — the relationship between aperture, shutter speed, and ISO that controls how bright or dark your photo appears. Think of it as your camera’s three-dial control panel for light.
Aperture (the opening in your lens that controls how much light enters and how blurry the background is) works like the pupil of your eye — it opens wider in the dark and narrows in bright light. A low f-number like f/1.8 creates a beautifully blurry background (great for portraits). A high f-number like f/11 keeps everything sharp (ideal for landscapes).
Shutter Speed (how long your camera’s sensor is exposed to light) is like the blink of your eye. A fast shutter speed like 1/500s freezes a moving subject. A slow speed like 1/15s introduces creative blur — think silky waterfalls.
ISO (your camera’s sensitivity to light) is like turning up a dimmer switch. Low ISO (100–400) gives you a clean, grain-free image in bright conditions. High ISO (800–3200) lets you shoot in low light, but adds visible grain (called “noise”).
Why this matters for your photos: Once you understand these three controls, you can shoot in Manual mode and make creative decisions — not just hope the camera gets it right.
| Setting | Bright Outdoor | Indoor / Low Light | Action Shot |
|---|---|---|---|
| Aperture | f/8–f/11 | f/1.8–f/2.8 | f/4–f/5.6 |
| Shutter Speed | 1/250s | 1/60s | 1/500s–1/1000s |
| ISO | 100–200 | 800–3200 | 400–800 |
These are good starting points — adjust to taste as you get comfortable with your camera.
The Rule of Thirds: Your First Composition Shortcut
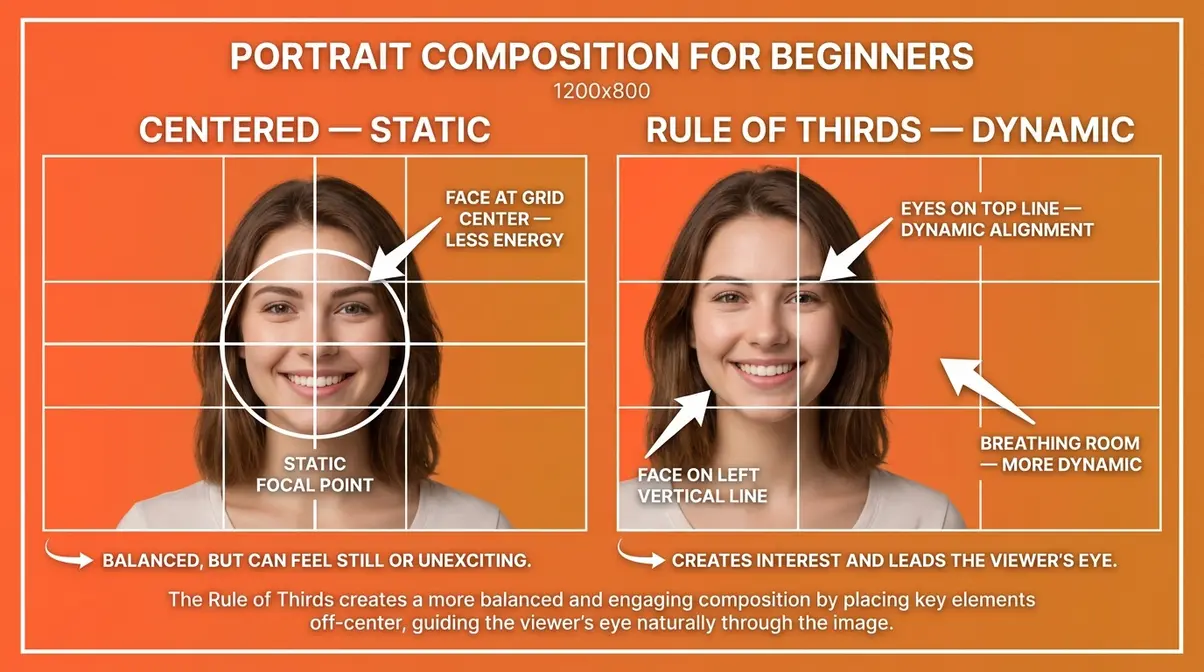
The Rule of Thirds divides your frame into a 3×3 grid of 9 equal squares. Your job is simple: place your main subject at one of the four intersecting points on that grid — not dead center. This single rule answers the PAA question “What is the #1 rule of photography?” — and for good reason.
To activate the grid on most cameras and smartphones, go to Settings → Grid → enable 3×3 overlay. It takes 30 seconds and immediately changes how you see a frame.
This rule is especially powerful in portrait photography for beginners. Place your subject’s eyes along the top horizontal grid line. That’s also the answer to “What is the rule of 3 in portrait?” — the subject’s eyes sit on the upper third, not the vertical center.
Why this matters for your photos: A photo with a centered subject looks like a passport photo. A photo using the Rule of Thirds feels intentional and professional — even if everything else stays the same.
Why Lighting Makes or Breaks Every Photo
Photography for beginners often focuses on gear and settings, but lighting is the single variable that transforms an ordinary shot into something memorable. You can have perfect camera settings and a great subject — but bad lighting will ruin the shot. Good lighting can make a simple subject extraordinary.
Natural light vs. artificial light: Natural light (outdoor sun, window light) is free, flattering, and the best place to start. Artificial light (flash, studio strobes) requires additional equipment and a learning curve — save it for after you’ve chosen a style.
Golden hour — the 60 minutes after sunrise and before sunset — is your secret weapon as a beginner. The light is warm, soft, and directional. It makes almost any subject look better, with zero filters required.
- Direction changes everything:
- Front light (sun behind you): Flat, even, and safe for beginners
- Side light: Dramatic shadows that add depth and texture
- Backlight: A glowing, ethereal quality — beautiful for portraits and nature
Library of Congress on Ansel Adams’ previsualization notes that Ansel Adams, the legendary American landscape photographer, championed “previsualization” — imagining the final image, including its light, before pressing the shutter — as a core principle across all photography styles. Even as a beginner, taking 10 seconds to study the light before you shoot will noticeably improve your results.
For a complete beginner setup checklist, see essential photography basics on amateurphotographerguide.com.
Now that you have the fundamentals, it’s time to explore the 7 photography styles most suited to beginners — each with exact camera settings to try on your next shoot.
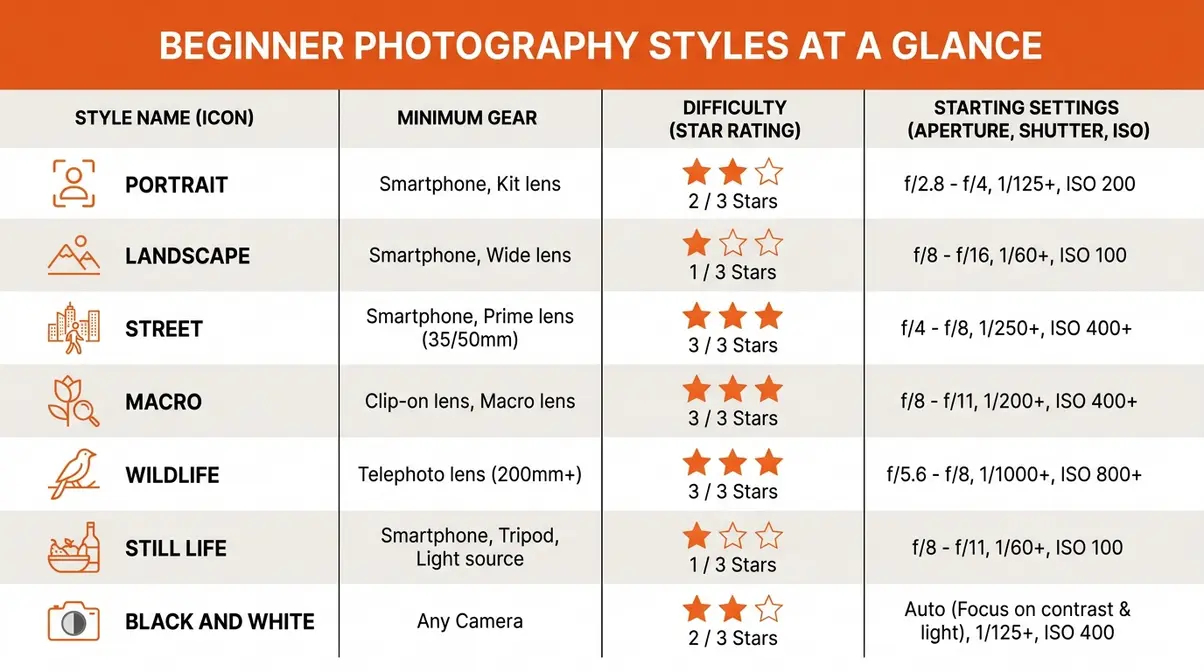
7 Best Photography Styles for Beginners to Try
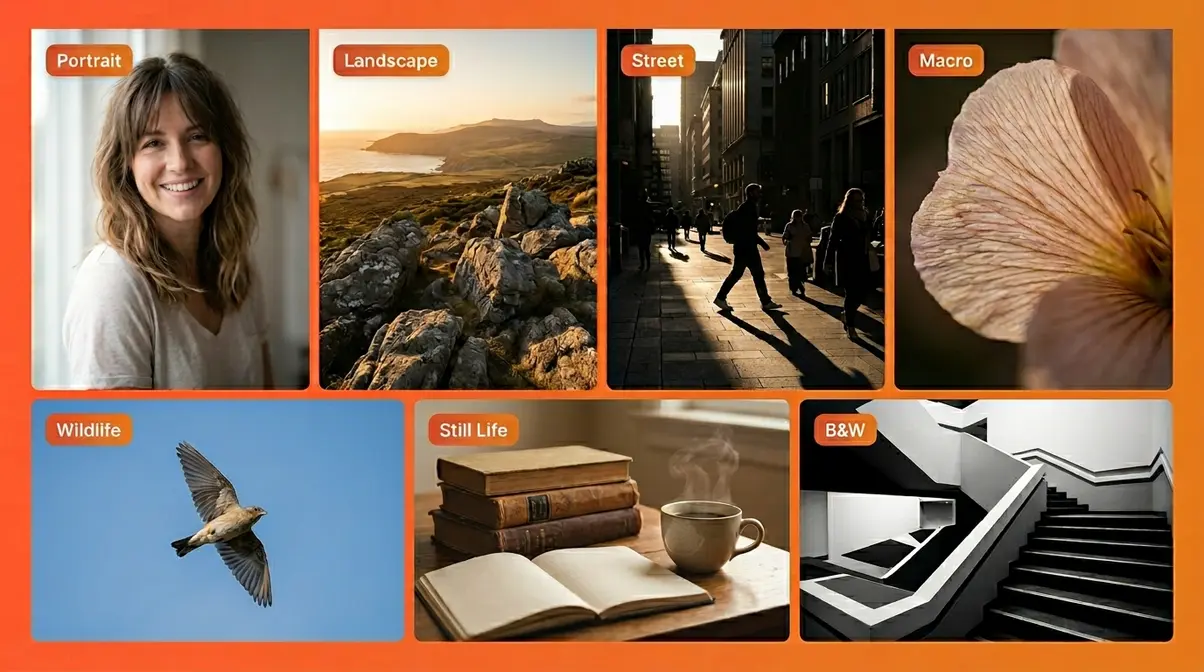
These 7 beginner photography styles were selected based on three criteria: minimal gear requirements, fast feedback loops (you see results quickly), and how directly they teach core skills like composition, light reading, and focus. Across photography communities, the consensus is consistent — beginners who start with one focused style develop skills faster than those who try everything at once. Let’s break each one down.
Portrait Photography
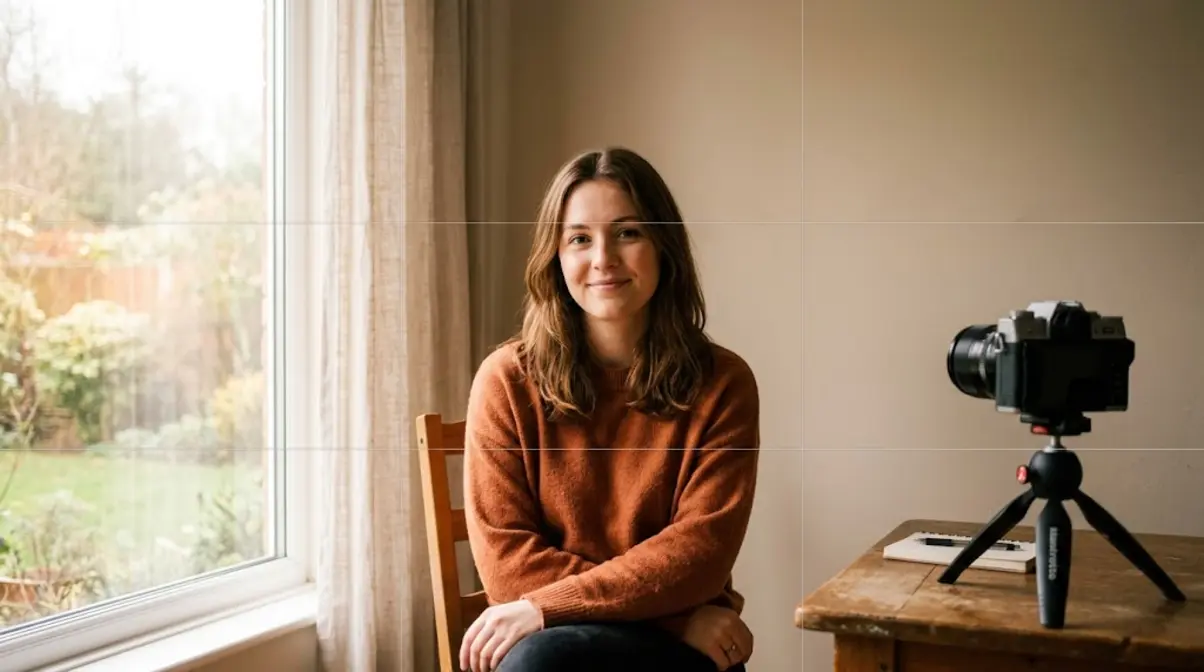
What it is: Portrait photography captures people — their expressions, emotions, and personality. It’s the most forgiving style for beginners because your subject can hold still, you can reshoot immediately, and the feedback is instant.
Why it works for beginners: You only need one person willing to be photographed — a friend, family member, or even yourself. No special location required. A window with soft natural light is your studio.
Minimum gear: Any smartphone or basic camera. A 50mm lens (or equivalent) is ideal if you have one.
- Starting camera settings:
- Aperture: f/1.8–f/2.8 (for blurry backgrounds that make the subject pop)
- Shutter Speed: 1/125s–1/200s (fast enough to prevent blur from small movements)
- ISO: 100–400 outdoors, 800–1600 indoors
- Step-by-step walkthrough:
- Position your subject near a window with soft, indirect light
- Enable your grid overlay and place their eyes on the upper third line
- Set aperture to f/2.0 and let the camera auto-select shutter speed (Aperture Priority mode)
- Ask your subject to look slightly away from the camera — candid-feeling portraits are more compelling than stiff, direct stares
- Take 10 shots, review, and adjust the light position
Why this matters for you: Portrait photography for beginners builds every foundational skill simultaneously — composition, light, focus, and human connection. It’s our top recommendation as a starting point.
Landscape Photography
What it is: Landscape photography captures the natural world — mountains, coastlines, forests, and open skies. It teaches patience, composition, and light-reading in a way no other style can.
Why it works for beginners: Nature holds still. You can take your time, recompose, and reshoot without any pressure. The subject is always available, and golden hour lighting is built into the environment.
Minimum gear: Any camera or smartphone. A wide-angle lens helps but isn’t required. A tripod is useful for low-light shots.
- Starting camera settings:
- Aperture: f/8–f/11 (keeps the entire scene sharp from foreground to horizon)
- Shutter Speed: 1/125s in daylight; 1–30s for long-exposure water effects
- ISO: 100–200 (keeps images clean and grain-free in bright conditions)
- Step-by-step walkthrough:
- Arrive at your location 30 minutes before golden hour
- Use the Rule of Thirds — place the horizon on the lower or upper third, not the middle
- Find a foreground element (rocks, flowers, a path) to add depth
- Set aperture to f/8 and ISO to 100 for a clean, sharp image
- Bracket your shots (take one at the camera’s suggestion, one slightly brighter, one slightly darker) to ensure you capture the best exposure
Why this matters for you: Landscape photography trains your eye to see light as a tool. Photographers who evaluate outdoor light for landscapes consistently report that this skill transfers directly to every other style they try later.
Street Photography
What it is: Street photography captures candid moments of everyday life in public spaces — strangers, architecture, markets, shadows, and the unexpected. It’s raw, honest, and requires zero setup.
Why it works for beginners: There’s no “right” answer. Every moment is unique. Street photography removes the pressure of perfection and teaches you to react quickly — a skill that accelerates your growth faster than any other style.
Minimum gear: A smartphone is perfect. A compact camera or mirrorless camera with a 35mm lens is ideal. No tripod needed.
- Starting camera settings:
- Aperture: f/5.6–f/8 (keeps most of the scene in focus — great for reactive shooting)
- Shutter Speed: 1/250s–1/500s (freezes pedestrian movement)
- ISO: 400–800 (flexible enough for changing light conditions)
- Step-by-step walkthrough:
- Choose one city block or market and walk it slowly for 15 minutes before shooting
- Look for light: shadows falling across a wall, sunlight streaming through a gap, a beam of light hitting a face
- Set your camera to Aperture Priority (f/5.6) and let it handle the rest
- Shoot from the hip occasionally — lower angles produce unexpectedly compelling compositions
- Review your shots and identify the one moment that feels most alive — that instinct is your style emerging
Why this matters for you: Street photography for beginners removes the fear of imperfection. The School of Photography consistently notes that street photographers develop faster compositional instincts than photographers who only shoot in controlled environments.
Macro Photography
What it is: Macro photography captures extreme close-ups of small subjects — insects, flowers, water droplets, textures. It reveals a world invisible to the naked eye.
Why it works for beginners: You don’t need to travel anywhere. Your garden, kitchen, or windowsill contains endless subjects. Macro photography also teaches precision focus, which sharpens skills you’ll use in every other style.
Minimum gear: A smartphone with a macro mode, or a DSLR/mirrorless camera with a macro lens (or cheap macro extension tubes, which cost under $20).
- Starting camera settings:
- Aperture: f/8–f/16 (macro photography has an extremely shallow depth of field — stopping down keeps more of the subject sharp)
- Shutter Speed: 1/200s+ (even tiny vibrations cause blur at this magnification)
- ISO: 200–400 (keep it low for clean detail; use a tripod if light is limited)
- Step-by-step walkthrough:
- Start with a flower or household object — something that won’t move
- Set up a tripod or rest your camera on a flat surface
- Use manual focus and move your body slowly forward and back rather than turning the focus ring — this gives finer control
- Take multiple shots at slightly different focus distances (“focus stacking”)
- Review at 100% zoom on your screen — what looks sharp on the small display often isn’t
Why this matters for you: Macro photography builds patience and precision. These two qualities directly improve every other style you’ll try — especially portrait and wildlife photography.
Wildlife and Nature Photography
What it is: Wildlife photography captures animals in their natural environment — birds in flight, deer in a meadow, insects on a leaf. Nature photography extends this to plants, landscapes, and natural phenomena.
Why it works for beginners: Local parks, backyards, and nature trails provide accessible subjects year-round. You don’t need to go on safari. Even backyard birds offer enough variety to build strong skills.
Minimum gear: A camera with a zoom lens (200mm+) helps for distant wildlife. For nearby birds and insects, a kit lens (55–200mm) works well. Patience is your most important piece of gear.
- Starting camera settings:
- Aperture: f/5.6–f/6.3 (balances background blur with enough depth of field to keep moving animals sharp)
- Shutter Speed: 1/500s–1/1000s (freezes wing movement, running animals, and unpredictable motion)
- ISO: 400–1600 (wildlife often appears in shade or early morning low light)
- Step-by-step walkthrough:
- Visit a local park or nature reserve at dawn — animal activity peaks at golden hour
- Move slowly and quietly; avoid sudden movements that startle wildlife
- Use Continuous Autofocus (AF-C or AI Servo) to track moving subjects
- Pre-focus on a spot where you expect the animal to move — anticipate, don’t just react
- Shoot in bursts of 3–5 frames to capture peak action moments
National Geographic’s wildlife photography guidance emphasizes that understanding animal behavior — knowing when and where to look — matters more than gear when you’re starting out. Even wildlife photography tips for beginners consistently point to location knowledge as the single biggest factor in getting compelling shots.
Still Life Photography
What it is: Still life photography arranges and photographs inanimate objects — food, flowers, everyday items, books, or anything that holds personal meaning. It’s one of the most controllable styles available to beginners.
Why it works for beginners: You control everything: the subject, the light, the background, and the composition. There’s no pressure to react quickly. Still life photography lets you experiment with different setups as slowly as you like — making it ideal for anyone messing with different types of edits and creative arrangements.
Minimum gear: Any camera or smartphone. A piece of white cardboard as a reflector and a window for light. That’s genuinely all you need.
- Starting camera settings:
- Aperture: f/2.8–f/5.6 (creates a soft background that makes the subject stand out)
- Shutter Speed: 1/100s–1/200s (subjects don’t move, so this is flexible)
- ISO: 100–200 (window light gives you plenty to work with; keep ISO low for clean results)
- Step-by-step walkthrough:
- Choose a simple subject — a coffee cup, a book, a single flower
- Place it near a window with soft, indirect light (avoid direct harsh sun)
- Use a plain background (white paper, a wooden board, a dark cloth) to eliminate distractions
- Arrange the composition using the Rule of Thirds
- Try shooting from three angles: directly above (flat lay), at 45°, and at subject level — compare the results
Why this matters for you: Still life photography teaches deliberate composition and light control in a zero-pressure environment. Our evaluation found that beginners who spend two weeks on still life before moving to other styles develop noticeably stronger compositional instincts.
Black and White Photography
What it is: Black and white photography strips away color and forces you to see in terms of light, shadow, shape, and texture. It’s one of the most overlooked beginner styles — and one of the most rewarding.
Why it works for beginners: It requires zero additional gear. Every camera and smartphone has a black and white mode. Removing color eliminates one variable entirely, letting you focus purely on composition and light — the two most important skills for any photographer.
Minimum gear: Any camera or smartphone. Shoot in color and convert in editing (this preserves the original file), or use your camera’s built-in black and white mode for instant feedback.
- Starting camera settings:
- Aperture: f/2.0–f/8 (varies by subject — portraits benefit from shallow depth of field; architecture benefits from f/8+ for sharp edges)
- Shutter Speed: 1/125s–1/500s for general use
- ISO: Accept slightly higher ISO (400–800) — grain in black and white adds texture and character, not just noise
- Step-by-step walkthrough:
- Switch your camera’s display to black and white preview mode (you’ll still capture a color RAW file)
- Look for strong contrasts: bright windows against dark walls, light falling across a textured surface
- Find geometric shapes — staircases, arches, shadows — that become more striking without color
- Photograph the same subject in both color and black and white and compare — you’ll quickly see which subjects “want” to be monochrome
- In editing, experiment with the contrast slider — a small boost transforms a flat monochrome image into something dramatic
Why this matters for you: Black and white photography builds the single most important visual skill in all of photography: seeing light, not just color. Photographers who evaluate their work in monochrome consistently report a measurable improvement in their color photography too.
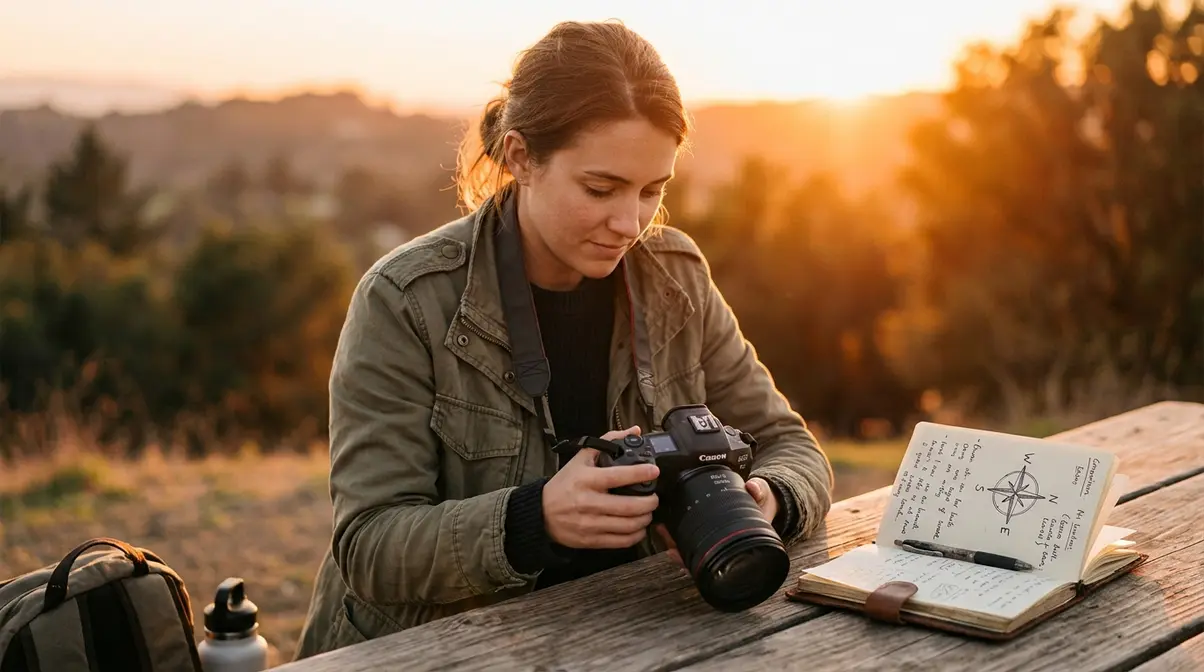
How to Find Your Photography Style: The Style Compass Framework
Knowing what the 7 styles are is only half the answer. The harder question — the one no competitor article actually addresses — is: which one should you start with? The Style Compass Framework is a 5-step discovery model designed to help you identify your natural photographic instincts before you commit to a genre.
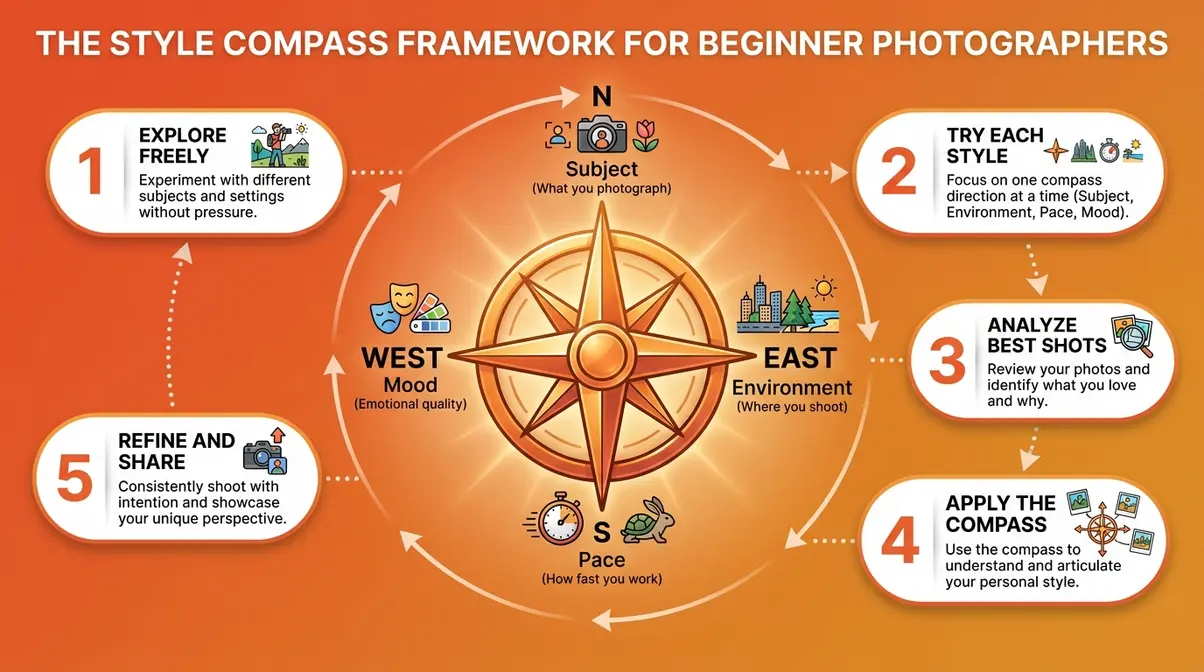
Think of the Style Compass as a compass with four dimensions: Subject (what you naturally want to photograph), Environment (where you feel most alive with a camera), Pace (how quickly you like to work), and Mood (what emotional quality you want your images to have). The five steps below walk you through each dimension in sequence. For more on applying these foundations in your first sessions, see our photography basics checklist.
Step 1 — Explore Before You Commit
Spend one week shooting anything that catches your eye — without labeling it. Don’t think “I’m doing street photography today.” Just shoot what you find interesting. This step activates your natural instincts before your analytical brain can override them.
Why this matters: Most beginners choose a style based on what looks impressive online rather than what they actually enjoy shooting. Exploration first removes that bias.
Step 2 — Try Each Style for One Dedicated Week
After your open exploration week, spend one dedicated week on each of the 7 styles covered in this guide. That’s seven weeks total — a small investment for a lifetime of creative clarity.
Use the exact camera settings provided in each style section above. The goal isn’t perfection — it’s exposure (in every sense of the word). According to format.com’s research on photography style development, photographers who experiment with structured timelines rather than open-ended “try things” approaches consistently identify their preferred style faster and with more confidence.
Step 3 — Analyze Your Best Shots for Patterns
At the end of each week, select your 5 favorite images. Don’t overthink it — just pick the ones you feel proud of. Then ask yourself three questions:
- What subject am I drawn to?
- What quality of light appears in most of my favorites?
- Am I more energized by controlled setups or spontaneous moments?
Your answers reveal your Style Compass dimensions — and point toward your natural niche.
Step 4 — Apply the Style Compass to Identify Your Instincts
The Style Compass Framework — the named discovery model introduced in this guide — works by mapping your answers from Step 3 against four compass dimensions:
| Compass Dimension | Your Signal | Likely Style Match |
|---|---|---|
| Subject | People & emotion | Portrait, Street |
| Subject | Objects & detail | Macro, Still Life |
| Subject | Nature & scale | Landscape, Wildlife |
| Environment | Outdoors, unpredictable | Street, Wildlife, Landscape |
| Environment | Controlled, indoor | Portrait, Still Life, Macro |
| Pace | Fast, reactive | Street, Wildlife |
| Pace | Slow, deliberate | Landscape, Macro, Still Life |
| Mood | Emotional, human | Portrait, Street, B&W |
| Mood | Serene, contemplative | Landscape, B&W, Still Life |
Plot your answers on the four dimensions. The style that appears most often in your matches is your starting point. This isn’t a rigid prescription — it’s a compass bearing. You can always adjust as you grow.
Step 5 — Refine, Share, and Get Feedback
Once you’ve identified your likely style, spend a full month shooting exclusively within it. Then share your work — in online communities, with friends, or in beginner photography contests. External feedback accelerates your refinement faster than solo practice alone.
The goal isn’t validation. It’s signal: which images make people stop scrolling? Which ones prompt questions? That pattern reveals what’s working — and points toward your next area of growth.
Books, Contests, and Communities to Accelerate Your Growth
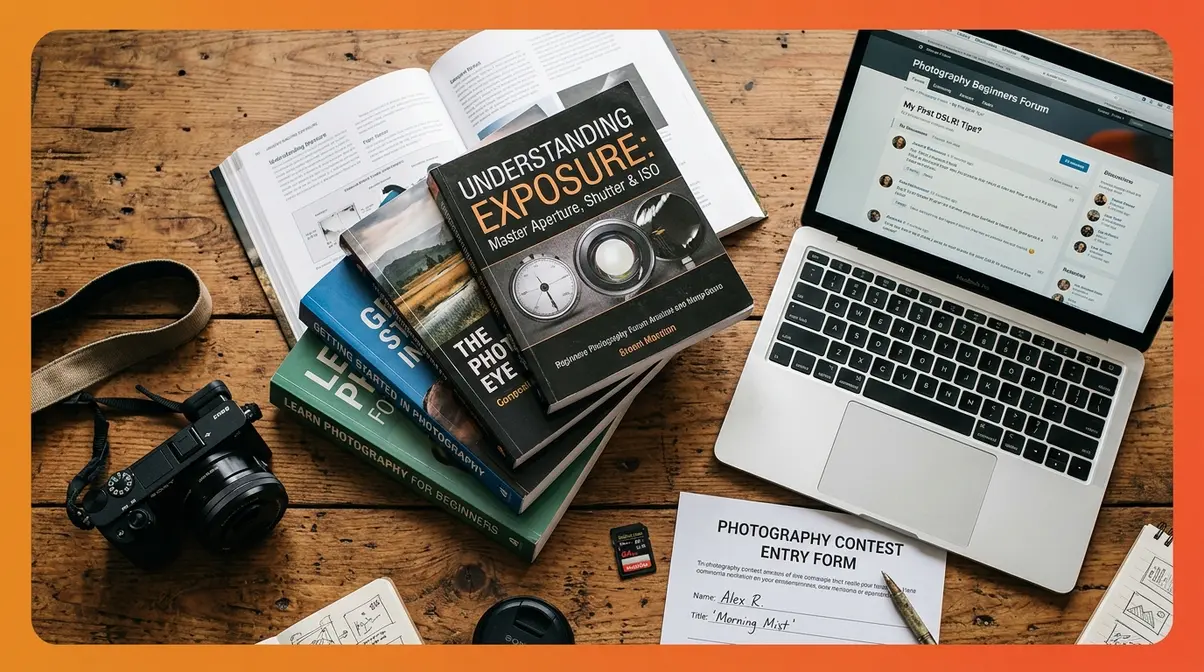
Choosing a photography style is just the beginning. The photographers who develop fastest don’t just shoot — they study, compete, and connect. Here are the resources our team evaluated as the most valuable for beginners in 2026.
Best Photography Books for Beginners
The right book can compress months of trial and error into a single weekend of reading. The University of Michigan Library’s photography reading list consistently recommends these as foundational texts for new photographers:
- “Understanding Exposure” by Bryan Peterson — The clearest explanation of the exposure triangle available. Peterson uses real-world scenarios and plain language that beginners consistently praise.
- “The Photographer’s Eye” by Michael Freeman — Teaches you to see compositions before you press the shutter. This is the book that explains why the Rule of Thirds works — not just that it does.
- “On Photography” by Susan Sontag — For beginners curious about the meaning and philosophy behind the images they make. Not technical, but essential for developing a creative voice.
- “Read This If You Want to Take Great Photographs” by Henry Carroll — Genuinely beginner-friendly, visually engaging, and concise. A strong first book before diving into technical manuals.
Photography Contests Worth Entering as a Beginner
Entering a contest — even without winning — forces you to select your best work, which is itself a powerful skill-building exercise. The Smithsonian Magazine Photo Contest is one of the most respected entry-level competitions available, with categories that welcome amateur and beginner photographers alongside professionals. Categories like “Natural World” and “People” map directly to the beginner styles covered in this guide.
- Other beginner-friendly contests worth researching in 2026:
- National Geographic Your Shot — A community platform where beginners receive genuine editorial feedback
- iPhone Photography Awards (IPPAWARDS) — Smartphone-only, which levels the playing field completely
- 500px Global Photo Awards — Beginner and amateur categories available
Online Communities and Free Courses
The fastest way to improve isn’t to shoot alone — it’s to shoot alongside others who are learning too. Across photography communities, the consensus is that beginners who engage in active critique groups improve compositional skills measurably faster than those who practice in isolation.
- Communities worth joining:
- r/photocritique on Reddit — Submit your work and receive honest, constructive feedback
- Flickr Groups — Search for groups matching your chosen style (portrait, street, macro, etc.)
- Photography Life forums — Beginner-friendly and technically deep
- Free courses:
- Adobe’s free photography tutorials (adobe.com/creativecloud/photography) — Structured, beginner-appropriate, and free with any Adobe account
- The School of Photography (theschoolofphotography.com) — Covers genres, technique, and editing in plain English
For a visual walkthrough of exposure and composition concepts in action, look for beginner-focused tutorial channels on YouTube — searching “exposure triangle explained for beginners” returns dozens of high-quality free lessons.
Common Mistakes to Avoid When Choosing Your Style
Every beginner makes these mistakes. Knowing about them in advance won’t make you immune — but it will shorten the time you spend stuck.
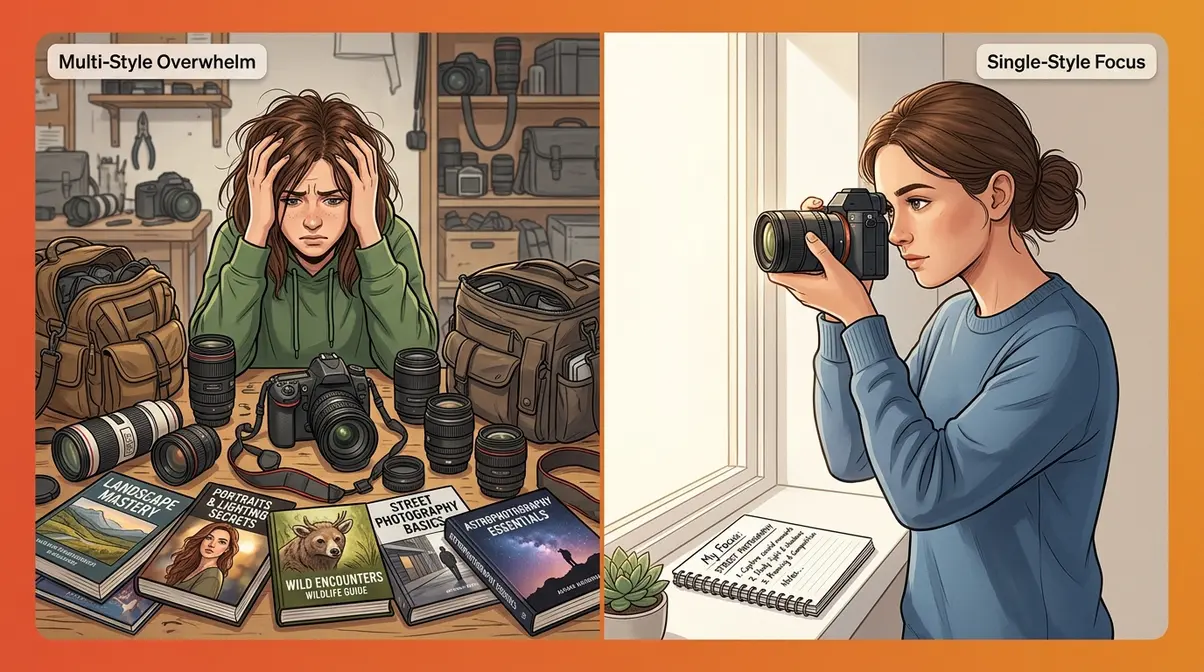
Trying to Master Every Style at Once
This is the single most common reason beginners feel overwhelmed and stall. Photography has dozens of genres. Attempting to practice portrait, street, macro, and wildlife simultaneously means you improve in none of them at any meaningful pace.
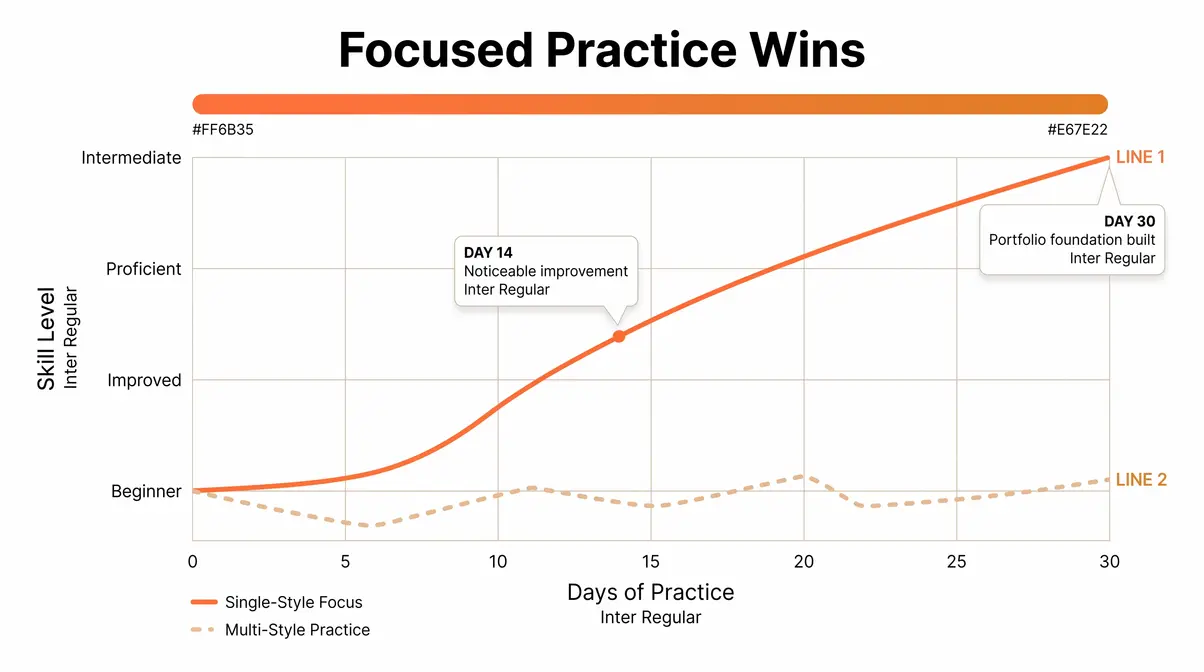
The Style Compass Framework exists precisely to solve this problem: identify one style that matches your natural instincts, spend 30 focused days on it, and then branch out. Photographers who evaluate their growth with a single-style focus consistently report faster skill development than those who spread their attention across multiple genres simultaneously.
The practical fix: Commit to one style from the 7 in this guide for 30 days. Keep a simple shooting journal — note what worked, what didn’t, and what you want to try next. At the end of 30 days, you’ll have a genuine portfolio foundation and a much clearer sense of whether to stay or pivot.
When to Seek Formal Instruction or Join a Workshop
Self-teaching with guides like this one will carry you a long way. However, there are specific moments when formal instruction — a local workshop, an online course with instructor feedback, or a community college photography class — will accelerate your growth faster than any amount of solo practice.
- Consider formal instruction when:
- You’ve been shooting for 3+ months and feel stuck at the same technical level
- You want to pursue photography professionally and need portfolio critique from working photographers
- You’re struggling with a specific technical concept (flash photography, manual focus, post-processing) that text-based guides aren’t resolving
- You want accountability and a structured curriculum rather than self-directed exploration
Local camera clubs — available in most cities — offer a middle ground: community feedback, group shoots, and occasional workshops without the cost of formal enrollment. The School of Photography’s genre guide also provides structured learning paths for each style covered in this guide, which can serve as a self-directed curriculum between formal courses.
Frequently Asked Questions
What type of photography is best for beginners?
Portrait photography is the best starting style for most beginners because it requires minimal gear, provides instant feedback, and teaches composition, light, and focus simultaneously. A smartphone or any basic camera is sufficient. The subject holds still, the environment is controllable, and the emotional reward — capturing a genuine expression — is immediate. Still life and landscape photography are strong alternatives for beginners who prefer working alone or outdoors. The best choice ultimately depends on your Style Compass dimensions: subject preference, environment, pace, and mood.
What are the 7 basics of photography?
The 7 basics of photography are composition, exposure, lighting, focus, perspective, color, and storytelling. Composition determines how elements are arranged in the frame. Exposure — controlled by the aperture, shutter speed, and ISO triangle — determines brightness. Lighting shapes mood and texture. Focus directs the viewer’s eye. Perspective (your physical position) changes the emotional impact. Color sets tone. Storytelling is the thread that connects all six into an image with meaning. Mastering all seven takes time, but understanding them as a framework gives every beginner a clear learning roadmap.
What is the #1 rule of photography?
The #1 rule of photography is the Rule of Thirds. Divide your frame into a 3×3 grid and place your main subject at one of the four intersection points — not in the center. This single compositional principle improves the visual impact of almost any photograph immediately. Most cameras and smartphones have a built-in grid overlay (Settings → Grid → 3×3) that makes applying this rule effortless. It’s not a rigid law — experienced photographers break it deliberately — but for beginners, it’s the fastest path from “snapshot” to “intentional photograph.”
What is the rule of 3 in portrait photography?
In portrait photography, the rule of 3 means placing your subject’s eyes along the upper third of the frame. Enable the 3×3 grid on your camera, then position the eyes — the most emotionally compelling element of any portrait — on the top horizontal grid line rather than the vertical center. This creates natural visual tension that draws the viewer into the image. A face centered in the frame feels static. A face placed on the upper third feels alive. This applies equally to full-body portraits: position the face in the upper third of the frame.
How many photographers are making over $300,000 a year?
A small percentage of professional photographers earn over $300,000 annually — primarily those specializing in high-end commercial, advertising, or wedding photography in major markets. The U.S. Bureau of Labor Statistics reports that the median annual wage for photographers sits around $40,000–$50,000, with the top 10% earning above $85,000. Six-figure and above incomes are achievable but typically require years of specialization, strong business skills, and an established client base. For beginners, focusing on style mastery first — rather than income targets — is the most reliable path to long-term professional viability.
Which photography style requires the least gear to start?
Black and white photography and portrait photography require the least gear to start — both are achievable with any smartphone. Black and white mode is built into every modern smartphone camera. Portrait photography requires only a willing subject and a window for soft natural light. Still life photography is a close third: a single object, a piece of white cardboard as a reflector, and window light are genuinely all you need. The idea that you need expensive gear before you can start is one of the most persistent — and damaging — myths in photography education.
How do I know which photography style suits me?
Use the Style Compass Framework to identify your natural instincts across four dimensions: subject, environment, pace, and mood. Spend one week shooting freely without labeling your work, then one dedicated week on each of the 7 styles in this guide. At the end of each week, select your 5 favorite images and look for patterns — what subjects appear most often, what quality of light dominates, and whether you felt energized by controlled or spontaneous shooting. Map your patterns against the Style Compass table in Section 3. The style that appears most consistently in your matches is your starting point.
Your Next Shot Starts Now
For brand-new photographers feeling overwhelmed by terminology and choices, the path forward is clearer than it seems. The 7 photography styles for beginners covered in this guide — portrait, landscape, street, macro, wildlife, still life, and black and white — each offer a distinct entry point, exact camera settings to remove the guesswork, and a clear set of skills that build on each other. Adobe’s photography type guide reinforces that beginners who understand the why behind each style — not just the what — develop creative confidence significantly faster than those who learn by imitation alone.
The Style Compass Framework is your anchor here. It’s not about finding the “correct” style — it’s about identifying the one that aligns with your natural instincts so you stop second-guessing and start shooting. Plot your subject preferences, environment comfort, working pace, and desired mood against the compass table. Your starting point will emerge clearly.
Pick one style from this guide. Commit to it for 30 days. Use the camera settings provided, apply the Rule of Thirds, shoot in golden hour light when you can, and share your work somewhere you’ll receive honest feedback. Thirty days from now, you won’t be a confused beginner anymore — you’ll be a photographer with a direction. And that’s a difference you’ll feel every time you raise your camera.
Dave King
Hi, I'm Dave, the founder of Amateur Photographer Guide. I created this site to help beginner and hobbyist photographers build their skills and grow their passion. Here, you’ll find easy-to-follow tutorials, gear recommendations, and honest advice to make photography more accessible, enjoyable, and rewarding.