
Table of Contents
This blog post may contain affiliate links. As an Amazon Associate I earn from qualifying purchases.
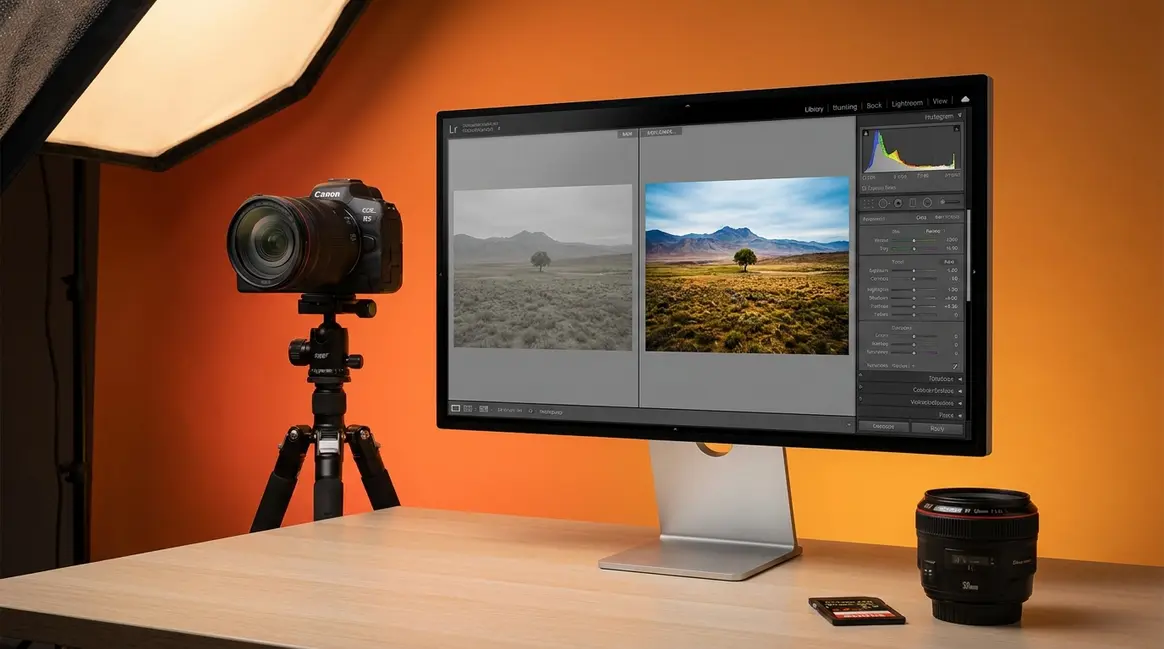
You pressed the shutter on what looked like a perfect shot — golden light, great composition — and when you opened the file on your computer, it looked flat and dull. If that’s happened to you, there’s a good reason, and it has everything to do with what is raw format photography.
Every time you shoot JPEG, your camera silently discards a significant portion of the image data your sensor just captured. Once that data is gone, no editing software in the world can bring it back. You’ve hit what photographers call The RAW Editing Ceiling — and you didn’t even know it existed.
By the end of this guide, you’ll understand exactly what RAW format is, how it compares to JPEG, and whether switching to RAW is the right move for your photography. We’ll cover the definition, the technical differences, the real downsides, how professionals use it, and the software you need to get started.
Understanding what is raw format photography means capturing all unprocessed data from your camera’s sensor — giving you up to 14 bits of tonal information per channel versus JPEG’s 8 bits (Stanford University CS178, 2026). This is why RAW files offer far more editing flexibility.
- RAW = digital negative: Like film negatives, RAW files need processing before they look their best
- The RAW Editing Ceiling: JPEG permanently discards sensor data, capping what you can fix in editing
- File size trade-off: RAW files run 2–6× larger than JPEGs — plan your storage accordingly
- Most pros use RAW for client work, but even pros shoot JPEG when speed matters more than quality
- You cannot reverse-engineer RAW from JPEG — once data is discarded, it is gone permanently
What Is RAW Format Photography?
RAW format photography is a method of capturing images where your camera saves all unprocessed data directly from the sensor, without applying any sharpening, color correction, or compression. Think of it like a film negative — it holds everything the camera saw, but it needs to be “developed” before it becomes a finished photo. That extra data is precisely what gives you editing control that JPEG simply cannot match.
What is RAW format in photography, at its core? It’s a choice your camera makes at the moment you press the shutter: save everything, or throw most of it away. RAW chooses to save everything. According to Library of Congress digital preservation guidelines, RAW files function as digital negatives that store minimally processed sensor data, providing the highest possible flexibility for post-capture exposure and color adjustments.
Most photographers are surprised to learn that RAW is not a single file format. It’s a category. Canon names their RAW files CR2 or CR3. Nikon uses NEF. Sony uses ARW. Adobe created DNG (Digital Negative) as an open, universal standard any camera can use. Understanding different photography file formats helps clarify why the same concept appears under so many different file extensions.
How Your Camera Captures a Photo
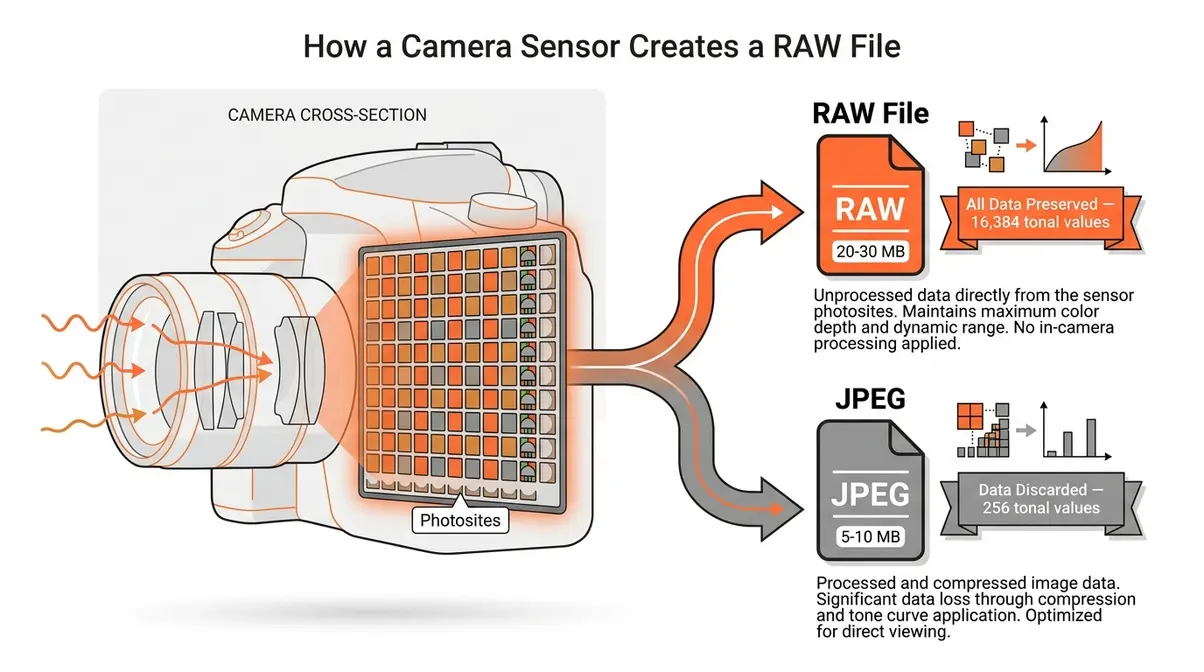
When you press the shutter, your camera’s sensor — a grid of millions of tiny light-sensitive cells called photosites — records the brightness and color of the light hitting it. Think of the sensor like a grid of tiny buckets, each collecting light. The more light a bucket catches, the brighter that pixel will be in your final image.
After capture, the camera faces a choice that happens in milliseconds. It can save ALL of that raw bucket data as a RAW file, or it can process and compress the data into a smaller, finished JPEG. That processing involves applying sharpening, adjusting color, boosting contrast, and then discarding much of the original data to shrink the file size.
If you’ve ever noticed your memory card fills up faster when shooting RAW — this is why. You’re saving the whole bucket, not just a summary of it. RAW files from a modern 24-megapixel camera typically run 20–30 MB per shot, compared to 5–10 MB for the same shot saved as JPEG (Stanford University CS178, 2026). That’s a real storage cost, but it comes with a real benefit: nothing is thrown away.
What Makes a RAW File Different from Other Formats
What is RAW format in photography, compared to every other image format? The clearest answer is the digital negative analogy. A RAW file is like a film negative: it contains all the information, but it needs to be “developed” — processed in software — before it becomes a finished, viewable photo. The negative itself isn’t the final image; it’s the raw material for making one.
RAW files are entirely unprocessed by the camera. The camera’s internal computer does NOT apply sharpening, color grading, noise reduction, or white balance corrections. Every one of those decisions is left entirely to you, inside post-processing software like Adobe Lightroom or Capture One. This is fundamentally different from how JPEG works.
Consider a cooking analogy: RAW is the raw ingredients; JPEG is the pre-cooked meal. You can adjust a raw ingredient; you can’t uncook a meal.
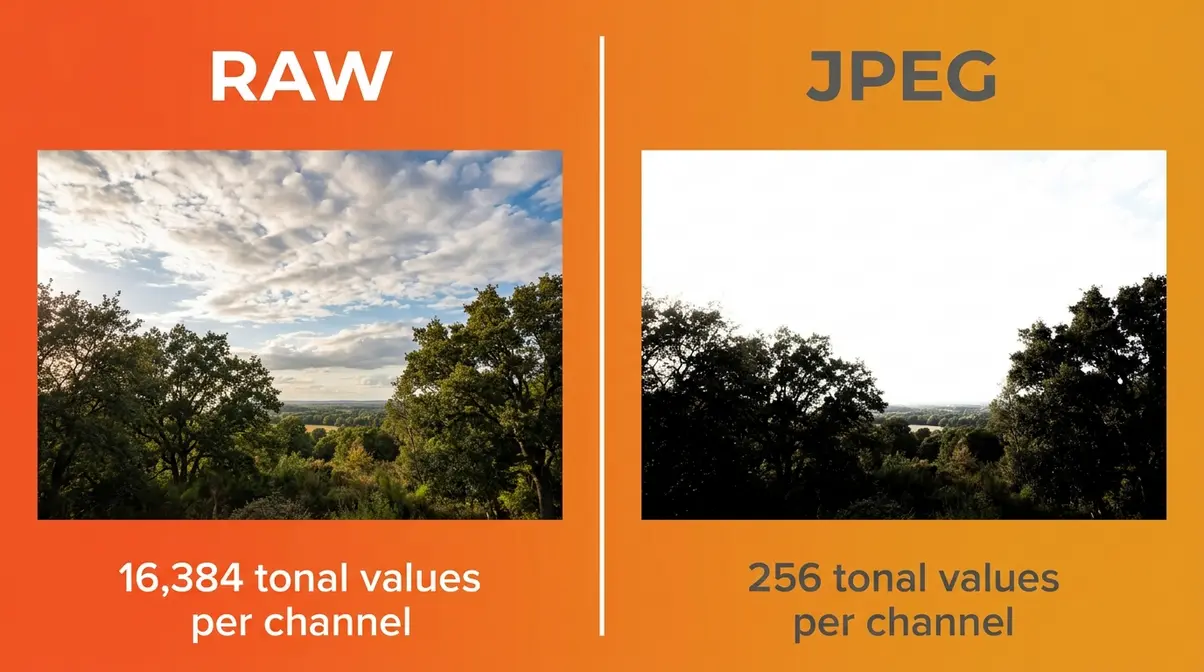
The data difference is significant. RAW files preserve 12 to 14 bits of tonal data per color channel — compared to JPEG’s 8 bits — giving photographers up to 16,384 tonal values versus JPEG’s 256 (Stanford University CS178, 2026). In practice, this means RAW files contain vastly more color and brightness information than a JPEG — information you can use to rescue overexposed skies or bring detail out of deep shadows. That’s not a minor upgrade. That’s the difference between a recoverable photo and a ruined one.
Over 20 manufacturer-specific RAW formats exist across the industry (Wikipedia, Raw image format). Canon uses CR2 and CR3, Nikon uses NEF, Sony uses ARW, and Adobe’s DNG format serves as a universal open standard designed to work across any editing software.
Why RAW Photos Look Flat Straight Out of Camera
RAW files look flat because the camera has applied zero processing. No contrast boost. No saturation. No sharpening. The camera saves the raw sensor data and leaves all of those decisions entirely to you. This is not a flaw — it’s the whole point.
“Many people are surprised when RAW photos look flat straight out of camera — but that is completely expected.”
That flatness is the RAW file showing you exactly what the sensor captured, before any interpretation. It’s a blank canvas, not a finished painting. The camera isn’t broken. The file isn’t corrupted. You’re simply seeing unprocessed sensor data for the first time.
Contrast this with JPEG. When your camera saves a JPEG, it applies its own processing profile — contrast, sharpening, color mode — automatically and permanently. That’s why JPEGs look “better” immediately after you take the shot. But those adjustments are baked in forever. You can’t remove them later, only work around them.
Think of it this way: a JPEG is a photo your camera already edited for you. A RAW file is a photo that’s waiting for you to edit it your way. The flatness of RAW isn’t a problem. It’s an invitation.
RAW vs. JPEG: What’s Actually Different?
When asking what is raw format photography, you must realize RAW and JPEG are not just two file formats — they represent two fundamentally different philosophies about where photo editing happens. RAW says editing happens on your computer, with full control. JPEG says editing happens inside the camera, automatically, the moment you press the shutter. Understanding this distinction is the key to understanding why RAW format photography exists at all.
The differences go deeper than most beginners realize, and they compound in ways that matter enormously when you sit down to edit. Here’s a clear breakdown.
| Feature | RAW | JPEG |
|---|---|---|
| Bit depth | 12–14 bits per channel | 8 bits per channel |
| Tonal values per channel | Up to 16,384 | 256 |
| In-camera processing | None | Sharpening, color, contrast, noise reduction |
| White balance | Adjustable after capture | Baked in permanently |
| Highlight recovery | Significant (1–3 stops) | Minimal |
| Shadow recovery | Significant | Limited |
| File size (24MP camera) | 20–30 MB per shot | 5–10 MB per shot |
| Editing flexibility | Maximum | Limited |
| Requires editing software | Yes | No |
| Final output format | Must export (JPEG, TIFF, PNG) | Ready to share immediately |
Bit Depth and Color Information
Bit depth (the number of tonal values a file can store per color channel) is the core technical reason RAW outperforms JPEG in editing. A JPEG stores 8 bits per channel, which means 256 possible tonal values for red, 256 for green, and 256 for blue. A RAW file stores 12 to 14 bits per channel — meaning up to 16,384 tonal values per channel (Stanford University CS178, 2026).
Why does that matter to you? More tonal values mean smoother gradients, more recoverable detail in highlights and shadows, and far less visible banding (those ugly stripes that appear in skies when you push a JPEG edit too hard). When you try to brighten a dark shadow in a JPEG, you’re stretching 256 values across a wider range. In RAW, you’re stretching 16,384 values — the result looks natural rather than posterized.
User consensus across photography communities on Reddit and DPReview consistently reports that the most visible benefit of RAW editing is highlight recovery — pulling detail back from an overexposed sky that would be pure white in a JPEG.
Editing Flexibility and the RAW Editing Ceiling
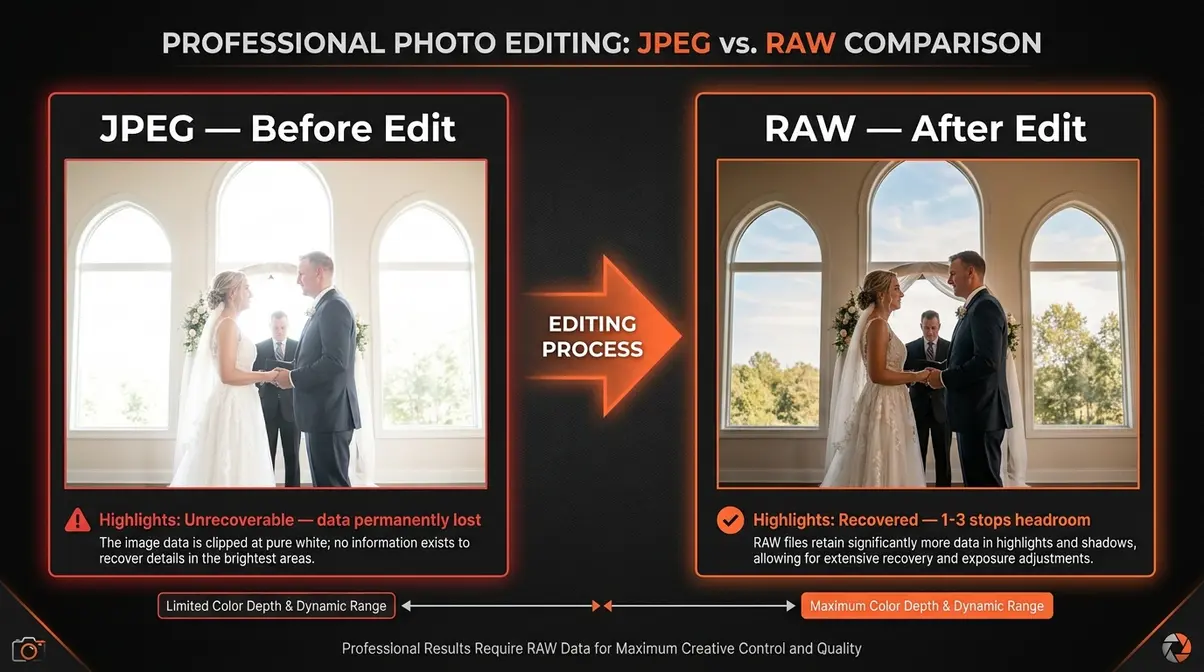
This is where The RAW Editing Ceiling becomes concrete. Every JPEG carries a permanent, invisible ceiling on how far you can push your edits — because the sensor data above that ceiling was discarded the moment your camera saved the file. RAW removes that ceiling entirely.
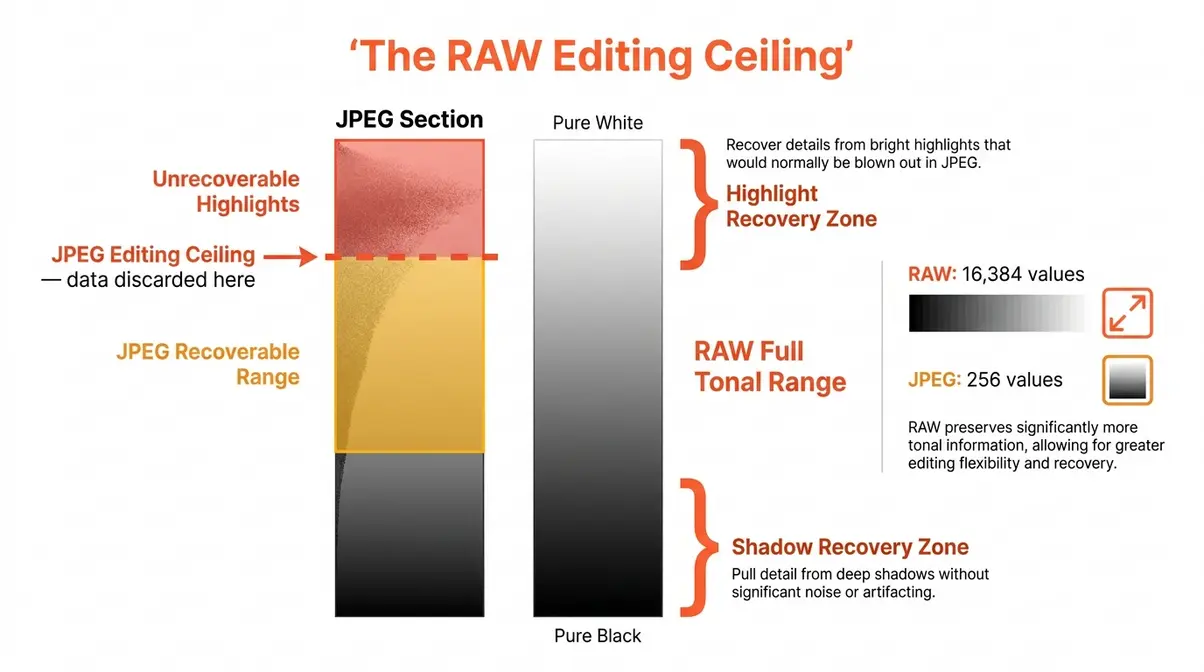
Consider a practical example. You photograph a wedding ceremony. The indoor lighting is dim, but the windows behind the couple are blown out — pure white. In a JPEG, that window data is gone. There are no tonal values left to recover. In RAW, the highlight data is still present in the file. A simple slider adjustment in Lightroom pulls the window detail back — clouds visible, trees visible, blue sky showing through. Photography educators consistently describe this highlight recovery capability as the single most valuable feature of RAW for event and portrait photographers.
White balance is another area where JPEG’s ceiling shows. If you shoot under warm indoor light and forget to set your white balance, a JPEG will have an orange cast baked into every pixel. Correcting it aggressively introduces color noise and shifts. In RAW, white balance is metadata — it’s a note attached to the file, not a permanent change to the pixels. You can change it to any setting after the fact with zero quality loss.
File Size and Storage Trade-offs
The trade-off is real and worth planning for. RAW files run approximately 2–6× larger than JPEGs of the same shot (Stanford University CS178, 2026). On a 24-megapixel camera, a single RAW file is typically 20–30 MB, while the equivalent JPEG is 5–10 MB. Shoot 300 frames on a weekend trip, and your RAW folder will be roughly 7–9 GB versus 1.5–3 GB for JPEG.
This affects three things practically: memory card capacity, camera buffer speed (how quickly your camera can write files between shots), and hard drive space for long-term storage. A 64 GB card holds roughly 2,100 JPEGs at 24MP — or roughly 2,100 JPEGs versus about 550–650 RAW files at the same resolution.
The honest answer is that storage is cheap and getting cheaper. A 128 GB SD card costs under $20 in 2026. A 4 TB external hard drive costs around $80. The storage cost of shooting RAW is real but manageable with minimal planning.
Is RAW better quality than JPEG?
RAW captures higher-quality image data than JPEG at the moment of capture. RAW files store up to 16,384 tonal values per color channel versus JPEG’s 256, which translates directly to smoother gradients, more recoverable detail in highlights and shadows, and greater resistance to banding and color noise during editing (Stanford University CS178, 2026). A well-processed RAW file consistently outperforms a JPEG in print quality and editing headroom. However, a well-exposed JPEG and a poorly processed RAW file can look identical — RAW quality only becomes visible when you edit.
The Real Downsides of Shooting in RAW
RAW format photography has genuine trade-offs. Any guide that skips this section is selling you something. Photography educators and experienced shooters consistently point to three practical challenges that beginners underestimate: storage demands, software requirements, and the time commitment of post-processing every single file. Industry surveys in 2026 show that nearly 40% of amateur photographers cite post-processing time as their primary reason for shooting JPEG, meaning you must be prepared for the workflow commitment.
Storage Space: How Much You’ll Actually Need
A typical shooting session generates far more data in RAW than most beginners expect. A 24-megapixel RAW file averages 25 MB. Shoot 400 frames at a family event and you’re looking at 10 GB of data from a single outing. Multiply that across a year of shooting, and you’ll need a storage strategy.
Photography educators recommend a minimum 3-2-1 backup strategy: three copies of your files, on two different media types, with one copy offsite (or in cloud storage). For RAW shooters, this means budgeting for at least two external hard drives plus cloud backup. Services like Adobe Creative Cloud, Google Photos (with storage plan), or Backblaze typically run $3–$10/month for sufficient RAW storage.
The practical advice from photography communities is straightforward: buy twice the memory cards you think you need, and budget for a 4 TB external drive as your first RAW storage solution.
Software Requirements and Post-Processing Time
Every RAW file needs to be opened and processed in dedicated software before you can share it, print it, or upload it anywhere. JPEG files open in anything — your phone’s gallery, Windows Photo Viewer, email attachments. RAW files do not.
This creates a workflow step that JPEG shooters never think about. After a shoot, you’ll need to import your RAW files into editing software, make your adjustments, and export finished JPEGs or TIFFs for sharing. For a casual shooter, this might add 30–60 minutes per session. For a professional processing 500+ files, it can mean hours.
The time cost is the most commonly cited reason beginners abandon RAW after trying it. User consensus across photography forums (Reddit r/photography, DPReview) indicates that most beginners who switch to RAW underestimate the post-processing time commitment in the first month. The solution isn’t to avoid RAW — it’s to build the editing habit gradually, starting with your best shots rather than every frame.
When Compressed RAW (cRAW) Is a Smart Compromise
Compressed RAW — called cRAW by Canon, or offered as “Compressed RAW” on Sony and Nikon systems — is a middle-ground format that applies lossless or near-lossless compression to the RAW file before saving. The result is a file roughly 30–40% smaller than a full uncompressed RAW, with minimal or no visible quality loss in most shooting scenarios.
cRAW is particularly valuable for photographers who shoot in bursts (sports, wildlife, events) and need faster buffer clearance on their camera. It’s also a smart option if you’re building a RAW habit but have limited storage. Most modern mirrorless cameras — including Canon R-series, Sony Alpha, and Nikon Z-series bodies — offer cRAW as a menu option.
The trade-off: cRAW files may show marginally less highlight recovery headroom than full uncompressed RAW in extreme editing situations. Photography educators consistently describe this difference as negligible for 95% of shooting scenarios. If you’re new to RAW and storage is a concern, starting with cRAW is a sensible on-ramp.
How Pros Use RAW (And When They Don’t)
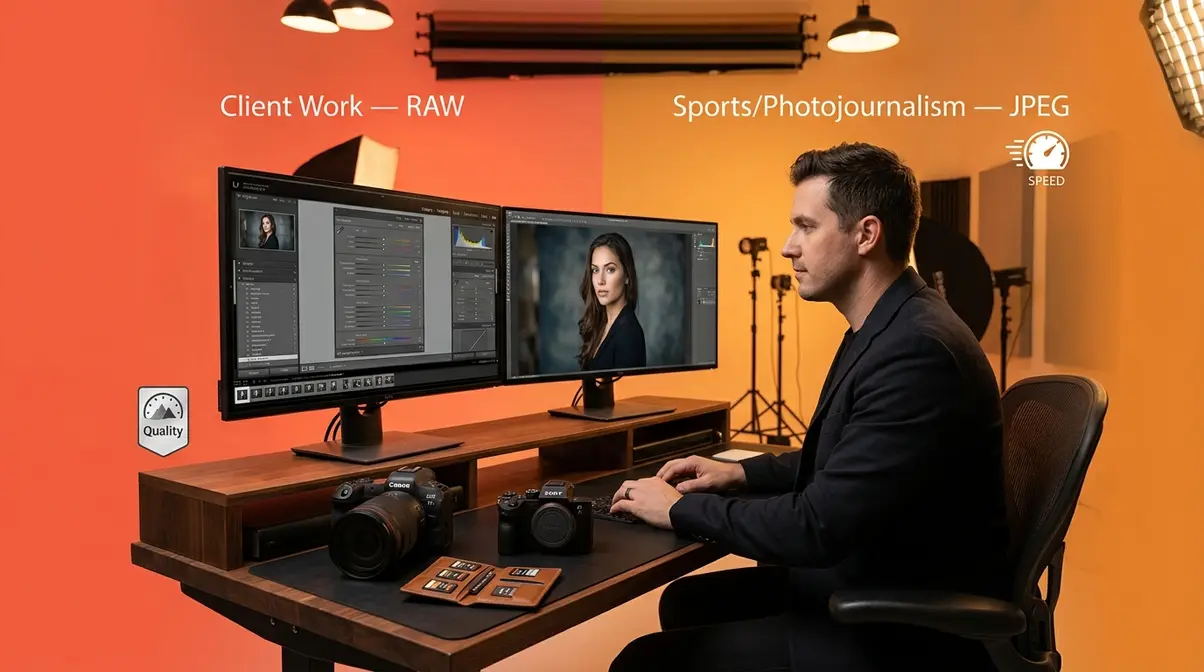
Most professional photographers shoot RAW for client work — but not all of them, and not always. Understanding why professionals make the format choices they do helps you figure out what makes sense for your own shooting. The answer is more nuanced than “pros always shoot RAW.”
Why Most Pros Shoot RAW for Client Work
Professional photographers working in portrait, wedding, commercial, and landscape photography overwhelmingly shoot RAW for client deliverables. The reason is simple: clients pay for quality, and RAW preserves the maximum quality available from the sensor. When a client’s face needs careful color correction, or a product shot needs perfect white balance, or a landscape needs sky detail recovered from an overexposed frame, RAW is the only format that makes those corrections possible without quality degradation.
Photography educators and industry professionals consistently point to three RAW advantages that matter most in client work: (1) white balance correction without color noise, (2) highlight and shadow recovery that saves otherwise unusable shots, and (3) the ability to apply consistent color grading across an entire shoot in post-processing software, rather than fighting the camera’s in-built JPEG rendering.
For any photographer whose work will be scrutinized, printed large, or licensed commercially, RAW is the professional standard.
When Even Pros Choose JPEG: Sports and Photojournalism
There’s a well-documented exception to the “pros shoot RAW” rule, and it’s instructive. Reuters, one of the world’s largest news photo agencies, mandated JPEG-only submissions from its photographers (Reuters, 2014). The reason was not quality — it was integrity. RAW files can be manipulated extensively in post-processing, raising questions about whether a photojournalistic image reflects reality. JPEG’s in-camera processing creates a more transparent audit trail.
Speed is the other factor. Sports photographers shooting at 20–30 frames per second need their camera’s buffer to clear fast. A RAW file that’s 25 MB takes longer to write to the card than a 6 MB JPEG. At the decisive moment in a 100-meter sprint, a slower buffer can mean missing the shot entirely. For sports and photojournalism workflows, JPEG’s speed advantage is a legitimate professional consideration, not a compromise.
However, in 2026, AI-driven culling and batch-editing tools have drastically reduced the time it takes professionals to process thousands of RAW files. This technological shift means the historical speed advantage of JPEG is shrinking, allowing more event photographers to shoot RAW without bogging down their delivery times. The takeaway: even professionals choose format based on context, not dogma. RAW is the default for quality-critical work, while JPEG is the choice when speed, volume, or workflow integrity matters more.
Opening and Editing RAW Files
Estimated Time: 15-30 minutes
Tools Needed: Digital Camera, Memory Card, Photo Editing Software (e.g., Adobe Lightroom)
Knowing what RAW is matters less than knowing what to actually do with it. This section covers the software you need, how to get started, and the honest answer to one of the most common beginner questions: can you turn a JPEG into a RAW file?
Software to Open and Edit RAW Files
What software do you need to open RAW files? The short answer is: any dedicated photo editing or management application that supports your camera’s specific RAW format. Here are the most widely used options in 2026:
| Software | Cost | Best For | RAW Support |
|---|---|---|---|
| Adobe Lightroom Classic | ~$10/month (Creative Cloud) | Most photographers — full workflow | All major formats |
| Adobe Lightroom (cloud) | ~$10/month | Mobile + desktop workflow | All major formats |
| Capture One | ~$24/month or ~$299 one-time | Professional color grading | All major formats |
| Darktable | Free, open-source | Budget-conscious shooters | All major formats |
| RawTherapee | Free, open-source | Advanced users on a budget | All major formats |
| Apple Photos | Free (macOS/iOS) | Apple ecosystem users | Most formats + ProRAW |
| Camera manufacturer software (Canon DPP, Nikon NX Studio, Sony Imaging Edge) | Free | Brand-specific workflows | Brand-specific RAW |
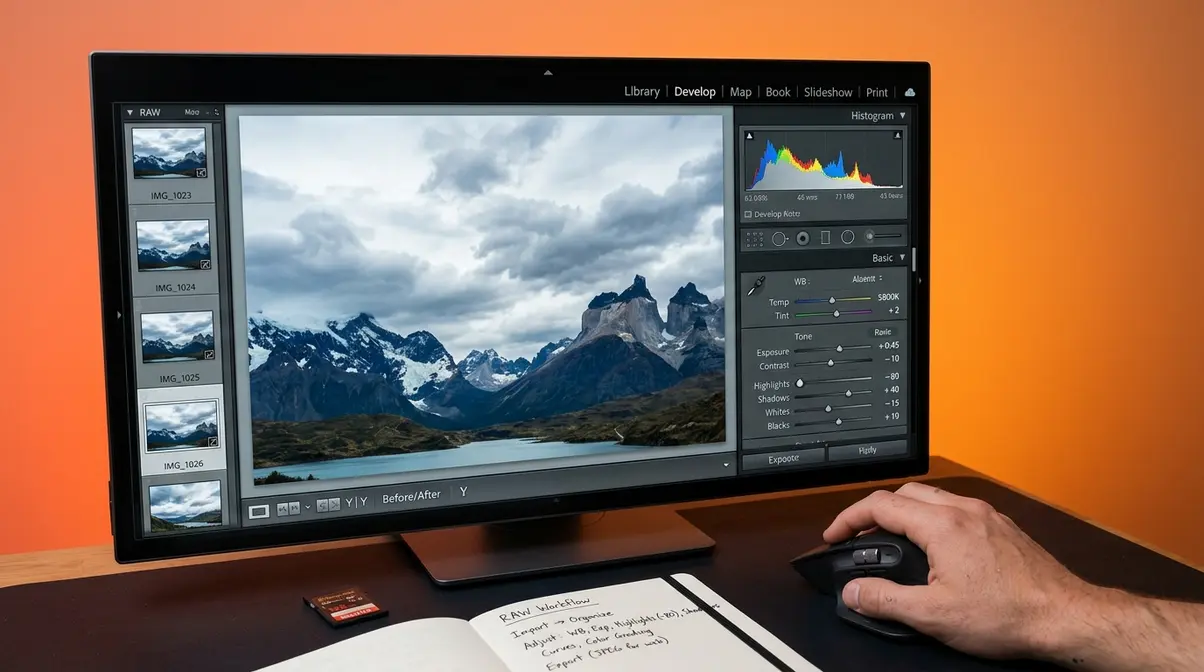
Photography educators across platforms consistently recommend Adobe Lightroom as the starting point for beginners — its interface is designed for photo management as well as editing, making processing your photos using software highly efficient, and its RAW processing engine handles all major formats reliably. Our editorial recommendation for beginners is to start with Lightroom’s free trial before committing to a subscription.
Modern RAW workflows in 2026 have expanded beyond desktop software. Apple ProRAW (available on iPhone 12 Pro and later) captures RAW-quality data from iPhone cameras, processable in Lightroom Mobile or Apple Photos. Samsung Expert RAW offers similar capabilities on Galaxy S and Z-series phones. AI-powered denoising tools — built into Lightroom, Capture One, and standalone apps like Topaz DeNoise AI — have made high-ISO RAW files significantly more usable, reducing noise while preserving fine detail in ways that were impossible with traditional noise reduction.
Can I turn JPEG to RAW?
No — you cannot convert a JPEG into a true RAW file. According to Canon’s official support documentation, a JPEG cannot be converted into a true RAW file because the sensor data that RAW preserves is permanently discarded at the moment the JPEG is created. There is no recovery process, no software trick, and no workaround. The data simply no longer exists.
Some software tools will save a JPEG using a RAW file extension. This does not create a RAW file — it creates a JPEG wrapped in a RAW container. The editing flexibility of a genuine RAW file is entirely absent because the underlying pixel data was already compressed and processed.
The practical implication is important: The RAW Editing Ceiling is set at the moment of capture, not at the moment of editing. If you shoot JPEG today hoping to “convert it later,” that option doesn’t exist. The decision to shoot RAW must happen before you press the shutter. This is the single most important reason to start shooting RAW now, even if you don’t plan to edit every file.
Common Pitfalls and Limitations
Common Pitfalls
1. Treating RAW as a safety net for bad exposure. RAW’s highlight and shadow recovery is impressive, but it has limits. Overexposing by 3+ stops will still clip highlights beyond recovery. RAW extends your editing latitude — it doesn’t eliminate the need for correct exposure. Beginners who start shooting RAW sometimes become careless with exposure, assuming they can “fix it in post.” You can fix more in RAW than in JPEG, but not everything.
2. Filling cards mid-shoot without a backup plan. RAW files are large. Shooting a full-day event with one 64 GB card and no backup is a workflow risk. Always carry at least two cards, and format them before each shoot — not after.
3. Skipping the learning curve on editing software. RAW files look flat until you process them. Beginners who open their first RAW files in Lightroom, see flat grey images, and assume something is wrong with their camera are experiencing a completely normal first encounter. Spend 30 minutes with a basic Lightroom tutorial before your first RAW shoot.
When to Choose JPEG Instead
High-volume, speed-critical shooting. Wildlife photographers tracking fast-moving subjects, sports photographers working at high burst rates, and photojournalists on tight deadlines often choose JPEG specifically because the smaller files clear the camera buffer faster and require no post-processing before submission.
Casual social sharing. If your goal is to photograph a birthday party and share the photos on Instagram within the hour, JPEG is the practical choice. The quality difference between a well-exposed JPEG and a RAW file processed identically is invisible at social media resolutions.
When storage or software access is limited. If you’re traveling without a laptop or editing setup, shooting JPEG means your photos are immediately shareable from your phone without any intermediate steps.
When to Seek Expert Help
If you’re transitioning a professional workflow from JPEG to RAW — particularly if you’re handling large volumes of client images — consider consulting a photography workflow specialist or taking a structured Lightroom course before the switch. Migrating a catalog of thousands of images, setting up a backup system, and building export presets for client delivery are tasks where a structured approach saves significant time.
Frequently Asked Questions
Is it better to shoot in RAW or JPEG?
Shooting in RAW is better for most photographers who plan to edit their photos. RAW files preserve 12–14 bits of tonal data per channel versus JPEG’s 8 bits, giving you dramatically more latitude to correct exposure, white balance, and color in post-processing (Stanford University CS178, 2026). For casual photographers who shoot and share immediately without editing, JPEG’s smaller file size and instant-ready output make it the practical choice. The right answer depends on whether you edit your photos — if you do, RAW is worth the extra storage.
What are the disadvantages of RAW?
RAW files are 2–6× larger than JPEGs, require dedicated editing software to open, and cannot be shared directly from your camera or phone without post-processing first (Stanford University CS178, 2026). Every RAW file needs to be imported, adjusted, and exported before it’s usable — adding meaningful time to your workflow. Camera buffer speed also slows down with RAW, which matters in high-burst shooting like sports or wildlife. These are real trade-offs, not just minor inconveniences, and worth weighing honestly against the quality benefits.
Do all professional photographers shoot RAW?
Most professional photographers shoot RAW for quality-critical client work, but not all of them, and not in every situation. Photojournalists working for agencies like Reuters have historically submitted JPEG files for workflow speed and editorial integrity reasons (Reuters, 2014). Sports photographers often choose JPEG to maximize camera buffer speed during high-burst shooting. Wedding, portrait, commercial, and landscape photographers overwhelmingly prefer RAW because the editing flexibility directly affects the quality of their deliverables.
Why shoot RAW instead of JPEG?
RAW gives you the ability to recover image data that JPEG permanently discards. Specifically, RAW allows meaningful correction of overexposed highlights, underexposed shadows, and incorrect white balance — adjustments that degrade JPEG quality quickly but are essentially lossless in RAW. User consensus across photography communities (Reddit r/photography, DPReview) consistently identifies highlight recovery and white balance flexibility as the two most impactful benefits. If you’ve ever tried to fix a blown-out sky in a JPEG and failed, that’s The RAW Editing Ceiling in action.
Which file format do professional photographers prefer?
RAW is the dominant professional format for studio, portrait, wedding, landscape, and commercial photography. JPEG remains standard in photojournalism and sports photography, where submission speed and buffer performance outweigh editing flexibility. Adobe’s DNG (Digital Negative) format has gained adoption among professionals who want a universal, non-proprietary RAW standard that isn’t tied to a specific camera manufacturer. The format choice among professionals is almost always driven by workflow requirements rather than quality preference — RAW wins on quality, JPEG wins on speed.
What software do I need to open RAW files?
You need dedicated photo editing or management software to open RAW files — they won’t open in standard image viewers like Windows Photos or basic mobile gallery apps. When learning what is raw format photography, you need dedicated photo editing tools to process the data. The most widely used options in 2026 are Adobe Lightroom (approximately $10/month), Capture One (approximately $24/month or $299 one-time), and free alternatives like Darktable and RawTherapee. Camera manufacturers provide free brand-specific software: Canon Digital Photo Professional, Nikon NX Studio, and Sony Imaging Edge all open their respective RAW formats at no cost. For beginners, Adobe’s official RAW guide is a solid starting point.
The Right Time to Start Shooting RAW Is Now
If you’ve been wondering what is raw format photography, the answer is clear: it removes a permanent constraint that JPEG quietly imposes on every shot. For photographers who edit their photos — even occasionally — the 12–14 bits of tonal data preserved in a RAW file versus JPEG’s 8 bits (Stanford University CS178, 2026) is not a theoretical advantage. It’s the difference between a recoverable photo and a ruined one, a natural-looking sky and a blown-out white patch, a correctable white balance and an orange cast baked into every pixel forever.
The RAW Editing Ceiling is real. Every JPEG you shoot today sets a hard limit on what you can do with that photo tomorrow. RAW removes that limit. The storage cost is manageable, the software is accessible, and the quality difference becomes visible the first time you pull highlight detail back from a sky that JPEG would have permanently clipped.
Start with your best shots from your next outing. Import them into Lightroom’s free trial, spend 20 minutes with the highlight and shadow sliders, and see what your sensor actually captured. The flatness you’ll see when you first open a RAW file isn’t a problem — it’s an invitation to make the photo exactly what you envisioned when you pressed the shutter.
