
Table of Contents
This blog post may contain affiliate links. As an Amazon Associate I earn from qualifying purchases.
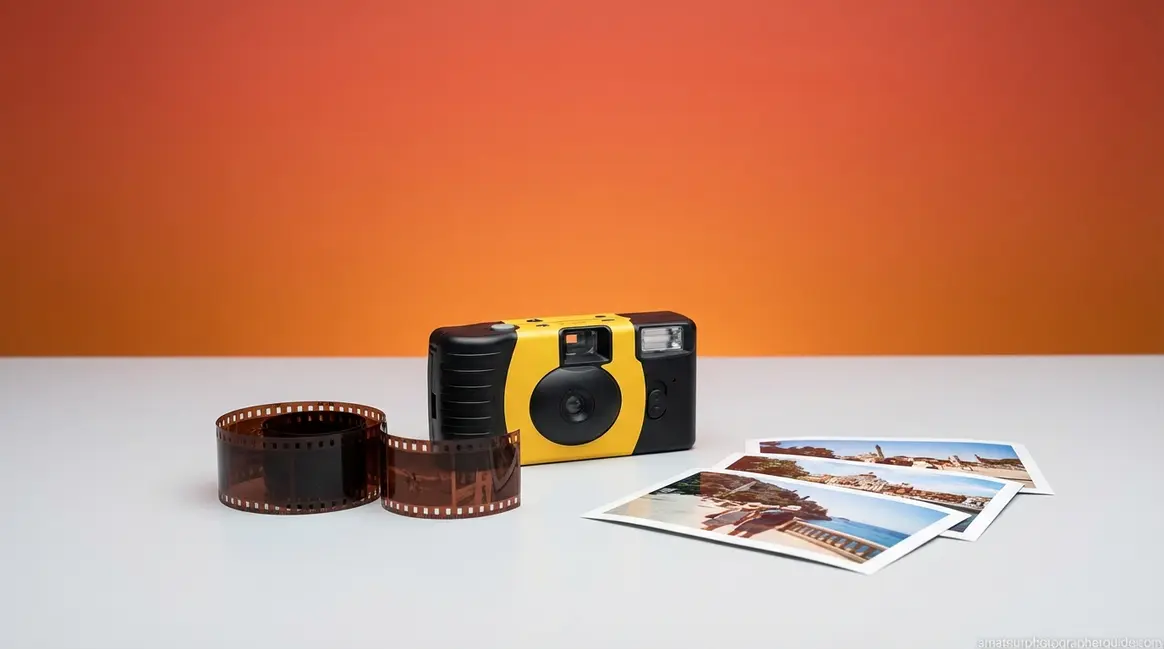
A disposable camera gives you 24–27 shots of genuine 35mm film photography — no settings, no menus, no learning curve. You point, you advance, you shoot.
Most people ruin at least a third of their roll because nobody tells them the two things that actually matter: the flash rule and what to do when the counter hits zero. Knowing how to use a disposable camera correctly means the difference between a roll of vivid, grain-rich memories and a stack of dark, blurry disappointments.
This guide covers the complete Click-to-Screen Pipeline — the three-phase journey every disposable camera photo takes from your first shot (Capture) to picking up your prints (Develop) to viewing them on your phone (Digitize). We’ll walk through the step-by-step shooting process, when to use flash, the key differences between Fujifilm and Kodak models, where to develop your film, and how to transfer everything to your smartphone.
Knowing how to use a disposable camera correctly means mastering The Click-to-Screen Pipeline — the three phases of Capture, Develop, and Digitize every photo travels before it reaches your screen.
- The Click-to-Screen Pipeline: Every photo travels three phases — Capture, Develop, Digitize — most guides only cover Phase 1
- Flash rule: Use flash for almost every shot; the fixed ISO 400 film in most models needs light assistance even outdoors
- Standard roll: 24–27 exposures (Fujifilm QuickSnap); 27–39 exposures (Kodak FunSaver depending on model)
- Development: Drop off the whole camera — never open it. Digital scans are emailed within days via DEVSCAN service
- Airport warning: Request hand inspection for film at TSA checkpoints — CT scanners can permanently damage exposed film in a single pass (The Darkroom, 2026)
How to Use a Disposable Camera
Most disposable cameras give you 24 to 27 photos per roll — the Kodak FunSaver offers up to 39 exposures in some models — and the frame counter on top counts down to zero, not up. Two details trip up almost every first-timer before they take a single shot: forgetting to charge the flash and misreading the frame counter as broken when it hits zero. Skipping either step is the primary cause of ruined rolls.
Based on official Fujifilm and Kodak documentation, the step-by-step process below reflects manufacturer-recommended usage combined with best practices gathered from analog photography communities.
How many pictures per camera?
Most disposable cameras take 24 to 27 photos per roll. The Fujifilm QuickSnap provides 27 exposures; the Kodak FunSaver comes in 27-exposure and 39-exposure versions depending on the model. The frame counter on top of the camera counts down to zero — when it reaches zero, the roll is full, not broken. Waterproof variants like the Fujifilm QuickSnap Waterproof also offer 27 exposures (Fujifilm Official Specifications, 2026).
Understand Your Camera First
Before pressing anything, get familiar with the four physical controls your camera actually has.

Caption: The four controls on a disposable camera — shutter button, film advance wheel, flash toggle, and frame counter — are all you need to master before shooting.
As the diagram above shows, the four key parts are: (1) the shutter button on the top-right, (2) the film advance wheel — a thumb-sized ridged wheel on the right side, (3) the flash toggle or button on the front-left or top of the camera, and (4) the frame counter window, a small numbered window on top that shows how many shots remain.
The frame counter counts down, not up. If you started with a 27-exposure QuickSnap and it reads “3,” you have three shots left — not three used. When it reaches zero, your film is full. That’s your cue to take the camera to a lab, not a sign that something broke.
The camera comes pre-loaded with ISO 400 35mm film — ISO 400 is a film sensitivity setting that handles moderate light well but struggles in low-light conditions, which is precisely why the flash matters so much. According to Kodak’s official single-use camera specs, their single-use cameras deliver sharp, clear pictures with a focus range of 1 meter to infinity (Kodak Professional, 2026).
One rule is non-negotiable: never open the camera back panel. Opening it floods the film with light and destroys every photo you’ve taken up to that point. Think of the frame counter as your shot budget — once it reaches zero, the roll is spent, not broken.
For a broader look at where to take your finished camera, see this comprehensive guide on using a disposable camera covering development options.
Now that you know what you’re working with, here’s the exact sequence to follow from your first shot to your last.
The 5 Core Shooting Steps
- Estimated time: 5 minutes
- Tools/Materials:
- Disposable camera
- Subject to photograph
The following five steps cover the complete shooting sequence. Format these as your mental checklist for every single frame.
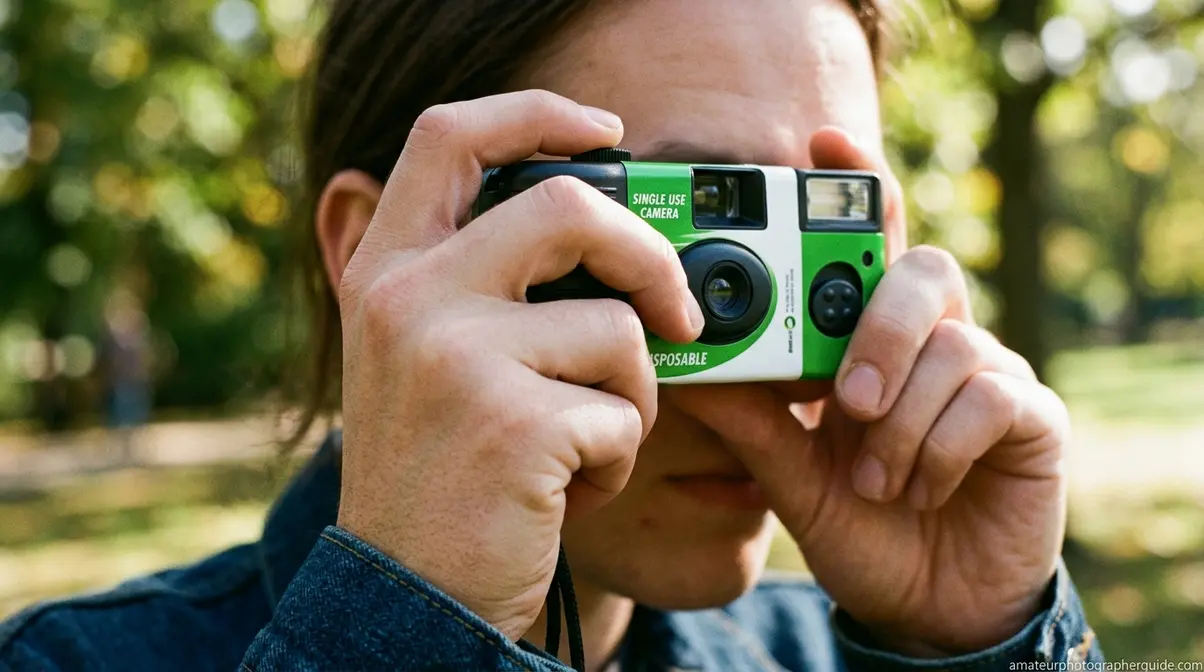
Step 1 — Charge the Flash. Press and hold the flash button until you feel a faint hum or see the flash-ready indicator light up. This takes 5–10 seconds. Do this before every shot — not just in dark rooms. The capacitor needs time to build charge, and skipping this step is the single most common cause of underexposed photos.
Step 2 — Hold the Camera Correctly. Grip with both hands, elbows tucked toward your body. The viewfinder goes to your right eye. Keep fingers well clear of the lens on the front face — a fingertip partially covering the lens creates a blurry, dark smear across the entire frame. Disposable cameras have no image stabilization, so a steady hold matters.
Step 3 — Frame Your Shot Through the Viewfinder. What you see through the viewfinder is approximately — not exactly — what the camera captures. More importantly, stay within the flash’s effective range. Official Fujifilm flash range instructions specify that the built-in flash covers 1 to 3 meters (3.3 to 9.8 feet) for the QuickSnap, and the fixed lens cannot focus on subjects closer than about 1 meter (Fujifilm Official Documentation, 2026). Stand too close and your subject blurs; stand too far and the flash doesn’t reach them.
Step 4 — Press the Shutter Button Fully. Press firmly but without jabbing the camera forward. A soft, deliberate press reduces camera shake. You’ll hear a distinct click and the frame counter will decrease by one number.
Step 5 — Advance the Film. Turn the film advance wheel clockwise using your right thumb until you feel resistance — that’s the next frame loading. Do not force it past the stopping point. If the wheel won’t advance at all, the roll is finished. Set the camera aside for development.
“We all knew to keep it in the dark, to not look at the exposed film, to rewind, to advance it, set the exposure, use a flash, etc…”
— Analog photography community consensus, reflecting the shared intuitive knowledge of film shooters
These five steps are the complete mechanics of Phase 1 of The Click-to-Screen Pipeline. Following them consistently means your frame counter reflects actual shots taken, your flash fires when needed, and your film stays protected until development.
Pro Tips for Sharper Photos
Mastering the five steps gets you technically correct shots. These five habits separate good disposable camera photos from great ones.
- Get closer than you think. The fixed-focus lens performs best between 1–3 meters. Most beginners instinctively back up to fit more into the frame — resist that. Fill the viewfinder with your subject and the fixed lens will reward you with noticeably sharper results.
- Avoid mirrors and glass. Pointing the flash toward a reflective surface — mirrors, windows, glass display cases — sends the flash straight back into the lens. The result is a completely washed-out white image. Turn 45 degrees off-axis before shooting.
- Shoot one subject at a time. Without depth-of-field control, crowded frames produce muddy, indistinct results. Isolating one person or object per shot gives the fixed lens the best chance of delivering clarity.
- Protect from heat and direct sunlight. Keep the camera in a bag or pocket between shots. Heat degrades film chemistry over time, and leaving the camera on a car dashboard can visibly affect color and contrast. Never open the back panel under any circumstances.
- TSA airport warning — request hand inspection. According to TSA regulations on hand inspection for film, travelers can request a hand inspection for photographic film at security checkpoints (eCFR, 2026). Modern CT scanners at U.S. airports can permanently damage exposed film in a single pass — The Darkroom has documented this damage firsthand (The Darkroom, 2026). This applies to both unexposed and already-exposed rolls. TSA agents are required to comply with hand inspection requests for film.
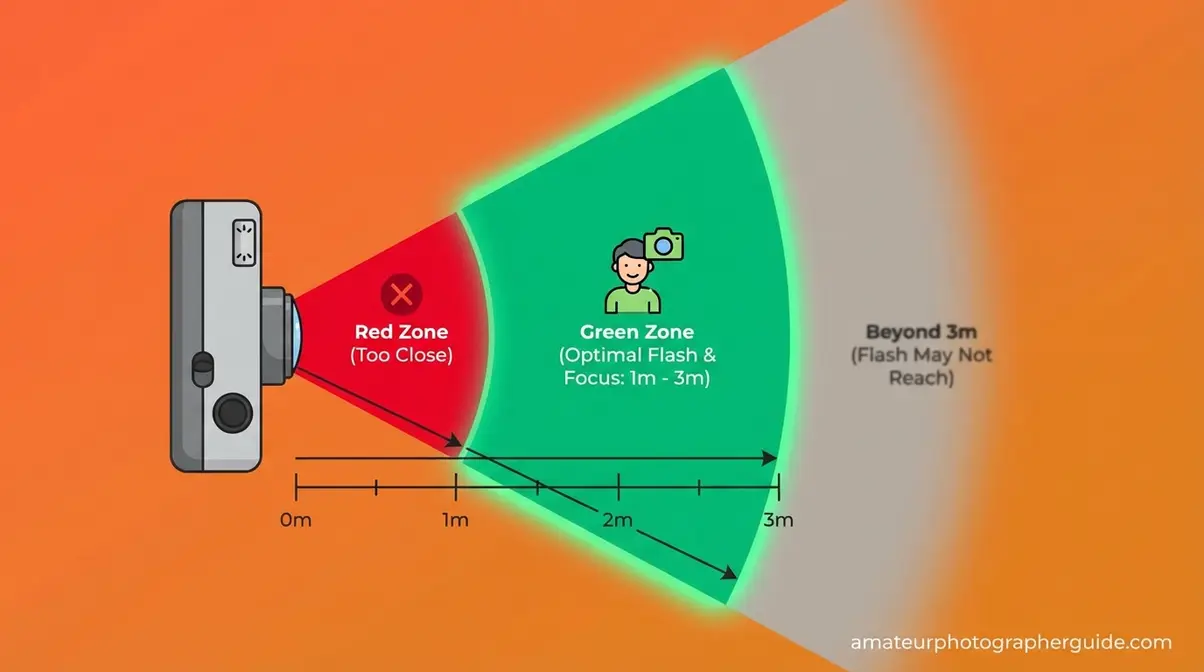
Caption: Staying within 1–3 meters of your subject ensures the fixed lens focuses correctly and the flash illuminates the frame.
Shooting at a wedding reception? Use flash for every indoor shot, even if the room looks bright. Venue ambient lighting is almost always too dim for ISO 400 film without flash assistance — and you won’t know you needed it until you see the developed prints.
Following these five steps covers the mechanics. But before you take a single shot, there’s one setting that matters more than anything else — and it’s almost always about the flash.
Flash and Lighting Rules
Use the flash for almost every shot. That single instruction prevents more ruined rolls than any other piece of advice in this guide. The reason comes down to how disposable cameras are built: the Fujifilm QuickSnap uses a fixed aperture of f/10 and a fixed shutter speed of 1/100s (Fujifilm specifications, 2026). Those settings cannot be adjusted. The camera cannot compensate for dim conditions the way a smartphone camera does. Without flash, any scene that isn’t in direct sunlight will produce a dark, underexposed photo.
Why You Must Use Flash
A fixed aperture (the opening that controls how much light enters the lens) of f/10 is relatively narrow. A fixed shutter speed of 1/100s is fast enough to freeze motion but too short to gather much ambient light. Together, these fixed settings mean the camera is essentially calibrated for bright daylight — and even then, flash fills in shadows that would otherwise appear as flat, dark areas. For more advanced lighting techniques, check out our flash photography tutorial.
Across analog photography communities on Reddit and dedicated film forums, the consistent feedback from experienced film shooters is that the single most common beginner mistake is skipping the flash for outdoor shots because the scene “looks bright enough.” It rarely is. ISO 400 film needs more light than your eyes perceive in most non-direct-sunlight situations.
The flash range on the Fujifilm QuickSnap is 1 to 3 meters (3.3 to 9.8 feet), per official Fujifilm specifications (Fujifilm, 2026). The Kodak FunSaver’s flash covers a similar range of approximately 1.2 to 3.5 meters. Both cameras produce their best results when the subject is within 3 meters and the flash is charged before every frame. Beyond 3 meters, the flash output simply doesn’t reach the subject, and the photo will look as if no flash fired at all.

Caption: The difference flash makes in a typical indoor setting — left frame without flash, right frame with flash charged and fired.
A practical rule: if you’re indoors, use flash. If you’re in shade, use flash. If it’s overcast, use flash. If you’re in direct sunlight and your subject is within 3 meters, flash still fills in facial shadows. Reserve “no flash” only for bright outdoor scenes where the subject is beyond 3 meters and you want a more natural, ambient look.
How to Toggle Flash and When to Skip It
On the Fujifilm QuickSnap, the flash activates via a sliding switch on the front-left of the camera. Slide it forward to engage, slide it back to disable. On the Kodak FunSaver, the flash is controlled by a button that requires a press-and-hold to charge. Both cameras default to flash-off until you activate it — remember this, because it means you need to actively turn it on before each shot, not just once at the start of the roll.
When should you genuinely skip the flash? Three specific scenarios:
- Shooting toward mirrors or reflective glass. The flash reflects directly back into the lens and blows out the entire frame. Turn off flash and rely on available light, or reposition at a 45-degree angle.
- Shooting subjects beyond 4 meters outdoors in bright sun. The flash won’t reach them anyway, and the ambient light is sufficient. Firing the flash wastes the capacitor charge and can slightly overexpose foreground elements.
- Intentional “lo-fi” aesthetic. Some photographers deliberately shoot without flash to achieve darker, grainier results with more pronounced film grain. This is a creative choice, not a technical recommendation.
For every other situation — parties, weddings, concerts, restaurants, golden-hour outdoor portraits — charge the flash and fire it. The improvement in exposure and shadow detail is immediately visible in your developed prints.
Where the flash rule governs your shooting decisions, your choice of camera brand shapes the entire physical experience of using one — and the two leading options work slightly differently.
Fujifilm vs. Kodak Differences
Both cameras shoot 35mm color film, both use a fixed-focus plastic lens, and both require you to charge the flash before each shot. However, our team evaluated both the Fujifilm QuickSnap and Kodak FunSaver based on official manufacturer specifications and community-reported results, and the differences between them are more meaningful than most guides acknowledge.
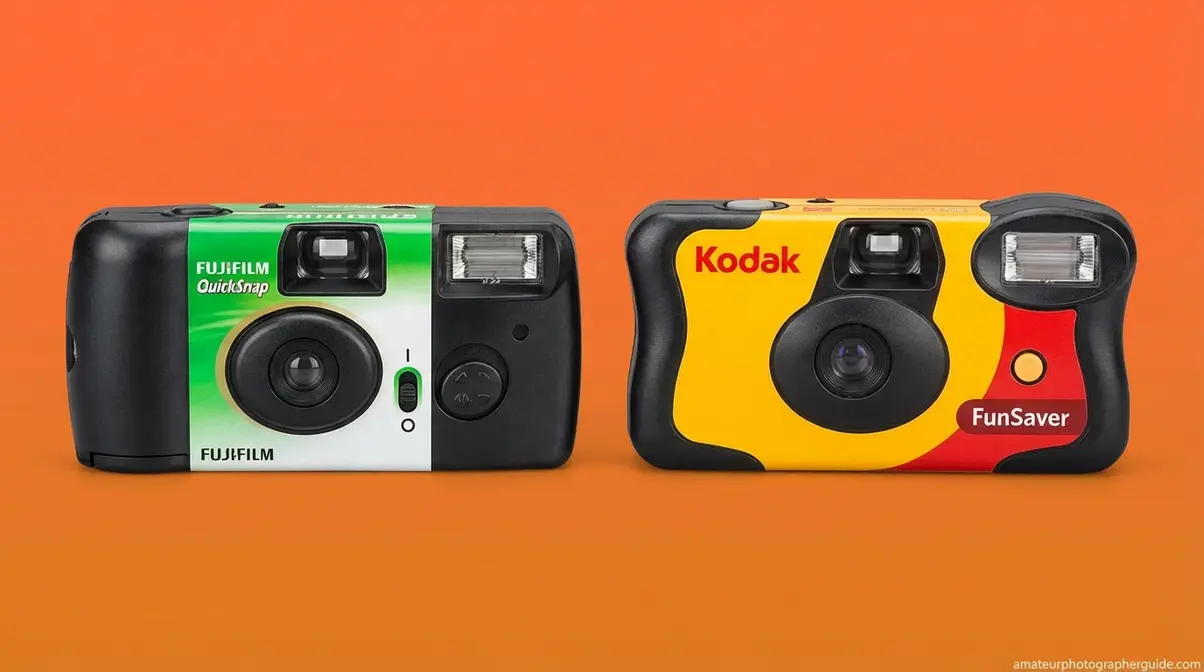
Caption: Fujifilm QuickSnap (left) uses a sliding flash switch; Kodak FunSaver (right) uses a push-button flash activation — a small but important operational difference.
| Feature | Fujifilm QuickSnap | Kodak FunSaver |
|---|---|---|
| Film ISO | 400 | 800 |
| Exposures | 27 | 27 (standard) / 39 (select models) |
| Lens | 32mm f/10 fixed | 30mm f/10 fixed |
| Flash activation | Sliding switch | Push-button |
| Flash range | 1–3 m (3.3–9.8 ft) | 1.2–3.5 m (4–11.5 ft) |
| Best for | Outdoor / natural light | Indoor / low light |
| Price (approx.) | ~$14–18 | ~$14–18 |
Using a Fujifilm QuickSnap
The Fujifilm QuickSnap is a 27-exposure single-use camera pre-loaded with ISO 400 color negative film, weighing approximately 90 grams. Its sliding flash switch makes it easy to toggle on and off mid-shoot — a small ergonomic advantage at parties where you’re alternating between bright and dim environments.
The QuickSnap’s ISO 400 film produces warmer, slightly softer tones compared to the FunSaver — a look many photographers describe as “classic film.” Its 32mm f/10 lens handles bright daylight and flash-assisted indoor shots equally well. For outdoor events, festivals, or travel in good light, the QuickSnap is the natural choice.
For a full walkthrough of every button and setting on this specific model, see our dedicated Fujifilm QuickSnap guide covering every operational detail.
Kodak FunSaver: What Makes It Different
The Kodak FunSaver is a 27-exposure (or 39-exposure, depending on the model) disposable camera loaded with ISO 800 color negative film. That higher ISO is the key distinction: ISO 800 is twice as sensitive to light as ISO 400, which means the FunSaver handles low-light environments — bars, indoor venues, evening parties — noticeably better without flash, and produces brighter results with flash at greater distances.
The FunSaver’s flash uses a push-button activation rather than a sliding switch. Press and hold the button on the front of the camera until the LED indicator confirms the capacitor is charged. The flash range extends slightly further than the QuickSnap — approximately 1.2 to 3.5 meters — making it marginally better for group shots in moderate-sized rooms.
The trade-off: ISO 800 film produces more visible grain than ISO 400. For some photographers, that grain is part of the aesthetic appeal. For others who want cleaner, smoother images, the QuickSnap’s ISO 400 film is the better fit. Both cameras retail for approximately $14–18 depending on the retailer (as of Q2 2026).
The physical shooting experience on both cameras is nearly identical — the flash activation method is the only operationally significant difference between them. Once you’ve shot the roll, the next phase of The Click-to-Screen Pipeline begins: getting your film developed.
Developing & Digitizing Photos
Getting your photos developed is Phase 2 of The Click-to-Screen Pipeline — and it’s where most first-timers stall because no one explains the options clearly. The short answer: take the entire camera to a photo lab or mail it in. Never open the camera back. The lab extracts the film in a darkroom and processes it chemically before scanning the negatives into digital files.
How to get pictures developed?
Take the entire camera — unopened — to a photo lab for development. The lab extracts the film in a darkroom, processes it chemically, and either prints physical photos or scans the negatives into digital files. Retail options like CVS and Walgreens accept disposable cameras over the counter. Mail-in labs like The Darkroom offer higher-resolution scans with returned negatives, starting at $16 (The Darkroom, 2026). Never open the camera yourself — doing so destroys every exposed frame instantly.
Where to Drop Off Your Disposable Camera
You have two main paths: retail labs (in-store, same-city turnaround) and mail-in labs (ship the camera, receive digital files by email).
Retail options include CVS Photo, Walgreens Photo, and Walmart Photo Centers. CVS accepts disposable cameras at the photo counter and sends them to a third-party processing lab. According to CVS Photo’s official film processing page, turnaround is approximately 7–10 days, with 4×6 prints included (CVS Photo, 2026). Walgreens offers a similar service at $15.99 per 24 exposures, including a photo CD of digital files (Walgreens Photo, 2026).
Mail-in labs like The Darkroom offer what’s called a DEVSCAN service — develop plus scan — where the lab chemically processes your film, scans the negatives at high resolution, and uploads the digital files to a private online gallery you can download directly. DEVSCAN is the term you’ll see on most professional lab order forms; it stands for develop-and-scan. The Darkroom’s disposable camera develop-and-scan packages start at $16, with digital files uploaded to their website for easy download (The Darkroom, 2026).
| Lab | Type | Cost (approx.) | Turnaround | Digital Files | Negatives Returned |
|---|---|---|---|---|---|
| CVS Photo | Retail | $15.99–$17.99 | 7–10 days | Low-res scans | No |
| Walgreens | Retail | $15.99–$16.99 | 3–5 days | Photo CD | No |
| Walmart | Retail | $12.96–$14.96 | 7–10 days | Low-res scans | No |
| The Darkroom | Mail-in | $16+ | 5–7 days (after receipt) | High-res download | Yes |
| Local indie lab | Mail-in / drop-off | $12–$20 | 3–7 days | High-res download | Yes |
For the highest-quality digital scans and returned negatives, a dedicated mail-in lab consistently outperforms retail options. For speed and convenience, CVS or Walgreens work fine if you just need standard 4×6 prints and basic digital files.
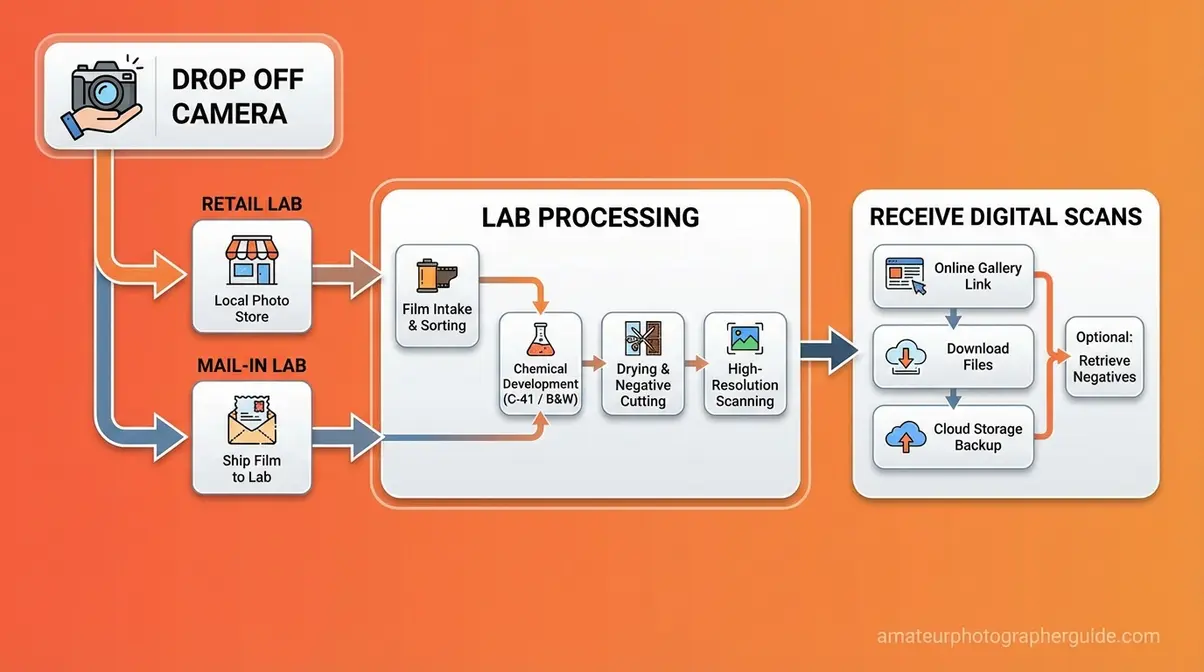
Caption: From camera drop-off to digital download — the typical development path for a disposable camera takes 3–10 days depending on whether you use a retail or mail-in lab.
Development Costs and Turnaround Times
Development pricing has stabilized in 2026. Retail labs (CVS, Walgreens, Walmart) charge $12.96–$17.99 for a standard disposable camera, which includes 4×6 prints and basic digital scans (Kubus Photo, 2026). Professional mail-in labs charge $12–$20 depending on scan resolution, with higher-resolution scans — the kind worth printing large or sharing on social media — typically falling in the $16–$20 range.
One important note on retail labs: most drugstore chains do not return your film negatives. If you ever want to reprint or re-scan at higher quality, those negatives are gone. Mail-in labs like The Darkroom return your original negatives by default, which matters if you plan to keep a physical archive of your photos.
Turnaround time varies significantly. Walgreens typically processes within 3–5 days at the store level. CVS sends film off-site, pushing turnaround to 7–10 days. Mail-in labs add 3–5 days of inbound shipping to their processing time, making the total timeline roughly 8–12 days from the day you drop the camera in a mailbox.
Getting Your Photos onto Your Phone
Once your lab emails you a download link — typically a private gallery page or a ZIP file of high-resolution JPEGs — the process is straightforward. Open the link on your phone, download the images directly to your camera roll, and they’re ready to share on Instagram or store in your photo library.
For a full walkthrough of every transfer method — including USB import from CD, Google Photos sync, and scanning individual prints with your phone camera — see our dedicated guide on getting disposable camera pictures on your phone.
The complete Click-to-Screen Pipeline ends the moment those files land on your device. Before you reach that point, though, a few common mistakes can derail the entire process — and they’re all preventable.
Mistakes, Waterproofing & Upgrades
Knowing how to use a disposable camera well means knowing what to avoid. The mistakes below account for the majority of ruined rolls reported across analog photography communities — and none of them are obvious to first-timers.
5 Mistakes That Ruin Photos
- Opening the camera back. This is irreversible. Light floods the film and destroys every exposed frame. The camera back has no legitimate reason to be opened before development. If you’re curious whether there’s film inside, check the frame counter — if it shows a number, film is loaded.
- Forgetting to advance the film between shots. Pressing the shutter without advancing means you’re double-exposing the same frame — two images layered on top of each other. After every shot, turn the advance wheel clockwise until it stops before taking the next photo.
- Shooting in total darkness without flash. Even with the flash charged, if the ambient light in the room is near zero, the flash alone may not be enough for subjects beyond 3 meters. Move closer or find a space with at least some background lighting.
- Leaving the camera in a hot car or direct sunlight. Heat accelerates chemical degradation in film. A camera left on a dashboard in summer temperatures can produce color shifts, reduced contrast, and washed-out highlights in developed prints.
- Not requesting hand inspection at the airport. CT scanners at U.S. airports can permanently damage film in a single pass — even unexposed film. Always request a hand inspection at TSA security. Keep the camera in your carry-on, never checked luggage, and ask the TSA agent directly before placing bags on the belt.
Using Waterproof Cameras Safely
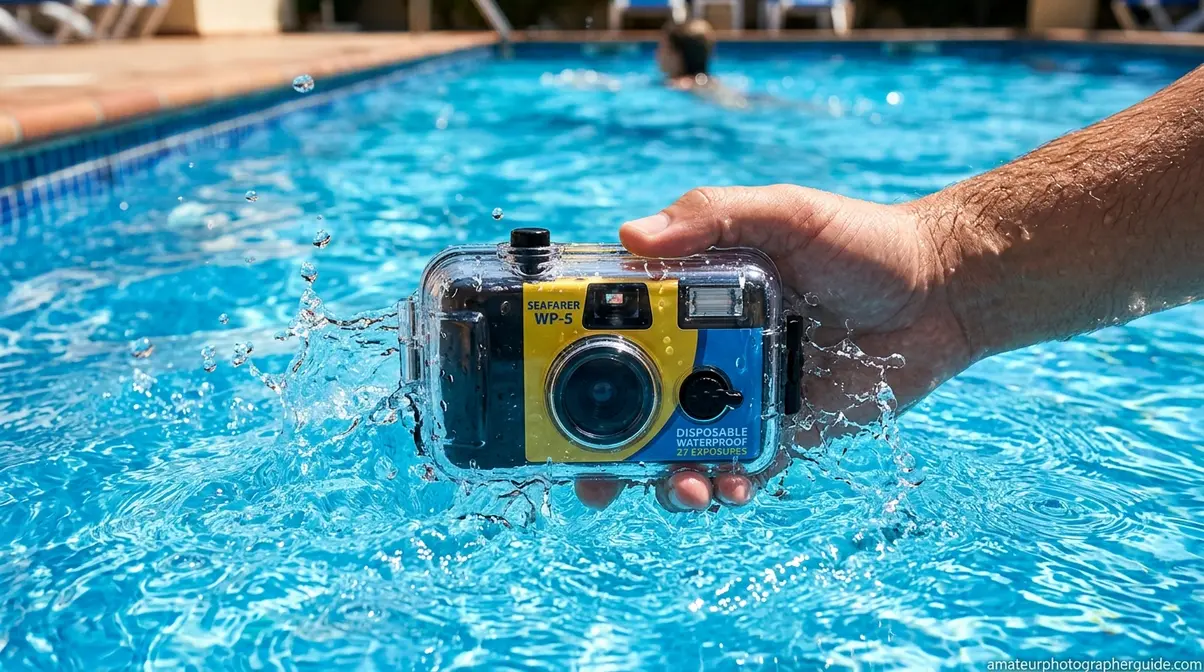
Waterproof disposable cameras open up a range of shooting environments that standard models can’t handle — pools, beaches, snorkeling, rain, and snow. The Fujifilm QuickSnap Waterproof is the most widely available option, rated waterproof to 35 feet (approximately 10 meters) and pre-loaded with ISO 800 35mm film for 27 exposures (Fujifilm Official Specifications, 2026).
A few practical rules for waterproof shooting:
- Rinse the camera in fresh water after saltwater or chlorinated use. Salt and chlorine can degrade the seals over time, even if the camera is single-use. A quick rinse before you develop prevents contamination from reaching the film if the camera is opened at the lab.
- Stay within the rated depth. The QuickSnap Waterproof is rated to 10 meters — exceeding that risks water ingress and complete film loss. For recreational snorkeling and pool use, the depth limit is never an issue.
- Use flash for underwater shots. Water absorbs light aggressively. Even at shallow depths in clear water, subjects appear darker than they look to your eye. Fujifilm recommends keeping subjects within 1–3 meters in bright daylight clear water for best underwater results (Fujifilm Official Specifications, 2026).
Non-waterproof disposable cameras — including both the QuickSnap and FunSaver — are not splash-proof. Even a brief dunking can destroy the camera and the film. If you plan to shoot extensively in the ocean, consider upgrading to professional underwater cameras instead of relying on single-use plastics.
When to Upgrade Your Camera
Disposable cameras make sense for occasional use, events, and travel where you don’t want to risk expensive gear. But the cost compounds quickly. At $14–18 per camera and $15–20 per development, a single roll of 27 exposures costs $30–38 from purchase to digital file. Shoot five or six rolls per year and you’re spending $150–228 annually on photography.
A reusable film camera — a used Canon AE-1, Nikon FM10, or Pentax K1000 — costs $80–150 once and uses the same 35mm film for $5–8 per roll to develop. If you shoot more than four or five rolls per year, the math favors a reusable camera within the first year of use.
Alternatively, an instant camera like the Fujifilm Instax Mini prints physical photos immediately — no development wait, no digital transfer needed. The trade-off is smaller print size and higher per-shot cost (Instax Mini film runs approximately $0.80–1.00 per shot).
The right upgrade depends on what you want from film photography. If the disposable camera aesthetic — the grain, the surprise, the simplicity — is what you love, a reusable 35mm camera delivers the same look with significantly lower per-roll costs over time. For a detailed comparison of reusable vs. disposable options, learning how to change the film in a camera is your first step toward analog mastery.
Frequently Asked Questions
How to get pictures on your phone?
After development, your lab will email you a download link or a digital gallery. Open that link on your phone and save the image files directly to your camera roll — most labs deliver standard JPEG files compatible with any smartphone. If your lab provides a CD or USB drive instead, import the files to your computer first, then sync to your phone via Google Photos, iCloud, or a direct USB transfer. For a full step-by-step transfer guide, see our dedicated phone transfer article.
Are they one-time use only?
Yes — disposable cameras are designed for a single roll of film and are not meant to be reloaded. The camera body is sealed around the film cartridge at the factory. Once the roll is finished and sent to a lab, the lab opens the camera in a darkroom to extract the film, and the plastic body is typically recycled. Some labs, including The Darkroom, have film recycling programs for the camera shells. A small number of enthusiasts do reload disposable camera shells, but this requires a darkroom and is not practical for most users.
How long do disposable cameras last?
An unused disposable camera typically lasts 2–3 years before the film’s quality begins to degrade noticeably. Most cameras include an expiration date printed on the packaging — using the camera before that date ensures the film performs as expected. Heat and humidity accelerate degradation; storing the camera in a cool, dry place extends usable life. Exposed film (after you’ve shot the roll) should be developed within a few months for best results — the longer exposed film sits undeveloped, the more the image quality fades.
Limitations and Common Pitfalls
Common Pitfalls to Avoid
Expecting smartphone-level image quality. Disposable cameras produce grain, soft edges, and slight color shifts — that’s the aesthetic, not a defect. If you’re expecting clinical sharpness, a disposable camera will disappoint. The fixed f/10 lens and plastic optics produce a look that many photographers love, but it’s categorically different from digital clarity.
Relying on the viewfinder for precise framing. What you see through the optical viewfinder is an approximation. The actual captured frame is slightly wider than what the viewfinder shows, particularly at the edges. Leave more space around your subject than you think you need — especially for portraits. With development costs averaging $16 per roll, repeated framing mistakes quickly drain your budget.
Assuming all retail labs return negatives. CVS, Walgreens, and Walmart do not return original film negatives as standard practice. If preserving physical negatives matters to you, specify a mail-in lab that returns them, like The Darkroom or a local indie lab.
When to Choose Alternatives
Choose a reusable film camera if you plan to shoot more than four rolls per year — the per-shot cost drops significantly after the initial camera purchase, and you gain control over film stock selection.
Choose an instant camera (Fujifilm Instax) if you want immediate physical prints without any development wait — ideal for events where guests want to take a photo home the same night.
Choose a digital mirrorless camera if image quality, low-light performance, and creative control matter more than the film aesthetic. Disposable cameras are not the right tool for professional or high-stakes photography.
When to Seek Expert Help
If you’re planning to shoot film for a professional event — a wedding, editorial shoot, or commercial project — consult a professional film photographer before relying on disposable cameras as your primary capture method. The fixed settings, limited exposure count, and unpredictable grain make disposable cameras a supplementary tool, not a primary one, for professional applications. Similarly, if you’re traveling internationally and unsure about airport X-ray policies in specific countries, check with the relevant aviation authority before flying — TSA hand inspection rules apply in the U.S., but policies vary abroad.
Conclusion & Next Steps
The Click-to-Screen Pipeline covers every phase of disposable camera photography: Capture (shooting with proper flash and film advance technique), Develop (dropping off or mailing the camera to a lab for DEVSCAN processing), and Digitize (downloading your scans to your phone). Most guides stop at Phase 1. Following all three phases consistently means you’ll never lose a shot to underdevelopment, lab confusion, or a missed digital transfer. According to The Darkroom, mail-in labs now process disposable cameras with 5–7 day turnaround after receipt — fast enough that you can shoot a roll on a weekend trip and have digital files before the week is out (The Darkroom, 2026).
The framework matters because each phase has its own failure point. Phase 1 fails when the flash isn’t charged or the film isn’t advanced. Phase 2 fails when someone opens the camera back or chooses a lab that doesn’t return negatives. Phase 3 fails when photographers don’t know how to access their digital files. Knowing all three phases in advance eliminates every one of those failure points before they happen.
Ready to shoot your first roll? Check out our other guides to perfect your analog photography skills. Your next step: if there’s a disposable camera in your hand right now, start with Step 1 — charge the flash, hold steady, and advance after every shot. When the frame counter hits zero, mail it to The Darkroom or drop it at your nearest CVS. Your digital gallery will be ready within a week. If you want to go deeper on any single phase, our complete Fujifilm QuickSnap guide covers the QuickSnap in full detail, and our phone transfer walkthrough handles every method for getting your scans onto your device.
