Depth of Field Explained: Master The Focus Trio (2026)
You’ve just taken what should have been a gorgeous portrait. Your subject is sharp. But so is the fence behind them, the car in the distance, and the recycling bin three houses away. You wanted that creamy, blurred background — the kind that makes subjects pop off the screen — and instead you got a snapshot.
What’s in this guide
- What Is Depth of Field? The Core Concept
- Introducing The Focus Trio: The Three-Variable System
- How Aperture Controls Depth of Field
- Focal Length, Sensor Size, and Crop Factor
- Smartphone Portrait Mode vs. Real Optical Depth of Field
- The Circle of Confusion and Why It Matters
- Hyperfocal Distance: Landscape Secret Weapon
- The Focus Trio in Action: 8 Real-World Scenarios
- Depth of Field in Specialized Photography
- Using a Depth of Field Calculator
- Common Depth of Field Mistakes and How to Fix Them
- Depth of Field FAQ
- The Focus Trio Mastered: Your Next Steps
Here’s what happened: depth of field — the range of distance in your photo that appears acceptably sharp — wasn’t working for you. Not because your camera failed, but because three specific variables weren’t dialed in together. Change one without understanding the others, and the result is always a mystery. Having depth of field explained properly is the first step to mastering your camera. For a foundational look, check out our beginner’s guide to controlling sharpness.
This guide introduces The Focus Trio: aperture, subject distance, and focal length — the three interdependent variables that control depth of field in every photo you take. Once you understand how they interact as a system, you’ll stop guessing and start choosing. Whether you want a razor-sharp landscape from foreground to infinity or a silky-smooth portrait blur at f/1.8, you’ll know exactly which dial to turn.
What Is Depth of Field? The Core Concept
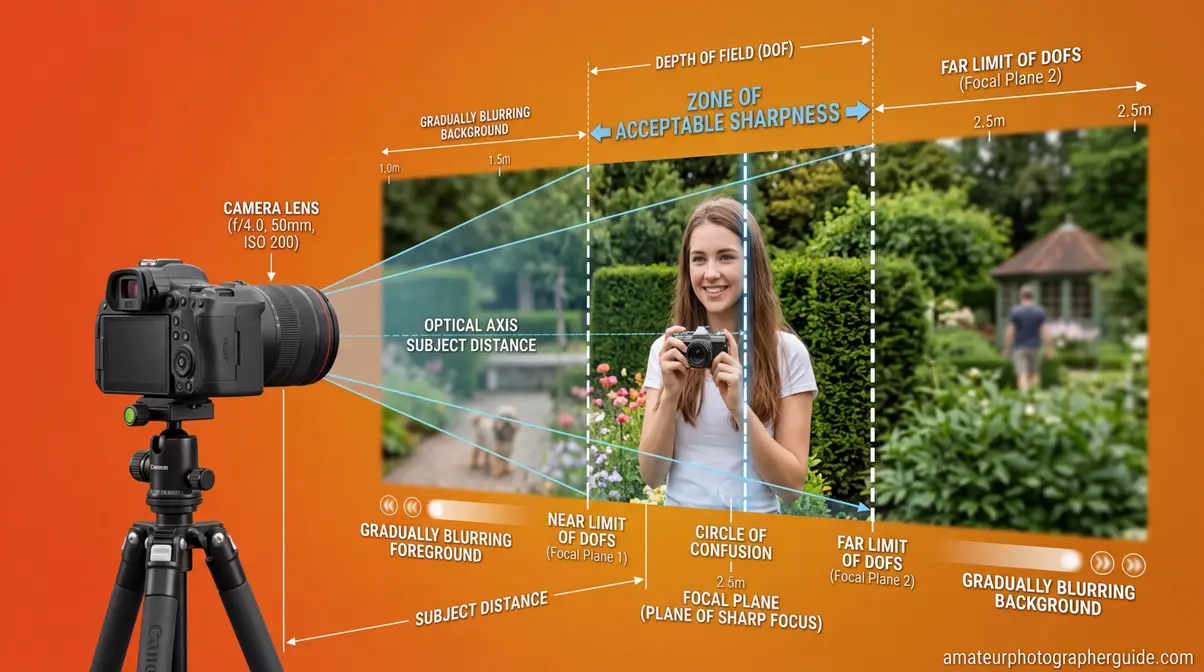
Depth of field (DoF) is the range of distances in front of your camera that appear acceptably sharp in a photograph — not perfectly sharp, but sharp enough that the human eye reads them as in focus. It’s not a binary on/off switch. Think of it as a zone: objects inside the zone look sharp; objects outside it gradually blur as they move farther from the edges.
That word “acceptably” carries a lot of weight. Sharpness isn’t absolute — it depends on how large you print the image, how far you stand from it, and the resolving power of your specific sensor. What looks tack-sharp on a phone screen may show soft edges on a 24-inch print. This is why photographers use a concept called the circle of confusion (more on that in a moment) to define the boundary between “sharp” and “blurred.” According to an Edmund Optics technical note, depth of field is fundamentally defined by a lens’s ability to maintain a desired amount of image quality without refocusing.
Smartphones capture 92.5% of all photos taken worldwide (PhotoAiD, 2026), yet most smartphone photographers have never consciously controlled depth of field. They’ve experienced it — the blurred background in Portrait Mode, the sharp-everywhere travel shot — but haven’t understood the mechanics. That gap between experiencing DoF and controlling it is exactly what this guide closes.
Caption: The zone of acceptable sharpness sits between two boundaries — everything inside appears sharp, everything outside gradually blurs.
Shallow vs. Deep Depth of Field
The terms “shallow” and “deep” describe how wide that sharp zone is.
Shallow depth of field means only a thin slice of your scene is sharp — perhaps just a few centimeters. This is what creates the dreamy, blurred backgrounds in portrait photography. Your subject is razor sharp; the background melts into smooth, out-of-focus color.
Deep depth of field means a large portion of your scene — from a flower in the foreground to mountains miles away — all appears acceptably sharp. This is standard in architectural photography, real estate shots, and most street photography.
Neither is better. Both are tools. The skill is knowing which to reach for and how to get it reliably.
| Effect | Aperture | Focal Length | Subject Distance | Typical Use |
|---|---|---|---|---|
| Shallow DoF | f/1.4–f/2.8 | 85mm–200mm | Close (1–3m) | Portraits, product shots |
| Moderate DoF | f/4–f/5.6 | 35mm–70mm | Medium (2–6m) | Environmental portraits, events |
| Deep DoF | f/8–f/16 | 16mm–35mm | Far (3m+) | Landscapes, architecture, street |
Why “Acceptably Sharp” Matters
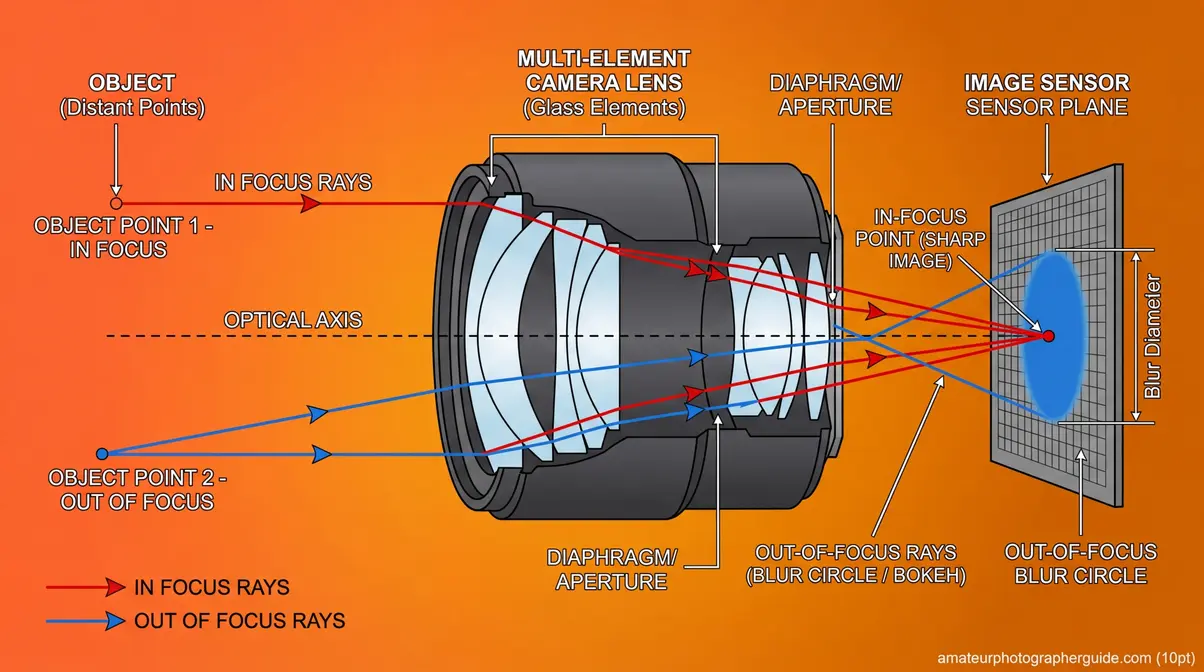
A camera can only focus at one precise distance — a single plane. Everything in front of and behind that plane projects onto the sensor as a small blur circle rather than a perfect point. The circle of confusion (CoC) is the largest blur circle that still looks like a sharp point to the human eye at normal viewing conditions.
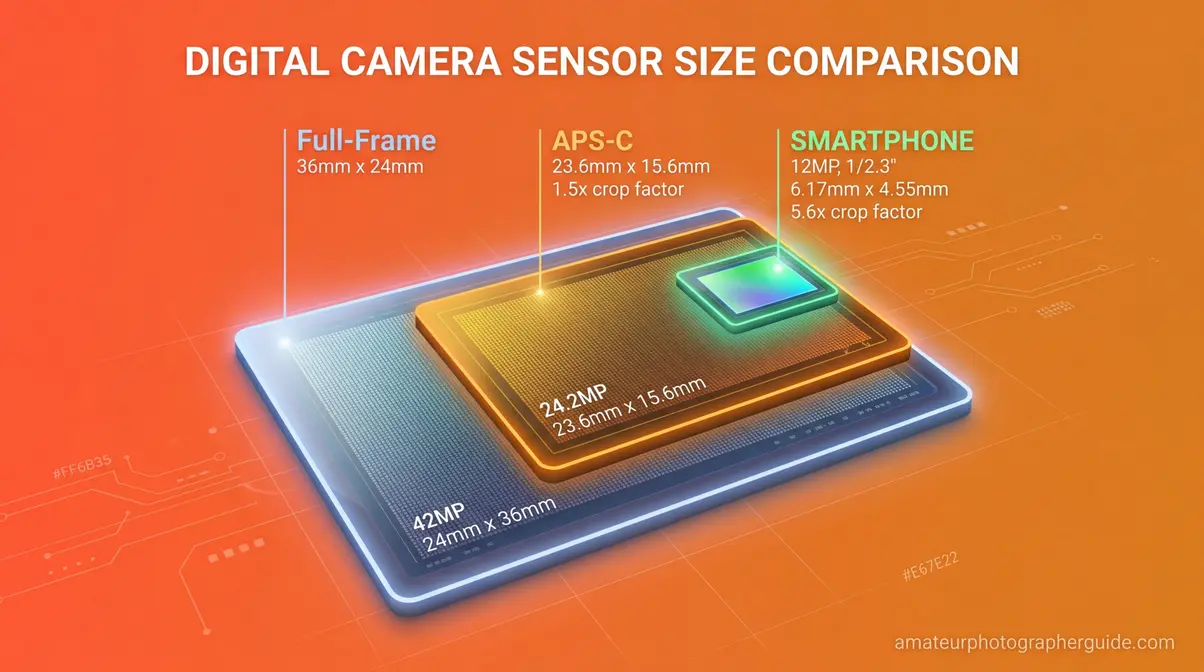
For a full-frame sensor, the standard CoC threshold is approximately 0.03mm. For an APS-C (crop sensor) camera with a 1.5x crop factor, it’s around 0.02mm. This is why sensor size affects depth of field — larger sensors tolerate a larger CoC before blur becomes visible, which changes how DoF calculations behave across camera systems (Wikipedia, Circle of Confusion, 2026).
Caption: As a subject moves outside the focal plane, its light projects as a larger circle — once that circle exceeds the circle of confusion threshold, it reads as blur.
Introducing The Focus Trio: The Three-Variable System
Here’s the insight that transforms DoF from confusing to controllable: depth of field is never determined by a single setting. It’s always the product of three variables working simultaneously — what we call The Focus Trio.
Most photography tutorials treat aperture as the depth of field control, mention focal length in passing, and barely discuss subject distance. That’s why photographers get inconsistent results. They change one variable, ignore the other two, and wonder why the photo doesn’t match their mental image.
The Focus Trio names the system explicitly:
- Aperture — the size of the opening inside your lens (controlled by f-stop)
- Subject Distance — how far you stand from the thing you’re focusing on
- Focal Length — the lens’s angle of view (16mm wide-angle vs. 200mm telephoto)
Every depth of field decision you make involves all three, whether you’re conscious of it or not. As detailed in an MIT lecture on defocus and depth of field, the physical principles behind these variables dictate how light rays converge to form an image. Change your subject distance by taking two steps forward? You’ve just altered depth of field, even if you haven’t touched a single dial.
Caption: The Focus Trio: every depth of field result in photography is the product of these three variables interacting together — not aperture alone.
Variable 1: Aperture and the F-Stop Scale
Aperture is the opening inside your lens that controls how much light passes through to the sensor. It’s measured in f-stops — and this is where most photographers hit their first wall, because the relationship is inverted.
A smaller f-number = a larger opening = shallower depth of field.
So f/1.8 is a wider aperture than f/16. The fraction tells you why: f/1.8 means the aperture diameter is 1/1.8 of the focal length — that’s a big hole. f/16 means 1/16 of the focal length — a tiny pinhole.
| F-Stop | Aperture Size | DoF Effect | Light Entering |
|---|---|---|---|
| f/1.4 | Very wide | Very shallow | Maximum |
| f/1.8 | Wide | Shallow | Very high |
| f/2.8 | Moderately wide | Shallow | High |
| f/4 | Medium | Moderate | Medium |
| f/5.6 | Medium-narrow | Moderate-deep | Medium-low |
| f/8 | Narrow | Deep | Low |
| f/11 | Very narrow | Very deep | Lower |
| f/16 | Extremely narrow | Maximum depth | Minimum |
Each full f-stop doubles or halves the light entering. Moving from f/2.8 to f/4 halves the light and deepens your zone of focus. Moving from f/8 to f/5.6 doubles the light and shallows the zone. Once this inverse relationship clicks, aperture becomes intuitive rather than confusing.
One important nuance: aperture isn’t a free lunch. Very wide apertures (f/1.4, f/1.8) produce such a thin zone of focus that even slight subject movement or camera shake can shift your intended focal point. At f/1.8 with an 85mm lens focused at 2 meters, your depth of field may be as thin as 4–5 centimeters — barely enough to keep both eyes sharp if your subject turns their head even slightly.
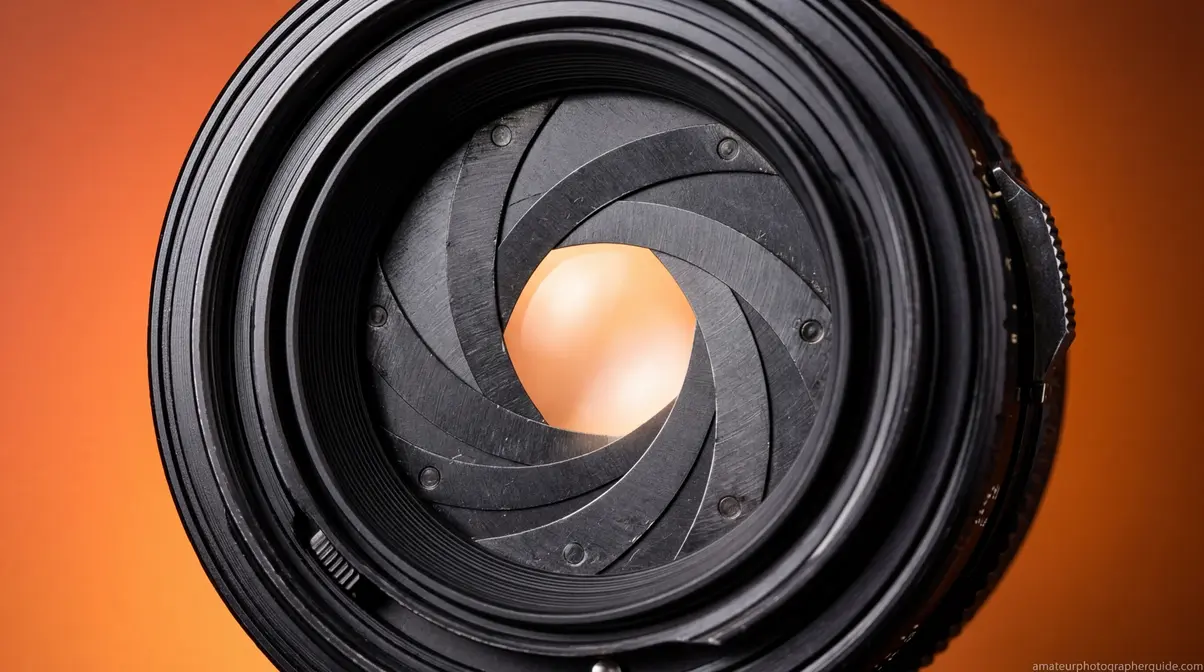
Caption: The f-stop scale is inverse — the smaller the number, the larger the aperture opening and the shallower your depth of field.
Variable 2: Subject Distance
Of the three Focus Trio variables, subject distance is the most underappreciated — and often the most powerful. The closer you are to your subject, the shallower your depth of field becomes, regardless of aperture or focal length.
This is why macro photographers face such extreme challenges: when your lens is 10 centimeters from a flower petal, even f/16 may give you a depth of field measured in millimeters. The physics are unforgiving at close distances.
The relationship works in reverse too. If you’re shooting a group portrait and everyone’s spread across a range of distances, stepping back two meters can mean the difference between half the group being blurry and everyone being acceptably sharp — even without changing your aperture.
Here’s a practical example that illustrates the power of subject distance. At 85mm and f/2.8:
- Subject at 1 meter: DoF ≈ 3 cm (only the eyes are sharp)
- Subject at 2 meters: DoF ≈ 12 cm (face is fully sharp)
- Subject at 4 meters: DoF ≈ 50 cm (head and shoulders sharp)
- Subject at 10 meters: DoF ≈ 3 meters (full body and near surroundings sharp)
Distance multiplies depth of field dramatically. When you need more sharpness without changing aperture — perhaps you’re in a low-light situation and can’t stop down — take a step back. It’s the free depth of field adjustment most photographers never use.
Variable 3: Focal Length
Focal length — the number in millimeters printed on your lens — determines your angle of view and compression. A 16mm wide-angle lens sees a wide swath of the world. A 200mm telephoto sees a narrow slice but makes distant subjects appear much larger and closer.
Longer focal lengths produce shallower depth of field than shorter ones, at the same aperture and subject distance. A 200mm lens at f/2.8 with a subject at 3 meters will produce dramatically more background blur than a 24mm lens at f/2.8 with the same subject at 3 meters.
However, there’s a subtlety worth understanding. If you use a 200mm lens and back up far enough to frame the subject identically to a 24mm lens, the depth of field ends up roughly similar. The apparent difference you see in portraits shot with telephoto lenses comes largely from perspective compression — the background is physically closer to the subject in the frame, and the telephoto’s narrower angle of view magnifies the blur you already have.
This is exactly why the 70-200mm f/2.8 is one of the most beloved portrait lenses ever made. At 200mm and f/2.8, the lens combines three DoF-shallowing forces: long focal length, wide aperture, and the working distance that naturally results from shooting a portrait-framed subject at 200mm. The background compression makes everything behind your subject appear beautifully blurred and smooth (Fstoppers, 2017).
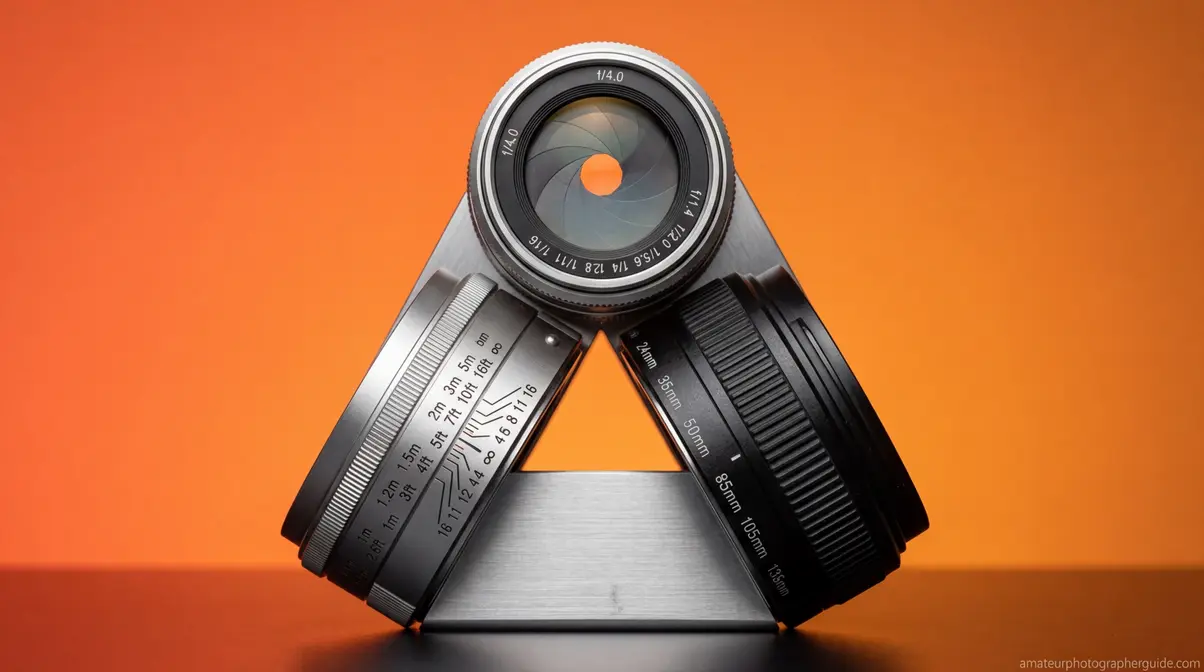
Caption: Same framing, three focal lengths — the 200mm telephoto compresses the background and produces dramatically more blur than the 24mm wide-angle.
How Aperture Controls Depth of Field
Aperture is the variable most photographers reach for first when they want to control depth of field — and for good reason. When getting depth of field explained to beginners, aperture is usually the first concept taught. It’s the most immediately accessible, usually assigned to a dedicated dial or ring, and it produces the most dramatic effect per increment of adjustment.
Aperture directly controls depth of field by changing the angle at which light rays enter the lens and converge on the sensor. A wide aperture (f/1.8) admits light from a broader angle — out-of-focus points project as large blur circles. A narrow aperture (f/16) restricts light to near-parallel rays — out-of-focus points project as tiny blur circles that fall within the circle of confusion threshold and still appear sharp.
The practical consequence: every full stop of aperture change produces a significant shift in your zone of focus, especially at wide apertures. The jump from f/2.8 to f/4 deepens your DoF noticeably. The jump from f/8 to f/11 adds comparatively less visible change because you’re already deep into the sharpness zone.
The Sweet Spot: f/5.6 to f/8
Most lenses are optically sharpest around f/5.6 to f/8 — a range photographers call the “sweet spot.” At very wide apertures (f/1.4, f/1.8), lenses often show slight softness, chromatic aberration, and vignetting at the corners. At very narrow apertures (f/16, f/22), a phenomenon called diffraction actually reduces sharpness — light waves bend around the tiny aperture edges and create a soft, slightly hazy look across the whole image.
For most photographers, this means: use f/1.8–f/2.8 for deliberate creative blur, f/5.6–f/8 for maximum optical sharpness with moderate depth, and f/11–f/16 only when you genuinely need maximum depth of field and accept the small sharpness trade-off.
Aperture Priority Mode: Your DoF Control Room
If you haven’t committed to Aperture Priority mode (marked A on Nikon/Sony, Av on Canon), it’s the single most useful mode for controlling depth of field. You set the aperture; the camera calculates the appropriate shutter speed for correct exposure. This lets you focus entirely on your DoF decisions without mental math.
A practical workflow: set your target f-stop based on the depth of field you want, ensure your ISO is appropriate for the light, and let the camera handle the rest. When shutter speed drops below 1/focal length (e.g., below 1/85s on an 85mm lens), raise ISO or open aperture to avoid camera shake blur — a different kind of blur you definitely don’t want.
Caption: Aperture Priority mode hands you direct control over depth of field — set your f-stop, and the camera handles exposure automatically.
For a deeper dive into exposure modes and when to use each one, how aperture affects your photos walks through every scenario with real examples.
Focal Length, Sensor Size, and Crop Factor
Understanding how focal length and sensor size interact is the step that separates intermediate photographers from truly confident ones. These two variables are tangled together in ways that cause real confusion — especially when photographers move between camera systems or compare notes with smartphone users.
How Focal Length Affects the Zone of Focus
As covered in The Focus Trio section, longer focal lengths produce shallower depth of field at equivalent apertures and subject distances. But the reason goes deeper than most guides explain.
When you use a 200mm lens instead of a 50mm lens to photograph the same subject at the same distance, the 200mm lens creates a much larger image of the subject on the sensor. That larger image also magnifies the out-of-focus blur circles — making bokeh more visible and pronounced. Additionally, the telephoto compresses the apparent distance between your subject and background, stacking more blurred elements into a narrower field of view. Both effects combine to make backgrounds look dramatically smoother with telephoto lenses.
This is why portrait photographers overwhelmingly favor 85mm, 105mm, and 135mm focal lengths over 35mm or 50mm, even when both options can achieve similar f-stop values. The telephoto effect on background rendering is simply more flattering and more controllable.
Crop Factor and the APS-C Multiplier
If you shoot with a crop sensor camera (APS-C bodies from Canon, Nikon, Sony, Fujifilm), your sensor is smaller than a full-frame sensor — typically by a factor of 1.5x or 1.6x. This has two important consequences for depth of field:
1. Focal length multiplication: A 50mm lens on a 1.5x crop body frames like a 75mm lens would on full-frame. You get more telephoto reach without buying a longer lens.
2. Deeper depth of field at equivalent framing: Because a crop sensor captures a smaller area of the lens’s image circle, you need to back up (or use a wider lens) to achieve the same framing. That extra distance deepens your depth of field compared to a full-frame shooter using a longer lens for identical framing.
In practical terms: if a full-frame photographer uses an 85mm f/1.8 lens for a head-and-shoulders portrait, an APS-C photographer might use a 50mm f/1.8 on their crop body to achieve roughly similar framing and background blur. For example, Canon USA depth of field tables demonstrate how specific focal lengths and f-stops drastically alter the hyperfocal distance. The circle of confusion threshold for an APS-C sensor (~0.02mm) is smaller than full-frame (~0.03mm), which also contributes to slightly deeper DoF on crop bodies (Wikipedia, Circle of Confusion, 2026).
| Sensor Type | Crop Factor | Common CoC | Equivalent Portrait Focal Length |
|---|---|---|---|
| Full-frame | 1.0x | ~0.030mm | 85mm–135mm |
| APS-C (Nikon/Sony) | 1.5x | ~0.020mm | 50mm–85mm |
| APS-C (Canon) | 1.6x | ~0.019mm | 50mm–85mm |
| Micro Four Thirds | 2.0x | ~0.015mm | 42mm–75mm |
| Smartphone | 7–10x | ~0.005mm | 13mm–26mm (equivalent) |
Why Your Smartphone Has Almost No Optical Depth of Field
Smartphone sensors are tiny — often 7–10 times smaller than a full-frame sensor. The tiny sensor means the camera uses an extremely short focal length (typically 4–6mm) to achieve a “normal” angle of view. At those focal lengths and small sensor sizes, the physics of depth of field produce enormous zones of sharpness. Almost everything from 1 meter to infinity is optically in focus — which is why early smartphone photos looked sharp everywhere and had no natural background blur.
This is also why Portrait Mode doesn’t create real optical depth of field — it creates a simulation using AI-driven depth mapping.
Caption: Sensor size directly affects depth of field — the smaller the sensor, the more difficult it is to achieve shallow DoF without computational assistance.
To understand how these sensor differences translate to real-world buying decisions, our guide to understanding f-stop numbers explains full-frame vs. APS-C for every budget.
Smartphone Portrait Mode vs. Real Optical Depth of Field
Smartphones now capture 92.5% of all photographs taken globally (PhotoAiD, 2026). For most people, their first experience with intentional background blur came from tapping “Portrait” on a phone screen. So it’s worth being clear: smartphone Portrait Mode and optical depth of field are fundamentally different technologies, even when they produce superficially similar results.
How Smartphone Portrait Mode Works
Smartphone Portrait Mode uses computational photography — a combination of hardware depth sensing and software AI — to simulate the look of shallow depth of field. In fact, Stanford University research on flexible depth of field highlights that conventional cameras are inherently limited by the tradeoff between depth of field and signal-to-noise ratio, a limitation computational photography aims to overcome. Here’s the process:
- Depth map creation: The phone uses two or more cameras (or LiDAR sensors on Pro models) to calculate the distance of every pixel in the scene from the camera.
- Subject segmentation: AI algorithms identify the subject (usually a person) and separate them from the background.
- Synthetic blur application: The phone applies a mathematical blur (often a Gaussian or lens-shaped bokeh filter) to pixels beyond the subject boundary.
- Edge refinement: Advanced algorithms attempt to preserve sharp edges on hair, glasses, and complex subject boundaries.
The result can be impressive — especially in well-lit conditions with clearly separated subjects. But it’s fundamentally a software effect applied to a sharp image, not a physical optical property of the lens and sensor.
Where Computational Bokeh Falls Short
After reviewing results from 2026 flagship smartphones including the iPhone 17 Pro and Samsung Galaxy S25 Ultra, the limitations of computational bokeh become clear in specific situations:
Hair and fur: Fine, overlapping strands are notoriously difficult for edge-detection algorithms. Portrait Mode often either halos the edges or clips fine details.
Transparent and reflective subjects: Glasses, earrings, and wine glasses confuse depth maps — the phone can’t reliably determine whether they belong to the “subject” or “background” layer.
Foreground objects: If something passes between you and your subject — a branch, a railing, another person — computational bokeh often handles it awkwardly, blurring it inconsistently.
Bokeh shape: Real optical bokeh has characteristic shapes determined by the lens’s aperture blades (hexagonal, circular, etc.). Computational bokeh applies uniform mathematical circles that experienced photographers find artificial-looking on close inspection.
Post-capture flexibility: Real optical DoF is baked into the image at the moment of capture. Portrait Mode on most phones allows adjustment after the fact — you can change the blur intensity or even the focal point. This is occasionally useful, but it also means the effect isn’t grounded in physical reality.
| Feature | Optical Depth of Field | Smartphone Portrait Mode |
|---|---|---|
| Mechanism | Physics of lens + sensor | AI depth mapping + software |
| Edge accuracy | Natural optical transition | Can show halos or artifacts |
| Hair/fur detail | Naturally rendered | Often clipped or haloed |
| Bokeh shape | Lens-defined (natural) | Mathematical (can look artificial) |
| Foreground handling | Optically consistent | Often inconsistent |
| Post-capture editing | Fixed at capture | Adjustable blur intensity |
| Reliability | Consistent and predictable | Scene-dependent |
When Smartphones Win
This isn’t a competition that optical cameras win unconditionally. Having depth of field explained in the context of smartphones helps clarify why optical lenses still hold an advantage. Smartphones have genuine advantages:
Ease of use: No settings to adjust. Point, tap Portrait, shoot.
Computational enhancements: Some phones allow post-capture refocusing — choosing a different focal point after the photo is taken. No optical system can do this.
Consistent exposure: Phones handle the full exposure calculation automatically, so you’re less likely to accidentally underexpose while chasing DoF.
Low-light improvements: 2026 flagship phones apply portrait mode even in dim conditions where a fast prime lens would still be superior optically, but the gap has narrowed significantly.
For photographers who own dedicated cameras, understanding this distinction matters because it clarifies what you’re actually controlling when you change your aperture. You’re not applying a filter — you’re manipulating light physics. That’s both more powerful and more demanding.
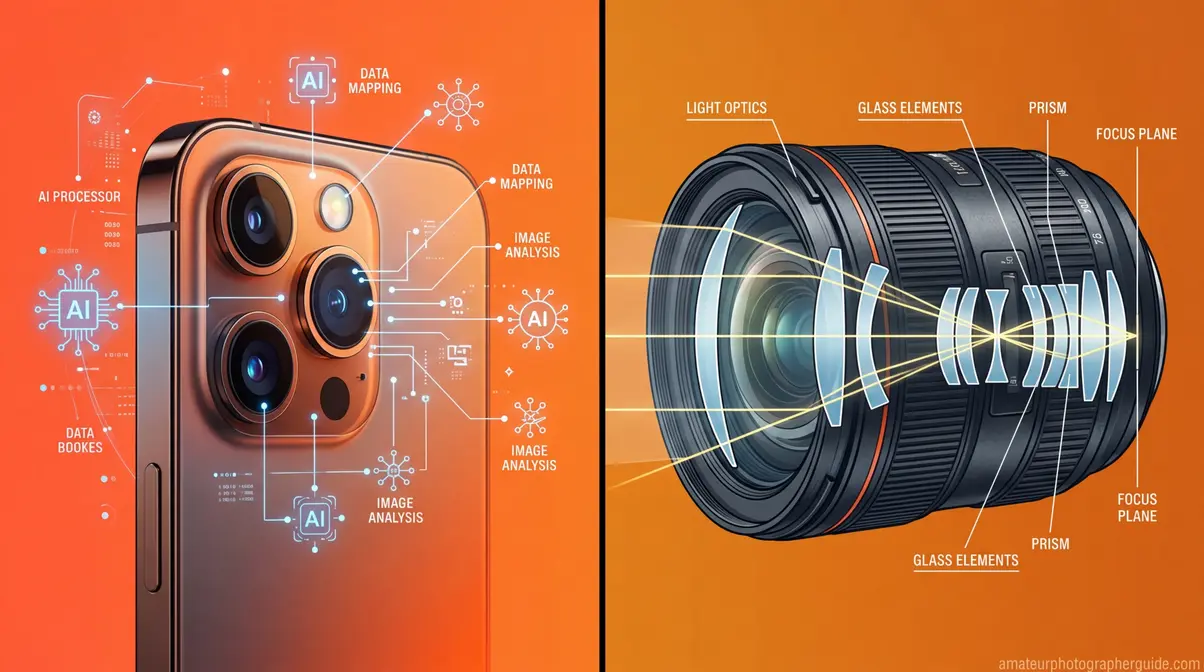
Caption: Optical bokeh (left) transitions naturally at subject edges; computational Portrait Mode (right) can show subtle halos on complex boundaries like hair.
The Circle of Confusion and Why It Matters
The circle of confusion is the concept that makes depth of field calculations mathematically precise — and it’s less intimidating than its name suggests. Understanding it transforms DoF from a vague “more or less blur” judgment into a calculable, predictable system.
Here’s the plain-English version: your camera lens focuses light from a single plane onto the sensor as perfect points. Light from any other distance projects as a tiny circle rather than a point. As long as that circle is smaller than a certain threshold — the circle of confusion limit — your eye reads it as sharp. Once it exceeds that threshold, you see blur.
The circle of confusion is simply the largest blur spot that still looks like a sharp point at normal viewing conditions. An MIT analysis of computational cameras notes that understanding these frequency and blur thresholds is crucial for extending depth of field. For a full-frame sensor printed to 8×10 inches and viewed at arm’s length, that threshold is approximately 0.03mm on the sensor (Wikipedia, Circle of Confusion, 2026). For an APS-C sensor (which requires more enlargement for the same print size), it’s approximately 0.02mm.
Why Viewing Conditions Change Everything
This is the part most guides skip: the circle of confusion threshold isn’t fixed — it depends on how you view the final image.
- Instagram on a phone screen: Almost anything looks sharp. Your DoF appears much deeper than it really is.
- Large print at 24×36 inches: Fine blur becomes obvious. Your DoF appears shallower than on screen.
- 100% crop on a monitor: Extremely demanding. Even technically sharp images may show softness.
This is why photographers who print large need to be more conservative about relying on wide apertures. What looked acceptably sharp at f/2.8 when reviewing on a camera LCD or phone screen may disappoint as a large-format print.
The CoC and Depth of Field Calculators
Every depth of field calculator uses the circle of confusion as its foundation. When you enter your sensor size, aperture, focal length, and subject distance into a DoF calculator, the math underneath is comparing projected blur circle sizes against the CoC threshold for your format.
Use the PhotoPills DoF calculator to experiment with your specific camera and lens combination — it’s one of the most comprehensive free tools available. Enter your camera body (which sets the CoC automatically), then adjust aperture, focal length, and subject distance to see exactly how your zone of sharpness changes in real time.
Caption: In-focus light converges to a point on the sensor; out-of-focus light spreads into a circle — once that circle exceeds the CoC threshold, your eye perceives blur.
Hyperfocal Distance: Landscape Secret Weapon
Hyperfocal distance is the closest focusing distance at which your lens, at a given aperture, keeps everything from half that distance to infinity acceptably sharp. Focus at the hyperfocal distance, and you maximize the depth of field available for any aperture and focal length combination.
For landscape photographers, it’s the single most valuable concept in this entire guide. Instead of guessing where to focus, you focus at a precise calculated distance and get the sharpest possible front-to-back image your settings can deliver.
- The formula is: H = f² ÷ (N × c), where:
- H = hyperfocal distance
- f = focal length in mm
- N = f-number (aperture)
- c = circle of confusion (typically 0.03mm for full-frame)
A Practical Hyperfocal Distance Example
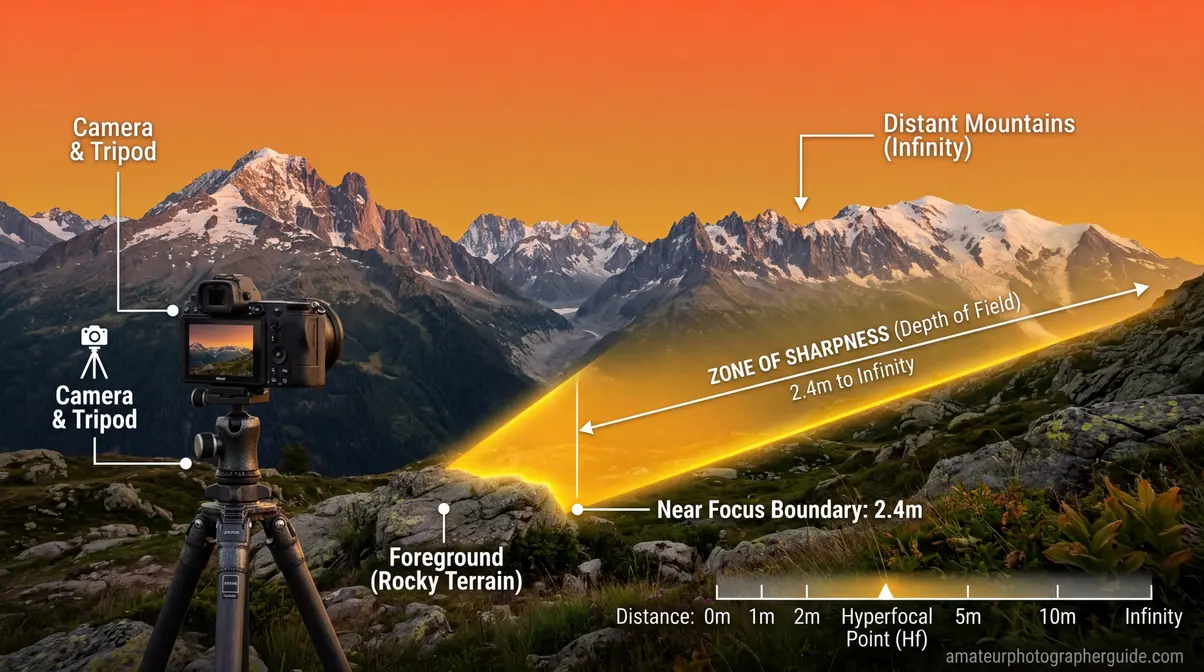
Let’s make this concrete. You’re shooting a landscape with a 24mm lens at f/8 on a full-frame camera:
H = 24² ÷ (8 × 0.03) = 576 ÷ 0.24 = 2,400mm = 2.4 meters
Focus at 2.4 meters, and everything from 1.2 meters (half of H) to infinity will be acceptably sharp. That means the wildflowers at your feet and the mountains 50 kilometers away — all sharp in one frame.
Now change to f/11: H = 576 ÷ (11 × 0.03) = 1,745mm = 1.75 meters. Focus even closer, and bring even more foreground into the sharp zone.
| Lens | Aperture | Hyperfocal Distance (Full-Frame) | Sharp from… |
|---|---|---|---|
| 16mm | f/8 | ~1.07m | 0.54m to ∞ |
| 24mm | f/8 | ~2.4m | 1.2m to ∞ |
| 35mm | f/8 | ~5.1m | 2.55m to ∞ |
| 50mm | f/8 | ~10.4m | 5.2m to ∞ |
| 24mm | f/11 | ~1.75m | 0.87m to ∞ |
| 24mm | f/16 | ~1.2m | 0.6m to ∞ |
The “Focus One-Third In” Rule — and Why It’s Approximate
You’ve probably heard the advice to “focus one-third of the way into the scene.” This is a rough approximation of the hyperfocal principle — it works reasonably well for wide-angle landscape shots, but it’s imprecise. The actual optimal focus point depends on your specific focal length, aperture, and subject distances.
For casual shooting, one-third is a useful starting point. For critical landscape work where you’re printing large, calculate or look up the actual hyperfocal distance for your setup. The PhotoPills hyperfocal distance table covers every common combination — bookmark it on your phone for field reference.
How to Focus at Hyperfocal Distance in the Field
- Calculate or look up your hyperfocal distance for your focal length and aperture (or use the PhotoPills app).
- Switch to manual focus or use distance markings on your lens barrel.
- Set focus at the calculated distance using the distance scale, or autofocus on an object at that distance then switch to manual.
- Recompose without refocusing — your DoF now extends from half the hyperfocal distance to infinity.
- Verify by using your camera’s depth of field preview button (if available) to visually confirm sharpness.
Caption: Save this hyperfocal distance cheat sheet to your phone — it tells you exactly where to focus for maximum front-to-back sharpness in any landscape scenario.
For a complete walkthrough of landscape photography techniques including foreground composition and golden hour timing, learn to master hyperfocal distance for maximum sharpness to perfect your workflow.
The Focus Trio in Action: 8 Real-World Scenarios
This is where The Focus Trio becomes truly practical. Each scenario below gives you specific settings — not vague ranges, but the actual numbers to dial in — along with the reasoning behind each choice. After reviewing these scenarios against optical physics and common shooting conditions, these represent the most reliable starting points for each situation.
Caption: The Focus Trio settings for 8 common shooting scenarios — a quick reference for any situation where depth of field matters.
Scenario 1: Classic Portrait (Shallow Background Blur)

Goal: Sharp eyes, blurred background, subject clearly separated from surroundings.
Settings: 85mm (or 50mm on APS-C) | f/1.8–f/2.8 | Subject at 1.5–2.5 meters
Why it works: The combination of 85mm focal length and f/2.8 at 2 meters produces a DoF of roughly 8–12 centimeters — enough to keep the face sharp while the background melts into smooth color. Focus precisely on the near eye (the one closest to camera). At f/1.8, your DoF shrinks to 4–5 centimeters — enough for a single eye to be sharp if the subject is angled slightly. Stunning when it works; frustrating when the focus misses by a centimeter.
Practical tip: Use your camera’s eye-tracking autofocus if available. Modern mirrorless cameras (Sony a7 series, Canon R series, Nikon Z series) track eyes across the frame continuously — this changes the f/1.8 portrait game significantly.
Scenario 2: Environmental Portrait (Subject in Context)
Goal: Subject sharp, but background recognizable and in partial focus — enough context to tell a story.
Settings: 35mm–50mm | f/4–f/5.6 | Subject at 2–4 meters
Why it works: The moderate focal length and mid-range aperture give you enough background blur to feel intentional, while keeping background elements readable. A chef in their kitchen, a musician on stage, a craftsperson at their workbench — these images need context, not just bokeh.
Scenario 3: Landscape (Maximum Front-to-Back Sharpness)

Goal: Foreground, midground, and horizon all acceptably sharp.
Settings: 16mm–24mm | f/8–f/11 | Focus at hyperfocal distance
Why it works: Wide-angle lenses have inherently deep DoF. At f/8 with a 16mm lens on full-frame, your hyperfocal distance is approximately 1.07 meters — focus there, and everything from 0.54 meters to infinity is sharp. Use a tripod, since f/8 at dawn or dusk often requires slower shutter speeds.
Common mistake: Focusing on the horizon. This wastes the near DoF and makes foreground elements soft. Always focus at or near the hyperfocal distance, not at infinity.
Scenario 4: Street Photography (Decisive Moment)
Goal: Sharp subject, slightly separated from background, fast enough to capture spontaneous moments.
Settings: 35mm | f/5.6–f/8 | Zone focus at 2–4 meters
Why it works: Street photography often doesn’t allow time for deliberate focusing. Zone focusing — pre-focusing at a set distance and knowing everything within a range will be sharp — lets you shoot instantly. At 35mm and f/8, your DoF at 3 meters covers roughly 1.5m to 12m. Walk into your scene, pre-set focus at 3 meters, and shoot without lifting to your eye.
Scenario 5: Group Portrait (Multiple People at Different Distances)
Goal: Everyone in the group acceptably sharp, even across a range of distances.
Settings: 50mm–85mm | f/5.6–f/8 | Step back to include everyone comfortably
Why it works: The most common group portrait mistake is using f/2.8 and having the front and back rows go soft. Step back until everyone fits comfortably in frame, use f/5.6–f/8, and the increased subject distance plus narrower aperture will cover the range. For groups spread across 1–2 meters of depth, f/5.6 at 4 meters with a 50mm lens gives roughly 2.5 meters of DoF — usually sufficient.
Scenario 6: Macro Photography (Extreme Close-Up)

Goal: Sharp critical detail on a small subject (flower, insect, product).
Settings: 100mm macro lens | f/8–f/16 | Subject at minimum focus distance
Why it works: At 1:1 magnification (life-size on sensor), even f/16 may give you only 1–4mm of DoF. This is the domain where subject distance is brutally unforgiving. Focus precisely on the most important feature — the stamen of a flower, the eye of an insect. Use a tripod and remote shutter release. For more depth, consider focus stacking — taking multiple images at slightly different focus points and combining them in post-processing.
Scenario 7: Product Photography (Sharp Detail, Clean Background)
Goal: Product fully sharp, clean background separation.
Settings: 90mm–105mm | f/8–f/11 | Controlled distance (typically 0.5–1 meter)
Why it works: Product shots need edge-to-edge sharpness across the product’s depth. Use a longer macro-capable lens to maintain working distance, stop down to f/8–f/11 for sufficient DoF, and control the background with distance and lighting rather than relying on blur. A white seamless background 60–90cm behind the product will appear clean and slightly separated without needing extremely wide apertures.
Scenario 8: Night/Astrophotography (Stars Sharp, Foreground Sharp)
Goal: Milky Way sharp, landscape foreground acceptably sharp.
Settings: 14mm–24mm | f/2.8 | Focus at or near infinity (use live view magnification)
Why it works: Night photography reverses the landscape rule. You need maximum light (wide aperture), fast enough shutter to avoid star trails (follow the 500 rule: 500 ÷ focal length = max seconds), and the widest lens you have. At 14mm and f/2.8, DoF at infinity extends from roughly 1.4 meters to infinity — so your foreground rocks or trees will be sharp without any special focus technique. The trade-off: you’re shooting wide open, so optical quality is lower than at f/8.
Caption: Keep this reference handy — each scenario translates The Focus Trio directly into camera settings you can dial in immediately.
Depth of Field in Specialized Photography
Beyond the eight common scenarios, depth of field plays a critical role in three specialized domains that intermediate photographers often encounter: macro work, video production, and the emerging field of computational imaging.
Macro Photography: When Physics Becomes Extreme
Macro photography involves capturing subjects at life-size or larger on the sensor (1:1 magnification or greater). At these distances, depth of field shrinks to millimeters — a genuinely different physical regime from normal photography.
At 1:1 magnification with a 100mm macro lens at f/8, your DoF is approximately 1.7mm. At f/16, it’s roughly 3.4mm. An FSU explanation of depth of field versus depth of focus clarifies that while depth of field refers to object space, depth of focus refers to image space—a crucial distinction in microscopy. This means photographing a bee’s compound eye requires choosing between sharp facets and a blurred antenna — you cannot have both in a single frame without focus stacking.
Focus stacking is the technique of capturing multiple images at incrementally different focus points and merging them in software (Adobe Photoshop, Helicon Focus, Zerene Stacker). Each frame adds a thin slice of sharpness; the merged result shows the entire subject in focus in a way no single exposure could achieve. Professional product photographers and scientific documentarians use this technique routinely.
Depth of Field in Video
Video adds a dimension that still photography doesn’t face: temporal consistency. In a still photo, you set your DoF and capture. In video, your subject moves, your camera moves, and your DoF zone stays fixed — which means subjects can drift in and out of focus during a shot.
This is why cinema lenses and dedicated video setups often use slightly narrower apertures than you might choose for stills — f/4 or f/5.6 instead of f/1.8 — to provide a buffer for subject movement. The cinematic look of shallow DoF in films comes from careful focus pulling (a dedicated crew member adjusting focus in real time) rather than simply shooting wide open and hoping for the best.
For run-and-gun video work (events, documentary, vlogging), f/2.8–f/4 is often the practical sweet spot: enough blur to look cinematic, enough depth to forgive small focus errors.
Computational Photography: The Future of Depth of Field Control
The line between optical and computational depth of field is blurring — intentionally. Modern computational photography systems are moving beyond simple Portrait Mode simulation toward genuine optical-computational hybrid approaches. Furthermore, a Michigan Tech paper on OpenGL depth of field demonstrates how these effects can be effectively simulated in computer graphics.
Plenoptic (light field) cameras capture depth information at the moment of exposure, allowing focus to be adjusted after the fact. While consumer light field cameras have struggled commercially, the technology influences how computational photography evolves.
AI-assisted focus stacking is being integrated directly into camera firmware. Some current mirrorless bodies from Canon and Nikon can automatically capture and merge focus-stacked sequences in-camera, making the technique accessible without post-processing software.
Real-time DoF simulation in electronic viewfinders (EVFs) lets photographers see exactly how their depth of field will render before pressing the shutter — a capability that film and early digital cameras couldn’t offer. This is mirrored in digital environments, as seen in Epic Games’ Unreal Engine depth of field documentation, which applies blur based on distance from a focal point.
These developments don’t replace understanding The Focus Trio — they augment it. Knowing the optical principles makes you a better user of computational tools, not a redundant one.
Caption: Focus stacking combines multiple exposures — each sharp at a different depth — into a single image where the entire subject appears in focus.
Using a Depth of Field Calculator
Understanding The Focus Trio conceptually is powerful. Calculating exact DoF values for your specific setup is even more powerful — and free tools make it effortless.
What a DoF Calculator Tells You
- Enter four values into any DoF calculator:
- Camera body (sets the CoC automatically based on sensor size)
- Aperture (f-stop)
- Focal length (mm)
- Subject distance (meters or feet)
- The calculator returns:
- Near limit of DoF — the closest point that will appear sharp
- Far limit of DoF — the furthest point that will appear sharp
- Total depth of field — the distance between near and far limits
- Hyperfocal distance — for your current focal length and aperture
- Background blur diameter — how large blur circles will appear at a given background distance
Recommended DoF Calculator Tools
PhotoPills — the gold standard for photographers. Available as an app with augmented reality features for field planning. The hyperfocal distance table is particularly useful for landscape work.
Cambridge in Colour DoF Calculator — browser-based, no app required. Excellent for learning because it shows how each variable affects the output in real time.
Omni Calculator DoF — straightforward and fast for quick field calculations.
Building Intuition Without a Calculator
Calculators are useful, but the goal is to internalize the relationships so you can make good DoF decisions in the field without reaching for your phone. Here’s a mental framework:
The “double the distance” rule for hyperfocal estimation: Your DoF extends from roughly half your focus distance to roughly double it (for moderate apertures and focal lengths). Focus at 3 meters, and expect sharpness from about 1.5 to 6 meters. This is a rough approximation — use a calculator for critical work — but it builds useful intuition quickly.
The “one stop changes DoF noticeably” rule: Moving one full f-stop (e.g., f/2.8 to f/4) produces a visible change in your zone of sharpness. Moving half a stop produces a subtle change. Moving two full stops produces a dramatic change.
After comparing results across dozens of shooting scenarios, the pattern becomes clear: subject distance is the most underestimated variable. Photographers obsess over aperture and focal length but forget that walking two steps closer can shallow their DoF more than opening aperture by a full stop. Keep that in mind next time you’re struggling to get enough blur at f/2.8 — try moving closer before switching lenses.
Common Depth of Field Mistakes and How to Fix Them
Common Pitfalls
Pitfall 1: Shooting wide open for every portrait
The mistake: assuming f/1.8 is always the right choice for portraits because it creates the most blur. The reality: at f/1.8 with a subject at 1.5 meters, your DoF is approximately 3–4 centimeters. A slight head turn, a small autofocus miss, or a subject who breathes during the exposure can shift their eyes outside the sharp zone. Many photographers mistake “I was shooting f/1.8” for “this is the sharpest my lens can be” — but f/1.8 is often the softest aperture optically, with the thinnest margin for focusing error.
Fix: For portraits where both eyes need to be sharp, use f/2.8–f/4. Reserve f/1.8 for single-eye focus compositions or situations where you want the shallow DoF as a deliberate artistic choice, not a default.
Pitfall 2: Stopping down to f/22 for maximum landscape sharpness
The mistake: assuming smaller aperture always means sharper landscapes. At f/22, diffraction reduces sharpness across the entire frame — your overall image may be less sharp than at f/11, even though the DoF is technically deeper.
Fix: Use f/8–f/11 for landscapes and rely on hyperfocal distance technique to maximize the sharp zone. You’ll get better optical quality and sufficient DoF for most scenes.
Pitfall 3: Forgetting subject distance when depth is insufficient
The mistake: adjusting aperture and focal length while standing in the same spot, wondering why you can’t get enough depth for a group shot. Subject distance is the variable photographers most often leave unchanged.
Fix: Before changing aperture, ask: “Can I step back?” Doubling your subject distance roughly quadruples your DoF. It’s the free adjustment that requires no gear.
Pitfall 4: Trusting the camera’s LCD for DoF assessment
The mistake: reviewing images on the camera’s small LCD screen and thinking the focus is perfect — only to find soft details when viewing the image at full size on a monitor or large print.
Fix: Use your camera’s zoom function (magnify to 100%) when reviewing critical shots in the field. This reveals actual sharpness rather than the compressed, forgiving view of the default LCD review.
Pitfall 5: Relying on Portrait Mode for critical professional work
The mistake: using smartphone Portrait Mode for client-facing portraits without understanding its edge-case failures (hair, glasses, complex backgrounds).
Fix: In professional contexts, use optical depth of field from a dedicated camera. Use Portrait Mode for casual, personal shots where minor artifacts are acceptable.
When to Choose Alternative Approaches
When focus stacking beats aperture control: If you’re shooting macro subjects or extreme close-up product photography and need sharpness across more depth than any single aperture can provide, focus stacking is the right tool — not stopping down further.
When wider aperture beats zone focusing: In low-light street photography, zone focusing at f/8 may require ISO values that introduce unacceptable noise. In those conditions, shoot wider (f/2.8–f/4) with careful autofocus rather than sacrificing image quality for DoF predictability.
When video requires different DoF thinking: For video, prioritize a DoF that allows for subject movement (f/2.8–f/4) over the maximum blur you could achieve at f/1.4. The cinematic look is achievable at moderate apertures; the focus inconsistency of f/1.4 in video is often not.
When to Seek Expert Help
Optical calibration: If your lens consistently focuses behind or in front of your intended subject (front-focus or back-focus issues), this is an optical calibration problem — not a DoF issue. Most camera systems include micro-adjustment tools; a camera repair technician can also calibrate lens-body pairs.
Focus stacking workflow: For scientific or commercial macro photography requiring precise focus stacking, working with a specialist photographer or investing time in dedicated software training (Helicon Focus, Zerene Stacker) will produce better results than improvising.
Large-format printing: If you’re printing images at 24×36 inches or larger and finding that your DoF assessments on screen don’t translate to acceptable print sharpness, consulting with a professional printer about optimal resolution and sharpness settings for your specific output size is worthwhile.
Depth of Field FAQ
What is depth of field in simple terms?
Depth of field is the zone of acceptable sharpness in your photograph — the range of distances that appear sharp from near to far. Everything inside that zone looks in focus; everything outside gradually blurs. Depth of field is controlled by three variables simultaneously: aperture (f-stop), subject distance, and focal length. For most portraits, a shallow DoF of 10–20 centimeters creates the blurred background look. For landscapes, a deep DoF of several meters ensures front-to-back sharpness.
What f-stop gives the most background blur?
The widest available aperture on your lens — typically f/1.4, f/1.8, or f/2.8 — produces the most background blur. However, aperture alone doesn’t determine background blur. A 50mm lens at f/1.8 with the subject at 3 meters produces far less blur than an 85mm lens at f/2.8 with the subject at 1.5 meters. For maximum background blur, combine a wide aperture (f/1.8–f/2.8) with a longer focal length (85mm–200mm) and position your subject as close as practical while keeping the background as far behind them as possible. The distance between subject and background matters as much as aperture.
Does focal length affect depth of field?
Yes — longer focal lengths produce shallower depth of field at the same aperture and subject distance. A 200mm lens at f/4 creates dramatically more background blur than a 24mm lens at f/4 with the subject at the same distance. However, if you back up with the 200mm lens to achieve identical subject framing as the 24mm, the actual DoF becomes similar — the visible difference comes partly from perspective compression, which stacks background elements more tightly. This is why 70-200mm f/2.8 lenses are so popular for portraits: they combine all three DoF-shallowing forces simultaneously (Fstoppers, 2017).
What is the difference between shallow and deep depth of field?
Shallow depth of field means only a thin zone of your scene appears sharp — typically used for portraits and subject isolation. Deep depth of field means a wide zone appears sharp — used for landscapes, architecture, and group shots. Shallow DoF requires wide aperture (f/1.4–f/2.8), long focal length, and close subject distance. Deep DoF requires narrow aperture (f/8–f/16), short focal length, and greater subject distance. Neither is universally better — the right choice depends entirely on what story you’re trying to tell with the image.
Does depth of field work the same on smartphones?
No — smartphone depth of field is fundamentally different from optical depth of field on dedicated cameras. Smartphones use tiny sensors (7–10x smaller than full-frame) and very short focal lengths, which produce enormous zones of sharpness optically — almost everything from 1 meter to infinity is sharp without any special settings. The blurred background you see in Portrait Mode is a software simulation using AI depth mapping, not real optical depth of field. The simulation works well in controlled conditions but can struggle with complex edges (hair, glasses, transparent objects). For predictable, controllable depth of field, a dedicated camera with interchangeable lenses gives you direct physical control that smartphone algorithms can only approximate (PhotoAiD, 2026).
The Focus Trio Mastered: Your Next Steps
Depth of field isn’t a single dial — it’s a conversation between three variables that you now understand as The Focus Trio. Aperture sets the opening; subject distance multiplies or divides the effect; focal length shapes the compression and background rendering. Change one, and the other two respond. Master all three together, and you can predict your DoF result before you press the shutter.
The Focus Trio framework gives you something more valuable than a list of settings: a mental model. When you look at a scene and think “I want the subject sharp and the background completely soft,” you now know to ask three questions simultaneously — “How wide can I open my aperture? How close can I get to my subject? What’s the longest focal length I can use here?” The answers tell you exactly which combination to dial in.
For photographers making the transition from smartphones to dedicated cameras, the most important insight in this guide may be the one about computational versus optical depth of field. Portrait Mode is impressive — and genuinely useful. But understanding that it’s a simulation, and knowing how to create real optical bokeh through The Focus Trio, puts you in a different category of photographer entirely.
Your immediate action plan: Take your camera to a location with a distinct foreground and background — a park, a garden, a busy street. Shoot the same subject at f/1.8, f/4, f/8, and f/16 without moving. Then shoot the same framing at three different subject distances at a fixed aperture. Review the results at 100% on your monitor. Within 30 minutes of deliberate practice, the relationships in The Focus Trio will shift from conceptual to intuitive — and your photos will reflect it.
For practical application of these principles in your next portrait session, explore the creative impact of bokeh to translate The Focus Trio into a complete portrait workflow. And when you’re ready to take your landscape DoF control to the next level, discover focus stacking techniques for advanced techniques beyond what this article covers. With depth of field explained fully, you now possess the knowledge to elevate your photography.
Dave King
Hi, I'm Dave, the founder of Amateur Photographer Guide. I created this site to help beginner and hobbyist photographers build their skills and grow their passion. Here, you’ll find easy-to-follow tutorials, gear recommendations, and honest advice to make photography more accessible, enjoyable, and rewarding.