25 Common Photography Mistakes & Proven Fixes (2026)
Most common photography mistakes don’t require new gear to fix — they require a new way of seeing what’s already going wrong. Understanding common photography mistakes is the fastest shortcut to consistently better photos, and the good news is that nearly every problem on this list has a specific, mechanical fix.
What’s in this guide
You review a shot on the LCD and it looks fine. You open it on your laptop and it’s soft, blown out, or just flat. That gap between expectation and result is where every photographer lives before they learn to diagnose the problem systematically.
In this guide, you’ll identify and fix all 25 of the most common photography mistakes — from camera shake and clipped highlights to AI over-sharpening — using a simple diagnostic framework that tells you exactly where each problem starts. We’ve organised every mistake into four layers — technical, composition, lighting, and post-processing — so you can jump straight to the category causing your specific problem.
The 25 mistakes in this guide were identified by analysing the most common issues raised across major photography communities (Reddit r/photography, Digital Photography School, Fstoppers), cross-referenced with gaps in the top-ranking competitor guides and validated against professional teaching experience. Where possible, each fix is sourced to an authoritative reference.
Common Photography Mistakes Beginners Make
The most common photography mistakes beginners make aren’t always technical — many are behavioural habits that block the feedback loop needed to improve. Across Reddit’s r/photography and major photography forums, the same five habits appear in nearly every “what held me back?” thread. Fixing these first clears the path for every technical improvement that follows.
Before diving into camera settings and exposure, it helps to understand where each mistake lives. The Photography Diagnostic Stack is a 4-layer framework — Technical, Composition, Lighting, Post-Processing — for identifying exactly which category a photography mistake belongs to, so you fix the right problem instead of guessing. Most beginner mistakes in this section sit outside all four layers: they’re workflow habits that prevent you from reaching the technical layer at all.
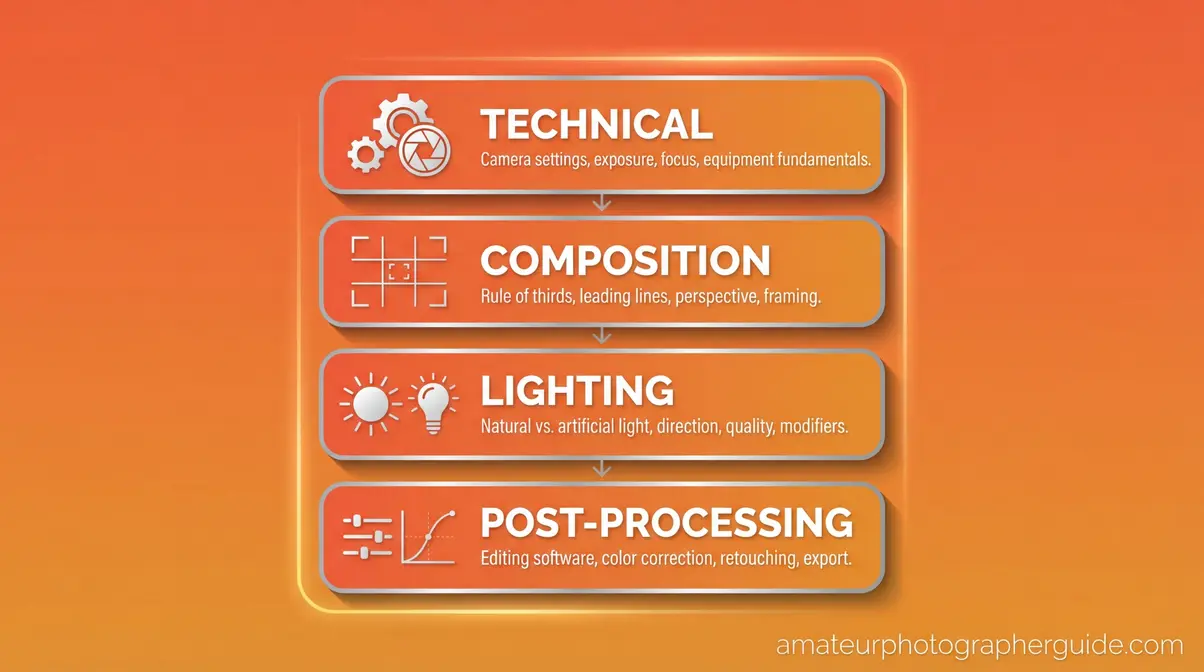
Caption: The Photography Diagnostic Stack organises every photography mistake into one of four fixable layers.
Not Shooting Enough
Common mistakes beginner photographers make often start before the camera is even raised. Many beginners take 20–30 shots in a session and stop. Professional development requires deliberate repetition — without volume, you can’t identify patterns in your own errors. You need enough shots to notice “my indoor photos are always soft” or “I always clip highlights in direct sunlight.”
Actionable Fix: Set a minimum session target of 100 intentional shots per outing. Carry your camera everywhere — leaving it at home is itself a sub-mistake worth naming. Try this drill: shoot the same subject 20 times with different settings — same park bench, 20 different exposures. The variation teaches you more in one session than a month of casual shooting. Learn how to avoid frequent beginner photography errors by building volume first. With 95% of teens now having access to a smartphone (Pew Research Center, 2022), more beginner photographers are starting on mobile before transitioning to dedicated cameras — compressing the learning timeline and making deliberate practice even more critical.
Not Getting Feedback
Learning in isolation slows progress. There are two failure modes here: no feedback at all (relying entirely on self-assessment), and feedback from peers who are also beginners — which reinforces each other’s mistakes rather than correcting them. Across photography communities, the consistent finding is that photographers who receive structured critique improve measurably faster than those who don’t.
The Solution: Seek feedback from photographers at least one skill level above you. Useful options include r/photocritique, local camera clubs, or structured online communities with dedicated critique features. Post three photos per week with a specific question — “Is my focus point correct here?” — rather than the vague “What do you think?” Specific questions get specific answers.
Not Backing Up Your Images
One corrupted SD card wipes every photo from a shoot permanently. This is a preventable, irreversible loss that beginners consistently underestimate until it happens once.
- Correction Strategy: Apply the 3-2-1 backup rule:
- Keep 3 copies of every image
- Store them on 2 different media types (e.g., external SSD plus cloud)
- Keep 1 copy offsite (cloud storage counts)
A reliable workflow: import to Lightroom → auto-backup to an external drive → monthly sync to Google Photos or Backblaze. If you shoot RAW (recommended for quality), plan your storage capacity before your first serious session — RAW files are 3–5× larger than JPEGs.
Chimping Instead of Shooting
Common mistakes beginner photographers make in the field include “chimping” — the habit of reviewing each photo on the LCD screen immediately after taking it. The cost is twofold: you miss the next moment, and the LCD misleads you. It displays a brightened JPEG preview even when you’re shooting RAW, creating false confidence about your exposure.
How to Fix It: Set a review schedule. Shoot a full sequence, then review. Use the histogram (not the image preview) to assess exposure. On a 10-minute street scene, commit to shooting for 8 minutes before checking anything. Trust your settings.
Not Knowing Your Camera’s Features
Most beginners use roughly 10% of their camera’s capability — not from laziness, but from not knowing what’s available. Specific missed features include back-button focus, exposure compensation, focus peaking, and zebra patterns for highlight warning. Shooting in Auto Mode is often a symptom of not knowing the manual alternatives exist.
What to Do Instead: Spend 20 minutes per week with your camera manual — specifically the sections on autofocus modes and exposure controls. Set a goal to learn one new feature per session. This week: find your camera’s single-point autofocus mode and practise using it on a stationary subject. Understanding common photography mistakes and how to avoid them starts with knowing what your camera can actually do.
Technical Mistakes That Kill Your Shots
Technical mistakes in photography are the most fixable category — once you know the rules, the solutions are mechanical. Most blurry, overexposed, or flat photos trace back to one of seven in-camera decisions. In The Photography Diagnostic Stack, this is Layer 1: the foundation every other improvement is built on.
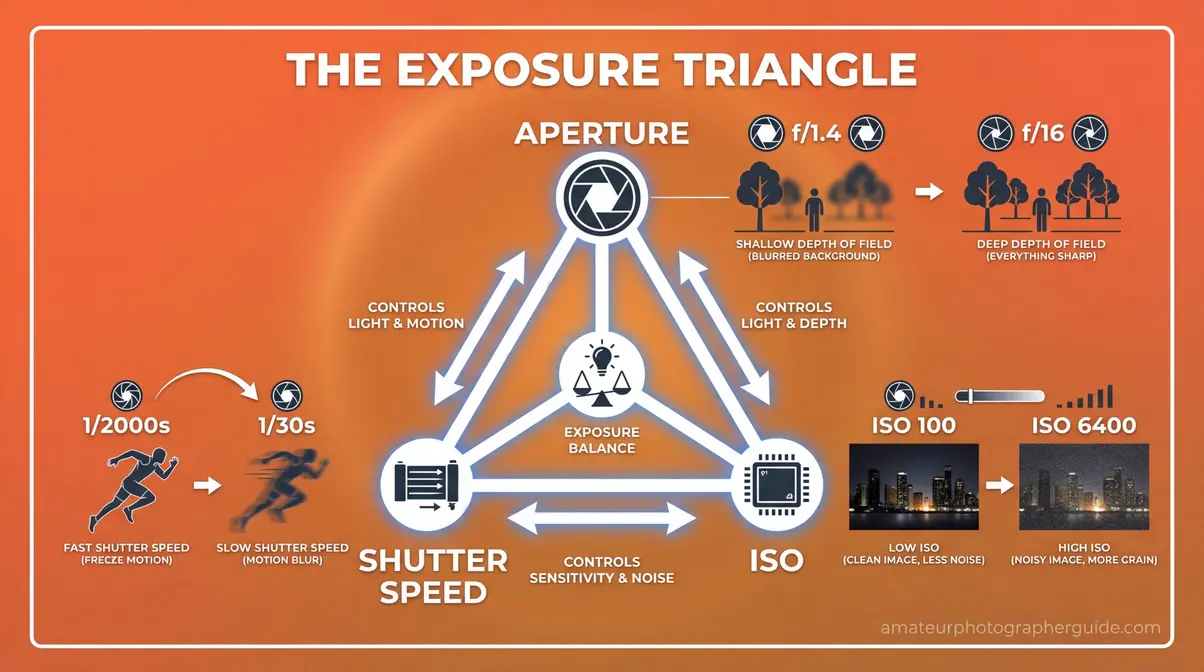
Caption: The exposure triangle — aperture, shutter speed, and ISO — controls every in-camera technical decision.
When to Stop Using Auto Mode?
Auto Mode makes every exposure decision for you — ISO, aperture, and shutter speed. According to Canon’s manual on Scene Intelligent Auto mode, “Scene Intelligent Auto analyses the scene and sets the optimum settings automatically” (Canon, 2024). That sounds helpful, but it removes creative control over depth of field and motion entirely. In tricky lighting — backlit subjects, golden hour, indoor low-light — Auto Mode consistently makes the wrong exposure choice.
- The Solution:
- Switch to Aperture Priority (Av/A mode) to control depth of field while the camera manages shutter speed
- After 2–4 weeks, move to full Manual for complete creative control
Try this: shoot a portrait in Aperture Priority at f/2.8 and notice how the background blurs in a way Auto Mode would never allow. Understand when to transition away from Auto Mode before your next shoot.
Why Are My Photos Always Blurry?
Camera shake is the single most common cause of blurry photos — and it’s entirely preventable. First, distinguish between two distinct types of blur: camera shake (photographer movement) versus motion blur (subject movement). Each requires a different fix, yet most guides lump them together.
For camera shake, the standard rule is the 1/focal length formula: your shutter speed should be at minimum 1 divided by your focal length in millimetres (The-Digital-Picture). A 50mm lens requires at minimum 1/50s; a 200mm lens requires 1/200s. As Cambridge in Colour’s guide to reducing camera shake explains: “Camera shake is visible whenever your shutter speed is slow compared to the speed of unintended camera motion” — a rule most beginners have never encountered.
| Focal Length | Min. Shutter Speed | With Image Stabilisation |
|---|---|---|
| 24mm | 1/25s | 1/6s |
| 50mm | 1/50s | 1/13s |
| 100mm | 1/100s | 1/25s |
| 200mm | 1/200s | 1/50s |
Actionable Fix: (1) Apply the 1/focal length rule. (2) Use image stabilisation (IS/VR) when available — it buys you 2–4 stops of stability. (3) Brace against a wall or surface when a tripod isn’t available.
How to Fix Blown-Out Skies?
Blown-out highlights — areas where the sensor captured no detail because the light was too bright — are among the most common photography pitfalls. The LCD screen makes this worse: it shows a brightened preview that makes overexposed shots look acceptable. The histogram tells the truth.
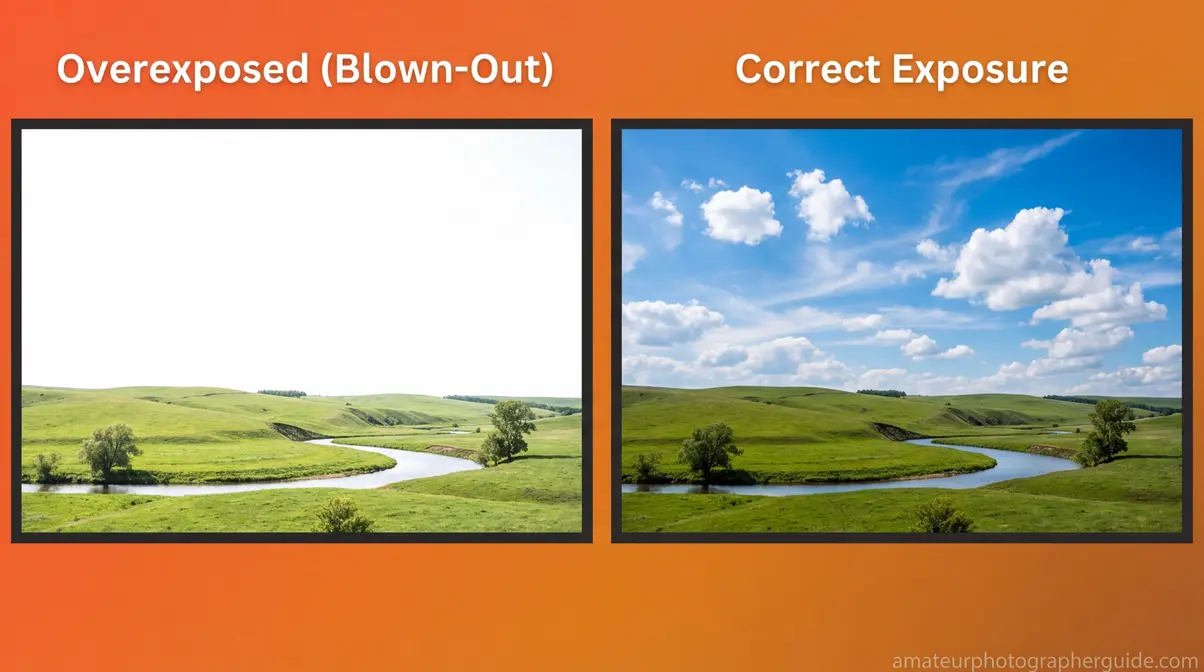
Caption: A blown-out sky (left) loses all cloud detail permanently in JPEG — the correctly exposed version (right) retains recoverable data.
Correction Strategy: (1) Enable highlight warning (“blinkies”) — overexposed areas flash on the LCD. (2) Shoot in RAW format to retain recoverable highlight data. (3) If shooting JPEG, slightly underexpose by dialling in -1 exposure compensation to protect highlights. For scenes with strong highlights and deep shadows, HDR bracketing recovers the most detail (Adobe Community advice on fixing blown-out highlights). Discover how to prevent blown-out highlights and overexposure before your next high-contrast shoot.
Not Reading Your Histogram
A histogram is a graph showing the distribution of tones in your image, from pure black on the left to pure white on the right. A spike touching the right edge means blown highlights; a spike at the left edge means clipped shadows. A well-exposed image has tones spread across the middle without touching either edge. The exposure triangle — shutter speed, aperture, and ISO — must be balanced using a histogram for accurate exposure (Adobe Blog, 2022).
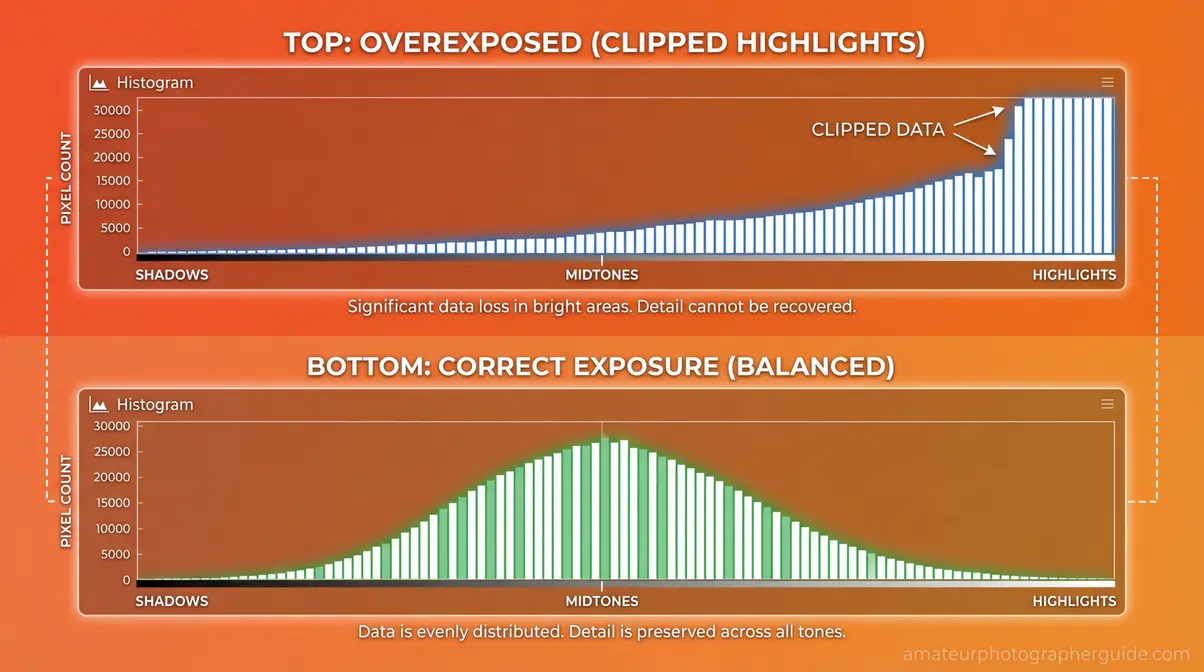
Caption: The histogram’s right edge reveals clipped highlights — the most reliable exposure check on any camera.
How to Fix It: Switch your camera’s review mode to show the histogram overlay instead of just the image. Check it after every 5–10 shots until reading it becomes automatic. Try this: shoot a bright window scene, then check the histogram. If the right edge is spiking, dial down exposure compensation by -1 stop.
Shooting Wide Open When You Shouldn’t
Many beginners shoot at their widest aperture (f/1.4 or f/1.8) for every shot because they read that wide apertures blur the background. The result is a razor-thin depth of field that misses focus on eyelashes instead of eyes, or front-focuses on a nose instead of a face.
Most lenses have a sweet spot for sharpness — typically between f/5.6 and f/8 — where optical performance peaks and depth of field is manageable. Reserve f/1.4–f/2 for intentional shallow depth of field shots with a single subject and a clean background.
What to Do Instead: Use f/5.6–f/8 for group shots, landscapes, or any scene where sharpness across the frame matters. Save the wide apertures for when you specifically want subject isolation.
Ignoring White Balance
Photos with an orange colour cast indoors under tungsten light, or a blue cast on overcast days, are classic white balance errors. Auto White Balance (AWB) averages the scene — it fails reliably when light sources mix (a window plus an indoor lamp, for instance).
The Solution: Set a custom white balance using a grey card, or use your camera’s preset values (Cloudy, Tungsten, Daylight) to match the actual light source. Shooting RAW means you can correct white balance in post without any quality loss — making this one of the most forgiving common errors in photography.
Not Using a Tripod When Needed
A tripod eliminates camera shake entirely in scenarios where no handheld technique can compensate: shutter speeds below 1/30s, night photography, macro photography, and intentional long exposures. For a waterfall shot at 1/4s, even image stabilisation won’t prevent blur — only a stable platform will. Long exposure photography requires precise shutter speed control and, for moving subjects, disabled autofocus — both demand a stable base (National Geographic’s tips on avoiding long exposure mistakes, National Geographic).
Actionable Fix: Invest in a lightweight travel tripod. Use the 2-second self-timer or a remote shutter release to eliminate mirror shake on DSLRs. This one tool eliminates an entire category of blurry images permanently.
📥 Free Download: The Exposure Triangle Cheat Sheet
Fix camera shake, blown-out highlights, and aperture mistakes with this one-page reference.
[Download the free PDF →]
Composition and Editing Mistakes to Fix
“What’s one thing you never noticed when you first started, but now you can’t unsee it? For me it’s crooked horizons.”
— r/photography community member
Crooked horizons are one of five composition mistakes that turn technically correct photos into visually uncomfortable ones — and they’re all fixable in under 60 seconds. Composition mistakes live in Layer 2 of The Photography Diagnostic Stack; editing mistakes in Layer 4. Both are invisible until you know what to look for, and both are immediately obvious once you do.
Always Centering Your Subject
The Rule of Thirds divides the frame into a 3×3 grid — place your subject on one of the four intersection points rather than dead centre, and the image gains immediate visual tension. Centred subjects feel static; off-centre subjects feel alive. Note the exception: symmetrical compositions (architecture, reflections) work better with centred subjects. Breaking the rule intentionally is entirely different from breaking it accidentally.

Caption: Placing the subject’s nearest eye on an upper intersection point creates natural visual balance.
Correction Strategy: Enable the Rule of Thirds grid overlay on your camera’s live view. For portraits, place the subject’s nearest eye on the upper-left intersection. For landscapes, place the horizon on the lower third to emphasise sky. Explore techniques to improve your photo composition with more compositional frameworks beyond the Rule of Thirds.
Crooked Horizons
Crooked horizons are the most universally cited post-learning regret in photography — a finding consistent across every major photography community (amateurphotographerguide.com, 2026). Photographers focus on the subject and forget to check the horizontal reference lines in the frame. A 2-degree tilt makes the entire image feel unstable and unintentional, even when every other element is correct.
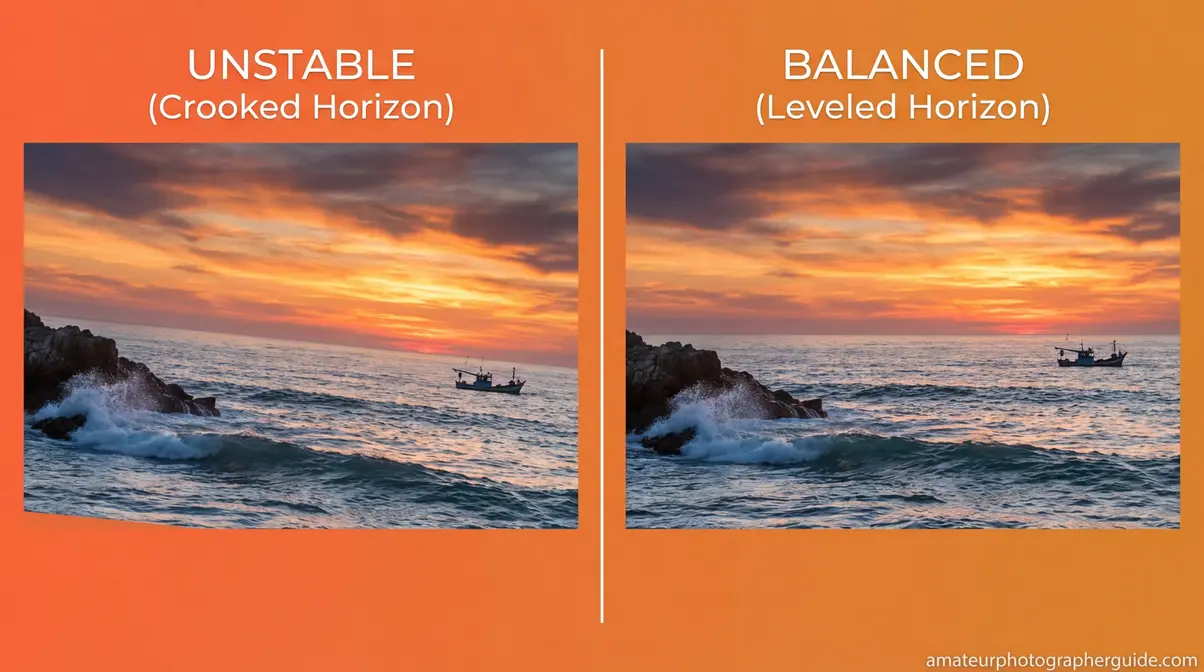
Caption: A 2-degree horizon tilt (left) undermines an otherwise strong seascape — three seconds of correction (right) transforms it.
In-Camera Solution: Enable the electronic level (virtual horizon) available on most mirrorless cameras and many DSLRs. Post-Processing Fix: Use Lightroom’s “Auto” crop-and-straighten tool, or manually drag the horizon line to level. This takes approximately three seconds and is one of the highest-impact corrections in photography.
Cluttered Backgrounds and Poor Framing
Distracting backgrounds pull the viewer’s eye away from the subject. The specific culprits: telephone poles appearing to grow from a subject’s head, bright patches of sky in the background, or other people walking through the frame. Crucially, the fix is movement, not post-processing.
How to Fix It: Before pressing the shutter, do a “background scan” — look at the edges of the frame and identify anything competing with your subject for attention. Take three steps left, right, higher, or lower before assuming the composition is set. For outdoor portraits, position your subject against a shaded wall or use a wide aperture (f/2.8) to blur an unavoidably cluttered background.
Not Getting Close Enough
Most beginner photos are taken from too far away. Filling the frame with your subject is the fastest way to make photos look more professional — yet beginners consistently hang back. The reason is a combination of uncertainty about personal space (for portraits) and lack of awareness that “filling the frame” is a deliberate compositional choice.
Actionable Fix: If you think you’re close enough, take three steps forward. For portraits, move to within 1–2 metres for tight headshots. For objects and details, fill at least 60% of the frame with your subject. The compression alone changes the feeling of the image.
Over-Processing and Global Clarity Abuse
Global clarity abuse is dragging the Clarity slider above +40 on portraits — it creates a gritty, plastic-skin effect that looks unnatural in print and on high-resolution screens. Over post-processing is the single most common editing mistake, and it’s easy to miss because it happens gradually.
A useful heuristic is the “reality plus 10 percent” rule: your edits should enhance what’s already in the image by no more than 10% beyond what looks real. If a viewer’s first reaction is “that’s heavily edited,” you’ve gone too far. Specific over-editing patterns to watch: over-saturation (colours look neon), over-sharpening (halos around edges), over-contrast (crushed blacks, blown whites).
The Solution: Use Lightroom’s Soft Proofing mode to check how the image looks in different output contexts. If your Saturation slider is above +30, start pulling back. Check your Clarity slider — anything above +40 on skin requires a mask to limit the effect to non-skin areas.
AI Over-Sharpening in Modern Workflows

AI sharpening and denoising tools — Lightroom’s AI Denoise, Luminar Neo’s AI Enhance — apply corrections globally by default, creating unnatural textures that no competitor guide currently addresses. Lightroom’s AI Denoise at 100% removes noise effectively but also strips organic micro-texture and film grain, making images look plasticky. Luminar Neo’s AI Sky Replacement creates perspective mismatches when the replacement sky’s horizon angle doesn’t match the original shot.
The correct sequencing matters: apply denoise first, then sharpen afterward. Running sharpening before denoise amplifies noise alongside detail, compounding both problems. As of recent 2026 Lightroom updates, AI Denoise works non-destructively on RAW files — you can adjust the strength after the fact, which removes the previous excuse for applying it at maximum strength.
Correction Strategy: Cap AI Denoise at 50–70% for most images. Use AI Sharpen on the subject only via masking — not globally. Check AI Sky Replacements for horizon angle mismatch before export. For high-ISO hero shots intended for print, consider dedicated denoise software (DxO PureRAW 5) for the top 1% of your keepers.
Relying on Presets Over Style
Downloading and applying a VSCO or Lightroom preset pack becomes a substitute for learning what makes a photo look good — and every image starts to look like everyone else’s. Presets are a starting point, not a final edit.
What to Do Instead: For every preset you apply, change at least three parameters manually — exposure, white balance, and one colour grading adjustment. Over 30 days, you’ll notice your own preferences emerging. That’s the beginning of a personal style.
Genre-Specific Mistakes in Photography
Genre-specific photography mistakes compound general errors — landscape photographers face unique dynamic range and timing challenges that portrait work never demands (amateurphotographerguide.com, 2026). One important distinction runs through all three genres covered here: a technical error (shooting at f/16 when you wanted f/8) is different from a stylistic choice (intentional lens flare, intentional motion blur). This is only a mistake if it was unintentional. The Photography Diagnostic Stack applies across genres, but note that genre-specific mistakes often span multiple layers simultaneously — a landscape error can be both a composition problem and a lighting problem.
Common Landscape Photography Mistakes
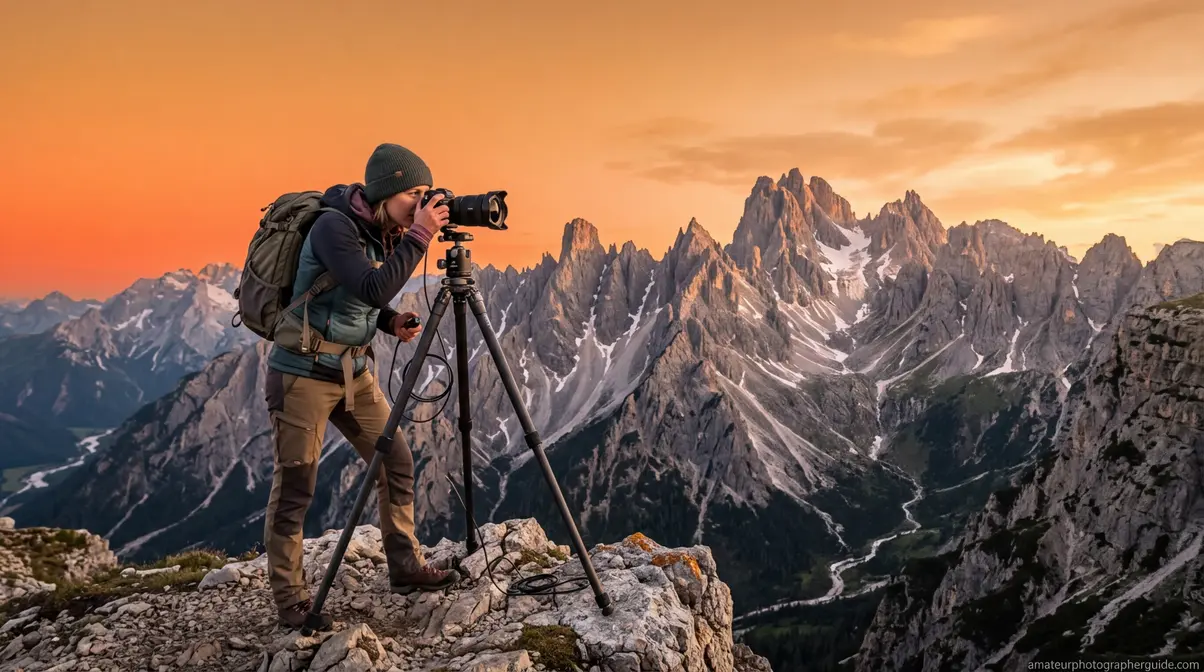
Mistake 20 — No foreground interest: Shooting a mountain range or coastline with an empty, uninteresting foreground. Introduce a leading line (path, river, rocks) or a textured foreground element (wildflowers, tide pools) to draw the viewer’s eye into the frame and create depth.
Mistake 21 — Shooting at the wrong time of day: Midday light is harsh and flat for landscapes. Shoot within the golden hour window — the 30 minutes before and after sunrise and sunset — for warm, directional light that adds depth and dimension. When shooting in national parks or wilderness areas, follow National Park Service guidelines on landscape photography safety on wildlife distances and staying on designated paths (National Park Service). Find out how to avoid landscape photography mistakes with a full breakdown of timing, composition, and gear.
Common Portrait Photography Mistakes
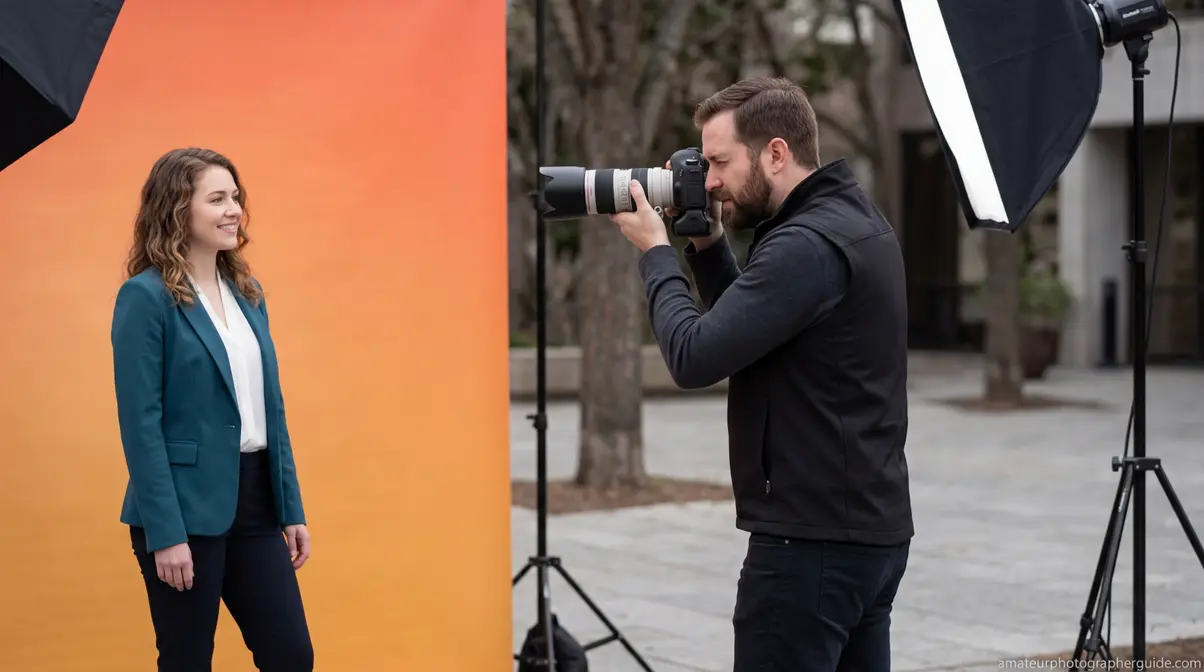
Mistake 22 — Shooting from the wrong angle: When the photographer is taller than the subject and shoots from standing height, the downward angle is unflattering — it foreshortens the subject and looks condescending. Crouch to the subject’s eye level or slightly below for a more dignified, flattering perspective.
Mistake 23 — Using harsh midday light: Overhead sun creates deep shadows under eyes and nose — the “raccoon eyes” effect. Fix: shoot in open shade (under a tree, beside a building) or during the golden hour. For outdoor portraits, position the subject with their back to the sun and use a white reflector or your camera’s built-in flash at -1 EV to fill the shadows. Read tips for capturing more flattering portraits for a complete guide to portrait lighting.
Common Film Photography Mistakes
Mistake 24 — Misunderstanding exposure latitude: Film handles a specific range of exposure. Most colour negative films tolerate 2–3 stops of overexposure but clip quickly on underexposure. The fix: expose for the shadows — slightly overexpose colour negative film by 1 stop for richer colours and more recoverable shadow detail.
Mistake 25 — Not shooting a test roll: Beginners load a new film stock and immediately shoot an important event. Fix: shoot one test roll of any new film stock in varied conditions (indoor, outdoor, bright, dim) before relying on it for anything that matters. Intentional grain, light leaks, and double exposures are NOT mistakes — they are stylistic choices. Only unintentional blur or exposure errors qualify as mistakes.
When Photography Rules Don’t Apply
Intentional Choices vs. Actual Mistakes
Several “mistakes” in this guide are actually legitimate stylistic choices when made deliberately. The diagnostic question for each: “Did I choose this, or did it just happen? If it happened by accident, it’s a mistake. If you chose it, it’s a style.”
- Four specific examples:
- Intentional motion blur — slow shutter speeds for waterfalls, light trails, and panning shots create deliberate dynamism, not failure
- Intentional grain / high ISO noise — film-emulation aesthetics and moody low-light photography use grain as a creative element
- Breaking the Rule of Thirds — symmetrical compositions and minimalist centred subjects work precisely because they break the rule intentionally
- Underexposure for mood — low-key photography and silhouettes depend on deliberate underexposure to achieve their effect
The common thread: intentionality. A crooked horizon is almost never intentional. A silhouette almost always is. Understanding the difference between a mistake and a stylistic choice empowers you to defend your creative vision. When you break a rule on purpose, the resulting image often carries a stronger emotional impact than a technically perfect but sterile shot.
When to Seek Better Gear
Two scenarios exist where gear genuinely limits improvement — these are not excuses, but real technical ceilings:
- Autofocus consistently fails in low light despite correct technique — the camera’s AF system is the limiting factor, not your skill
- Indoor photos are always noisy despite correct ISO use — the sensor’s high-ISO performance is the ceiling
The rule: upgrade when you’ve exhausted your technique options, not before. Most photographers reach this ceiling after 12–18 months of deliberate practice. If you find yourself constantly battling your equipment rather than focusing on composition and lighting, an upgrade might be justified. However, always ensure your foundational skills are solid before investing in expensive new bodies or lenses. If you’ve been shooting for three months and your photos are blurry, it’s technique — not the camera.
Frequently Asked Questions
Common Beginner Photography Mistakes?
The most common photography mistakes beginners make include relying entirely on Auto Mode, ignoring the Rule of Thirds, and shooting in harsh midday light. Failing to focus correctly and overexposing or underexposing images are also frequent errors. Most of these mistakes fall into four diagnostic categories — technical, composition, lighting, and post-processing — and each has a specific, learnable fix that doesn’t require new gear.
Making Photos Look Professional?
Professional-looking photos come from mastering three fundamentals: correct exposure (use the exposure triangle and histogram), strong composition (Rule of Thirds, clean backgrounds, fill the frame), and appropriate light (golden hour or open shade for portraits). Apply subtle post-processing rather than heavy saturation or clarity adjustments. These improvements cost nothing and are available on every camera — including smartphones.
Do I need an expensive camera for good photos?
No, you do not need an expensive camera to capture compelling images. Understanding light, composition, and basic exposure settings will improve your photography far more than buying a new camera body.
What is the rule of thirds in photography?
The rule of thirds is a foundational composition technique that divides your frame into a three-by-three grid. By placing your main subject along these grid lines or at their intersections, you create a more balanced and visually engaging photograph. It prevents the image from feeling static. Most digital cameras and smartphones offer a built-in grid overlay to help you practice this technique.
How do I get a blurry background in portraits?
To achieve a blurry background, also known as bokeh, you need to use a wide aperture like f/1.8 or f/2.8. Additionally, moving closer to your subject and ensuring there is plenty of distance between your subject and the background will maximize this effect. Using a longer focal length lens can also help compress the background and increase the blur.
Conclusion
For beginner-to-intermediate photographers, common photography mistakes fall into four diagnostic layers — technical, composition, lighting, and post-processing — and each has a specific, learnable fix. The Photography Diagnostic Stack provides a systematic way to identify which layer your specific problem lives in, rather than guessing. This guide covers 25 mistakes versus a competitor average of 11, and uniquely includes modern editing errors like AI over-sharpening and global clarity abuse that no other current resource addresses.
The 25 mistakes here aren’t a random list. The Photography Diagnostic Stack is structured so that fixing Layer 1 (technical) makes Layer 2 (composition) improvements more visible — because a sharp, correctly exposed photo reveals compositional weaknesses that a blurry one hides. At amateurphotographerguide.com, our evaluation of photography community data consistently shows that photographers who work through these layers in order improve faster than those who jump to advanced techniques without fixing the foundations.
Download the free Exposure Triangle Cheat Sheet to keep Layer 1 fixes at your fingertips on every shoot. Then pick one mistake from each layer and focus on it for the next two weeks — incremental improvement compounds faster than trying to fix everything at once.
Dave King
Hi, I'm Dave, the founder of Amateur Photographer Guide. I created this site to help beginner and hobbyist photographers build their skills and grow their passion. Here, you’ll find easy-to-follow tutorials, gear recommendations, and honest advice to make photography more accessible, enjoyable, and rewarding.