
Table of Contents
This blog post may contain affiliate links. As an Amazon Associate I earn from qualifying purchases.
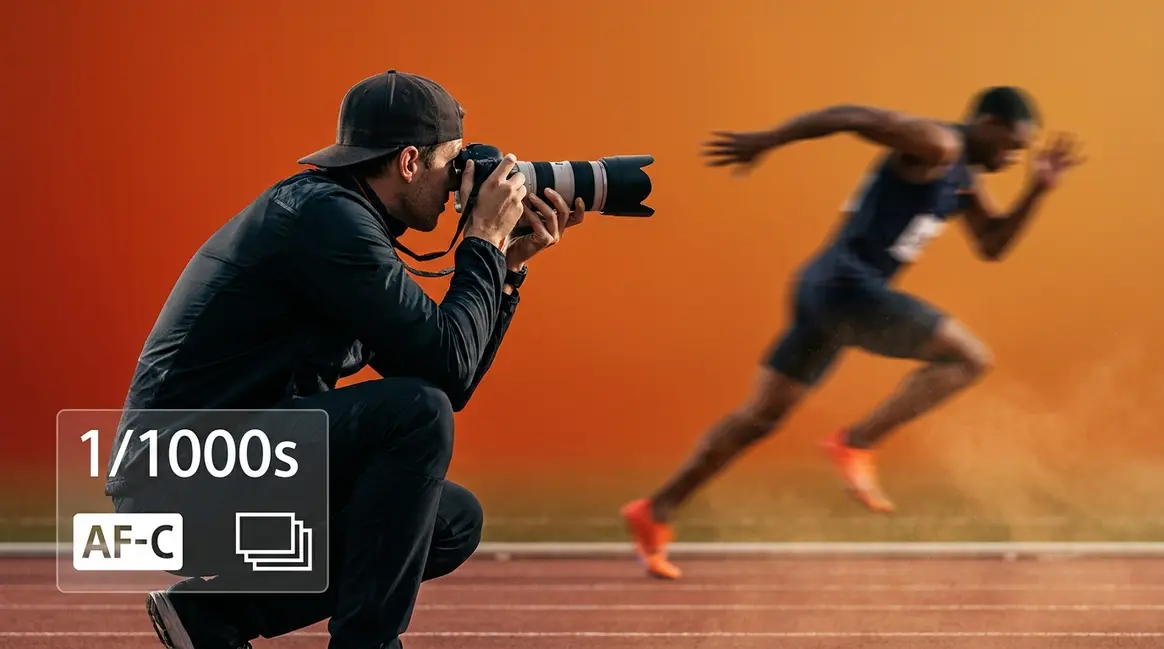
You pressed the shutter at exactly the right moment — your kid’s perfect jump, the ball mid-air — and the photo came out as a blur. It happens to almost every beginner who picks up a camera at a sports event.
“Played around with my camera today trying to really figure out these action shots for cheer season and lighting settings 😩 This ended up being one of my favorites though. Definitely still learning, but I can already see the difference when I slow down and actually pay attention.”
The problem is not your camera. It is not bad luck. It is three specific settings that most beginners never learn to configure correctly. In this guide, you will learn the exact action photography tips and settings — what we call The Freeze Formula — to capture sharp, dynamic photos every time, whether you are shooting cheer, hockey, wildlife, or anything in between. We will cover the foundational concepts, the core camera settings, advanced techniques, sport-specific scenarios, challenging environments, and the most common mistakes to avoid.
Action photography tips come down to three core settings — The Freeze Formula: fast shutter speed, continuous autofocus, and burst mode — that work together to eliminate blur and capture the peak moment every time.
- Shutter speed: Use 1/500s or faster to freeze most sports motion
- Autofocus mode: Switch to continuous AF (AF-C or AI Servo) to track moving subjects
- Burst mode: Hold the shutter to capture 8–20 frames per second at the peak moment
- F-stop: Shoot at f/2.8–f/5.6 to let in enough light for fast shutter speeds
- The Freeze Formula works in every environment — from indoor hockey rinks to outdoor cheer competitions
What Is Action Photography?

Action photography is the art of capturing subjects in motion — freezing a fraction of a second to reveal something the human eye cannot hold onto. Unlike portrait photography, where your subject holds still, action photography demands that your camera respond faster than the moment itself. If you are at a cheer competition, a hockey rink, or even a backyard with a dog at full sprint, you are already doing action photography.
Action photography covers any genre where the subject is in motion — from sports fields and wildlife reserves to cheerleading competitions and toy photography. Understanding the breadth of the genre helps you choose the right settings for your specific situation. In the next section, you will learn the action photography settings that form The Freeze Formula.
The Different Types of Action Photography
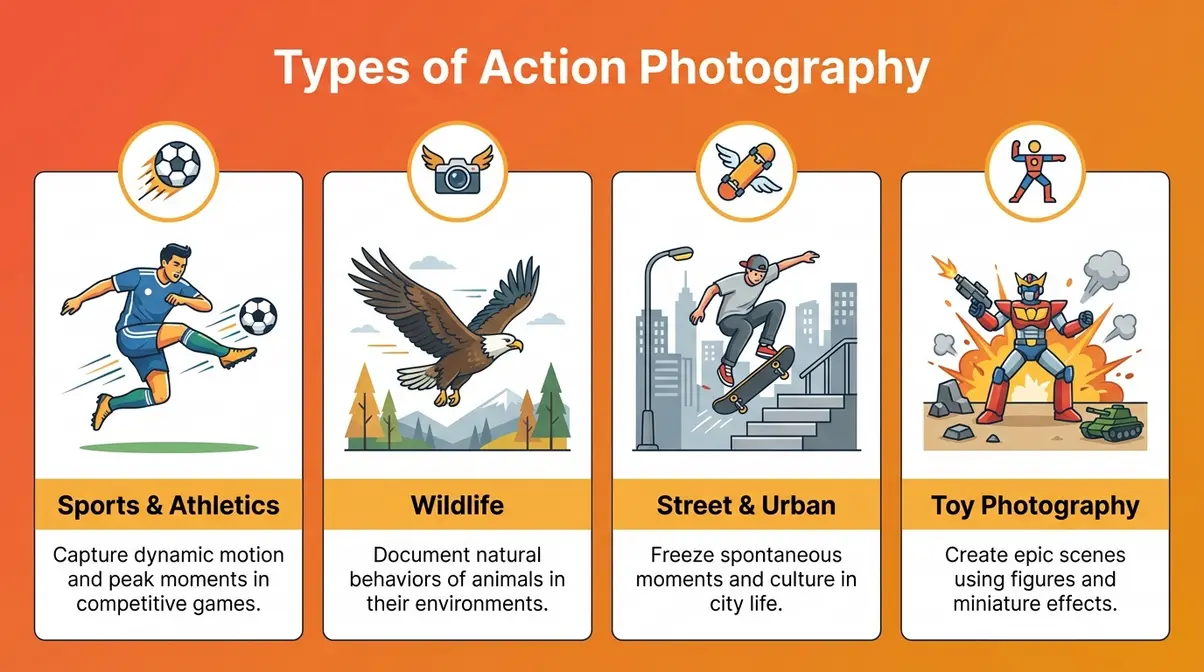
The main types of action photography share a common challenge: your subject refuses to hold still. Here is a quick map of the genre to help you identify your own niche:
- Sports and athletics — football, basketball, hockey, gymnastics, and cheerleading. This is where most beginners start, and it is the primary focus of this guide.
- Wildlife photography — birds in flight, animals running, fish jumping. The same fast-shutter principles apply; you just add camouflage and patience.
- Street and urban action — skateboarders, cyclists, dancers, and crowds in motion. Great for practicing timing without committing to a full sports event.
- Action figure / toy photography — a tabletop genre with its own unique challenges around lighting and depth of field.
If you are at a cheer competition or a hockey game this weekend, you are already an action photographer. Knowing your genre helps you dial in the right settings before you even raise the camera. For a deeper look at movement-specific techniques, explore our full guide on action photography techniques.
What Gear Do You Need to Get Started?
Good news: you do not need the most expensive gear to capture great action shots. Here is what matters:
- Camera body: Any DSLR (a camera type with a physical mirror inside) or mirrorless camera (a newer camera type without the internal mirror — typically faster at tracking subjects) with a manual mode will work. Modern mirrorless options from Sony’s Alpha series, Canon’s EOS R series, and Nikon’s Z series offer faster subject-tracking autofocus, which genuinely helps — but your existing camera is a perfectly fine starting point.
- Lens: A telephoto zoom lens (70–200mm or 55–250mm kit telephoto) is ideal for sports from the sidelines. A 50mm or 85mm works for closer action like a cheer floor or sideline basketball. A longer focal length (the number in “mm”) lets you zoom in from a distance without physically moving closer.
- Memory card: Use a fast card rated UHS-I or UHS-II, V30 or higher. Burst mode fires many frames per second — a slow card fills the camera’s internal buffer and freezes your shooting mid-action.
For a cheer competition, a 70–200mm f/2.8 lens is the gold standard among professional sports photographers. A 55–250mm kit lens at f/5.6 will still deliver solid results once you nail the settings in the next section.
Once you have your camera and lens ready, it is time to dial in the three settings that make up The Freeze Formula — starting with the most important one of all: shutter speed.
Master Your Camera Settings: The Freeze Formula
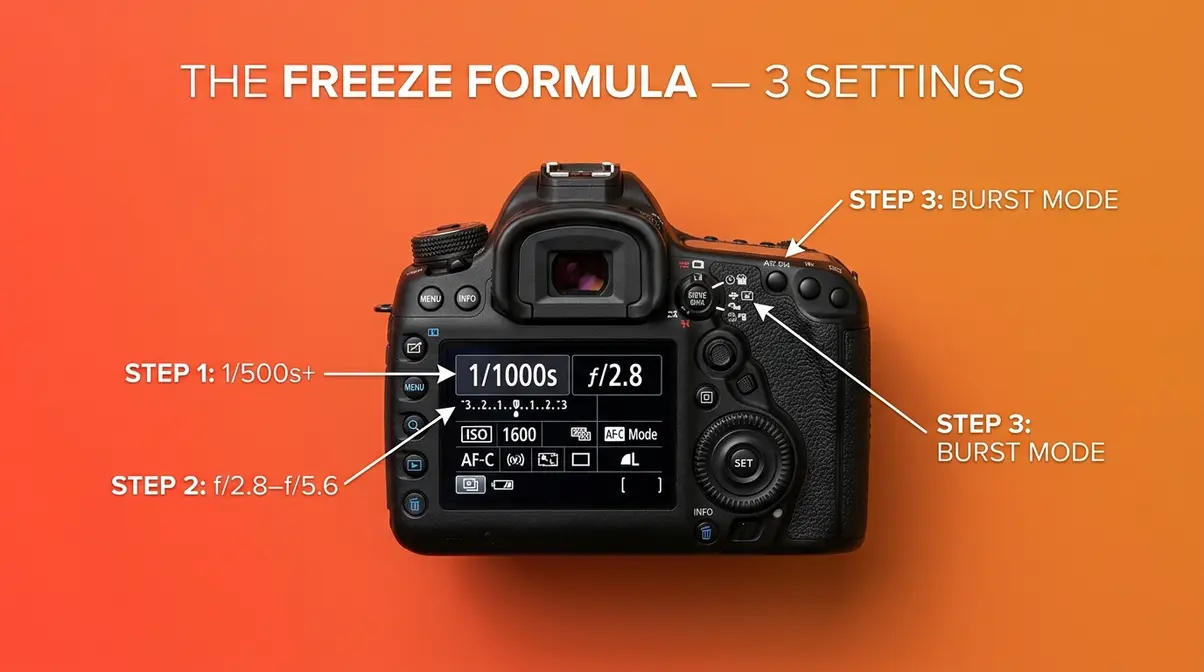
These are the action photography settings that separate sharp, frame-worthy shots from blurry disappointments. The Freeze Formula is a three-part camera configuration: (1) a shutter speed of 1/500s or faster, (2) continuous autofocus mode (AF-C or AI Servo), and (3) burst mode enabled. Together, these three settings eliminate the two most common causes of ruined action shots — motion blur and missed timing. Two supporting settings — aperture and ISO — give The Freeze Formula the light it needs to work. The goal of these tips for action photography is to stop action in its tracks, not to chase it after the fact.
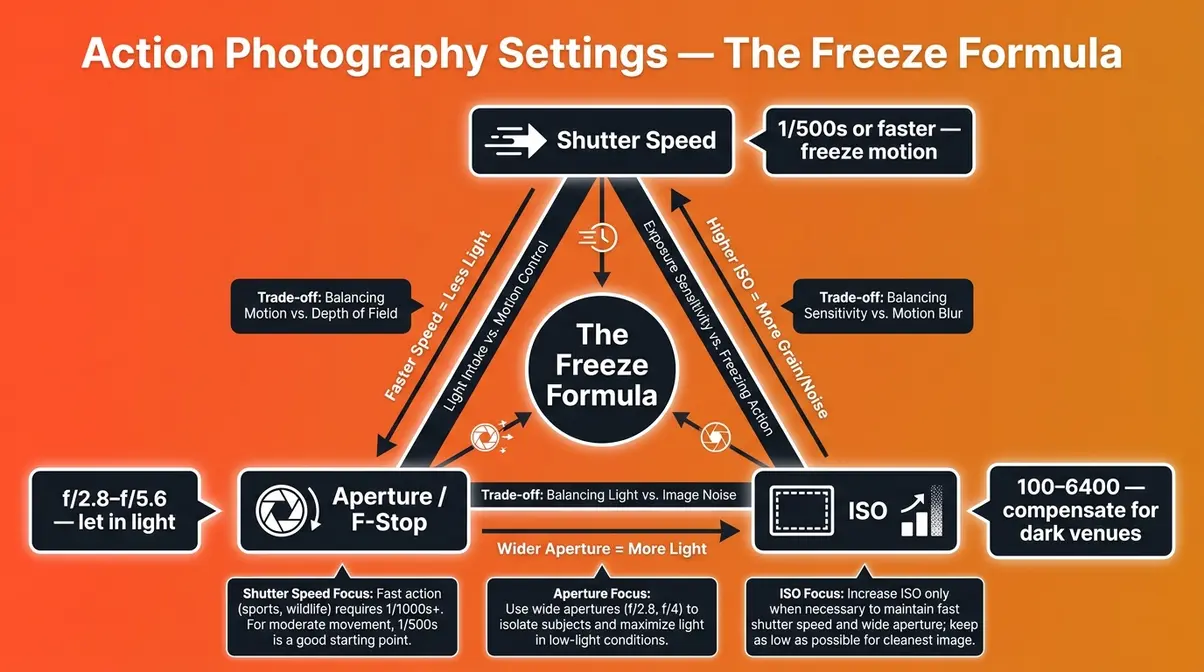
Shutter Speed: Your Most Important Setting
Shutter speed controls how long your camera’s sensor is exposed to light. A fast shutter speed means the sensor is exposed for a very short burst of time — freezing whatever is in front of it. A slow shutter speed means the sensor is exposed longer, and any movement during that time becomes a blur.
For action photography, use 1/500s or faster. Here is the practical breakdown:
- 1/500s — Freezes moderate motion: a cheerleader’s running approach, a basketball player dribbling, a dog mid-trot.
- 1/1000s — Freezes fast motion: a gymnast mid-flip, a hockey player at full stride, a soccer player striking the ball.
- 1/2000s — Freezes very fast motion: a sprinter at top speed, a bird in flight, a baseball pitch.
Freezing fast action typically requires a shutter speed of 1/500s or faster, depending on the subject’s velocity and distance from the lens (Stanford University CS 178). The farther away the subject, the slower the apparent motion — so a subject 100 feet away at 1/500s may look as sharp as a nearby subject at 1/1000s.
Why it matters: If your shutter speed is too slow, even a slight hand movement or a subject’s small gesture creates blur. Beginners often shoot at 1/60s or 1/125s — settings designed for still portraits — and wonder why every sports photo looks smeared. The fix is simple: push that number up.
Beginner warning: A faster shutter speed lets in less light. This means you will need to compensate with a wider aperture (lower f-stop number) or a higher ISO — both covered in the next two H3 sections. Learn how shutter speed interacts with your full camera settings in our how to capture motion with shutter speed guide.
Aperture (F-Stop): Control Light
Aperture is the opening inside your lens — measured as an f-stop number like f/2.8 or f/5.6. Here is the counterintuitive part: a smaller f-stop number means a wider opening, which lets in more light.
For action photography, shoot at f/2.8–f/5.6. This range lets in enough light to support fast shutter speeds and creates a pleasantly blurred background (called “bokeh”) that isolates your subject from a busy gym or sideline crowd. If you are unsure how this works, read our guide on what f-stop does on a camera.
| F-Stop | Light Admitted | Background Blur | Best For |
|---|---|---|---|
| f/2.8 | Maximum | Strong blur | Indoor sports, low-light events |
| f/4 | Moderate | Soft blur | Outdoor sports on overcast days |
| f/5.6 | Less | Mild blur | Bright outdoor events, kit lenses |
| f/8+ | Minimal | Sharp background | Landscape-style action, bright sun |
Why it matters: Most kit lenses max out at f/5.6 when zoomed in. That is still workable in good light — but if you are indoors under gymnasium lighting, f/5.6 may force your ISO uncomfortably high. This is why professional sports photographers invest in f/2.8 telephoto lenses. For now, use whatever your lens offers at its widest setting. According to Adobe’s photography resources, shooting wide open (your lens’s lowest f-stop) is the single most effective way to compensate for the light lost at fast shutter speeds (Adobe, 2026).
Beginner warning: At f/2.8, your depth of field (the range of the image that appears sharp) is very shallow. If your subject moves toward or away from you quickly, they can slip out of focus. This is exactly why continuous autofocus is the third pillar of The Freeze Formula.
ISO: Compensating for Low Light
ISO is your camera’s sensitivity to light. A higher ISO number means the sensor amplifies the available light — useful when you are stuck in a dim gymnasium but need a fast shutter speed.
Recommended ISO values by environment:
- Bright outdoor (sunny day): ISO 100–400
- Overcast outdoor or shaded sideline: ISO 400–800
- Indoor gymnasium or arena: ISO 1600–6400
- Very dark indoor venue (hockey rink with poor lighting): ISO 3200–12800
Why it matters: Raising ISO introduces digital noise (grain) into the image. This used to be a dealbreaker, but modern AI noise reduction tools — built into Adobe Lightroom, Topaz DeNoise AI, and DxO PhotoLab — can dramatically clean up high-ISO images in post-processing. Across professional photography communities, the consistent advice for indoor action photography tips is: do not be afraid of ISO 3200 or higher. A sharp, slightly noisy image is always preferable to a blurry, technically “clean” one.
Beginner warning: Shoot in RAW format (not JPEG) whenever possible. RAW files retain far more image data, which gives AI noise reduction tools much more to work with. If you have never shot RAW before, check your camera’s image quality menu — it is usually one setting change.
Autofocus Mode and Burst Mode: Never Miss the Shot
The first two pillars of The Freeze Formula handle blur. These final two handle timing.
Continuous autofocus, called AF-C on Sony and Nikon cameras, or AI Servo on Canon, tells your camera to keep tracking a moving subject as long as you hold the shutter button halfway down. Single-shot AF (the default on most cameras) locks focus once and stops — perfect for portraits, disastrous for sports.
- How to switch to continuous AF:
- Find the AF mode button on your camera body (often labeled “AF” or accessed through the quick menu).
- Select AF-C (Sony/Nikon) or AI Servo (Canon).
- On modern mirrorless cameras, also enable subject recognition or eye/face tracking in the AF settings — this uses AI to lock onto athletes and hold them in focus even through a crowd.
Burst mode fires multiple shots per second while you hold the shutter button down. Modern mirrorless cameras shoot 8–20 frames per second (fps); many DSLRs shoot 5–10 fps. This dramatically increases your odds of capturing the exact peak moment — the highest point of a jump, the ball at the moment of contact.
- How to enable burst mode:
- Find the drive mode button (often an icon showing stacked rectangles or a film strip).
- Select High-Speed Burst or Continuous High.
- Hold the shutter button through the peak of the action rather than tapping it once.
Back-button focus is an advanced technique worth mentioning: reassigning autofocus from the shutter button to a button on the back of the camera (usually labeled “AF-ON”). This separates focusing from shooting, giving you more precise control. Professional sports photographers widely recommend it once you are comfortable with the basics. Our dedicated guide walks through how to set up back-button focus step by step.
The full Freeze Formula in one sentence: set your shutter to 1/500s or faster, switch to AF-C or AI Servo, and hold down the shutter in burst mode at the peak moment. Now let’s look at the techniques that take you beyond technically sharp and into genuinely dynamic imagery.
What is the 80/20 rule in photography?
The 80/20 rule in photography states that 80% of your best images will come from 20% of your technical decisions — specifically, getting shutter speed and autofocus right accounts for the vast majority of action photography success. Most photographers interpret the rule practically: spend 80% of your learning time mastering the two or three settings that matter most (shutter speed, AF mode, burst mode) rather than spreading effort across every possible camera feature. Mastering The Freeze Formula is a direct application of the 80/20 rule — three settings, most of your results.
Techniques for Dynamic Action Shots
Sharp is the baseline. Dynamic is the goal. Once The Freeze Formula handles your technical settings, these three techniques determine whether your photos feel alive or static. Professional sports photographers consistently report that beginners who master the settings but neglect technique produce technically perfect but emotionally flat images (Digital Photography School, 2026).
The Panning Technique: Show Speed with Motion Blur
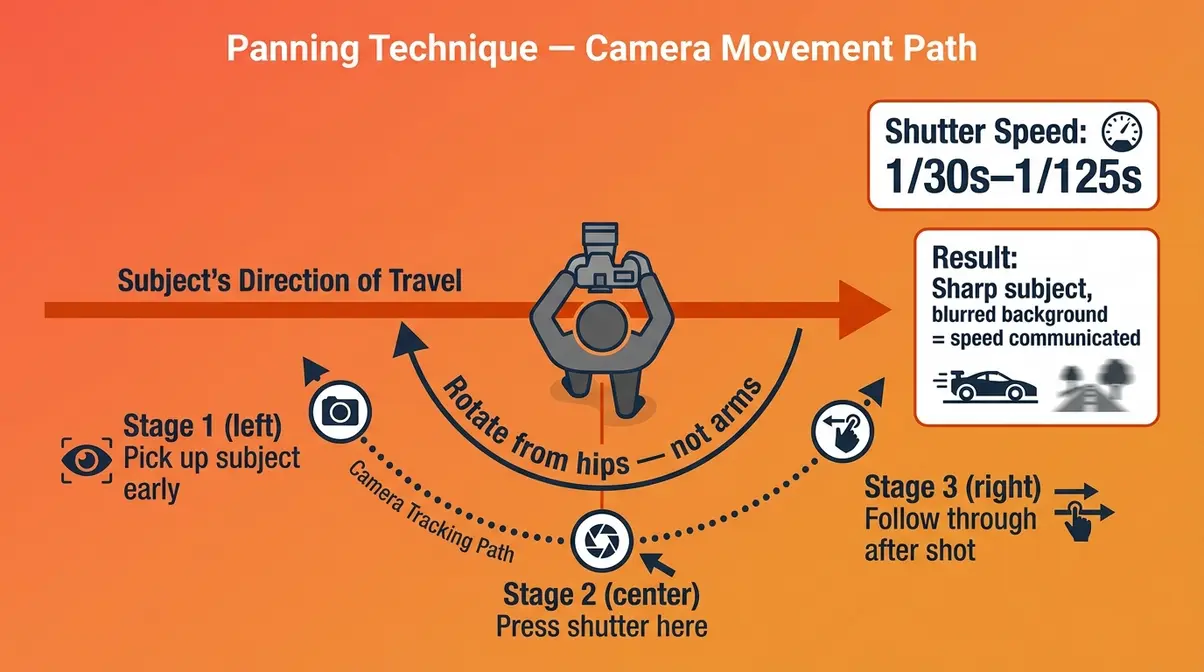
Panning is the art of moving your camera with the subject while using a slower shutter speed — creating a sharp subject against a blurred background that screams speed. It is the opposite of The Freeze Formula, and it is intentional. For a deeper dive, check out our panning photography beginner’s guide.
- How to pan:
- Set your shutter speed to 1/30s–1/125s (much slower than freeze settings).
- Stand perpendicular to your subject’s path of travel.
- Pick up the subject in your viewfinder before they reach your frame.
- Rotate your body smoothly from the hips — not just your arms — tracking the subject as they pass.
- Press the shutter at the moment they are directly in front of you, continuing the follow-through motion after the shot.
Why it matters: A perfectly frozen shot of a skateboarder looks like a statue. A panning shot with a blurred background communicates that the skateboarder is moving. The technique requires practice — expect a 10–20% keeper rate at first, which is completely normal.
Beginner tip: Try panning with cyclists or runners first. Their path is predictable and their speed is moderate — ideal for building muscle memory before attempting it at a hockey game.
Anticipation and Timing: Capture the Peak Moment
The best action photographers do not react to the peak moment — they predict it. This skill, called anticipation, is what separates a mediocre burst sequence from a single frame-worthy image.
- How to develop anticipation:
- Study the sport before you shoot. A cheerleader’s stunt sequence has a predictable arc — the flyer goes up, reaches the peak, comes down. Pre-focus on where the peak will happen, not where the subject currently is.
- Use burst mode as a safety net, not a crutch. Hold the burst trigger through the anticipated peak, but try to consciously “feel” the moment as it happens. Over time, your timing will sharpen.
- Pre-focus on a spot. For predictable action (a hurdle, a goal crease, a cheer mat), switch to single-shot AF, pre-focus on the exact spot where the action will happen, then switch back to burst mode and fire as the subject enters that zone.
According to photographymc.com’s analysis of professional sports technique, the photographers who consistently capture peak-moment images are the ones who have watched the sport long enough to anticipate the action rather than chase it. Anticipation is a skill that compounds — the more events you shoot, the sharper your instincts become.
Composition Rules That Make Action Shots Dynamic
Your subject is sharp and perfectly timed. Now make the frame itself compelling. Mastering these basics is essential; learn more in our composition in photography guide.
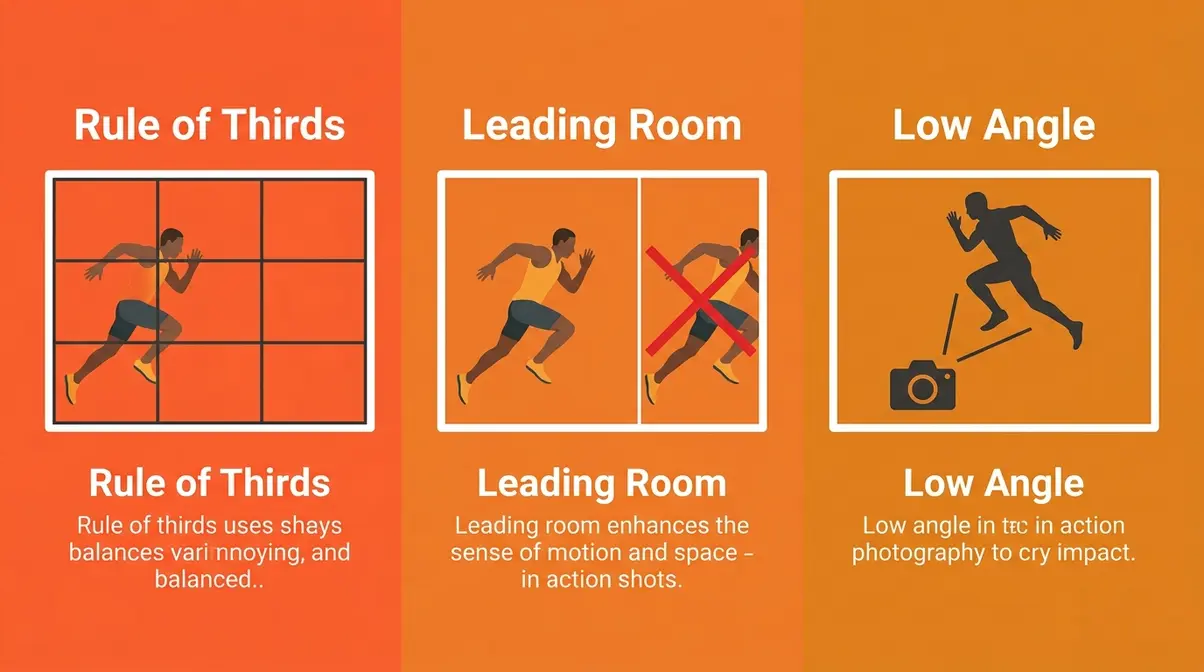
Rule of Thirds: Place your subject off-center — at one of the four intersection points of an imaginary 3×3 grid over your frame. A centered subject feels static; an off-center subject feels in motion.
Leading room: Leave space in front of the direction your subject is moving. A sprinter running toward the right edge of the frame feels trapped. Repositioning them to the left third of the frame, with open space ahead, communicates forward momentum.
Background awareness: A cluttered background competes with your subject. Use a wide aperture (f/2.8–f/4) to blur it, or physically reposition yourself so a clean wall, sky, or grass fills the background behind your subject.
Shoot from a low angle: Getting down to your subject’s level — or even below it — makes athletes look powerful. A cheerleader photographed from ground level looks like she is launching into the sky. The same shot from eye level looks ordinary.
Sport-Specific Action Photography Tips
The Freeze Formula is universal. But each sport has its own lighting quirks, timing rhythms, and positioning challenges. These sport-specific action photography tips help you apply the formula with precision.
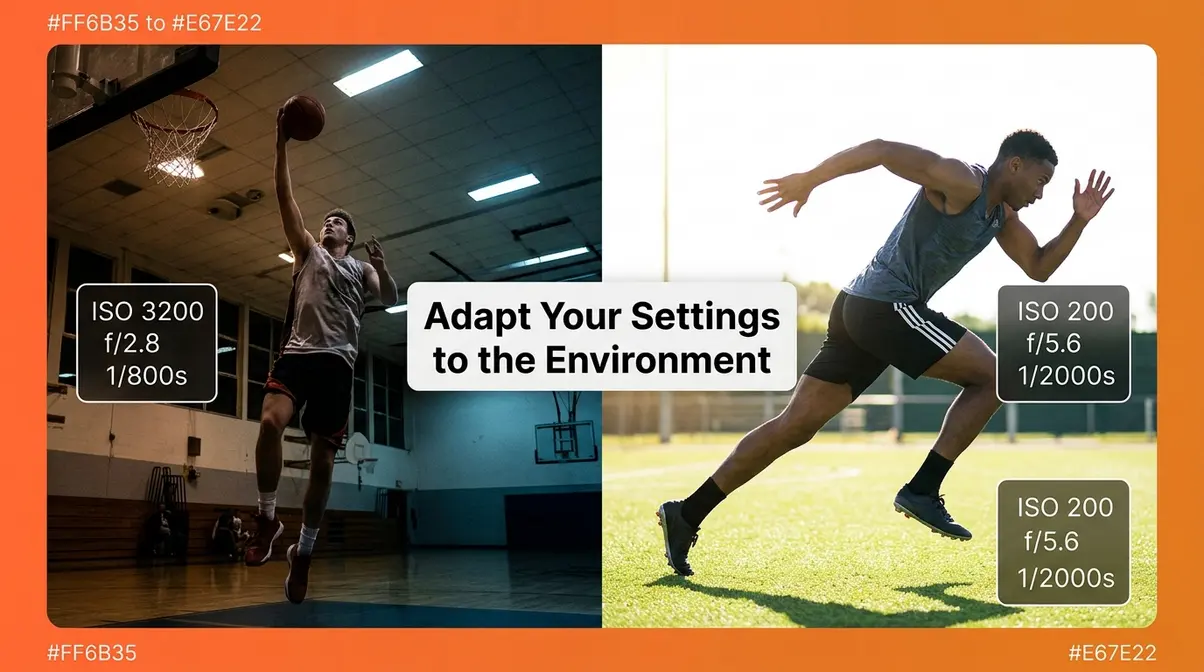
Indoor Sports: Hockey, Basketball, and Gymnastics
Indoor venues are the hardest environment for beginners. The lighting is often dim, uneven, and sometimes flickering — exactly the conditions that force you to push ISO high and widen your aperture.
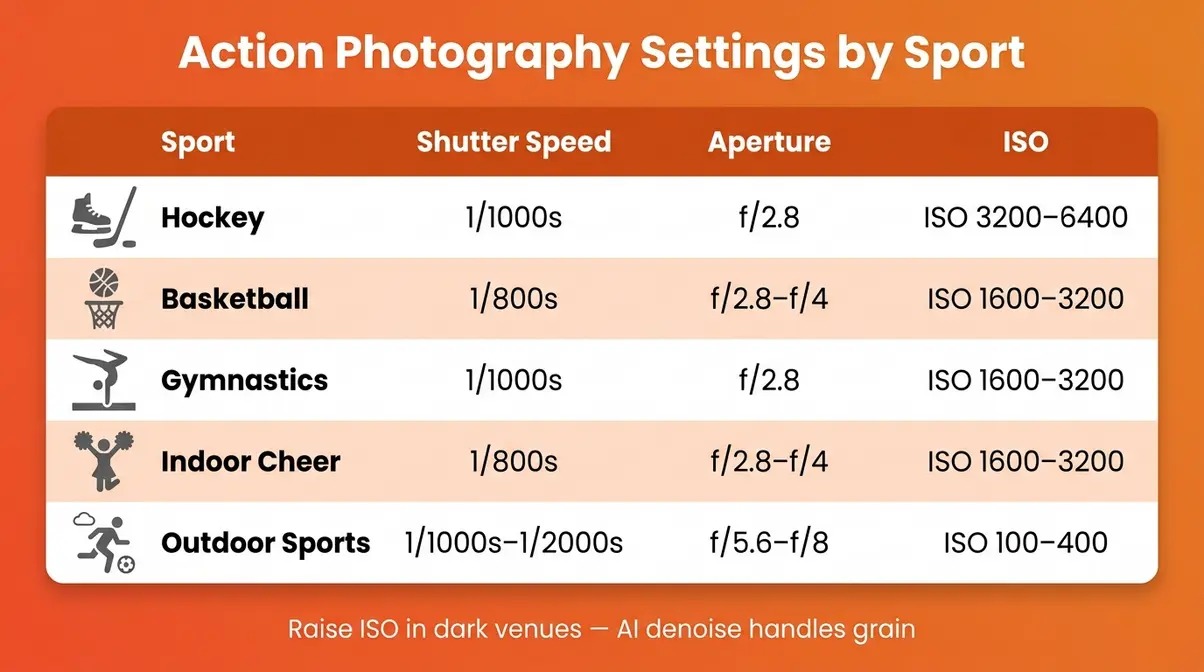
Recommended settings for indoor sports:
| Sport | Shutter Speed | Aperture | ISO | Notes |
|---|---|---|---|---|
| Hockey | 1/1000s | f/2.8 | 3200–6400 | Glass reflection — shoot from side, not end |
| Basketball | 1/800s | f/2.8–f/4 | 1600–3200 | Watch for jump cut moments |
| Gymnastics | 1/1000s | f/2.8 | 1600–3200 | Anticipate peak of each skill |
| Indoor Cheer | 1/800s | f/2.8–f/4 | 1600–3200 | LED stage lighting varies widely |
Hockey-specific note: Shooting through the glass at a hockey rink introduces reflections. Minimize this by pressing your lens hood against the glass to block ambient light from behind you. Modern mirrorless cameras with subject-recognition AF track skaters through the glass surprisingly well.
For a deeper dive into challenging indoor environments, Digital Photography School’s guide to bad-light action photography covers additional techniques for venues with mixed or flickering lighting.
Outdoor Sports and Cheerleading
Outdoor shooting is more forgiving — natural light lets you use lower ISO values and still maintain fast shutter speeds. But it introduces its own challenges: harsh midday sun, changing cloud cover, and backgrounds that shift as you move around the field.
Recommended settings for outdoor sports:
- Bright sun: 1/1000s–1/2000s, f/5.6–f/8, ISO 100–400
- Overcast or shade: 1/500s–1/800s, f/2.8–f/4, ISO 400–800
- Golden hour (early morning / late afternoon): 1/500s, f/2.8, ISO 400–800 — the most flattering light for action photography
- Cheerleading-specific tips:
- Competitions are typically held in LED-lit gymnasiums or outdoor fields. For indoor cheer competitions, use the indoor sports settings above.
- Outdoor cheer practice often happens in harsh midday sun — use a fast shutter (1/2000s) and position yourself so the sun is behind you, not behind your subject.
- The peak moment in a stunt is the top of the flyer’s ascent — pre-focus on the space above the bases and fire burst mode as the flyer approaches that point.
For a well-structured walkthrough of the fundamentals, photographymc.com’s 9-step action photography guide reinforces many of these outdoor techniques with additional scenario examples.
Know Your Sport: The Secret Weapon
No camera setting compensates for not understanding what you are photographing. Across professional photography communities, sports photographers consistently identify sport knowledge as the most underrated skill in their toolkit. Follow our action photo shooting steps guide for a structured approach.
Why this matters: Every sport has a rhythm — a predictable sequence of moments that repeat. A basketball player’s shot has a wind-up, a release, and a follow-through. A cheerleader’s stunt has a prep, a load, a peak, and a catch. If you know the rhythm, you can pre-focus and pre-fire at the right moment instead of reacting after it passes.
- How to build sport knowledge fast:
- Watch 15–20 minutes of the sport on video before your first shoot, paying attention to where the “peak moments” happen spatially.
- Arrive early and watch a few minutes of warm-ups with your camera down.
- Talk to coaches or parents about the typical sequence of events — they will tell you exactly when and where the action concentrates. For expert-level technique inspiration, Jeff Vogan’s sports photography blog documents how professional sports photographers approach pre-shoot preparation.
Shooting in Challenging Environments
Some of the most memorable action shots happen in the most difficult lighting conditions. These tips help you adapt The Freeze Formula when the environment refuses to cooperate.
Indoor and Low-Light Action Photography
Indoor action photography tips come down to one core trade-off: you need a fast shutter speed, but dim light punishes fast shutter speeds with dark, underexposed images. Review these 7 essential low-light photography tips for beginners for more help. The solution is a three-part compensation:
- Open your aperture as wide as it goes (lowest f-stop number on your lens).
- Push your ISO to 1600–6400 without fear — modern AI noise reduction handles this.
- If the image is still too dark, try Shutter Priority mode (Tv on Canon, S on Sony/Nikon): set your shutter speed and let the camera choose the aperture and ISO automatically. This is a useful training-wheels mode for beginners in difficult light.
AI noise reduction workflow: After the shoot, import your RAW files into Adobe Lightroom and use the AI Denoise feature (Photo > Enhance > Denoise). For even more aggressive noise removal, Topaz DeNoise AI processes images that Lightroom cannot fully clean. Across professional photography communities, AI denoise tools have fundamentally changed the calculus of indoor sports photography — ISO 6400 images that would have been unusable three years ago are now publishable.
Flicker compensation: Many indoor venues use LED or fluorescent lighting that flickers at 60Hz (or 50Hz in some countries). Some cameras offer an Anti-Flicker or Flicker Reduction mode in the drive menu — enable it if available. It syncs your shutter to the light’s peak brightness cycle, reducing the uneven exposure that creates one bright frame and one dark frame in the same burst sequence.
Action Camera Photography Tips
Action cameras (GoPro, DJI Osmo Action, Insta360) are wide-angle, rugged, and built for immersive point-of-view footage — but getting great still images from them requires a different mindset. If you need gear recommendations, see our review of the best budget action camera tested in real adventures.
- Key action camera photography tips:
- Use ProRes or RAW photo mode if your camera supports it — the automatic JPEG processing often crushes shadow detail.
- Set a fast shutter speed (1/1000s or higher) even in video mode, using the manual exposure settings.
- Mount position matters more than settings: A chest mount gives a dynamic runner’s-eye view; a helmet mount is immersive but can look disorienting. For still photos, a low angle (ground level or waist height) often produces the most dramatic perspective.
- HyperSmooth stabilization (GoPro) or RockSteady (DJI) reduces blur from camera shake — leave it enabled for all action shooting.
Action Figure Photography: Making Small Subjects Look Epic
Action figure photography (also called toy photography) applies all the same principles of motion and dynamism — but your “subject” is stationary and your “action” is implied through posing, lighting, and composition.
- Tips for epic action figure shots:
- Shoot at eye level or below your figure. A low angle makes a 6-inch figure look life-sized.
- Use a wide aperture (f/2.8–f/4) to blur the background and create depth.
- Use a single directional light source (a small LED panel or even a desk lamp with a diffuser) to create dramatic shadows that imply motion and power.
- Add practical effects: A small fan creates motion blur in a fabric cape; a spray bottle creates rain or splashing water effects.
- Shoot outdoors for natural backgrounds — forests, urban streets, and dirt paths make compelling environments for action figure photography.
What colors do not photograph well in action settings?
Colors that absorb light and lack contrast tend to photograph poorly in action settings. Dark navy, dark brown, and black uniforms against dark backgrounds (a black hockey board, a dark gymnasium floor) are notoriously difficult — they lack contrast and tend to become muddy at high ISO values. Neon yellow-green can blow out (overexpose) under bright LED stage lighting. White uniforms under harsh overhead light can lose all detail in the highlights. The fix in all cases is to meter for the subject’s face or torso rather than the uniform, and to shoot RAW so you can recover highlight and shadow detail in post.
Common Mistakes to Avoid
Understanding what goes wrong is just as valuable as knowing what to do right. These are the mistakes that consistently appear across beginner photography communities — and the fixes are all straightforward once you know to look for them.
The 5 Most Common Beginner Mistakes
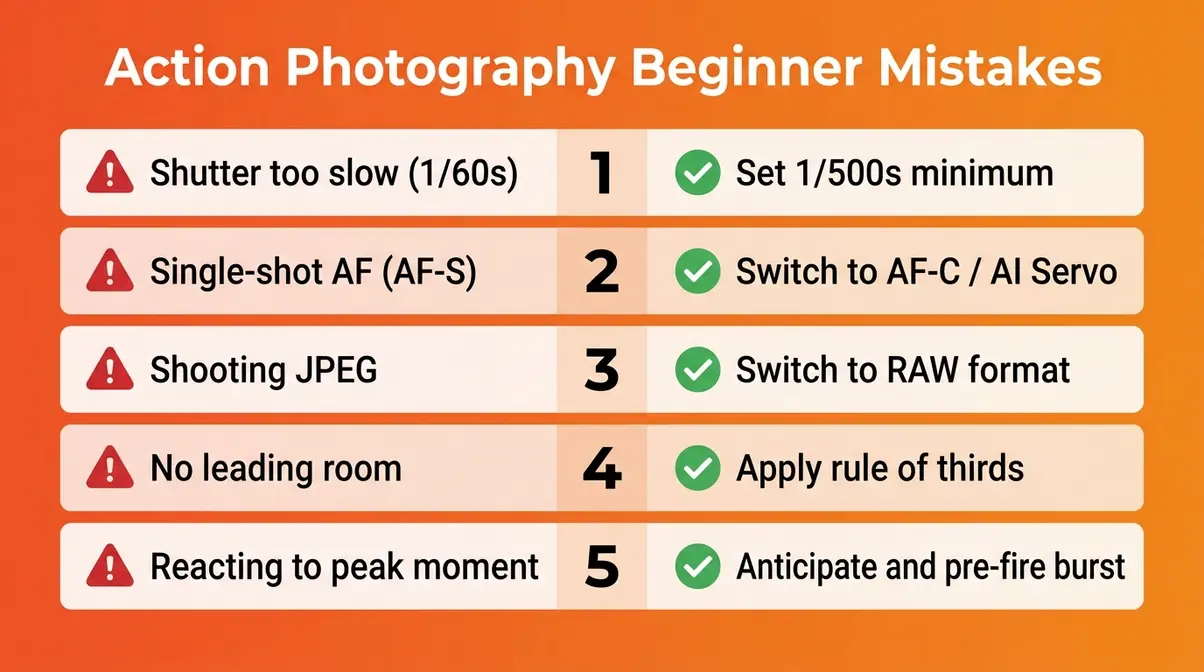
Mistake 1: Shutter speed is too slow.
This is the single most common cause of blurry action photos. Beginners leave the camera in Auto mode, which often selects 1/60s–1/125s for indoor scenes — far too slow for sports. Fix: Switch to Shutter Priority or Manual mode and set 1/500s as your floor.
Mistake 2: Using single-shot autofocus (AF-S) instead of continuous (AF-C).
Single-shot AF locks focus once, then stops. The moment your subject moves, the focus does not follow. Fix: Switch to AF-C (Sony/Nikon) or AI Servo (Canon) before the action starts — not during it.
Mistake 3: Shooting in JPEG instead of RAW.
JPEG files are processed in-camera and compress away the image data you need for noise reduction and exposure recovery. Fix: Switch to RAW in your image quality settings. Your files will be larger, but your editing flexibility will be dramatically greater.
Mistake 4: Not leaving room in front of the subject.
A subject moving toward the edge of the frame feels cramped and uncomfortable. Fix: Apply the “leading room” rule — position your subject in the third of the frame opposite to the direction they are moving.
Mistake 5: Waiting for the peak moment instead of anticipating it.
By the time your brain registers “that’s the moment,” your finger has already pressed the shutter a fraction of a second too late. Fix: Start burst mode just before the anticipated peak — a half-second early is better than a half-second late.
When to Try a Different Approach
The Freeze Formula is the right tool for most action photography situations. But it is not always the right tool.
When to use panning instead: If your subject is moving laterally at a consistent speed (cyclists, runners, cars), panning at 1/30s–1/60s often produces more compelling images than a frozen shot. The motion blur communicates speed in a way a freeze cannot.
When to slow down intentionally: Waterfall photographers, dancers, and some street photographers use intentionally slow shutter speeds (1/15s–1/2s) to create ethereal motion blur as an artistic choice. If your goal is art rather than sports documentation, blur can be the point.
When your lens limits you: If your kit lens tops out at f/5.6 and you are in a dark gymnasium, you may not be able to achieve a clean shot at 1/800s without unacceptable noise. In that case, lower your shutter speed to 1/500s and accept that some frames will have slight motion blur — a slightly soft shot is still better than a black frame.
Frequently Asked Questions
What are the top action photography tips for beginners?
The most effective action photography tips for beginners center on three settings: a fast shutter speed (1/500s or faster), continuous autofocus (AF-C or AI Servo), and burst mode. These three form The Freeze Formula, and they address the two root causes of bad action photos — motion blur and missed timing. Beyond settings, anticipating the peak moment and understanding your sport’s rhythm will improve your results faster than any gear upgrade. Start with Shutter Priority mode if Manual feels overwhelming, and move to full Manual once you are comfortable.
What is the 30/60 rule in photography?
The 30/60 rule is a shutter speed guideline for video and photography: your shutter speed should be approximately double your frame rate to achieve natural-looking motion. For video at 30fps, use 1/60s ((https://www.adobe.com/creativecloud/video/discover/shutter-speed-for-video.html)). For action stills where you want a slight, natural sense of motion rather than a completely frozen frame, 1/60s can work for slow-moving subjects. For sports and fast action, however, this rule does not apply — you want to exceed the 30/60 guideline significantly, pushing to 1/500s–1/2000s to fully freeze the subject.
What are the best F-stops for action photos?
The best f-stops for action photography are f/2.8–f/5.6 ((https://digital-photography-school.com/13-tips-for-doing-action-photography-in-bad-light/)). A wide aperture (lower f-stop number) admits more light, which allows you to use a faster shutter speed without raising ISO excessively. For indoor sports in dim lighting, f/2.8 is ideal — it is why professional sports photographers use expensive f/2.8 telephoto lenses. For bright outdoor events, f/4–f/5.6 is sufficient and gives you a slightly deeper depth of field, which helps keep fast-moving subjects in the focal plane even if they shift toward or away from you mid-burst.
What are the 5 C’s of photography?
The 5 C’s of photography are Composition, Color, Contrast, Clarity, and Creativity. In action photography specifically: Composition means using the rule of thirds and leading room; Color means understanding how your white balance and venue lighting affect your subject’s skin tones and uniform colors; Contrast means using light direction to separate your subject from the background; Clarity means achieving sharp focus through The Freeze Formula; and Creativity means making intentional choices — like panning or a low angle — that elevate a technically correct shot into a memorable image.
How do you get sharp action photos in low light?
To get sharp action photos in low light, you must balance a fast shutter speed with maximum light intake. Start by opening your aperture as wide as possible, such as f/2.8 or f/4, to let in the most light. Next, raise your ISO significantly—often to 3200 or 6400—to compensate for the fast shutter speed required to freeze motion. While this introduces digital noise, modern AI noise reduction software can easily clean up the image in post-processing. A slightly grainy but sharp photo is always better than a clean but blurry one.
What is the panning technique in photography?
The panning technique involves tracking a moving subject with your camera while using a slower shutter speed. Typically shot between 1/30s and 1/125s, this method keeps the subject relatively sharp while blurring the background into streaks of color. It is highly effective for conveying a sense of speed in sports like cycling or motorsports. To execute it properly, rotate smoothly from your hips and continue following the subject even after you press the shutter.
Conclusion
For beginner photographers shooting cheer seasons, hockey games, or any fast-moving subject, action photography tips ultimately reduce to three decisions made before you raise the camera: how fast is your shutter, which autofocus mode is active, and is burst mode on. The Freeze Formula — shutter speed at 1/500s or faster, continuous AF engaged, burst mode firing — eliminates the two root causes of failed action shots in every environment, from a sun-drenched outdoor competition to a dim gymnasium with flickering LEDs.
The Freeze Formula is not a shortcut. It is a framework that removes the guesswork so you can focus on the part of photography that actually matters: being present, reading the rhythm of the sport, and pressing the shutter at the right moment. Every tip in this guide — panning, anticipation, sport-specific settings, AI denoise workflows — builds on that three-part foundation.
Your next step: pick one upcoming event — a practice session, a game, a backyard sprint — and commit to shooting it entirely with The Freeze Formula dialed in. Set 1/1000s, switch to AF-C, enable burst mode, and spend 30 minutes doing nothing but holding the shutter through the peak of each action. Review your frames afterward with the settings checklist from this guide in hand. One focused session with the right settings will teach you more than a month of shooting on Auto.
