
Table of Contents
This blog post may contain affiliate links. As an Amazon Associate I earn from qualifying purchases.
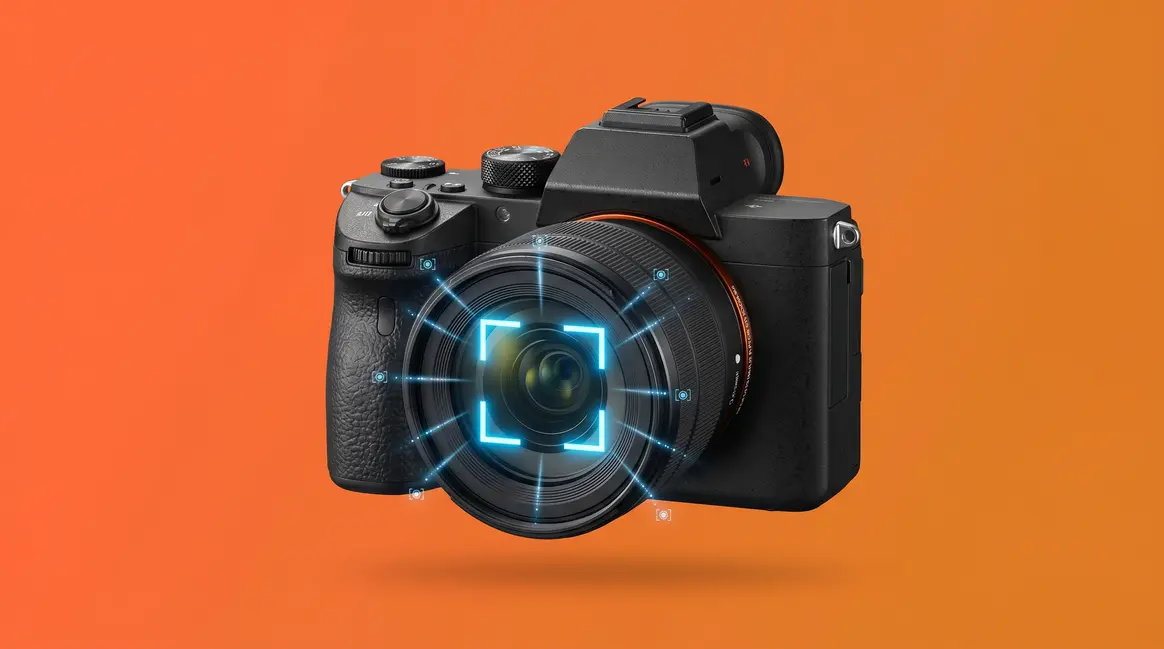
Have you ever half-pressed your shutter button and watched a little square snap onto your subject, wondering what just happened inside your camera? You’re not alone. One curious beginner put it perfectly:
“I’m a complete clueless about cameras (aperture, megapixels…) So I’m curious, how does a camera know it has focused properly?”
That question is exactly what this guide answers. Understanding how autofocus works isn’t just for engineers — it’s the single most useful piece of camera knowledge a beginner can have. Once you see the logic behind it, blurry photos stop feeling like mysterious accidents and start feeling like solvable puzzles.
This guide walks you through how autofocus works from the ground up, using the “AF Technology Ladder” — a mental model that shows how autofocus evolved from a single clever trick into the AI-powered tracking system in your camera today. You’ll learn the core mechanics, explore every major AF type, and finish with practical techniques you can use on your very next shoot.
How autofocus works is a story of smart light-reading: your camera measures contrast, phase differences, or reflected signals to calculate exactly where to move the lens for a sharp image.
- Phase detection AF is fast because it calculates focus direction and distance in a single step — no guessing required.
- Contrast detection AF is precise but slower — it rocks the lens back and forth until sharpness peaks.
- AI autofocus (Eye AF, deep learning tracking) uses neural networks trained on millions of images to predict where subjects will move next.
- The AF Technology Ladder shows how each generation built on the last — understanding it helps you choose the right AF mode for any situation.
What You’ll Need to Know First
Quick orientation: This guide assumes zero prior knowledge. You don’t need to understand aperture, ISO, or shutter speed. The only thing you need is a camera — phone, mirrorless, or DSLR — and curiosity about why it sometimes focuses perfectly and sometimes doesn’t.
What Is Autofocus and How Does It Actually Work?
Autofocus is your camera’s ability to move the lens automatically until the subject in front of you appears sharp. When you half-press your shutter button — or tap a face on your phone screen — the camera runs a rapid calculation, moves a motor inside the lens, and locks focus, usually in a fraction of a second.
The core idea is simple: a sharp image has high contrast (crisp edges where light meets dark), and a blurry image has low contrast (those edges are smeared). Your camera exploits this difference to judge whether the lens is in the right position.
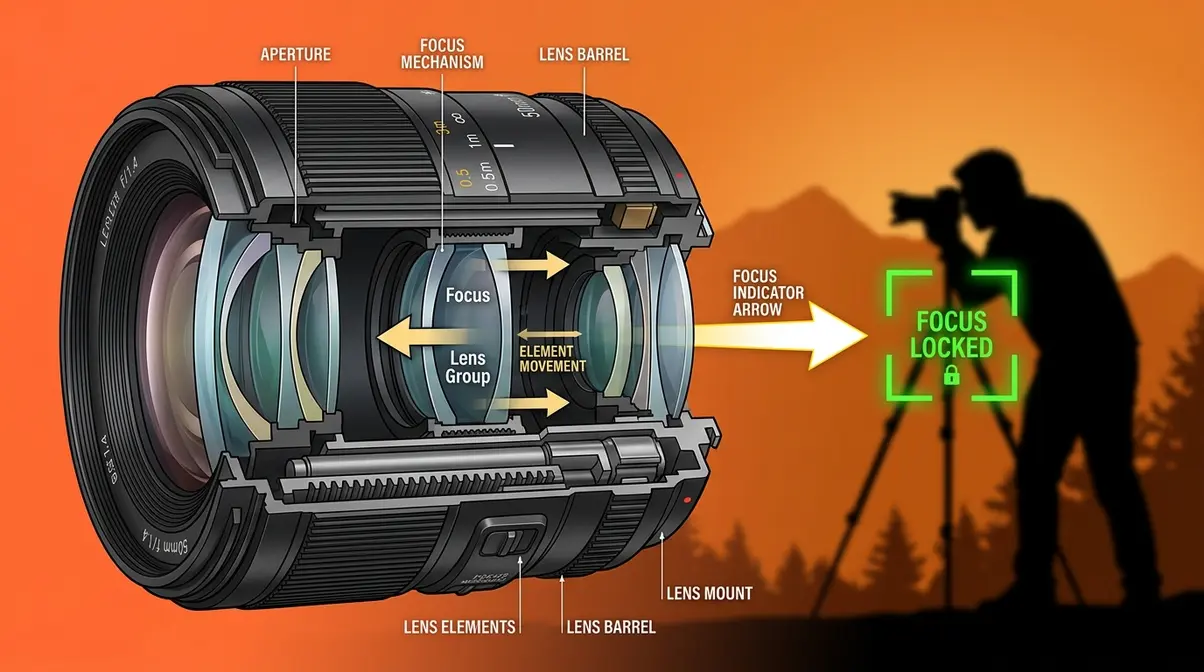
Three Core Autofocus Components
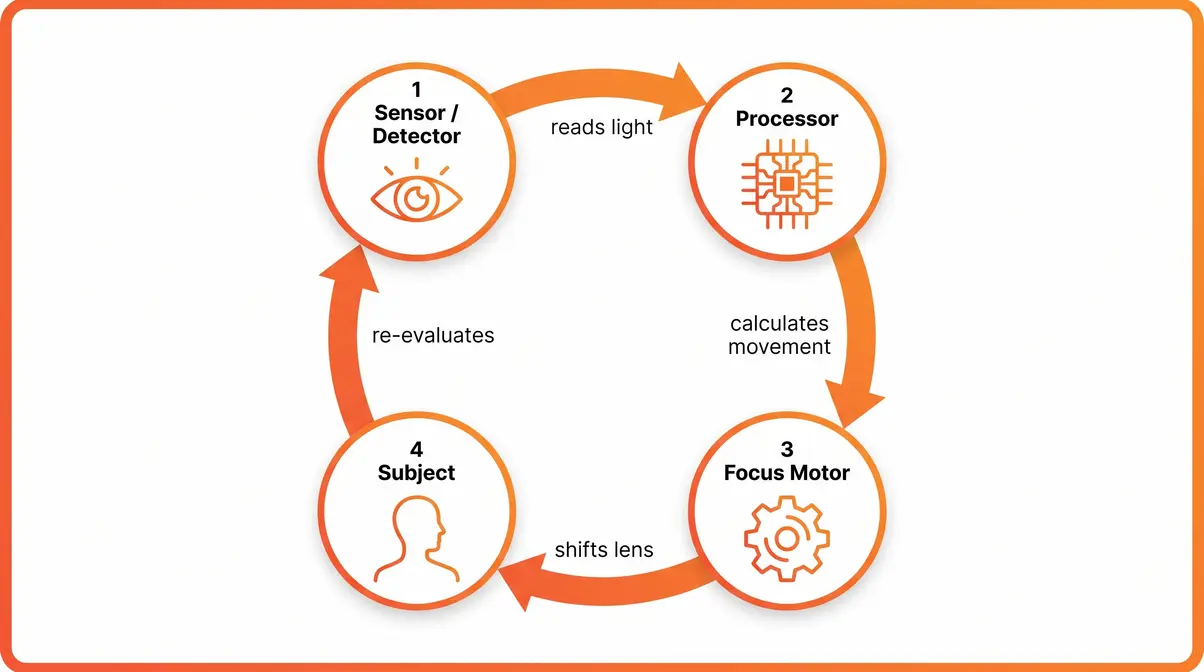
Every autofocus system — from a 1980s film camera to a modern mirrorless body — relies on three things working together:
- A sensor or detector that reads the incoming light and measures sharpness or distance.
- A processor that interprets that reading and calculates how far and in which direction to move the lens.
- A focus motor inside the lens that physically shifts the glass elements to the calculated position.
Remove any one of these and the system breaks down. The detector gives the processor raw data; the processor turns that data into a movement instruction; the motor executes it. According to HowStuffWorks, this feedback loop runs continuously as long as you hold the shutter half-pressed, re-checking and re-adjusting many times per second.
How Cameras Detect Focus
Think about what a blurry photo looks like: the edges of objects bleed into each other. Now think about a sharp photo: every edge is crisp and defined. Your camera’s autofocus sensor is constantly measuring that crispness, which photographers call contrast (the difference in brightness between neighbouring pixels).
A useful analogy: imagine tuning an old radio dial. You hear static (low contrast = out of focus), and as you turn the dial, the music gets clearer (high contrast = in focus). Your camera is doing the same thing electronically — searching for the “clearest signal” position for the lens.
Once the processor detects that contrast has peaked, it tells the motor to stop. That moment is what you feel as the satisfying “click” or the green confirmation square in your viewfinder.
Focus Motors: STM vs USM
The focus motor is the unsung hero of the system. Two types dominate modern camera lenses:
- STM (Stepping Motor): Moves in tiny, smooth increments — ideal for video because it’s nearly silent and produces no hunting (searching) noise that microphones would pick up. Canon’s STM lenses are a popular example.
- USM (Ultrasonic Motor): Uses ultrasonic vibrations to spin a ring inside the lens at high speed, achieving near-instant focus. It’s faster than STM and nearly silent too, but optimized for still photography speed rather than video smoothness.
As a beginner, the practical takeaway is this: if you shoot video, look for STM lenses. If you shoot fast-moving subjects and prioritize speed, USM (or Nikon’s equivalent, SWM — Silent Wave Motor) will serve you better.
Phase vs. Contrast Detection
These two methods are the foundation of the AF Technology Ladder. Every other autofocus system you’ll encounter — hybrid AF, Dual Pixel, AI tracking — is built on top of them. Understanding both is the single most important step toward understanding all modern autofocus.
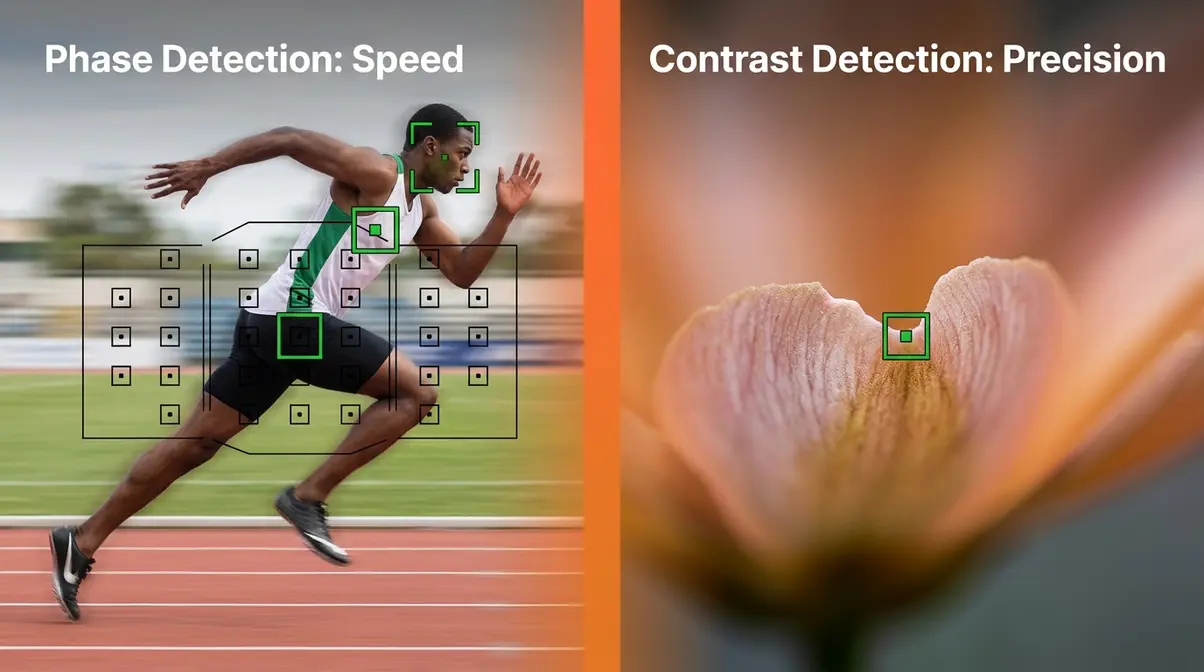
Phase Detection: Built for Speed
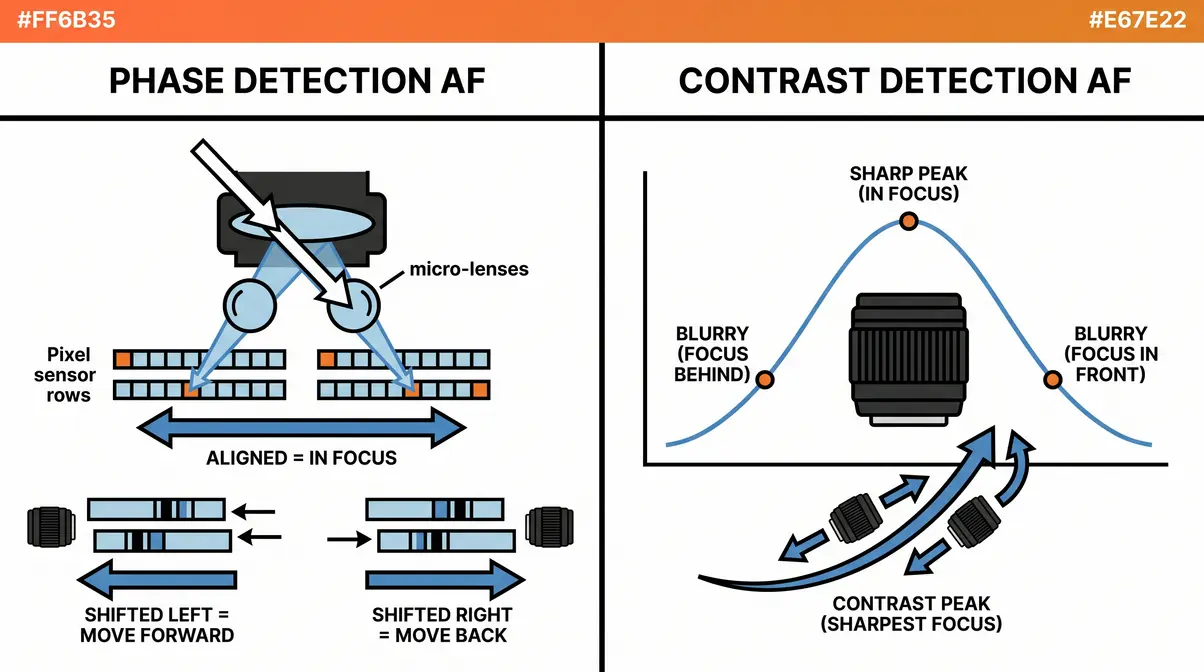
Phase detection autofocus is a method that splits incoming light into two separate images and compares them to calculate focus distance directly — without any trial-and-error movement.
Here’s the analogy that makes it click: close one eye and hold up a finger. Now open that eye and close the other. Your finger appears to jump sideways. That apparent shift is called parallax, and it tells your brain how far away the finger is. Phase detection works exactly like this — your camera uses pairs of tiny micro-lenses on the sensor (or a dedicated AF sensor in older DSLRs) to capture two slightly offset views of the same scene.
If the two images are aligned, the subject is in focus. If they’re shifted left, the lens needs to move forward. If they’re shifted right, it needs to move backward. Critically, the amount of shift tells the processor exactly how far to move — so the lens travels directly to the correct position in a single motion, with no searching required.
This is why phase detection is fast. According to Canon’s engineering documentation, modern phase detection systems can lock focus in as little as 0.05 seconds on flagship bodies.
Why this matters for your photos: Phase detection is the reason a sports camera can track a sprinter across the frame without hunting or hesitating. It’s decisive.
Contrast Detection: Precision Focus
Contrast detection autofocus works by measuring the contrast (sharpness of edges) directly on the imaging sensor, then moving the lens until that contrast reaches its maximum value.
The process looks like this: the lens moves slightly in one direction, the processor checks whether contrast increased or decreased, then moves again based on the answer. This “wobble and check” cycle repeats until the sharpest position is found. It’s sometimes called the hill-climbing algorithm because the processor is always trying to reach the peak of the sharpness “hill.”
Contrast detection is inherently more accurate than phase detection because it uses the actual imaging sensor — the same pixels that capture your photo — as its measuring tool. There’s no calibration gap between the AF sensor and the imaging sensor. However, because it requires multiple lens movements to converge on focus, it’s slower, especially in low light where contrast differences are subtle.
Why this matters for your photos: Contrast detection excels at macro photography (extreme close-ups) and situations where absolute precision matters more than speed.
Hybrid AF: Speed Meets Precision
Modern cameras don’t force you to choose between speed and accuracy — they combine both methods. Hybrid AF uses phase detection to get the lens close to the correct focus distance quickly, then hands off to contrast detection to fine-tune the final position for maximum sharpness.
Think of it like driving to a new restaurant: phase detection is your GPS getting you to the right street fast, and contrast detection is you slowly cruising the block to find the exact parking spot.
Sony’s EXMOR sensors, Canon’s Dual Pixel CMOS, and most modern smartphone processors all use some form of hybrid AF. This combination is why today’s cameras focus noticeably faster and more accurately than cameras from just five years ago.
Active AF: Laser, Infrared, LiDAR
Everything covered so far is called passive autofocus — it relies entirely on light that’s already in the scene. But some cameras take a more direct approach: they emit their own signal, bounce it off the subject, and measure how long it takes to return. This is active autofocus, and it’s the technology behind that mysterious red beam your camera sometimes projects.
Laser and Infrared Autofocus
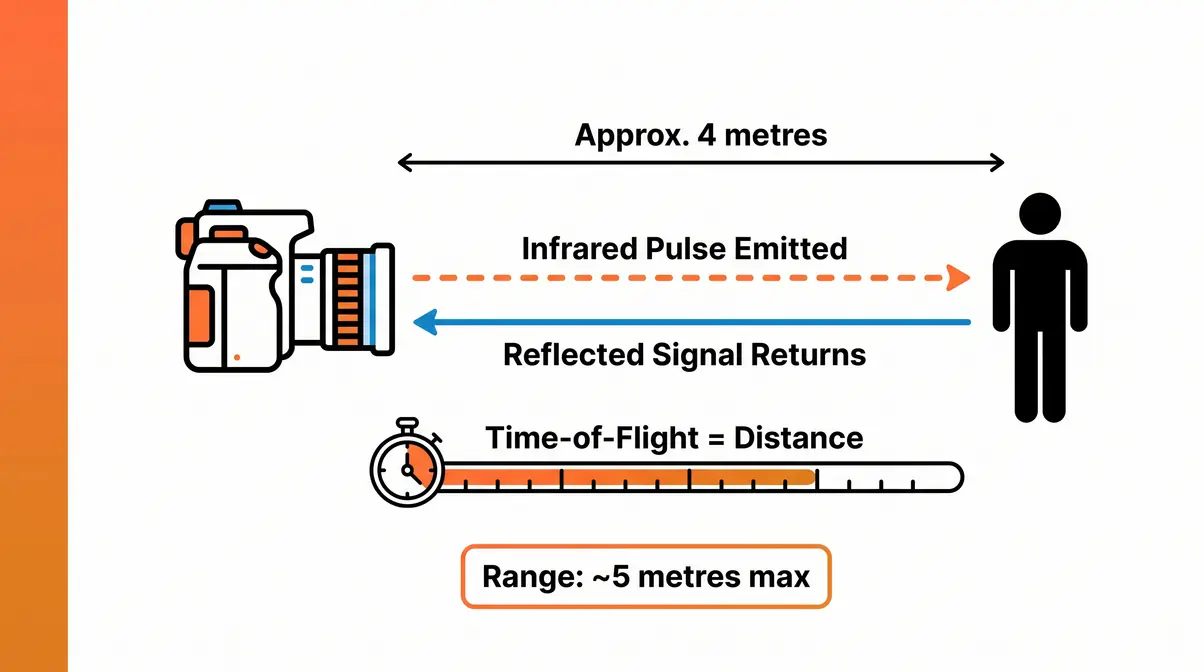
Laser and infrared AF systems work like a bat’s echolocation. The camera emits a pulse of infrared light (invisible to the human eye) or a visible red beam, and a receiver measures how quickly the reflection returns. Because the speed of light is constant, the time-of-flight measurement translates directly into a distance reading.
This approach has one major advantage: it works in total darkness. Passive systems need existing light to read contrast or phase; active systems create their own. This is why your camera’s AF assist beam fires automatically in dark rooms — it’s giving the passive AF system enough information to work with.
The limitation is range. Infrared AF typically works reliably up to about 5 metres (16 feet). Beyond that, the reflected signal weakens too much for accurate measurement. You’ve probably experienced this: in a dark concert venue, your camera focuses fine on subjects nearby but struggles with the stage far away.
LiDAR: Smartphone AF Technology
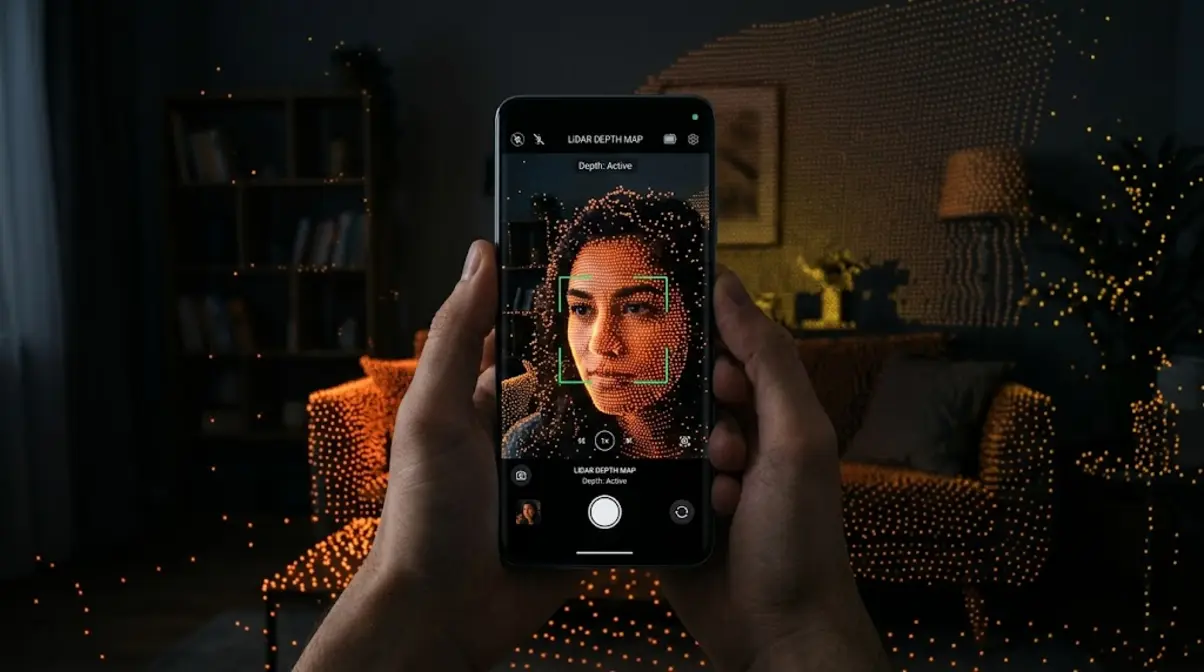
LiDAR (Light Detection And Ranging) is essentially a vastly more sophisticated version of the infrared pulse idea. Instead of a single beam, LiDAR fires thousands of invisible laser pulses per second across the entire scene, building a precise three-dimensional depth map in real time.
Apple introduced LiDAR in the iPhone 12 Pro (2020) and has refined it through the iPhone 16 series. According to Apple’s engineering notes, LiDAR allows the iPhone to achieve focus up to six times faster in low light compared to earlier models, and it enables augmented reality features by giving the phone an accurate 3D model of the surrounding environment.
The practical photography benefit is dramatic: in near-darkness, an iPhone with LiDAR locks focus almost instantly on subjects that would cause traditional contrast detection to hunt for several seconds. For night portraits or indoor events with dim lighting, this is a genuinely meaningful improvement.
The AF Technology Ladder insight: LiDAR represents the point where active and passive AF systems began to merge — the LiDAR depth map feeds directly into the AI tracking system, giving the neural network a spatial understanding of the scene, not just a 2D image.
The Purpose of the Red AF Beam
That red or orange beam your camera (or a separate flash unit) projects in low light is the AF assist beam — a visible-spectrum version of the active AF principle. Your camera is essentially painting the subject with a pattern of light so the passive phase detection system has contrast to work with.
Some cameras use a patterned grid (a series of lines) rather than a solid beam, because a grid creates many high-contrast edges for the phase detection system to grab onto. This is why AF assist beams often look like a grid or crosshatch pattern rather than a simple dot.
One practical note: the AF assist beam has a range of roughly 3–5 metres. Beyond that, the projected pattern becomes too faint to be useful. If you’re shooting subjects farther away in the dark, consider using a fast lens (wide aperture) to let in more ambient light for the passive system instead.
AF in DSLRs, Mirrorless & Phones
Now that you understand the underlying technologies, it’s worth seeing how they’re implemented differently across the three main types of cameras. Each device has a distinct physical architecture, and that architecture shapes which AF approach works best.
DSLR Mirror-Based AF Systems
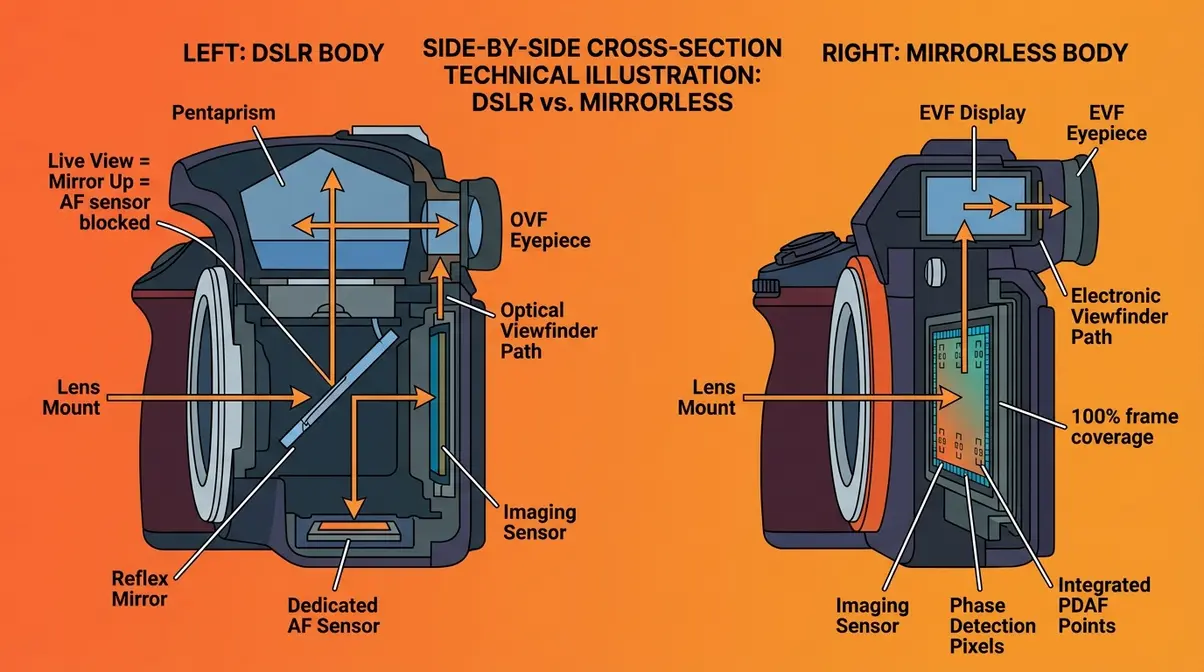
In a DSLR (Digital Single-Lens Reflex) camera, there’s a mirror sitting at a 45-degree angle between the lens and the image sensor. When you look through the viewfinder, you’re actually seeing light that bounced off that mirror up through a prism to your eye.
This mirror serves a secondary purpose: a small portion of the incoming light passes through a semi-transparent section of the mirror and is deflected downward to a dedicated AF sensor at the bottom of the camera body. This dedicated sensor uses phase detection exclusively — it’s fast, responsive, and works beautifully when you’re shooting through the optical viewfinder.
The complication arises in Live View mode (when you’re composing on the rear screen instead of the viewfinder). In Live View, the mirror must flip up to expose the imaging sensor — which means the dedicated AF sensor is blocked. The camera falls back to contrast detection on the imaging sensor, which is why DSLR Live View AF feels noticeably sluggish compared to viewfinder shooting.
This architectural limitation is one reason DSLR vs mirrorless debates often highlight how mirrorless cameras have largely overtaken DSLRs for new product development. According to PetaPixel, the mirrorless design eliminates this split-personality AF problem entirely.
Mirrorless Dual Pixel CMOS AF
Mirrorless cameras remove the mirror entirely. The imaging sensor is always exposed to incoming light, which means phase detection can be performed directly on the imaging sensor itself — giving you fast, accurate AF whether you’re using the electronic viewfinder or the rear screen.
Canon’s implementation of this idea is called Dual Pixel CMOS AF (introduced in 2013 and continuously refined in modern models). The concept is elegant: every single pixel on the sensor is split into two halves, each half acting as one “eye” in a phase detection pair. This means the entire sensor surface is a phase detection array — not just dedicated AF zones around the edges.
The result is that focus can be acquired anywhere in the frame, from corner to corner, with equal speed and accuracy. Canon’s documentation describes Dual Pixel CMOS AF as capable of covering up to 100% of the frame area on bodies like the EOS R5 and R6 Mark II.
Sony’s equivalent is called Fast Hybrid AF, which combines phase detection pixels embedded in the sensor with real-time contrast detection verification. The competition between these systems has driven remarkable improvements in AF performance across the industry.
Smartphone Autofocus Technology
Modern flagship smartphones pack three or four separate AF technologies into a body thinner than your finger. A typical modern flagship might combine:
| AF Technology | What It Does | When It’s Used |
|---|---|---|
| Phase Detection (PDAF) | Fast initial focus acquisition | Bright conditions, standard shots |
| Laser / ToF sensor | Measures distance directly | Low light, close-up subjects |
| LiDAR (iPhone Pro) | 3D depth mapping | Near-darkness, AR, night portraits |
| AI Subject Detection | Tracks faces, eyes, animals | Any condition, continuous tracking |
This layered approach is why your phone focuses so reliably across such a wide range of conditions. The processor selects whichever combination of systems gives the fastest, most accurate result for the current scene — all in a fraction of a second, entirely invisibly to you.
The key difference from dedicated cameras: Smartphone lenses have very short focal lengths (typically 5–26mm equivalent), which gives them a naturally deep depth of field. This means that even moderately imprecise focus still looks acceptably sharp, giving the AF system a wider margin for error than a telephoto lens on a DSLR would allow.
Modern AI Autofocus Technology
This is the top rung of the AF Technology Ladder — where autofocus stops being purely a physics problem and becomes a computer vision problem. AI-based autofocus doesn’t just measure light; it recognizes what it’s looking at and makes predictions about where the subject will move next.
How AI Subject Tracking Works
Traditional AF systems focus on wherever you point them. AI subject tracking focuses on what you’re trying to photograph, even if it moves unpredictably across the frame.
The technology behind this is a convolutional neural network (CNN) — a type of AI trained on tens of millions of labelled images to recognize categories of subjects: human faces, human bodies, animals, birds, vehicles, and more. Once the camera identifies a subject type, it maintains a continuous prediction of where that subject will be in the next frame, compensating for movement before it happens.
User consensus in professional photography communities consistently identifies AI tracking as the single biggest practical improvement in camera technology of the past five years — more impactful than megapixel increases or improved low-light performance.
Why this matters for your photos: You no longer need to keep a focus point manually on a moving subject. Point the camera at a person, activate tracking, and the camera handles the rest — even if they turn away, duck behind an obstacle, or sprint across the frame.
Eye AF and Face Detection
Eye AF is a specific application of AI subject detection focused on the most important element of a portrait: the eyes. Sharp eyes are the single most important factor in a compelling portrait — blurry eyes make a photo feel disconnected, even if the rest of the image is technically perfect.
Sony pioneered Eye AF in 2013 with the Alpha 7 series and has refined it dramatically through the Alpha 9 III and Alpha 1 bodies. Canon’s equivalent, called EOS iTR AFX (Intelligent Tracking and Recognition with AI), uses a deep learning model trained specifically on eye structure, skin tones, and facial geometry.
- The system works in layers:
- Face detection identifies that a human is present in the frame.
- Facial landmark detection maps the positions of eyes, nose, and mouth.
- Eye prioritization locks the active focus point onto the nearest or most prominent eye.
- Predictive tracking maintains that lock even when the subject blinks, turns slightly, or is partially obscured.
For portrait photographers — even beginners — this means sharp eyes in nearly every frame, without manually placing a focus point on them.
Deep Learning Autofocus Systems
Canon’s EOS iTR AFX (introduced on the EOS R3 and now standard across the modern R-series lineup) uses a dedicated deep learning accelerator chip to run subject recognition at up to 30 frames per second. It can simultaneously detect and track humans, animals, vehicles, and aircraft — switching subject categories on the fly as the scene changes.
Sony’s Real-time Tracking system, available on the Alpha series from the A6600 onward, uses a combination of colour, depth, pattern recognition, and AI classification. Sony’s documentation notes that the system maintains tracking through partial occlusion (when the subject briefly moves behind an object) by predicting the subject’s trajectory and re-acquiring focus when they reappear.
Both systems represent a fundamental shift in how autofocus works: rather than reacting to where a subject is, the AI predicts where it will be — reducing the lag between subject movement and lens adjustment to near zero.

How to Use Autofocus Effectively
Understanding how autofocus works is only half the equation. The other half is knowing which AF settings to choose for different situations. Most cameras offer three core AF modes, and choosing the wrong one is the most common reason beginners end up with blurry photos.
Single, Continuous, and Auto AF
Single AF (One-Shot AF on Canon, AF-S on Nikon/Sony): The camera focuses once when you half-press the shutter, then locks focus at that distance until you release and press again. Use this for stationary subjects — landscapes, still portraits, food photography, architecture.
Continuous AF (AI Servo on Canon, AF-C on Nikon/Sony): The camera continuously re-focuses as long as you hold the shutter half-pressed, tracking moving subjects in real time. Mastering continuous autofocus in photography is essential for action shots. Use this for sports, wildlife, children running, pets, or any situation where the subject’s distance changes.
Automatic AF (AI Focus on Canon, AF-A on Nikon/Sony): The camera attempts to detect whether the subject is moving and switches between Single and Continuous automatically. This sounds ideal for beginners, but user consensus in photography forums indicates it can be unreliable — it sometimes switches modes at the wrong moment. Most experienced photographers recommend learning to choose between Single and Continuous deliberately.
| Situation | Recommended AF Mode |
|---|---|
| Still portrait (indoors) | Single AF (One-Shot / AF-S) |
| Child running toward you | Continuous AF (AI Servo / AF-C) |
| Bird in flight | Continuous AF + AI tracking |
| Landscape at sunrise | Single AF (or manual focus) |
| Street photography | Continuous AF or Zone AF |
| Macro (extreme close-up) | Manual focus (AF often unreliable) |
Choosing Your AF Area Mode
Beyond how the camera tracks focus, you also control where in the frame it looks. This is the AF area mode, and it’s a separate setting from the AF tracking mode above.
Common AF area modes include:
- Single Point: You manually select one focus point anywhere in the frame. Maximum control, best for precise subjects like a flower petal or a specific eye in a group shot.
- Zone AF: You select a zone (a cluster of focus points), and the camera picks the best point within that zone. Good for moving subjects where you can predict their general location.
- Wide/Auto Area: The camera evaluates the entire frame and selects focus points automatically. With AI tracking enabled, this is extremely powerful — the camera finds your subject anywhere in the frame.
- Tracking/Lock-on AF: Once you designate a subject, the camera tracks it across the frame, dynamically moving focus points to follow it.
For beginners, a practical starting point: use Single Point AF for stationary subjects (gives you control) and Wide Area AF with subject tracking for moving subjects (lets the AI handle the complexity).
Mastering Back-Button Focus
Most cameras, by default, assign both activating autofocus and taking the photo to the same button — the shutter. Half-press to focus, full-press to shoot. This works fine until you need to separate those two actions.
Back-button focus reassigns AF activation to a dedicated button on the back of the camera (usually labelled AF-ON), while the shutter button is set to only take the photo — no longer activating focus at all.
Why do professional photographers almost universally use this technique? It solves a specific problem: when you’re shooting a mix of stationary and moving subjects, you no longer need to switch AF modes between shots. Press the AF-ON button and hold it for continuous tracking. Release it, and focus locks at the current distance — instantly switching to the equivalent of Single AF behaviour. The shutter fires whenever you want, independently.
Setting up back-button focus requires a short trip into your camera’s menu (look for “AF/AE Lock” or “Custom Controls” settings). The setup varies by brand, but PhotographyLife’s AF guide provides manufacturer-specific instructions for Canon, Nikon, and Sony bodies. Understanding why back-button focus is so popular can transform your shooting.
Do Pros Use Autofocus?
Yes — the vast majority of professional photographers use autofocus for most of their work, including sports, wildlife, weddings, and commercial photography. Across professional photography communities, the consistent finding is that modern AI-assisted AF systems are more reliable and faster than manual focus for tracking moving subjects. However, professionals often use AF in highly deliberate ways: single-point AF for precise portrait work, back-button focus to separate tracking from shooting, and AF fine-tuning to correct micro-calibration errors. Manual focus remains the professional choice for macro photography, astrophotography, and situations where the AF system is reliably fooled — such as shooting through obstacles or in near-total darkness.
When Autofocus Fails
Autofocus is remarkably capable today, but it has genuine limitations. Understanding them — and knowing when to override the system — is what separates a photographer who blames the camera from one who consistently gets sharp results.
Disadvantages of Autofocus
Automatic focus can fail in low contrast, low light, or complex scenes where the camera struggles to identify the intended subject. Even the best AF systems have difficulty in predictable scenarios. Common frustrations reported by beginners include:
- Low contrast subjects: A white wall, a clear blue sky, a flat grey surface — there’s nothing for contrast detection to grab onto, and phase detection struggles too. The lens will “hunt” (visibly rack back and forth without settling).
- Low light: Below roughly EV -4 (a very dark room), even the best phase detection systems lose accuracy. The signal-to-noise ratio in the sensor data degrades too much for reliable phase comparison.
- Subjects behind glass or mesh: A bird in a cage, a tiger behind zoo glass, a face behind a window. The AF system often locks onto the glass or mesh instead of the intended subject.
- Busy, overlapping subjects: Two people standing close together, a crowd scene, branches in the foreground of a portrait. The system may lock onto the wrong subject or oscillate between them.
- Flat surfaces parallel to the camera: A painting on a wall, a product shot of a book cover. There’s no depth difference for phase detection to exploit — contrast detection must do all the work, and it can struggle with low-texture surfaces.
- Very fast lateral movement: A racing car passing perpendicular to the camera. Predictive AF works best on subjects moving toward or away from the camera; pure lateral speed can exceed tracking capacity.
Additionally, contrast detection AF — used in DSLR Live View and some older cameras — is noticeably slower than phase detection, which can cause missed shots with fast-moving subjects. Manual focus remains the better choice in several specialized scenarios.
When Manual Focus Is Better
Manual focus isn’t a fallback for when autofocus fails — for certain situations, it’s genuinely the better tool. Consider switching to manual focus when:
Macro photography: At extreme close-up distances, the depth of field (the range of acceptable sharpness) can be thinner than a millimetre. AF systems hunt constantly and rarely land exactly where you want. A slow, deliberate manual focus rotation gives you precise control.
Through-obstacle shots: Shooting through a chain-link fence, between branches, or through foreground foliage. Point the camera, activate AF, and it will almost certainly lock onto the obstacle rather than the subject behind it. Switch to manual, focus through the gaps visually.
Astrophotography: Stars are tiny, faint pinpoints of light against a black sky — essentially zero contrast for any AF system. Manual focus to infinity (or slightly back from the infinity stop) is the standard technique.
Pre-focusing for action: If you know a subject will pass through a specific point — a finish line, a doorway, a gap in the trees — you can manually pre-focus on that spot and fire the shutter as the subject arrives. This is faster and more reliable than asking AF to track and acquire in a split second.
Quick Autofocus Troubleshooting
| Problem | Likely Cause | Fix |
|---|---|---|
| Lens hunts back and forth, won’t lock | Low contrast or low light | Switch to manual focus; add AF assist beam; use centre single point |
| Photos are sharp but focused on wrong area | AF area mode too wide | Switch to Single Point AF; manually select your focus point |
| Focus is consistently slightly behind the subject (back-focus) | AF micro-adjustment needed | Use camera’s AF Fine-Tune menu (AF Microadjustment on Canon/Nikon) |
| Focus is consistently slightly in front of subject (front-focus) | Same as above, opposite direction | AF Fine-Tune in the opposite direction |
| Camera focuses on background instead of subject | Subject has low contrast vs. background | Use Single Point AF aimed directly at subject; move subject away from busy background |
| AF works but feels slow | Contrast detection mode active (Live View on DSLR) | On DSLRs, use optical viewfinder; on mirrorless, ensure phase detection is active |
| Eye AF won’t activate | Face not clearly visible, or feature disabled | Ensure face/eye detection is enabled in menu; face must be reasonably large in frame |
Autofocus FAQs
How does AF work on a camera?
Autofocus works by measuring light from the scene to calculate the correct lens position for a sharp image. Most modern cameras use phase detection, which splits incoming light into two offset images and compares them to determine both the direction and distance the lens needs to move — all in a single step. Contrast detection, the alternative method, moves the lens incrementally while monitoring edge sharpness until it peaks. Flagship cameras combine both methods: phase detection for speed, contrast detection for final precision. The entire process typically completes in 0.05-0.3 seconds, according to Canon’s engineering documentation, depending on the camera and lighting conditions.
How do cameras detect focus?
Cameras know something is in focus when the contrast (sharpness of edges) in the image reaches its maximum value for the current lens position. Phase detection cameras compare two offset light paths to determine the precise lens position needed without trial movement. Contrast detection cameras move the lens until edge contrast peaks — a process called the hill-climbing algorithm. In both cases, the underlying principle is the same: a sharp image has high-contrast edges, and a blurry image does not. Modern AI systems add a layer on top: they use neural networks to verify that the right subject (a face, an eye, an animal) is in focus, not just whatever happens to have the most contrast.
Why does my camera lens hunt?
Lens hunting occurs when the autofocus system cannot find enough contrast to lock onto a subject. This typically happens in low-light environments, when shooting flat surfaces with no texture (like a blank wall), or when using a lens with a narrow maximum aperture. To fix this, try focusing on an edge with high contrast, use your camera’s AF assist beam, or switch to manual focus.
Does AF work in the dark?
Passive autofocus systems struggle in complete darkness because they rely on ambient light to detect contrast. However, cameras equipped with active autofocus technologies—such as LiDAR, laser assist, or infrared beams—can focus perfectly in pitch-black conditions. If your camera lacks these features, using an external flash with an AF assist grid can help it lock focus in the dark.
When Autofocus Gets It Wrong
Common AF Pitfalls
Pitfall 1 — Trusting Wide AF Area mode for portraits. When the camera selects focus points automatically across the full frame, it tends to prioritize the closest object with high contrast. In a portrait with a cluttered background, this is often not the subject’s eyes. The fix: switch to Single Point AF and place the point on the eye yourself, or activate Eye AF if your camera supports it.
Pitfall 2 — Using Continuous AF for still subjects. Continuous AF re-evaluates focus constantly, which introduces micro-variation. For a still subject like a flower or a product shot, Single AF locks focus firmly — resulting in slightly sharper images than Continuous AF would deliver.
Pitfall 3 — Ignoring AF fine-tune (micro-adjustment). Many camera-lens combinations have a small, consistent front-focus or back-focus error — the focus lands just in front of or behind the intended plane. This isn’t a malfunction; it’s a calibration gap between the AF sensor and the imaging sensor. Most DSLRs and mirrorless bodies include an AF Micro-Adjustment menu to correct this. If your portraits are consistently slightly soft, this is the first thing to check.
When to Choose Alternatives
For macro photography: Autofocus is genuinely unreliable at extreme close-up distances. Switch to manual focus and use live view magnification to fine-tune sharpness on the specific detail you want.
For astrophotography: No AF system handles stars reliably. Use manual focus, zoom in on a bright star using live view, and adjust until the star is a sharp pinpoint rather than a soft disk.
When to Seek Expert Help
If your AF system is consistently front-focusing or back-focusing after applying AF Micro-Adjustment corrections, the lens or camera body may need professional calibration. Authorised service centres for Canon, Nikon, and Sony can perform optical alignment tests that go beyond what in-camera software can correct. This is worth considering for lenses used in professional work where consistent sharpness is non-negotiable.
Bringing It All Together
For beginners who have ever wondered how cameras focus automatically, the answer is a layered system of remarkable elegance. How autofocus works comes down to light physics: your camera reads contrast differences, compares phase-shifted images, or measures reflected signals to calculate exactly where the lens needs to be for a sharp result. According to the Wikipedia overview of autofocus technology, the core principles have remained consistent since the first commercial AF cameras of the late 1970s — but the speed, intelligence, and sophistication of their implementation has transformed entirely.
The AF Technology Ladder gives you a way to understand any camera you’ll ever use: every AF system sits somewhere on the progression from simple contrast detection → phase detection → hybrid AF → active laser/LiDAR → AI deep learning tracking. Knowing where your camera sits on that ladder tells you what it can and can’t do — and that knowledge is worth more than any individual camera upgrade.
Start with one practical change on your next shoot: if you’re photographing a moving subject, switch to Continuous AF. If you’re photographing something still, switch to Single AF with a single focus point placed deliberately on what matters most. Those two adjustments alone will produce a visible improvement in your keeper rate.
