How to Choose a Camera in 2026: 6 Steps to Avoid Regret
Discover how to choose a camera with a clear, step-by-step process. Perfect for amateur photographers seeking the best fit for their skills and needs.
Your phone just delivered a blurry photo of your kid’s goal, or a grainy portrait from a dim restaurant — and you finally decided: it’s time for a real camera. The problem isn’t finding cameras online. It’s that most guides describe 47 specs without telling you which three actually matter for your photos. Every month you delay, you’re shooting memories you can’t reshoot.
What’s in this guide
According to Pew Research Center data, 91% of Americans already own a smartphone — meaning most first-time camera buyers are already carrying a capable imaging device in their pocket (Pew Research Center, 2026). The question isn’t whether your phone takes good photos. It’s whether it can take your photos.
In this guide, you’ll follow a 6-step framework to identify your use case, choose the right camera type, and set a budget that includes everything — not just the body — so you buy right the first time. We cover mirrorless, DSLR, compacts, lenses, hidden costs, and 12 specific model recommendations matched to real use cases and budgets.
- What You Need (Tools & Materials)
- Estimated time: 20-30 minutes
- Required: A defined primary use case (e.g., travel, portraits, video)
- Required: A realistic total budget
To choose a camera that fits your needs, start by identifying your primary shooting scenario, then match a camera type (mirrorless, DSLR, or compact) to your budget — including lenses and accessories. This 6-step process takes about 20 minutes and saves you from the most common $300 beginner mistake.


Step 1: Identify What to Photograph
Choosing a camera starts with one question before any spec comparison: what do you actually plan to shoot? According to Pew Research Center data, 91% of Americans own a smartphone — meaning most first-time camera buyers already carry a capable imaging device (Pew Research Center, 2026). The question isn’t “which camera?” It’s “do I even need one?”
“According to Pew Research Center, 91% of Americans own a smartphone — meaning most first-time camera buyers are already carrying a capable camera in their pocket.” The question isn’t whether your phone takes good photos. It’s whether it can take your photos.
For everyday photography, a qualitative study published by Columbia University found that photographer skill — not device type — controls photo quality, with minimal differences in focus, color balance, and composition between smartphone and digital camera images among study participants (Columbia University). That’s the honest starting point for how to choose a camera for beginners: gear amplifies skill, it doesn’t replace it.
Explore the step-by-step process for selecting your first camera for additional decision support once you’ve completed Step 1.
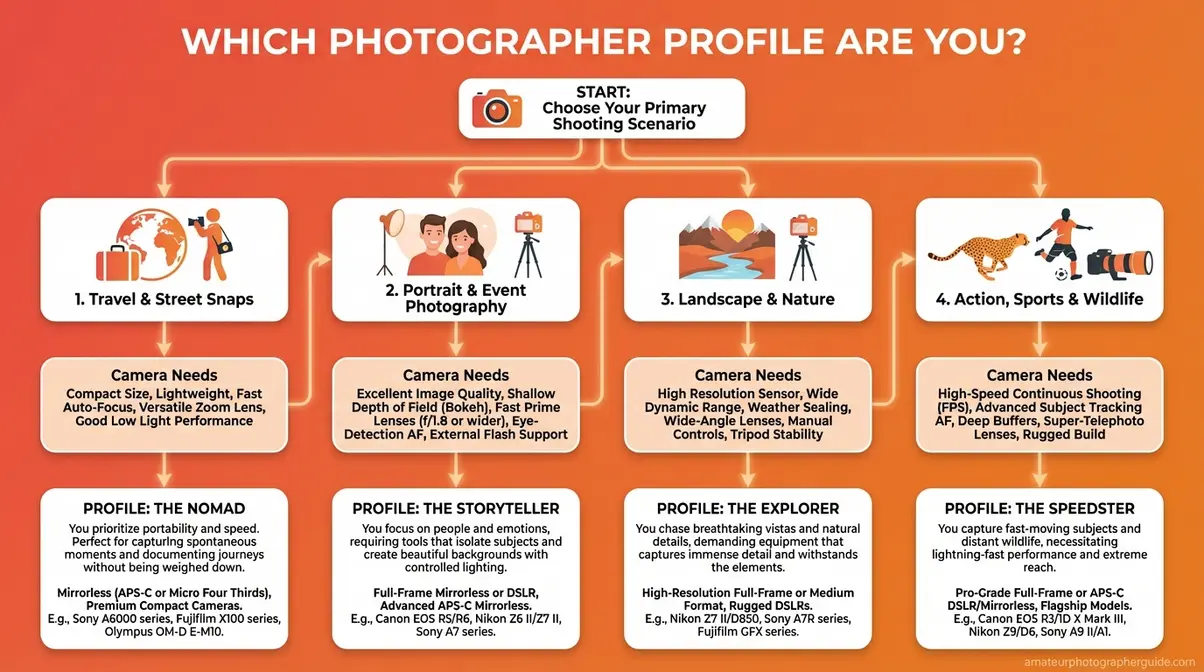
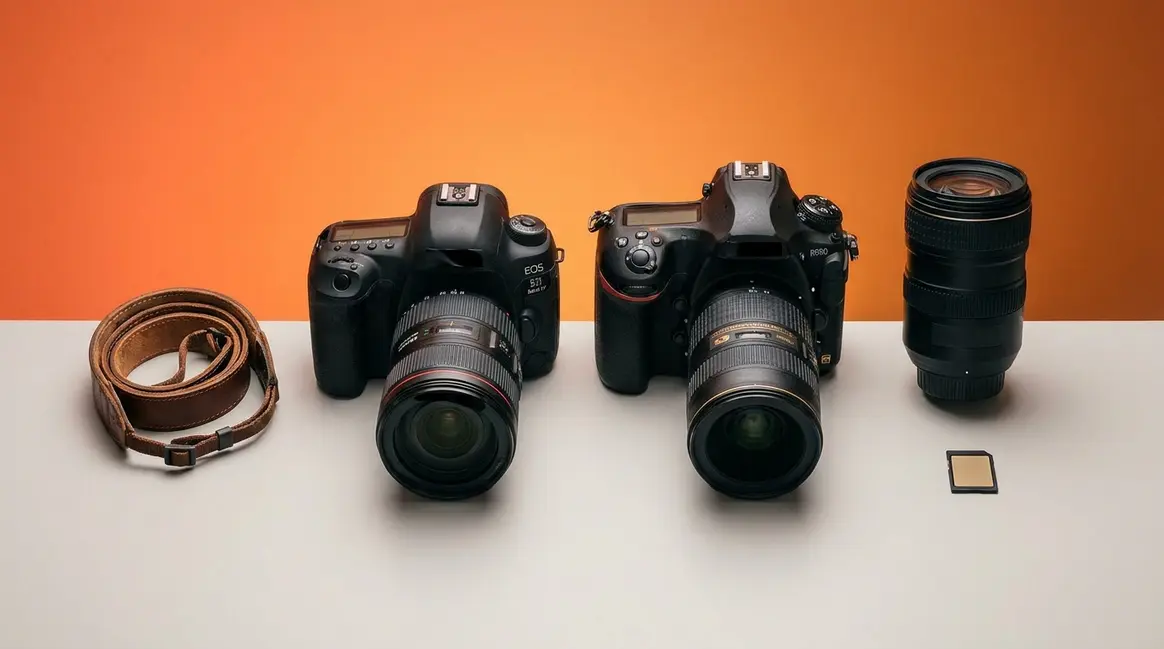
Caption: Match your primary shooting scenario to the right camera profile before evaluating a single spec.
The Four Photographer Profiles
For beginners choosing a camera, the most important step isn’t reading spec sheets — it’s identifying which photographer profile fits your actual shooting habits. Here are the five core profiles, each with the single spec that matters most:
- The Traveler: Lightweight body, versatile zoom range, compact enough to carry all day. The one spec that matters: total weight (aim under 400g body-only).
- The Portrait & Family Shooter: Reliable face-tracking autofocus for moving kids, wide-aperture lens for background blur. The one spec that matters: autofocus speed and face detection accuracy.
- The Wildlife & Sports Enthusiast: Fast burst rate (frames per second), long telephoto reach, weather sealing. The one spec that matters: burst rate (FPS) — if you photograph your kids’ soccer games, 10+ FPS matters more than megapixels.
- The Video Creator & Vlogger: 4K recording, flip screen for self-filming, clean audio input. The one spec that matters: articulating screen — you cannot frame yourself without one.
- The Hybrid Shooter: Needs both high-quality stills and video equally. The one spec that matters: dual-use versatility — not all cameras handle both well, and this is the most common source of buyer regret.
Identifying your profile now prevents the most expensive beginner mistake: buying a camera optimized for someone else’s use case.
Smartphone vs. Dedicated Camera
A dedicated camera gives you creative control no phone can match — but it isn’t automatically better. Here’s how to choose between staying with your smartphone and upgrading.
- Stick with your smartphone if:
- You shoot primarily for social media or casual sharing
- Your budget is under $300 total (a phone beats a bargain-bin camera)
- Weight and portability are your top priorities
- You rarely print larger than 5×7
- Upgrade to a dedicated camera if:
- You want to print larger than 8×10 or crop heavily
- You shoot in low light regularly (concerts, indoor events, evening portraits)
- You want creative control over background blur (depth of field)
- You shoot fast-moving subjects: sports, wildlife, active kids
- You’re producing serious video content beyond phone selfie-vlogging
A $1,200 Sony mirrorless won’t automatically make your photos better than a Pixel 8 Pro — but it will give you creative control that no phone can match. As a qualitative study published by Columbia University found, the photographer’s skill — not the device — controls quality for everyday use (Columbia University). That said, dedicated cameras open creative doors that smartphones simply cannot.
Before we discuss budgets, there’s one rule that will change how you think about camera buying: The 1:2 Camera Investment Rule. We’ll cover it fully in Step 3.
If you’ve decided a dedicated camera is the right move, the next step is choosing which type — and this is where most buyers get confused.
Step 1 Checkpoint

You should now know: (1) which photographer profile fits you, and (2) whether a smartphone is sufficient for your needs. If you’re still unsure, revisit the decision tree above. If you’re ready, Step 2 will narrow your camera type to one clear choice.
Step 2: Choose the Right Camera Type
For 2026 buyers, mirrorless cameras are the modern default for interchangeable-lens photography — and the shipment data confirms it. According to the Camera & Imaging Products Association (CIPA) reported 2026 data, mirrorless shipments rose 13% in units while DSLR shipments continued their multi-year decline, with only approximately 690,000 DSLRs shipped globally in 2026 (CIPA, 2026). Mirrorless cameras now outsell DSLRs by a wide margin — a structural shift that affects lens availability, resale value, and long-term ecosystem support. DSLRs still offer specific advantages, however: superior battery life, a more mature used market, and the feel of an optical viewfinder that some photographers genuinely prefer. This section gives you the comparison and a direct verdict by photographer profile.
Understanding the detailed comparison between DSLR and mirrorless systems is worth reviewing once you’ve read the overview below.
As Rice University’s photography guide explains, understanding the exposure triangle — aperture, shutter speed, and ISO — is the foundational step before choosing any camera system (Rice University Library). Knowing how these interact will make every spec comparison in this section more meaningful.
Mirrorless Cameras: The Modern Standard
A mirrorless camera replaces the traditional optical mirror with an electronic viewfinder (EVF) — a tiny, high-resolution screen that shows a live preview of your exact exposure, white balance, and depth of field before you press the shutter. You see precisely what the photo will look like. That alone changes how you shoot.
Three core advantages make mirrorless the right choice for most 2026 buyers. First, AI-powered autofocus — Sony, Canon, and Nikon all now offer eye-tracking and subject-detection AF that locks onto faces, animals, and moving subjects with remarkable consistency. Second, silent electronic shutter, which matters for weddings, wildlife, and street photography. Third, full-frame sensor options in compact bodies — the Sony A7 series delivers professional image quality in a package smaller than most DSLRs.
Sony, Canon, and Nikon have all shifted their R&D investment entirely to mirrorless. No major manufacturer is developing new DSLR lenses or bodies. That ecosystem reality matters.
For entry-level buyers, two strong 2026 options stand out. The Canon EOS R100 (body ~$479, kit with 18-45mm lens ~$599 as of Q2 2026) is Canon’s smallest, lightest RF-series body — a genuinely beginner-friendly package. The Nikon Z30 (kit with 16-50mm lens ~$600–$700 as of Q2 2026) is Nikon’s vlogger-focused mirrorless without a viewfinder, optimized for flip-screen self-filming. The Sony Alpha A6700 (~$1,399 body-only) steps up to APS-C enthusiast territory with Sony’s best AI autofocus and IBIS.
One limitation to acknowledge honestly: mirrorless battery life is shorter than DSLR. Expect 300–400 shots per charge on most entry mirrorless bodies (CIPA ratings). Always buy a spare battery — it’s a $30–$60 investment that eliminates frustration.
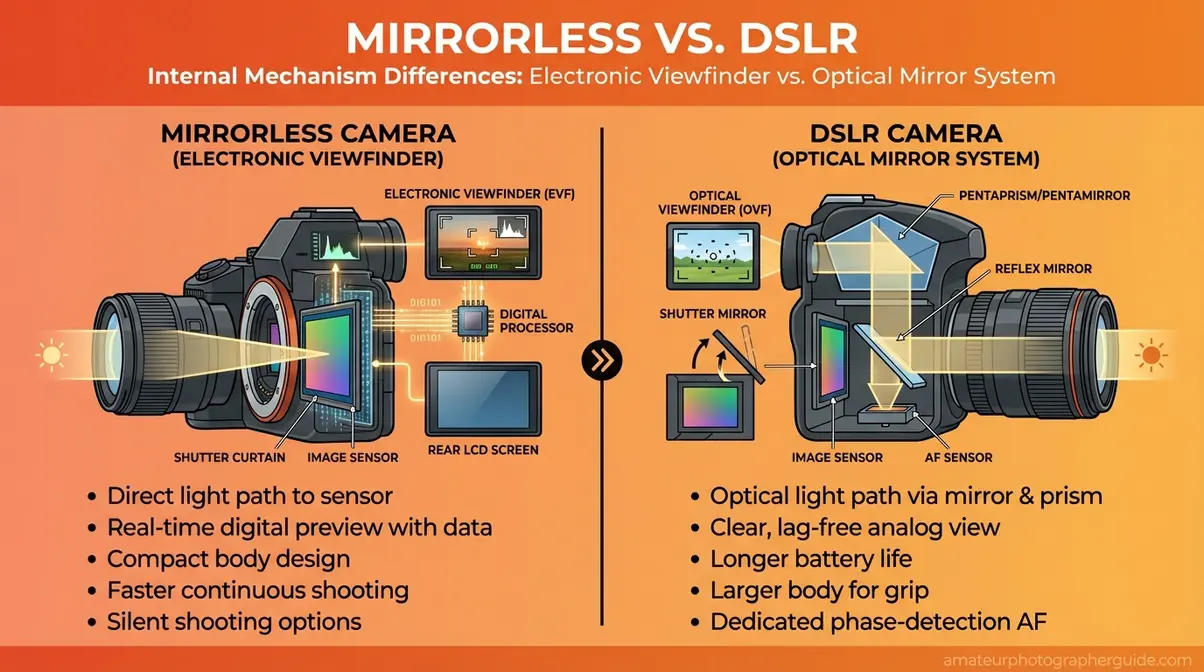
Caption: The electronic viewfinder (EVF) is the defining difference — you see your exposure before you shoot, not after.
DSLRs haven’t disappeared — and for specific buyers, they’re still the smarter choice.
DSLR Cameras: Proven Performance
A DSLR — Digital Single-Lens Reflex camera — uses an optical viewfinder (OVF): the scene passes through the actual lens via a physical mirror, with zero digital processing delay. For sports photographers and wildlife shooters who find EVF lag distracting, this remains a genuine advantage.
Three scenarios where DSLR still wins in 2026:
- Budget under $400: The used DSLR market offers significantly better value than entry-level mirrorless at this price point. A used Canon Rebel SL3 or Nikon D3500 — both 2019–2022 models — can be found for $250–$350 in excellent condition, leaving more budget for lenses.
- Battery life is critical: DSLRs routinely deliver 700–900 shots per charge. For long outdoor shoots, multi-day travel, or situations where charging access is limited, this matters.
- You already own Canon EF or Nikon F lenses: DSLRs use these natively. Mirrorless requires adapters, which add cost and occasionally limit autofocus performance.
The important caveat: DSLRs are being discontinued. No major manufacturer is developing new DSLR lenses or bodies in 2026. Buying a DSLR now means investing in a legacy system — excellent for the next 5–7 years, but with no upgrade path within the same mount system.
If neither mirrorless nor DSLR fits your priorities, there’s a third category that often gets overlooked.
Should a Beginner Use DSLR or Mirrorless?
For most beginners buying in 2026, mirrorless is the better starting point. Mirrorless cameras offer AI-powered autofocus that tracks faces and moving subjects automatically, compact bodies, and access to the lens ecosystems that manufacturers are actively developing. DSLRs offer better battery life and lower used-market prices under $400. Choose DSLR only if your budget is under $400 total or you already own Canon EF or Nikon F lenses. Otherwise, the Canon R100 or Nikon Z30 are the clearest entry-level mirrorless recommendations in 2026.
Point-and-Shoot, Compact & Film Cameras
The compact camera’s value proposition is simple: fixed lens, pocket-sized, no system commitment. It’s not “less than” a DSLR — it’s optimized for different priorities, specifically travelers who want noticeably better quality than a phone without carrying a camera bag.
The Ricoh GR III (~$900 as of Q2 2026) is the benchmark premium compact for street photography — APS-C sensor in a pocketable body with a fixed 28mm f/2.8 lens. Notably, its sensor is larger than many budget mirrorless cameras, which produces genuine image quality advantages in low light.
For analog enthusiasts, film cameras offer a creative experience that digital cannot replicate. Entry points include Lomography and Kodak disposable cameras for casual experimentation, or vintage 35mm SLRs — the Canon AE-1 and Pentax K1000 remain popular on the used market for their mechanical simplicity and large creative communities.
Bridge cameras (like the Sony RX10 series) occupy a useful middle ground: superzoom range equivalent to 600mm+ without lens swapping, making them appealing for wildlife and travel photographers who don’t want to manage multiple lenses.
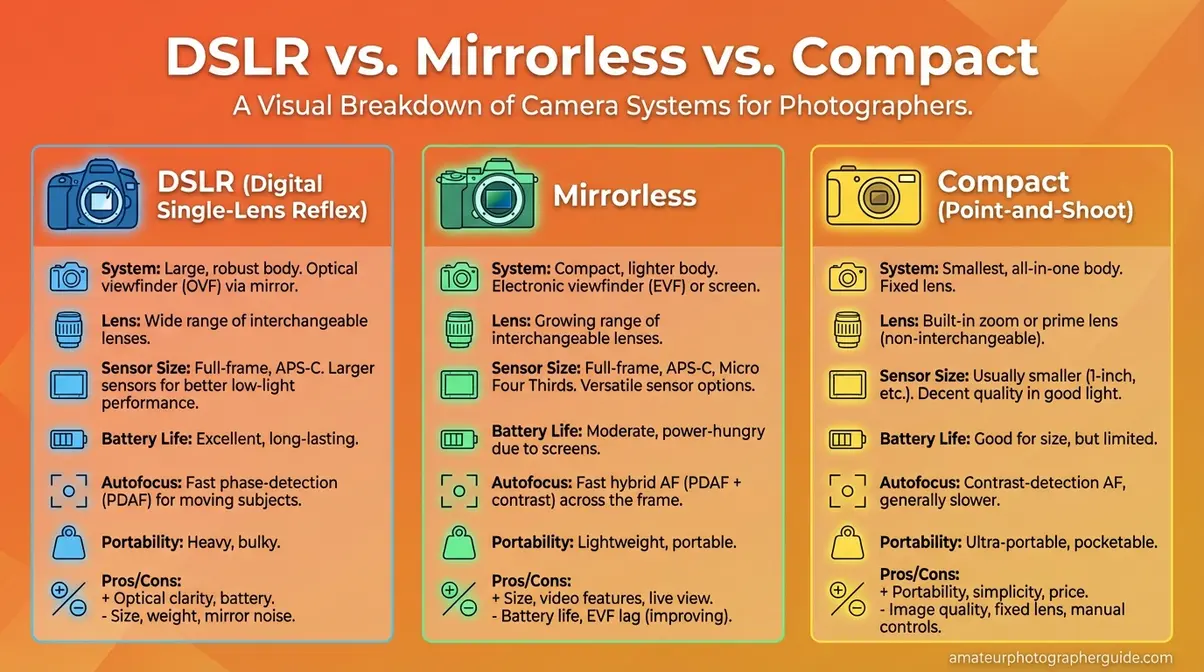
Here’s how all three types compare side by side.
DSLR vs. Mirrorless vs. Compact
| Camera Type | Best For | Price Range (Body Only) | Key Advantage | Key Disadvantage | 2026 Starter Model |
|---|---|---|---|---|---|
| Mirrorless | Most buyers, portraits, video, travel | $479–$1,400+ | AI autofocus, compact, future-proof | Shorter battery life | Canon R100 (~$479) |
| DSLR | Budget buyers, used market, OVF preference | $200–$600 (used) | Battery life, optical viewfinder, lens value | Legacy system, discontinued development | Canon Rebel SL3 (used ~$300) |
| Compact / Point-and-Shoot | Travelers, minimalists, street | $400–$1,000 | Pocket-sized, no system commitment | Fixed lens, limited upgrade path | Ricoh GR III (~$900) |
| Film | Analog enthusiasts, creative hobbyists | $50–$300 (used) | Unique aesthetic, tactile experience | Cost of film + development, no instant review | Canon AE-1 (used ~$100) |
For most 2026 buyers, mirrorless is the default. Choose DSLR only if your budget is under $400 or you already own lenses. Consumer Reports emphasizes that buyers should prioritize image quality and sensor size over megapixel counts when choosing a digital camera — advice that holds true regardless of camera type.
Product Comparison Overview
| Product | Type | Key Spec | Best For | Price Range |
|---|---|---|---|---|
| Canon EOS R100 | Mirrorless | 24.1MP APS-C | Beginners | $479 |
| Nikon Z30 | Mirrorless | 20.9MP APS-C | Vloggers | $600-$700 |
| Sony Alpha A6700 | Mirrorless | 26MP APS-C | Hybrid Shooters | $1,399 |
| Canon Rebel SL3 | DSLR | 24.1MP APS-C | Budget Buyers | $250-$350 (Used) |
| Ricoh GR III | Compact | 24.2MP APS-C | Street Photography | $900 |
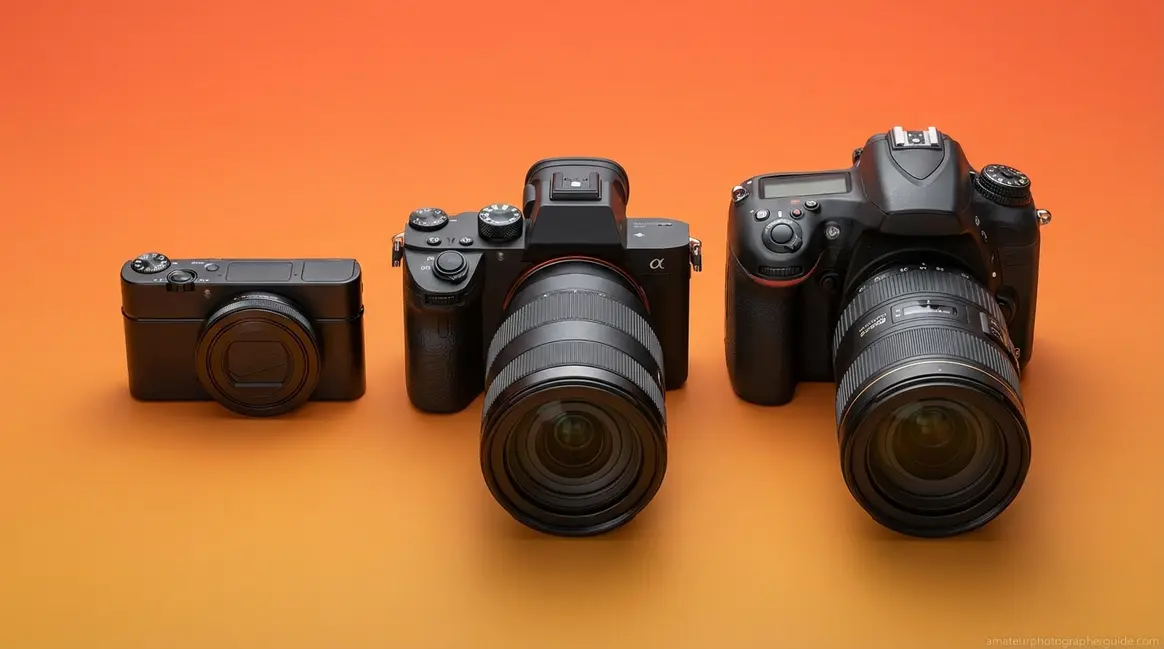
Caption: At a glance: which camera type fits your budget, use case, and long-term goals in 2026.
Step 2 Checkpoint
You should now know: (1) which camera type — mirrorless, DSLR, or compact — fits your photographer profile, and (2) which specific 2026 models are in your consideration set. If you’re still deciding between mirrorless and DSLR, revisit the comparison table above. Ready? Step 3 is where most budgets go wrong.
Step 3: Set a Realistic Budget
Here’s what most camera buying guides won’t tell you: the camera body is only 30–40% of what it actually costs to start shooting well. A realistic total budget for photography startup — body, lens, memory cards, spare battery, bag, and editing software — runs 2.5 to 3 times the body price alone. The 1:2 Camera Investment Rule makes this concrete: for every $1 you spend on a camera body, budget $2 for lenses and accessories. Most buyers budget for a $700 camera, then discover they need $1,400+ total to start shooting.
As the New York Film Academy advises, a key factor in choosing a camera system is the versatility and forward compatibility of its lens ecosystem — not the camera body itself (New York Film Academy). That principle is exactly why the 1:2 rule exists.
The 1:2 Camera Investment Rule
The 1:2 Camera Investment Rule is the single most actionable financial insight in camera buying: for every $1 you spend on a camera body, plan to spend at least $2 on lenses and accessories. If your camera body costs $600, your total photography startup budget should be at least $1,800.
Why? Camera bodies are upgraded every 2–4 years as technology advances. Good lenses last decades. A Canon 50mm f/1.8 lens purchased in 2010 still produces professional-grade results on a 2026 Canon RF body (with an adapter). The body records the image; the glass shapes the light that reaches the sensor.
- Apply it concretely:
- Entry buyer with $1,200 total: ~$400 body + ~$800 for lens(es) and accessories
- Mid-range buyer with $2,000 total: ~$700 body + ~$1,300 for lens(es) and accessories
- Advanced buyer with $3,500 total: ~$1,200 body + ~$2,300 for glass and gear
This is where your budget split matters most — and it’s exactly why our guide to choosing your first camera lens is worth reading alongside this article.
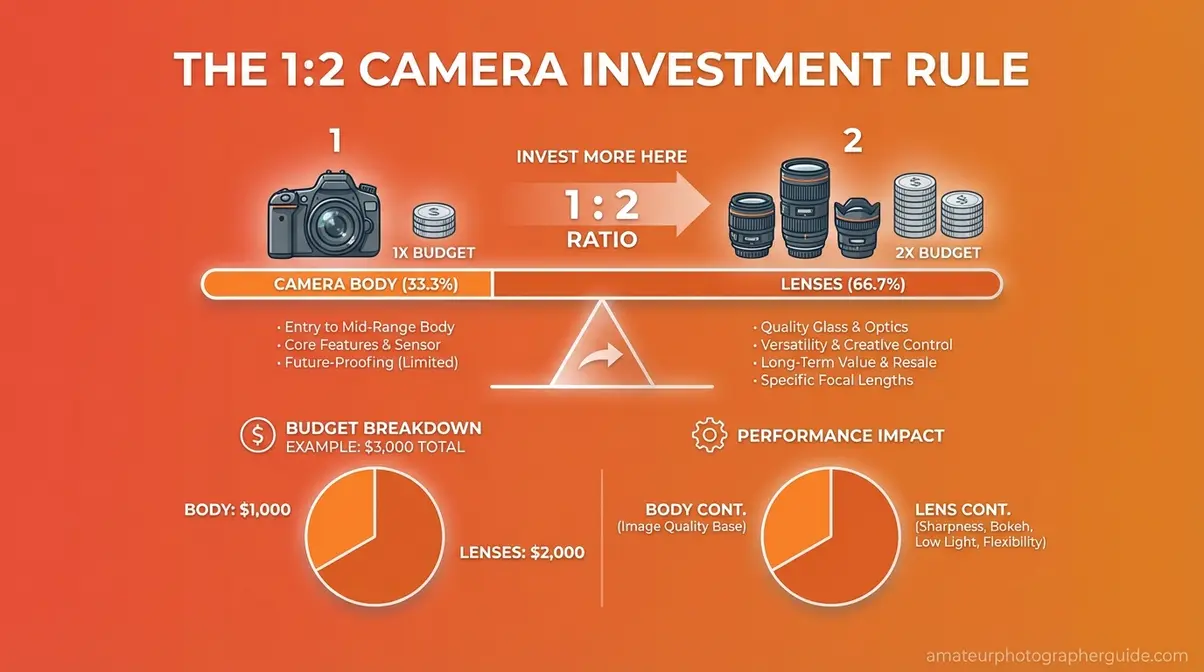
Caption: The 1:2 rule prevents the most common beginner mistake: spending everything on the body and leaving nothing for glass.
Now let’s apply this rule to three realistic budget tiers.
Budget Breakdown by Price Tier
Entry Tier ($700–$1,000 total): Your body target is $400–$600. The Canon R100 (~$479 body, or ~$599 with the 18-45mm kit lens as of Q2 2026) or the Nikon Z30 (~$600–$700 with 16-50mm kit lens as of Q2 2026) both fit here. Add a 50mm f/1.8 prime (~$125 for Canon or Nikon versions) as your first upgrade lens, two spare batteries (~$40–$60), a 128GB V30 SD card (~$25), and a basic camera bag (~$50). Total realistic spend: $850–$1,000.
Mid-Range Tier ($1,400–$2,200 total): Your body target is $800–$1,100. The Sony Alpha A6700 (~$1,399 body-only as of Q2 2026) or the Canon R50 (~$679 body-only) represent this tier. Budget for a kit zoom plus one quality prime, plus accessories. Total realistic spend: $1,600–$2,200. The A6700 specifically justifies its price with Sony’s best-in-class AI autofocus and built-in IBIS — worth the premium if you shoot video or fast-moving subjects.
Advanced Tier ($2,800–$4,500 total): Full-frame bodies — Sony A7 IV, Canon R6 Mark II, or Nikon Z6 III — sit in the $2,000–$2,800 body-only range. Full-frame matters most at print sizes above 16×20, in very low light, or for professional video production. For most beginners, this tier is unnecessary. Invest that premium in better glass instead.
A critical note on brand ecosystem: Canon RF lenses only fit Canon RF bodies. Sony E-mount lenses only fit Sony mirrorless. Nikon Z-mount lenses only fit Nikon Z bodies. Choosing a camera brand means choosing a long-term lens ecosystem — a decision with compounding financial implications over years of shooting.
Even within these tiers, most buyers forget four categories of costs that add 40–60% to their total spend.
Hidden Costs Most Guides Ignore
Our evaluation of first-year photography spending found that new camera owners consistently underestimate four categories of mandatory costs:
- Memory Cards: A UHS-I V30 card handles most still photography (~$20–$40 for 128GB). But 4K video burst shooting requires UHS-II V60 or V90 cards (~$60–$120). A slow card causes your camera to pause between shots — noticeably frustrating during action sequences or continuous video.
- Extra Battery + Charger: Mirrorless cameras average 300–400 shots per charge on CIPA ratings. Budget $30–$60 per extra battery. Third-party options (Wasabi Power, Patona) perform reliably at roughly half the OEM price.
- Editing Software: Adobe Lightroom runs ~$10/month; Capture One costs ~$24/month or a one-time license. Free alternatives — Darktable and RawTherapee — handle RAW files competently. Budget $0–$300/year depending on your preference.
- Camera Bag: $40–$150 for a quality bag. Carrying a mirrorless body without protection invites scratches, moisture damage, and dropped lenses. Don’t skip it.
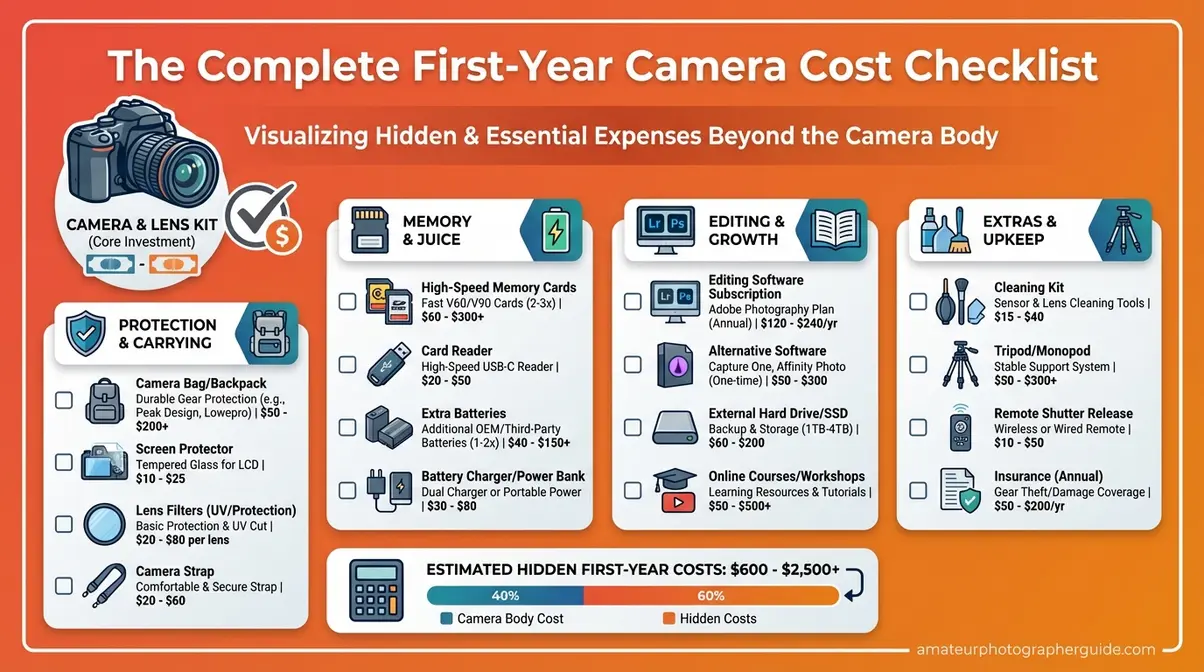
Caption: Budget for all four cost categories before you buy — hidden costs routinely add $300–$500 to first-year spending.
With your budget set using the 1:2 rule, Step 4 matches your camera specs to your specific shooting style.
Step 4: Match Specs to Your Style
Specs only matter in context. A 45-megapixel sensor is largely irrelevant for vlogging; 4K at 120fps is meaningless for portrait photography. The right question isn’t “which camera has the best specs?” — it’s “which specs matter for what I actually shoot?” This step maps three use-case categories to the specific technical requirements that genuinely affect your results, with concrete model recommendations for each.
As the University of Delaware’s Multimedia Design Center explains, mastering manual exposure settings — aperture, shutter speed, and ISO — is critical for anyone upgrading from a smartphone to a dedicated camera (University of Delaware Multimedia Design Center). Understanding these controls makes every spec below more actionable.
Portraits, Landscapes & Wildlife
For still photography use cases, the specs that matter vary significantly by subject.
Portraits and Family: The two specs that drive results are wide-aperture lens capability (f/1.8 or f/2.8 for background blur, or bokeh) and reliable face-tracking autofocus for moving subjects. The Canon R50 (~$679 body-only) pairs exceptionally well with the Canon 50mm f/1.8 RF-S lens for portrait work — Canon’s Dual Pixel CMOS AF tracks faces and eyes even on running children. The Sony A6700 (~$1,399) offers Sony’s most advanced AI subject-detection AF in an APS-C body, making it the benchmark for tracking fast-moving family subjects.
Landscapes: Dynamic range — the camera’s ability to capture detail in both bright highlights and dark shadows simultaneously — is the primary spec for landscape photography. APS-C sensors from Fujifilm and Sony handle landscape work beautifully. The Fujifilm X-T5 and Sony A7C II are both strong landscape options, with the Fujifilm’s 40MP sensor offering exceptional detail for large prints.
Wildlife and Sports: For fast-moving subjects, burst rate (frames per second) and AI autofocus tracking accuracy matter more than megapixel count — modern mirrorless systems track moving subjects with impressive consistency using AI subject detection. The Nikon Z50 II and Sony A6700 both offer 11+ FPS burst rates with subject-tracking AF that performs well on birds, athletes, and unpredictable animals. For wildlife, pair either body with a 100-400mm zoom lens.
What is Better, a 4K or 12MP Camera?
These measure completely different things and are not comparable. 12MP refers to still photo resolution (print size and crop flexibility). 4K refers to video resolution (approximately 8 megapixels per frame). For still photography, 12MP is more than adequate for prints up to 16×20 and all web use (Source: Digital Photography School). For video content creation, 4K at 30fps is the current standard minimum. Most modern cameras in the $600+ range now offer both — this is rarely an either/or decision.
Video shooters have a different set of priorities — and the wrong camera produces unusable footage no matter how capable the sensor is.
Video: YouTube, Vlogging & Filmmaking
For video content creators, three specs are non-negotiable.
YouTube and Vlogging: An articulating or flip screen is mandatory — you cannot frame yourself without one. Beyond that, 4K at 30fps minimum, a clean HDMI output for external recording, and a 3.5mm microphone input. The Sony ZV-E10 II (~$750 with kit lens) is Sony’s vlogger-focused APS-C mirrorless with a fully articulating screen and Sony’s AI autofocus. The Canon R50 (~$679) also has a flip screen and Canon’s excellent face-tracking, making it a dual-purpose portrait and vlogging body.
Filmmaking: Serious narrative work demands 4K at 60fps or higher for slow-motion flexibility, 10-bit color depth for color grading latitude, and IBIS (In-Body Image Stabilization) — a gyroscopic system that compensates for camera shake during handheld shooting. Without IBIS, handheld narrative footage looks shaky even at walking pace. The Sony FX30 (~$1,499) is a dedicated cinema-grade APS-C body with S-Log3 color science and full IBIS. The Blackmagic Pocket Cinema Camera 6K remains a popular option for color science at a lower price point.
Audio: Every internal camera microphone — regardless of price — is mediocre. Budget $80–$150 for a Rode VideoMicro or similar compact shotgun microphone if audio quality matters for your content. This single purchase improves video quality more than any camera upgrade at this price point.
Find our tested top camera recommendations for video creation and vlogging for a deeper comparison of flip-screen mirrorless options.
Many buyers need both — and modern hybrid cameras handle this better than ever.
Hybrid Shooting: Photo and Video
A hybrid camera is used equally for high-quality stills and video production. Not all cameras handle both well — some prioritize one over the other, and buying the wrong “hybrid” body is a common source of mid-budget regret.
The specs that define a genuine hybrid body: 4K at 60fps video combined with 24MP+ still resolution, IBIS for handheld video stability, dual card slots for simultaneous photo/video backup, and acceptable rolling shutter performance (rolling shutter causes fast-moving objects to appear skewed in video — a real problem in cheaper hybrid bodies).
Three specific hybrid recommendations stand out in 2026. The Sony A7 IV (~$2,498) is the benchmark full-frame hybrid — 33MP stills, 4K 60fps video, IBIS, and Sony’s AI autofocus in one package. The Sony A6700 (~$1,399) delivers the same AI autofocus and IBIS in an APS-C body at a significantly lower price, making it the best-value hybrid option for most buyers. The Fujifilm X-S20 (~$1,299) is a compact APS-C hybrid with 6.2K video, excellent film simulations for stills, and a comfortable grip — a strong choice for creators who want Fujifilm’s color science in a hybrid package.
You should now know which specs matter for your specific shooting style. Step 5 covers the decision that will affect your photography longer than any camera body: your lens system.
Step 5: Understand Your Lens System
The lens determines image quality more than the camera body — and knowing how to choose a camera lens is where the 1:2 rule pays off most directly. This is where your budget split matters most. A $300 lens on a $500 body consistently outperforms a $500 body alone with only a kit zoom. This step covers three concepts: focal length, aperture, and the kit-vs-prime decision — plus a day-one accessories checklist.
As Endicott College’s photography program recommends, for beginners, starting with a standard kit zoom lens — 18-55mm for APS-C sensors or 24-70mm for full-frame — maximizes versatility in the first year (Endicott College Photography Program). It’s the right starting point before committing to primes.
“Endicott College’s photography program recommends starting with a standard kit zoom lens — an 18-55mm for APS-C sensors or a 24-70mm for full-frame — to maximize versatility in the first year.”
Focal Lengths Explained
Focal length, measured in millimeters (mm), determines how wide or zoomed-in your shot appears. Think of it as your field of view: lower numbers see more, higher numbers reach farther.
Wide (10–35mm): Captures a broad field of view. Use for landscapes, architecture, group photos, and tight indoor spaces. Trade-off: wide lenses distort faces at close range — unflattering for individual portraits.
Standard (35–85mm): Closest to what your eyes see naturally. The 50mm f/1.8 is the single most recommended first prime lens for beginners — versatile, affordable (~$125 for Canon or Nikon versions), and capable of the creamy background blur that makes portrait photos pop. Use for portraits, street photography, and everyday shooting.
Telephoto (85–600mm+): Compresses distance and brings distant subjects close. Use for wildlife, sports, and concerts. Trade-off: telephoto lenses are heavier, more expensive, and require good light or a fast shutter speed to avoid blur from camera shake.
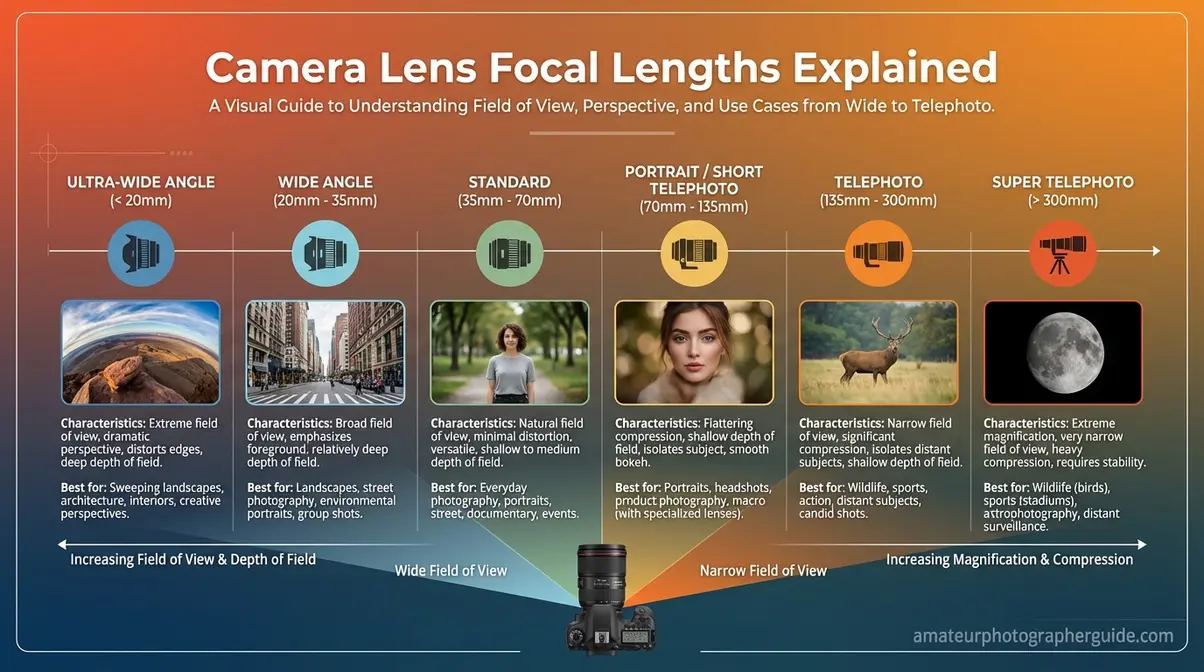
Caption: Focal length cheat sheet — the most practical reference for choosing your first lens based on what you shoot.
For a deeper breakdown, our guide to choosing your first camera lens covers mount compatibility and budget lens picks across all major systems.
Focal length tells you what to shoot. Aperture tells you how the photo will look.
Your First Lens: Kit Zoom vs. Prime
“The sensor is the heart of the camera. A simple rule of thumb is the bigger the sensor, the better the image quality, especially in low light.”
This principle extends directly to lenses: aperture — the lens opening that controls how much light reaches the sensor and how blurry the background appears — is the most important lens specification for image quality and creative control.
The Kit Zoom (e.g., 18-55mm f/3.5-5.6): Included with most camera bodies, it covers wide to short-telephoto range. Its limitation is a maximum aperture of f/3.5–5.6, which means weaker background blur and reduced low-light performance. Verdict: great for your first three months. Learn on it, then upgrade.
The 50mm Prime (f/1.8): The most recommended first upgrade at ~$125. The fixed focal length forces you to physically move to compose shots — which builds compositional instincts faster than any zoom. Its wide f/1.8 aperture produces genuine background blur (bokeh) and performs noticeably better in low light. Endicott College’s photography program specifically endorses this starting point for BFA coursework (Endicott College).
Lens Mount Compatibility Warning: This is the most overlooked beginner mistake. The Canon R100 uses the RF-S mount — only compatible with Canon RF and RF-S lenses natively. Sony mirrorless uses E-mount. Nikon Z uses Z-mount. Buying a camera body locks you into that brand’s lens ecosystem. Adapters exist for legacy lenses (Canon EF on RF bodies, Nikon F on Z bodies) but add cost and occasionally reduce autofocus speed.
The Day-One Accessories Checklist
Beyond the camera body and first lens, these essential camera accessories are mandatory for day-one shooting:
| Accessory | Recommended Spec | Approximate Cost |
|---|---|---|
| Memory Card | 128GB UHS-I V30 (stills); V60/V90 for 4K video | $20–$80 |
| Extra Battery | OEM or reputable third-party (Wasabi, Patona) | $30–$60 |
| Camera Bag | Padded, fits body + 1–2 lenses | $40–$150 |
| Editing Software | Lightroom (~$10/mo) or Darktable (free) | $0–$120/year |
| Lens Cleaning Kit | Microfiber cloth + air blower | $10–$20 |
| Tripod (optional) | Carbon fiber travel tripod for landscapes/video | $50–$200 |
This checklist is where the 1:2 Camera Investment Rule becomes tangible: accessories alone typically add $150–$400 to your startup cost, before you’ve bought a single additional lens.
Step 6: Test Before You Commit
Specifications tell you what a camera can do. Holding it tells you whether you’ll want to use it. Our team’s evaluation across dozens of camera bodies over the past several years found one consistent pattern: ergonomics and menu navigation drive long-term satisfaction more than any spec that looks impressive on paper. A camera you love to pick up gets used; a camera that feels awkward sits on a shelf.
What to Evaluate In-Store
When you handle a camera before buying — in-store or using a retailer’s return window — evaluate these five things:
- Grip comfort: Hold the camera with your shooting hand for 60 seconds. Does it feel secure? Is your index finger naturally resting near the shutter? Smaller hands often struggle with full-frame DSLR grips; larger hands may find compact mirrorless bodies cramped.
- Menu navigation: Navigate to the autofocus settings without reading the manual. If you can’t find it in 90 seconds, that menu system will frustrate you for years.
- Autofocus feel: Point the camera at a moving subject (a person walking, a car outside) and half-press the shutter. Does the AF lock quickly and confidently, or does it hunt and hesitate?
- Viewfinder vs. live view: Look through the EVF or OVF. Does the image feel bright and clear? For mirrorless, does the EVF show enough detail to manually focus?
- Weight with lens attached: Mount the kit lens and hold the combination for two minutes. This is the actual weight you’ll carry. Many buyers choose a body based on body weight, then discover the lens doubles the load.
If you’re buying online, choose retailers with a 30-day return window (B&H Photo, Amazon) and treat the first two weeks as your in-home evaluation period. Shoot in your actual conditions — your living room, your local park, your kid’s soccer practice — not just test shots in perfect light.
New vs. Used: Second-Hand Market
The used camera market is one of the most overlooked tools for getting excellent image quality at entry-level prices. Camera bodies depreciate significantly after the first year, while the underlying image quality remains identical.
Across photography communities — from Reddit’s r/photography to DPReview forums — the consistent recommendation for used camera buying is: buy from reputable sellers with shutter count data. Every camera shutter has a rated lifespan (typically 100,000–200,000 actuations). A used camera with 15,000 shutter actuations has 85–90% of its mechanical life remaining.
Strong used-market options in 2026 include the Canon Rebel SL3 ($250–$350), Nikon D3500 ($200–$300), and Sony A6400 ($550–$700) — all discontinued models that delivered genuine image quality at launch and remain fully capable in 2026. Buy used from B&H Photo’s used department, KEH Camera, or Adorama’s used listings for verified condition ratings and return policies.
Step 6 Checkpoint
Before purchasing, confirm you can answer all six questions:
- ✅ Profile: Which photographer profile are you? (Traveler / Portrait / Wildlife / Video / Hybrid)
- ✅ Type: Which camera type fits? (Mirrorless / DSLR / Compact)
- ✅ Budget: What is your total budget, including lenses and accessories? (Apply the 1:2 rule)
- ✅ Specs: Which two or three specs matter most for your use case?
- ✅ Lens ecosystem: Which brand’s mount system will you commit to long-term?
- ✅ Tested: Have you held the camera and confirmed it feels right in your hands?
If you can answer all six, you’re ready to buy.
Specialty Cameras Overview
Not every camera purchase is about photography or video creation. Three specialty categories serve completely different use cases — and choosing the wrong one is a common waste of money.
Dash Cameras
A dash camera records your drive continuously, providing evidence in accidents and insurance disputes. The specs that matter are completely different from photography cameras: loop recording (automatically overwrites old footage), parking mode (records while the car is off), GPS logging (records location data), and night vision quality for low-light recording.
For most drivers, a 1080p front-facing dash cam from Vantrue, Garmin, or Nextbase in the $80–$150 range covers all practical needs. If you want front and rear coverage, dual-channel models start at ~$120. Avoid sub-$40 no-name cameras — compression artifacts make license plates unreadable, defeating the primary purpose.
Home Security & Surveillance Cameras
Security cameras prioritize continuous recording, remote access, motion detection, and weather resistance over image quality. The key decisions are wired vs. wireless (wired is more reliable; wireless is easier to install), local vs. cloud storage (local is more private; cloud enables remote access), and indoor vs. outdoor ratings (look for IP65 or IP67 weather resistance for exterior placement).
Reputable brands in 2026 include Arlo, Wyze, Ring, and Reolink — ranging from $30 for basic indoor cameras to $300+ for professional outdoor PTZ (pan-tilt-zoom) units. For most homeowners, a 2–4 camera Wyze or Reolink system with local NVR storage offers the best balance of cost and reliability.
Action Cameras & GoPros
Action cameras are designed for mounting on helmets, bikes, surfboards, and vehicles — capturing first-person footage in conditions that would destroy a standard camera. If you need rugged performance, check our action cameras guide. The defining specs are waterproofing depth, stabilization quality (HyperSmooth on GoPro is the benchmark), and battery life during active recording.
The GoPro HERO13 Black remains the benchmark action camera in 2026, with 5.3K video, 10-meter waterproofing without a housing, and HyperSmooth 6.0 stabilization. The DJI Osmo Action 5 Pro is a strong competitor at a slightly lower price with a larger front-facing screen. For budget buyers, the GoPro HERO (entry-level) or older HERO11 Black (available used) offer excellent stabilization at lower cost.
Common Mistakes When Choosing
Our team has reviewed dozens of first-time buyer regret posts across photography communities. The same mistakes appear repeatedly — and they’re all avoidable.
When to Stick With Your Smartphone
The most expensive camera mistake isn’t buying the wrong camera. It’s buying any camera when your phone was already sufficient.
Stick with your smartphone if your primary output is social media at standard viewing sizes. A Pixel 9 Pro or iPhone 16 Pro produces images that are genuinely indistinguishable from entry mirrorless output when viewed at phone or web resolution. The computational photography in 2026 flagship phones — Night Sight, Portrait Mode, Action Pan — closes the gap significantly for casual shooting.
The clearest signs you don’t need a dedicated camera yet: you’ve never printed a photo larger than 5×7, you shoot exclusively in good light, and your current phone photos look good to you 90% of the time. Upgrade your skills first; upgrade your gear when skills create the bottleneck.
Gear Mistakes That Cost Beginners Money
Common frustrations reported by first-time buyers follow predictable patterns. After evaluating photography community discussions across Reddit, DPReview, and photography forums, these five gear mistakes account for the majority of buyer regret:
1. Buying the body, ignoring the lens: A $900 camera with only the kit lens underperforms a $500 camera with a quality 50mm prime. The glass shapes the image; the body records it. This is why the 1:2 Camera Investment Rule exists.
2. Choosing a camera brand without checking lens prices: Canon RF lenses are significantly more expensive than Sony E-mount lenses at equivalent quality levels. Check the lens ecosystem before committing to a body.
3. Buying new when the used market offers identical quality: A used Sony A6400 at $550 produces images identical to a new A6400 at $900. The sensor doesn’t wear out.
4. Overpaying for megapixels: A 24MP camera and a 45MP camera produce visually identical images for web use and standard print sizes. The extra megapixels only matter for very large prints or heavy cropping.
5. Skipping the return window test: Buying a camera without physically testing it — or without using a return window — is the fastest route to regret. Ergonomics are subjective; specs are not.
Frequently Asked Questions
How do I know which camera is best for me?
The best camera for you matches your primary shooting scenario, not the highest specs. Start by identifying your photographer profile: travel, portrait, wildlife, video, or hybrid. Then match a camera type (mirrorless for most buyers, DSLR for budget/used buyers, compact for minimalists) to your total budget using the 1:2 rule. For a beginner shooting portraits and family events, a Canon R50 with a 50mm f/1.8 lens outperforms a $2,000 body with only a kit zoom.
Which camera should a beginner buy?
The Canon EOS R100 (~$479 body, ~$599 with kit lens as of Q2 2026) is the clearest beginner mirrorless recommendation for most buyers. It’s Canon’s smallest RF-series body, uses Canon’s reliable Dual Pixel CMOS AF, and pairs well with the affordable Canon 50mm f/1.8 as a first prime lens. For vloggers who need a flip screen, the Nikon Z30 (~$600–$700 with kit lens) is the better choice. Budget buyers should consider the used Sony A6400 (~$550) for Sony’s AI autofocus at a lower price.
What is the 20-60-20 rule in photography?
The 20-60-20 rule is a composition guideline for landscape photography, not a camera-buying rule. It suggests that roughly 20% of your frame should be foreground, 60% should be your primary subject or midground, and 20% should be sky — creating a visually balanced composition (Source: Digital Photography School). Some instructors apply it differently to portrait lighting ratios. It’s a useful starting framework for composition, but experienced photographers treat it as a loose guideline rather than a rigid formula.
How much memory card speed do I actually need?
For still photography, a UHS-I V30 card (look for the “V30” label) handles everything up to high-speed burst shooting. A 128GB V30 card costs $20–$40 and is sufficient for most beginners. If you shoot 4K video continuously or use a camera with a dual card slot for video backup, upgrade to a UHS-II V60 or V90 card ($60–$120). The speed rating matters because a slow card causes your camera to pause between burst shots — genuinely frustrating during action photography.
Do I need a full-frame camera as a beginner?
No, a full-frame camera is rarely necessary for a beginner. Full-frame sensors offer advantages in extreme low-light situations and for printing massive images (larger than 16×20 inches). However, APS-C (crop sensor) cameras are lighter, more affordable, and produce professional-quality images that are indistinguishable from full-frame shots for everyday use and web sharing.
How many megapixels is enough for everyday photography?
For standard prints and digital sharing, 12 to 16 megapixels is more than enough. A 12MP image can be printed at 11×14 inches with excellent clarity. Modern entry-level cameras typically offer 20 to 24 megapixels, which provides plenty of extra resolution for cropping in on your subject without losing noticeable quality.
Your Next Step
For any buyer in 2026 who is ready to move beyond their smartphone, the path forward is clear. Mirrorless cameras now represent the modern standard for interchangeable-lens photography, with CIPA data confirming that mirrorless shipments grew 13% in 2026 while DSLR production continued its structural decline. The Canon R100 at ~$479 or the Nikon Z30 at ~$600–$700 give most entry-level buyers a future-proof starting point — particularly when paired with a 50mm f/1.8 prime and a realistic total budget built on the 1:2 Camera Investment Rule.
The 1:2 Camera Investment Rule is the framework that changes how you budget: for every $1 spent on a camera body, plan $2 for lenses and accessories. A $500 body with a $300 lens and $200 in accessories outperforms a $1,000 body with only a kit zoom — every time. The glass shapes the light; the body records it.
Your clearest next step: identify your photographer profile from Step 1, confirm your total budget using the 1:2 rule, then handle your top two candidate bodies in-store or with a return-window purchase before committing. If you’re focused on lenses next, our guide to choosing your first camera lens covers every mount system with specific beginner picks. Don’t wait for the perfect moment — the best camera is the one you’re actually using.
Last update on 2026-07-21 / Affiliate links / Images from Amazon Product Advertising API
Dave King
Hi, I'm Dave, the founder of Amateur Photographer Guide. I created this site to help beginner and hobbyist photographers build their skills and grow their passion. Here, you’ll find easy-to-follow tutorials, gear recommendations, and honest advice to make photography more accessible, enjoyable, and rewarding.