
Table of Contents
- Is Your Sensor Actually Dirty? The Diagnostic Test
- What You’ll Need Before You Start
- Step 1 — Run the Camera’s Built-In Self-Cleaning Mode
- Step 2 — Dry Cleaning with a Rocket Blower
- Step 3 — Wet Cleaning with a Sensor Swab
- Brand-Specific Sensor Cleaning Settings
- DIY Alternatives and What NOT to Use
- DIY vs. Professional Cleaning — What Does It Cost?
- Common Mistakes and When to Call a Professional
- Frequently Asked Questions
- Conclusion
This blog post may contain affiliate links. As an Amazon Associate I earn from qualifying purchases.

You’ve just imported your shots from a weekend hike and spotted it — a dark, smudgy blob in the same corner of every single photo, most visible against that open blue sky at f/16. It doesn’t move. It doesn’t disappear when you switch lenses. That frustrating, stationary spot is almost certainly sensor dust. Learning how to clean a camera sensor safely is the skill that gets you back to shooting without an expensive trip to the repair shop.
The fear is real, and it’s understandable. One wrong move — a cotton bud, a can of compressed air, a puff of breath — can make the problem far worse and potentially cause damage that costs hundreds to fix. Most photographers reach for exactly the wrong things first. This guide walks you through a strict hierarchy: the safest method first, physical contact only as a last resort.
By the end, you’ll know exactly how to diagnose sensor dust, gather the right equipment, work through a proven three-step cleaning process, and recognize the handful of situations where calling a professional is the smarter call.
Cleaning a camera sensor safely means following a strict hierarchy — auto-clean first, then dry blower, then wet swab only if needed. Most dust can be removed without ever touching the sensor surface.
- Always start with your camera’s built-in self-cleaning mode before touching anything
- Use a Rocket Blower (never canned air — propellant residue causes irreversible coating damage)
- The Sensor Sandwich Protocol means you’re cleaning glass filters, not raw electronics — it’s safer than you think
- Wet cleaning requires size-matched swabs and specialist fluid (not isopropyl alcohol)
- Mirrorless users: activate Cleaning Mode to lock IBIS before inserting any tool
Is Your Sensor Actually Dirty? The Diagnostic Test
A dirty camera sensor shows as dark, stationary spots in the same position across multiple photos when shot at f/16 or f/22 against a bright, even background. This is the photography community’s standard definition, confirmed by WEX Photo Video as the diagnostic benchmark. Before running any test, know this: a dirty viewfinder is the single most common false alarm — thousands of photographers have booked professional services only to be told their sensor was perfectly clean. Running the correct test first saves time, money, and unnecessary risk.
This section covers how to run the test and, critically, how to interpret what you’re seeing — because not every dark spot means sensor cleaning is required.

Caption: Side-by-side comparison of sensor dust (stationary, defined edges) vs. lens dust (soft, positionally variable) at f/22.
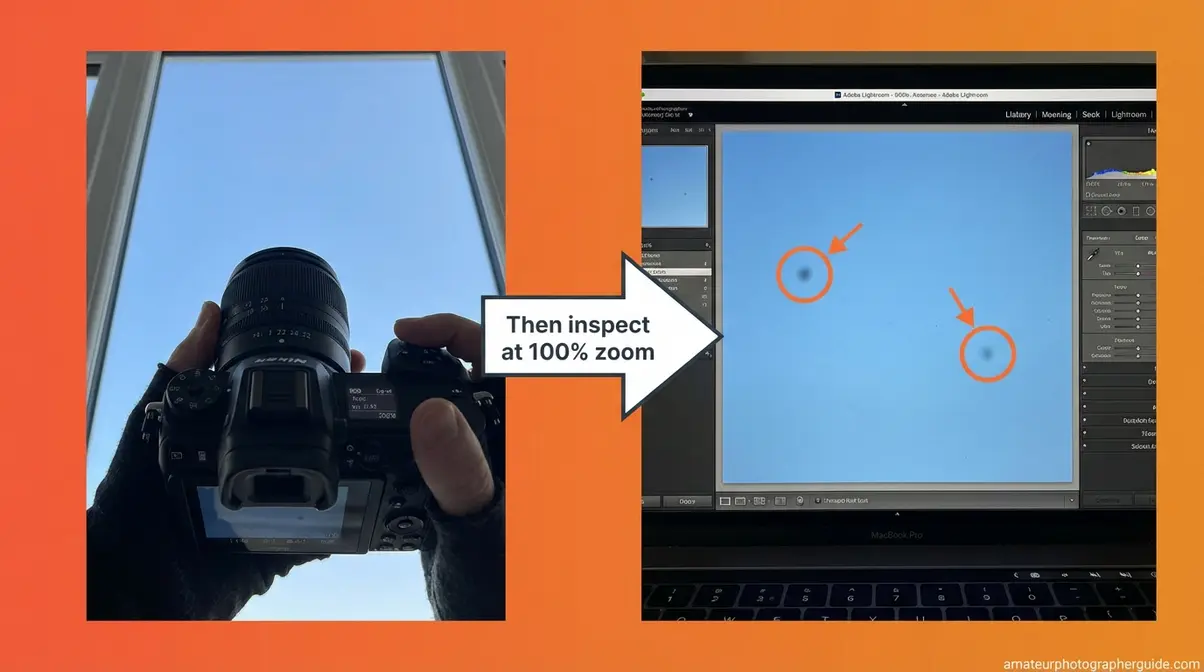
The f/22 Sky Test: Your First Diagnostic Step
For a DSLR or mirrorless camera, this test works the same way. The f/22 sky test is the photography community’s standard diagnostic method for confirming sensor dust (WEX Photo Video guide, 2024).
Follow these steps precisely:
- Set aperture to f/16 or f/22. Use Aperture Priority mode (marked Av on Canon, A on Nikon and Sony). Narrower apertures (higher f-numbers) increase depth of field — the lens brings everything, including dust particles on the sensor filter, into sharp focus. At f/4 or f/5.6, most dust is invisible or blurry.
- Point the camera at a bright, evenly lit surface. A clear blue sky or a white wall in good lighting both work. The goal is a uniform background with no detail to confuse results.
- Take 3–4 shots, slightly varying the framing. Do not change lenses between shots.
- Import to your computer and zoom to 100%. Dark spots that appear in the exact same position in every frame are sensor dust. Spots that shift position or disappear are likely lens dust or a smudge on the viewfinder eyepiece.
Key clarification: If spots only appear when looking through the viewfinder but disappear in the actual photos, that is viewfinder dust. Cleaning the sensor won’t fix it — and no sensor cleaning is needed at all.
Video: Camera Sensor Dust Sky Test — Step by Step Tutorial” — Source: “Create
Dust on the Sensor vs. Dust on the Lens
Whether you’re dealing with a digital camera sensor in a mirrorless or DSLR body, the diagnostic process is identical — but what you find determines the fix. This comparison table is the most practical quick-reference in the guide:
| Location | Appears in photos? | Position stable across frames? | Fix required |
|---|---|---|---|
| Sensor dust | Yes | Yes — same spot every shot | Sensor cleaning (this guide) |
| Lens dust (rear element) | Sometimes at small apertures | Moves if lens is removed or swapped | Cleaning your camera lenses |
| Viewfinder dust | Never in photos | Visible only in optical viewfinder | Clean viewfinder eyepiece only |
| Dead pixel | Yes | Exact same pixel, perfectly sharp edge | Camera service required — not a cleaning issue |
Hot pixels (bright, colored stuck pixels — often red or blue) are also not sensor dust. They are electronic faults caused by long exposures or sensor aging, and no amount of cleaning will resolve them. If the test reveals lens dust, see our guide on cleaning your camera lenses for the correct process.
With your sensor confirmed as dirty, it’s time to prepare — and the items you choose to use (and avoid) will determine whether this process is safe or risky.
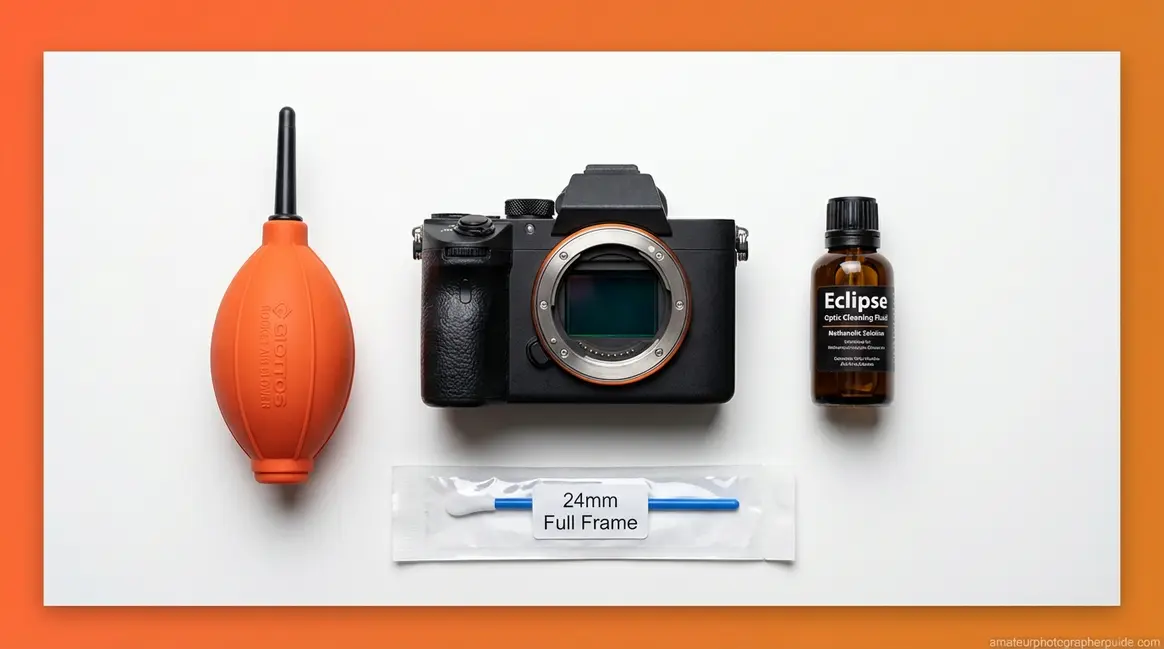
What You’ll Need Before You Start
The single most important rule of sensor cleaning is this: the tool you choose determines the outcome. A proper Rocket Blower costs under $15 and removes the majority of sensor dust without ever touching the sensor. A can of compressed air or a cotton bud can strip the anti-reflective coating from your sensor in a single use — damage that is, in most cases, irreversible.

Caption: The three-tier cleaning hierarchy — always exhaust each level before moving to the next.
The Safe Cleaning Toolkit: What to Buy
As Mirrorless cameras expose the sensor immediately upon lens removal, dust accumulation risk rises with every lens change — making a proper kit essential (B&H Explora guide, 2024). Here is every item you need, and exactly why each one matters:
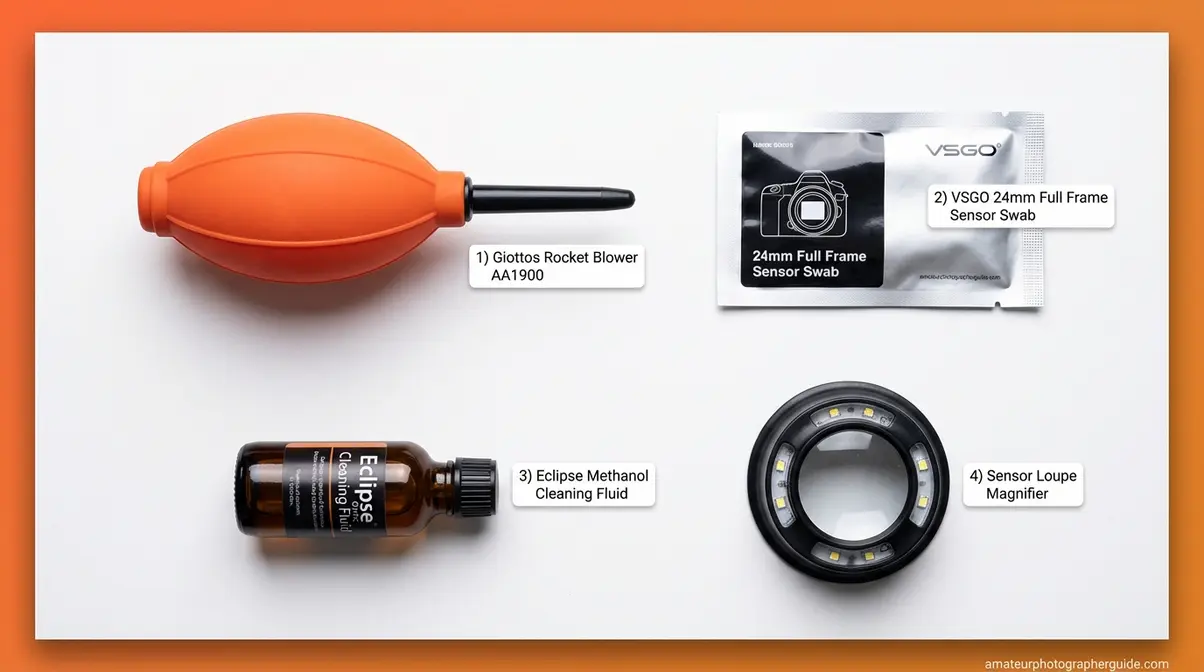
- Rocket Blower (e.g., Giottos Rocket Blower AA1900, Giotto Rocket-Air Blaster). A manually-operated rubber bulb blower using only air — no propellant. Buy the largest bulb available for maximum air volume. This is the most critical tool. Do NOT substitute aerosol air.
- Sensor Cleaning Swabs. Must be size-matched: Full-Frame (24mm), APS-C (16mm), or Micro Four Thirds (14mm). VSGO and Photographic Solutions represent reliable industry standards. Critical rule: one time use only — discard each swab after a single pass.
- Specialist Sensor Cleaning Fluid. Eclipse fluid (methanol-based) is standard for most sensors. For Sony Alpha cameras with fluorine coatings, use VSGO DDR-24 to prevent coating degradation. Use 1–2 drops max. Never use isopropyl alcohol.
- Sensor Loupe (optional). Helpful for visual confirmation of dust before and after cleaning, though not mandatory for the process.
All four items are available at B&H Photo, Amazon, or any dedicated camera retailer. For a complete breakdown of every accessory a camera owner needs, including essential sensor cleaning tools, see our full accessory guide.
Without a kit, a Rocket Blower alone can handle most dry dust — but never substitute household items for sensor swabs.
Now that you know what to buy, it’s equally important to know what’s already in your home that you should absolutely never use.
Dangerous Household Items to Leave in the Drawer
Canon explicitly warns users not to use spray blowers or pressurized air, as the gas can freeze the sensor or damage the coating (official Canon cleaning guidelines, 2024). Understanding why each item fails helps the warning stick:
- Canned air / compressed air. Propellants (often difluoroethane) can freeze sensor coatings at -26°C on contact. This damage is irreversible.
- Q-tips / cotton buds. Cotton fibers shed micro-strands that embed in coatings. Rigid shafts apply uncontrolled pressure that can scratch filters.
- Breath / blowing with mouth. Saliva and moisture create wet smudges far worse than dry dust, forcing a wet clean.
- Windex / lens wipes. These contain detergents or additives that leave streaks and degrade anti-reflective coatings.
- WD-40 / lubricants. Leaves oil residue requiring professional ultrasonic cleaning to remove.
If you’ve already used a household item and created a smudge on your camera sensor, skip to the Wet Cleaning section — but use proper materials this time. For a complete breakdown of risk scenarios, see our dedicated guide on preventing sensor damage.
Before you even pick up the Rocket Blower, there are three non-negotiable safety conditions to confirm.
Pre-Cleaning Safety Checklist
Fujifilm recommends turning the camera on to activate the built-in vibration cleaning cycle before any manual cleaning (Fujifilm’s recommended cleaning sequence, 2024). Confirm all three conditions before proceeding:
- Battery charge ≥80%. If power fails during cleaning, the shutter or mirror can close on your tool, permanently damaging the curtain. This is non-negotiable.
- Dust-free indoor environment. Close windows/doors for 10 minutes to let airborne particles settle. Never clean outdoors or in high-traffic areas.
- Correct swab size. Verify your sensor format (Full Frame vs APS-C). Oversized swabs miss edges; undersized ones require risky multiple passes.

Caption: Confirm all three conditions before opening the camera body — skipping any one of them creates avoidable risk.
Checklist complete. Now work through the three-step cleaning process in order — and resist the urge to skip steps.
Step 1 — Run the Camera’s Built-In Self-Cleaning Mode

Built-in self-cleaning is the safest possible first step because it requires no tools and involves zero contact with the sensor surface. Every major camera manufacturer — Canon, Nikon, Sony, and Fujifilm — includes this feature in their modern bodies, and that fact alone should be reassuring: camera built-in self-cleaning uses ultrasonic vibration to dislodge loose dust particles — it is risk-free and should always be run before any manual cleaning attempt. For many photographers, this one step resolves the problem entirely.
After running the mode, repeat the f/22 sky test to confirm whether spots remain before proceeding further.
Activating Self-Cleaning by Brand
Sony’s official support documentation confirms that Cleaning Mode must be activated before any blower or manual cleaning attempt to prevent IBIS mechanism contact (Sony’s sensor support page, 2024). Here are the exact menu paths for each major brand:
- Canon EOS R Series (R, RP, R5, R6, R6 Mark II, R7, R8, R10, R50):
- Menu → Yellow Setup Tab (wrench icon) → Tab 4 → “Sensor Cleaning” → Select “Clean Now” for immediate vibration, or “Clean Manually” to open the sensor for physical cleaning. For model-specific settings across the full Canon lineup, see our Canon camera maintenance hub.
- Nikon Z Series (Z5, Z5 II, Z6, Z6 III, Z7, Z8, Z9, Zfc, Z30, Z50):
- Menu → Setup Menu (wrench icon) → “Sensor Cleaning” → “Clean Now.” IBIS locks automatically when Cleaning Mode activates.
- Nikon D Series DSLR (D3500, D5600, D7500, D850):
- Menu → Setup Menu → “Lock Mirror for Cleaning.” ⚠️ This mechanically locks the mirror in the UP position using the shutter — it exposes the sensor but does NOT trigger ultrasonic vibration. Treat this as Cleaning Mode activation, not automatic self-cleaning.
- Sony Alpha Series (A7 IV, A7R V, A6700, A9 III, A1):
- Menu → Setup 2 (suitcase icon, page 2) → “Cleaning Mode” → OK. ⚠️ IBIS Warning: On all Sony Alpha bodies with In-Body Image Stabilization (IBIS — the moving mechanism inside mirrorless cameras), activating Cleaning Mode locks the sensor assembly in place. Do NOT skip this step before using a blower or swab.
- Fujifilm X Series (X-T5, X-T30, X-S20, X100VI):
- Power OFF → Power ON — the camera automatically runs cleaning on startup. Can also be triggered via: Menu → Wrench 5 → “Sensor Cleaning.”
After running self-cleaning, re-take the f/22 sky test. Spots gone? You’re done. Spots remain? Proceed to Step 2.
If spots remain after self-cleaning, don’t panic. Most stubborn spots respond to the next step — a Rocket Blower — still with no contact with the sensor surface required.
What Sensor Self-Cleaning Actually Does (and Its Limits)
Whether you’re cleaning a mirrorless camera sensor or a DSLR, self-cleaning is step one for the same reason: it carries zero damage risk. The mechanism works by using a piezoelectric element to vibrate the low-pass filter (the outermost glass layer of the sensor stack) at a specific high frequency, shaking loose dry particles so they fall away from the surface.
Effective for: Dry dust, pollen, and loose particles resting on the surface.
Not effective for: Oil smudges, fingerprint residue, propellant contamination from canned air, or particles physically embedded in the coating.
Run self-cleaning 1–2 times only. Running it 10 or 15 times adds no benefit — if spots persist after two cycles, the vibration isn’t going to shift them. Nikon advises that if a blower does not remove foreign matter, the camera should be serviced by authorized personnel rather than attempting further DIY methods (Nikon’s sensor maintenance advisory, 2024). That advice reinforces an important point: manufacturer-endorsed self-cleaning is normal maintenance — not a dangerous special operation reserved for technicians.
Self-cleaning mode cleared the easy dust. Now for the stubborn loose particles the vibration couldn’t shift: the Rocket Blower.
Step 2 — Dry Cleaning with a Rocket Blower

The Rocket Blower removes the majority of stubborn sensor dust with zero contact risk. Holding the camera with the lens mount facing down while using a Rocket Blower lets gravity pull dislodged particles away from the sensor rather than redepositing them — an established principle in professional photography communities that competitors consistently omit. This is the step where most cleaning journeys end, successfully. The Rocket Blower handles loose, dry particles that survived the built-in vibration cycle. It will not shift oil smudges or wet contamination.
Choosing a Rocket Blower (and What to Avoid)
The Giottos Rocket Blower AA1900 is the most widely referenced manual air blower across professional photography communities. The Giotto Rocket-Air Blaster is an acceptable alternative. When buying, prioritise the largest bulb available — greater air volume per squeeze means more effective dust dislodging per puff.
One absolute rule: No canned or aerosol compressed air. No products marketed as “camera air dusters.” The propellant (often difluoroethane or HFC-134a) condenses on contact with the sensor coating and can freeze it at around -26°C — irreversible damage that no subsequent cleaning can fix (official Canon cleaning guidelines, 2024).
A note on sensor cleaning brushes: the VisibleDust Ultra MXD-100 is an intermediate option between the blower and a wet swab for stubborn dry particles. However, brushes require careful anti-static technique and are beyond the scope of a beginner workflow. Stick to the blower → swab hierarchy for your first several cleanings. LensRentals’ technical data also confirms that gel stick cleaners can strip the coating off certain Sony sensors and that compressed air risks should be treated as categorically off the table (risks of using gel sticks on Sony sensors, 2024).
With the right blower in hand, here’s the exact technique that minimises the risk of redistributing dust instead of removing it.
How to Use a Rocket Blower Correctly
Follow these steps in order:
- Activate Cleaning Mode on your camera (see Step 1 for your brand’s menu path). This keeps the shutter open and, on mirrorless bodies, locks the IBIS.
- Remove the lens and set the camera body on a clean, flat surface with the lens mount facing upward. This orientation prevents dislodged particles from falling back onto the sensor.
- Hold the Rocket Blower nozzle 1–2 cm (approximately a finger-width) from the sensor surface. Do NOT insert the nozzle tip into the mirror box or touch the sensor filter.
- Squeeze in short, sharp bursts — 3–5 puffs, working from one side of the sensor to the other. Avoid one long continuous stream, which redistributes rather than removes dust.
- Tilt the camera body so the lens mount faces DOWN. Deliver 2–3 more short puffs. Gravity now assists particle removal, pulling dislodged dust away from the sensor surface rather than back onto it.
- Reattach the lens, exit Cleaning Mode, and retake the f/22 sky test.
After completing the blower steps, take your diagnostic photo. Now comes the decision that separates photographers who keep cleaning from those who should have stopped.
Decision Point: Stop Here or Proceed to Wet Cleaning?
Take the f/22 sky test photo after the blower step, then read your result:
- ✅ Spots are GONE → You’re done. Reattach the lens and shoot.
- ⚠️ Spots shifted to different positions → Normal. Some dust migrated. Run the blower sequence once more.
- ❌ Same spots, same positions after 2 blower attempts → Proceed to Step 3 (Wet Cleaning).
- 🚫 You see a smear or streak (not spots) → Moisture from breathing on the sensor, or propellant residue. Wet cleaning with specialist fluid is now required.
The majority of photographers can stop here. Wet cleaning is needed less often than most guides imply — many photographers run the blower sequence twice a year and never reach for a swab.

Caption: Follow the decision tree after each cleaning attempt — never skip straight to wet cleaning before exhausting dry methods.
If you’ve reached this point, the stubborn spots require a sensor swab and specialist fluid. Before you make contact with the sensor, there is one crucial piece of knowledge that will make this feel far less intimidating.
Step 3 — Wet Cleaning with a Sensor Swab
Most photographers hesitate before wet cleaning for a sensible reason: they imagine scrubbing raw, exposed electronics with liquid. The Sensor Sandwich Protocol reframes this entirely. What you call “the sensor” is actually the outermost glass layer of a multi-filter protective stack. You are cleaning a glass surface — the same category of material used in camera lens elements — not delicate circuitry.
Understanding the Sensor Sandwich: Why This Is Safer Than You Think
The Sensor Sandwich Protocol defines exactly what you’re touching when you clean a camera sensor. Your camera’s imaging system is not one exposed piece of silicon — it is a layered stack of optical glass filters. From front to back:
- IR Cut Filter (Infrared Blocking Filter) — The outermost glass layer you actually clean. Its job is to block infrared light from reaching the sensor. This is robust optical glass, the same category as lens glass.
- Low-Pass Filter (Anti-Aliasing Filter) — The second layer, directly behind the IR cut filter. It reduces moiré patterns (the wavy interference patterns that appear in fine repeating textures). Also glass.
- Image Sensor (Silicon) — The actual light-sensitive layer that records your image. It sits recessed behind both glass filters. You never directly touch this layer during any recommended cleaning method.
LensRentals confirms that the outermost cleaning surface is the protective filter stack, not the silicon sensor — and that gel sticks risk stripping the fluorine coating on this glass layer (risks of using gel sticks on Sony sensors, 2024). Think of it this way: cleaning the sensor is closer to cleaning a camera lens element than it is to handling circuit boards. When guides warn about “extreme delicacy,” they are right about technique — but they are misleading about what you are physically touching.

Caption: The Sensor Sandwich Protocol: the glass surface you clean (IR cut filter) sits two layers above the actual silicon image sensor.
Now that you understand what you’re cleaning, the next decision is which swab to use — and getting the size wrong is the most common beginner mistake.
Choosing the Right Swab Size and Cleaning Fluid
Matching swab size to sensor format is not optional — an oversized swab can drag fluid outside the sensor area; an undersized swab may require multiple passes, increasing streak risk.
| Sensor Format | Sensor Size | Correct Swab Size | Example Cameras |
|---|---|---|---|
| Full Frame | 36×24mm | 24mm swab | Sony A7 IV, Canon EOS R6 Mark II, Nikon Z6 III |
| APS-C | ~23×15mm | 16mm swab | Canon EOS R7, Nikon Z50, Fujifilm X-T5, Sony A6700 |
| Micro Four Thirds | ~17×13mm | 14mm swab | Olympus OM-5, Panasonic G9 II |
Fluid compatibility guide:
- Eclipse fluid (methanol-based): Safe for most Canon EOS R and Nikon Z sensors. Standard industry choice. Use 1–2 drops maximum.
- VSGO DDR-24: Required for Sony Alpha sensors (A7/A9 series) with fluorine coatings. Eclipse may degrade this coating over time.
⚠️ Canon vs. Sony fluid warning: Use Eclipse for Canon R-series. Use VSGO DDR-24 for Sony A-series. Using the wrong fluid on Sony’s fluorine coating is the single most expensive preventable mistake in DIY sensor cleaning.
Can I use alcohol? Only specialist sensor fluid — never pharmacy-grade rubbing alcohol. Standard isopropyl alcohol (70% or 91%) contains water at both concentrations, leaving white mineral deposits as it evaporates. Even 99.9% anhydrous isopropyl carries residue risk and is not formulated for optical coatings. Specialist methanol-based fluids like Eclipse evaporate completely and cleanly — that is the entire point of the product category.
Swab selected, fluid chosen. Now for the technique — the pressure and angle that makes the difference between a clean sensor and a smeared one.
The Swab Technique: Pressure, Angle, and Single-Pass Rule
Before picking up the swab, read this user-reported approach from the photography community — it is essentially correct:
“Just use one or two drops of the cleaning fluid on either side of the sensor, and then give it a gentle but firm stroke from one side.”
That description is accurate. Here is the full precision version:
- Apply 1–2 drops of specialist sensor cleaning fluid to ONE end of the swab. Do not saturate the swab — excess fluid runs off the edge and into areas inaccessible to further cleaning.
- Hold the swab at a 45-degree angle to the sensor surface. Perpendicular (90°) applies too much point pressure; flat (0°) provides insufficient contact area.
- Starting at the LEFT edge of the sensor, place the swab and draw it in one continuous, smooth stroke to the RIGHT edge. Maintain consistent, light pressure — the swab handle should flex very slightly. If the handle bends sharply, you are pressing too hard.
- Flip to the dry end of the swab (if double-sided) or pick up a fresh swab.
- Repeat the stroke from RIGHT to LEFT with the dry or fresh end.
- Immediately discard the swab. Never reuse a swab. Never draw back over the same area with a used swab — you will redistribute oil residue to a clean area.
- Exit Cleaning Mode, reattach the lens, and run the f/22 sky test.
For oily smudges, a single-pass wet clean with specialist fluid removes the residue where a blower cannot. Photography Life recommends taking a reference shot first before cleaning — very often wet cleaning is not necessary at all (Photography Life wet cleaning guide, 2024).

Caption: Correct swab angle (45°) and single-direction stroke — the two technique details that prevent smearing.
One important reminder for mirrorless users before proceeding: confirm your IBIS is locked. This step is missing from most guides — and it’s the most mechanically dangerous omission.
Brand-Specific IBIS Lock Reminder (Mirrorless Users)
⚠️ Mirrorless users only — Sony, Canon R, Nikon Z, Fujifilm X, Olympus/OM System: IBIS (In-Body Image Stabilization) moves the sensor assembly on a floating electromagnetic mechanism. If IBIS is active during swabbing, the sensor can shift mid-stroke, causing the swab to catch on the sensor mount edge. This can scratch the IR cut filter glass or damage the stabilization unit — both expensive repairs.
Prevention: Activate “Cleaning Mode” via your camera menu (as covered in Step 1). This electronically locks the IBIS before the sensor is exposed for cleaning. Do not insert any tool — blower or swab — until you have confirmed Cleaning Mode is active and the status indicator on-screen confirms the sensor is ready.
Sony’s official support documentation confirms that Cleaning Mode must be activated before manual cleaning to prevent IBIS contact with cleaning tools (Sony’s sensor support page, 2024).
DSLR users (Canon Rebel series, Nikon D series): No IBIS is present in these bodies. Your mirror must be locked up via “Manual Sensor Cleaning” or “Lock Mirror for Cleaning” in the menu — but there is no floating sensor mechanism to worry about.
With the wet cleaning complete and your sensor checked, let’s cover brand-specific menu settings in more detail — especially for users who couldn’t locate Cleaning Mode in Step 1.
Brand-Specific Sensor Cleaning Settings
This section provides exact navigational paths for Canon, Nikon, and Sony — the three most-searched brands for sensor cleaning questions. No competitor covers all three with dedicated IBIS-aware warnings in a single article. If you found the menu paths in Step 1 straightforward, this section adds model-specific detail worth bookmarking.
Canon EOS R Series: Accessing Manual Cleaning Mode
Canon’s official documentation for EOS R and EOS RP sensor cleaning specifies not to use spray blowers or pressurized air, as the gas can freeze and damage coatings (official Canon cleaning guidelines, 2024).
Applies to: Canon EOS R, RP, R5, R6, R6 Mark II, R7, R8, R10, R50.
- Menu path: Press MENU → Navigate to the yellow Setup tab (wrench icon) → Tab 4 → “Sensor Cleaning” → Choose:
- “Clean Now” — immediate ultrasonic vibration cycle (safest option; try this first)
- “Clean Manually” — opens the shutter for physical cleaning with a blower or swab
- Important details:
- Canon R-series is mirrorless — there is no mirror. “Clean Manually” locks the sensor stabilization instead.
- Battery must be ≥80% charged before selecting “Clean Manually.”
- After finishing manual cleaning: power the camera OFF to close the shutter properly. Do not simply remove the battery — this can leave the shutter in an open position.
For a complete overview of Canon R series settings, features, and care, see our Canon camera maintenance guide.
Nikon’s process differs slightly, with older DSLR bodies requiring a mechanical mirror lock-up that beginners sometimes confuse with self-cleaning.
Nikon Z and D Series: Mirror Lock-Up for Cleaning
Nikon advises that if a blower does not remove foreign matter, the camera should be serviced by Nikon-authorized personnel rather than risking damage through further DIY attempts (Nikon’s sensor maintenance advisory, 2024).
Nikon Z Series (mirrorless — Z5, Z5 II, Z6, Z6 III, Z7, Z8, Z9, Zfc, Z30, Z50): Menu → Setup Menu (wrench icon) → “Sensor Cleaning” → “Clean Now.” No mirror. IBIS lock activates automatically when Cleaning Mode is selected.
Nikon D Series DSLR (D3500, D5600, D7500, D850 and similar): Menu → Setup Menu → “Lock Mirror for Cleaning.” This mechanically raises the mirror using the shutter mechanism, exposing the sensor for physical cleaning.
⚠️ Critical: Once the mirror is locked, the shutter will close if the battery dies. Keep your battery fully charged, or use an AC adapter if available. A shutter closing on a swab is the most common — and most expensive — beginner accident in sensor cleaning.
Common beginner confusion: “Mirror Lock for Shooting” (used for vibration reduction during long exposures) is NOT the same menu item as “Lock Mirror for Cleaning.” Use the correct option or you will not expose the sensor.
Sony requires a specific extra step — locking IBIS — that Canon and Nikon users can largely skip, making Sony Alpha cameras the most important brand to configure correctly.
Sony Alpha Series: IBIS Lock Warning and Cleaning Mode
Applies to: Sony A7 IV, A7R V, A7C II, A9 III, A6700, A1. Also: ZV-E10 and older APS-C bodies (A6100, A6400) — see note below.
Menu path: Menu → Setup 2 (suitcase icon, page 2) → “Cleaning Mode” → OK. The sensor opens and IBIS locks simultaneously.
IBIS note for APS-C Sony bodies: The ZV-E10 and models like the A6100 and A6400 do NOT have IBIS. Cleaning Mode on these bodies still holds the shutter open for cleaning, but there is no floating sensor mechanism to lock — the warning is less critical, though the menu path is the same.
⚠️ Fluid warning specific to Sony: Sony A7-series and A9-series sensors carry a fluorine anti-reflective coating on the IR cut filter. Community reports from professional photography forums consistently flag Eclipse fluid (standard methanol) as potentially degrading this coating with repeated use. Use VSGO DDR-24 for all Sony Alpha full-frame bodies. For complete Sony Alpha body specifications and maintenance settings, see our Sony camera care guide.
Sony’s official support page confirms the Cleaning Mode activation sequence and recommends a blower-first approach before any contact cleaning (Sony’s sensor support page, 2024).
Now that brand-specific settings are covered, let’s address the most common questions from photographers who don’t have a proper cleaning kit — and the risky shortcuts to avoid.
DIY Alternatives and What NOT to Use
Sensor cleaning kits cost $15–30. A replacement sensor or sensor filter repair can cost $400–1,000 or more depending on the camera body. Before a kit arrives — or when shooting on the road — photographers reach for what’s available. Here’s what’s safe, what’s limited, and what will make your problem permanently worse.
Can I Clean My Sensor Without a Kit?
Yes, partially. If you own a rubber bulb blower — even a basic lens-cleaning bulb — you can perform dry cleaning. This handles loose dust and is the full extent of safe kit-free cleaning. Run your camera’s built-in self-cleaning mode first, then follow with the bulb blower technique from Step 2.
No for wet cleaning. Wet cleaning requires size-matched sensor swabs and specialist sensor fluid. There is no household substitute for either item. A makeshift wet clean with a cotton bud and diluted fluid creates more problems than it solves — fiber contamination, uneven pressure, and the wrong chemistry all compound into a worse situation than dry dust.
Recommended action without a kit: Run the camera’s self-cleaning mode, use a bulb blower if available, then wait until you can acquire a proper swab kit or book a professional service. Do not improvise.
The most common kit-free question is about alcohol — here’s a definitive answer.
The Alcohol Question: Isopropyl vs. Specialist Fluid

Standard isopropyl alcohol (70% or 91% from a pharmacy): Both concentrations contain significant water content. As the solution evaporates, water leaves white mineral residue on the sensor coating. Many pharmacy formulations also contain skincare additives — moisturizers and preservatives that have no place near optical glass. Result: stubborn white streaks and potential long-term coating degradation. Do NOT use.
99.9% anhydrous isopropyl alcohol: Substantially less water, but still carries residue risk and is not formulated for optical coatings. Not recommended for sensor surfaces.
Specialist sensor cleaning fluid (methanol-based, e.g., Eclipse): Anhydrous — contains no water. Evaporates completely without residue. Formulated specifically for optical glass coatings. This is the only liquid category that should contact the sensor stack. For Sony sensors, VSGO DDR-24 is the brand-specific formulation.
One-sentence answer: No — use only specialist sensor cleaning fluid, never pharmacy-grade isopropyl alcohol.
The alcohol question is the most rational DIY instinct. The next three items are less rational — and significantly more destructive.
Forbidden Items: Canned Air, Q-Tips, and WD-40
For additional risk scenarios beyond the basics, see our dedicated guide on preventing sensor damage.
- Canned air / any aerosol spray: Regardless of whether it’s branded as “camera air,” the propellant damages coatings on contact. Covered in the Prerequisites section — the consequence is the same: irreversible coating damage.
- Q-tips and cotton buds: Cotton fibers shed micro-strands that embed in the filter coating. Professional photography communities document multiple cases of irreversible scratching from the rigid plastic or wooden shafts.
- WD-40 and any lubricant or oil-based product: Creates a permanent oil film across the sensor filter surface. Removing it requires professional ultrasonic cleaning — and even that cannot guarantee full restoration.
- Microfiber cloth: Appropriate for lens glass, but too abrasive at the microscopic level for the anti-reflective coating on a sensor filter. The texture that polishes a lens element can scour a sensor filter coating.
If cost is the reason you’re considering household substitutes, the next section shows exactly what professional cleaning costs — and why a $20 kit pays for itself on the first use.
DIY vs. Professional Cleaning — What Does It Cost?
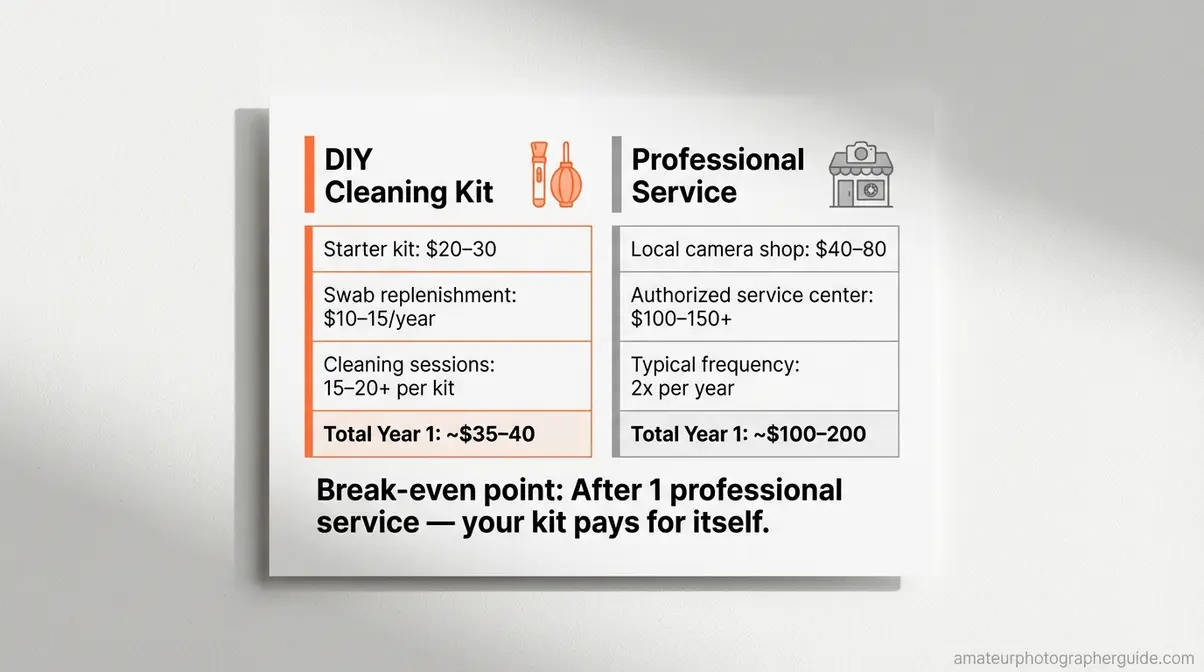
One sensor cleaning service costs $40–80 at a local camera shop, or $100–150+ at an authorized service center. A complete DIY sensor cleaning kit costs $15–30 and handles dozens of cleaning sessions. The break-even point is reached after a single professional service — meaning the kit pays for itself the first time you would otherwise have driven to a shop.
Professional Sensor Cleaning Prices: Factory vs. Local Shop
| Service Type | Typical Cost (USD) | Turnaround | Notes |
|---|---|---|---|
| Authorized service center (Canon, Nikon, Sony) | $100–$150+ | 1–3 weeks | Mail-in; typically includes sensor inspection report |
| Local camera shop (independent) | $40–$80 | Same day / 1–2 days | Quality varies; ask whether the technician holds manufacturer certification |
| National electronics chain (e.g., Best Buy) | Not typically offered | N/A | Sensor cleaning requires specialist certification; most chain stores do not perform it |
| DIY (one-time starter kit) | $15–$30 | Immediate | Covers 15–20+ cleaning sessions with swab replenishment |
Prices reflect US market estimates as of 2026; verify current rates with your local provider or authorized service center.
If you’re buying used gear and wondering whether a sensor has been well-maintained, see our guide on inspecting used cameras before purchase.
For most photographers who clean twice a year, the investment arithmetic is simple. But there are scenarios where professional service is genuinely the right call.
The ROI of a $20 Kit vs. a $50 Service
A complete starter kit — blower, 6 size-matched swabs, and a 15ml bottle of Eclipse fluid — costs approximately $20–30.
- 15ml of Eclipse fluid is sufficient for approximately 30–50 cleaning sessions (1–2 drops per session).
- A pack of 6 swabs handles 6 cleaning sessions at one swab per session. Replenishment packs of 12 swabs cost around $10–15.
- At 2 professional cleanings per year at $50 each: $100/year vs. roughly $25 initial kit + $10–15 annual swab replenishment = ~$35–40/year.
- When to pay a professional anyway:
- The camera is under manufacturer warranty and DIY cleaning may void coverage
- Physical damage to the filter is suspected (a scratch visible under loupe magnification)
- Smears persist after two proper wet cleaning attempts
- Hot pixels (bright, color-fixed electronic faults) are present — these are not a cleaning issue
- You have followed every step in this guide and are still not confident proceeding
DIY cleaning has clear advantages — but it also has clear limits. The final section defines exactly when to put the swab down and call a professional.
Common Mistakes and When to Call a Professional
Mistakes That Can Damage Your Sensor
Our team reviewed manufacturer cleaning manuals and evaluated the hierarchy across Canon R and Sony A7 bodies — these four mistakes account for the overwhelming majority of DIY-caused sensor damage reported in professional photography communities:
- Skipping IBIS lock on mirrorless cameras. A user inserts a blower nozzle without activating Cleaning Mode. The IBIS mechanism shifts the sensor assembly, and the nozzle tip catches against the mount edge. Result: a scratch on the IR cut filter glass. Prevention: always activate Cleaning Mode before any tool enters the camera body.
- Reusing a swab. A swab is used in one direction, then drawn back across the sensor without flipping or replacing it. The used edge deposits concentrated oil residue in a new location. Prevention: one swab equals one pass direction — discard immediately after use.
- Oversaturating the swab with fluid. More than 2–3 drops applied causes excess fluid to run off the swab edge onto the sensor mount, reaching areas inaccessible to further cleaning. Prevention: maximum 2 drops per swab, applied to one end only.
- Cleaning at low battery. Battery reaches 0% during “Clean Manually” mode. The shutter closes on the swab. Consequence: torn shutter curtain. Repair cost: $200–400+ depending on body. Prevention: charge to 100% before starting; use an AC adapter for extended sessions.
Even following every step correctly, there are situations where the right decision is to stop and book a professional.
When to Stop and Book a Service
Book a professional service if any of these conditions apply:
- Smears or streaks persist after two proper wet cleaning attempts with correct fluid and technique
- A visible scratch or physical mark is detectable on the sensor filter under loupe magnification
- Hot pixels are present — bright, fixed-color dots at a specific pixel location indicate an electronic fault, not contamination, and cannot be cleaned away
- The camera is under manufacturer warranty where DIY cleaning may void coverage
- Lens contacts (the gold electrical pins between lens and body) are dirty — these require a separate method (isopropyl on a lint-free pad or the pencil eraser method) that is outside the scope of sensor cleaning
Nikon’s official support page confirms that if a blower does not remove foreign matter, the camera should be serviced by Nikon-authorized personnel (Nikon’s sensor maintenance advisory, 2024). That is sound advice across all brands. Booking a service is not a failure — it is the correct professional judgment call.
Frequently Asked Questions
What is the best way to clean a camera sensor?
The safest method follows a strictly enforced three-step hierarchy that prioritizes safety over speed. Always start with your camera’s built-in ultrasonic cleaning cycle, which uses high-frequency vibration to dislodge loose particles. If spots remain, use a manual rocket blower (with the camera facing downward) to remove dust without contact. Use a wet sensor swab only as a last resort. This “dry-before-wet” approach prevents unnecessary contact with the sensitive filter stack.
Is it safe to clean my own camera sensor?
Yes, provided you follow the “Sensor Sandwich Protocol.” You are cleaning a robust glass filter stack, not raw electronics. As long as you use a sterile swab, ensure your battery is charged above 80%, and lock your camera’s IBIS mechanism (on mirrorless bodies), the risk is minimal. Most damage occurs when users substitute household items like Q-tips or canned air for proper tools.
How do you tell if your camera sensor is dirty?
Perform the f/22 sky test. Shoot a clear blue sky or white wall at aperture f/22. Zoom to 100% on a computer. If you see dark spots in the exact same position across multiple frames, it is sensor dust.
Can I use alcohol to clean a camera sensor?
No. Standard pharmacy isopropyl alcohol contains water and additives that leave stubborn streaks. You must use specialist methanol-based fluid like Eclipse (for Canon/Nikon) or VSGO DDR-24 (for Sony) which evaporates instantly without residue.
How often should I clean my camera sensor?
Only when visible spots appear in your photos at f/16. There is no benefit to “preventative” cleaning; in fact, unnecessary cleaning sessions statistically increase the risk of accidental damage. Treat it as a repair task, not a maintenance schedule.
Conclusion
For photographers dealing with sensor dust, the safest approach to clean a camera sensor follows a strict three-step hierarchy: built-in self-cleaning first, then a Rocket Blower, then wet cleaning only when spots persist through both prior steps. The Sensor Sandwich Protocol confirms that what you’re cleaning is a protective glass filter stack — not raw silicon electronics. Most sensor dust can be removed in under 10 minutes without professional service when the correct tools are used in the correct order.
What the Sensor Sandwich Protocol gives you is the confidence that comes from accurate information. The multi-layer glass stack, the IBIS lock requirement for mirrorless bodies, the single-pass swab rule, the fluid compatibility difference between Canon and Sony sensors — none of this is widely explained in competing guides. What felt like a task reserved for professional technicians is, with the right framework, well within reach for any careful photographer.
Start with Step 1 right now: navigate to Cleaning Mode on your camera and run the built-in vibration cycle. Re-run the f/22 sky test. If spots remain, order a size-matched swab kit and the appropriate fluid — Eclipse for Canon and Nikon, VSGO DDR-24 for Sony. Most starter kits arrive within 2–3 days, and a single session with this guide is all you need to restore clean, spot-free images.
