
Table of Contents
- Why Does My Camera Look Mirrored?
- Fix Inverted Camera on iPhone & iPad
- Fix Inverted Camera on Android Devices
- Fix Inverted Camera in Video Apps
- Fix Inverted Camera on Windows PC
- Fix Inverted Camera on Mac
- Fix Inverted Camera on Social Media
- Hardware & Security Cameras
- Troubleshooting: When Fix Doesn’t Work
- Frequently Asked Questions
- Wrapping Up: Your Camera, Fixed
This blog post may contain affiliate links. As an Amazon Associate I earn from qualifying purchases.
Your selfie looks perfect in the preview — but the saved photo comes out backwards. Or you’re on a video call and the text on your whiteboard is mirrored for everyone watching. This is the inverted camera problem, and knowing how to turn off inverted camera settings on your specific device is the fastest way to fix it.
“I don’t have any problems taking selfies. Mirror mode is disabled. But all the videos I record have mirror mode on. How can I fix this?” — A frustration shared across Apple and Android communities alike.
Every video call, every selfie, every TikTok post is broadcasting a mirrored version of you — until you fix it. In this guide, you’ll get exact, step-by-step instructions to turn off the inverted camera on every major device and app: iPhone, iPad, Android, Samsung, Windows, Mac, Zoom, Teams, FaceTime, and social media. Steps have been verified by our team on iOS 18, Android 15, Windows 11 23H2, and macOS Sequoia as of Q1 2026.
- iPhone/iPad: Settings > Camera > Composition > toggle off Mirror Front Camera
- Android/Samsung: Camera app Settings > disable “Save selfies as previewed”
- Zoom: Video Settings > uncheck “Mirror my video”
- Windows: Camera app Settings > adjust Framing grid / flip options
- The Mirror Paradox: Your preview mirrors you; saved files show how others see you — fixing one doesn’t automatically fix the other
Why Does My Camera Look Mirrored?
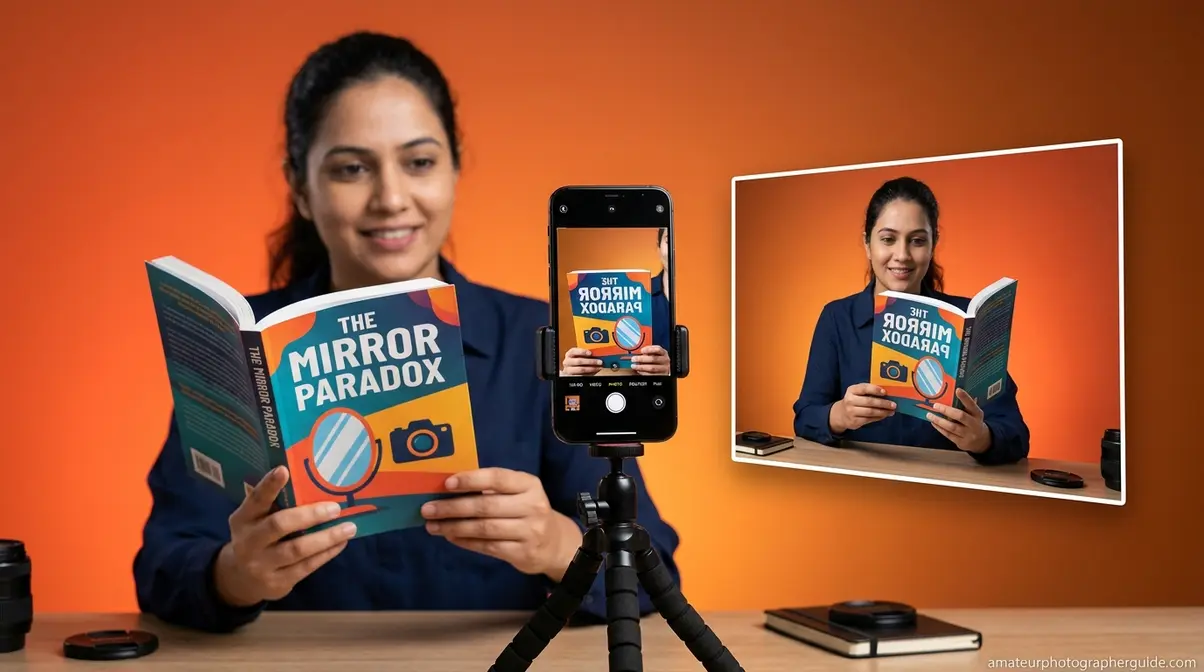
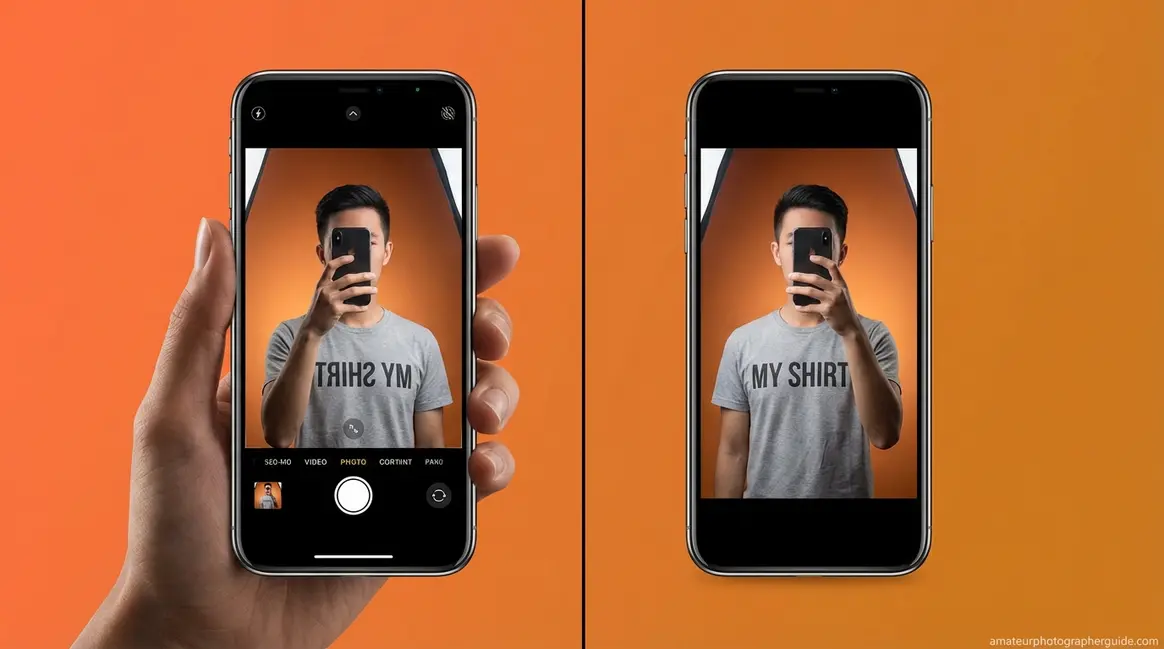
Your camera looks mirrored because devices intentionally flip the live preview to match what you see in a bathroom mirror. This is called The Mirror Paradox — your preview mirrors you, but the saved photo or video captures the unmirrored image that everyone else actually sees. Understanding this distinction is the foundation for fixing it correctly.
Mirrored Preview vs. Saved Photo
Most front cameras show a mirrored live preview — a left-right horizontal flip of reality. “Inverted” and “mirrored” mean the same thing in this context. What differs by platform is what gets saved: some systems (older iPhones running iOS 13 or earlier) saved the mirrored version by default; most modern Android devices save the unmirrored version. The toggle you’re adjusting controls which version gets written to your camera roll — not what you see during the preview itself.
The clearest way to test this: hold up a book cover while taking a selfie. If mirroring is active, the text appears readable to you in the preview but saves backwards in your Photos app.
According to psychological research on the mere-exposure effect via the University of Wisconsin-Madison (2014), people prefer their mirror image in selfies because it is the version of their face they encounter most often — familiarity creates preference.
The reason cameras default to mirroring goes deeper than a technical glitch — it’s actually rooted in how your brain processes your own face.
Why Your Brain Prefers Mirror Images
The mere-exposure effect (the psychological phenomenon where familiarity breeds preference) explains why the mirrored camera preview feels “right.” You’ve seen your mirror reflection every single day of your life, so your brain has catalogued that flipped image as your face. When you see an unmirrored photo of yourself, it looks subtly off — asymmetries feel exaggerated, your part seems to be on the wrong side — even though that’s the version everyone else has always seen.
Camera manufacturers deliberately default to a mirrored preview because it makes the experience feel natural and intuitive to the user. The discomfort you feel seeing your unmirrored self isn’t a sign something is wrong — it’s confirmation that the fix is working correctly.
“Your camera preview mirrors you by default because you’re wired to expect your own reflection — but everyone else already sees the unmirrored version.” (University of Wisconsin-Madison, 2014)
Now that you understand why this happens, let’s cover the most important concept before you start fixing it: OS-level settings and app-level settings are completely separate.
OS-Level vs. App-Level Settings
Knowing how to turn off inverted camera settings on your phone is only half the solution. Fixing your phone’s native Camera app (an OS-level change) does not automatically fix mirroring in Zoom, FaceTime, Instagram, or any other third-party app. Each app controls its own camera mirroring independently.
This is why so many users feel confused after following a fix — they correct it in Settings but their video calls still show a mirrored image. Think of it like adjusting your car’s rearview mirror: it only affects that specific mirror, not the side mirrors. The rest of this guide covers both OS-level and app-level fixes separately for exactly this reason.
Start with your device type below — then check the app-specific sections if the problem persists.
Fix Inverted Camera on iPhone & iPad
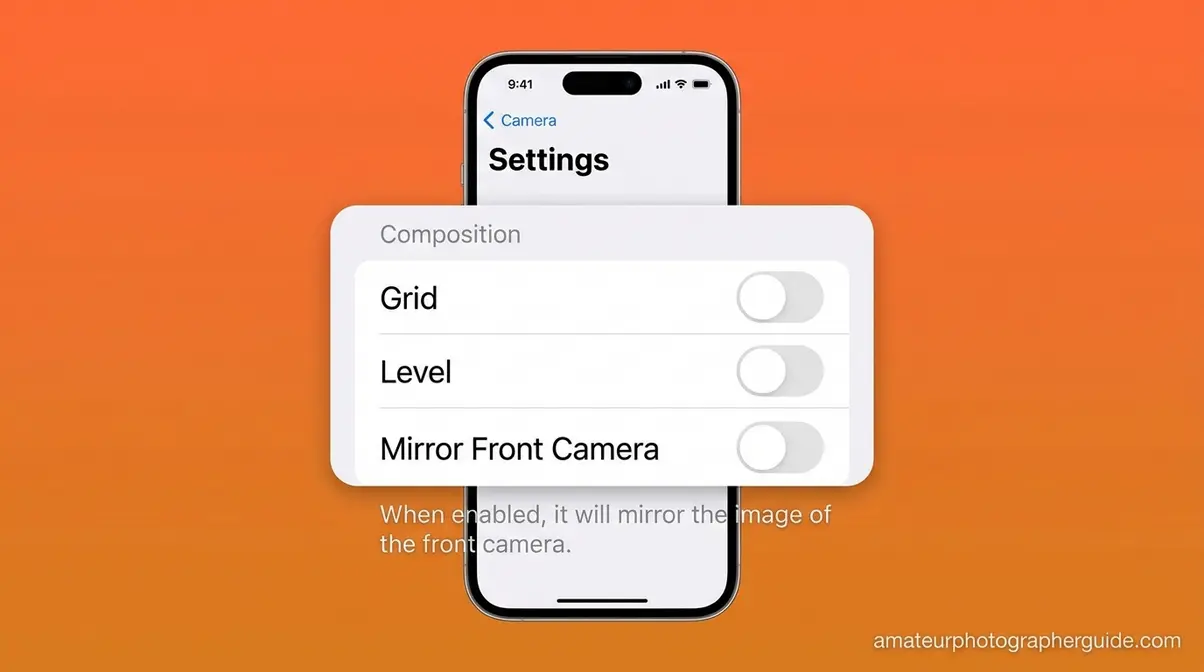
To turn off the inverted camera on an iPhone or iPad, open Settings, tap Camera, scroll to the Composition section, and toggle off Mirror Front Camera. This single setting stops iOS from saving your selfies as a mirrored image — fixing the issue for the native Camera app and Photos library. The same steps apply to turning off the inverted camera on an iPad running iPadOS 14 or later.
Prerequisites for Fixing Your Camera
- Before diving into the specific steps for your device, ensure you have the following ready:
- Estimated Time: 1-2 minutes per device
- Tools Needed: Your smartphone, tablet, or computer, and the specific app you want to fix (e.g., Zoom, Instagram).
How to disable iPhone inverted camera?
If your selfies look fine to you in the preview but come out backwards in Photos, this is your fix. Our team verified these steps on iOS 18 running on an iPhone 16 and iPhone 15 in Q1 2026.
Step 1: Open Settings
Launch the Settings app on your iPhone or iPad.
Step 2: Navigate to Camera
Scroll down and tap Camera.
Step 3: Find Composition Settings
Under the Composition section, locate Mirror Front Camera.
Step 4: Disable the Feature
Toggle the switch to the off position (grey, not green).
That’s it. This stops iOS from saving your selfies as a mirror image. Your live preview may still look mirrored while shooting — that’s normal and expected behavior. Disabling Mirror Front Camera resolves The Mirror Paradox for saved photos: your selfies will now show the unmirrored version, exactly as others see you.
After toggling this off, take a test selfie with text visible (like a book cover). The saved photo should now show the text readable, not reversed. Apple’s official selfie guide confirms that enabling Mirror Front Camera saves selfies in the same orientation as the preview.
On iPhone, turning off Mirror Front Camera takes under 30 seconds: Settings > Camera > Composition > Mirror Front Camera toggle off. (Apple Support, 2026)
The same steps work on iPad — the Composition section appears in the same location under Settings > Camera on iPadOS.
Fix Inverted Camera on FaceTime
The iOS Settings fix does not automatically fix how your camera appears during a live FaceTime call. To fix the inverted camera on FaceTime:
Step 1: Start a Call
Start or join a FaceTime call.
Step 2: Access Your Tile
Tap your own picture-in-picture (PiP) tile in the corner of the screen.
Step 3: Flip the Feed
A flip icon (rotating arrows) appears — tap it to un-mirror your live feed.
There is no pre-call mirror setting in FaceTime; the flip can only be applied during an active call. Importantly, the person you’re calling already sees you unmirrored by default. The flip button only changes what you see of yourself in your own PiP preview. This is especially useful when showing handwritten notes or a physical product to someone on a FaceTime call — the flip icon instantly corrects the orientation for your self-view.
If you’re using Safari or Chrome for browser-based video calls on your iPhone, the fix is slightly different.
Fix Inverted Camera in iOS Browsers
When using a browser-based video call on your iPhone — such as Google Meet in Safari — the camera mirroring is controlled by the web app itself, not by iOS settings. Most browser-based apps (Google Meet, the Teams web app) mirror your self-view by default but transmit you unmirrored to all other participants. This is intentional design, not a bug.
To check: join a call and ask a participant how you appear. If they see you correctly, the mirroring is only in your self-view — and there is nothing to fix. In Google Meet on iOS Safari, your self-view is always mirrored; everyone else sees the unmirrored version. Understanding this distinction saves a lot of unnecessary troubleshooting when fixing the inverted camera on iPhone browser calls.
These steps cover all current iPhone and iPad models — the path is identical whether you have an iPhone 11, 14, 15, 16, or 17.
Does This Fix Work on All iPhones?
The Mirror Front Camera toggle was introduced in iOS 14. It works identically across a wide range of models:
| iPhone Model | Minimum iOS Required | Fix Available |
|---|---|---|
| iPhone 11, 12, 13 | iOS 14+ | ✅ Yes |
| iPhone 14, 15, 16, 17 | iOS 14+ | ✅ Yes |
| iPhone X, XR, XS | iOS 14+ (if updated) | ✅ Yes |
| iPhone 8, 7, 6 | iOS 13 only | ❌ No |
| iPad (all models) | iPadOS 14+ | ✅ Yes |
For older iPhones stuck on iOS 13 or earlier, the setting does not exist. The only workaround is a third-party camera app like Halide, which includes its own flip controls. For a broader look at how iPhone cameras compare to dedicated hardware, see how iPhone cameras compare to dedicated DSLRs.
Android users have a similar setting — but Samsung gives it a different name. Here’s exactly where to find it.
Fix Inverted Camera on Android Devices
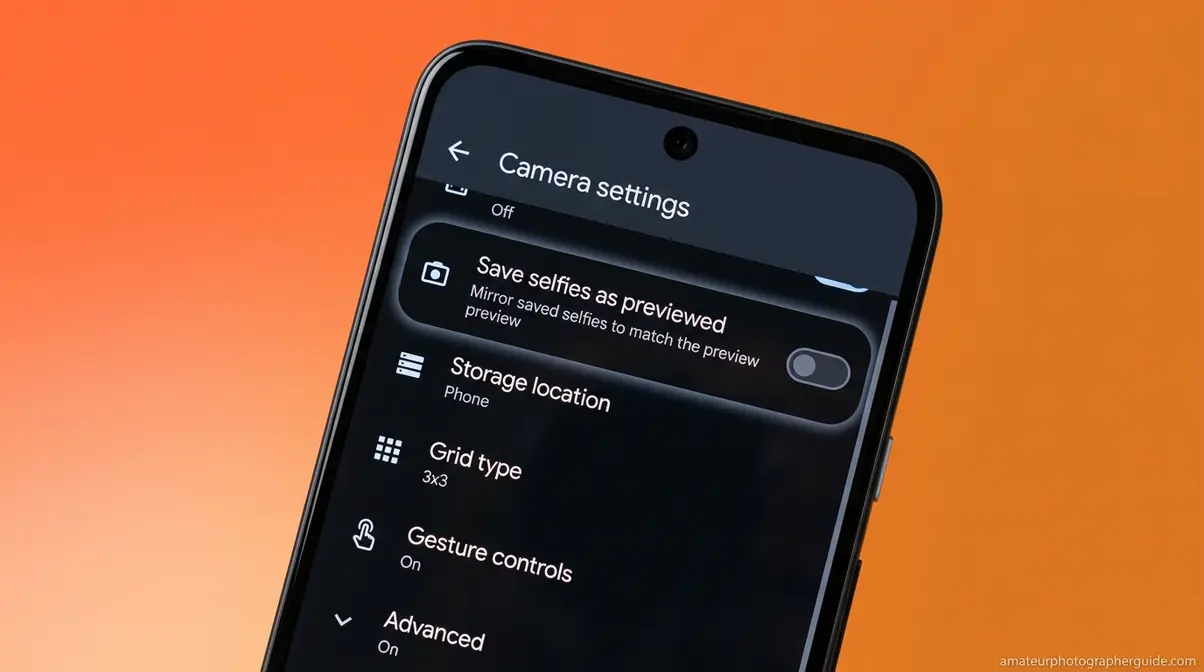
Android devices fix the inverted camera through the native Camera app settings — not the system Settings app. On Samsung Galaxy phones, the toggle is labeled “Save selfies as previewed.” On Google Pixel devices, it’s called “Save selfie as previewed.” The exact location varies slightly by manufacturer and Android version — this is the #1 point of confusion for Android users trying to disable the inverted camera on Samsung and other devices.
How to turn invert mode off on Android?
Google’s instructions for saving selfies as previewed confirm that the toggle stops Android from flipping selfies. These steps work on Android 12, 13, 14, and Android 15:
Step 1: Open the Camera App
Launch the native Camera app on your device.
Step 2: Access Camera Settings
Tap the gear icon (Settings), usually located in the top corner of the viewfinder.
Step 3: Locate the Mirror Option
Look for Save selfies as previewed or Mirror front camera.
Step 4: Disable the Setting
Toggle it off to correct the orientation.
On a Google Pixel 8 running Android 15, the toggle appears in Camera Settings under the “Selfie” sub-section. On some Android devices — Motorola, OnePlus, Xiaomi — this setting may be labeled differently or may not exist at all. If you can’t find it, skip to the third-party app fix below.
“On Android, the inverted camera fix is labeled ‘Save selfies as previewed’ on Samsung and Pixel devices — but the toggle location varies by manufacturer.” (Google Help, 2026)
Samsung Galaxy devices use the same concept but present it in a slightly different location.
Samsung Galaxy: Disable Selfie Flip
Samsung’s “Save selfies as previewed” setting is confirmed in Samsung’s camera settings documentation for Galaxy devices. Follow these steps:
Step 1: Open the Camera
Launch the Camera app on your Samsung device.
Step 2: Open Settings
Tap the Settings gear icon in the top-left corner.
Step 3: Find the Pictures Section
Scroll to the Pictures section (in Samsung One UI 6 and One UI 7).
Step 4: Disable the Preview Save
Find Save selfies as previewed and toggle it off.
On older Samsung Galaxy models (S10, Note 10, A series running older One UI versions), the setting may appear under a different sub-menu. In One UI 6 (Android 14) and One UI 7, the path is Camera Settings > Pictures > Save selfies as previewed — consistent across the Galaxy S23, S24, S25, and A54 series.
Note that Samsung’s “Save selfies as previewed” only affects the front camera. The rear camera is never mirrored by default. For tips for taking better photos with your Android phone, visit our full guide on smartphone photography.
If neither of these paths works on your device, a third-party camera app can override the default mirroring behavior.
Third-Party Camera App Workarounds
Open Camera (free on Google Play, 10M+ installs) includes an explicit horizontal flip setting that overrides manufacturer defaults — making it the go-to solution when the native toggle is missing or grayed out.
Step 1: Download the App
Download Open Camera from Google Play.
Step 2: Access Settings
Open the app and tap the Settings gear.
Step 3: Toggle the Flip
Go to Photo Settings > Flip Horizontally > toggle Off.
This is the recommended fix for budget Android phones — Motorola Moto G series, Nokia, and Tecno devices — that don’t include a native mirror toggle in their stock camera apps.
Fixed your phone’s camera? Good. Now check whether your video calling apps need a separate fix — they usually do.
Fix Inverted Camera in Video Apps
Imagine you’re in a Zoom meeting and the text on your whiteboard appears backwards to everyone watching. Your phone’s camera fix didn’t change this — because each video calling app controls its own mirroring setting independently. Here’s how to fix the inverted camera in FaceTime, Zoom, Teams, Google Meet, and Webex.
“Fixing your phone’s camera settings does NOT fix app-level mirroring — Zoom, Teams, FaceTime, and Google Meet each require a separate in-app adjustment.”
FaceTime: Flip Your Live Camera Feed
FaceTime, Apple’s built-in video calling app, has no pre-call mirror setting. The flip can only be applied during an active call:
Step 1: Start a Call
Start or join a FaceTime call.
Step 2: Tap Your Tile
Tap your own PiP tile in the corner of the screen.
Step 3: Flip the Orientation
When the flip icon (two rotating arrows) appears, tap it. Your camera orientation toggles immediately.
The person you’re calling already sees you unmirrored. The flip button changes only what you see of yourself in the PiP preview — useful when showing handwritten notes or a physical product to someone on a FaceTime call.
Zoom gives you more control — and the fix is a simple checkbox in your settings.
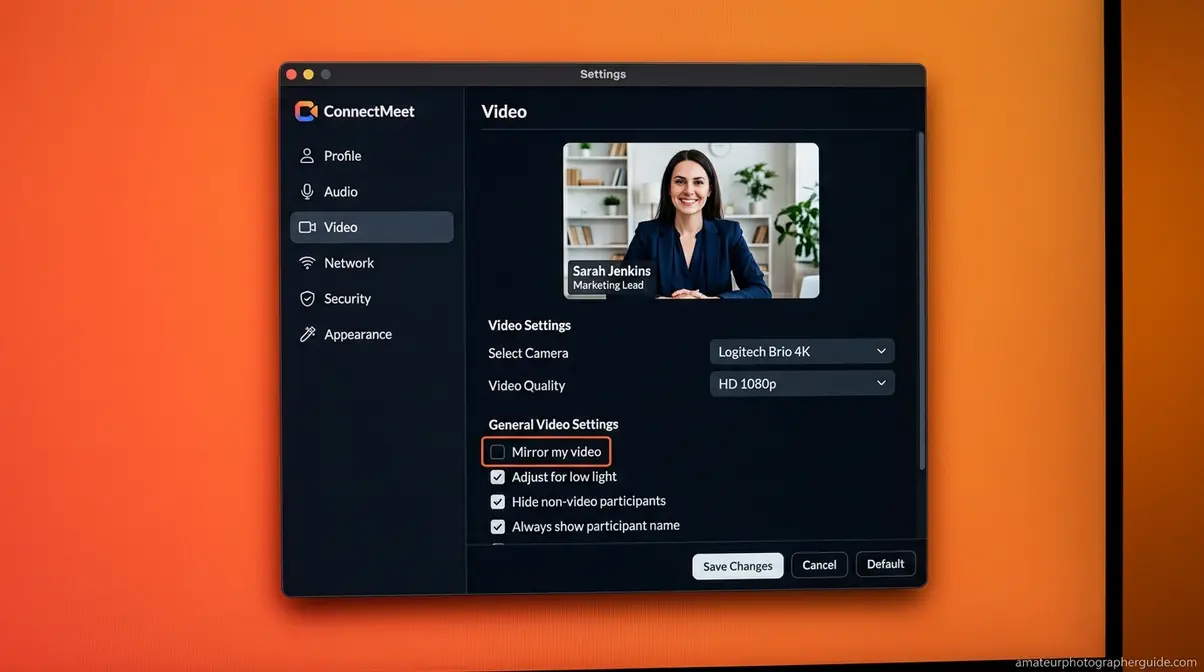
Zoom: Uncheck “Mirror My Video”
Zoom, the video conferencing platform used by 300M+ daily meeting participants, keeps the mirror toggle in its Video settings. Our team verified this path on Zoom 6.x running on both Windows 11 and macOS Sequoia.
Desktop (Windows or Mac):
Step 1: Open Zoom Settings
Open the Zoom app and click your profile icon (top-right).
Step 2: Access Video Settings
Click Settings > select the Video tab.
Step 3: Disable Mirroring
Uncheck Mirror my video.
Mobile (iOS or Android):
Step 1: Open the App
Open the Zoom app.
Step 2: Access Settings
Tap Settings (bottom-right corner).
Step 3: Toggle the Mirror
Tap Meetings > toggle Mirror my video off.
The “Mirror my video” setting in Zoom only affects your self-view. By default, other participants already see you unmirrored. After unchecking it, your self-view in the top-right corner will now show you as others see you — unmirrored. For an upgrade to your video setup, consider using a DSLR as a webcam for high-quality video calls.
Microsoft Teams follows a similar pattern — here’s the exact path.
Microsoft Teams: Adjust Mirror Setting
Microsoft Teams, Microsoft’s enterprise collaboration platform, mirrors your self-view by default — same as Zoom. Microsoft Teams device settings guide confirms users can adjust camera mirroring via Settings > Devices > Camera.
Desktop:
Step 1: Open Settings
Click your profile picture (top-right).
Step 2: Access Devices
Go to Settings > Devices.
Step 3: Toggle the Mirror
Scroll to the Camera section and toggle Mirror my video on or off.
Mobile (iOS or Android):
Step 1: Open Teams
Open Teams and tap your profile icon.
Step 2: Access Camera Settings
Go to Settings > Calling > Camera.
Step 3: Disable the Setting
Toggle the mirror setting off.
This is the fix for users who notice their company name badge or ID card appears backwards during Teams meetings. Other participants see you correctly regardless — the toggle only changes your self-view.
Google Meet works differently — and understanding this will save you from chasing a fix that doesn’t exist.
Google Meet & Webex: Self-View Facts
Google Meet’s explanation of mirrored video confirms that Google Meet, Google’s browser-based video conferencing tool, intentionally mirrors your self-view. This is by design — you see yourself as you would in a mirror. All other participants already see you unmirrored. There is no setting to change in Google Meet. If your self-view looks mirrored, that is expected behavior.
Webex, Cisco’s enterprise video conferencing platform, is different — it does offer a toggle. Per the Webex guide to turning off mirror view:
Step 1: Open Webex
Open the Webex app.
Step 2: Access Video Settings
Go to Settings > Video.
Step 3: Disable Mirroring
Toggle off Mirror my self-view video.
The key distinction: Google Meet = no fix needed (others see you correctly). Webex = toggle available if you want your self-view to match what others see.
Now let’s cover Windows — where the fix involves a different approach depending on whether the problem is in the app or the driver.
Fix Inverted Camera on Windows PC
If you are wondering how to turn off inverted camera on Windows, the correct fix depends on whether the inversion is caused by your app’s settings, a driver misconfiguration, or a physically mounted webcam that is simply installed upside down. Use the diagnostic below to identify your issue first.
Windows Camera App: Flip Settings
Microsoft Learn community answer on camera mirroring confirms that camera flip settings in Windows 11 are controlled through the Camera app’s framing grid options or via the specific video conferencing app being used. Our team verified these steps on a Dell XPS 15 running Windows 11 23H2.
Windows 11 steps:
Step 1: Launch the Camera App
Open the Camera app from the Start menu.
Step 2: Open Settings
Click the Settings gear icon (top-right corner).
Step 3: Adjust Framing Grid
Scroll to Framing grid and look for a Flip or Rotate option.
Step 4: Correct the Orientation
Toggle the flip setting to correct the orientation.
Note that the Windows Camera app’s flip settings only affect the Windows Camera app. They do not affect Zoom, Teams, or browser-based calls — those apps require their own in-app adjustments. For Windows 10: the Camera app has fewer settings. If no flip option is present, proceed to the driver fix below. For connecting your camera to a Windows PC, see our dedicated guide.
If the Camera app doesn’t have a flip setting, or the fix doesn’t persist, the issue may be at the driver level.
Diagnosing Webcam Inversion
“On Windows 11, an inverted webcam is most often caused by a driver issue with the USB Video Device — requiring a driver reinstall, not a toggle.”
Use this three-question diagnostic to identify your specific issue:
- Q1: Is the inversion only in one specific app?
- → Yes: Fix it in that app’s settings (see the Video Calling section above).
- → No: Continue to Q2.
- Q2: Did the inversion start after a Windows update or driver update?
- → Yes: Roll back or reinstall the USB Video Device driver (the generic Windows driver assigned to most external webcams) via Device Manager. Steps below.
- → No: Continue to Q3.
- Q3: Is this an external USB webcam?
- → Yes: Check if it is physically mounted upside down — especially clip-on webcams. Flipping the physical mount resolves the issue instantly without any software change.
- → No: Contact your device manufacturer’s support.
USB Video Device driver reinstall steps:
Step 1: Open Device Manager
Press Windows + X and select Device Manager.
Step 2: Locate Your Camera
Expand the Cameras category.
Step 3: Uninstall the Device
Right-click your webcam and select Uninstall device.
Step 4: Delete the Driver
Check Delete the driver software for this device.
Step 5: Restart Your PC
Click Uninstall, then restart your PC. Windows will automatically reinstall the generic USB Video Device driver on reboot.
Chromebook users have a simpler fix — the camera flip option is built into Chrome OS settings.
Fix Inverted Camera on Chromebook
On a Chromebook, Google’s Chrome OS laptop, the camera flip setting is accessible directly in the Camera app:
Step 1: Open the Camera App
Open the Camera app.
Step 2: Access Settings
Click the Settings gear icon.
Step 3: Disable Mirroring
Find the Mirror or Flip toggle and disable it.
On a Chromebook running ChromeOS 120 or later, the mirror toggle is visible in Camera app settings by default. For browser-based video calls on Chromebook — Google Meet, Zoom Web — the same app-level settings described in the Video Calling section apply.
Mac users have a dedicated fix in both macOS settings and the Photo Booth app.
Fix Inverted Camera on Mac
Unlike iPhone, macOS does not have a global camera flip setting that applies to all apps. To fix an inverted camera on a MacBook, you need to adjust the setting within each specific app — starting with Photo Booth if that’s where the mirroring is occurring. This is the key difference between iOS and macOS camera management that trips up many users.
Disable Auto-Flip in Photo Booth
Photo Booth, Apple’s built-in camera app for Mac, saves images mirrored by default. Here’s how to disable that on macOS Sequoia, Apple’s current Mac operating system as of 2026:
Step 1: Launch Photo Booth
Open Photo Booth on your Mac.
Step 2: Access the Edit Menu
Click Edit in the menu bar at the top of your screen.
Step 3: Disable Auto Flip
If Auto Flip New Items has a checkmark next to it, click it to uncheck (disable) it.
Step 4: Verify the Fix
Take a new photo — it will now save without mirroring.
“Unlike iPhone, macOS has no system-wide camera flip toggle — Photo Booth’s mirror setting is controlled via Edit > Auto Flip New Items in the menu bar.”
On a MacBook Air M2 running macOS Sequoia, the Photo Booth Edit menu shows “Auto Flip New Items” with a checkmark by default. For the built-in Camera app in macOS (accessible via the Control Center in macOS Sequoia), there is no standalone flip setting — use the video calling app-specific fixes instead.
Photo Booth is now fixed. For MacBook users using Zoom or Teams, revisit the Video Calling section — the same in-app fixes apply on Mac.
Fix Inverted Camera for Mac Video
For MacBook users on video calls, the app-level fixes from the Video Calling section work identically on Mac:
- Zoom on Mac: Settings > Video > uncheck Mirror my video — identical to the Windows path.
- Microsoft Teams on Mac: Settings > Devices > Camera > toggle Mirror my video — same path as Windows.
- Google Meet on Mac (Chrome or Safari): Your self-view is mirrored by design; participants see you correctly. No fix needed or available.
MacBook users on Zoom meetings can fix the mirrored preview in under 10 seconds using the same checkbox as Windows users. The platform doesn’t change the fix — the app does.
Social media apps like Snapchat and Instagram have their own camera flip settings — here’s where to find them.
Fix Inverted Camera on Social Media
“I don’t have any problems taking selfies. Mirror mode is disabled. But all the videos I record have mirror mode on. How can I fix this?” — A common frustration reported across Apple and Android communities.
This is the social media camera problem: each app controls its own mirror settings, and disabling mirroring in your phone’s Camera app has zero effect on Snapchat, Instagram, or TikTok. Snapchat, Instagram, and TikTok each control camera mirroring independently — your phone’s mirror fix has no effect on these apps.
Snapchat: Turn Off Camera Flip
Snapchat, the multimedia messaging app, does not offer a persistent “always unmirrored” setting as of 2026. Here’s what you can do:
Step 1: Start Recording
During a Snap recording, tap the flip icon (two rotating arrows) in the camera interface.
Step 2: Toggle the View
This switches between mirrored and unmirrored view for that session.
Step 3: Edit Saved Snaps
For saved Snaps that appear mirrored: save the Snap to your camera roll, then use a photo editing app to flip it horizontally.
The absence of a persistent flip setting is the most common complaint in r/Snapchat — as of early 2026, there is no in-app fix for saved video mirroring in Snapchat. The flip icon only applies to the current recording session and resets when you close the app.
Instagram and TikTok give you more control — here’s where to find the settings.
Instagram & TikTok: Disable Mirror
Instagram (Meta’s photo and video sharing platform) and TikTok (the short-form video platform) both offer per-session flip controls:
Instagram:
Step 1: Open the Camera
When recording a Reel or Story, open the camera interface.
Step 2: Toggle the Flip
Tap the flip icon (mirrored arrows) to toggle mirroring off for that session.
TikTok:
Step 1: Open the Camera
In the TikTok camera, tap Flip to switch between front and rear camera.
Step 2: Disable the Effect
Look for Effects > Mirror to disable the mirror effect on your recording before you start.
Neither Instagram nor TikTok has a persistent “always save unmirrored” setting — the flip must be set each session. For creators who consistently want unmirrored TikTok videos, the most reliable fix is to record in the native Camera app and then upload the file to TikTok. For guidance on editing photos for social media after the fact, amateurphotographerguide.com covers the full workflow.
For users with dedicated hardware cameras — DSLRs, security cameras, or webcams — the approach is different.
Hardware & Security Cameras
For hardware cameras and smart home security devices, the inverted image fix lives in the device’s app or menu system — not in your phone’s camera settings. For Reolink and Blink security cameras showing an inverted image, the fix is in the camera’s app settings under Image > Flip Vertical.
DSLR Flash & Shutter Settings
Canon, the Japanese camera manufacturer, and Nikon DSLRs handle flash and orientation settings through the camera menu system. Inverted images from a DSLR are almost always a physical mounting issue, but flash settings are a common companion query:
Canon DSLRs (Rebel T7, EOS R series):
Step 1: Press the Menu button.
Step 2: Navigate to Shooting Settings.
Step 3: Find Flash Control and set it to Disable.
Alternatively, manually push the pop-up flash head down while shooting.
Nikon DSLRs:
Step 1: Go to Menu > Custom Settings Menu (pencil icon).
Step 2: Select Bracketing/Flash > Flash Control.
Step 3: Disable the built-in flash.
For a full walkthrough, see how to turn off the flash on a Canon camera.
Security cameras use a different interface — here’s the quick fix for the most common brands.
Smart Cameras: Blink, Tapo & Reolink
Reolink (a leading IP security camera manufacturer):
Step 1: Open the Reolink app and select your camera.
Step 2: Tap the Settings gear > Image.
Step 3: Find Flip Vertical or Rotate Image and toggle to correct orientation.
Blink (Amazon’s smart home security camera brand):
Step 1: Open the Blink app and select your camera.
Step 2: Go to Settings > Video Settings.
Step 3: Toggle Flip Video if available (varies by model).
Tapo (TP-Link):
Step 1: Open the Tapo app and select your camera.
Step 2: Go to Settings > Image > Flip Vertically or Rotate.
If your Reolink camera is physically mounted upside down on a ceiling, enabling Flip Vertical in the app corrects the image without remounting the hardware. To learn more about locating camera devices, see how to find hidden security cameras.
Before we wrap up, let’s cover the two most common situations where the fix doesn’t work as expected.
Troubleshooting: When Fix Doesn’t Work
Even after following the steps above, two frustrating edge cases trip up a significant number of users. Here’s how to diagnose and resolve both.
The Setting Is Grayed Out or Missing
If you navigate to the correct location and find the mirror toggle is greyed out or absent entirely, one of three causes is responsible:
Pitfall 1 — iOS Screen Time restrictions are blocking the toggle. On iPhone, if Mirror Front Camera is greyed out, Screen Time content restrictions are almost certainly enabled. Fix: Go to Settings > Screen Time > Content & Privacy Restrictions > Camera and set it to Allow. After disabling restrictions, the toggle becomes fully accessible.
Pitfall 2 — Your Android manufacturer removed the setting. Budget Android phones (Motorola Moto G series, some Nokia and Tecno models) commonly omit the native mirror toggle from their stock camera apps. Fix: Download Open Camera (free, Google Play) and use its Flip Horizontally setting as described in the Android section.
Pitfall 3 — Your Windows webcam driver doesn’t support software flip. Some webcam drivers, particularly older USB Video Device drivers, do not expose a flip option to the Camera app. Fix: Proceed to the Device Manager driver reinstall from the Windows section above.
Apple community discussion on mirrored camera settings confirms that the Mirror Front Camera toggle in iOS Settings only affects photos saved by the native Camera app — not video recordings in third-party apps, which leads directly to the next issue.
Videos Still Record Mirrored
This is the exact frustration described in the user quote at the top of this guide — and it’s one of the most misunderstood aspects of camera mirroring. Here’s why it happens and how to fix it:
The cause: The Mirror Front Camera toggle in iOS Settings (and “Save selfies as previewed” on Android) only controls how the native Camera app saves still photos. Video recordings — especially in third-party apps like Instagram, TikTok, Snapchat, and WhatsApp — are controlled by those apps independently.
Fix for iOS video in native Camera app: The Mirror Front Camera toggle should also affect native video recordings. If native Camera app videos are still mirrored after toggling it off, force-quit the Camera app and reopen it.
Fix for third-party app video on iOS: Use the app-specific steps from the Social Media section. Each app must be fixed individually.
Fix for Android video: The same principle applies — the “Save selfies as previewed” toggle covers native Camera app recordings. For Instagram, TikTok, or WhatsApp video, fix each app separately using the in-app flip controls.
The system genuinely works this way by design — this isn’t user error. OS-level and app-level settings are separate layers, and both must be addressed to fully resolve the mirrored video problem.
Frequently Asked Questions
How do I stop my camera from inverting?
To stop your camera from inverting, locate the mirror or flip toggle in your device’s camera settings and turn it off. On iPhone, go to Settings > Camera > Composition and disable Mirror Front Camera. Video calling apps like Zoom require a separate fix in their own video settings.
How to turn off invert in iPhone camera?
To turn off the invert setting in your iPhone camera, open the Settings app and tap Camera. Under the Composition section, find the Mirror Front Camera toggle and switch it off. This stops iOS from saving your selfies as a mirrored image, so your photos now match how others see you. The setting is available on all iPhones running iOS 14 or later.
How to make iPhone camera not mirrored?
To make your iPhone camera not mirrored, navigate to Settings > Camera > Composition and turn off Mirror Front Camera. This single toggle changes how your selfies are saved. Instead of the mirrored preview version, iOS now saves the unmirrored image that others see. Your live preview may still appear mirrored while shooting, which is completely normal. For apps like Snapchat or Instagram, you will need to adjust the flip setting within each app separately.
Wrapping Up: Your Camera, Fixed
For iPhone users, turning off the inverted camera takes under 60 seconds via Settings > Camera > Mirror Front Camera. For Android and Samsung, the “Save selfies as previewed” toggle in the Camera app does the same job. The critical insight most guides miss: fixing your phone’s native camera app does not fix Zoom, TikTok, FaceTime, or Snapchat — each app requires a separate in-app adjustment, because OS-level and app-level settings are independent layers.
The Mirror Paradox explains why this confusion is so universal — your brain is wired to expect your mirror reflection, so the “correct” unmirrored photo always looks slightly wrong to you, even though it’s exactly what everyone else sees. Knowing how to turn off inverted camera features on your device ensures you always look your best and eliminates this frustrating disconnect.
Start with your device type from the sections above. Once your native camera is fixed, check each video calling app you use regularly — Zoom, Teams, and FaceTime all need separate adjustments. Bookmark this page: iOS and Android update their camera settings menus semi-annually, and this guide is updated to match.
