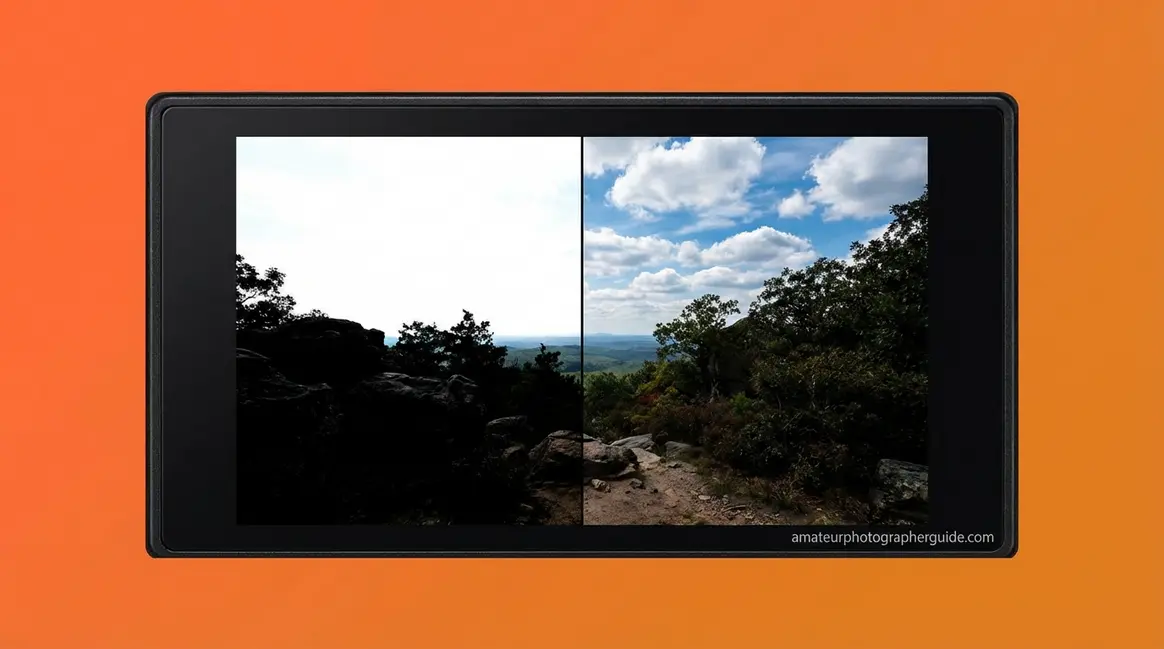
You’re standing at the edge of a sun-drenched canyon at golden hour. The sky blazes with color, the shadows below are rich and deep — your eyes drink it all in effortlessly. Then you check the LCD on your camera: the sky is a washed-out white void, and the canyon floor is a featureless black mass. Your eyes handled it perfectly. Your camera failed completely.
What’s in this guide
- What Is Dynamic Range in Photography?
- 5 Techniques to Maximize Dynamic Range
- HDR Photography: Bracketing and Beyond
- Camera Sensors and Dynamic Range
- Dynamic Range in Audio and Video
- Common Dynamic Range Mistakes
- Frequently Asked Questions About Dynamic Range
- Closing Thoughts on Dynamic Range Photography
That failure has a name and a measurable cause. It’s The Exposure Gap — the difference between your visual system’s 20+ stops of dynamic range and your camera sensor’s 12–15 stops. Every blown highlight and crushed shadow you’ve ever shot traces back to this single gap. The good news: once you understand it, you can bridge it using five proven techniques that work on any camera you own.
This guide walks you through exactly what dynamic range in photography is, how to measure it, five actionable techniques to maximize it in-camera, when to use HDR, how to choose a camera sensor that performs well in high-contrast light, and how “dynamic range” applies to audio and video when you’re searching for the wrong thing.
Before You Dive In
This guide assumes you’re comfortable with: (1) the exposure triangle — aperture, shutter speed, ISO; (2) the difference between JPEG and RAW file formats; (3) how to read a basic histogram. If any of those are unfamiliar, learn the fundamentals of dynamic range in photography first, then return here.
What Is Dynamic Range in Photography?
Dynamic range in photography is the range of light intensities — from the brightest highlight to the darkest shadow — that a camera can capture with visible, recoverable detail in a single exposure. It’s measured in stops, where each stop represents a doubling of light. A camera with 14 stops of dynamic range can handle a scene where the brightest point is over 16,000 times brighter than the darkest point — and still retain texture and tone in both. When a scene’s contrast exceeds that range, information is permanently lost: highlights clip to pure white, shadows crush to pure black.
“Dynamic range in photography describes the ratio between the maximum and minimum measurable light intensities.”
This is the foundational concept behind every technique in this guide.
The Ratio Between Light and Dark
Dynamic range in photography isn’t about brightness — it’s about the span of brightness where your image still holds usable detail. Picture a sunny beach: the white foam of a breaking wave versus the deep shadow under a pier. Both are in the same scene. Whether your camera captures both with detail depends entirely on its dynamic range.
The critical qualifier is detail. Dynamic range doesn’t measure the brightest or darkest tone your camera can record — it measures the range over which the image retains contrast and information. Push beyond that range in either direction and you hit clipping: highlights turn pure white (blown out) with zero recoverable texture, and shadows turn pure black (crushed) with only noise underneath. That washed-out sky you’ve shot at midday? That’s clipping. The featureless black foreground in a backlit portrait? Also clipping.
Here’s a distinction most beginner resources skip: scene dynamic range (the contrast range actually present in front of your lens) is separate from sensor dynamic range (how much of that contrast your camera can record). A foggy morning has a low scene dynamic range — soft, even light with little contrast — and almost any camera handles it cleanly. A direct-sun landscape at noon has an extreme scene dynamic range, often exceeding 20 stops, that will overwhelm even the best modern sensors.
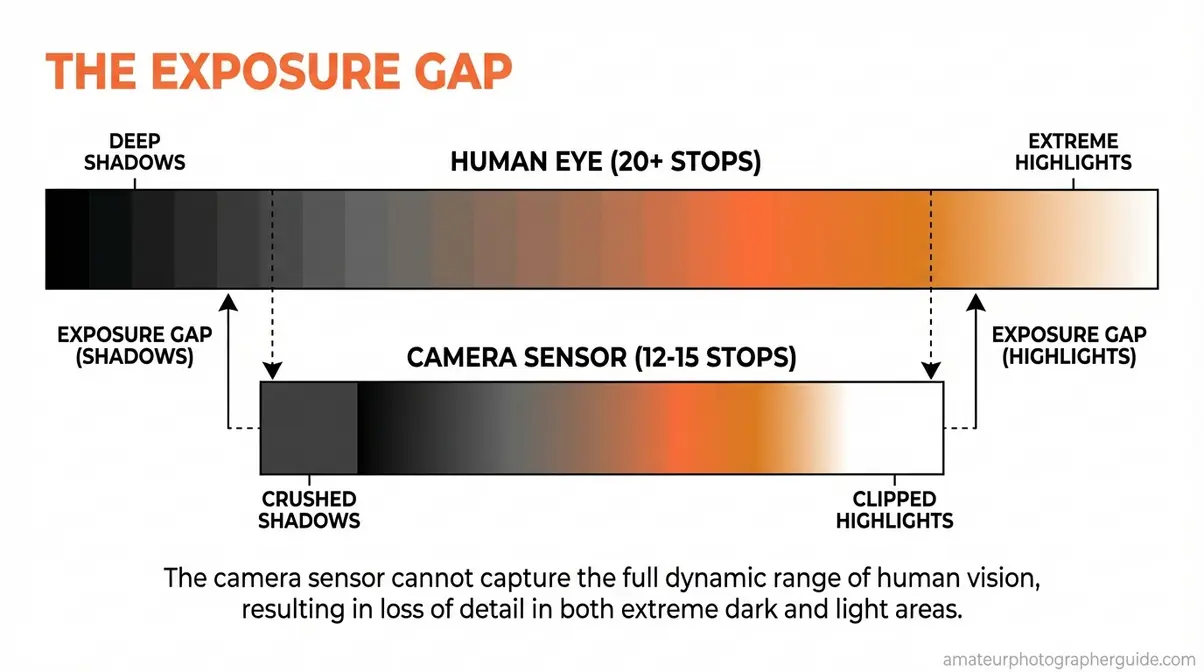
Caption: The Exposure Gap — your visual system adapts across 20+ stops in real time; your camera locks to a single 12–15 stop window per exposure.
Imatest’s technical definition frames it precisely: dynamic range is the range of scene brightness over which a camera responds with good contrast and a high signal-to-noise ratio. Once you cross the boundary in either direction, signal quality collapses.
For deeper fundamentals, learn the fundamentals of dynamic range in photography in our dedicated explainer.
Understanding “Stops” of Light
Stops are photography’s unit of light measurement, and they work on a doubling scale, not a linear one. Move up one stop and you double the light reaching your sensor. Move down one stop and you halve it. This is why 14 stops sounds modest but represents an enormous tonal range.
Do the math: 2¹⁴ = 16,384. A camera with 14 stops of dynamic range can distinguish a scene where the brightest point is over 16,000 times brighter than the darkest. That’s the difference between bright sunlight and a dimly lit interior — in a single frame.
| Stops | Light Ratio | Real-World Scene |
|---|---|---|
| 10 stops | 1,024 : 1 | Overcast day — soft, even light |
| 12 stops | 4,096 : 1 | Indoor/outdoor transition |
| 14 stops | 16,384 : 1 | Bright sun with deep shadow areas |
| 20 stops | 1,048,576 : 1 | Human eye — simultaneous range |
The ISO 15739 standard is the official benchmark for measuring and comparing dynamic range across digital cameras — it’s the methodology behind every credible sensor test you’ll find online (ISO, 2023). When a manufacturer claims “15 stops,” that number should trace back to this standard.

Caption: Each stop doubles the light — a 14-stop camera captures over 16,000 times the brightness range of a 10-stop camera.
Human Eye vs. Camera Sensor
Here’s the number that makes The Exposure Gap concrete: the human visual system perceives approximately 20 stops simultaneously in a single scene. When fully dark-adapted, that range extends to roughly 24 stops. Your camera, regardless of brand or price, captures 12–15 stops in a single exposure. The NIH study on human visual dynamic range reports that natural viewing challenges the visual system with luminance ratios approaching 1,000,000:1 — far exceeding what any camera sensor captures in a single frame (NIH, 2011).
Modern cameras capture 12–15 stops of dynamic range in a single exposure, while the human visual system adapts to a luminance ratio approaching 1,000,000:1 — that 5–8 stop difference is the precise size of The Exposure Gap.
This is why the sunrise looked stunning to your eyes but came out wrong in your photo. Your visual system adjusted continuously — brightening shadows, dimming highlights — in real time. Your camera took a snapshot of one fixed exposure window and discarded everything outside it. Understanding this gap doesn’t just explain the problem; it tells you exactly which technique to reach for to solve it.
5 Techniques to Maximize Dynamic Range
These 5 techniques are your practical toolkit for bridging The Exposure Gap. They’re listed in order of impact — start with Step 1 before anything else, because without it, the rest deliver diminishing returns.
Our evaluation of these techniques across multiple camera systems — from entry-level APS-C bodies to full-frame mirrorless cameras — consistently confirms the same hierarchy: RAW + low ISO form the foundation, ETTR refines your in-camera capture, and filters plus timing handle the edge cases that in-camera tools can’t solve alone.
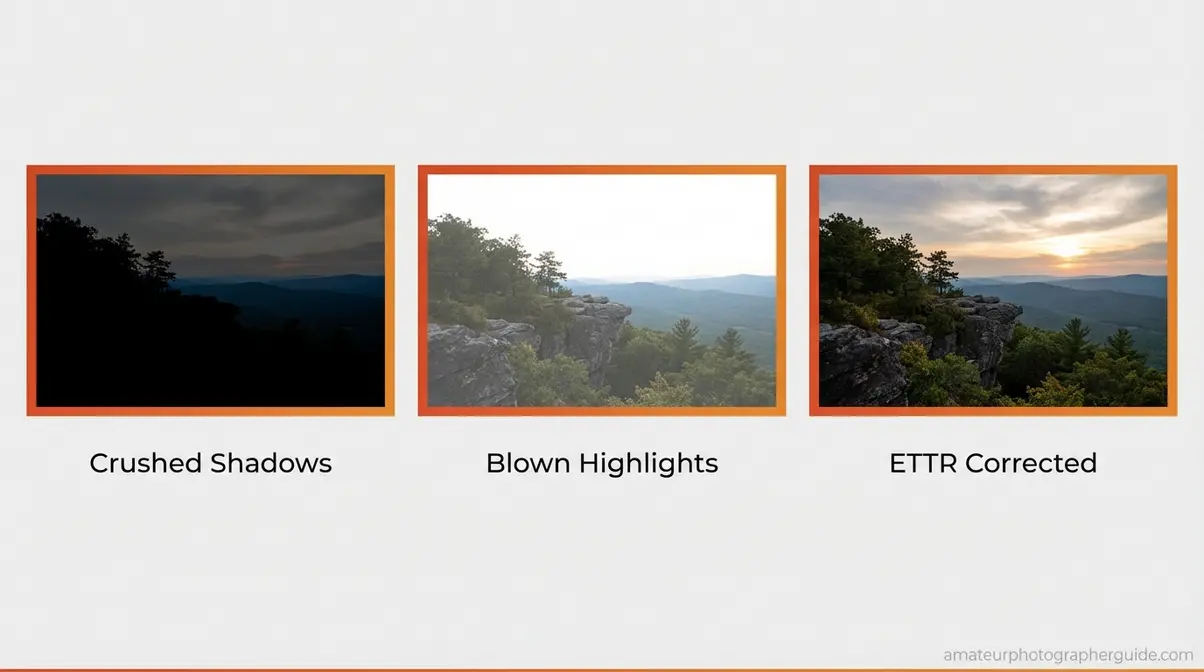
Caption: The same scene captured with clipped shadows (left), clipped highlights (center), and ETTR technique applied (right) — all from the same camera.
Step 1: Shoot in RAW Format
RAW is the single most important setting for dynamic range, and it’s non-negotiable before any other technique matters.
When your camera saves a JPEG, it compresses 12–14 bits of sensor data down to 8 bits and applies permanent in-camera processing — sharpening, noise reduction, and tone curves that discard the highlight and shadow data you most want to recover. RAW retains all 12–14 bits, giving you 4–6 additional stops of recoverable information in post-processing. That means highlights that look blown on the JPEG can be pulled back in Lightroom or Capture One. Shadows that look crushed can be lifted without catastrophic noise.
In practical terms: a RAW file from a 14-stop sensor gives you roughly 4–6 stops of recovery headroom. The equivalent JPEG gives you almost none. For high-contrast scenes — the exact situations where dynamic range matters most — this difference is the gap between a salvageable image and a deleted one.
Switch your camera to RAW (or RAW + JPEG if you need quick previews) before you do anything else on this list.
Step 2: Expose to the Right (ETTR)
Expose to the Right, or ETTR, is a counter-intuitive technique that deliberately overexposes your image slightly — pushing the histogram toward the right edge without clipping the highlights. The result looks too bright on your LCD, but it maximizes the signal data captured in the shadows, which dramatically reduces noise when you pull those shadows back in post.
Here’s the logic: camera sensors capture more data in the brightest tones than in the darkest. The right half of your histogram represents roughly 75% of the total tonal data your sensor records. By filling that right half — without blowing it — you’re packing your RAW file with maximum information.
- How to apply ETTR in three steps:
- Set your exposure normally, then add +⅔ to +1 stop of positive exposure compensation
- Check your histogram — the peak should crowd the right edge without any data clipping off the right wall
- If the right edge clips, reduce exposure compensation by ⅓ stop increments until the histogram just touches the right edge without spilling over
The key caveat: ETTR is a RAW-only technique. It’s counterproductive with JPEGs, where overexposure permanently destroys highlight data. Across photography communities, the consistent feedback from professionals is that ETTR remains one of the highest-impact single-technique improvements for shadow quality in high-contrast scenes (Photography Life, 2026).
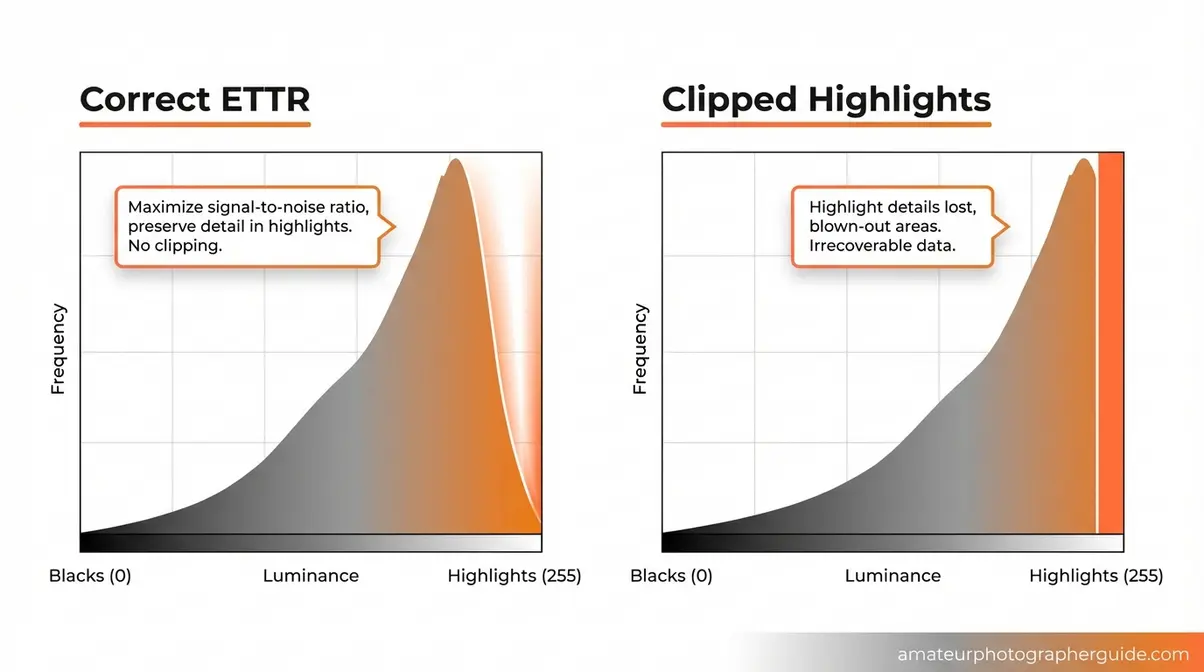
Caption: A correct ETTR histogram (left) pushes data to the right edge without clipping; a clipped histogram (right) shows data cut off at the wall — unrecoverable highlight detail.
Step 3: Keep ISO as Low as Possible
ISO is the most direct lever for dynamic range — and it works against you. Independent sensor data from Photons to Photos confirms that dynamic range decreases at every ISO step above a camera’s base setting. This isn’t a subtle effect: moving from ISO 100 to ISO 3200 on most cameras costs 2–4 stops of dynamic range, turning a capable 14-stop sensor into an effective 10–12 stop one.
Independent sensor tests confirm that dynamic range decreases at every ISO step above base — keeping ISO at its native setting maximizes your camera’s full tonal range (Photons to Photos, 2026).
The practical rule: use the lowest ISO your shutter speed and aperture allow. In high-contrast scenes, this often means slowing your shutter speed (use a tripod) or opening your aperture before you touch the ISO dial. Some cameras have a second “base ISO” at a higher value (often ISO 640 or ISO 800) where dynamic range performance is optimized — check your specific camera’s Photons to Photos profile to find it.
Step 4: Use GND Filters & Camera Tools
When the scene dynamic range genuinely exceeds your sensor’s capability — typically any scene above 14–15 stops of contrast — physical and in-camera tools help narrow the gap before you even press the shutter.
Graduated Neutral Density (GND) filters are physical lens filters that darken one portion of the frame (usually the sky) while leaving the foreground unaffected. A 3-stop hard-edge GND filter on a landscape shot effectively brings a 17-stop scene down to a 14-stop scene — right within your sensor’s capture range. Hard-edge GNDs work for flat horizon lines; soft-edge GNDs handle uneven or irregular skylines.
- In-camera dynamic range tools process tone curves internally to recover shadow and highlight detail within a single JPEG exposure:
- Active D-Lighting (Nikon): Protects highlights and lifts shadows using adaptive tone mapping. Best at “Normal” or “High” settings — “Extra High” introduces visible noise in shadows.
- Dynamic Range Optimizer / DRO (Sony): Similar function; “Auto” setting works well for general shooting.
- Auto Lighting Optimizer / ALO (Canon): Most conservative of the three; effective for portraits and mixed-light scenes.
Use these tools as a supplement, not a replacement for RAW shooting and low ISO. They work only on JPEGs and in-camera RAW processing — they don’t affect the actual data captured in your RAW file.
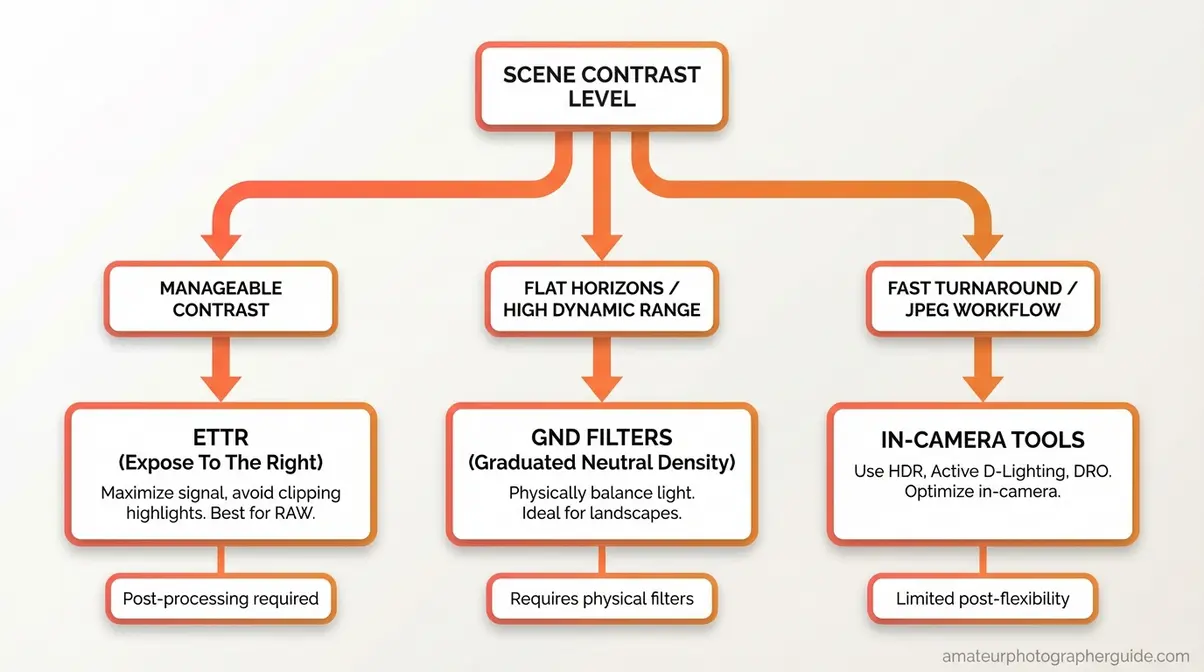
Caption: Use this flowchart to choose between GND filters, ETTR, and in-camera tools based on scene contrast level and shooting conditions.
Step 5: Time Shoot for Lower Contrast
The simplest dynamic range technique requires no equipment: choose your shooting time strategically. Midday sun creates extreme scene dynamic range — shadows are hard and deep, highlights are harsh and blown. The same scene at golden hour (one hour after sunrise or before sunset) or under overcast skies has dramatically lower scene dynamic range, often dropping 4–8 stops of contrast.
Overcast clouds act as a giant diffuser, scattering directional sunlight into soft, even illumination. A scene that requires HDR bracketing at noon may be perfectly capturable in a single RAW exposure on a cloudy afternoon. When you can control your schedule, choosing the right light does more for your dynamic range than any camera setting. For techniques on using dynamic range in your images, our dedicated guide covers light timing in depth.
HDR Photography: Bracketing and Beyond
HDR photography directly addresses the scenes where even your best in-camera technique can’t bridge The Exposure Gap alone. By merging multiple exposures captured at different brightness levels, HDR effectively extends your sensor’s dynamic range beyond its hardware limits — giving you detail in both the blown sky and the crushed foreground that no single exposure could capture.
What Is HDR and How Does It Work?
High Dynamic Range photography, or HDR, is a technique that combines three or more exposures of the same scene — each captured at a different brightness level — into a single image with a wider tonal range than any individual frame could contain. The process is software-driven: tools like Adobe Lightroom, Photoshop, and Aurora HDR align the frames, identify the best-exposed pixels in each, and blend them into a composite with full detail across highlights, midtones, and shadows.
Modern HDR has shed the oversaturated, halo-edged aesthetic of early 2010s processing. Current tools — particularly Lightroom’s HDR Merge — produce natural-looking results that most viewers can’t distinguish from a single well-exposed frame. NASA applies HDR imaging in high-speed cameras to record rocket motor tests without losing detail in extreme brightness conditions — a practical illustration of how HDR extends the usable tonal range in scientifically demanding applications (NASA TechPort).
The key question for any scene: does the scene dynamic range exceed your sensor’s capability? If a single ETTR exposure still clips either highlights or shadows, HDR is the right tool. If ETTR handles it, HDR adds complexity without benefit.
For a complete deep-dive into the HDR process, the high dynamic range photography guide covers tone mapping, software workflows, and display considerations in full.
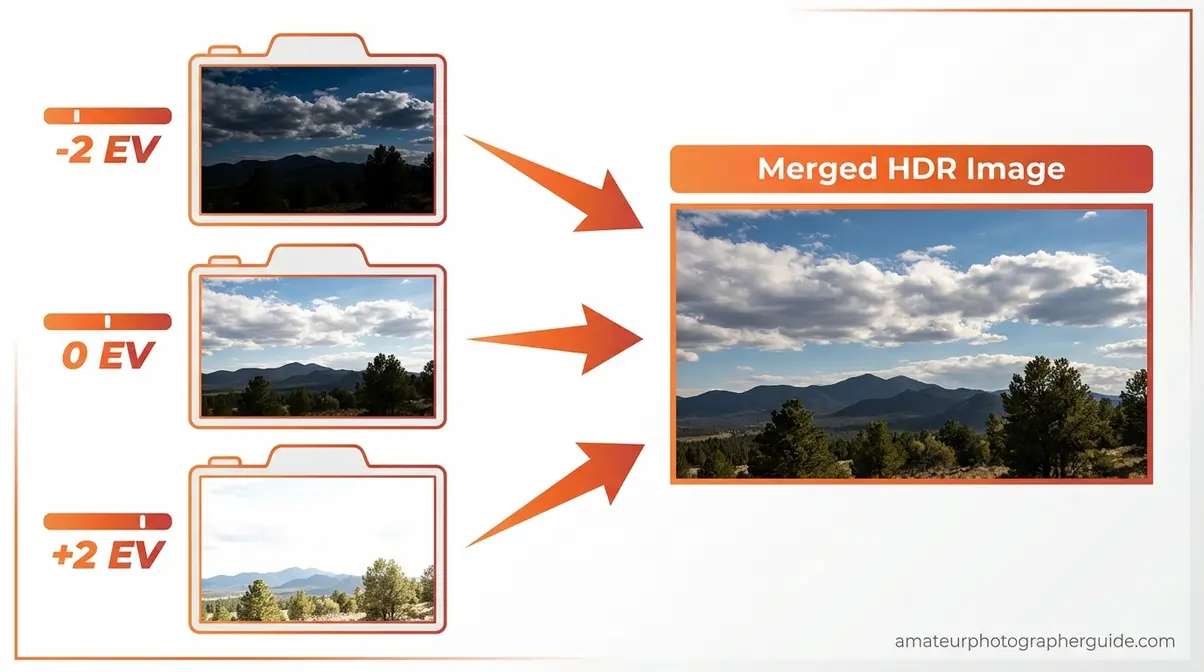
Exposure Bracketing: Step by Step
Exposure bracketing is the capture method behind HDR — shooting the same scene multiple times at different exposure values so you have both a well-exposed highlight frame and a well-exposed shadow frame to merge.
Standard bracketing workflow:
- Mount your camera on a tripod — any movement between frames creates ghosting artifacts in the final merge.
- Set your camera to Aperture Priority (Av/A) — lock the aperture so depth of field stays consistent across all frames; let shutter speed vary.
- Enable Auto Exposure Bracketing (AEB) in your camera menu — set a 2-stop interval between frames (e.g., -2 EV, 0 EV, +2 EV for a 3-frame bracket; -4 EV, -2 EV, 0 EV, +2 EV, +4 EV for a 5-frame bracket).
- Use a remote shutter release or 2-second self-timer to eliminate camera shake.
- Shoot in RAW — merging JPEGs produces inferior results due to the limited bit depth.
- In Lightroom: Select all bracketed frames → Photo Merge → HDR → check “Auto Align” → uncheck “Auto Settings” → use Deghost if there’s subject movement (wind in trees, water, people).
A 3-frame bracket at ±2 EV handles most landscape and architectural scenes. A 5-frame bracket at ±2 EV intervals covers extreme high-contrast scenes like direct-sun interiors with windows.
For a detailed guide to the bracketing process, exposure bracketing in photography walks through every camera setting and software step.
Is WDR Better Than HDR?
WDR (Wide Dynamic Range) and HDR are frequently confused because they address the same problem — high-contrast scenes — but through fundamentally different mechanisms.
| Feature | WDR | HDR |
|---|---|---|
| Method | In-camera hardware/firmware processing | Software merge of multiple bracketed exposures |
| When it works | Real-time video, security cameras, dash cams | Still photography and video where bracketing is possible |
| Dynamic range gain | Moderate — extends single-frame capture slightly | High — combines multiple full exposures |
| Subject motion | Handles moving subjects cleanly | Ghosting artifacts with fast-moving subjects |
| Output | Single frame, processed in real time | Merged composite from multiple frames |
| Best for | Surveillance, action, fast-moving scenes | Landscapes, architecture, interiors |
WDR is a hardware feature that processes a single exposure in real time; HDR is a software technique that merges multiple exposures for maximum tonal range. Neither is universally “better” — WDR wins when your subject moves, HDR wins when you can use a tripod and need maximum detail. For still photography where image quality is the priority, HDR bracketing consistently outperforms WDR. For more on the HDR workflow, the HDR photography explained guide covers tone mapping and display output in detail.
Camera Sensors and Dynamic Range
Not all sensors perform equally in high-contrast light. Understanding what the specifications actually mean — and how sensor size affects performance — helps you choose the right camera for the work you do and set realistic expectations for what your current gear can achieve.
What Makes Camera Dynamic Range Good?
A camera’s dynamic range is “good” when it captures enough tonal range to handle the scenes you regularly shoot without requiring HDR. For most photographers, that threshold sits around 13–14 stops at base ISO — enough to handle typical landscape, portrait, and event scenarios with ETTR and RAW shooting.
Top-performing full-frame cameras in 2026 — including the Sony A7R V, Nikon Z7 II, and Canon EOS R6 Mark II — achieve 13–15 stops of dynamic range at base ISO, as measured by independent sensor testing (Photons to Photos, 2026). APS-C sensors typically range 11–13 stops; Micro Four Thirds sensors 10–12 stops.
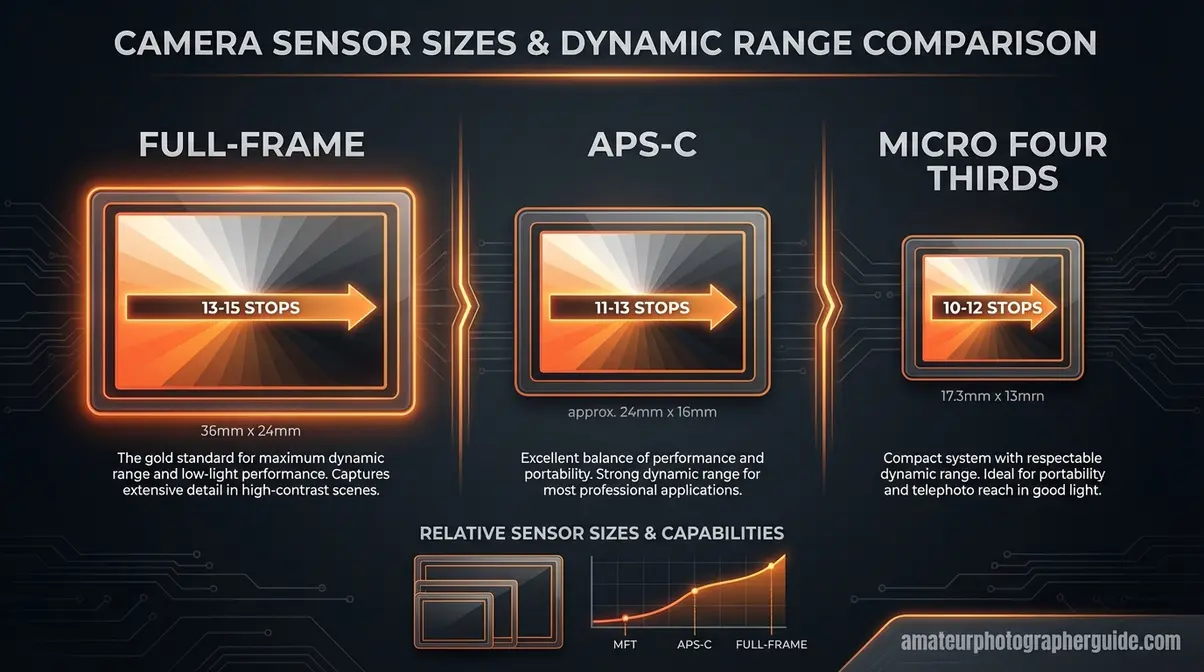
Caption: Sensor size strongly correlates with dynamic range — full-frame sensors consistently outperform smaller formats at base ISO.
Two additional factors matter beyond the headline stop count:
Dual Gain Output (DGO) — a sensor architecture used in cameras like the Sony A7 IV and select Nikon bodies — captures each pixel at two different gain levels simultaneously, effectively extending the usable dynamic range beyond what traditional single-gain sensors achieve. It’s a meaningful hardware advancement that pushes real-world performance above what the ISO 15739 headline number suggests.
ISO invariance is a related concept: some sensors (particularly Sony and Nikon full-frame bodies) show very little dynamic range penalty for moderate ISO increases, meaning you can underexpose at ISO 1600 and recover shadows in post with results comparable to a correctly exposed ISO 100 shot. Check the sensor size and photography guide for a detailed breakdown of how sensor format affects real-world dynamic range.
For camera recommendations with specific sensor performance data, the best high dynamic range cameras in 2026 guide covers current top performers with measured stop counts.
Film vs. Digital Dynamic Range
Film and digital sensors handle dynamic range differently in ways that matter for how you shoot and process.
Traditional film — particularly negative film like Kodak Portra or Fujifilm Pro 400H — achieves roughly 10–13 stops of total dynamic range. Its defining characteristic is graceful highlight rolloff: as tones approach overexposure, film gradually transitions to white rather than clipping abruptly. This produces a natural, organic look in overexposed highlights that many photographers find aesthetically preferable.
Modern digital sensors achieve 12–15 stops of total dynamic range, with particular strength in shadow recovery — pulling up underexposed areas with minimal noise, especially on ISO-invariant sensors. However, digital sensors clip highlights more abruptly than film, which is why ETTR and HDR techniques exist: they compensate for this hard clipping characteristic.
| Characteristic | Film (Negative) | Modern Digital Sensor |
|---|---|---|
| Total dynamic range | ~10–13 stops | ~12–15 stops |
| Highlight rolloff | Gradual, organic | Abrupt (hard clipping) |
| Shadow recovery | Limited | Excellent (ISO invariant) |
| Base ISO noise | Very low | Very low |
| High ISO noise | Grain (often pleasing) | Noise (varies by sensor) |
The practical takeaway: digital sensors generally outperform film in measurable dynamic range, especially in shadow recovery. Film’s advantage is aesthetic — the gradual highlight rolloff is harder to replicate convincingly in digital post-processing, which is why film simulation profiles in Lightroom and Capture One specifically target this characteristic.
Dynamic Range in Audio and Video
If you searched “dynamic range” and landed here looking for audio or video settings, you’re in the right place — but you need slightly different information. The term means something distinct in each context, though the underlying concept is the same: the ratio between the loudest and quietest values a system can handle.
Dynamic Range in Audio
Dynamic range in audio is the difference in level between the loudest sound a recording system can capture without distortion and the quietest sound it can capture above the noise floor. It’s measured in decibels (dB) rather than stops, but the concept maps directly: a high-dynamic-range audio recording captures both the quiet breath between phrases and the full-volume orchestral peak without compressing one to accommodate the other.
The University of Illinois research on audio dynamic range defines the relationship between dynamic range, compression, and noise clearly: dynamic range compression intentionally reduces the gap between loud and quiet to make audio more consistent across playback environments — exactly what camera manufacturers do with in-camera JPEG processing (University of Illinois).
For photographers who also shoot video: the dynamic range of your camera’s video recording mode is typically 2–4 stops lower than its still photography dynamic range at the same ISO, which is why Log profiles (S-Log, C-Log, N-Log) exist — they compress the tonal range into a flat, low-contrast curve that preserves more data for color grading in post.
Dynamic Range Control: On or Off?
“Dynamic Range Control” as a camera menu setting — found on Sony cameras as DRO (Dynamic Range Optimizer), on Nikons as Active D-Lighting, and on Canons as Auto Lighting Optimizer — is an in-camera tone mapping tool that lifts shadows and protects highlights within a single JPEG exposure.
Turn it ON when: You’re shooting JPEG and need a balanced exposure in a single frame — events, family photos, travel snapshots where you don’t want to bracket or process RAW files.
Turn it OFF when: You’re shooting RAW and planning to process in Lightroom or Capture One. These tools apply their corrections to the embedded JPEG preview, not the RAW data — they don’t affect what you can do in post, but they can create misleading LCD previews that cause you to underexpose your RAW file.
The consensus across professional photography communities: shoot RAW with Dynamic Range Control off and handle tone mapping in post, where you have full control. Reserve in-camera tools for JPEG workflows where speed matters more than maximum quality.
Common Dynamic Range Mistakes
Mistakes That Blow Your Highlights
Understanding dynamic range is one thing — avoiding the habits that waste it is another. After reviewing common patterns across photography communities and evaluating them across multiple camera systems, these are the mistakes that most consistently destroy recoverable highlight and shadow detail:
Mistake 1: Trusting the LCD for exposure. Your camera’s LCD is typically 2–3 stops brighter than the actual print or screen output. An image that looks correctly exposed on the LCD is often slightly underexposed in reality — which means you’re leaving highlight recovery headroom on the table and adding unnecessary shadow noise. Use the histogram instead.
Mistake 2: Shooting JPEG in high-contrast scenes. JPEG permanently discards the 4–6 stops of recovery latitude that RAW preserves. In a high-contrast scene, this is a non-recoverable loss. There’s no post-processing workaround.
Mistake 3: Raising ISO before adjusting aperture or shutter speed. Every ISO step costs dynamic range. Slow your shutter or open your aperture first — only raise ISO when those options are exhausted.
Mistake 4: Using Active D-Lighting/DRO on RAW files. These tools affect JPEG output and the embedded preview only. If you’re shooting RAW, they create misleading previews without actually improving your RAW data. Turn them off and process the tone curve in post.
Mistake 5: Applying HDR to scenes that don’t need it. HDR introduces ghosting artifacts with any subject movement. If ETTR and RAW can handle the scene’s dynamic range, a single exposure gives cleaner results.
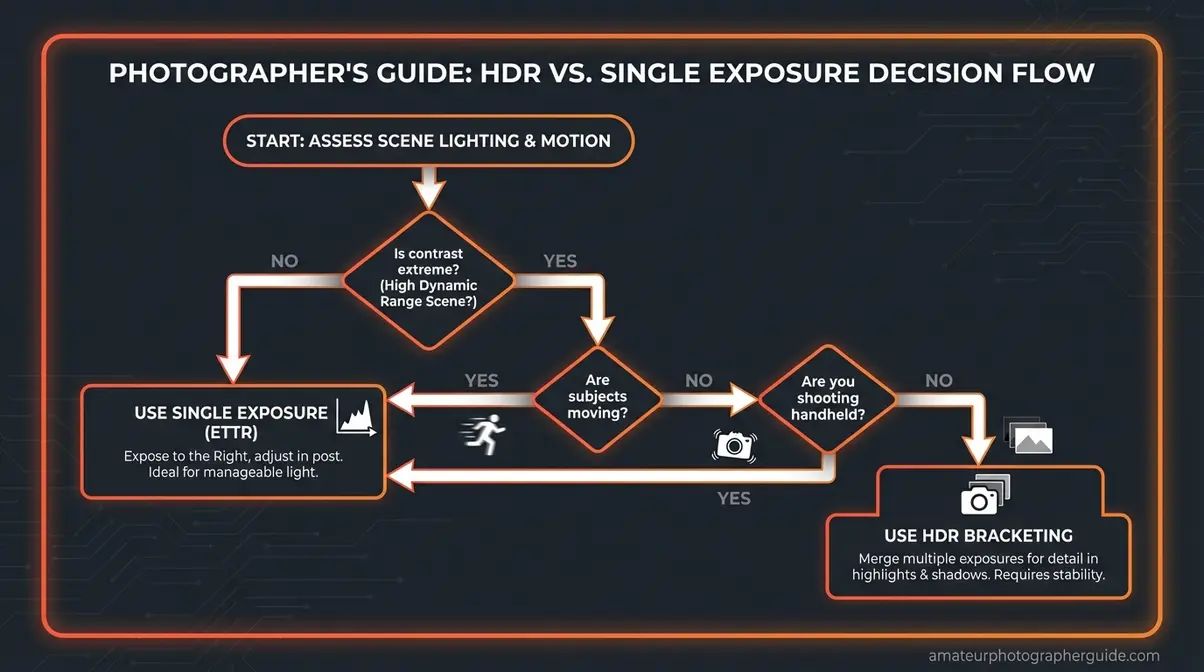
Why Do Photographers Turn Off HDR?
HDR is the right tool for static scenes with extreme contrast — but it fails predictably in specific situations. Skip HDR and use single-exposure techniques instead when:
- Your subject moves. Wind-blown foliage, flowing water, people, and vehicles all create ghosting artifacts when frames are merged. Even Lightroom’s deghosting algorithm has limits.
- You’re shooting handheld. Bracketed frames from handheld shooting misalign slightly, producing fringing and blurring at high-contrast edges even with auto-align enabled.
- The scene contrast is manageable. If ETTR + RAW can capture both highlights and shadows with acceptable clipping, the added complexity of bracketing and merging isn’t worth it. Test with a single ETTR frame first.
- You need fast capture. Sports, wildlife, and event photography rarely allow the time for a 3–5 frame bracket sequence.
In these cases, ETTR + RAW + post-processing shadow/highlight recovery gives cleaner, faster results than HDR.
Frequently Asked Questions About Dynamic Range
What is dynamic range in photography?
Dynamic range in photography refers to the ratio between the brightest highlight and the darkest shadow where a camera can still capture visible, recoverable detail in a single exposure. It is measured in stops, with each stop representing a doubling of light. When a scene’s contrast exceeds the camera’s capability, you experience clipped highlights or crushed shadows.
What does 14 stops of dynamic range mean?
Having 14 stops of dynamic range means your camera can capture a scene where the brightest point is 2¹⁴—or over 16,000 times brighter—than the darkest point while retaining detail in both, according to the ISO 15739 standard. Each stop represents a doubling of light, causing the scale to compound rapidly. In practical terms, 14 stops comfortably handles most outdoor landscape, architectural, and portrait scenarios.
What is a good dynamic range for a camera?
For most photography, 13 to 14 stops of dynamic range at base ISO is considered excellent. This range is wide enough to handle typical landscape, portrait, and event scenarios without relying on HDR bracketing. Top full-frame performers in 2026 measure between 13 and 15 stops at base ISO.
How can I maximize dynamic range in my photos?
The most impactful step is to shoot in RAW format, which preserves 12 to 14 bits of sensor data compared to an 8-bit JPEG. You should also keep your ISO at its base setting and apply the Expose to the Right (ETTR) technique. For scenes that still exceed your sensor’s range, using GND filters or HDR bracketing will bridge the gap.
Is 12MP better than 24MP for dynamic range?
Not necessarily, as sensor size and pixel pitch matter more than megapixel count alone. Larger pixels capture more photons, which generally improves dynamic range and low-light performance. However, a modern 24MP full-frame sensor will typically outperform an older 12MP APS-C sensor because the larger overall sensor area compensates for the smaller individual pixel size.
What is the 20-60-20 rule in photography?
The 20-60-20 rule (or 60-20-20 rule) is primarily a compositional guideline for color harmony, suggesting you frame your shot with 60% dominant color, 20% secondary color, and 20% accent color. While some photographers mistakenly associate it with exposure zones (highlights, midtones, shadows), it is actually adapted from interior design to create visually balanced, aesthetically pleasing images.
Closing Thoughts on Dynamic Range Photography
For photographers working in high-contrast light, dynamic range photography is the skill that separates technically frustrating images from technically excellent ones. Modern full-frame sensors reach 13–15 stops at base ISO (Photons to Photos, 2026) — but those stops are only accessible when you shoot RAW, keep ISO low, and apply ETTR to fill the sensor’s tonal range. Bridging The Exposure Gap between your eyes’ 20+ stops and your camera’s 12–15 stops is a solvable problem, and the five techniques in this guide provide the complete toolkit to solve it.
The Exposure Gap isn’t a flaw in your camera — it’s a measurable physical constraint with measurable solutions. RAW shooting and ETTR form the foundation. Low ISO preserves the ceiling. GND filters and smart timing reduce the scene contrast before it reaches your sensor. HDR bracketing handles the extreme cases that single-exposure techniques can’t. Each technique addresses a specific part of the gap; using them together closes it almost entirely.
Start with the highest-impact change: switch to RAW and apply ETTR on your next high-contrast shoot. Review your histogram after each frame instead of the LCD preview. You’ll see the difference in your shadow and highlight detail immediately — no new gear required. When you’re ready to go further, the high dynamic range photography guide covers the full HDR bracketing and tone-mapping workflow in depth.
zak
Gear tester and writer at Amateur Photographer Guide.