
Table of Contents
- Table of Contents
- Quick Summary
- Step 1: Prepare Gear and Scout Location
- Step 2: Set Up Camera for Optimal Results
- Step 3: Capture Compelling Landscape Images
- Step 4: Organize and Select Best Shots
- Step 5: Edit and Enhance Your Photos
- Step 6: Review and Export Final Images
- Take Your Landscape Photography to the Next Level Today
- Frequently Asked Questions
- Recommended
This blog post may contain affiliate links. As an Amazon Associate I earn from qualifying purchases.
Did you know that over 80 percent of breathtaking landscape photos are the result of detailed preparation before a single shot is taken? Capturing the beauty of nature takes more than quick snaps or spontaneous adventures. The right approach blends careful planning, awareness of changing conditions, and smart gear choices, paving the way for impressive and memorable images every time you head outdoors.
Table of Contents
- Step 1: Prepare Gear And Scout Location
- Step 2: Set Up Camera For Optimal Results
- Step 3: Capture Compelling Landscape Images
- Step 4: Organize And Select Best Shots
- Step 5: Edit And Enhance Your Photos
- Step 6: Review And Export Final Images
Quick Summary
| Key Point | Explanation |
|---|---|
| 1. Research Locations Thoroughly | Use digital tools to scout unique landscapes and note key geographical features that inspire creativity. |
| 2. Prepare Your Camera Settings | Utilize Aperture Priority or Manual mode to control depth of field and ensure sharpness throughout your images. |
| 3. Focus on Composition Techniques | Apply the rule of thirds and leading lines to create balanced and engaging landscape photographs. |
| 4. Edit with Purpose and Care | Make both global and local adjustments to enhance color, tone, and details for a polished final product. |
| 5. Organize and Review Your Images | Import, cull, and categorize your shots systematically to streamline the selection process and enhance quality control. |
Step 1: Prepare Gear and Scout Location
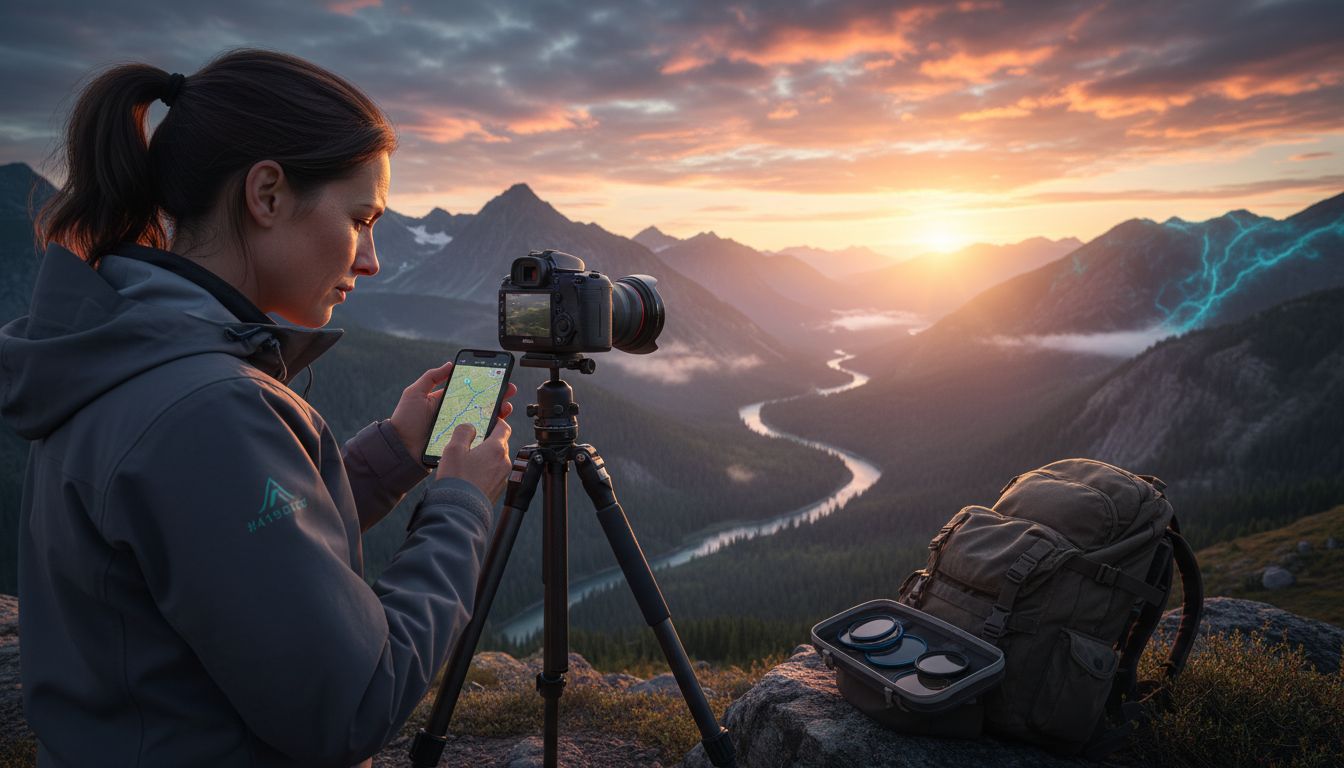
Landscape photography success starts well before you press the shutter. Your preparation determines the quality of images you will capture. This step is about researching potential locations, understanding the terrain, and ensuring you have the right equipment to document stunning natural scenes.
Start by selecting locations that spark your imagination. Use digital mapping tools like Google Earth or specialized photography location apps to scout potential shooting sites. Look for unique geographical features such as mountain ranges, coastlines, forests, or dramatic rock formations that offer compelling visual narratives.
Weather research becomes crucial in landscape photography. Check local forecasts and understand how different atmospheric conditions impact lighting and composition. Cloudy days often provide soft diffused light perfect for woodland scenes, while dramatic storm clouds can create powerful landscape images. Websites like PhotoPills can help you predict sunrise and sunset times for optimal golden hour shooting.
Pro Tip: Always pack extra batteries, memory cards, and weather appropriate clothing. Landscape photography often involves remote locations with limited access to supplies.
Before your actual shoot, consider a preliminary location visit. Walk the terrain, identify potential shooting angles, and mentally map out your compositions. This reconnaissance allows you to understand lighting conditions, potential obstacles, and the best vantage points without the pressure of capturing images.
As you prepare your gear, select versatile lenses that can capture wide landscapes and detailed scenes. A sturdy tripod becomes essential for sharp images in varying light conditions. Include neutral density filters to manage exposure and polarizing filters to enhance sky and water details.
Here’s a comparison of essential gear and scouting strategies for landscape photography:
| Category | Key Items | Tips & Strategies |
|---|---|---|
| Location Scouting | Google Earth Photo apps |
Look for unique features Visit before shooting |
| Weather Prep | Local forecasts PhotoPills |
Check light, clouds Plan for golden hour |
| Camera Gear | Extra batteries Memory cards |
Use versatile lenses Pack weather clothing |
| Support & Filters | Tripod ND & polarizer |
Essential for sharp shots Enhance sky/water |
Your next step will involve setting up and capturing your initial landscape compositions with the preparation you have carefully undertaken.
Step 2: Set Up Camera for Optimal Results
With your location scouted and gear prepared, it is time to configure your camera for capturing stunning landscape images. The key to remarkable landscape photography lies in understanding and mastering your camera settings to maximize image quality and depth.
Start by selecting the right shooting mode. Landscape photographers typically prefer Aperture Priority mode or Manual mode to have complete control over depth of field. Set your aperture to a smaller f stop like f/11 or f/16 to ensure sharp focus across the entire scene from foreground to background. This technique guarantees that intricate landscape details remain crisp and well defined.
Stabilize your camera using a sturdy tripod to eliminate any potential camera shake. This becomes especially critical when shooting in low light conditions or using slower shutter speeds. Position your tripod on stable ground and ensure it is level to maintain straight horizon lines in your compositions.
Pro Tip: Use your camera’s built in electronic level or hot shoe bubble level to guarantee perfectly horizontal landscape shots.
Adjust your ISO to the lowest possible setting to minimize digital noise and maximize image clarity. For most landscape scenarios, an ISO between 100 and 400 works perfectly. If shooting in very low light conditions, you might need to incrementally increase your ISO while being mindful of potential image grain.
Consider using the beginner’s guide to manual camera settings to dive deeper into understanding how these technical elements work together. Your next step involves selecting the perfect composition and fine tuning your camera settings for the specific landscape before you.
Step 3: Capture Compelling Landscape Images
With your camera meticulously set up, you are now ready to transform the breathtaking landscape before you into a powerful photographic narrative. This step is about translating the three dimensional beauty of nature into a two dimensional image that captures imagination and emotion.
Composition becomes your primary storytelling tool. Use the classic rule of thirds to create balanced and engaging images. Imagine your frame divided into a 3×3 grid and position key elements along these lines or at their intersections. Dramatic landscapes often benefit from placing the horizon line either in the lower or upper third of the frame rather than directly in the center.
Leading lines are your secret weapon for creating depth and drawing viewer attention. Look for natural elements like rivers, coastlines, mountain ridges, or tree lines that can guide the eye through your image. These visual pathways create a sense of movement and invite viewers to explore the entire scene.
Pro Tip: Experiment with different perspectives. Get low to the ground or find an elevated position to reveal unique landscape interpretations that most people never see.
Light transforms landscape photography from good to extraordinary. The golden hours just after sunrise and before sunset provide warm soft light that adds incredible depth and texture to your images. During these times, shadows become longer and more dramatic, revealing intricate landscape details that harsh midday light would flatten.
Consider long exposure techniques for adding dynamism to your shots. Use neutral density filters to create silky smooth water effects or capture movement in clouds. Experiment with shutter speeds between 1 to 30 seconds to transform ordinary scenes into ethereal visual experiences.
10 tips for taking stunning landscape photos can provide additional insights into refining your technique. Your next step involves carefully reviewing and selecting the most impactful images from your shoot.
Step 4: Organize and Select Best Shots
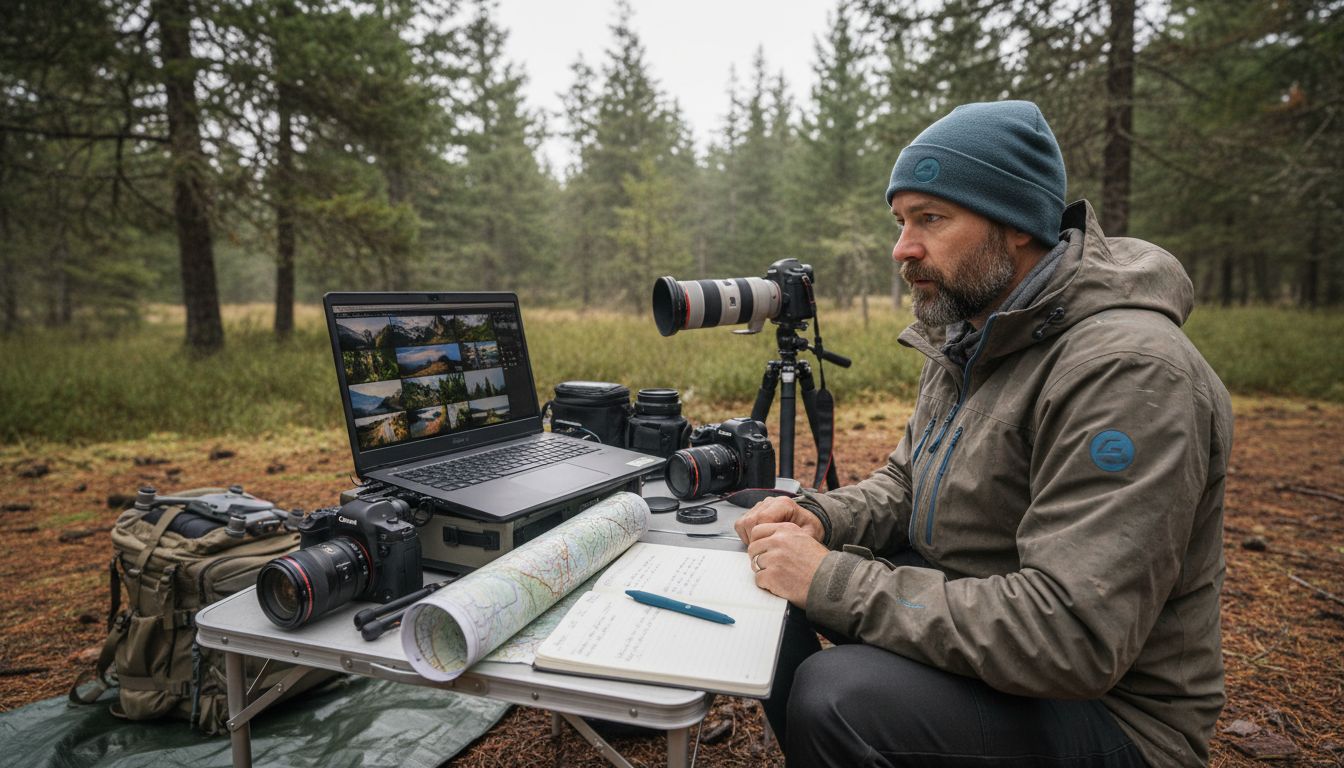
After capturing potentially dozens of landscape images, the critical task of organizing and selecting your best shots begins. This process transforms your raw photographic data into a curated collection of powerful visual stories that represent your creative vision.
Start by importing all images into your preferred photo management software. Create a dedicated folder for your landscape shoot and use a consistent naming convention that includes date and location. This systematic approach helps you quickly locate and track your images over time.
Begin your culling process by first eliminating obviously flawed images technical issues like extreme blurriness, severe overexposure, or unintended camera movement. These immediate disqualifications help streamline your selection process and reduce visual clutter.
Pro Tip: Use the zoom function to check image sharpness at 100% magnification. What looks good at a small size might reveal imperfections when viewed closely.
Evaluate the remaining images based on several key criteria. Look for compositions that tell a story compelling images that evoke emotion and showcase the landscape unique characteristics. Pay attention to technical aspects like exposure balance color accuracy and overall visual impact.
Consider creating a rating system using your photo management software. A simple star rating method can help you quickly categorize images from exceptional to marginal. This approach provides a structured way to compare and contrast your shots objectively.
Learn about culling techniques in photography to refine your selection skills further. Your next step involves preparing the selected images for post processing and final editing.
Step 5: Edit and Enhance Your Photos
With your best landscape images selected, the editing process transforms good photographs into extraordinary visual narratives. This stage allows you to refine technical elements and reveal the true emotional essence of the landscape you captured.
Begin with global adjustments to establish a strong foundation. Adjust exposure to recover details in highlights and shadows. Fine tune white balance to ensure colors appear natural and vibrant. Use the histogram as your guide to understand the overall tonal distribution and make precise corrections.
Local adjustments become your creative toolkit for selective enhancement. Use graduated filters to balance bright skies with darker foregrounds. Apply adjustment brushes to selectively brighten interesting details or add depth to specific landscape elements. These targeted modifications help guide viewer attention and create visual drama.
Pro Tip: Always work non destructively by using adjustment layers. This approach preserves your original image and allows you to experiment without permanent changes.
Color grading can dramatically transform your landscape images. Subtle shifts in color temperature color saturation and tone can evoke different emotional responses. Experiment with split toning techniques to add unique atmospheric qualities that reflect your creative vision.
For more advanced techniques consider exploring HDR compositing or exposure blending. These methods help capture a wider dynamic range particularly in challenging lighting conditions where a single exposure cannot capture all scene details.
Check out our guide on essential photo editing tips to further refine your post processing skills. Your final step involves preparing and sharing your stunning landscape images with the world.
Step 6: Review and Export Final Images
You have reached the final stage of your landscape photography journey where careful review and strategic exporting will transform your edited images into shareable masterpieces. This critical phase ensures your creative vision is perfectly preserved and ready for presentation.
Begin with a meticulous visual review of each edited image. Zoom in to 100% magnification to check for subtle details like sharpness noise and potential artifacts. Compare your edited versions side by side to ensure consistent color balance and aesthetic quality across your landscape collection.
Cropping becomes your final compositional refinement tool. Look for opportunities to strengthen visual impact by removing distracting elements or adjusting the image proportions. Consider different aspect ratios that might enhance the storytelling potential of your landscape photograph.
Pro Tip: Step away from your images for a few hours then return with fresh eyes. This perspective helps you evaluate your edits more objectively and critically.
When preparing to export choose file formats strategically. For digital sharing use high quality JPEG files with appropriate compression. For prints or professional portfolios consider uncompressed TIFF or PNG formats that preserve maximum image information.
Establish a consistent file naming system that includes shoot location date and sequence number. This organizational approach helps you quickly locate and manage your landscape photography archive over time.
Check out our guide on processing photos using software to further refine your export workflow. Your photographic journey continues as you share and showcase your stunning landscape captures with the world.
Take Your Landscape Photography to the Next Level Today
Mastering the full landscape photography workflow can feel overwhelming from scouting the perfect location to exporting your final shots. You want your images to capture the true beauty and emotion of the scene but might struggle with technical details like aperture settings, composition, or editing techniques. This guide distills complex concepts such as aperture priority mode, depth of field, and exposure blending into easy steps to help you gain confidence and control.
Enhance your skills now with trusted advice and practical tutorials from Amateur Photographer Guide. Explore resources on manual camera settings and learn how to process your photos using software. Don’t wait to transform your landscape shots into stunning works of art. Visit us today and unlock the full potential of your photography journey.
Frequently Asked Questions
What are the key steps in mastering landscape photography workflow?
Mastering landscape photography involves six key steps: preparing gear and scouting locations, setting up your camera, capturing images, organizing and selecting shots, editing photos, and reviewing and exporting final images. Follow these steps systematically to improve your landscape photography skills.
How can I effectively scout a location for landscape photography?
Scout potential photography locations by using digital mapping tools to identify unique geographical features. Plan a preliminary visit to the site to evaluate shooting angles and lighting conditions, allowing you to make informed decisions when it’s time to shoot.
What camera settings should I use for landscape photography?
Use Aperture Priority mode or Manual mode, setting your aperture to f/11 or f/16 for sharp focus across the scene. Stabilize your camera with a tripod and keep your ISO low (around 100-400) to minimize noise while capturing stunning images.
How do I edit my landscape photos for the best results?
Begin editing by making global adjustments such as exposure and white balance to ensure natural colors and detail. Follow up with local adjustments using brushes or filters to enhance specific areas, helping guide viewer attention to compelling elements in your images.
What should I look for when selecting my best landscape shots?
Select your best shots by eliminating clearly flawed images first, then evaluate the remaining options based on composition, emotion, and technical quality. Create a rating system to help categorize your images objectively before moving on to the editing stage.
How can I prepare my final images for sharing?
To prepare final images, conduct a visual review for sharpness and consistency, and crop as needed to enhance composition. Choose appropriate file formats for exporting based on whether you will share digitally or print, such as JPEG for online use or TIFF for print.
Recommended
- How to Master Post Processing Photography: A Beginner’s Blueprint That Actually Works – Amateur Photographer Guide
- Top Tips For Processing Your Photos Using Software – Amateur Photographer Guide
- 10 Tips for Taking Stunning Landscape Photos – Amateur Photographer Guide
- Best Camera for Landscape Photography: Hidden Features Pros Actually Use – Amateur Photographer Guide
- Choosing the Best Portrait Photo for Stunning Results – The Family Portrait Companys
- How to Plan a Product Photoshoot for Professional Results
