
Table of Contents
This blog post may contain affiliate links. As an Amazon Associate I earn from qualifying purchases.
Your photos are technically sharp. The exposure is right. So why do they still feel… flat?
The answer, almost every time, is framing. Photography framing tips aren’t just advice about borders and edges — they’re the invisible architecture that tells a viewer where to look, what to feel, and why a shot is worth a second glance. Photographers who master compositional framing don’t just take better pictures; they make intentional ones. And intention is exactly what separates a snapshot from a photograph.
This guide introduces “The Framing Toolkit” — a progressive framework built around 5 core frame types, advanced compositional rules most guides skip entirely, and practical techniques you can apply on your next shoot. Whether you’re working with a DSLR, a mirrorless body, or a smartphone, these photography framing tips will give you a repeatable system for building stronger images from the ground up.
Strong photography framing tips center on one core idea: every element in your frame should either support or strengthen your subject. The Framing Toolkit organizes five frame types into a progressive skill ladder, paired with advanced rules most photographers never learn.
- Natural frames (doorways, trees, arches) are the most accessible starting point for beginners moving to intermediate level
- Advanced rules like the 80/20, 50/50, and 3-line give you a mathematical backbone for composition decisions
- Tiny shifts change everything — moving 30 cm left or right can transform a cluttered background into a clean, layered image
What Is Framing in Photography?

Framing in photography is the technique of using elements within your scene — architectural features, natural objects, light, shadow, or color — to create a visual border around your subject, drawing the viewer’s eye inward and adding context to the image. As MasterClass explains, framing is one of the foundational compositional tools that separates intentional imagery from casual snapshots.
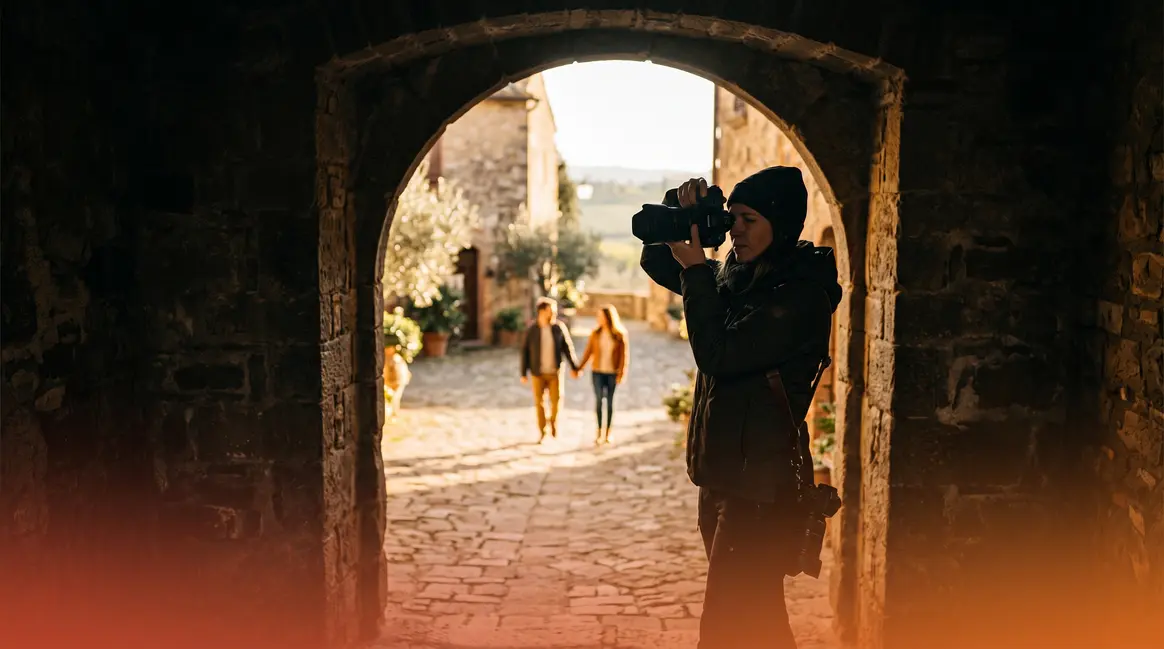
Think of your camera’s viewfinder as a window. Most photographers point that window at their subject and press the shutter. Skilled photographers, however, look for another window — a doorway, an overhanging branch, a tunnel opening — and position themselves so that second window surrounds their subject inside the first. The result is a “frame within a frame”: a layered, more interesting composition that pulls the viewer through multiple planes of depth. If you want to master photography framing techniques, understanding these core principles is the first step.
Why Framing Works: The Visual Psychology
The human eye is wired to follow edges and borders. When a strong compositional frame surrounds a subject, the brain interprets it as a signal: this is what matters. That instinctive response is why framing is so effective even when viewers can’t consciously identify it.
Photographers consistently find that framed compositions hold a viewer’s attention significantly longer than unframed equivalents. Evidence from photography educators shows that depth cues — the sense that a photo has a foreground, middle ground, and background — are among the most reliable predictors of perceived image quality among amateur audiences. Framing creates those depth cues almost automatically.
The Framing Toolkit: A Progressive Skill Ladder
The Framing Toolkit is the organizing principle of this guide. Rather than presenting framing techniques as a random list, it arranges them on a skill ladder from most accessible to most advanced:
| Level | Frame Type | Difficulty | Best Starting Scene |
|---|---|---|---|
| 1 | Natural Frames | Beginner–Intermediate | Doorways, archways, tree canopies |
| 2 | Architectural Frames | Intermediate | Windows, tunnels, corridors |
| 3 | Foreground Frames | Intermediate | Foliage, fences, objects |
| 4 | Light & Shadow Frames | Intermediate–Advanced | Harsh sunlight, urban shadows |
| 5 | Color & Abstract Frames | Advanced | Reflections, bokeh, color contrast |
Work through these levels in order and you’ll build a reliable, expandable compositional vocabulary — not just a bag of tricks.
What You’ll Need Before You Start
- Before diving into the techniques, make sure you have:
- Any camera (DSLR, mirrorless, or smartphone with manual or semi-manual modes)
- Basic understanding of your camera’s viewfinder or live view screen
- Willingness to move your feet — framing is 70% about where you stand, not camera settings
- A subject to practice on (a person, a building, or any object with clear edges)

The 5 Core Frame Types

Every compelling framed photograph uses at least one of five frame types. Understanding each type — and knowing when to reach for it — is what transforms photography framing tips from theory into instinct. These are your go-to framing techniques, arranged from most accessible to most challenging. For a broader overview of visual structure, check out our complete guide to composition in photography.
Level 1: Natural Frames
Natural frames are environmental elements — doorways, archways, tree branches, cave openings, overhanging rocks — that occur in the scene and can be positioned around your subject. They’re the most accessible frame type because they require no special equipment and appear in almost every shooting environment.
Canon’s composition guide notes that natural frames are particularly effective because they feel organic to the viewer — the eye accepts them as part of the scene rather than as a deliberate compositional device, which makes the framing feel effortless rather than forced.
- How to use natural frames:
- Identify a strong subject — a person, a building, a tree, a mountain peak
- Scan the scene for any surrounding element that could form a partial or complete border: a doorway, a gap in foliage, two vertical trees
- Move your feet until the natural element sits in your foreground and your subject sits cleanly inside it
- Check that the frame element is at least slightly out of focus (shallow depth of field helps) so it doesn’t compete with your subject
- Shoot and compare the framed version against a straight shot — the difference is immediate
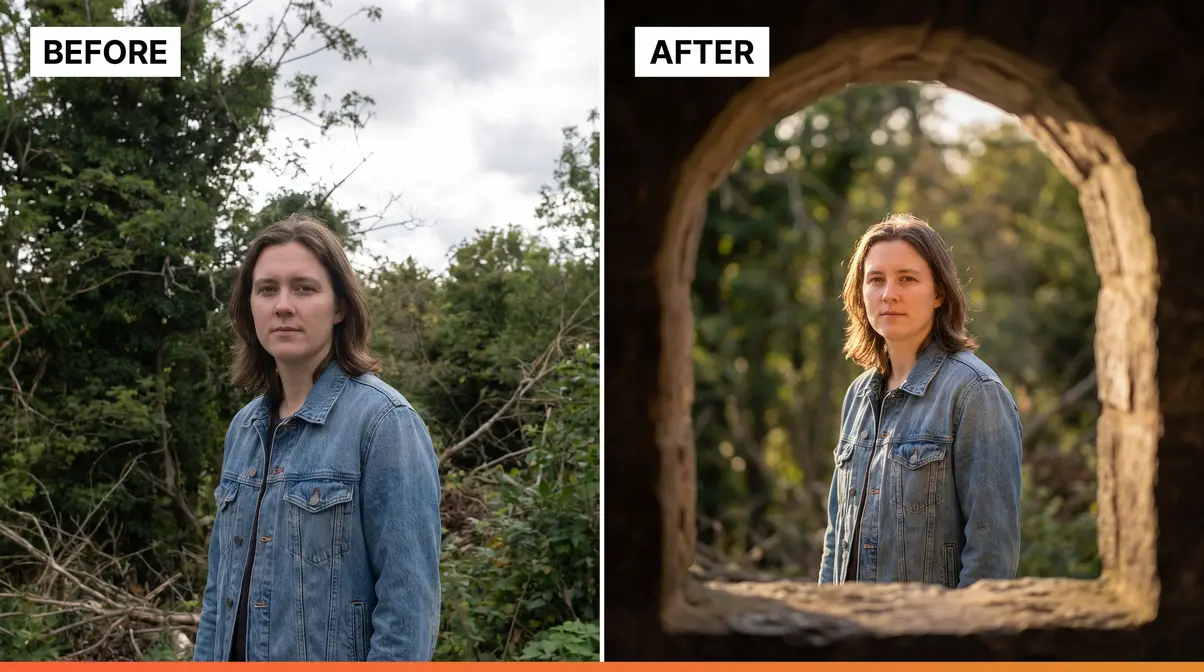
Photographers consistently find that even a partial natural frame — one side of a doorway, a single overhanging branch — is enough to create the layered effect. You don’t need a complete border to activate the frame-within-a-frame response.
Level 2: Architectural Frames
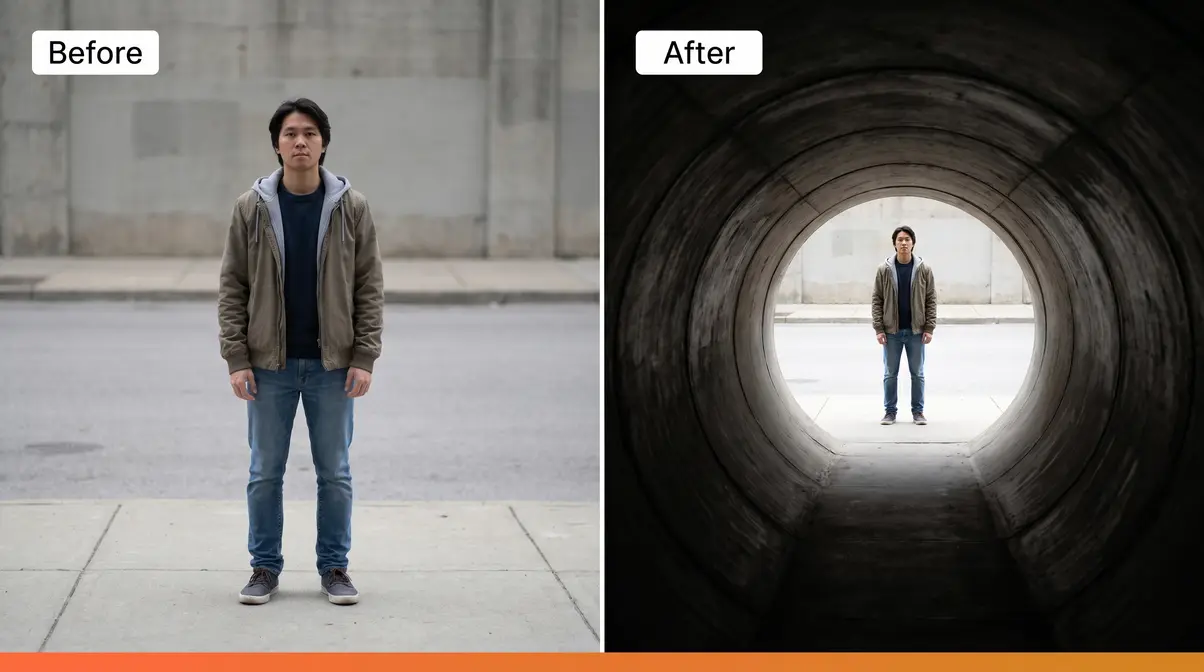
Architectural frames use man-made structures — windows, doorways, tunnels, corridors, bridges, arches — as compositional borders. Unlike natural frames, architectural frames tend to be geometric and precise, which suits urban, street, and interior photography particularly well.
Nikon’s composition guidelines highlight that architectural frames are especially powerful when the frame itself tells part of the story — a crumbling stone window framing a modern cityscape creates visual contrast that adds narrative to the image.
- How to use architectural frames:
- Look for rectangular or arched openings: windows, doorframes, tunnels, underpasses, bridges
- Position yourself so your subject is visible through the opening, not beside it
- Expose for your subject, not the frame — accept that the frame may go slightly dark; this silhouette effect often strengthens the composition
- Use a wide aperture (f/2.8–f/4) to keep the frame soft while the subject stays sharp
“Instead of just shooting at your subject, try shooting through something.”
This single mindset shift — from pointing at to shooting through — is the most reliable way to elevate architectural frame shots. Across photography communities, the consistent feedback is that photographers who adopt this approach notice improvements in their compositions within a single shoot.
Level 3: Foreground Frames
Foreground frames use objects in the near foreground — flowers, foliage, fences, fabric, bokeh-blurred objects — to create a soft, organic border at the edge of the frame. Unlike natural or architectural frames that surround the subject, foreground frames typically occupy one corner or edge, adding depth without fully enclosing the subject.
Evidence from photography educators shows that foreground framing is particularly effective in landscape and nature photography, where a cluster of out-of-focus wildflowers in the lower third can transform a flat wide-angle shot into a layered, more interesting image with a clear sense of three-dimensional space.
- How to use foreground frames:
- Find an object between you and your subject — flowers, leaves, a fence post, a window ledge
- Move close to the foreground object (within 20–40 cm) and use a wide aperture (f/1.8–f/2.8) to render it as soft bokeh
- Position the foreground element in a corner or along an edge — not dead center, where it competes with the subject
- Check that the foreground element’s color complements rather than clashes with your subject
Level 4: Light and Shadow Frames
Light and shadow frames use the contrast between bright and dark areas to isolate your subject. A pool of light falling on a face in a dark room, a shaft of sunlight cutting through a doorway, or a shadow-framed silhouette against a bright wall — these are all light-and-shadow frames. They’re among the most dramatic compositional tools available.
National Geographic’s photography composition advice emphasizes that light direction and quality are inseparable from composition — the best framing techniques work with the available light, not against it.
- How to use light and shadow frames:
- Identify a strong directional light source: window light, a doorway, a gap between buildings
- Position your subject in the light and step back until the surrounding shadow creates a natural dark border
- Meter for your subject’s highlights to preserve detail; let the shadows go dark
- Look for shadow patterns — window grilles, tree branches, venetian blinds — that can project a graphic frame onto your subject
Level 5: Color and Abstract Frames
Color frames use contrasting hues, tones, or abstract shapes — reflections in puddles, bokeh circles, colored walls — to create a visual boundary around the subject. This is the most advanced frame type because it requires the photographer to see in terms of color relationships rather than physical objects.
When evaluating these techniques against real-world examples, color framing tends to work best when the frame color is clearly distinct from the subject’s dominant color — a warm-toned subject against a cool blue background, or a single saturated element surrounded by neutral tones.
- How to use color and abstract frames:
- Identify a strong color contrast in the scene: a brightly painted wall, a reflective puddle, a field of uniform color
- Position your subject so the contrasting color surrounds or borders them
- For abstract frames (bokeh circles, lens flare), shoot toward a light source with your subject between you and the light
- Post-process with restraint — color frames are most effective when the color difference feels natural, not forced
Practical Photography Framing Tips
Knowing the five frame types is the foundation. Applying them under real shooting conditions — portraits, street scenes, landscapes, smartphone sessions — is where The Framing Toolkit becomes a practical tool. These photography framing tips are organized by scenario so you can reach for the right technique on any given shoot.
Portrait Framing: Directing Attention to the Face
Portraits benefit most from Level 1 (natural) and Level 2 (architectural) frames because human viewers are instinctively drawn to faces — any frame that isolates a face from a busy background dramatically increases the portrait’s impact.
- Step-by-step portrait framing process:
- Before raising the camera, walk around your subject and identify potential frames in a 360° scan
- Prioritize frames that are at eye level or slightly above — low frames create distortion, high frames feel documentary
- Ensure the frame doesn’t bisect the subject’s face or create tangent lines (edges that appear to touch the face)
- Use a focal length of 50mm–85mm for natural perspective; wider lenses exaggerate the frame but can distort the subject
For more specialized advice, explore these practical portrait photography framing tips.
Street Photography Framing: Finding Frames on the Move
Street photography demands fast compositional decisions. The most reliable approach is to pre-visualize — identify a promising frame (a tunnel, a doorway, a gap between market stalls) and wait for a subject to enter it rather than chasing subjects and hoping for a frame.
Photographers consistently report that the pre-visualization approach — sometimes called “fishing” — produces more compositionally consistent street work than reactive framing. Set up your frame, set your exposure, and let the scene come to you.
- Key street framing techniques:
- Use architectural frames (Level 2) for urban environments with strong geometric lines
- Look for reflections in shop windows and puddles for unexpected abstract frames (Level 5)
- Shoot into the light to create silhouette-within-frame compositions (Level 4)
- Frame at intersections where multiple lines converge — the convergence itself becomes the compositional structure
Landscape Framing: Adding Depth to Wide Scenes
Wide-angle landscape photography is the scenario where foreground framing (Level 3) pays the biggest dividends. A flat, featureless foreground makes landscapes feel two-dimensional. Introducing a foreground frame — rocks, wildflowers, a fence line, overhanging branches — immediately creates the depth cues that make landscape images feel immersive.
BBC Bitesize’s photography composition guide notes that leading lines and framing elements work together in landscape photography: the frame draws the eye in, and the leading line carries it toward the focal point.
- Landscape framing checklist:
- Is there a foreground element within 1–2 metres? If not, move closer to something
- Does the foreground element complement or compete with the subject?
- Is the horizon level? (A tilted frame plus a tilted horizon creates visual chaos)
- Does the framing element add context or story to the scene?
Smartphone Framing: Full Toolkit on a Pocket Device
Modern smartphones — particularly those with multiple focal length options and portrait modes — support every technique in The Framing Toolkit. The key differences from DSLR/mirrorless shooting are:
- Depth of field: Smartphone sensors create deeper depth of field by default; use Portrait mode to simulate shallow depth for foreground and natural frames
- Grid overlay: Enable the 3×3 grid in your camera app — it activates rule-of-thirds placement and helps identify frame alignment
- Wide-angle lens: The ultra-wide lens (typically 0.5x or 13mm equivalent) exaggerates foreground frames dramatically — useful for Level 3 and Level 5 techniques
Smartphones are also excellent for creative macro photography framing ideas when you get close to your subject.
Drone Framing: Compositional Rules at Altitude
Drone photography opens a fifth spatial dimension for framing: the top-down and oblique aerial perspective. At altitude, traditional Level 1–2 frames (doorways, trees) are no longer available, but Level 4 (shadow frames) and Level 5 (color/abstract) become dramatically more powerful.
- Drone-specific framing approaches:
- Shadow frames: Shoot in the golden hour when long shadows create graphic borders around subjects below
- Color contrast frames: Agricultural fields, rooftops, and water bodies create large-scale color frames visible only from altitude
- Geometric abstract frames: Roads, paths, field boundaries, and building footprints form precise geometric frames impossible to see at ground level
Advanced Compositional Rules: Beyond the Basics
Most photography composition guides stop at the rule of thirds. The photographers who consistently produce stand-out images have typically internalized several additional rules that 80% of tutorials never cover. This section introduces the advanced tier of The Framing Toolkit — mathematical and conceptual frameworks that give your compositional decisions a principled backbone. Mastering these frameworks will help you improve advanced photo composition across all your work.
As Cambridge in Colour’s rule of thirds tutorial establishes, the rule of thirds is itself a simplified approximation of the golden ratio — which hints at the deeper mathematical structures underlying all strong composition. These advanced rules extend that logic.
What Is the 80/20 Rule in Photography?
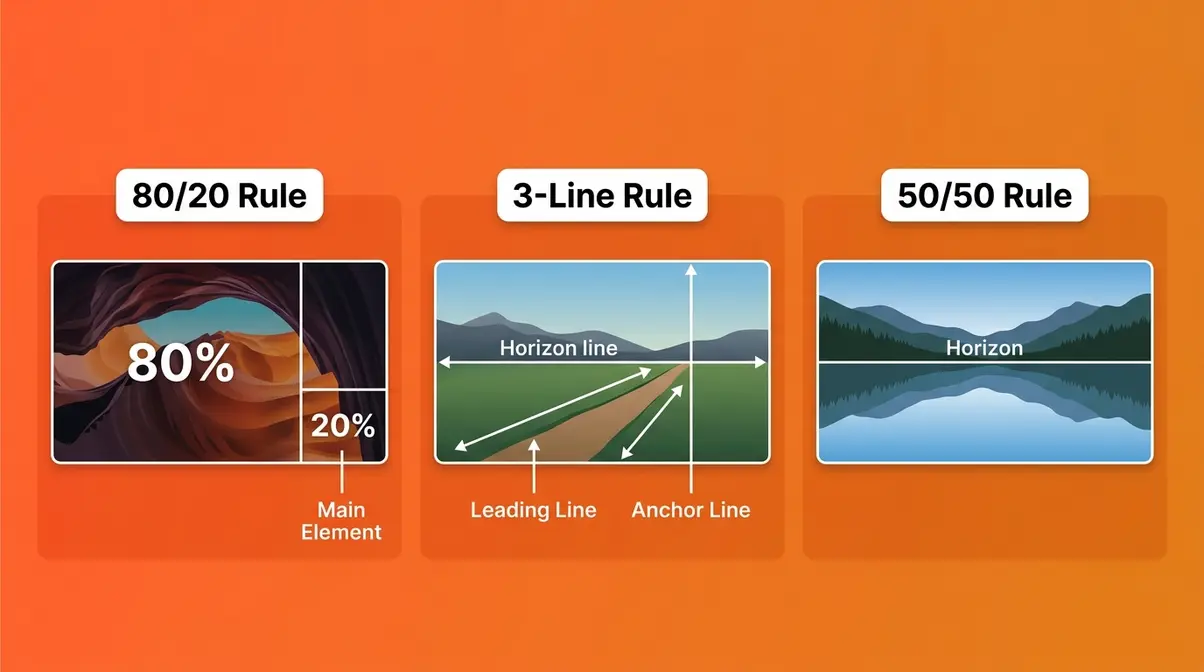
The 80/20 rule (also called the Pareto principle applied to composition) states that approximately 80% of your frame’s visual weight should be devoted to your primary subject or background, with 20% allocated to secondary elements. It’s a practical antidote to over-cluttered compositions where multiple competing elements fight for the viewer’s attention.
- How to apply the 80/20 rule:
- Identify your single most important element (subject, sky, background)
- Position it so it occupies roughly 80% of the frame’s visual weight
- Ensure all secondary elements — supporting frames, foreground details, secondary subjects — share the remaining 20%
- If any secondary element is drawing more than its 20% share of attention, reframe or remove it
What Is the 50/50 Rule in Photography?
The 50/50 rule is a specific compositional choice — not a mistake — where the frame is divided exactly in half, typically along the horizon line or a strong vertical element. It’s counterintuitive (most composition advice warns against centered horizons), but the 50/50 rule is deliberately used for symmetrical subjects — still water reflections, architectural symmetry, or abstract geometric compositions.
The key distinction: the 50/50 rule only works when the scene itself is genuinely symmetrical. Using it on an asymmetrical subject creates an unresolved, uncomfortable composition. Using it on a perfectly symmetrical subject creates calm, authoritative images.
- When to use the 50/50 rule:
- Still water reflections where sky and reflection are equal in interest
- Architectural facades with a strong central axis
- Abstract or minimalist compositions where symmetry is the subject
What Is the 3-Line Rule in Photography?
The 3-line rule is a compositional framework that uses three dominant lines within the frame — typically a horizon, a leading line, and a vertical element — to create visual structure and direct the viewer’s eye through the image in a controlled sequence. Rather than placing a single subject and hoping the eye finds it, the 3-line rule constructs a visual pathway.
- How to implement the 3-line rule:
- Identify a horizon or strong horizontal line in your scene
- Find a leading line (road, path, fence, shoreline) that enters the frame from a lower corner and travels toward your subject
- Add a vertical anchor (a tree, a building, a person) that stops the eye at the destination
- Compose so all three lines are clearly distinct and non-parallel — crossing or converging lines create dynamic tension; parallel lines create static monotony
The 5 C’s and 7 C’s of Photography
The 5 C’s of photography is a compositional checklist developed by photography educators to cover the five most critical elements of a strong image:
| C | Element | What It Means |
|---|---|---|
| 1 | Concept | Does the image have a clear central idea or story? |
| 2 | Composition | Are the visual elements arranged with intention? |
| 3 | Camera angle | Is the shooting angle the most effective for this subject? |
| 4 | Context | Does the background support or explain the subject? |
| 5 | Color | Does the color palette support the image’s mood? |
The 7 C’s extends this framework with two additional elements:
| C | Element | What It Means |
|---|---|---|
| 6 | Candid | Does the image feel authentic rather than staged? |
| 7 | Consistency | Does the image fit within a coherent visual style or series? |
MIT OpenCourseWare’s introduction to photography frames compositional thinking in terms of intentionality — every element in the frame should be there for a reason. The 5 and 7 C’s checklists operationalize that principle into a pre-shoot and post-shoot review process.
- Using the 5 C’s as a pre-shoot checklist:
- Before raising your camera, run through the 5 C’s mentally:
- Concept: What is this photo about?
- Composition: Which frame type from The Framing Toolkit applies here?
- Camera angle: Am I at the best height and distance?
- Context: What does the background add or subtract?
- Color: Is the color palette working for or against me?
Common Framing Mistakes (and How to Fix Them)

Even photographers who understand framing theory consistently make the same compositional errors. Recognizing these patterns — and knowing the specific fix — is what separates photographers who improve steadily from those who plateau. When evaluating these techniques against real-world examples, these five mistakes account for the majority of weak compositions in intermediate-level photography. Learning to avoid common photo framing mistakes is just as important as mastering the rules.
MoMA Learning’s photography resources note that compositional awareness develops through active critique — looking at your own images and identifying what pulls the viewer’s eye away from the intended subject.
Common Pitfall 1: Using Frames That Compete With the Subject
The most frequent framing error is choosing a frame so visually strong — a brightly colored doorway, a heavily textured archway — that it draws more attention than the subject inside it. The frame should be a supporting actor, not the lead.
The fix: Ensure your frame is at least one stop darker or softer in tone than your subject. If you can’t control the frame’s brightness, use a shallower depth of field to blur it out of competition.
Common Pitfall 2: Tangent Lines
A tangent line occurs when an edge of your framing element appears to touch or bisect a critical part of your subject — a branch appearing to grow from a person’s head, a doorframe bisecting their shoulder. These visual coincidences are jarring and hard to unsee once you spot them.
The fix: Before shooting, scan every edge of your frame for tangent lines. Move left, right, up, or down by 20–30 cm until the tangent resolves. This is one of those tiny shifts that changes everything.
Common Pitfall 3: Centering by Default
Placing the subject dead-center in every frame is the single most common habit among photographers moving from beginner to intermediate level. Centered compositions aren’t always wrong — the 50/50 rule is deliberately centered — but centering by default, without a compositional reason, produces static, unengaged images.
The fix: Before centering, ask: “Is this subject symmetrical? Is symmetry the point?” If no to both, apply rule of thirds placement instead. Move your subject to a third-line intersection and notice how the composition immediately gains energy.
Common Pitfall 4: Ignoring the Background
A compelling foreground frame paired with a chaotic, cluttered background defeats the purpose of framing entirely. The frame draws the eye in — but if what it reveals is visual noise, the viewer disengages.
The fix: Before composing your frame, look through the frame at the background. Is it clean, complementary, and uncluttered? If not, change your angle, wait for background elements to clear, or use a wider aperture to blur the background into neutrality.
Common Pitfall 5: Over-Framing
Stacking multiple frames — a window inside a doorway inside a tunnel — can add depth, but photographers consistently find that more than two nested frames creates visual complexity that overwhelms rather than guides. The viewer gets lost in the layers rather than reaching the subject.
The fix: Limit yourself to one strong frame per composition. If a second frame presents itself naturally and adds to the story without competing, use it — but test both versions and compare.
When to Choose a Different Approach
Framing isn’t always the right compositional tool. Specifically:
- Minimalist compositions — where the subject’s isolation is the point — are weakened by additional framing elements. A lone figure against an empty sky needs no frame.
- Action photography — fast-moving subjects rarely give you time to pre-visualize and position a frame. Leading lines and panning are more practical tools in this context.
- Macro photography — at extreme close distances, framing elements in the foreground become distractingly large. Composition at macro scale relies more on light direction and background separation.
When to Seek Additional Guidance
If you’re working on professional-level editorial or commercial photography, compositional framing decisions may intersect with client briefs, publication requirements, or brand guidelines that override personal compositional preferences. In those contexts, consult with an art director or photo editor before applying advanced framing rules that may conflict with the project’s visual identity.
Frequently Asked Questions About Photography Framing
What is the rule of framing in photography?
The rule of framing states that using elements within a scene to create a border around your subject — a doorway, a tree canopy, a shadow border — draws the viewer’s eye directly to the subject and adds depth to the composition. It works because the human eye naturally follows edges and borders, treating any enclosed area as a region of primary interest. Photographers consistently find it one of the highest-impact single compositional changes available. It applies across all genres: portrait, landscape, street, and architectural photography.
What are the 5 C’s of photography?
The 5 C’s of photography are Concept, Composition, Camera angle, Context, and Color — a pre-shoot checklist developed by photography educators to ensure every critical compositional element is considered before the shutter fires. Evidence from photography education programs shows that photographers who use structured checklists like the 5 C’s produce more consistently strong compositions than those who rely on intuition alone. The 7 C’s version adds Candid and Consistency, making it especially useful for documentary and series photography.
What are common photo framing mistakes?
The most common photography framing mistakes are: (1) Tangent lines — frame edges appearing to touch or bisect the subject; (2) Competing frames — frames that are brighter or more detailed than the subject; (3) Centering by default — placing subjects center-frame without a compositional reason; (4) Ignoring the background — framing carefully while leaving a cluttered background visible; and (5) Over-framing — nesting too many frames and creating visual complexity that overwhelms the subject. Photographers consistently find that identifying and eliminating just one of these errors per shoot produces measurable improvements in image quality.
What are the 7 C’s of photography?
The 7 C’s of photography extend the 5 C’s framework (Concept, Composition, Camera angle, Context, Color) with two additional elements: Candid (does the image feel authentic rather than staged?) and Consistency (does the image fit within a coherent visual style or series?). The 7 C’s checklist is particularly useful for photographers building a portfolio or working on a documentary series, where individual images need to function both as standalone compositions and as cohesive parts of a larger body of work. MIT OpenCourseWare’s photography curriculum emphasizes this kind of intentional, framework-driven compositional thinking.
How do you use natural framing in photography?
Natural framing involves using environmental elements like doorways, archways, or tree branches to create a border around your subject. This technique draws the viewer’s eye directly to the focal point and adds three-dimensional depth to the composition. It is highly effective because the human eye naturally follows edges and boundaries.
Does framing always require a foreground object?
No, framing does not always require a physical foreground object. You can use light and shadow, color contrasts, or architectural elements in the background to create a frame. The goal is to establish a visual boundary that isolates the subject, regardless of where the framing element is positioned in the depth of the scene.
Can light and shadow act as a frame?
Yes, light and shadow can act as a highly dramatic frame. By positioning your subject in a bright pool of light surrounded by deep shadows, the contrast creates a natural border. This technique isolates the subject effectively and adds a moody, atmospheric quality to the photograph without needing physical objects.
Putting The Framing Toolkit to Work
Strong photography framing tips converge on one principle: every element in your frame should either support or strengthen your subject. The five frame types in The Framing Toolkit — natural, architectural, foreground, light/shadow, and color/abstract — give you a complete compositional vocabulary for any scene and any genre. Photographers who work through these levels systematically, rather than grabbing techniques at random, build compositional instincts that show up in every image they make. According to National Geographic’s composition guidance, the photographers who produce the most consistently compelling work are those who treat composition as a deliberate, repeatable practice — not a happy accident.
The Framing Toolkit gives you the structure to make that practice repeatable. The skill ladder moves from natural frames (accessible, immediate) through architectural and foreground techniques, into the advanced territory of light/shadow and color/abstract framing — each level building on the last. Layer in the advanced compositional rules (80/20, 50/50, 3-line, 5 C’s) and you have a mathematical backbone for decisions that previously felt like guesswork.
Your next step: pick one frame type from Level 1 or Level 2 of The Framing Toolkit and commit to using it on every shot in your next session. Not every shot will work — but by the end of that session, you’ll have internalized the compositional logic in a way that reading alone never achieves. For deeper compositional study, MasterClass’s photography framing guide and BBC Bitesize’s composition resources are reliable next steps. Shoot deliberately, review critically, and iterate — those tiny shifts really do change everything.
