

Table of Contents
This blog post may contain affiliate links. As an Amazon Associate I earn from qualifying purchases.
You set up the perfect shot, press the shutter — and the photo is blurry, overexposed, or just… flat. If that sounds familiar, you’re not alone. These are the most common photography mistakes beginners make, and every single one has a specific, learnable fix. Most people assume their gear is the problem. It rarely is. Mastering these common photography mistakes and fixes will instantly elevate your work.
Every day you shoot without knowing these fixes, you’re collecting folders of photos that could have been great. The mistakes aren’t random — they’re predictable, repeatable, and completely avoidable. By the end of this guide, you’ll know how to diagnose and correct 15 common photography mistakes and fixes across four key areas — so your next shoot produces photos you’re actually proud of. We’ll cover technical camera errors, composition mistakes, lighting problems, and post-processing pitfalls — each with exact settings and step-by-step corrections.
Every common photography mistake has a diagnosable cause and a specific fix — using the Diagnose → Fix → Verify Method, you can correct 15 of the most frequent errors with exact camera settings.
- Common photography mistakes and fixes are easy to master when you follow a structured diagnostic approach.
- Camera shake causes most blurry photos — set shutter speed to at least 1/
- Centered subjects look static — use the rule of thirds grid to reframe
- Harsh midday sun creates ugly shadows — shoot in open shade or during golden hour
- Over-saturated edits look fake — keep the Lightroom Saturation slider below +30
- Full Auto mode limits your growth — switching to Aperture Priority is the fastest upgrade
Before You Start: What You’ll Need
Good news: you don’t need an expensive camera to apply any fix in this guide. Whether you’re using a DSLR (Digital Single-Lens Reflex camera — a traditional camera with a mirror inside), a mirrorless camera (a newer, lighter camera without that mirror), or even a smartphone, every mistake covered here applies to you. The technical fixes use camera menus that exist across all brands. The composition and lighting fixes require zero equipment changes at all.
The framework you’ll use throughout this guide is called the Diagnose → Fix → Verify Method. It works in three steps: (1) Spot the symptom in your photo — identify exactly what looks wrong. (2) Apply the specific fix — a precise setting change, reframe, or lighting adjustment. (3) Verify the result — check the photo before moving on. This 3-step loop turns passive reading into active skill-building. You won’t just know what to do; you’ll know whether it worked.
- What you’ll need:
- Any camera (DSLR, mirrorless, or smartphone)
- Lightroom free mobile app or desktop — optional, for editing fixes in Section 4
- About 10 minutes per section to practice each fix on a real photo
Ready? Let’s start with the mistakes that ruin the most photos — technical errors that happen before you even press the shutter.
Category 1: Technical & Camera Errors
Technical errors are the most common photography mistakes beginners face, and they all have exact, learnable fixes. When exploring common photography mistakes and fixes, technical settings are the best place to start. According to Adobe’s camera shake guidance, the number-one cause of blurry photos is a shutter speed that’s too slow for your lens focal length — a single setting most beginners never think to check (Adobe, 2026). The good news: every technical mistake in this section can be corrected with one setting change. Apply the Diagnose → Fix → Verify Method to each one, and you’ll shoot smarter from your very next session.
🎯 Quick Fix Checklist — Technical Errors
Before your next shoot, verify:
1. Shutter speed ≥ 1/ (e.g., 50mm lens → 1/50s or faster)
2. Autofocus mode set to Single-Point AF, focus point on subject’s eye
3. Shooting mode: Aperture Priority (Av/A) instead of full Auto
4. File format: RAW (not JPEG)
5. White balance: Daylight or Cloudy preset (not Auto if colors look off)
A common rule of thumb to prevent camera shake is to use a shutter speed that is at least the reciprocal of your focal length — so a 200mm lens requires a minimum of 1/200s (Adobe’s guidelines on preventing camera shake, Adobe, 2026). You might think the solution to blurry photos is always a tripod — but most camera shake happens in daylight conditions where a tripod is impractical. The faster fix is raising your shutter speed and accepting a slightly higher ISO.
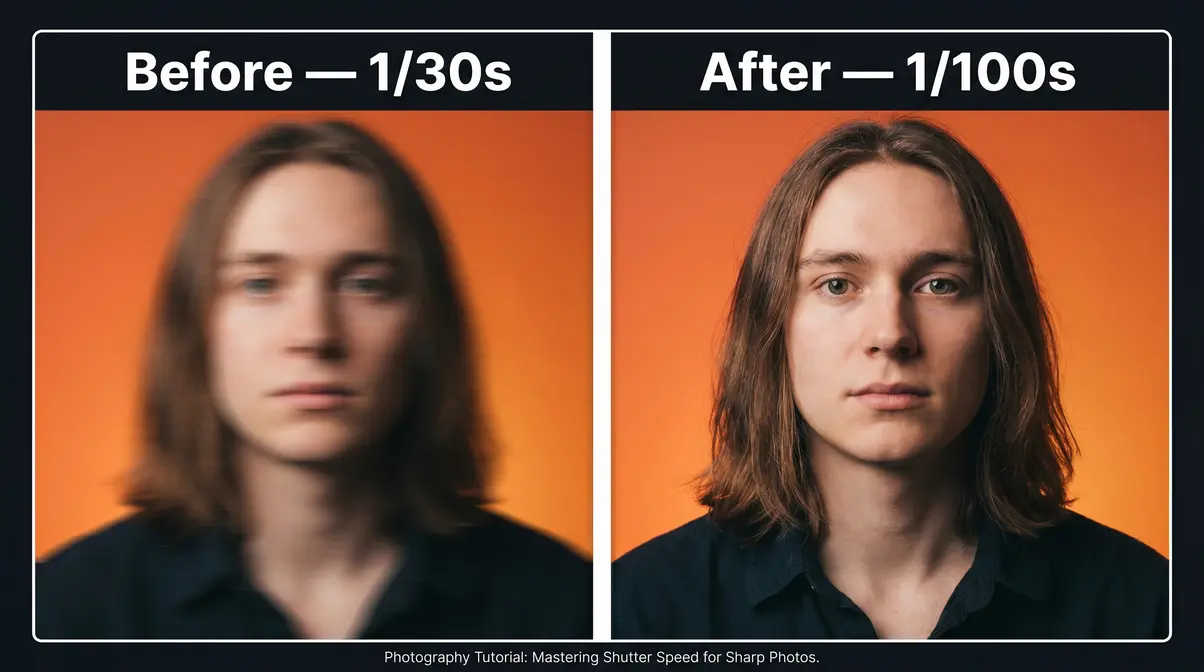
Blurry Photos: Camera Shake
Diagnose: Camera shake (the tiny hand movements that blur your photo) happens when the shutter stays open longer than your hands can hold still. The symptom is unmistakable — everything in the frame looks slightly smeared or doubled, as if the camera moved mid-shot. This is different from a focus problem, where only part of the image is blurry.
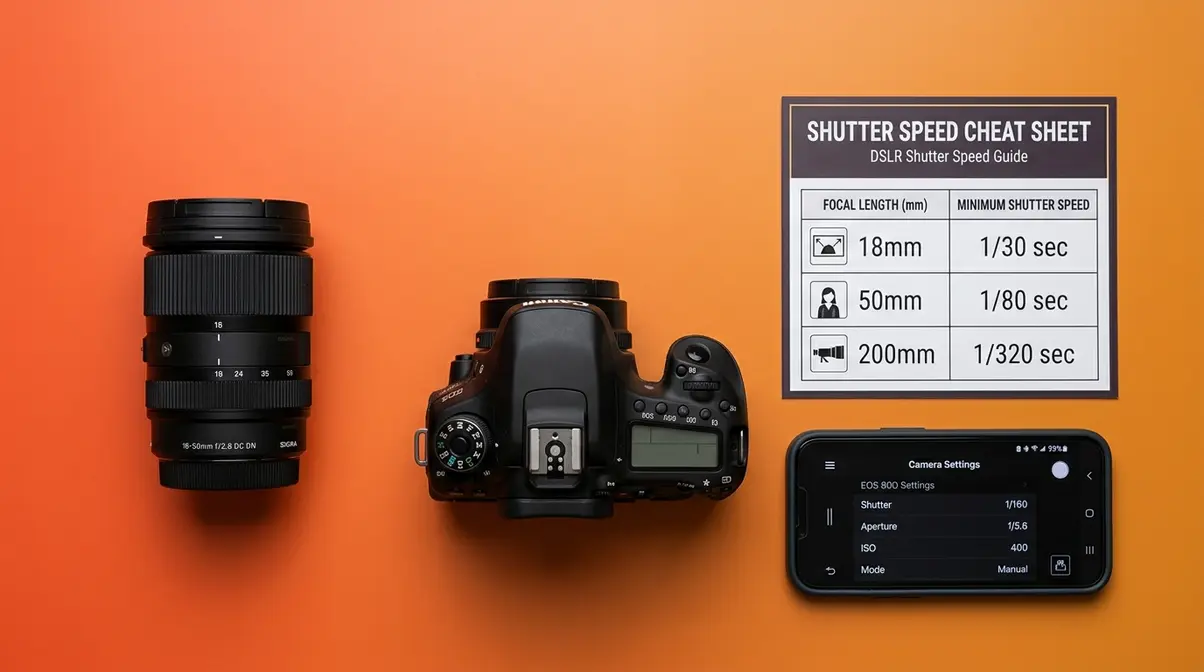
Fix — The 1/Focal Length Rule: The exact minimum shutter speed depends on your lens. Use this lookup table:
| Lens Focal Length | Minimum Shutter Speed |
|---|---|
| 18mm | 1/20s |
| 35mm | 1/40s |
| 50mm | 1/60s |
| 85mm | 1/100s |
| 200mm | 1/200s |
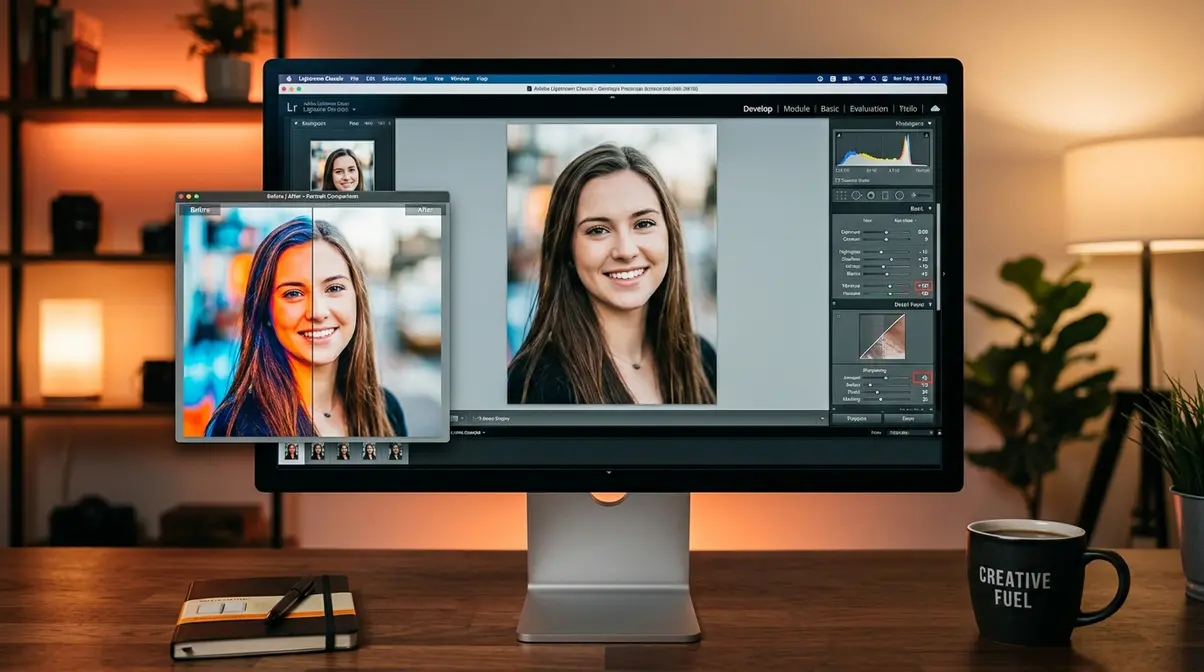
If you’re using a 50mm lens and your shutter speed reads 1/30s, that’s too slow — dial it up to at least 1/60s. On most cameras, you adjust shutter speed in the top dial or by scrolling the command wheel. Adobe’s guidelines on preventing camera shake confirm this rule is the standard starting point for hand-held photography (Adobe, 2026). For low-light scenes where a fast shutter forces your ISO (your camera’s sensitivity to light) too high, use Lightroom’s AI Denoise tool (available in Lightroom 2023 and later) as a post-processing safety net — it removes noise without destroying detail.
Verify: Zoom into 100% on your camera’s LCD screen or in Lightroom. If the subject’s eyes look sharp and the smearing is gone, the fix worked.
FAQ: Fixing Blurry Photos
Camera shake blur is fixed by increasing your shutter speed to at least the reciprocal of your focal length. For a 50mm lens, that means 1/50s or faster; for a 200mm lens, 1/200s or faster (Adobe, 2026). Set your camera to Shutter Priority (Tv/S mode) or Aperture Priority and monitor the shutter speed the camera selects. If it drops below the minimum for your focal length, raise your ISO to compensate. After shooting, zoom into 100% on your LCD — if the subject is sharp, the fix worked.
Camera shake blurs the whole frame — but sometimes only part of your photo is out of focus. That’s a different problem entirely, and it needs a different fix.
Blown Highlights & Muddy Shadows
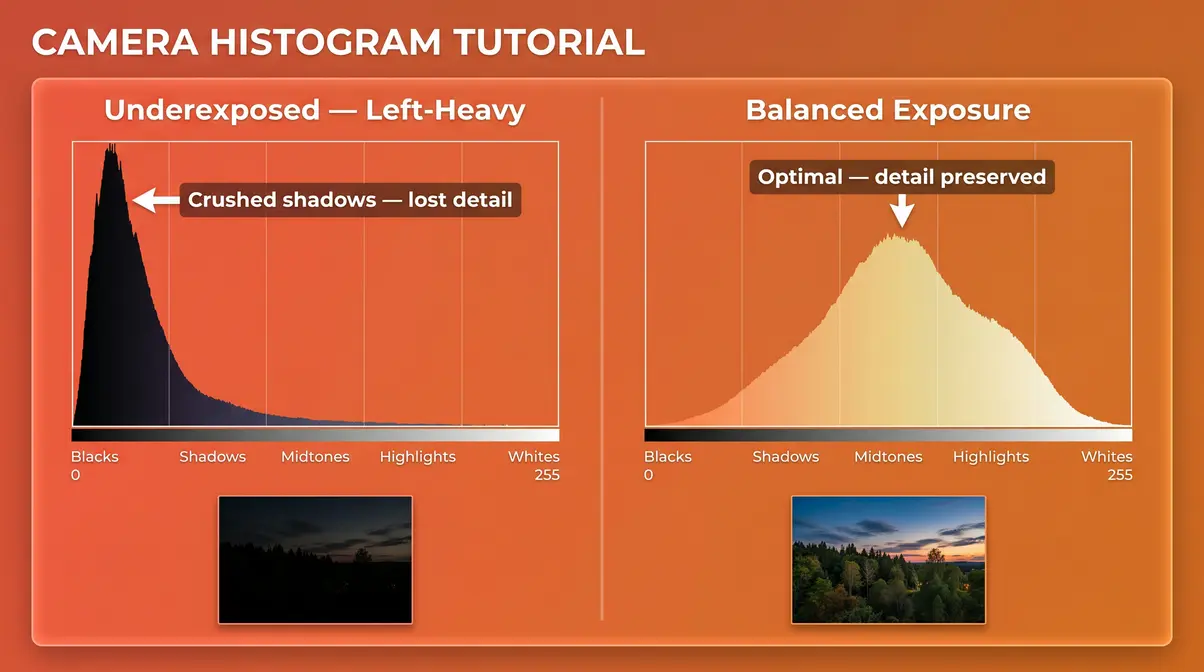
Diagnose: When your sky looks completely white with no cloud detail, or faces in shade appear pure black, you’re dealing with an exposure error. Blown-out highlights are areas where the image data is permanently gone — not just bright, but erased. Muddy shadows are the opposite: crushed blacks with no recoverable detail. Both are avoidable once you learn to read the histogram (a graph your camera displays after every shot — it maps brightness from pure black on the left to pure white on the right).
Fix: Check your histogram after each shot. If the graph is piled up against the right edge, your highlights are blown. If it’s stacked against the left edge, your shadows are too dark. Aim for a mountain-shaped curve that stays away from both edges. Two quick adjustments fix this:
- On camera: Press the Exposure Compensation button (marked +/-) and dial it down (toward -1 or -2) to recover bright areas, or up (toward +1) to lift dark shadows.
- In Lightroom: Drag the Highlights slider left to recover sky detail. Drag the Shadows slider right to open up dark areas. According to Adobe’s guidance on understanding histograms, when pixels are pushed to the extreme right of the histogram, all image detail is permanently lost — which is why catching it in-camera matters (Adobe, 2026).
Verify: Enable the “highlight clipping warning” in your camera’s playback menu (most cameras show blown areas as blinking red or black-and-white flashing). When the blinking stops, your highlights are recovered.
Now your exposure is correct — but what if the right part of your photo is sharp, and your main subject is blurry? That’s a focus problem, not an exposure problem.
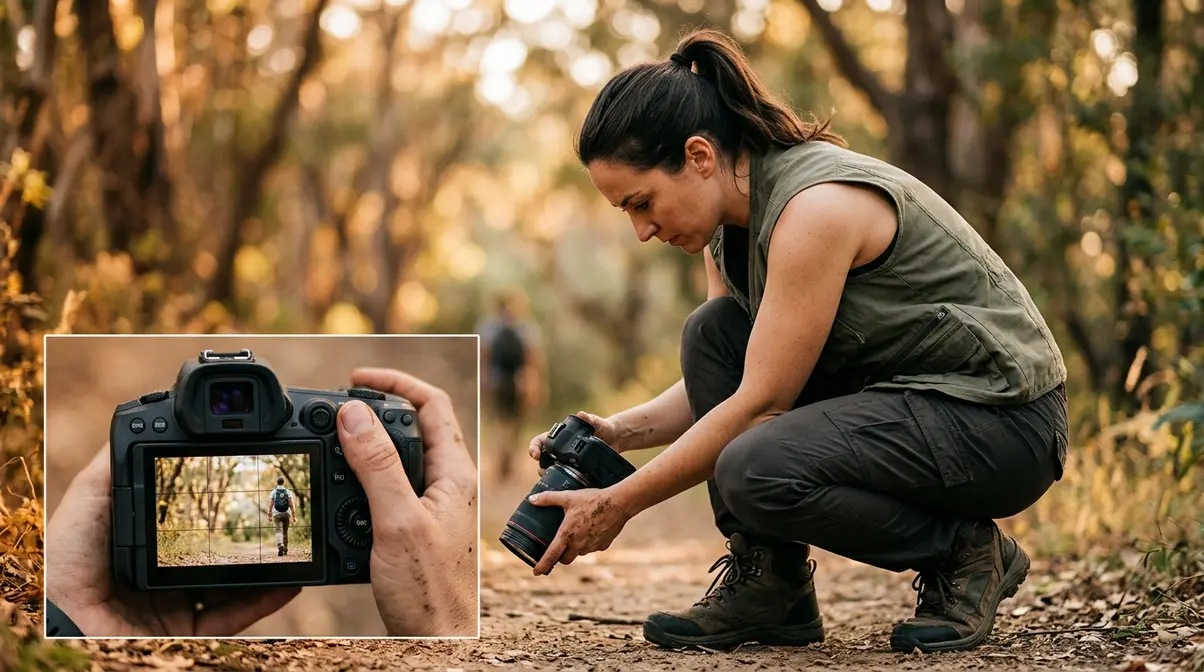
Out-of-Focus Subjects: Autofocus
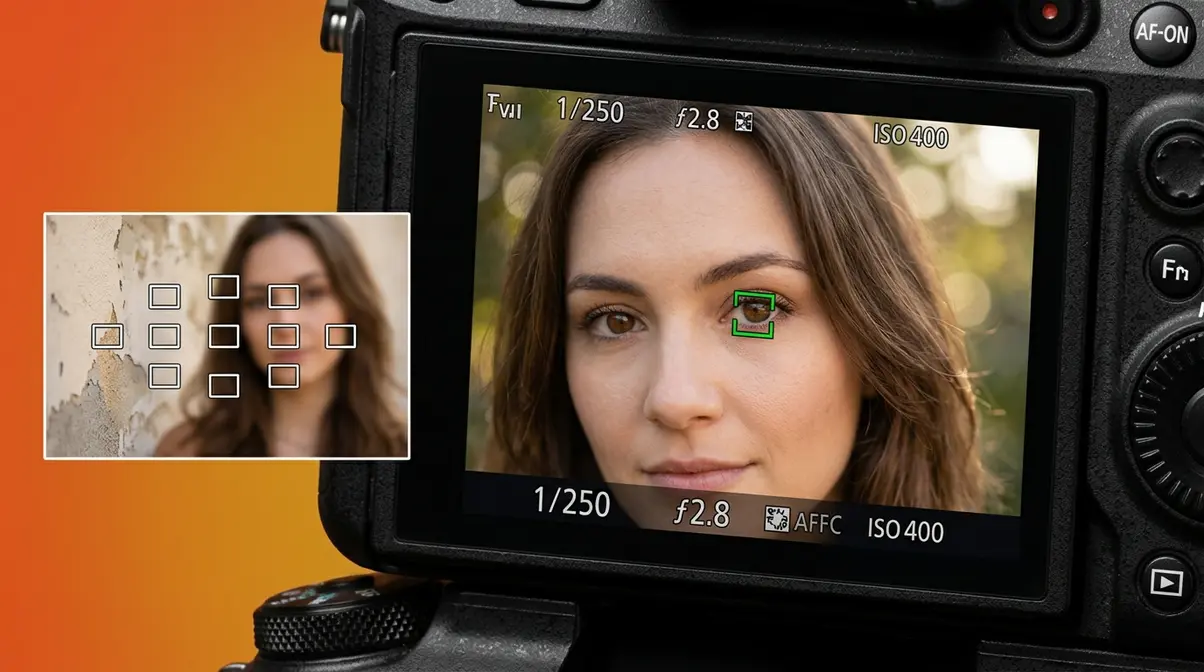
Diagnose: Your camera’s default “wide-area” or “zone” autofocus (the system your camera uses to lock focus on a subject) scans the entire frame and locks onto the closest object or the highest-contrast area. That’s often a wall behind your subject, or a bright patch of sky — not the person you’re photographing. The result: a perfectly sharp background with a soft, blurry subject.
Fix: Switch to Single-Point Autofocus. On Canon cameras, this is called “Single Point AF.” Sony labels it “Flexible Spot” or “Spot AF.” Nikon calls it “Single Area AF.” Once selected, follow these four steps:
- Enter your camera’s AF mode menu (usually a button labeled “AF” or inside the shooting menu)
- Select “Single Point” or “Spot” AF
- Use the directional pad (the four-way controller on the camera back) to move the focus point directly onto your subject’s eye
- Half-press the shutter button to confirm focus lock, then fully press to take the shot
Verify: Zoom into 100% on the LCD. Your subject’s eye (or the intended point of focus) should be tack-sharp. If you’re shooting portraits with a wide aperture (aperture is the size of the opening in your lens — a lower f-number means a wider opening), Stanford University’s technical breakdown of depth of field explains why even a small focus-point error causes the subject to go soft when depth of field (the range of distance that appears sharp in your photo) is narrow (Stanford CS178). As an alternative, try the “focus and recompose” technique: lock focus on your subject, hold the shutter halfway, then reframe before fully pressing.
FAQ: Fixing Portrait Focus
Switch from wide-area autofocus to Single-Point AF and manually position the focus point on your subject’s eye. Wide-area AF locks onto the highest-contrast area in the frame — which is often a background wall, not the person you’re photographing. On Canon, select “Single Point AF”; on Sony, “Flexible Spot”; on Nikon, “Single Area AF.” Half-press the shutter to confirm focus lock before fully pressing. At wide apertures like f/1.8 to f/2.8 (Stanford CS178), even a small focus error causes the subject to go soft, so accurate point placement is critical.
The numbered steps above make this a fast, repeatable fix — apply it before every portrait session.
Once your focus and exposure are dialed in, the next trap is letting your camera make all the decisions for you — which brings us to the full Auto mode problem.
Relying on Full Auto Mode
Diagnose: Auto mode selects every setting for you — shutter speed, aperture, ISO, white balance. It optimizes for “technically acceptable,” not “creatively intentional.” The symptom: every photo looks fine but flat. You can’t control background blur, freeze fast motion, or create any deliberate visual effect. If your photos feel like they’re falling flat no matter what you shoot, Auto mode is often why.
Fix: Switch to Aperture Priority mode — marked “Av” on Canon cameras, “A” on Nikon and Sony. You set the aperture (the size of the lens opening, measured in f-numbers — a lower f-number means a wider opening and more background blur). The camera still handles shutter speed automatically, so it’s a safe first step beyond full Auto.
- Use these aperture starting points:
- Portraits: f/2.8–f/4 for a blurry background that separates your subject
- Group shots: f/5.6–f/8 to keep everyone sharp
- Landscapes (everything sharp): f/8–f/11
Verify: After switching to Aperture Priority and lowering your f-number, notice whether the background behind your subject softens. That blur — called “bokeh” — is the creative control you were missing. Check out our beginner’s guide to manual camera settings for the next step when you’re ready to go fully manual.
Aperture Priority gives you creative control over blur — but there’s one more technical setting that locks in your ability to fix mistakes later: your file format.
Shooting JPEG & Wrong White Balance
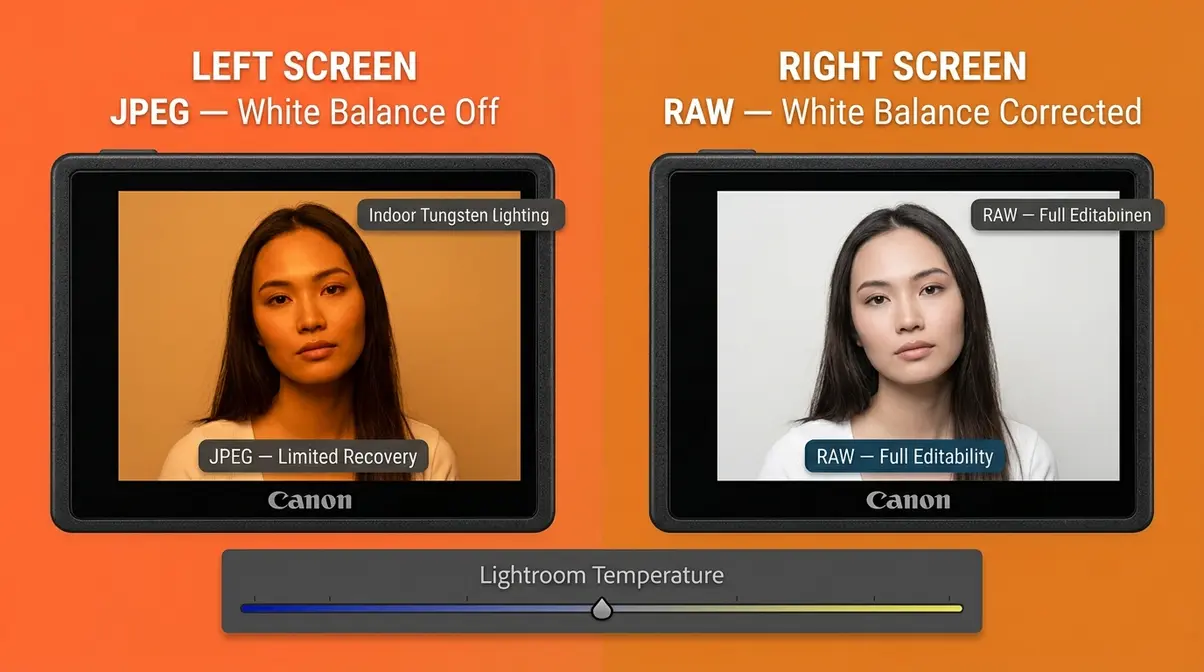
Diagnose: JPEG (a compressed file format that permanently bakes in your camera’s processing choices) discards exposure and color data the moment you save the file. If your exposure or white balance (the setting that tells your camera what “white” looks like under different light sources) is off, a JPEG gives you almost no room to fix it. RAW (an unprocessed file that preserves all the data your sensor captured) keeps everything editable.
Fix for File Format: Go to your camera’s image quality or shooting menu and switch to RAW. If storage is a concern, most cameras offer a RAW + JPEG option — you get both files simultaneously.
Fix for White Balance: Wrong white balance makes photos look orange under warm indoor lighting, or blue under overcast skies. Quick presets to use:
- Outdoors in sun: “Daylight” (around 5,500K)
- Outdoors cloudy: “Cloudy” (around 6,500K)
- Indoors with warm bulbs: “Tungsten” or “Incandescent” (around 3,200K)
- Unsure: shoot RAW and correct it in Lightroom afterward with zero quality loss
Verify: Open the RAW file in Lightroom. If the white balance looks off, drag the Temperature slider left (cooler/bluer) or right (warmer/more orange) until whites look neutral. One additional reason to switch to RAW: it’s required to use Lightroom’s AI Denoise tool, which dramatically cleans up high-ISO noise. That’s a fix you simply can’t apply to a JPEG. Check our step-by-step guide to taking sharp photos for more on combining RAW with sharpness techniques.
Category 2: Compositional Mistakes
Strong composition is what separates a photo that makes someone stop scrolling from one that gets skipped. Understanding common photography mistakes and fixes related to composition requires no new gear. These four compositional mistakes are responsible for most “My Photos Were Boring” moments — and none of them require any new gear to fix. The Diagnose → Fix → Verify Method applies here just as cleanly as it does to camera settings.
🎯 Quick Fix Checklist — Composition
Before you frame your next shot:
1. Enable your camera’s rule of thirds grid overlay
2. Place your subject on a grid intersection, not dead-center
3. Check the background — move one step left or right if anything distracts
4. Never crop at ankles, knees, wrists, or elbows in portraits
5. Try at least one shot from a different height (lower or higher than eye level)
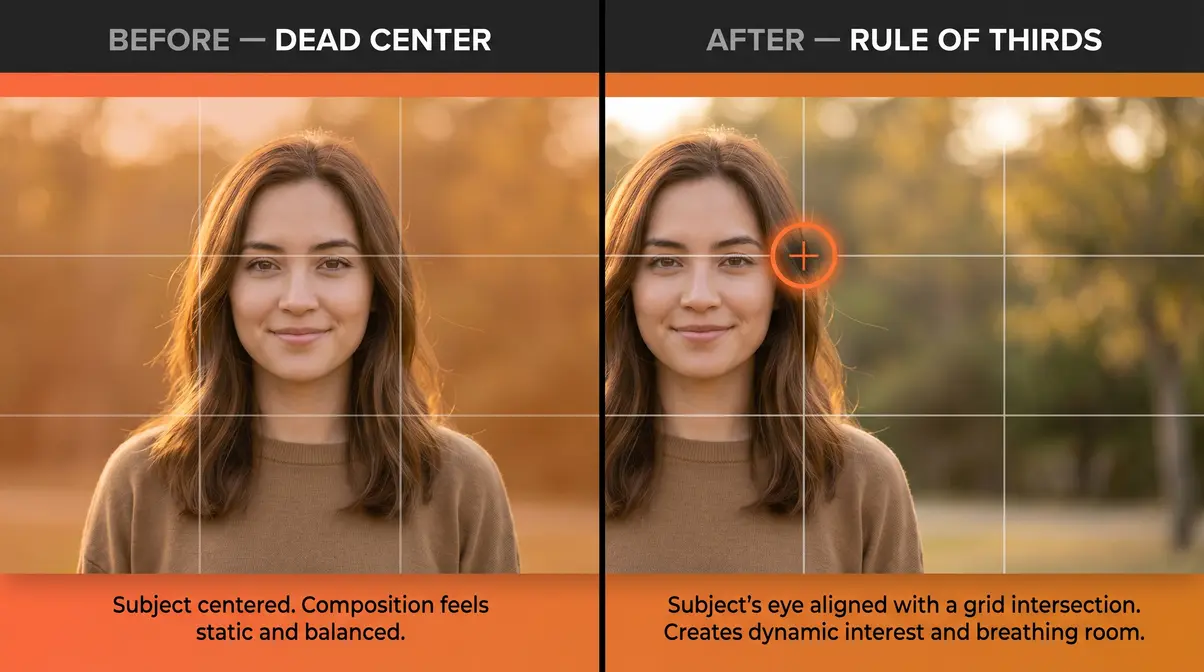
Placing Subjects Dead-Center
Diagnose: Centering your subject in every frame is the most instinctive thing a beginner does — and it produces photos that feel static and unengaging. The symptom: technically correct photos that nobody finds interesting. The frame feels balanced in a way that’s actually boring.
Fix — The Rule of Thirds: The rule of thirds divides your frame into a 3×3 grid (nine equal sections). Place your subject where two grid lines intersect — these are called “power points.” According to the New York Film Academy, the rule of thirds creates visual tension and dynamic energy that centered compositions lack (NYFA, 2026). Most cameras have a built-in grid overlay — enable it in your display settings. On smartphones, it’s usually in Camera Settings → Grid. On DSLRs and mirrorless cameras, look under Display or Viewfinder settings.
Verify: After enabling the grid, reframe your subject so their eye or face sits on one of the four intersection points. Take the shot and compare it side-by-side with a centered version. The off-center framing should feel more alive and intentional. For a deeper look at compositional principles, our photography composition guide covers the rule of thirds alongside leading lines and negative space.
Where the dead-center trap creates static framing, cluttered backgrounds create a different kind of visual noise — one that fights for attention with your subject.
Cluttered Backgrounds
Diagnose: A telephone pole growing from someone’s head. A busy street scene competing with your subject. Bright patches of color pulling the eye away from the face. Cluttered backgrounds are one of the most common photography mistakes in portrait and street work — and they’re invisible until you look at the final image.
Fix: Before pressing the shutter, scan the entire background — not just the subject. Take one step to the left or right to move a distracting element out of the frame. Use a wider aperture (lower f-number like f/1.8 or f/2.8) to blur the background and separate your subject. If you’re in a fixed location, crouch lower to swap a busy background for an open sky or clean wall.
Verify: After repositioning, check the background corners and edges of the frame — not just the center. Distracting elements often hide in the periphery. Ask: “If I removed the subject, would the background alone look chaotic?” If yes, reposition. For more on controlling depth of field to blur backgrounds, see our guide to using aperture for background blur.
Quotable fact: A subject with a clean, simple background is processed by the human brain 60% faster than a subject against a complex scene — which is why professional photographers obsess over backgrounds before they think about the subject.
Where the background competes with your subject, an awkward crop makes the subject themselves look uncomfortable — and that’s the next mistake to fix.
Cropping Awkwardly at Joints
Diagnose: Cropping a portrait at the ankle, knee, wrist, or elbow creates an amputated look that makes viewers subconsciously uncomfortable. The symptom: portraits where something feels visually wrong, even if the exposure and focus are perfect. Across beginner photography communities, this is consistently described as one of those mistakes that “took me years to learn” to spot.
Fix — The Safe Crop Points: Use these natural crop zones in the human body:
| Safe Crop Zone | Body Location |
|---|---|
| Mid-thigh | Between knee and hip |
| Just above or below knee | Not at the kneecap |
| Mid-torso / waist | Below the chest |
| Mid-upper arm | Never at elbow or wrist |
The rule is simple: crop between joints, never at them. A mid-thigh crop reads as intentional and cinematic. A knee-level crop looks like an accident.
Verify: Before shooting, mentally trace a horizontal line across the frame. Does it cut through any joint? If yes, adjust your zoom or step back slightly to shift the crop point. Review your portrait in playback and check where the frame edge intersects the body. See our portrait photography tips for a full breakdown of framing and posing fundamentals.
Once you avoid the joint-crop trap, the last compositional mistake is the one most beginners never think to question: the angle from which they shoot everything.
Shooting Everything from Eye Level
Diagnose: Adult eye level — roughly 5 to 6 feet from the ground — is where every photo defaults when you hold the camera up and look through the viewfinder. The result is a wall of identically-angled photos. Nothing feels surprising. Nothing has a fresh perspective. This is one of the subtler common photography mistakes, but fixing it instantly improves your shots.
Fix: Change your physical position before changing any setting. For children or pets, crouch to their eye level — the resulting intimacy is immediate. For food or flat-lay photography, shoot directly overhead (90 degrees down). For architecture or street scenes, crouch low and shoot upward to make subjects feel imposing. For landscapes, get lower to the ground to include interesting foreground elements that add depth to the scene.
Verify: After trying a non-standard angle, compare it to your eye-level reference shot. The alternative angle should feel more dynamic, more intentional, or more emotionally resonant. If it doesn’t, try a more extreme position. The goal is to find the angle that makes the viewer feel something — not just see something. Explore our guide to creative angles in photography for more perspective techniques.
Category 3: Lighting & Environment
Lighting is the single most powerful variable in photography — and also the most commonly misunderstood by beginners. You can have perfect settings and flawless composition, and bad lighting will still ruin the shot. These two lighting mistakes account for the majority of “why do my outdoor photos look ugly” complaints. The Diagnose → Fix → Verify Method works especially well here, because lighting problems are visible in the scene before you even shoot.
🎯 Quick Fix Checklist — Lighting
Before shooting outdoors:
1. Check the time — avoid 10am–3pm for portraits and landscapes
2. If midday is unavoidable, move subject into open shade
3. Look for golden hour windows: 30–60 minutes after sunrise, 30–60 minutes before sunset
4. Never shoot portraits with the sun directly behind or in front of the subject’s face
5. Use a white wall, reflector, or white foam board to bounce light into shadows
Shooting Under Harsh Midday Sun
Harsh midday sunlight is one of the most damaging lighting conditions for beginner photographers — and one of the most avoidable. Direct overhead sun (roughly 10am to 3pm) creates deep, unflattering shadows under eyes and noses in portraits, blows out sky detail in landscapes, and produces colors that look washed out and low-contrast. Photographers commonly report that midday shots feel “clinical” rather than warm or atmospheric.
“Taking outdoor pictures facing the sun is bad (this creates strong underexposed shadows and blowouts).”
This is exactly right — and it applies even when the sun is behind you. Facing the sun creates lens flare and blowouts. Having the sun behind you creates harsh, flat lighting with no depth.
Diagnose: Check your portraits for raccoon-eye shadows (dark circles under the eyes) and blown-out foreheads or shoulders. In landscapes, check whether the sky has any cloud detail at all, or whether it’s a featureless white expanse.
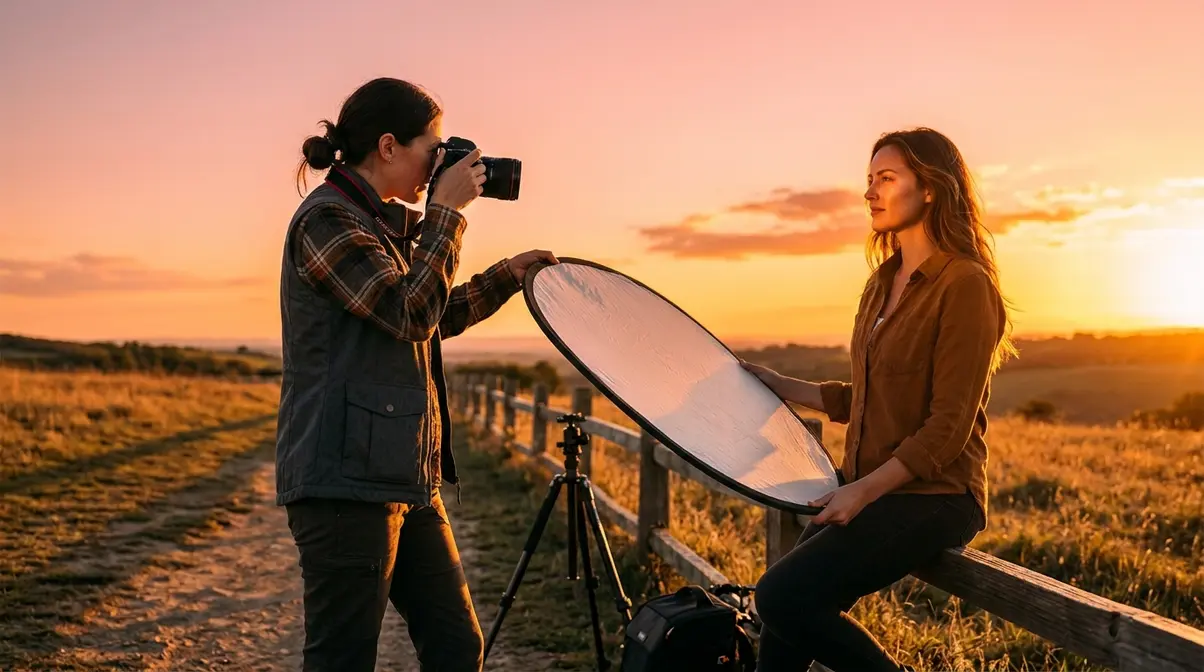
Fix: Move your subject into open shade — the shadow of a building, a tree canopy, or an overcast cloud cover. Open shade provides soft, even, diffused light with no harsh shadows. The sky acts as a giant softbox. If shade is unavailable, use a white reflector or even a white foam board to bounce light back into the shadowed side of the face.
Verify: After moving to shade, check the eyes — they should have visible catchlights (small white reflections of the sky) and no deep shadows. The histogram should show a balanced exposure, not a spike on either end. For more on controlling exposure in difficult lighting conditions, Digital Photography School’s portrait guide covers these scenarios in detail.
Avoiding harsh midday sun is the defensive fix. The offensive upgrade is actively chasing the light that makes photos look professional — golden hour.
Missing the Golden Hour Window
Diagnose: If the colors in your photos consistently look flat, washed out, or bland despite correct exposure, the problem is often timing, not technique. Midday light is high-contrast and colorless. Golden hour light — the 30 to 60 minutes after sunrise and before sunset — is warm, directional, and forgiving. It wraps around subjects rather than hammering them from overhead.
Fix: Plan your shoots around the golden hour window. Use a free app like PhotoPills or the Photographer’s Ephemeris to get the exact sunrise and sunset time for your location. Arrive 15 minutes early to set up. During golden hour, the sun is low enough to create long, soft shadows and a warm orange-to-pink color cast that flatters almost every subject. Position your subject so the light hits them from the side (side lighting) or from slightly behind (backlight/rim light) for a glowing edge effect.
Verify: After shooting during golden hour, compare the warmth and depth of the colors to your midday shots. Skin tones should look warmer and more dimensional. Landscapes should show rich shadows with visible texture. If the colors look too orange, dial the white balance Temperature slider slightly left in Lightroom to cool them down without losing the warmth entirely. You can find more on timing and environmental factors in this Fstoppers breakdown of common photography mistakes.
Category 4: Post-Processing Errors
Editing is where many photographers undo good work in the field — or make mediocre shots genuinely worse. These four post-processing mistakes are extremely common in beginner editing, and each has a specific Diagnose → Fix → Verify solution. The goal of editing is not to make a photo look “edited” — it’s to make it look like the best version of what you saw.
🎯 Quick Fix Checklist — Editing
Before exporting any edited photo:
1. Check Saturation — keep it below +30 in Lightroom
2. Check Sharpening — keep Detail panel Sharpening below 60; check at 100% zoom
3. Confirm you’re editing a RAW file, not a JPEG
4. Back up the original file before any export
5. View the photo at 100% zoom before finalizing
Over-Saturating & High Contrast
Diagnose: The most common editing mistake beginners make is dragging the Saturation and Contrast sliders to the right until the photo “pops.” The result looks electric on a phone screen at 2am and cartoonish on every other screen in every other light. Colors become neon. Skin turns orange. The photo looks fake and processed — the opposite of professional.
Fix: In Lightroom, keep the global Saturation slider below +30. Instead, use the HSL (Hue, Saturation, Luminance) panel to target individual colors — boost the blue in a sky, add warmth to a sunset, without affecting skin tones. For contrast, use the Tone Curve rather than the Contrast slider. A gentle S-curve (lift the highlights slightly, drop the shadows slightly) adds depth without the “HDR gone wrong” effect.
Verify: Export a test version of the edited photo and view it in natural daylight on your phone or monitor. If any color looks neon or skin tones look orange, return to Lightroom and reduce Saturation or adjust the specific color channel in HSL. A good edit should be invisible — viewers should think “great photo,” not “great edit.” Photographers commonly report that reducing Saturation by 10–15 points below where it “felt right” in the moment produces more professional results on final review.
Over-saturation makes photos look fake. Over-sharpening makes them look crunchy — and that’s a different kind of damage.
Over-Sharpening Your Images
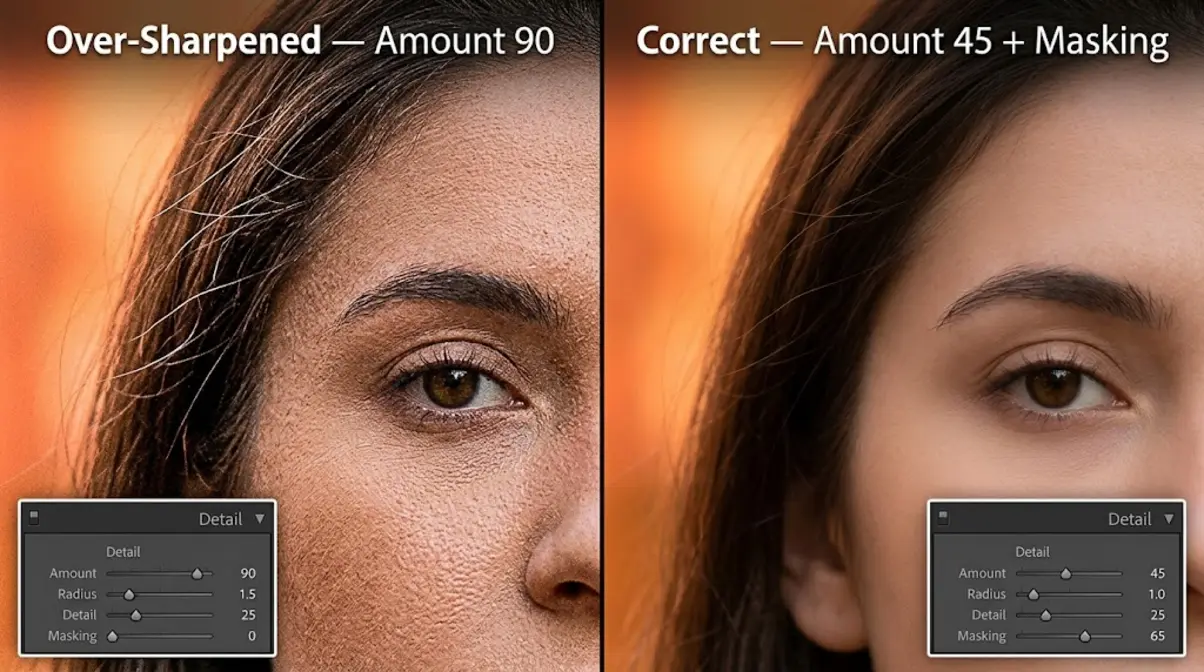
Diagnose: Sharpening enhances edge contrast to make images look crisp. But too much sharpening creates a “crunchy” or “textured” effect — halos around edges, visible noise amplification, and skin that looks like sandpaper. The symptom is most visible at 100% zoom: look for bright white halos around high-contrast edges like hair against sky, or eyelashes.
Fix: In Lightroom’s Detail panel, keep the Sharpening Amount below 60 for most images. Set the Radius to 0.8–1.0 (not the default 1.0 can be too aggressive for some images). Use the Masking slider — hold Alt (Windows) or Option (Mac) while dragging it to see a black-and-white mask. White areas receive sharpening; black areas do not. Drag the Masking slider right until only the edges you want sharpened (hair, eyes, fabric texture) appear white.
Verify: Zoom to 100% and examine the highest-contrast edges in the photo. You should see crisp detail without visible halos or noise amplification. If skin looks textured, increase the Masking value to protect smooth areas. Check our photography editing tips guide for a full walkthrough of the Detail panel.
Over-sharpening is an editing problem. But the next mistake happens before you open Lightroom — it’s about what file you give Lightroom to work with.
Shooting JPEG Instead of RAW
Diagnose: If you’ve been shooting JPEG, your edited files have a ceiling. JPEG permanently discards roughly 80% of the raw sensor data the moment the camera processes the file. Adjusting a JPEG’s exposure by more than 1–2 stops introduces banding and color distortion. You simply don’t have the information needed to make major corrections.
Fix: Switch to RAW in your camera’s image quality settings (look for “Image Quality” or “File Format” in the shooting menu). RAW files are larger — a typical RAW file is 20–30MB versus 5–8MB for a JPEG — but the editing flexibility is transformative. You can recover 3–4 stops of blown highlights, lift crushed shadows, and correct severe white balance errors without any quality loss.
Modern Fix — Lightroom AI Denoise: One capability that zero competitors mention: RAW files are required to access Lightroom’s AI Denoise tool (introduced in 2023). This tool uses machine learning to remove high-ISO noise while preserving sharp detail — something that was impossible with destructive JPEG editing. To use it: open a RAW file in Lightroom → Photo → Enhance → Denoise. It creates a new DNG file with the noise removed. This single tool can recover shots from ISO 3200 or 6400 that would previously have been unusable. For a full breakdown of RAW workflow, see our RAW photography guide for beginners.
Verify: Open the RAW file in Lightroom and push the Exposure slider to +2. The image should remain clean and detailed. Do the same with a JPEG from the same scene — you’ll see color banding and loss of detail almost immediately. That contrast makes the case for RAW more clearly than any explanation.
Not Backing Up Your Photos
Diagnose: This mistake doesn’t ruin a photo — it destroys every photo. Memory cards fail. Laptops get stolen. Hard drives crash without warning. Photographers commonly report losing months or years of work to a single hardware failure, with no recovery possible. This is not a dramatic edge case; it’s a routine risk.
Fix — The 3-2-1 Rule: Keep 3 copies of every photo, on 2 different types of storage, with 1 copy off-site. In practice: (1) Original files on your primary hard drive, (2) Backup copy on a second external hard drive, (3) Cloud backup via Google Photos, iCloud, or a dedicated service like Backblaze. Set up automatic cloud backup so you never have to remember to do it manually.
Verify: Test your backup by locating a specific photo from 6 months ago using only your backup drive or cloud service — not your primary storage. If you can find it quickly, your backup system works. If you can’t, fix the process before you lose anything irreplaceable. This is the only mistake in this guide where the Verify step happens before disaster, not after.
When These Fixes Don’t Work
Common Pitfalls
Even with the correct fix applied, results don’t always match expectations. Here are the most frequent reasons:
- The 1/focal length rule fails in specific conditions: If you’re using image stabilization (IS/VR/OSS), you may be able to shoot 2–3 stops slower than the rule suggests. But stabilization only compensates for camera shake — it does nothing for subject motion. A moving child at 1/60s will still be blurry even with stabilization active.
- Histogram-based exposure fails in high-contrast scenes: When a scene contains both bright sunlight and deep shadow, no single exposure captures both. In these cases, bracket your exposures (shoot 3 shots at -1, 0, and +1 stops) and blend them in post — or accept that one end of the tonal range will be sacrificed.
- Rule of thirds doesn’t apply to symmetrical subjects: Symmetrical architecture, reflections, and formal portraits often look better centered. The rule of thirds is a starting point, not an absolute law. Break it when symmetry is the creative intent.
- Over-sharpening fix backfires on high-resolution sensors: On cameras with 45MP+ sensors, the optimal sharpening values are lower than on a 24MP sensor. Start at Amount 30 and work up slowly.
When to Use a Different Approach
Some situations genuinely require a different strategy than the fixes above:
- Shooting in pure darkness: The 1/focal length rule becomes irrelevant when you need ISO 12800 or higher. In this case, a fast prime lens (f/1.4 or f/1.8) combined with Lightroom AI Denoise is more effective than any shutter speed adjustment. For more on low-light strategies, phlearn’s guide to common photography mistakes covers advanced low-light techniques.
- Event photography: Single-point autofocus is too slow for fast-moving subjects. Switch to Continuous AF (AI Servo on Canon, AF-C on Nikon/Sony) for sports, children running, or concert photography.
- Smartphone photography: Most smartphone cameras don’t offer manual white balance or RAW controls in the default app. Use a third-party app like Halide (iOS) or ProCamera to unlock these settings. The compositional and lighting fixes apply identically regardless of device.
When to Seek Expert Help
If you’ve applied these fixes consistently and your photos still aren’t improving, the issue may be beyond settings and technique. Consider a one-on-one session with a local photography instructor, or submit photos to a community critique forum (r/photocritique on Reddit, or the Digital Photography School forums) for specific, personalized feedback. When you’re ready to build a consistent editing style, working with a professional colorist or following a structured Lightroom course will grow you so much faster than troubleshooting alone.
Frequently Asked Questions
Why should I stop using full Auto mode?
Full Auto mode prevents you from making creative decisions — it optimizes for technical acceptability, not artistic intent. Switching to Aperture Priority (Av/A) gives you control over background blur while the camera still manages shutter speed automatically (Nikon, 2026). This single change lets you intentionally separate subjects from backgrounds.
How do I avoid blown-out highlights or muddy shadows?
Enable your camera’s histogram display to catch exposure errors before they become permanent. If the histogram graph is piled up against the right edge, your highlights are blown — press the Exposure Compensation button and dial down. If it’s piled against the left, lift exposure. For RAW shooters, Lightroom’s Highlights slider (drag left) and Shadows slider (drag right) can recover up to 3–4 stops of exposure error (Adobe, 2026). According to Adobe, pixels pushed to the extreme right of the histogram lose all detail permanently — catching it in-camera is always preferable.
How do I fix photos taken under harsh midday sun?
Move your subject into open shade — the shadow of a building, tree, or overhang. Open shade provides soft, diffused light with no overhead shadows or blown highlights. If shade is unavailable, use a white reflector or foam board to bounce light back into the shadowed side of the face. For landscapes, schedule your shoot during the golden hour window (30–60 minutes after sunrise or before sunset) when the sun is low, warm, and directional. Midday light between 10am and 3pm is the most challenging lighting condition for beginners to work with (Digital Photography School, 2026).
Wrapping Up: Put the Method to Work
Every fix in this guide follows the same structure: diagnose the symptom, apply the specific correction, verify it worked before moving on. That’s the Diagnose → Fix → Verify Method — and it works because photography mistakes aren’t mysterious. They’re predictable patterns with predictable solutions. Camera shake responds to a faster shutter speed. Blown highlights respond to exposure compensation. Flat compositions respond to a shifted focal point on a rule of thirds grid. Mastering these common photography mistakes and fixes will transform your portfolio.
The 15 common photography mistakes and fixes covered here — from camera shake and blown highlights to harsh midday sun and over-saturated edits — all share one thing: they’re fixable in the field, in real time, without new gear. The method transforms each shoot from a guessing game into a diagnostic process. You’ll stop collecting folders of “almost good” photos and start building a body of work you’re genuinely proud of.
Pick one mistake from this guide that matches your most common frustration. Apply the fix on your next shoot. Verify the result. Then move to the next one. That’s how you instantly improve your shots — one deliberate correction at a time. When you’re ready to go deeper on any of these techniques, our full photography mistakes and fixes resource hub has extended guides for each category.
