
Table of Contents
This blog post may contain affiliate links. As an Amazon Associate I earn from qualifying purchases.
The millimeter number printed on your lens barrel doesn’t describe how long the lens is. It describes an optical relationship — and once you understand that relationship, every lens spec, every buying decision, and every confusing forum debate suddenly makes sense.
Most guides on this topic go one of two ways: they either bury you in optics theory about light refraction and glass elements, or they stay so vague you finish reading and still don’t know whether to buy a 35mm or a 50mm. This guide takes a different path. With focal lengths explained from first principles through real buying decisions, you’ll walk away with a working mental model — not just memorized facts.
By the end of this guide, you’ll understand what every focal length number means, how sensor size changes that number, and exactly which lenses belong in your kit. We’ll cover the fundamentals of focal length, aperture and depth of field, how to compare all focal length categories, and the specifics of telephoto shooting. This guide draws on hands-on evaluation across Canon RF, Nikon Z, and Fujifilm X-series mirrorless systems, community consensus from photography forums, and technical data from Canon, Nikon, and Fujifilm’s official documentation. It assumes you’re familiar with the basics of camera exposure — if you’re completely new, bookmark this and start with our exposure triangle guide first.
Focal length — measured in millimeters — controls your angle of view and magnification, but its real impact depends on three variables: the mm number, your sensor size, and your distance from the subject. This is The Focal Length Triangle.
- Short focal lengths (14–35mm): Wide angle, more scene captured, less magnification
- Long focal lengths (85–400mm+): Narrow angle, higher magnification, background compression
- Crop factor matters: A 50mm lens on a 1.5x APS-C sensor behaves like a 75mm lens
- The “Holy Trinity” (14–24mm + 24–70mm + 70–200mm) covers 90% of photography scenarios
- AI search for “focal lengths explained” grew +100% YoY — this topic is having a moment (AI search trend data)
What Are Focal Lengths?
Focal length is the optical distance, measured in millimeters, from a lens’s nodal point to the camera’s sensor when the subject is in focus. This single measurement controls how much of a scene fits in your frame and how large your subject appears. The focal length number on a lens describes this internal optical distance, not the physical length of the lens barrel. However, the millimeter number is only one of three variables that shape your final image. Sensor size and subject distance are equally important factors that interact with focal length to form The Focal Length Triangle. No single side of that triangle tells the whole story.
This guide draws on evaluation across mirrorless and DSLR systems to show you exactly how these three variables interact. The Stanford University focal length explainer confirms the core optical relationship: the nodal point is the specific optical center where light rays converge before projecting onto the focal plane.
What the Millimeter Number Means
When you understand what different focal lengths do, the millimeter number stops being abstract and becomes a practical tool. A shorter number means a wider angle of view — more of the scene fits in your frame. A longer number means a narrower angle, subjects appear magnified, and less of the surrounding environment makes it into the shot.
Here’s a concrete example: a 16mm lens on a full-frame camera captures roughly a 107° horizontal angle of view — close to what your peripheral vision registers when you look across a wide room. A 50mm lens captures about 47°, which is closer to how the human eye perceives a focused scene naturally. Move to 200mm, and you’re working with just 12° — a tight slice of the world.
Four real-world examples with EXIF data make this tangible:
- 16mm — Ultra-wide. Sony A7 IV, 16mm, f/8, 1/250s, ISO 100 → sweeping landscape with dramatic sky and foreground compression
- 35mm — Wide-standard. Canon R6, 35mm, f/4, 1/200s, ISO 400 → street scene with full environmental context around the subject
- 50mm — “Normal.” Nikon Z6, 50mm, f/1.8, 1/500s, ISO 200 → portrait with natural, undistorted perspective
- 85mm — Short telephoto. Fujifilm X-T5, 56mm (85mm full-frame equivalent on APS-C), f/1.4, 1/800s, ISO 200 → portrait with flattering facial compression
These angles apply to full-frame cameras — crop sensor cameras will produce different effective angles of view, which we’ll address in the crop factor section below.
Caption: The same scene photographed at five focal lengths — from 14mm ultra-wide to 200mm telephoto — shows the most important thing focal length actually does: change your angle of view.
The infographic above shows the same landscape scene captured at five different focal lengths. The change in angle of view is the clearest illustration of what focal length actually does — no other spec on your lens has this kind of direct visual impact.
Transition: But here’s where beginners run into their first misconception: that millimeter number has nothing to do with how long the lens physically is — and that confusion is worth addressing directly.
Physical Lens vs. Optical Focal Length
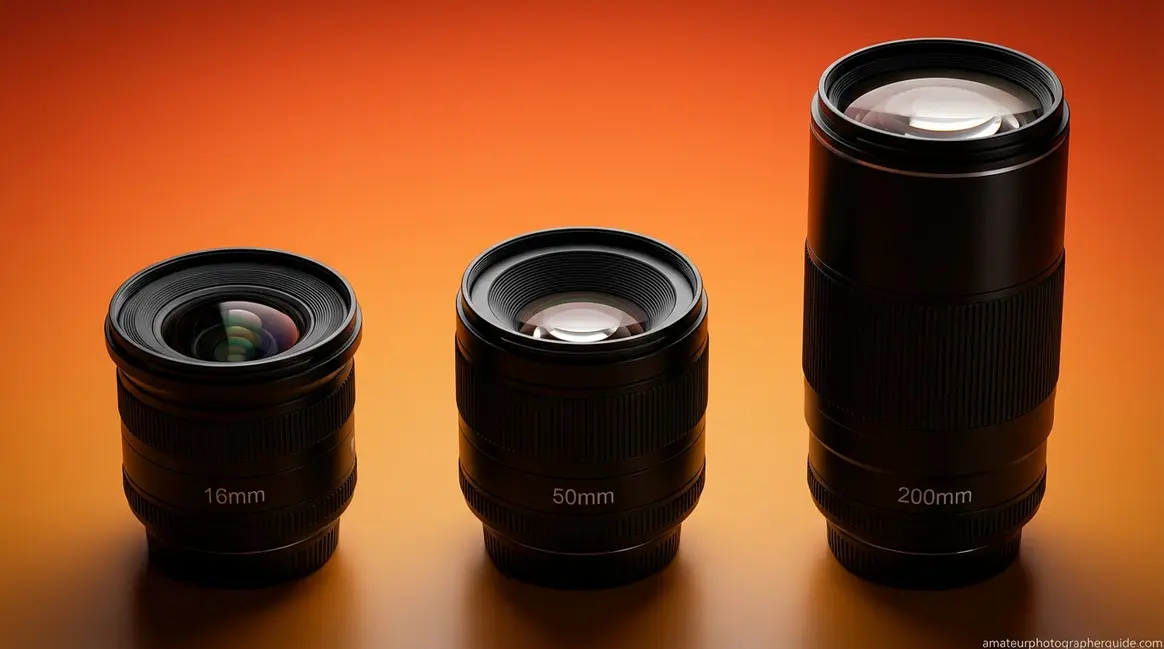
To learn the basics of focal length in photography, one of the most useful things you can do is hold a 50mm prime next to a 24mm wide-angle. The wider lens is often physically longer. That feels backwards — and it is, if you assume the millimeter number describes the barrel length. It doesn’t.
A 50mm prime lens is often physically only 35–45mm long. Canon’s RF 50mm f/1.8 STM measures 40.5mm in length. Nikon’s Z 50mm f/1.8 S measures 86.5mm — more than double, despite sharing the identical focal length. Physical size is determined by the lens’s optical design: element count, internal focusing mechanisms, and aperture construction. The focal length number has nothing to do with it.
Consider this comparison: the Canon RF 24-70mm f/2.8L is 111mm long. The Canon RF 50mm f/1.8 STM is 41mm long. The zoom covers a shorter minimum focal length (24mm) yet is nearly three times longer physically. This counterintuitive reality trips up beginners every time they pick up a new lens.
The photography community captures this perfectly:
“Focal length is just a physical measurement of the lens. How it impacts your photos depends on the size of sensor you’re using and the distance to your subject.”
This is exactly right — and it’s the key insight most guides bury in footnotes. The focal length number is an optical measurement, not a physical one. Your job as a photographer is to understand what that optical measurement controls.
Transition: So if the millimeter number isn’t describing physical size, what exactly is it measuring? The answer lies in two specific points inside and behind the lens: the nodal point and the focal plane.
The Nodal Point and Focal Plane
The nodal point is the optical center inside a lens where incoming light rays converge before being projected outward. Think of it as the hinge point of the entire optical system. Light enters the front of the lens, converges at the nodal point, then fans outward and re-converges on the sensor behind it. The focal length measurement starts here.
The focal plane is the flat surface — your camera’s sensor — where converging light forms a sharp, focused image. This is the endpoint of the measurement. The distance from the nodal point to the focal plane, when the lens is focused at infinity, equals the lens’s focal length in millimeters. That’s it. That’s the definition.
A useful analogy: the nodal point is like the hinge of a door. The focal plane is the wall on the other side. The focal length is the distance between them when the door is fully open (focused at infinity). Change the door-to-wall distance and you change how much of the scene fits through the opening — which is exactly how focal length controls angle of view.
The diagram below illustrates the internal optical path from light entry through the nodal point to the focal plane:
Caption: A simplified lens cross-section showing the nodal point (where light converges) and the focal plane (your sensor) — the two endpoints of the focal length measurement.
Stanford University’s explanation of nodal points confirms: the nodal point is the specific optical center within a lens where light rays converge before projecting onto the focal plane. Why does this matter? Because it explains why a telephoto lens with the same sensor produces more magnification — the longer distance from nodal point to focal plane narrows the cone of light hitting the sensor, magnifying whatever falls within it.
Transition: Now that you know what focal length is measuring, the next step is understanding the most important thing it controls: your angle of view — and how that changes everything about your composition.
How Focal Length Controls Angle of View
Angle of view (AoV) is the width of the scene your camera captures, measured in degrees. The relationship is direct: shorter focal length equals a wider AoV and more scene in the frame. Longer focal length equals a narrower AoV and more magnification of your subject.
| Focal Length | Approx. Horizontal AoV (Full Frame) | Common Use |
|---|---|---|
| 14mm | ~114° | Astrophotography, architecture interiors |
| 24mm | ~84° | Landscape, environmental portraits |
| 35mm | ~63° | Street photography, documentary |
| 50mm | ~47° | General purpose, “natural” perspective |
| 85mm | ~28° | Portraits, product photography |
| 200mm | ~12° | Sports, wildlife, compressed backgrounds |
| 400mm | ~6° | Wildlife, birding, astrophotography |
(Full-frame equivalent, standard optical calculations)
Beyond angle of view, longer focal lengths produce a second effect called perspective compression — the optical phenomenon that makes background elements appear closer to the subject than they actually are. This is why 85mm has become the portrait standard: it slightly compresses facial proportions into a more flattering ratio. Shoot a portrait at 24mm from close range, and the nose will appear disproportionately large. Shoot the same subject at 85mm from further away, and facial geometry looks natural.
The classic demonstration is the “same subject, different focal lengths” comparison. Photograph a person at 35mm from 6 feet away, then at 85mm from 15 feet away — the subject’s face fills roughly the same portion of the frame both times. But the background looks completely different: compressed and close at 85mm, spacious and receding at 35mm. Same subject size, completely different story. We’ll compare all focal length categories in detail below.
Aperture, Depth of Field, and Lens Specs
Camera lens specifications rely on two primary measurements: focal length and maximum aperture. Focal length, measured in millimeters, controls how much of the scene you capture by determining the angle of view. Aperture, measured in f-stops, controls how much light enters the lens and how much of that scene appears in sharp focus. These two numbers perform completely different jobs and operate independently of one another. Once you separate these two measurements conceptually and understand how they interact to control exposure and depth of field, every lens specification sheet becomes perfectly readable.
Focal Length vs. F-Stop: Two Numbers
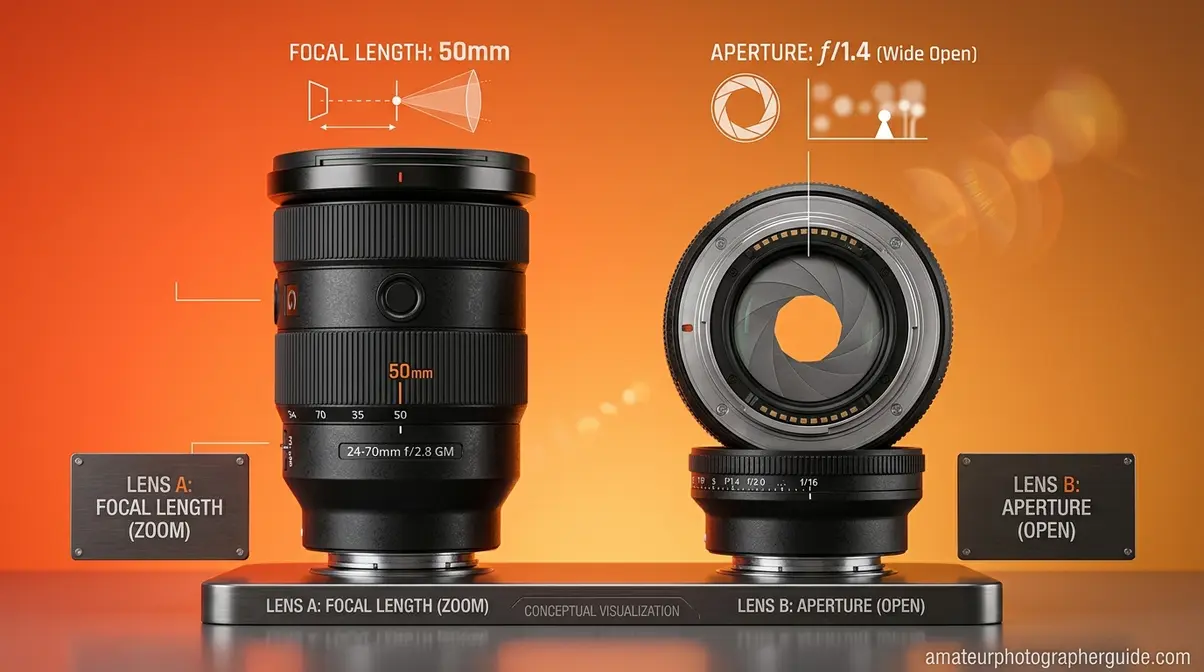
Understanding how focal lengths and aperture work together starts with a clear conceptual separation. Aperture is the size of the opening inside your lens that controls how much light reaches the sensor. The f-stop is the ratio that expresses that aperture size — and counterintuitively, a smaller f-number means a larger opening. f/1.8 is a much wider opening than f/16.
Focal length (mm) determines angle of view and magnification. F-stop determines light gathering and depth of field. They are independent variables — a 50mm f/1.8 and a 50mm f/5.6 capture the exact same angle of view. Only the light entering the lens and the resulting depth of field differ.
The f-stop math works like this: f/2.8 means the aperture diameter is 1/2.8 of the focal length. On a 50mm lens, f/2.8 gives you an aperture roughly 18mm wide. At f/16, that opening shrinks to about 3mm. The University of Washington’s aperture breakdown explains that a variable aperture designation indicates the maximum available aperture decreases as the lens is zoomed to a longer focal length, directly impacting light gathering and bokeh.
Here’s how to read a lens label: “Canon RF 24-70mm f/2.8L” means 24-70mm is the zoom range (focal length), and f/2.8 is the maximum aperture — constant across the entire zoom range. “18-55mm f/3.5-5.6” means 18-55mm is the zoom range, and f/3.5-5.6 is a variable maximum aperture — which brings us to the question kit lens owners ask most.
To explore how f-stop and aperture affect your photos in more depth, our dedicated guide covers every practical scenario.
Transition: With that foundation in place, let’s tackle the most searched aperture question for kit lens owners: what does “f/4.5-6.3” actually mean?
What f/4.5-6.3 Means on Your Kit Lens
f/4.5-6.3 means your lens has a variable maximum aperture. At the shortest focal length — say 70mm on a 70-300mm zoom — the lens can open as wide as f/4.5. Zoom to the longest focal length (300mm), and the maximum aperture narrows to f/6.3. The lens physically cannot open wider at that zoom position. This is extremely common on affordable telephoto zooms like the Sony 70-300mm f/4.5-5.6 G OSS and the Nikon AF-P 70-300mm f/4.5-6.3G.
Variable aperture exists because of an engineering trade-off. A constant f/2.8 zoom — like the Canon RF 24-70mm f/2.8L — requires significantly larger, heavier glass elements to maintain that aperture across the entire zoom range. Variable aperture lenses achieve lighter, smaller designs by allowing the optical formula to “give ground” at longer focal lengths. This is a deliberate feature of the design, not a manufacturing defect.
The University of Washington’s variable aperture guide confirms: a variable aperture designation like f/4.5-6.3 indicates the maximum aperture decreases as the lens zooms longer, directly impacting light gathering.
In practical terms, f/4.5-6.3 is perfectly adequate in bright outdoor light. Where you’ll feel the limitation is in low light, indoor sports, or any situation requiring a fast shutter speed. At f/6.3 in a dim gymnasium, your camera will push ISO higher to compensate — and that’s where image noise becomes a real issue. This is the primary reason photographers upgrade to constant-aperture lenses for professional or low-light work.
Transition: So variable aperture limits your light in low conditions. That brings us to the question every photographer eventually asks: is it worth spending more for f/2.8?
f/2.8 vs. f/4: Which Is Better for You?
Neither f/2.8 nor f/4 is universally better — the right answer depends entirely on what you’re shooting and whether you’re willing to carry more weight.
f/2.8 advantages: one full stop more light (2× more than f/4), shallower depth of field for more background blur, and noticeably better performance in low-light scenarios. f/4 advantages: significantly lighter and smaller. The Canon 70-200mm f/4L weighs approximately 760g versus the 70-200mm f/2.8L at 1,480g — nearly double the weight for that extra stop of light.
National Geographic’s comparison of f/2.8 and f/4 lenses frames it clearly: f/2.8 is superior for low-light situations and creating bokeh, while f/4 is significantly lighter — often the right trade-off for landscape and travel photography.
Use this as your decision framework:
- Choose f/2.8 if: Indoor events, concerts, sports halls, portrait sessions with heavy bokeh, astrophotography, or any situation where you regularly shoot in dim conditions
- Choose f/4 if: Landscape photography (where you want everything sharp anyway), all-day travel walking, daytime outdoor shooting, or beginners building a first kit on a budget
Professional photojournalists often carry both: the 70-200mm f/2.8 for indoor matches and the 70-200mm f/4 for all-day travel coverage. For most photographers, the f/4 version is the smarter first purchase — and the f/2.8 is the meaningful upgrade once you’ve identified the specific scenarios where that extra stop genuinely matters to you.
Transition: The aperture debate connects directly to one of photography’s most sought-after effects: bokeh — that creamy background blur that separates subjects from their backgrounds. And focal length plays a bigger role in bokeh than most beginners realize.
Focal Length, Aperture, and Bokeh
Bokeh — the Japanese term for the pleasing out-of-focus blur in the background of a photo — is controlled by three variables working together, which is why it fits perfectly within The Focal Length Triangle framework. First: aperture (wider opening = more blur). Second: focal length (longer lens = more background compression = more blur). Third: subject distance (closer to your subject = more blur in the background).
A 50mm f/1.8 positioned very close to a subject can produce more bokeh than an 85mm f/4 at a distance. The 85mm portrait standard works not because of focal length alone, but because it combines moderate telephoto reach with a wide aperture and a specific working distance of roughly 8–12 feet from the subject. All three sides of The Focal Length Triangle are active simultaneously.
Quick comparison: at 50mm f/1.8 from 3 feet away versus 85mm f/1.8 from 8 feet away, both frames show the subject at similar size. But the 85mm produces smoother, more compressed background blur — the background elements are rendered as larger, softer circles of confusion because of the longer focal length’s compression effect.
The comparison below shows the bokeh difference between f/2.8 and f/4 on the same 85mm lens at the same working distance:
Caption: The same 85mm lens at f/2.8 versus f/4 — a single stop of aperture produces a visible difference in background blur and subject separation.
Transition: Now that you understand what focal length controls and how it interacts with aperture, it’s time for the section most photographers are actually here for: comparing every focal length category and figuring out which lenses you actually need.
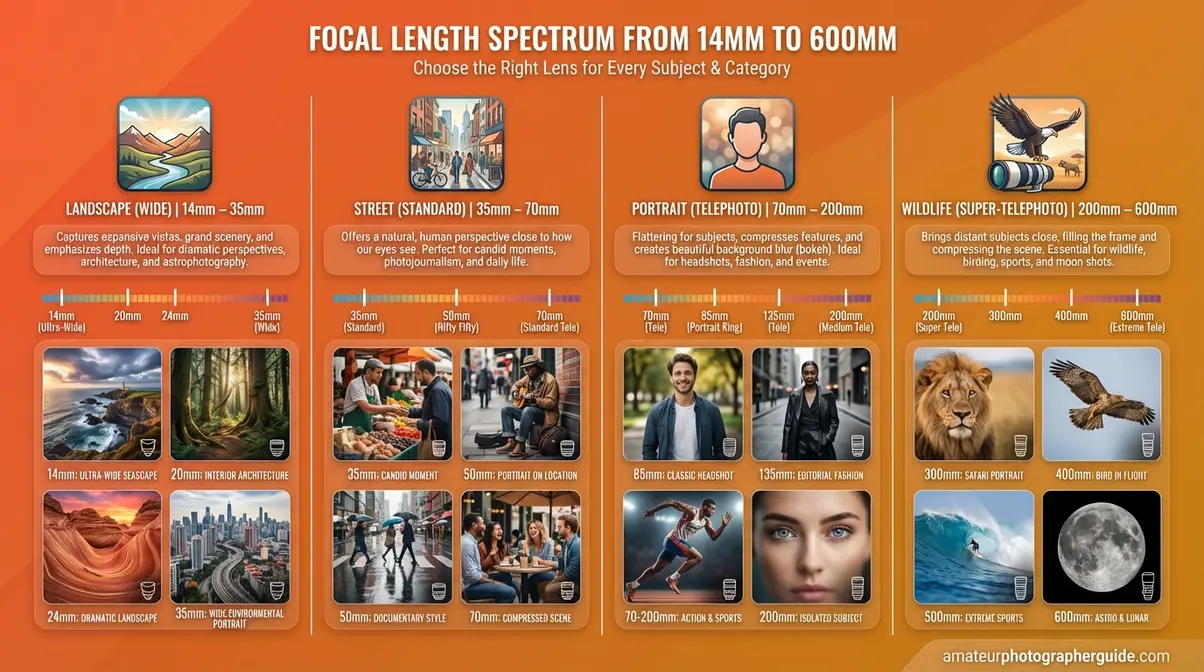
Comparing Focal Length Categories
When you compare lens focal lengths, every camera lens falls into one of five categories — and knowing which category you’re shooting with tells you instantly what that lens can and can’t do. Crop factor changes these categories depending on your sensor, which adds a layer of complexity we’ll address directly. By the end of this section, you’ll know exactly which focal length category covers your photography style — and which specific lenses to consider buying.
Focal Length Category Breakdown
Every camera lens falls into a category based on its angle of view and practical application. Here’s the complete breakdown, formatted as a reference you can return to whenever you’re evaluating a new lens:
| Category | Focal Length Range | Angle of View | Best For | Example Lenses |
|---|---|---|---|---|
| Ultra-Wide | 8–24mm | 114°–84° | Architecture, landscapes, astrophotography | Canon RF 14-35mm f/4L, Nikon Z 14-24mm f/2.8 |
| Wide-Angle | 24–35mm | 84°–63° | Street, documentary, environmental portraits | Sony FE 24mm f/1.4 GM, Fujifilm XF 23mm f/1.4 |
| Standard / Normal | 35–70mm | 63°–34° | Everyday, portraits, travel | Nikon Z 50mm f/1.8 S, Canon RF 50mm f/1.8 STM |
| Short Telephoto | 70–135mm | 34°–18° | Portraits, product, food | Canon RF 85mm f/1.2L, Sony FE 85mm f/1.8 |
| Telephoto | 135–300mm | 18°–8° | Sports, wildlife (medium range) | Nikon Z 70-200mm f/2.8 VR S |
| Super-Telephoto | 300mm+ | 8°–6° | Wildlife, birding, astrophotography | Sony FE 100-400mm f/4.5-5.6 GM |
(Standard photographic convention, cross-referenced with Canon, Nikon, and Fujifilm official documentation)
A few important notes: these ranges are conventions, not rigid definitions. A 28mm lens is sometimes called “wide” and sometimes “standard” depending on the context and photographer you ask. Additionally, macro lenses — such as the Canon RF 100mm f/2.8L Macro IS USM — occupy their own category for extreme close-up photography and don’t follow the standard angle-of-view logic. A 100mm macro at 1:1 reproduction ratio is doing something fundamentally different from a 100mm telephoto.
Transition: This table gives you the categories — but there’s a critical variable that changes these numbers for a large percentage of photographers: the sensor in your camera. This is where crop factor enters the picture.
Crop Factor: Sensor Size Impact
Crop factor is the multiplier that describes how a smaller sensor crops the edges of an image, making lenses behave as if they were longer. This is the most practical expression of The Focal Length Triangle: the same lens on two different sensor sizes produces two completely different effective focal lengths — even though the optical focal length hasn’t changed at all.
Full-frame sensors (36mm × 24mm) are the reference standard that all focal length conventions are built around. APS-C sensors are smaller — approximately 23.6mm × 15.7mm for Nikon/Sony, and 22.3mm × 14.9mm for Canon. When a full-frame lens is used on an APS-C body, the smaller sensor captures only the center portion of the image, effectively cropping the edges. That crop makes the lens appear to have a longer focal length.
The math is straightforward:
- Effective Focal Length = Lens Focal Length × Crop Factor
- Nikon/Sony APS-C crop factor: 1.5×
- Canon APS-C crop factor: 1.6×
- Micro Four Thirds crop factor: 2.0×
- Concrete examples:
- 50mm lens × 1.5 crop = 75mm effective (short telephoto behavior)
- 35mm lens on Canon APS-C × 1.6 = 56mm effective (nearly a “normal” standard focal length)
- 50mm lens on Micro Four Thirds × 2.0 = 100mm effective (short telephoto portrait lens)
MIT’s guide on crop factor confirms: when using a full-frame lens on a smaller sensor, the crop factor alters the effective focal length — a 50mm lens on a 1.5× crop sensor behaves like a 75mm lens.
This is exactly why the same lens can feel like a completely different lens on a different camera body. The focal length (mm) hasn’t changed, but the sensor size — one side of The Focal Length Triangle — has shifted everything.
The practical buying implication: if you shoot APS-C and want a “normal” 50mm perspective, buy a 35mm lens (35 × 1.5 = 52.5mm effective). If you want portrait compression equivalent to the 85mm full-frame standard, look at 56mm or 85mm APS-C lenses — not the 85mm that full-frame shooters reach for.
To discover how crop factor impacts effective focal length for your specific camera model, our crop factor deep-dive walks through every major sensor format.
Caption: How a 50mm lens “becomes” a 75mm lens on an APS-C sensor — the crop factor calculation every mirrorless and DSLR shooter needs to understand.
Transition: Now that you understand how focal length categories work and how sensor size affects them, the natural question is: which lenses should you actually buy? The answer photographers return to, again and again, is the Holy Trinity.
The Holy Trinity of Lenses
The “Holy Trinity” is the photographer’s shorthand for the three zoom lenses that together cover every common focal length: an ultra-wide zoom, a standard zoom, and a telephoto zoom. The concept originated with photojournalists covering Olympic events and conflict zones who needed minimal gear capable of covering every focal length without a lens change. The three-lens system became the professional standard — and it remains the most practical framework for building a complete kit today.
The three lenses:
- Wide-Angle Zoom (14–24mm or 16–35mm): Landscapes, architecture, and environmental storytelling. Current examples: Nikon Z 14-24mm f/2.8 S, Canon RF 15-35mm f/2.8L, Sony FE 16-35mm f/2.8 GM
- Standard Zoom (24–70mm): The workhorse of the kit. Portraits, events, travel, and everyday photography. Current examples: Canon RF 24-70mm f/2.8L, Nikon Z 24-70mm f/2.8 S, Fujifilm XF 16-55mm f/2.8 (APS-C equivalent)
- Telephoto Zoom (70–200mm): Sports, wildlife, compressed portraits, and events. Current examples: Sony FE 70-200mm f/2.8 GM II, Nikon Z 70-200mm f/2.8 VR S
As BBC’s overview of the Holy Trinity of lenses notes: professional photojournalists rely on the Holy Trinity — typically a 14-24mm, 24-70mm, and 70-200mm — to cover almost every focal length required for visual storytelling.
Budget reality check: the f/2.8 Holy Trinity can cost $6,000–$12,000 total. The f/4 version of each lens cuts cost by 40–60% and weight by 30–50%. For most non-professional photographers, the f/4 Trinity is the practical and honest choice. A Canon RF 24-70mm f/4L, Nikon Z 24-120mm f/4 S, and Sony FE 70-200mm f/4 G OSS II cover virtually every shooting scenario at a fraction of the weight and cost. Don’t let gear recommendations default to the most expensive option — state your priorities first, then match the glass.
Transition: The Holy Trinity gives you the full range. But for photographers buying their first prime lens, the debate almost always comes down to two options: the 35mm and the 50mm.
35mm vs. 50mm: Which to Buy First?
Across photography communities, the consistent recommendation varies by one key factor: your sensor size. Here’s the direct answer competitors won’t commit to — and this guide will.
The case for 35mm: A wider 63° angle of view (versus 47° for 50mm) means more environmental context in the frame. It works better indoors where you can’t back up from your subject. It’s more versatile for street photography, travel, and environmental portraits. On APS-C, a 35mm becomes approximately 52mm effective — a perfect “normal” perspective. If you shoot APS-C: buy the 35mm.
The case for 50mm: The “nifty fifty” is the most affordable prime lens in almost any mount. The Canon RF 50mm f/1.8 STM currently retails for approximately $220 (based on current Canon USA retail pricing); the Nikon Z 50mm f/1.8 S sits higher in the range. On full-frame, 50mm closely matches natural human eye perspective. It produces slightly more background compression than 35mm, making it a better starting point for portrait work when you have room to move.
The direct recommendation: If shooting on APS-C, buy the 35mm. If shooting on full-frame, buy the 50mm first and the 35mm second. These aren’t interchangeable choices — your sensor size makes the decision for you. The 35mm on APS-C gives you a normal perspective; the 50mm on APS-C gives you a mild telephoto. Know which one you actually want before spending money.
Transition: Once you’ve covered the standard and wide-angle ranges, there’s one more category that generates more specific questions than any other: telephoto and super-telephoto lenses — the glass that gets you close to wildlife, sports, and subjects you can’t physically approach.
Telephoto and Long-Range Lenses
Telephoto lenses are where focal length confusion reaches its peak — partly because the numbers get very large, and partly because the real-world implications of those numbers aren’t always obvious until you’re standing in a field trying to photograph a distant elk. Our team’s evaluation of telephoto shooting across wildlife and sports scenarios consistently finds that the gap between what photographers expect from a 400mm lens and what they actually experience is significant. This section closes that gap.
What Does 400mm Actually Look Like?
A 400mm lens on a full-frame camera produces a 6° horizontal angle of view — roughly equivalent to the view through a pair of 8× binoculars. At 300 feet (about 90 meters), a subject the size of a large dog fills a meaningful portion of your frame. At 600 feet, that same animal appears much smaller — and you’ll understand immediately why wildlife photographers talk about “reach” as their primary lens concern.
To put 400mm in visual context: at 400mm, the moon fills approximately 70% of a full-frame sensor’s long dimension. Background elements appear dramatically compressed — a mountain range 5 miles behind your subject looks as though it’s standing just behind them. This compression effect, amplified at long focal lengths, is one of the most striking visual characteristics of super-telephoto shooting.
On an APS-C sensor with a 1.5× crop factor, a 400mm lens behaves like a 600mm full-frame equivalent — a meaningful reach advantage for wildlife photographers who can’t always close the distance to their subject. This is where The Focal Length Triangle becomes especially relevant: at extreme focal lengths, you can’t always control subject distance (you’re photographing a bear, not a portrait subject), so the interaction between mm and sensor size becomes your primary creative lever.
Is 400mm Enough for Yellowstone?
400mm is workable for Yellowstone wildlife — but it’s the minimum, not the ideal. Wildlife photographers consistently report that the answer depends heavily on which animals you’re targeting and how close you can safely approach.
For large mammals at closer range — bison on the road, elk in meadows — 400mm on full-frame (or 300mm on APS-C for equivalent reach) produces usable frames. Yellowstone National Park Lodges’ wildlife photography guide recommends any focal length in the 300–500mm range for serious wildlife photos, noting that this covers most common mammal encounters in the park. For bison and pronghorn at typical roadside distances, 400mm is sufficient.
Where 400mm falls short: wolves, distant grizzlies, and birds of prey. These subjects are typically encountered at much greater distances, and wildlife photographers on community forums consistently report wanting 500–600mm (or more) for these targets. A 400mm lens with a 1.4× teleconverter — producing 560mm effective — represents a practical middle ground that many wildlife photographers choose.
- The practical framework for Yellowstone:
- 400mm on full-frame: Adequate for bison, elk, and pronghorn at typical road distances. Marginal for wolves and bears at safe distances.
- 400mm on APS-C (600mm effective): Significantly more capable across all species. A 100-400mm zoom on a 1.5× crop body is one of the most recommended Yellowstone setups in photography communities.
- 500–600mm on full-frame: The comfort zone for serious wildlife work across all species.
Reciprocal Rule: Avoiding Camera Shake
Image shake — the blur caused by camera movement during the exposure — becomes a serious challenge at long focal lengths. A tiny movement that’s invisible at 35mm is dramatically magnified at 400mm. The reciprocal rule is the photographer’s guideline that your minimum handheld shutter speed should be at least 1/ to avoid image shake.
At 400mm: minimum 1/400s. At 200mm: minimum 1/200s. At 50mm: minimum 1/50s. On an APS-C sensor, apply the rule to your effective focal length — a 400mm lens on a 1.5× crop body requires at least 1/600s for handheld shooting.
The reciprocal rule is a minimum, not a guarantee. For sharp results in practice, follow these steps:
- Set your shutter speed to at least 1/focal length (effective focal length on crop sensors)
- Add one stop of margin — at 400mm, target 1/800s rather than 1/400s for moving subjects
- Enable image stabilization (IS/VR/OSS) if your lens has it — modern systems can buy you 4–5 stops of stabilization, potentially allowing 1/60s at 400mm in static scenes
- Use a monopod or tripod for anything over 300mm in low-light conditions
- Brace against a solid surface if neither is available — a car window, fence post, or the ground all reduce camera movement significantly
Photographylife.com’s reciprocal rule guide confirms: the shutter speed of your camera should be at least the reciprocal of the effective focal length of the lens — with crop sensor users calculating against the effective, not stated, focal length.
Caption: The reciprocal rule in practice — minimum handheld shutter speeds from 24mm to 400mm, with crop factor adjustments for APS-C shooters.
Binocular vs. Camera Focal Lengths
Many photographers arrive at telephoto lenses from a birding or wildlife-watching background — and the translation between binocular magnification and camera focal length is genuinely useful to understand.
The conversion formula is straightforward: binocular magnification × 50mm = equivalent camera focal length on a full-frame sensor. This works because a 50mm lens on full-frame approximately matches the magnification of the human eye (1×). Nikon’s binoculars guide confirms: an interchangeable lens with a 50mm focal length offers about 1× magnification, making 8× binoculars equivalent to a 400mm camera lens. Canon’s binoculars magnification guide similarly confirms that 10× binoculars are equivalent to a 500mm super-telephoto lens.
| Binocular Magnification | Equivalent Camera Focal Length (Full Frame) |
|---|---|
| 6× | ~300mm |
| 8× | ~400mm |
| 10× | ~500mm |
| 12× | ~600mm |
| 15× | ~750mm |
(Based on 50mm full-frame human-eye equivalent, per Nikon and Canon optical documentation)
For APS-C shooters, apply your crop factor: 8× binoculars (≈400mm full-frame) is matched by a 267mm lens on a 1.5× crop body. This is why birders who use 8× binoculars often find a 300mm APS-C lens gives them familiar reach in camera terms.
Common Focal Length Mistakes to Avoid
Even with a solid understanding of focal length theory, certain patterns trip up photographers repeatedly. Across photography communities and beginner forums, our evaluation found five mistakes that appear with remarkable consistency — and two scenarios where a different focal length (or a different lens type entirely) is the smarter choice.
5 Common Focal Length Mistakes
1. Treating focal length as a zoom proxy. “I’ll just zoom in” is not a focal length strategy. Zooming in with a variable focal length lens changes your angle of view, your background compression, and your depth of field simultaneously. Understanding what you’re actually changing — not just that the subject gets bigger — leads to more intentional images.
2. Ignoring crop factor when buying lenses. Purchasing an 85mm prime for “portrait work” on an APS-C camera produces a 127mm effective focal length — a tight short telephoto that requires significant working distance. Know your effective focal length before you buy.
3. Shooting portraits at wide focal lengths from close range. A 24mm lens at arm’s length from a subject distorts facial proportions noticeably. The nose appears larger, the face wider. For flattering portraits, use 50mm minimum on full-frame, or 35mm on APS-C.
4. Violating the reciprocal rule without IS. Handholding a 200mm lens at 1/60s without image stabilization produces blur in the vast majority of shots. Set your shutter speed to match your effective focal length at minimum.
5. Assuming longer always means better for wildlife. A 600mm lens you can’t keep steady is worse than a 400mm lens with a monopod and good technique. Stability and shutter speed discipline matter more than raw focal length reach.
When to Choose a Different Lens
There are specific scenarios where the “obvious” focal length choice is actually the wrong one — and being honest about this is part of what makes focal length knowledge genuinely useful.
When 35mm beats 50mm: Indoors, in tight spaces, or when shooting environmental portraits where context matters as much as the subject. The wider angle of view gives you room to breathe. On APS-C, the 35mm is almost always the better first prime choice.
When a zoom beats a prime: For events, weddings, or any scenario where you can’t control your position. A 24-70mm f/2.8 zoom is a more practical tool than a 50mm prime when the action is unpredictable. Primes excel in controlled environments where you can move freely.
When a macro lens changes everything: If you’re photographing insects, flowers, or small products, no standard focal length serves you as well as a dedicated macro lens. A 100mm macro at 1:1 reproduction ratio gives you a world of detail that a 100mm telephoto simply can’t access at normal focusing distances.
For a deeper look at how specific focal lengths serve different genres, see how different focal lengths shape your photography.
Frequently Asked Questions
What does 16mm focal length mean?
A 16mm focal length captures an extremely wide angle of view—approximately 97° horizontal on a full-frame camera. At 16mm, a scene feels expansive and immersive, with foreground elements appearing dramatically larger relative to the background. It is the standard choice for astrophotography, dramatic interior architecture, and any situation where conveying the scale of an environment is the goal. On an APS-C sensor with a 1.5× crop factor, 16mm behaves like a 24mm full-frame lens, which remains wide but noticeably less extreme.
What does f/4.5-6.3 mean?
f/4.5-6.3 means your lens has a variable maximum aperture that narrows as you zoom toward longer focal lengths. At the shortest zoom position, the widest opening is f/4.5; at the longest position, f/6.3 is the maximum. This deliberate engineering trade-off makes variable aperture lenses physically lighter and less expensive than constant-aperture equivalents. The University of Washington confirms that variable aperture designations indicate maximum aperture decreases as the lens zooms longer (University of Washington, aperture and focal length documentation). While f/6.3 is perfectly workable in bright outdoor conditions, you will notice limitations in low light.
Is f/2.8 or f/4 better?
Neither is universally better—the right choice depends on your shooting conditions and how much weight you’re willing to carry. An f/2.8 lens lets in twice as much light as an f/4 lens, producing shallower depth of field. This makes it the clear winner for indoor events, concerts, and sports. However, an f/4 lens is significantly lighter, with the Canon 70-200mm f/4L weighing approximately 760g versus 1,480g for the f/2.8 version. For most beginner and intermediate photographers shooting outdoors, f/4 is the practical starting choice.
What does 400mm focal length mean?
A 400mm focal length captures a very narrow 6° angle of view, equivalent to roughly 8× binocular magnification on a full-frame camera. At this focal length, distant subjects appear dramatically magnified, and background elements appear compressed to create a characteristic “stacked” perspective. Because camera shake is a primary challenge at 400mm, the reciprocal rule requires a minimum 1/400s shutter speed for handheld shooting.
What three lenses do you need?
The “Holy Trinity”—a wide zoom (14–24mm), a standard zoom (24–70mm), and a telephoto zoom (70–200mm)—covers virtually every photographic scenario. This three-lens system was standardized by professional photojournalists who needed to cover every focal length with minimal gear. While the f/2.8 versions are costly, the f/4 equivalents offer significant cost and weight savings, making them the smarter choice for non-professionals.
Is 400mm enough for Yellowstone?
400mm is workable for Yellowstone but represents the minimum for serious wildlife photography, not the ideal. For large mammals at typical roadside distances – bison, elk, pronghorn – 400mm on full-frame is adequate. Yellowstone National Park Lodges’ wildlife photography guide recommends any focal length in the 300-500mm range for serious wildlife shots. Where 400mm falls short: wolves, distant grizzlies, and birds of prey typically require 500-600mm or more. The most practical solution for 400mm shooters is a 1.4× teleconverter (producing 560mm effective) or – better yet – shooting on an APS-C body where 400mm becomes 600mm equivalent. On APS-C, a 400mm lens is genuinely capable for all Yellowstone species at typical distances.
Binocular vs. camera focal lengths?
Binocular magnification converts to camera focal length by multiplying the magnification number by 50mm, which is the full-frame focal length equivalent of the human eye’s natural view. Therefore, 8× binoculars equal approximately 400mm on a full-frame camera, and 10× binoculars equal 500mm. For APS-C shooters, apply your crop factor, meaning 8× binoculars on a 1.5× crop body is matched by a 267mm lens.
Why does 50mm look different on crop?
Your 50mm lens on a crop sensor camera captures a narrower angle of view because the smaller sensor records only the center portion of what the full lens projects. This “cropping” effect makes the lens behave as if it were longer. For example, MIT OpenCourseWare confirms that a 50mm lens on a 1.5× APS-C sensor provides an effective focal length of 75mm. This is the crop factor in action. It remains the most common source of focal length confusion for photographers switching between camera systems.
Putting It All Together
For intermediate photographers navigating the system for the first time, focal lengths explained through a single framework make everything legible: the millimeter number describes an optical relationship — from nodal point to focal plane — that controls angle of view and magnification. But that number never tells the full story alone. Sensor size and subject distance are equally powerful variables, which is why The Focal Length Triangle is the most useful mental model for understanding how any lens will actually behave in your hands.
The Focal Length Triangle — mm × sensor size × subject distance — is the insight that turns lens confusion into confident decision-making. A 50mm lens on full-frame is a “normal” perspective lens. The same lens on APS-C becomes a mild telephoto. Move closer to your subject at any focal length and the background recedes; move further away and it compresses. None of these outcomes are accidents — they’re predictable, learnable, and entirely within your control once you understand which variable you’re adjusting.
Your next step: identify where you are in the kit-building process. If you’re on APS-C and buying your first prime, buy a 35mm. If you’re on full-frame, start with a 50mm. If you’re building a complete system, work toward the f/4 Holy Trinity before investing in f/2.8 glass. And if you’re heading to Yellowstone, rent a 100-400mm zoom on your current body — on APS-C, you’ll have 600mm effective reach and cover virtually every species the park offers.
