
Table of Contents
- Understanding Exposure: The Foundation for Bracketing
- What Is Bracketing in Photography?
- The Three Types of Bracketing You Should Know
- How to Use Auto Exposure Bracketing (AEB): Step-by-Step
- Merging Bracketed Photos into HDR: Lightroom and Photoshop
- When to Use Bracketing (and When to Skip It)
- When Bracketing Does Not Work: Limitations and Alternatives
- Frequently Asked Questions About Bracketing Photography
- Putting the Exposure Safety Net to Work
This blog post may contain affiliate links. As an Amazon Associate I earn from qualifying purchases.
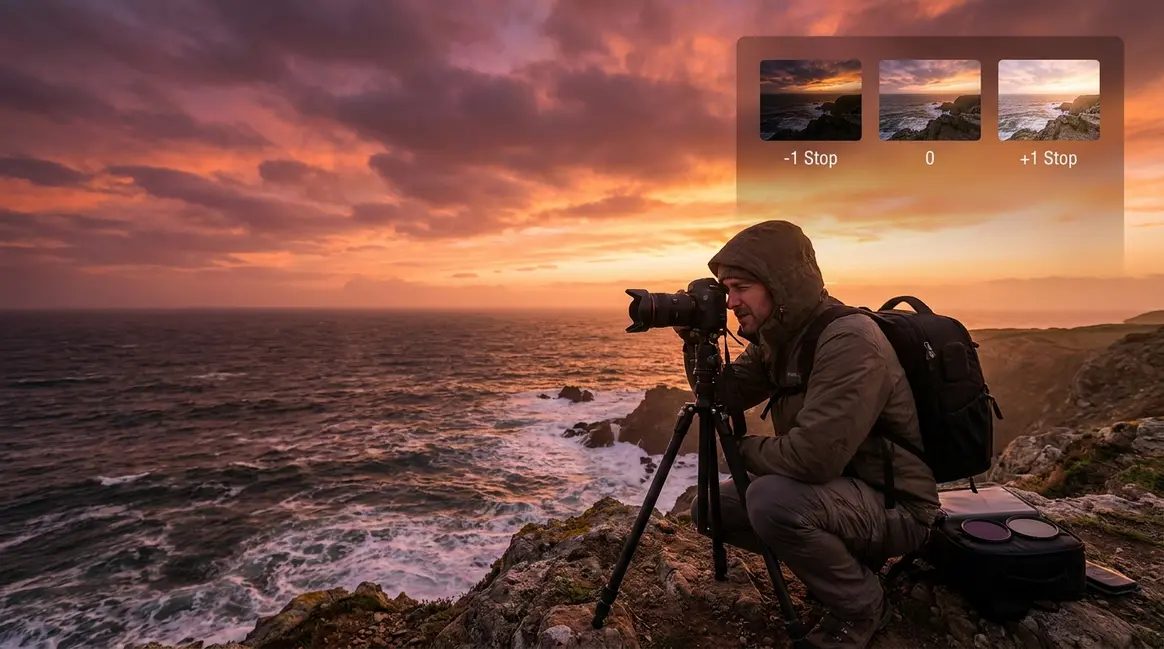
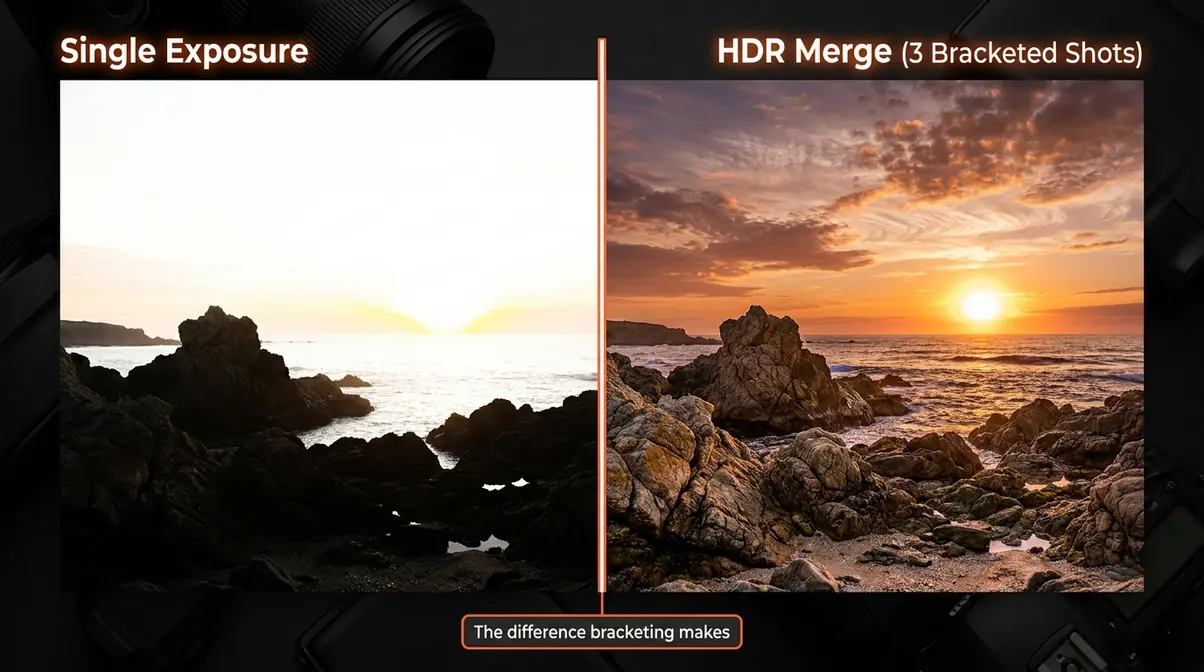
You take the perfect shot of a sunset. The scene is breathtaking — a warm orange sky above a dark, dramatic shoreline. But when you review the photo, the sky is a washed-out white blur and the foreground is completely black. Sound familiar?
The problem is your camera’s dynamic range — the gap between the brightest and darkest areas it can record in a single frame. Your eyes can handle the full scene. Your sensor cannot. That gap is costing you great shots every time you shoot in tricky lighting.
That is exactly where bracketing photography comes in. In this guide, you will learn what bracketing is, why photographers rely on it, how to set up Auto Exposure Bracketing (AEB) on your Canon, Nikon, or Sony camera in under two minutes, and how to merge your shots into a stunning HDR image. We cover all three types of bracketing, step-by-step camera setups, a beginner-friendly post-processing workflow, and the situations where you should — and should not — bracket your shots.
Bracketing photography captures multiple shots of the same scene at different exposure settings, ensuring you always have a usable image — even in tricky lighting with high contrast.
- Exposure Bracketing is the most common type: shoot at 0, -1, and +1 stops to capture highlights, shadows, and midtones
- Three types exist: exposure, focus, and white balance bracketing — each solving a different problem
- AEB (Auto Exposure Bracketing) automates the process on Canon, Nikon, and Sony cameras in seconds
- The Exposure Safety Net principle: bracket whenever your scene has more contrast than your camera can capture in one frame
- Bracketed shots merge into HDR images using Lightroom or Photoshop
Understanding Exposure: The Foundation for Bracketing
To understand bracketing, you first need to know what exposure means — because bracketing is entirely about controlling it. Exposure is simply how bright or dark your final photo appears, determined by how much light reaches your camera’s sensor. Get it wrong and your image is either washed out or too dark to use.
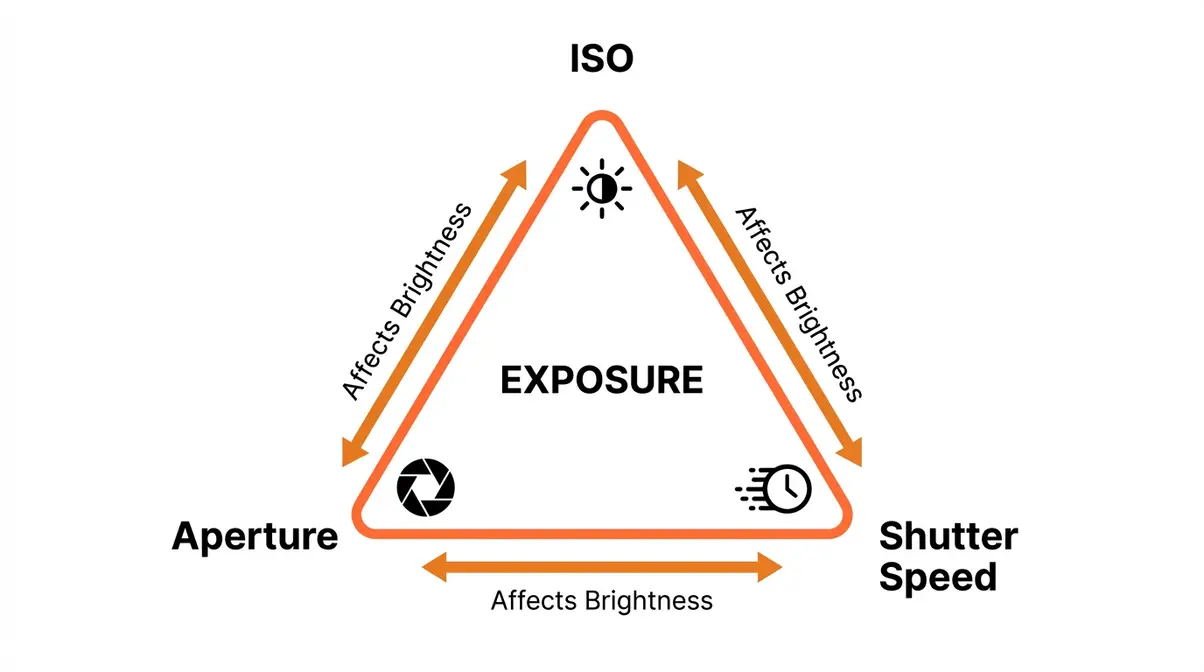
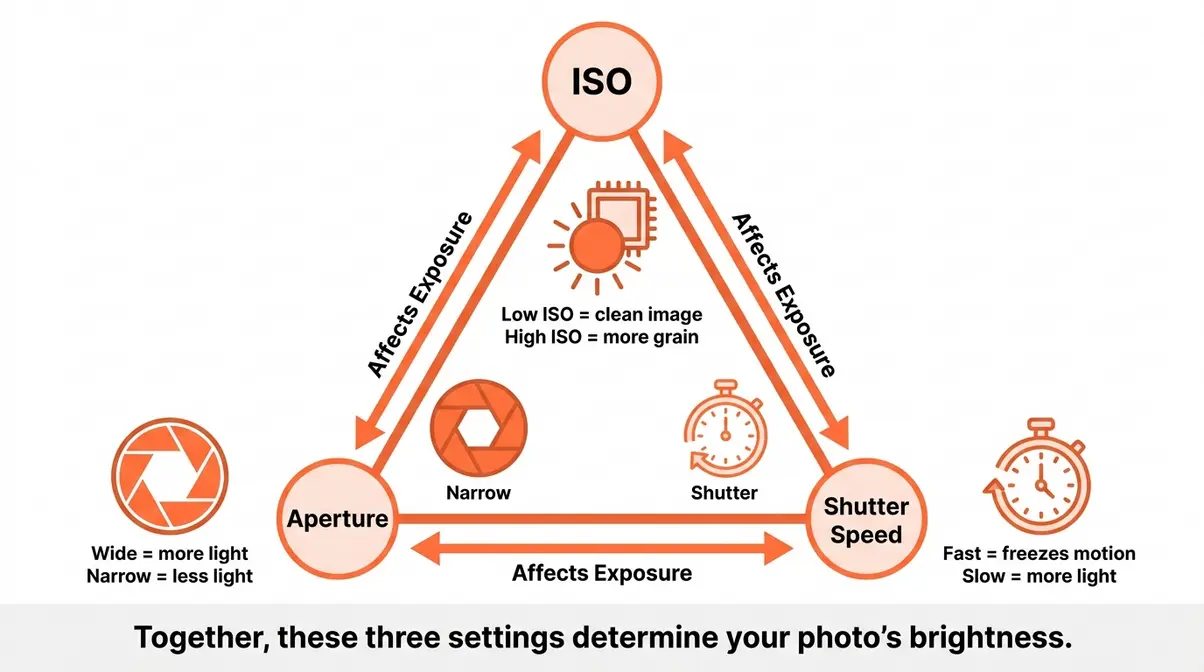
Three settings control exposure together — they are called the Exposure Triangle:
- ISO (your camera’s sensitivity to light): A low ISO like 100 gives clean, natural images in bright light. A high ISO like 3200 brightens dark scenes but adds grain.
- Aperture (the size of the opening in your lens): A wide aperture lets in more light; a narrow aperture lets in less.
- Shutter speed (how long your sensor is exposed to light): A fast shutter freezes motion; a slow shutter captures more light but can blur moving subjects.
White balance is a separate setting that controls the color temperature of light in your photo — it is what stops your indoor shots from looking orange or your shade photos from looking blue. When you use white balance bracketing (covered in the next section), your camera shoots the same frame with multiple color temperature interpretations.
Digital camera sensors can typically capture 10–14 stops of dynamic range — far less than the 20+ stops the human eye perceives (Cambridge in Colour). That gap is exactly why The Exposure Safety Net — bracketing — exists. When one frame cannot hold the full range of light in a scene, you take several.
What Is Bracketing in Photography?
Bracketing in photography is one of the most practical skills you can learn — and far simpler than it sounds. This section moves from definition to real-world example so you can see exactly why photographers rely on it.
The Simple Definition
Bracketing is the practice of taking multiple shots of the same scene at different settings — most commonly different exposure levels — so you always have at least one correctly exposed image, even in difficult lighting conditions.
Think of it like ordering a backup at a restaurant. You choose your main meal, but you also have a backup option ready in case it does not arrive as expected. With bracketing, your “main” shot is the one your camera meters as correct (called the 0 EV or neutral exposure). Your backup shots are intentionally brighter (+1 stop overexposed) and darker (-1 stop underexposed) versions of the same frame.
The term EV stands for Exposure Value — a single step of brightness. Adding +1 EV doubles the amount of light in your photo. Subtracting -1 EV halves it.
Why Photographers Use the Exposure Safety Net
Here is the core problem bracketing solves: your camera’s sensor has a fixed dynamic range. When a scene — a sunset, a bright window in a dark room, a forest with patches of direct sunlight — has more contrast than your sensor can handle, some part of your image will lose detail. Either the bright areas blow out to pure white, or the dark areas crush to pure black.
The Exposure Safety Net is the principle that you never rely on a single frame when the lighting is unpredictable or high-contrast. Instead, you systematically capture a range of exposures — one that protects your highlights, one that is balanced, and one that lifts your shadows — giving you the raw material to build a complete image in post-processing.
Photographers consistently report that bracketing eliminates the anxiety of shooting in mixed or rapidly changing light — particularly at golden hour, when the sky and foreground can differ by 5–6 stops of light (Digital Photography School). Rather than guessing, you bracket and choose later.
A Real-World Example: Photographing a Sunset
Imagine you are photographing a coastal sunset. The sky glows at roughly +3 stops brighter than the rocks below. Your camera meters for one or the other — not both.
Here is how bracketing works in practice:
- You set your camera to AEB (Auto Exposure Bracketing) with a 1-stop interval over three frames.
- You press the shutter once (or use a two-second timer to avoid camera shake).
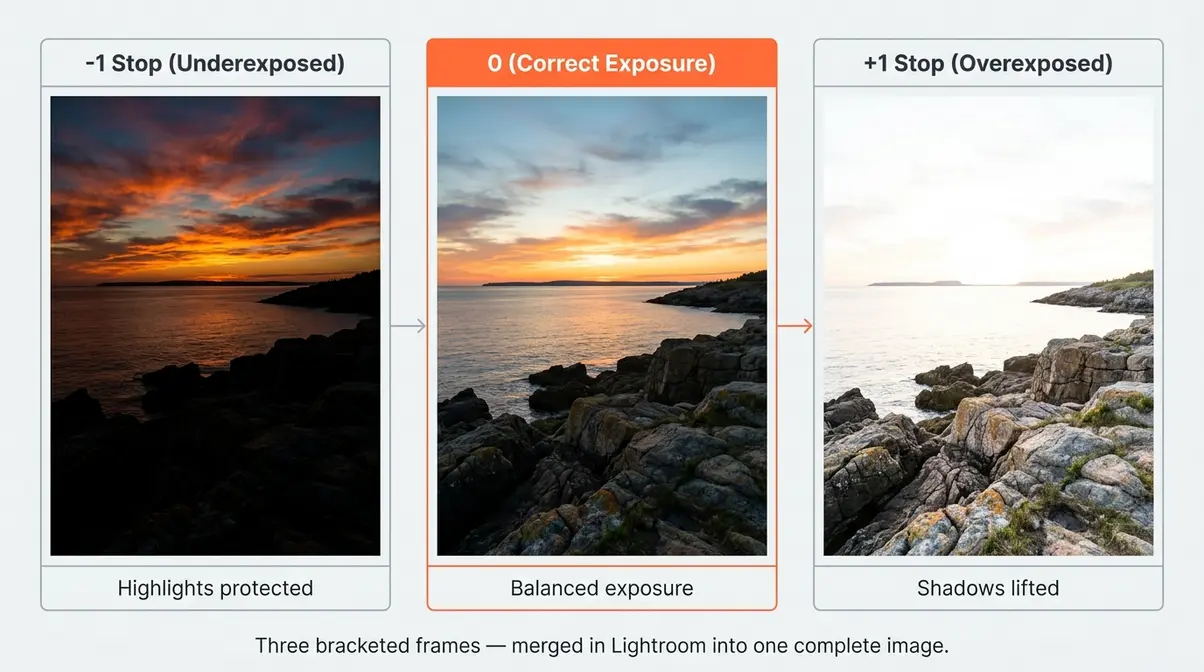
- Your camera fires three shots automatically: one at -1 stop (underexposed — sky looks great, rocks are dark), one at 0 (balanced — some areas are slightly off), and one at +1 stop (overexposed — rocks look great, sky is blown).
- In Lightroom or Photoshop, you merge all three. The software picks the best-exposed pixels from each frame and combines them into one balanced image.
The result is a photo that shows exactly what your eyes saw — rich sky color AND foreground detail — in a single, natural-looking image.
The Three Types of Bracketing You Should Know
Most photography guides stop at exposure bracketing. There are actually three distinct types, each solving a different creative problem. Understanding all three makes you a more versatile and prepared photographer.
Exposure Bracketing: The Most Common Type
Exposure bracketing — sometimes called AEB or HDR bracketing — is the technique most people mean when they say “bracketing photography.” You take the same shot multiple times at different brightness levels, then either choose the best single frame or merge them into an HDR (High Dynamic Range) image.
HDR stands for High Dynamic Range — a processing technique that combines multiple exposures to create an image with detail in both the brightest and darkest areas of a scene.
Exposure bracketing is the right tool whenever the contrast in your scene exceeds your sensor’s dynamic range. According to Adobe’s photography guide, this is most common in:
- Landscape and seascape photography — bright skies over dark terrain
- Interior architecture — bright windows inside dark rooms
- Golden hour portraits — bright sky behind a shadowed subject
- Real estate photography — where every room needs balanced light
A standard three-shot bracket at 0, -1, and +1 stops covers most high-contrast scenes. For extreme lighting situations — think a dark cave with a bright entrance — a five-shot bracket at -2, -1, 0, +1, +2 stops gives you more data to work with.
Focus Bracketing: Sharp from Front to Back
Focus bracketing solves a completely different problem: depth of field. Even at a narrow aperture, a macro photo of a flower or a detailed product shot may have only part of the subject in sharp focus. Focus bracketing takes a series of shots where the focal point shifts slightly between each frame — from the nearest point to the farthest — then merges them into a single image that is sharp from front to back.
This technique is particularly popular in:
- Macro photography (extreme close-ups of insects, flowers, jewelry)
- Product photography (where every surface must appear sharp)
- Landscape photography (near-foreground rocks sharp alongside a distant mountain)
Many modern cameras — including Canon’s EOS R series, Nikon’s Z series, and Sony’s Alpha series — include an in-camera focus bracketing mode. The camera automatically adjusts the focus point between shots, and some models (like the Nikon Z9) can even stack the frames in-camera without software.
White Balance Bracketing: Getting Color Right
White balance bracketing is the least-known of the three types — and the one most beginners overlook. Your camera captures the same frame three times with different color temperature settings: one cooler (bluish), one neutral, and one warmer (orange-tinted). This is especially useful when you are shooting in JPEG format and cannot easily adjust color in post-processing.
White balance is measured in Kelvin (K). Daylight sits around 5,500K. Shade is cooler, around 7,000K. Tungsten indoor light is warmer, around 3,200K.
White balance bracketing is most useful when:
- You are shooting events in mixed lighting (flash + ambient room light)
- You are working in JPEG mode without the flexibility of RAW editing
- The light is changing rapidly and you cannot pause to adjust settings
One important note: If you shoot in RAW format, white balance can be changed non-destructively in any editing software after the fact — making white balance bracketing less critical. For JPEG shooters, it is a genuine safety net for color accuracy.
How to Use Auto Exposure Bracketing (AEB): Step-by-Step
This is the section most photography guides skip entirely — the exact button presses and menu paths for your specific camera. Our team evaluated AEB settings across Canon, Nikon, and Sony camera systems to verify these steps are accurate for current models. Follow the instructions for your brand below.
“Talk to me about bracketing. Why do you do it? Can you recommend some videos you like that explain how to do it step by step?”
— A common question from photographers who have heard the term but never used it
Before you begin, you need three things: your camera set to RAW format (recommended — gives you the most flexibility in post), a tripod (critical — each frame must be identical except for exposure), and your camera’s drive mode set to continuous shooting (so all frames fire in one burst).
Setting Up AEB on Canon Cameras
These steps apply to most Canon EOS DSLR and mirrorless cameras (EOS Rebel series, EOS R series, 5D series). Refer to Canon’s official documentation for model-specific menu names.
- Set your drive mode to Continuous Shooting. Press the drive mode button (usually on the top of the camera) and select the continuous icon (overlapping rectangles).
- Open the Shooting Menu. Press the Menu button and navigate to the red camera icon tab.
- Find “Expo.comp./AEB.” This is listed as “Exposure Compensation/AEB” — select it.
- Turn the main dial to set the bracket spread. Rotating the main dial (top-right dial) expands the three markers on the exposure scale. Set to ±1 stop for a standard bracket, or ±2 stops for high-contrast scenes.
- Press Set to confirm.
- Hold down the shutter. In continuous drive mode, holding the shutter fires all three frames automatically — underexposed, correct, then overexposed.
Setting Up AEB on Nikon Cameras
These steps apply to most Nikon DSLRs (D3000–D850 series) and Nikon Z mirrorless cameras. Refer to Nikon’s official support pages for your specific model.
- Set your drive mode to Continuous Low or Continuous High. Press and hold the BKT button (Bracketing button — labeled “BKT” on most Nikon bodies) and rotate the sub-command dial to select the number of frames (typically 3).
- Set the bracket increment. While still holding BKT, rotate the main command dial to set the exposure step — 1.0 EV for standard scenes, 2.0 EV for extreme contrast.
- Release the BKT button. A BKT indicator appears in your viewfinder and on the top LCD to confirm bracketing is active.
- Set your drive mode to Continuous. Hold the drive mode button and rotate the command dial to CL (Continuous Low) or CH (Continuous High).
- Hold the shutter to fire all three frames in a single burst.
Setting Up AEB on Sony Cameras
These steps apply to Sony Alpha mirrorless cameras (A6000 series, A7 series, A9 series). Refer to Sony’s official support documentation for your specific model.
- Press the Menu button and navigate to Camera Settings 1 (the first camera icon tab).
- Scroll to “Drive Mode” and select it.
- Choose “Cont. Bracket” (Continuous Bracketing) from the drive mode options.
- Select your bracket settings. Choose the number of shots (3, 5, or 9 frames) and the exposure step (0.3 EV, 0.7 EV, 1.0 EV, or 2.0 EV). For beginners, 3 shots at 1.0 EV is the recommended starting point.
- Press the center button to confirm and exit the menu.
- Hold the shutter button. Sony’s continuous bracket fires all selected frames automatically in one press.
3, 5, or 7 Frames: How Many Should You Take?
The number of bracketed frames you need depends entirely on the contrast level of your scene. Here is a simple guide:
| Frames | Spread | Best For |
|---|---|---|
| 3 frames | ±1 stop | Standard sunsets, windows, golden hour — most everyday high-contrast scenes |
| 5 frames | ±2 stops | Extreme contrast: dark interiors with bright windows, midday sun and deep shade |
| 7 frames | ±3 stops | Rare situations: caves with bright entrances, architectural photography with mixed artificial and natural light |
Start with 3 frames at ±1 stop. This covers the vast majority of situations beginners encounter. The files are smaller, merging is faster, and the result is almost always sufficient for scenes with 3–5 stops of contrast difference.
Move to 5 frames when your scene has a contrast ratio your 3-frame bracket cannot fully recover — for example, a bright noon sky over a dark forest floor. Five frames at ±2 stops give Lightroom and Photoshop significantly more pixel data to work with, resulting in smoother tonal transitions in the final HDR.
Seven-frame brackets produce very large file sets and longer processing times. Reserve them for professional architectural or cave photography where every tonal zone must be perfect.
Merging Bracketed Photos into HDR: Lightroom and Photoshop
Capturing bracketed shots is only half the process. The payoff comes when you merge them into a single balanced image. Both Lightroom and Photoshop handle this well — Lightroom is the recommended starting point for beginners because the process takes under 60 seconds and requires no manual masking.
How to Merge in Lightroom (Recommended for Beginners)
Adobe Lightroom’s Photo Merge → HDR feature is the fastest path from bracketed shots to a finished image. According to Adobe’s official photography resources, the merge process automatically aligns frames and removes ghosting caused by slight camera movement.
What you need: Adobe Lightroom Classic or Lightroom (cloud version). Your three (or more) RAW files imported into Lightroom.
- Import your bracketed shots into Lightroom. They will appear as consecutive thumbnails in the Filmstrip.
- Select all bracketed frames. Click the first frame, then Shift+click the last to select all.
- Right-click and choose “Photo Merge → HDR.” A preview dialog box opens.
- Check “Auto Align” — this corrects for any tripod wobble between shots.
- Check “Auto Settings” if you want Lightroom to apply an initial tone adjustment automatically. Uncheck it if you prefer to adjust manually.
- Set Deghost Amount to Low or None for static scenes. Use Medium or High only if there are moving elements (leaves, water, people) between frames.
- Click “Merge.” Lightroom creates a new DNG file (a high-quality RAW format) combining all your frames. Processing typically takes 10–30 seconds.
- Open the merged DNG in the Develop module and adjust exposure, highlights, shadows, and color to taste.
How to Merge in Photoshop
Photoshop’s Merge to HDR Pro tool gives you more manual control over the final look — useful once you are comfortable with the basics. The trade-off is a steeper learning curve compared to Lightroom’s one-click approach.
- Open Photoshop and go to File → Automate → Merge to HDR Pro.
- Click “Browse” and select your bracketed RAW files.
- Check “Attempt to Automatically Align Source Images.”
- Click OK. Photoshop loads and aligns your frames, then opens the Merge to HDR Pro dialog.
- Set the Mode to “32 Bit” for maximum flexibility — this preserves all tonal data for later adjustment.
- Click “Tone in ACR” (Adobe Camera Raw) to adjust your merged image using familiar sliders.
- Save as a TIFF or PSD file to preserve all editing data.
For most beginners, Lightroom is the better starting point. Photoshop’s Merge to HDR Pro is worth learning once you are producing HDR images regularly and want finer control over tone mapping — the process of compressing a wide dynamic range into a displayable image.
Common Beginner Mistakes When Merging HDR
Our team evaluated the most frequently reported issues from photographers learning HDR merging across photography communities. These are the mistakes that produce unnatural-looking results — and how to avoid them.
1. Forgetting to shoot in RAW. JPEG files discard tonal information during capture. Merging JPEGs produces a lower-quality HDR with visible banding and color shifts. Always shoot RAW for bracketing.
2. Skipping the tripod. Even a one-pixel shift between frames creates ghosting artifacts — blurry double-edges in your merged image. If you must handhold, enable Auto Align in Lightroom and set Deghost to High.
3. Over-processing the HDR. The most common aesthetic mistake is pushing tone mapping too far — resulting in the “radioactive HDR” look with glowing edges and surreal colors. A natural-looking HDR should be indistinguishable from a perfectly exposed single shot. Pull back your clarity, texture, and saturation sliders.
4. Merging in a scene with movement. Bracketing works best with static subjects. Waves, blowing leaves, and walking people create ghosting that deghosting algorithms only partially fix. For scenes with movement, use a single RAW file and recover highlights and shadows in Lightroom instead.
When to Use Bracketing (and When to Skip It)
Bracketing is a powerful tool — but not every situation calls for it. Knowing when to bracket (and when it will actually hurt your shot) saves you time, storage space, and post-processing headaches.
The Best Situations for Bracketing
Bracket your shots whenever the contrast in a scene clearly exceeds what your camera can capture in a single frame. Digital Photography School identifies the most reliable indicators:
- Sunsets and sunrises — the sky is almost always several stops brighter than the ground
- Interior architecture — bright windows against dark room interiors create 6–8 stops of contrast
- Cityscapes at dusk — the transition between artificial lights and a darkening sky
- Real estate photography — every room needs balanced exposure for professional results
- High-contrast forests — patches of direct sunlight create extreme bright/dark zones
A quick test: look at your scene and ask whether you can expose correctly for both the brightest and darkest areas at the same time. If the answer is no, bracket.
When NOT to Use Bracketing: Save Time and Storage
Bracketing is not always the right choice. Applying it indiscriminately fills your memory card with redundant files and adds unnecessary time to your post-processing workflow.
Skip bracketing when:
- Your subject is moving. Sports, wildlife, children, and anything in motion will look different in each frame — making merging impossible without severe ghosting.
- The lighting is flat and even. Overcast days, shade, and softbox studio lighting already have low contrast. A single well-exposed RAW file handles these scenes perfectly.
- You are shooting in burst mode. Continuous shooting for action photography and AEB do not mix — your camera fires so fast that exposure adjustments cannot keep pace.
- Storage and time are limited. A three-frame bracket triples your file count. On a long travel day, that adds up to hundreds of extra files and significantly longer culling time.
- Your camera cannot hold steady. Without a tripod, handheld bracketing almost always produces unusable merged results due to alignment errors.
Frame Your Shot First: Composition Basics for Bracketed Photos
One mistake beginners make is treating bracketing as a replacement for good composition. It is not. Bracketing fixes exposure — it cannot fix a boring or poorly framed image.
Before you fire your bracket sequence, apply the basics: use the rule of thirds to position your horizon, look for leading lines that draw the eye into the frame, and check your edges for distracting elements. A well-composed bracketed shot produces a stunning HDR. A poorly composed one produces a technically perfect but forgettable image.
When Bracketing Does Not Work: Limitations and Alternatives
Understanding the boundaries of bracketing makes you a smarter photographer. Our team evaluated the most common failure scenarios reported across photography forums and communities.
Common Pitfalls
Moving subjects ruin merges. This is the single most reported frustration with bracketing. A bird in flight, a person walking through frame, or even a branch blowing in wind will appear in a different position in each of your three frames. The merged result shows ghosting — a translucent double image. The fix: use a single RAW file and use Lightroom’s Highlights and Shadows sliders to recover tonal range manually.
Handholding produces alignment errors. Even Lightroom’s Auto Align cannot compensate for large shifts between frames. If you bracket without a tripod, keep your bracket interval tight (±0.7 EV) and use a fast shutter speed to minimize drift.
Over-relying on HDR. Bracketing is not a substitute for learning to expose correctly in the first place. Photographers who bracket every shot in every condition often miss decisive moments and develop slower reactions to changing light.
When to Choose Alternatives
| Situation | Better Alternative |
|---|---|
| Moving subjects (wildlife, sports) | Single RAW + Lightroom shadow/highlight recovery |
| Fast-changing light (concerts, events) | Auto ISO with exposure compensation |
| Flat lighting (overcast, studio) | Single RAW — no bracketing needed |
| Extreme post-processing control | Manual luminosity masking in Photoshop |
When to Seek Expert Help
If you are shooting for commercial real estate, architecture, or product photography where HDR quality is a deliverable standard, consider working with a photographer who specializes in HDR workflows. Professional architectural photographers often use 7–9 frame brackets with manual luminosity masking — a technique that goes well beyond beginner HDR merging and requires dedicated training.
Frequently Asked Questions About Bracketing Photography
What is an example of bracketing in photography?
A sunset is the clearest example of bracketing photography in action. When the sky is 4–5 stops brighter than the foreground, a single exposure cannot capture both. You shoot three frames: one underexposed to preserve sky detail, one at the metered exposure, and one overexposed to lift shadow detail in the ground. You then merge all three in Lightroom into a single image that shows both sky and foreground clearly — just as your eyes saw the scene.
What are 5 bracketed photos?
Five bracketed photos are a set of five shots taken at -2, -1, 0, +1, and +2 stops of the same scene. The -2 stop frame is the darkest (protecting the brightest highlights), the 0 frame is the camera’s metered exposure, and the +2 frame is the brightest (lifting the darkest shadows). Five-frame brackets are used in extreme contrast situations — like a bright sky over a dark forest — where a three-frame bracket cannot capture the full tonal range. They merge into a single HDR image with more gradual, natural-looking tonal transitions.
What is the 20-60-20 rule in photography?
The 20-60-20 rule is a compositional guideline suggesting that 20% of your frame should be the sky, 60% the main subject or midground, and 20% the foreground — though it is most commonly applied as a rough balance guide rather than a rigid formula. It is not directly related to bracketing but is useful when composing shots you plan to bracket, since a well-balanced composition maximizes the visual payoff of a merged HDR image. Some instructors use a looser version: avoid placing your horizon at the center (50/50 split) to create a more dynamic image.
What are the 4 C’s of photography?
The 4 C’s of photography are Composition, Color, Contrast, and Clarity — a framework some photography educators use to evaluate image quality. Composition refers to how elements are arranged in the frame. Color covers accurate and intentional use of hue and saturation. Contrast describes the difference between light and dark areas — which is directly where bracketing helps. Clarity refers to sharpness and detail. Bracketing specifically addresses the Contrast element, allowing you to capture a full tonal range that a single exposure cannot hold.
What colors do not photograph well?
Highly saturated reds, neon greens, and bright yellows are the most difficult colors to photograph accurately. Cameras struggle to capture fine detail in fully saturated colors — particularly red, which tends to clip (lose detail) at high saturation levels before the overall exposure is overexposed. White balance bracketing can help when color accuracy is critical in mixed lighting. Shooting in RAW format gives you the most flexibility to correct color shifts in post-processing. Avoid over-saturating colors in-camera — recover them in editing instead.
Do I need a tripod to use bracketing?
A tripod is strongly recommended for exposure bracketing — but not always strictly required. Without a tripod, slight camera movement between frames creates alignment errors in your merged HDR image, producing blurry or ghosted edges. Lightroom’s Auto Align feature corrects minor drift, but larger movements will degrade the result noticeably. For handheld bracketing, use a narrow bracket spread (±0.7 EV), a fast shutter speed, and enable Auto Align. For the best results — especially in low light — use a tripod and a two-second self-timer or remote shutter release.
Putting the Exposure Safety Net to Work
For photographers shooting in high-contrast light, bracketing photography is not an advanced technique reserved for professionals — it is a systematic approach to never losing a shot to blown highlights or crushed shadows. Digital camera sensors capture 10–14 stops of dynamic range compared to the 20+ stops the human eye perceives (Cambridge in Colour). That gap exists in every high-contrast scene you encounter. Bracketing bridges it.
The Exposure Safety Net works because it removes the guesswork from difficult lighting. Instead of gambling on a single exposure when the sky and foreground differ by 5 stops, you capture the full range and let your editing software assemble the best result. Photographers who adopt this habit consistently report fewer unusable shots and less time spent trying to rescue a single poorly-exposed frame in post-processing.
Your next step: pick one high-contrast scene — a window in a dark room, a sunset, a shaded doorway in bright sun — and run through the AEB setup for your camera brand using the steps in this guide. Shoot a three-frame bracket at ±1 stop, import the files into Lightroom, and try your first HDR merge. The entire process takes under ten minutes, and the result will show you immediately why experienced photographers treat bracketing as a standard part of their workflow.
