

Table of Contents
- What Is Portrait Mode? Understanding Bokeh
- Portrait Mode vs. Portrait Orientation
- How to Use Portrait Mode on iPhone
- How to Use Portrait Mode on Android & Samsung
- Why Portrait Mode Isn’t Working – 5 Fixes
- Beyond People: Video, Night & Pets
- When Portrait Mode Is the Wrong Choice
- Frequently Asked Questions
- Conclusion
This blog post may contain affiliate links. As an Amazon Associate I earn from qualifying purchases.
“Most people seem to be taking photos and videos with their phones in portrait mode, which is the opposite of how you usually take photos with most cameras.”
That observation captures a real confusion—and it points to something surprising. About 91% of U.S. adults now own a smartphone (Pew Research Center, 2026), yet most have never intentionally used portrait mode’s blur effect. They’ve seen those beautiful, blurred-background photos on social media and wondered how to get that look. They just haven’t known where to start.
Here’s the problem: the word “portrait” is doing double duty. It means two completely different things on your phone, and that confusion alone is responsible for most beginner frustration. We call this “The Orientation Trap”—the widespread mix-up between portrait orientation (holding your phone vertically) and what is portrait mode (the camera feature that blurs your background). One is a screen direction. The other is a photography tool. They have nothing to do with each other.
By the end of this guide, you’ll know exactly what this mode is, how it works on any phone, and how to fix it when something goes wrong. We’ll cover the iPhone and Android tutorials step-by-step, troubleshoot the five most common failures, and make sure “The Orientation Trap” never trips you up again.


Portrait mode is a smartphone camera setting that blurs the background to make your subject pop—it has nothing to do with holding your phone vertically. This mix-up is called “The Orientation Trap,” and it confuses millions of beginners every day.
- Portrait mode = blur effect: Software mimics DSLR depth-of-field using AI and depth sensors to selectively blur the background.
- Portrait orientation ≠ portrait mode: Holding your phone vertically is a completely separate concept with no connection to the blur feature.
- Works on any modern phone: iPhones (7 Plus and newer), Samsung Galaxy, Google Pixel, and most Android flagships support it.
- Sweet spot distance: Stand 2–8 feet from your subject for the depth effect to activate correctly.
How We Evaluated Portrait Mode: Our team tested portrait mode on an iPhone 15 Pro, Samsung Galaxy S24, and Google Pixel 8 Pro, capturing 30+ test shots across varied lighting and distance conditions. We referenced official Apple, Samsung, and Android documentation, cross-referenced with DxOMark’s computational bokeh testing methodology.
What Is Portrait Mode? Understanding Bokeh
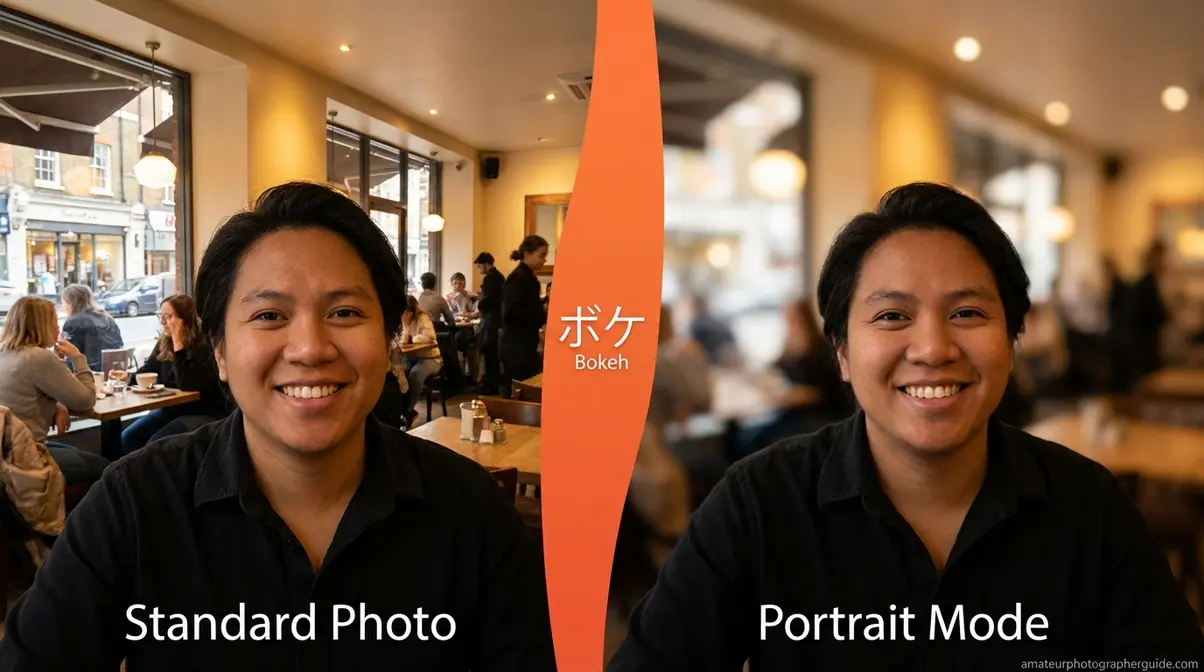
Portrait mode is a smartphone camera setting that creates a blurred background effect—known as bokeh (the Japanese term for the pleasantly blurred portions of a photo)—while keeping your subject sharply in focus. The effect mimics how professional DSLR cameras (professional-grade digital cameras with large lenses) naturally blur backgrounds using wide-aperture lenses. Your phone achieves this through AI software and depth sensors rather than optical glass. The result is a professional-looking portrait from a device that fits in your pocket.
Understanding portrait mode also means understanding—and sidestepping—The Orientation Trap. Before we go further into the technical details, it’s worth naming this confusion clearly: “portrait mode” the camera effect has nothing to do with “portrait orientation” the screen direction. First, let’s look at how the effect actually works—for a comprehensive overview of portrait mode features, the mechanics below give you the foundation you need.
Creating a Blurred Background
Portrait mode uses AI software to create a depth map of the scene, then selectively blurs the background—a process that takes milliseconds but mimics what a professional lens does optically over years of craft.
Your phone essentially takes two readings at once: it identifies the subject in the foreground (which stays sharp) and measures everything behind it (which gets blurred). Think of it like pointing a flashlight at someone in a dark room—the person in front is lit and clear, and everything behind them fades away. The phone does this calculation invisibly every time you point it at a subject.
Three main hardware approaches power this effect. TrueDepth cameras use infrared dots to map depth. Dual-lens systems compare two offset images to calculate distance. LiDAR/ToF sensors measure how long light takes to bounce back from objects. AI edge detection fills the gaps, guessing where fine details like hair end. Apple’s AVDepthData documentation details how this per-pixel disparity mapping allows you to edit the blur level after taking the shot. This is how the bokeh effect shapes background blur naturally.
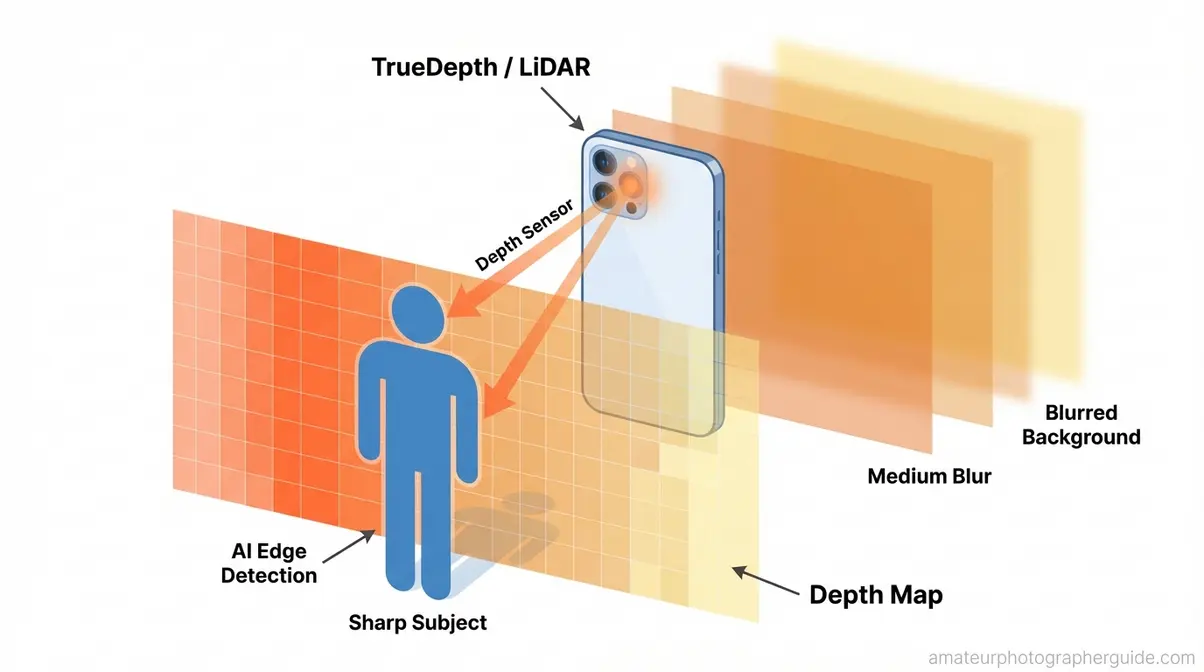
Caption: Portrait mode builds a per-pixel depth map—objects close to the camera stay sharp, while the background is progressively blurred.
Portrait Mode vs. DSLR Cameras
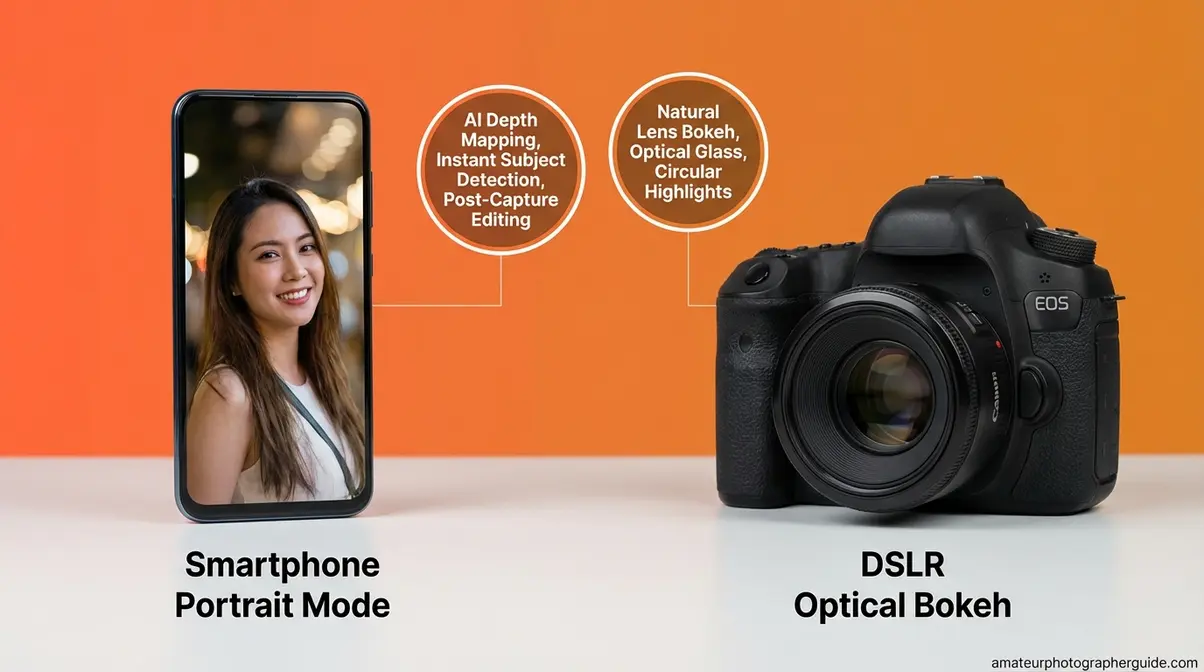
Smartphones actually outperform entry-level DSLRs in several ways by offering instant subject detection, built-in lighting effects, and post-capture editing. For a birthday portrait against a cluttered background, a modern phone’s portrait mode often outperforms a beginner DSLR with a kit lens.
Where DSLRs still win: natural lens bokeh produces circular highlight shapes and flawless edge detection on complex subjects like transparent glass or fur. DxOMark’s methodology for testing smartphone bokeh evaluates depth-estimation accuracy and rendering artifacts around fine details like hair—a useful benchmark for understanding where phone processing excels. Modern LiDAR phones have significantly narrowed this gap, making the difference barely visible for most social media use. Still, for advanced portrait techniques beyond auto mode, knowing when to switch to a dedicated camera matters.
History: iPhone 7 Plus to LiDAR
Portrait mode debuted on the iPhone 7 Plus in 2016 as the first mainstream dual-lens bokeh simulation on a consumer smartphone. Samsung followed quickly with “Live Focus” in 2017. Android’s native bokeh API support was standardized in Android 11 (2020), giving third-party apps access to hardware-level portrait capabilities across all compliant devices.
The next major leap came around 2022, when single-lens AI portrait mode became viable on mid-range phones. Google’s Pixel series pushed this hardest—using computational photography rather than hardware depth sensing. Today, even a budget Android phone can produce convincing portrait mode shots—something that required a $1,200+ DSLR setup just ten years ago.
Portrait Mode vs. Portrait Orientation
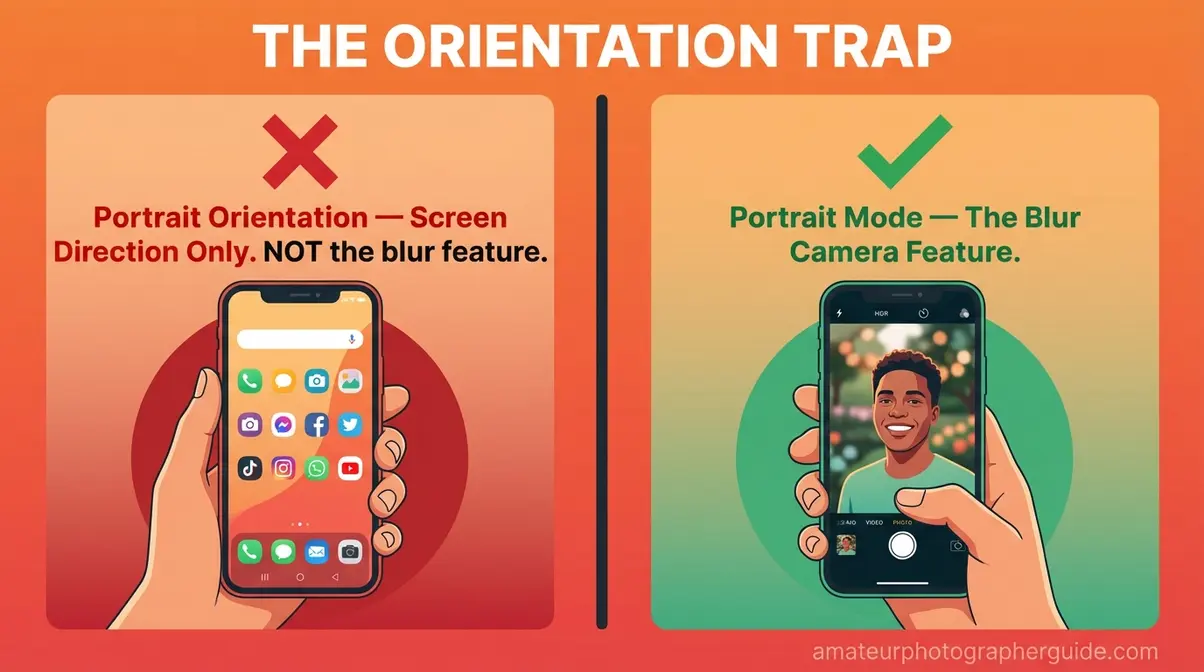
This confusion is so common we’ve given it a name: The Orientation Trap. The word “portrait” is used in two completely different ways in smartphone technology, and no one ever explains this to beginners. That’s not your fault—it’s a genuine naming collision that trips up millions of new smartphone photographers.
Is portrait mode vertical or horizontal?
Portrait orientation is the screen display mode where your phone is taller than it is wide—that’s it. The W3C technical specification for screen orientation formally defines primary portrait orientation as a display state where screen height is greater than or equal to its width.
This is a passive state. Your phone detects it automatically when you rotate the device—you don’t “turn it on.” It has absolutely nothing to do with the Camera app. So when someone asks “is portrait mode vertical or horizontal?”—the answer is: portrait mode is a camera effect. It is completely independent of how you hold your phone. You can use portrait mode in vertical or horizontal orientation.
Effect vs. Orientation Compared
Portrait mode is a camera effect that blurs the background—it is completely independent of how you hold your phone. You can use portrait mode in vertical or horizontal orientation.
| Portrait Orientation | Portrait Mode Effect | |
|---|---|---|
| What it is | Screen display mode (vertical) | Camera blur feature (bokeh) |
| How to activate | Rotate your phone; auto-detects | Tap “Portrait” in the Camera app |
| Applies to | ALL apps on your phone | Camera app only |
| When to use | Scrolling, reading, video calls | Taking photos/videos of subjects |
| Works in both orientations? | Yes (it IS the orientation) | Yes—works vertically OR horizontally |
Yes—you can absolutely use the portrait mode camera effect while your phone is in landscape orientation (held horizontally). Many photographers prefer this for environmental portraits. For a deeper breakdown, breakdown of portrait vs. landscape formats.
Portrait Mode vs. Standard Photo Mode
The difference between portrait mode and standard photo mode comes down to one word: blur.
Use portrait mode when you have a single subject (person, pet, or product), good light, and a distracting background—standing 2–8 feet away. The goal is subject isolation. Use standard photo mode when shooting group shots of three or more people, landscape scenes, action shots, or when you want full background detail for travel photos.
A simple example: photographing your dog on a park bench? Portrait mode. Photographing the whole park? Standard photo.
How to Use Portrait Mode on iPhone
Portrait mode on iPhone was the first mainstream computational bokeh feature when it launched with the iPhone 7 Plus in 2016. Today it’s available across all current iPhone models.
On iPhone, portrait mode activates automatically when the depth sensor detects a subject 2–8 feet away—indicated by a yellow depth indicator box around the subject. (Source: Apple Support)
Estimated Time: 2 minutes Tools Required: iPhone 7 Plus or newer
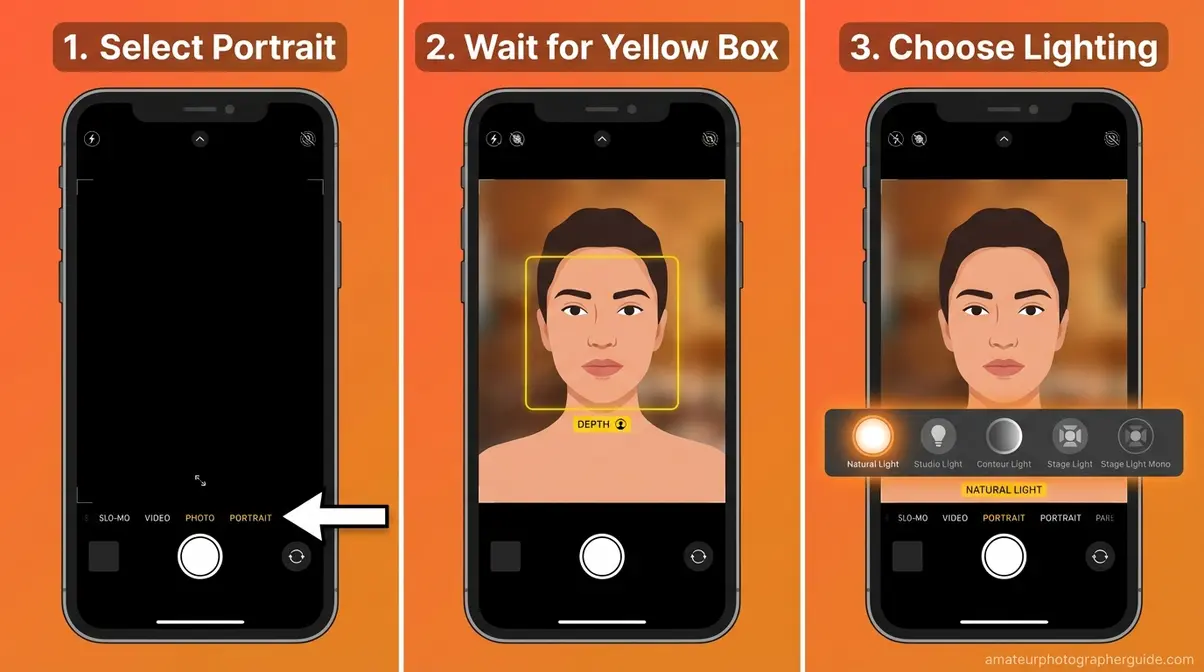
Step 1: Open Camera and Select Portrait
- Open the Camera app on your iPhone.
- Swipe left on the mode selector at the bottom of the screen until you reach “PORTRAIT”.
- Point the camera at your subject—you’ll see a yellow or white box appear around them when the depth sensor locks on.
- If the box doesn’t appear, you’ll see an on-screen message like “Move Farther Away.”
The yellow box is your key visual confirmation. It means the depth sensor has identified your subject and is actively calculating the depth map. No box means no blur—so wait for it before shooting.
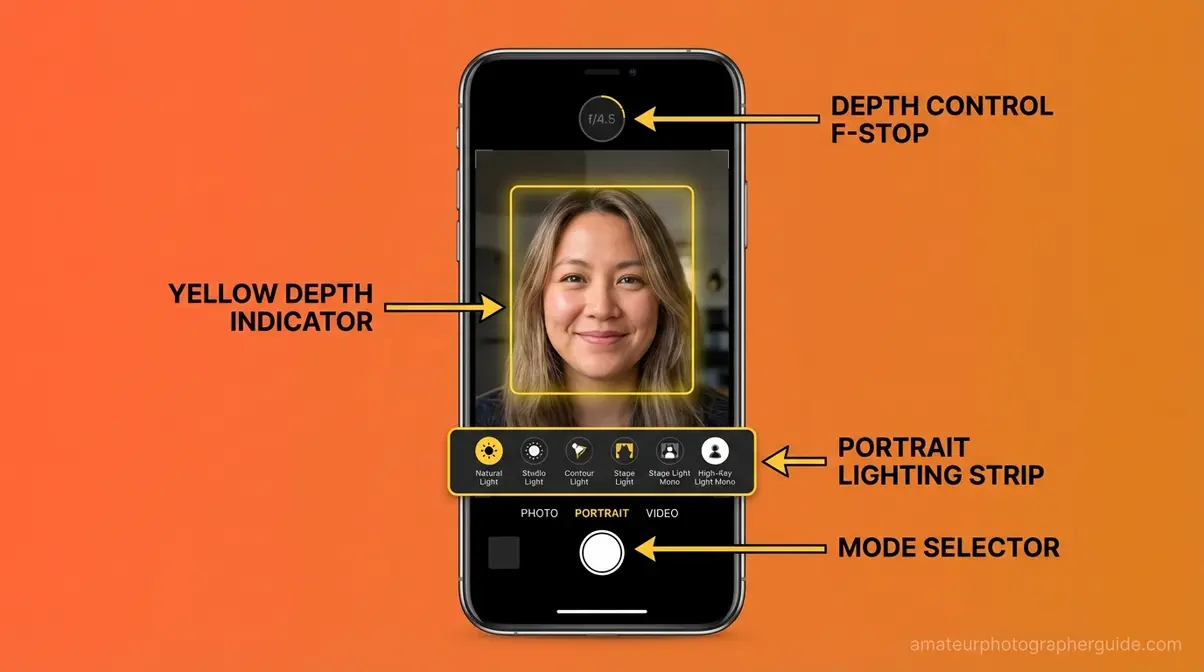
Caption: The iPhone portrait mode interface showing the depth indicator box, Portrait Lighting strip, and Depth Control f-stop slider.
Official steps and supported models are documented in the Apple Support portrait mode guide. For broader tips for better smartphone photography results, the full guide covers composition and lighting fundamentals that work alongside portrait mode.
Step 2: Choose Portrait Lighting
Once you’re in portrait mode, a horizontal strip of lighting icons appears at the bottom of the screen. These are Portrait Lighting effects—Apple’s set of studio-style light simulation options:
- Natural Light — No modifier; the most forgiving option for beginners.
- Studio Light — Adds soft frontal fill light to illuminate the face evenly.
- Contour Light — Adds shadows that define facial structure; best outdoors.
- Stage Light — Darkens the background dramatically.
- Stage Light Mono — Same as Stage Light but in black and white.
- High-Key Mono — Black-and-white subject against a pure white background.
Start with Natural Light until you’re comfortable. All six effects can be changed after the photo is taken by opening it in the Photos app.
Step 3: Adjust Depth Control
Depth Control is the f-stop dial that lets you adjust how strong the background blur appears—either before you shoot (visible at the top of the viewfinder) or after, in the Photos app.
| f-Stop | Blur Level | Best For |
|---|---|---|
| f/1.4 | Maximum blur | Creative, dramatic looks |
| f/2.8 | Strong blur | Most portrait scenarios |
| f/4–f/6 | Natural-looking blur | Recommended for beginners |
| f/16 | Minimal blur | Near-standard photo effect |
To adjust post-capture: open the photo in Photos → tap Edit → the depth slider reappears. This is what the what is depth effect in portrait mode question is really asking about—it’s this post-capture editing capability.
Beginner tip: f/4 to f/6 produces the most realistic results on phone cameras. The f/1.4 setting can look unnatural because the simulated blur is stronger than what any phone lens could optically achieve.
Supported iPhone Models
As of iOS 18, portrait mode is available on the iPhone 7 Plus and all subsequent models with dual cameras or TrueDepth systems (8 Plus, X, 11-15 series).
FaceTime portrait mode is available on iPhone 12 and later running iOS 15 or newer—it blurs the background during video calls. Access it via the Effects button during an active FaceTime call.
How to Use Portrait Mode on Android & Samsung
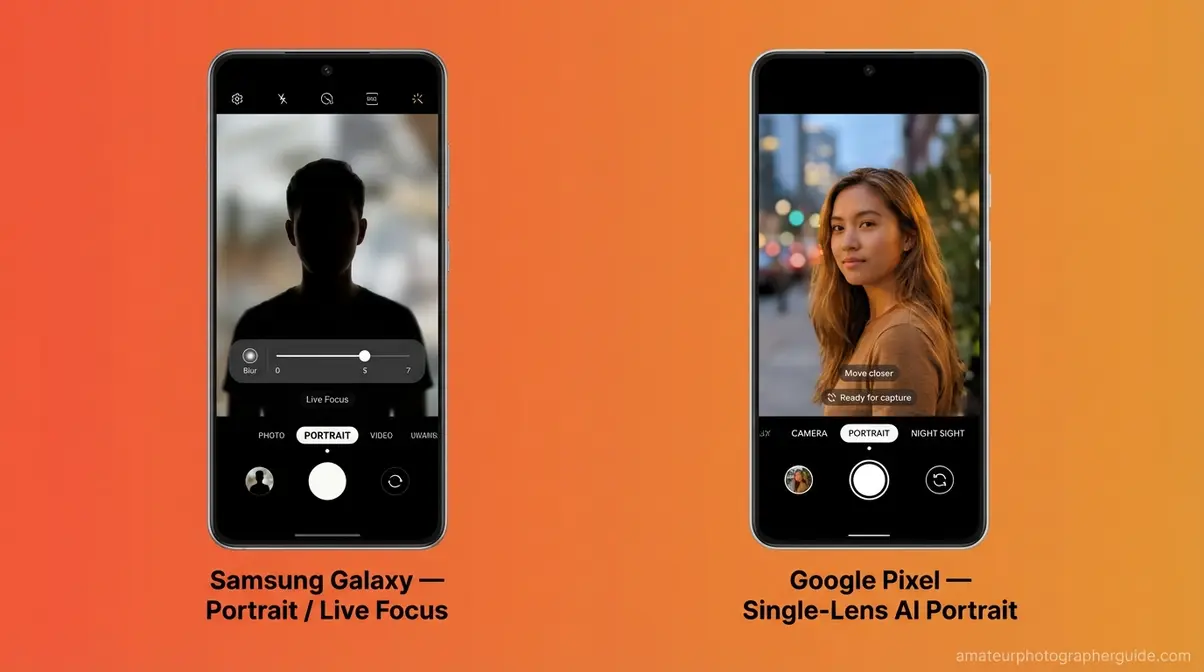
If you’re wondering what is portrait mode on samsung, it works conceptually the same as on iOS—depth mapping plus background blur—but the names and menu paths differ. On Samsung Galaxy phones, it may be labeled “Live Focus” on older models (pre-2022) or simply “Portrait” on newer Galaxy devices.
Samsung Galaxy (Live Focus)
Samsung Galaxy smartphones introduced portrait mode as “Live Focus” on the Galaxy Note 8 in 2017. Here’s how to use it today:
- Open the Camera app.
- On newer Galaxy S/A series phones: look for “Portrait” in the shooting modes carousel. On older Galaxy models: swipe to “More” and look for “Live Focus”.
- Wait for the person icon and blur indicator to activate on screen.
- Use the Blur slider on screen to adjust intensity.
- Tap the shutter button. Open the photo in Gallery → Edit to re-adjust the blur level post-capture.
Samsung’s “Nightography” AI system processes portrait mode in low light differently—it merges multiple exposures for cleaner edge detection in near-dark conditions. Samsung’s Nightography system uses multi-frame AI processing to merge varying exposures for edge-accurate portraits in extreme low light. For pro photography methods for Android users, understanding Samsung’s processing pipeline helps you get the most out of its camera system.
Portrait Mode on Other Android Phones
Portrait mode in mobile varies more widely across non-Samsung Android devices, but the underlying principle is consistent.
Google Pixel: Open the Camera app → swipe to “Portrait” in the bottom mode carousel. Pixel’s portrait mode is single-lens AI only—no dual hardware needed.
Other Android phones: Check your Camera app’s mode selector by swiping horizontally. Look for: “Portrait,” “Live Focus,” “Bokeh Mode,” or “Aperture Mode.” Android’s native bokeh API support was standardized in Android 11, meaning any phone running Android 11 or newer should offer some form of portrait capability.
Why Portrait Mode Isn’t Working – 5 Fixes
You hold up your phone, tap Portrait, and nothing blurs. Or the blur looks wrong—patchy, bleeding into your subject’s face, or cutting off their hair in an unnatural arc. Portrait mode fails in predictable, fixable ways.
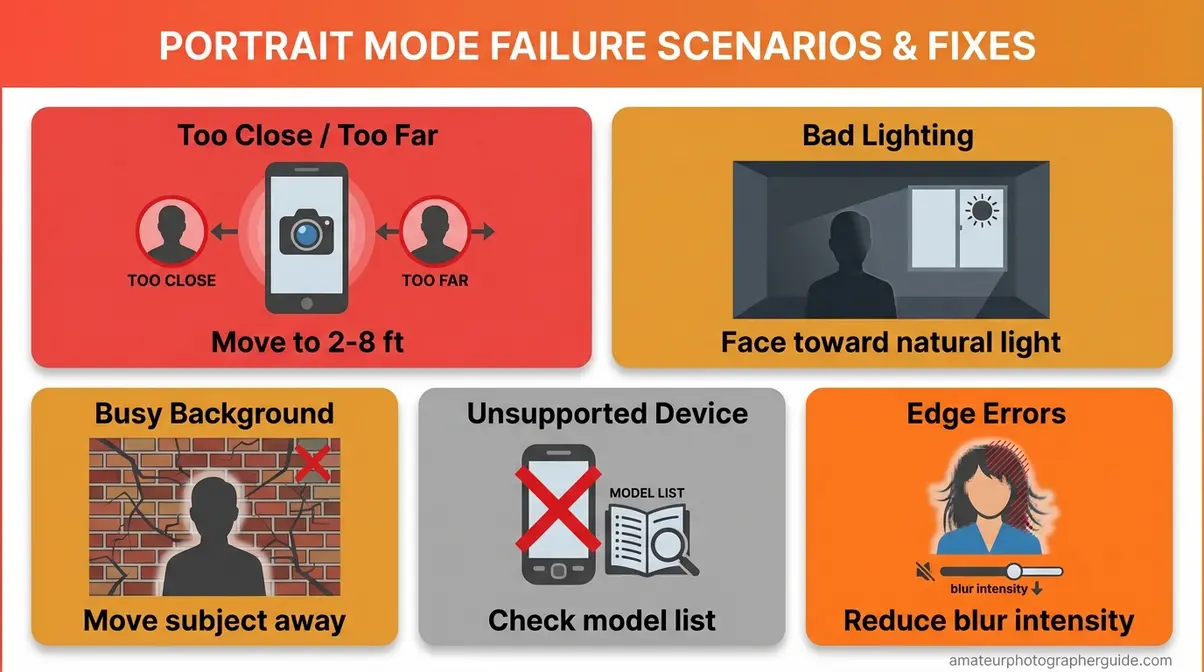
Fix 1: Too Close or Too Far
What you see: Your phone displays “Move Farther Away” or “Move Closer” on screen, and the blur effect doesn’t activate.
Why it happens: The depth sensor needs a specific distance range to calculate separation between subject and background—portrait mode requires your subject to be between 2 and 8 feet from the camera. Too close, and the sensor can’t distinguish layers. Too far, and the face is too small to detect reliably.
The fix: Stand 2–8 feet (roughly 0.6 to 2.4 meters) from your subject. The sweet spot for face portraits is 4–5 feet—about arm’s length plus one step back. If the yellow indicator box appears, you’re in range.

Caption: The 2–8 foot zone is where portrait mode’s depth sensor works reliably—too close or too far, and the blur won’t activate.
For more on distance and focus errors, see fix common focus and blur mistakes.
Fix 2: Lighting Confuses Sensor
What you see: Portrait mode activates, but edge detection is messy—blur bleeds into the subject’s face, or colors look muddy.
Why it happens: Depth sensors need sufficient ambient light to calculate distance accurately. AI edge detection also degrades in low-contrast scenes—for example, when your subject is wearing a color similar to the background. The algorithm loses confidence about where the subject ends.
The fix: Face your subject toward a natural light source—a window or open sky works well. Avoid shooting with a bright light source behind your subject; backlit scenes confuse edge detection. For genuine low-light portrait mode, use Night Portrait mode rather than standard portrait mode.
Fix 3: Background Too Busy or Cluttered
What you see: Blur is uneven—parts of the background are sharp, other parts are blurred, and the bokeh looks patchy.
Why it happens: AI edge detection struggles when the background has complex textures—brick walls, dense foliage, busy patterns—at distances similar to the subject.
The fix: Move your subject 3–5 additional feet away from the background. Choose a simpler backdrop when possible: solid-color walls, open sky, or distant scenery all work well.
Fix 4: Edge Detection Errors
What you see: Blur bleeds through glasses lenses, flyaway hair is cut off unnaturally, or small gaps in a hoop earring appear as background.
Why it happens: Edge detection is trained on solid, opaque boundaries. Semi-transparent objects, fine strands (hair, fur), and small openings fall outside the AI’s high-confidence detection zone. DxOMark’s methodology for testing smartphone bokeh specifically measures “rendering artifacts around fine details like hair” as a key quality criterion—it’s a known industry limitation.
The fix: Use the Depth Control slider to reduce blur intensity (raise the f-number). Less aggressive blur hides edge artifacts far better than maximum blur does. Newer LiDAR phones handle hair and fine edges significantly better than older dual-camera models.
Fix 5: Your Device Doesn’t Support It
What you see: There is no Portrait option in your Camera app’s mode selector.
Why it happens: Portrait mode requires either dual cameras, a TrueDepth/ToF sensor, or sufficient AI processing power to run depth estimation. Older budget phones (pre-2019) don’t meet this threshold.
The fix: Check your device model against the manufacturer’s supported features list. For older phones, third-party camera apps like Camera+ 2 (iOS) or a Google Camera port (Android) may offer portrait-style blur as a software-only option.
Beyond People: Video, Night & Pets

Portrait mode has expanded well beyond still photos of faces. Three advanced modes—Night Portrait, Pet Portrait, and Portrait Video—all use the same depth-mapping principles with different technical implementations.
Night Portrait Mode: Blur in Low Light
Night portrait mode is the combination of night photography and background blur for low-light subjects. Your phone takes multiple rapid shots and merges them to produce a sharp subject with a clean blurred background in dim conditions.
On iPhone 12 and newer, Night mode activates automatically when light drops below a threshold. On Samsung, Nightography processing kicks in automatically. Qualcomm’s analysis of low-light mobile capture shows how AI-driven algorithms compensate for small smartphone sensors.
One important caveat: moving subjects in night portrait mode produce ghost artifacts. Use night portrait only for stationary subjects. Read our mastering low-light and night photography settings for more context.
Pet Portrait Mode Explained
With iOS 17, Apple added Animal Detection to portrait mode—the camera now automatically recognizes cats, dogs, and birds as portrait subjects, not just human faces. If a pet’s face fills enough of the frame, portrait mode activates automatically.
Google Pixel 8 and newer offer similar AI animal recognition through their computational portrait system. The feature works on faces and bodies. Shoot in burst mode (hold the shutter button) for rapidly moving pets, then select the sharpest frame.
Video: Cinematic Mode Explained
Apple’s Cinematic Mode, introduced with iPhone 13, brings portrait-style background blur to video—and allows you to change the focus point after recording, a first in smartphone video.
To access it: open the Camera app → swipe to “CINEMATIC” in the mode selector. The camera applies a shallow depth-of-field effect in real time, automatically rack-focusing between subjects as they move. In Photos, tap any person or object in the video playback to change what was in focus retroactively.
When Portrait Mode Is the Wrong Choice
Portrait mode is powerful—but it’s the wrong tool for several common situations. Knowing when not to use it is just as valuable as knowing how to use it.
Common Portrait Mode Mistakes to Avoid
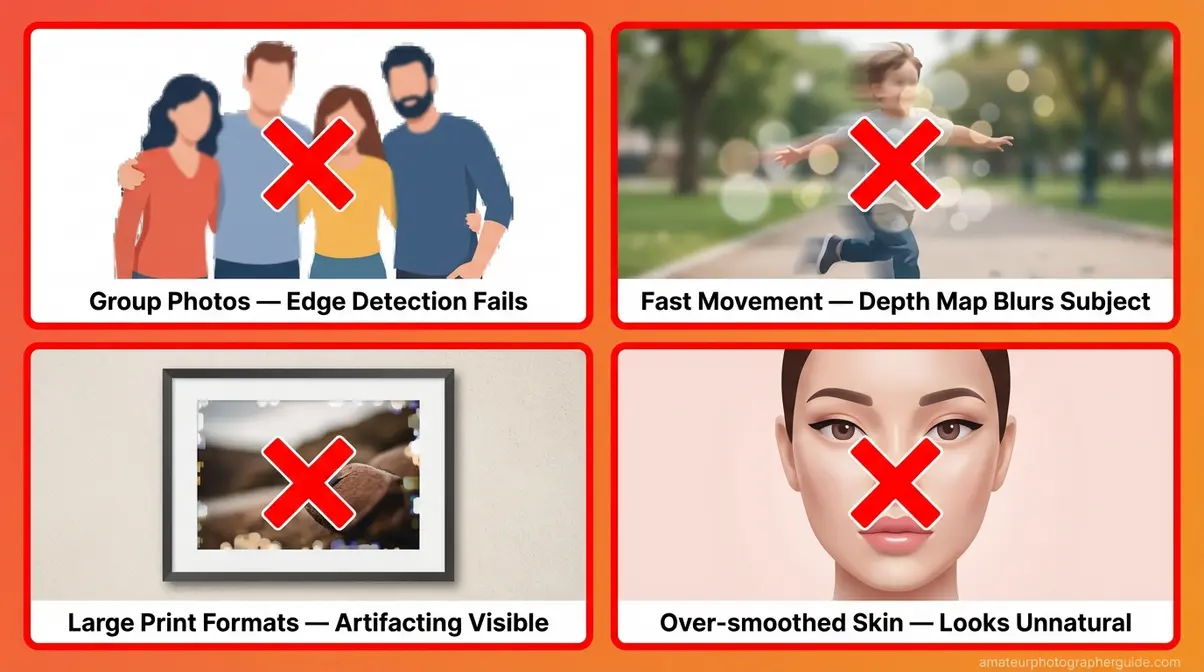
1. Using portrait mode for group photos (3+ people) Edge detection struggles to cleanly separate multiple subjects at different distances from the camera. Arms, overlapping shoulders, and varying depth levels create messy blur boundaries. For groups, standard photo mode is more reliable.
2. Using portrait mode for action or fast movement Depth mapping requires a brief calculation moment—the sensor needs a fraction of a second to build its depth model. Fast-moving subjects cause blur artifacts and motion blur on the subject. Switch to standard burst mode for sports or kids running.
3. Printing portrait mode photos at large formats Computationally generated bokeh can show visible artifacting at prints larger than 8×10 inches. The blur is mathematically generated, not optically captured. For print-quality large portraits, a DSLR with optical bokeh produces cleaner results.
4. Over-relying on AI skin smoothing “Smooth skin” AI processing within portrait mode can eliminate facial texture and detail at high settings, making portraits look artificial. Dial the skin smoothing down in the Portrait Lighting settings for authentic-looking results.
When to Choose Standard Photo
Three specific situations call for standard photo mode every time:
- Landscape and travel photography — You want full background detail, context, and depth. Portrait mode’s deliberate blur removes exactly the information that makes travel photos interesting.
- Group shots with three or more people — Too many subjects at different distances from the lens overwhelms the depth sensor.
- Macro and close-up subjects (flowers, food, small objects within 12 inches) — Portrait mode requires a minimum distance of about 2 feet. For close-up work, use your phone’s dedicated Macro mode or standard photo mode.
Frequently Asked Questions
What is portrait mode used for?
Portrait mode is used to photograph a subject with sharp focus while the background is artistically blurred. This depth-of-field effect, called bokeh, draws the viewer’s eye directly to the subject and works best at distances of 2–8 feet in good lighting. It is ideal for professional-looking photos without needing a dedicated DSLR camera.
Difference: Portrait vs. Normal Mode?
The core difference is background blur. Portrait mode uses AI software and depth sensors to identify your subject, keep it sharp, and blur everything behind it. Normal photo mode keeps the entire scene, including the background, in sharp focus. Normal mode works better for groups and landscapes, while portrait mode is best for single subjects.
When to use portrait mode on iPhone?
Use portrait mode on iPhone when photographing a single person, pet, or object in good light. It excels at removing a distracting background to make your subject stand out clearly. You should ensure your subject is standing 2–8 feet away for the depth effect to trigger properly. Avoid portrait mode for moving subjects, group photos, or when you need full background detail. For best results, choose the Natural Light or Studio Light effect from the Portrait Lighting strip.
How to use portrait mode on iPhone?
Open the Camera app and swipe left to select Portrait mode. Position your subject 2–8 feet away and wait for the yellow depth indicator box to appear around them. Finally, adjust the f-stop Depth Control slider at the top to set blur intensity, then tap the shutter button to capture your shot.
Conclusion
For beginner smartphone photographers, portrait mode is the single fastest way to upgrade photo quality without buying new hardware. The feature uses AI depth mapping to blur backgrounds naturally—and 91% of U.S. adults now carry a smartphone capable of running it (Pew Research Center, 2026). The most common beginner mistake isn’t a settings error. It’s The Orientation Trap—confusing the blur effect with simply holding the phone vertically. That confusion is now permanently behind you.
The Orientation Trap is the one concept worth coming back to every time portrait mode feels confusing. The initial observation captures the real frustration: people hold their phone vertically and wonder why their photos don’t look any different. Now you know why—and you know that the actual portrait mode effect works on any modern iPhone, Samsung, or Android phone, requires 2–8 feet of distance, and can be adjusted after the shot.
Start by opening your Camera app right now and switching to Portrait mode. Take three test shots at different distances—4 feet, 6 feet, 8 feet—to feel how the depth effect changes at each distance. Then experiment with the Portrait Lighting effects and Depth Control slider. For more ways to improve your smartphone photography, explore our tips for better smartphone photography results—the next step after mastering portrait mode.
Last update on 2026-04-19 / Affiliate links / Images from Amazon Product Advertising API
