
Table of Contents
This blog post may contain affiliate links. As an Amazon Associate I earn from qualifying purchases.
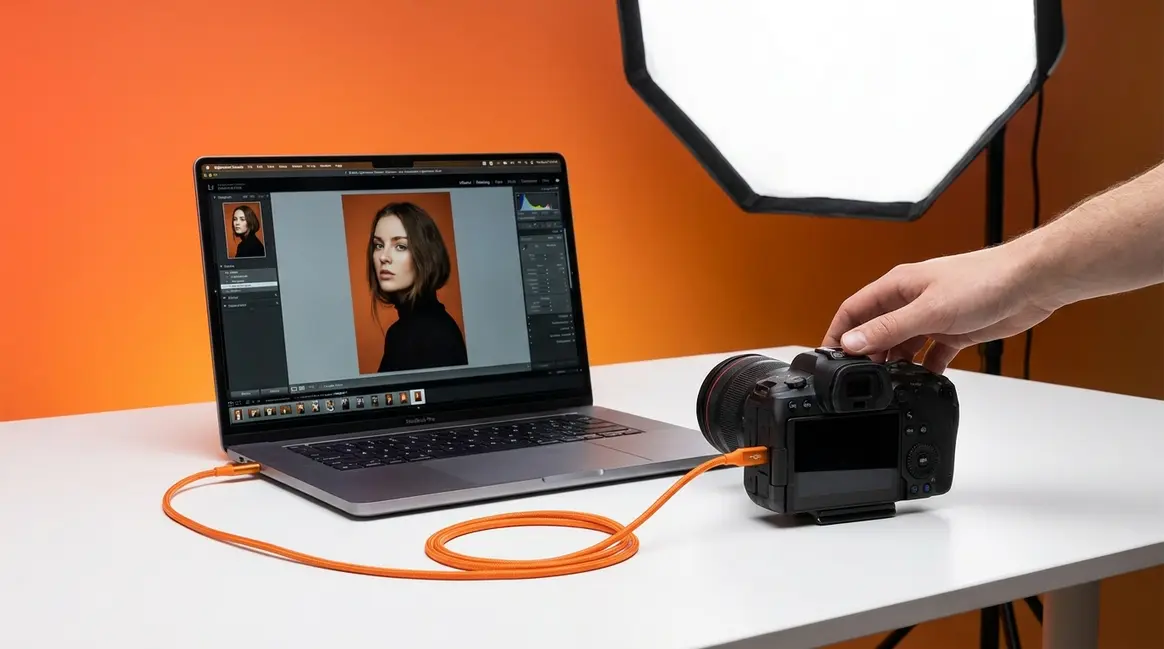
You’ve just wrapped a two-hour portrait session. Back at your desk, you open the files — and the sharpest expression of the shoot has one soft eye. You couldn’t tell on a 3-inch camera screen. Nobody can.
“I’ve been shooting tethered for a few years and yet I’m still not feeling like I’ve mastered it.”
If that sounds familiar, this guide is for you — whether you’re hearing about tethered shooting for the first time or finally ready to make it work. By the end, you’ll know exactly what tethered shooting is, what gear you need, and how to set it up in Lightroom Classic — so you can check critical focus in real time and never miss a shot again. We’ll cover the definition, a gear checklist, a software comparison, a step-by-step setup walkthrough, and a troubleshooting decision tree.
Tethered shooting connects your camera to a laptop so images appear on a large screen the instant you shoot — giving you real-time focus checks, client collaboration, and automatic file backup in one setup.
- Definition: A USB or Wi-Fi link between camera and computer that transfers images instantly
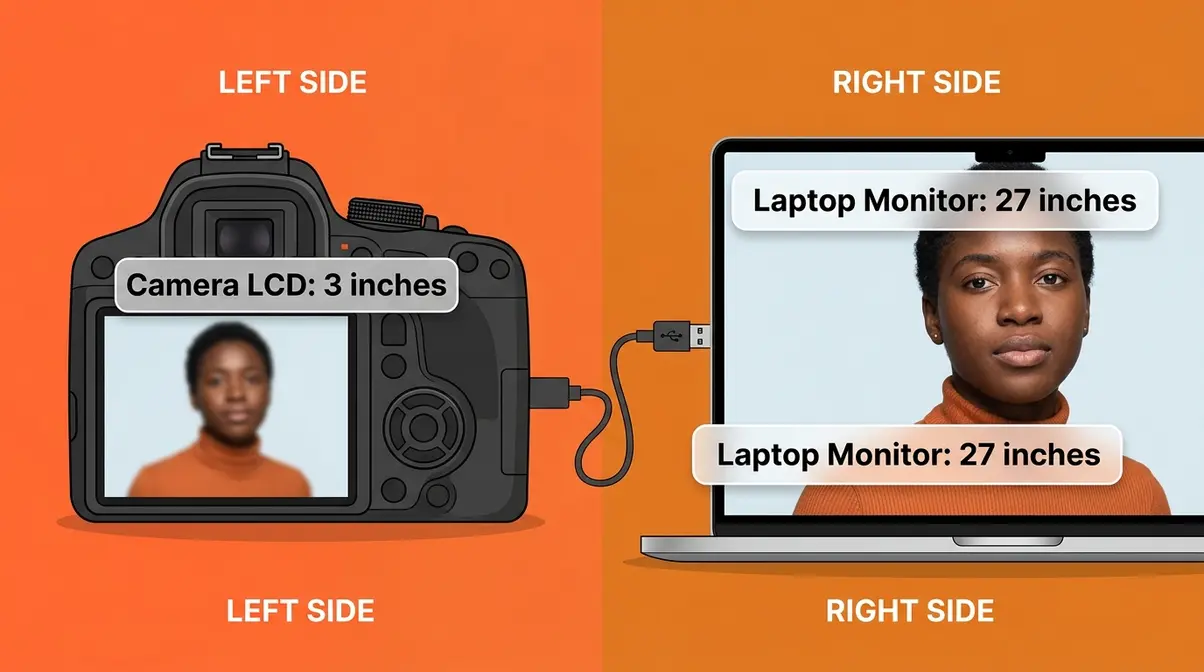
- Top benefit: Spot critical focus issues on a full-size monitor, not a 3-inch LCD
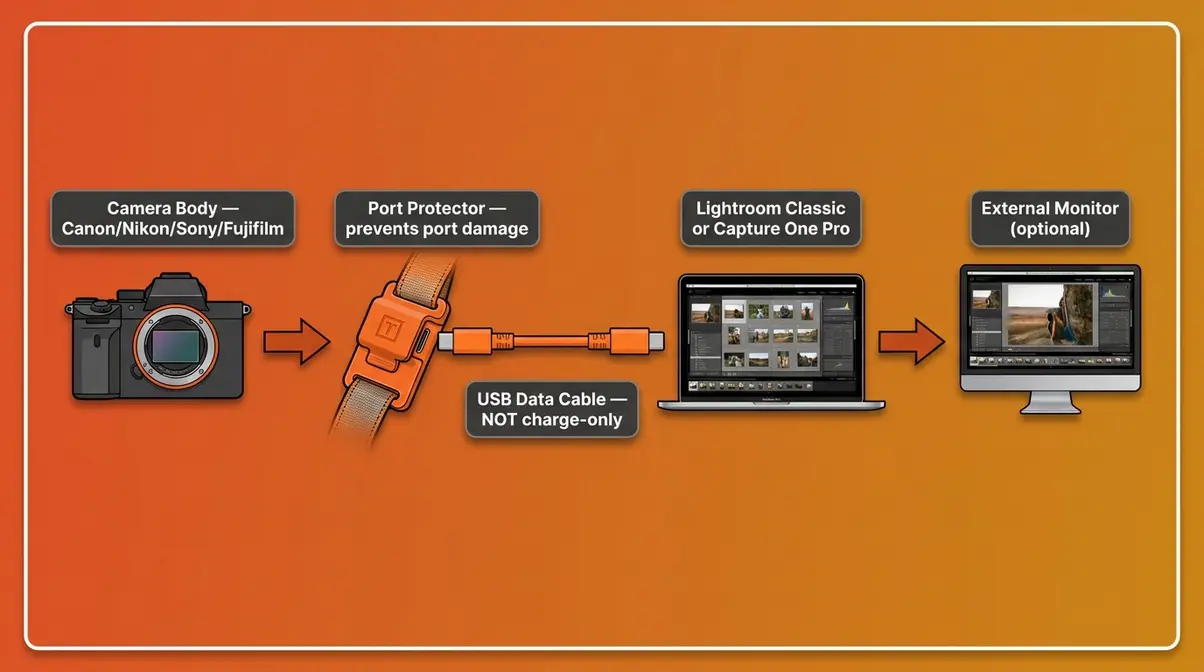
- The Tether-to-Trust Pipeline: Connect → Review → Approve — the three-stage workflow that transforms your shoots
- Minimum gear: Compatible camera + USB data cable + Lightroom Classic or Capture One Pro
- Best for: Studio, portrait, food, and product photographers who shoot with clients present
What Is Tethered Shooting? Why It Matters
Tethered shooting is the process of connecting your camera directly to a laptop or computer — via a USB cable (the physical cord used to link devices) or Wi-Fi — so that every photo transfers to the screen the moment you press the shutter. Instead of reviewing images on your camera’s small LCD (the built-in display on the back of the camera), you see them at full size in software like Adobe Lightroom Classic or Capture One Pro. For beginners checking whether a subject’s eyes are sharp, it’s the difference between knowing and guessing.
What Tethering Actually Means
What is tethered shooting? It’s a direct connection between your camera and a computer that sends each image to a large screen the instant you capture it. The word “tethered” comes from the idea of keeping your camera literally attached — like a boat tied to a dock — so data flows continuously between the two devices.
There are two ways to make that connection. First, a USB cable (the most common method): you plug one end into your camera’s data port and the other into your laptop. This is the standard starting point for beginners — it’s fast, reliable, and works with almost every tethering software. Second, Wi-Fi (wireless tethering): some newer camera models support a cable-free connection, though it comes with trade-offs we’ll cover shortly.
On the software side, images arrive inside a program like Adobe Lightroom Classic — the industry-standard photo editing and tethering software — where they’re automatically organized and displayed at full resolution. Think of it like this: instead of handing your camera to a client to review on a 3-inch screen, they’re watching every shot appear at full size on your MacBook Pro — in real time.
For a deeper dive into how this workflow fits together, see our understand the basics of tethered shooting guide. As PetaPixel’s tethered shooting guide notes, tethered shooting is essential for commercial workflows because it allows clients and art directors to review focus, lighting, and composition on a color-calibrated monitor in real time.
Transition: A simple definition is a start — but the real question most beginners ask is: why would I bother? Here are five specific reasons professional photographers won’t work without it.
5 Reasons to Shoot Tethered

Here are five specific reasons photographers choose to shoot tethered — and why each one matters to your workflow.
- Critical Focus Verification. On a 3-inch camera LCD, a slightly soft eye looks sharp. On a 27-inch monitor, it doesn’t. Tethering lets you zoom to 100% and check critical focus before your subject moves. Why this matters: It eliminates the most common cause of unusable portraits — discovering softness only after the client has left.
- Real-Time Client Collaboration. Clients and art directors watch every shot appear on the laptop as you work. They give immediate feedback — “chin down,” “more shadow,” “that’s the one.” No more guessing what the client wanted after the session ends.
- Automatic File Backup. Images save directly to your computer hard drive as you shoot — no memory card transfer needed at the end. If a card fails mid-session, your files are already safe on the laptop. Why this matters: Memory card failures, while rare, are devastating when they happen on a paid job.
- Live View for Tricky Compositions. Many tethering setups send a live feed (a real-time video stream from your camera sensor) to your laptop screen. This is especially useful for overhead flat-lay shots — food photography, product photography — where looking through the viewfinder is physically awkward or impossible.
- On-the-Fly Editing. With Capture One Pro — a professional-grade tethering and editing application favored by many commercial photographers — you can apply color grades and exposure adjustments while shooting. The client sees the finished look, not just the raw capture (the unprocessed image file straight from the sensor).
Picture this: a food photographer shoots an overhead flat lay of a dish. The client watches on the laptop, spots a garnish out of place, and calls it out before the next frame. Without tethering, that detail wouldn’t surface until post-production — after the food has been cleared and the set torn down.
Academic photography programs recognize this value too. RIT photography program guidelines teach tethered capture as a foundational digital workflow standard, ensuring precise focus checking and immediate exposure verification in studio environments.
For a visual walkthrough of these benefits in action, watch our setup video below.
Transition: Those five benefits explain the why. Now let’s look at the how — specifically, whether you should use a cable or go wireless.
Wired vs. Wireless Tethering Data
For most photographers, a wired USB connection is the right starting point. It’s near-instant — USB 3.0 can transfer a 30MB RAW file (the uncompressed, full-quality image format your camera saves) in under a second — and it doesn’t drop connections mid-shoot. Wireless tethering is real and improving, but it introduces trade-offs worth understanding before you commit to a cable-free setup.
| Wired USB | Wireless Wi-Fi | |
|---|---|---|
| Transfer Speed | Near-instant (USB 3.0: ~5 Gbps) | Slower — approx. 0.5–2 sec delay per image |
| Reliability | Very high — no interference | Moderate — subject to Wi-Fi congestion |
| Battery Impact | Charges camera with USB-C PD cables | Camera battery drains faster |
| Best For | Studio, controlled environments | On-location, run-and-gun, low-volume shoots |
Wireless tethering is supported on newer camera models — including the Sony a7R V via Sony Imaging Edge wireless tethering and Canon EOS R-series bodies via EOS Utility — using a 5GHz Wi-Fi connection. The latency (the delay between pressing the shutter and seeing the image on screen) runs approximately 0.5–2 seconds per image based on community-reported benchmarks and manufacturer documentation. That’s fine for a relaxed portrait session on location. It’s less ideal for a fast-paced studio shoot where you’re firing 10 frames per minute and need instant review.
One modern advancement worth highlighting: USB-C Power Delivery. As confirmed by USB-IF data transfer specifications, modern USB Type-C cables support data transfer and simultaneous power delivery — meaning your camera battery charges while you shoot tethered. This is a significant upgrade from older Micro-USB setups, where your battery drained throughout the session.

For your first tethered shoot, start with a wired USB connection. Once you’re comfortable with the workflow, explore wireless for on-location portrait or event work.
Transition: Now that you understand what tethered shooting is and why it works, let’s build your starter kit — here’s exactly what you need to get going.
The Essential Gear You Need to Start Tethering
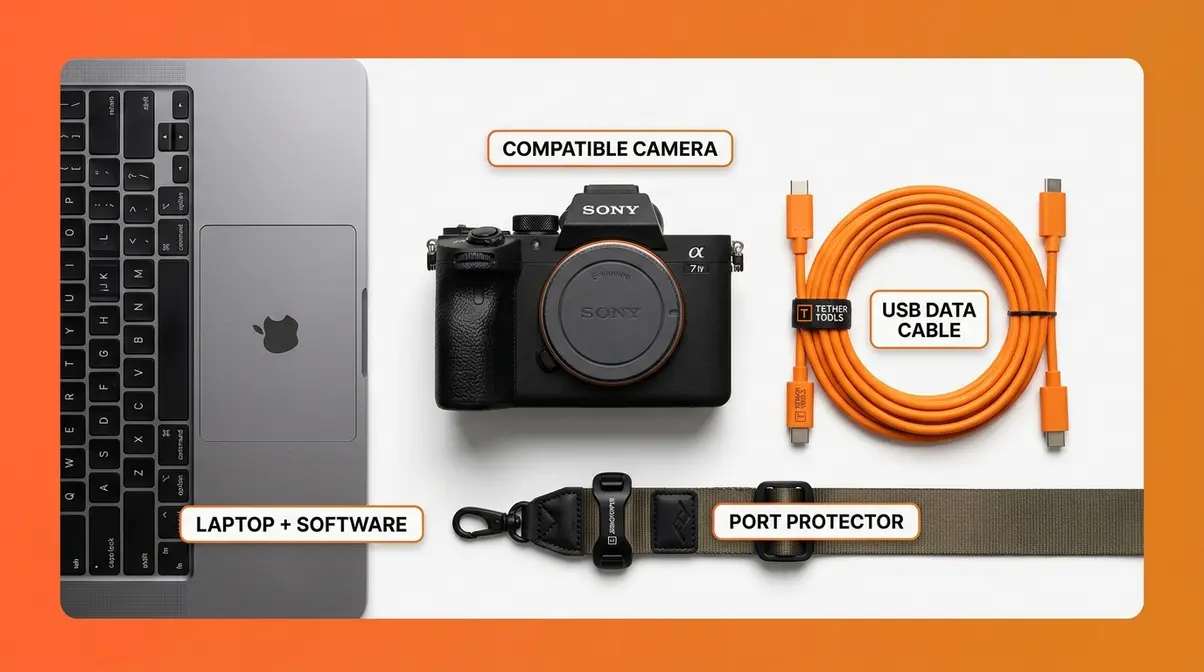
Getting started with tethered photography doesn’t require an expensive overhaul of your kit. If you are wondering exactly what is tethered shooting going to require for your specific camera, the answer usually starts with a simple USB data cable. You likely already own two of the three required components. The goal here is knowing what to buy, what to skip, and — critically — what not to cheap out on.
- What You’ll Need Before You Start:
- A camera with a USB data port (check compatibility below)
- A USB data cable — not a charge-only cable (see below for why this matters)
- A laptop or desktop computer with available USB ports
- Tethering software: Adobe Lightroom Classic or Capture One Pro
- Optional but recommended: a cable port protector (such as the TetherTools JerkStopper)
Checking Camera Compatibility
Not every camera supports tethered shooting, and compatibility varies by software. Most modern DSLRs (Digital Single-Lens Reflex cameras) and mirrorless cameras from Canon, Nikon, Sony, and Fujifilm support tethering — but it’s worth checking before you buy cables.
Adobe Lightroom Classic supports a broad range of cameras from Canon, Nikon, Sony, Fujifilm, and Leica. You can verify your specific model on Adobe’s official supported camera list. Capture One Pro supports an even wider range and is particularly well-regarded for Sony and Phase One medium-format bodies.
- Common beginner-friendly cameras with confirmed tethering support include:
- Canon: EOS R6, EOS R5, EOS 90D, EOS 5D Mark IV
- Nikon: Z6 II, Z7 II, D850, D780
- Sony: a7R III, a7R V, a7 IV (via Sony Imaging Edge or Capture One)
- Fujifilm: X-T5, X-T4, GFX 100S (Capture One or Fujifilm’s Tether Shooting Plug-In for Lightroom)
If you’re shooting a Sony a7R III, you’re already compatible with both major software platforms. Always verify compatibility on the manufacturer’s website before your first tethered session, since firmware updates occasionally add or change tethering support.
Cables, Port Protectors, and Power
This is the section most beginners skip — and the one that causes the most frustration. Here’s what you actually need to know.
Data cables vs. charge-only cables. This is the single most common beginner mistake. Many USB-C cables sold for phone charging carry power only — they physically cannot transfer data. If you plug a charge-only cable into your camera and laptop, your tethering software will not detect the camera. The cable looks identical. Always buy a cable explicitly labeled USB data cable or USB 3.0 data transfer cable. According to Tether Tools’ official cable guide, using a dedicated data cable prevents the most common connection drops. Tether Tools, a leading manufacturer of tethering cables and accessories, makes cables specifically rated for tethered photography use — their orange TetherPro USB-C cable is a community-recommended standard.
Port protectors. An accidental kick of the cable can snap your camera’s USB port — a repair that costs hundreds of dollars and kills your shoot. A port protector (also called a cable clamp or JerkStopper) clips to your camera strap or body and absorbs the stress of a cable pull before it reaches the port. It costs under $20. Use one.
USB-C Power Delivery. If your camera supports USB-C PD (Power Delivery), a compatible cable will charge your camera while simultaneously transferring data. For long studio sessions, this effectively gives you unlimited battery life. Check your camera manual to confirm whether your model supports PD — not all USB-C ports on cameras are equal.
Cable length matters too. USB data cables have a practical limit of about 15 feet (4.5 meters) before signal degradation can cause dropped connections. For longer runs — say, across a large studio — use an active USB extension cable or a USB hub with its own power supply.
Computer and SSD Requirements
Your laptop is the other half of the tethering equation. An underpowered machine will lag, buffer, and frustrate — especially when shooting RAW files at high resolution.
Minimum recommended specs for tethered shooting:
| Component | Minimum | Recommended |
|---|---|---|
| RAM | 8GB | 16GB+ |
| Storage | HDD (7200 RPM) | SSD (solid-state drive) |
| Processor | Intel Core i5 / Apple M1 | Intel Core i7 / Apple M2 or M3 |
| USB Port | USB 3.0 | USB 3.1 or USB-C Thunderbolt |
| Display | 1080p (any size) | 1440p or 4K, 24″+ |
The biggest performance bottleneck for most photographers is storage speed. When images transfer directly to your drive as you shoot, a slow HDD (Hard Disk Drive — the older spinning-disk storage type) will cause a visible lag. An SSD (Solid-State Drive — faster, flash-based storage) keeps up with even burst shooting. A MacBook Pro with an M-series chip handles tethered shooting seamlessly, even with 45-megapixel RAW files.
User consensus across photography communities indicates that 16GB of RAM is the practical sweet spot for running Lightroom Classic or Capture One Pro alongside tethered capture without slowdowns.
FAQ: Do I Need Special Equipment?
You need three things: a compatible camera, a USB data cable, and tethering software. The most common beginner mistake is using a charge-only USB cable, which cannot transfer image data. Strongly recommended — though not strictly required — is a port protector like the TetherTools JerkStopper, which prevents costly port damage from accidental cable pulls. Your laptop should have at least 8GB of RAM and an SSD for smooth performance. Most modern DSLRs and mirrorless cameras from Canon, Nikon, Sony, and Fujifilm support tethering.
Transition: You have your gear list. Now let’s choose the right software and walk through the actual setup — step by step.
Tethering Software and Step-by-Step Setup
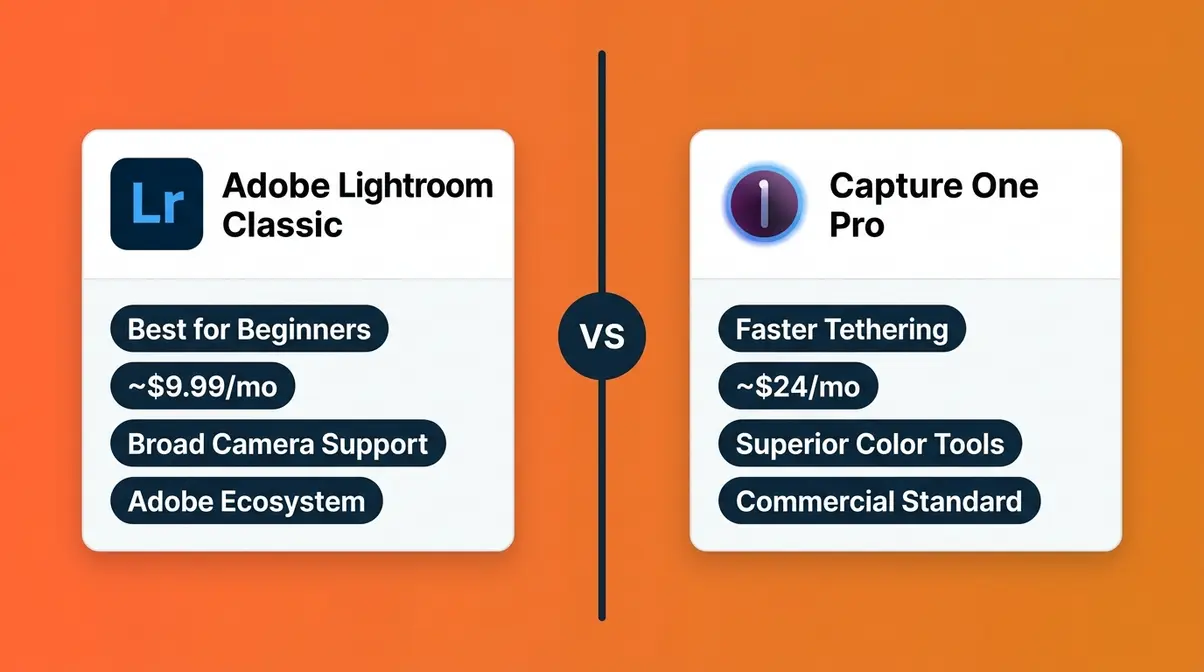
The software you choose shapes your entire tethered workflow. Two platforms dominate: Adobe Lightroom Classic and Capture One Pro. Both work well. They’re different enough that the choice matters — and the right answer depends on what you’re already using and who you’re shooting for.
Lightroom vs. Capture One
Both platforms support tethered capture, but they differ in speed, interface, and ecosystem. Here’s an objective comparison:
| Adobe Lightroom Classic | Capture One Pro | |
|---|---|---|
| Tethering Speed | Good — slight delay on high-res files | Faster — widely reported as quicker to display |
| Camera Compatibility | Broad (Canon, Nikon, Sony, Fuji, Leica) | Broader (adds Phase One, Hasselblad) |
| Live View Support | Limited (camera-dependent) | More robust, especially on Sony/Phase One |
| Color Tools | Strong (Lightroom-native) | Industry-leading (preferred by commercial shooters) |
| Price | ~$9.99/mo (Creative Cloud subscription) | ~$24/mo (full plan) or ~$179/yr (photographer plan) |
| Best For | Beginners, hobbyists, mixed-use photographers | Commercial, fashion, food photographers |
| Workflow Integration | Seamless with Adobe ecosystem (Photoshop, Bridge) | Standalone or integrated with Adobe |
Our team’s evaluation of user consensus across photography communities — including forums on DPReview, Reddit’s r/photography, and professional Facebook groups — indicates that Capture One Pro is generally perceived as faster for displaying tethered images, particularly on Sony camera bodies. However, Lightroom Classic is the better starting point for beginners because of its lower price, gentler learning curve, and broader tutorial availability.
If you already subscribe to Adobe Creative Cloud, start with Lightroom Classic. You can always migrate to Capture One Pro once you’ve built your tethering fundamentals.
Which Software Is Best?
For beginners, Adobe Lightroom Classic is the best starting point for tethered shooting. It supports a wide range of camera brands, integrates with the broader Adobe ecosystem, and has the largest library of tutorials. Capture One Pro is faster at displaying incoming images and offers superior color tools — making it the preferred choice for commercial, fashion, and food photographers. Both platforms are legitimate professional tools; the right choice depends on your budget, camera brand, and how deeply you’re already invested in either ecosystem.
Lightroom Classic Setup Steps
What you’ll need: Your camera, a USB data cable, Lightroom Classic (version 13 or later recommended), and about 15 minutes.
Step 1: Connect your camera to your laptop.
Use your USB data cable — not a charge-only cable. Plug one end into your camera’s USB/data port and the other into your laptop. Attach your port protector before plugging in. Turn your camera on and set it to shooting mode (not playback mode).
Step 2: Open Lightroom Classic.
Launch Lightroom Classic on your computer. Adobe’s official tethered camera support list is regularly updated, so ensure you are running the latest version. Wait for it to fully load before proceeding — attempting to start tethering before the software is ready can cause detection failures.
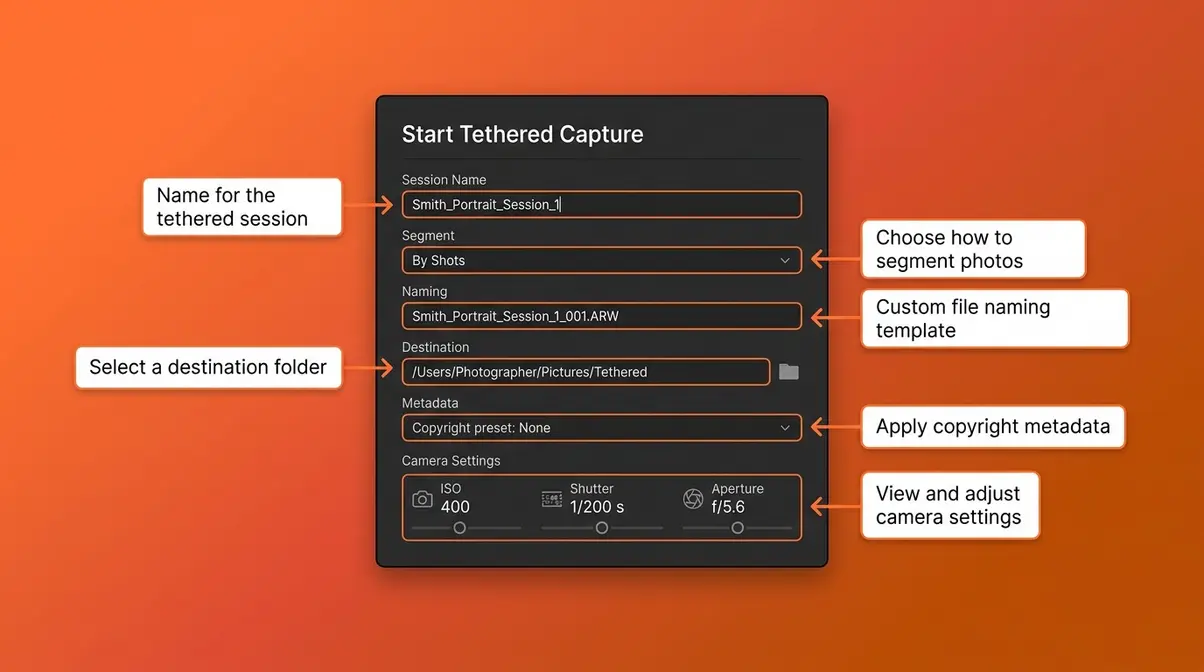
Step 3: Start the Tethered Capture session.
Go to File → Tethered Capture → Start Tethered Capture. A dialog box will appear. If Lightroom detects your camera, you’ll see its model name at the top of the dialog. If you see “No Camera Detected,” check the troubleshooting section below.
- Step 4: Configure your session settings.
- In the Tethered Capture dialog, set:
- Session Name: Use a descriptive name (e.g., “Smith_Portrait_Session_1”) — this becomes your folder name
- Segment: Choose “By shots” or keep the default
- Naming: Set your file naming convention
- Destination: Choose where on your SSD the files will save
- Metadata: Apply your copyright preset here — it saves time later
Step 5: Set your camera controls.
Optionally, use the Camera Settings section in the dialog to adjust ISO (the camera’s sensitivity to light), shutter speed, and aperture directly from Lightroom — without touching the camera body.
Step 6: Fire a test shot.
Press your shutter. Within 1–3 seconds, the image should appear full-size in Lightroom’s Loupe View. Zoom to 100% (press Z) to check critical focus. If the image appears, your tethered session is live.
Step 7: Apply a develop preset on import.
In the Tethered Capture dialog, click Develop Settings and choose a preset. Every incoming image will have your base grade applied automatically — a significant workflow time-saver.
On-Set Workflow Tips
Once your tethered connection is live, the Tether-to-Trust Pipeline kicks in: Connect (hardware + software handshake), Review (check every frame at full size), Approve (confirm the shot before moving on). Here’s how to make each stage work smoothly.
- Before you shoot:
- Place your laptop where both you and your client can see the screen without either of you moving far
- Disable screen savers and sleep mode — an auto-sleeping laptop will break your tethered connection
- Close all non-essential apps to free up RAM for Lightroom
- During the shoot:
- Use the Live View feature (a real-time feed from your camera to the laptop screen) for overhead shots where you can’t see through the viewfinder. In Lightroom’s Tethered Capture bar, click the Live View button if your camera supports it.
- After each key setup change (new light position, new pose), zoom to 100% in Lightroom and verify critical focus before continuing
- Encourage clients to watch the screen — their real-time reactions are your fastest feedback loop
Six environment-specific setup examples:
- Studio portrait: Camera on tripod, laptop on a stand beside the subject, client seated nearby
- Food photography (overhead flat lay): Camera on a copy stand directly above the subject; Live View on laptop replaces the viewfinder entirely
- Product photography: Camera on tripod, laptop angled for art director review; apply color grade preset on capture
For more complex environments, adapt your approach:
- On-location commercial: Wireless tethering via Sony Imaging Edge or Canon EOS Utility; minimal cable management required
- Portrait on location: Wired USB, laptop in a Pelican case or on an assistant’s stand; use a longer active USB cable for subject distance
- Fashion/editorial: Capture One Pro with a second monitor for the client; art director applies selects in real time using the client viewer feature
User consensus across professional photography communities indicates that the most common on-set mistake is forgetting to disable laptop sleep mode — a fix that takes ten seconds but saves the frustration of a dropped connection mid-session.
Transition: Even with perfect preparation, tethered connections occasionally drop. Here’s how to diagnose and fix the most common problems fast.
Common Tethering Problems and When to Skip It
Tethered shooting is reliable when set up correctly — but it does have failure points. Knowing how to troubleshoot quickly is what separates a minor inconvenience from a session-ending problem. This section covers the most common issues and gives you an honest look at when tethering simply isn’t the right tool.
Troubleshooting Dropped Connections
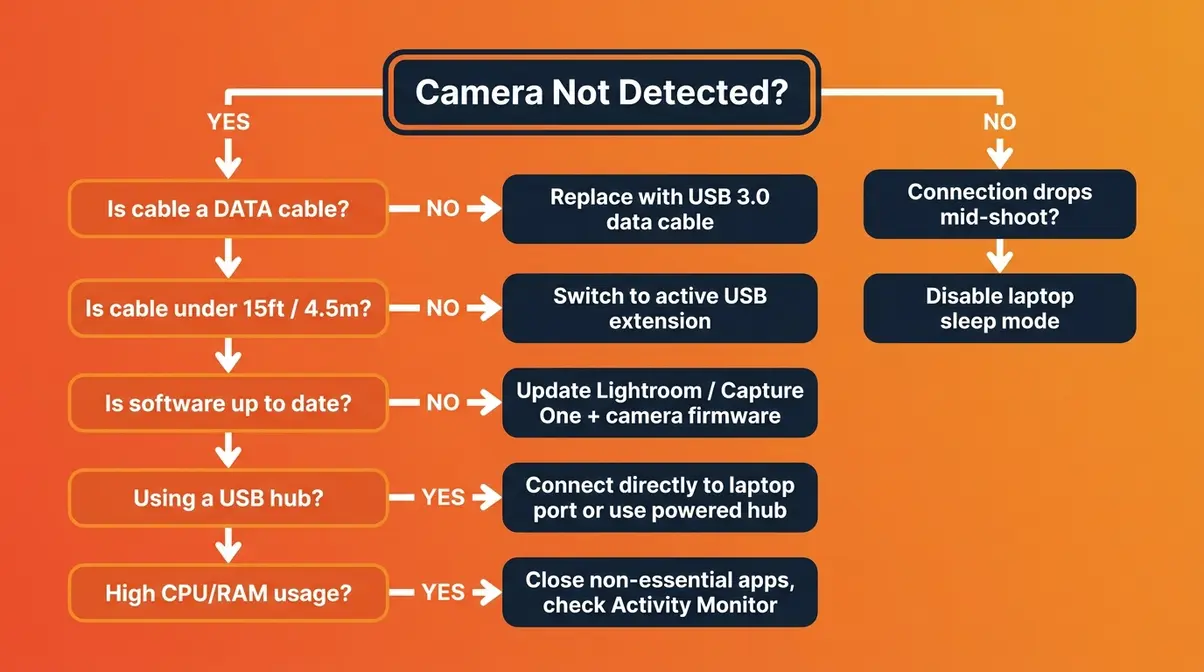
When your tethered connection drops or your camera isn’t detected, work through this decision tree in order:
- Step 1 — Is the camera recognized at all?
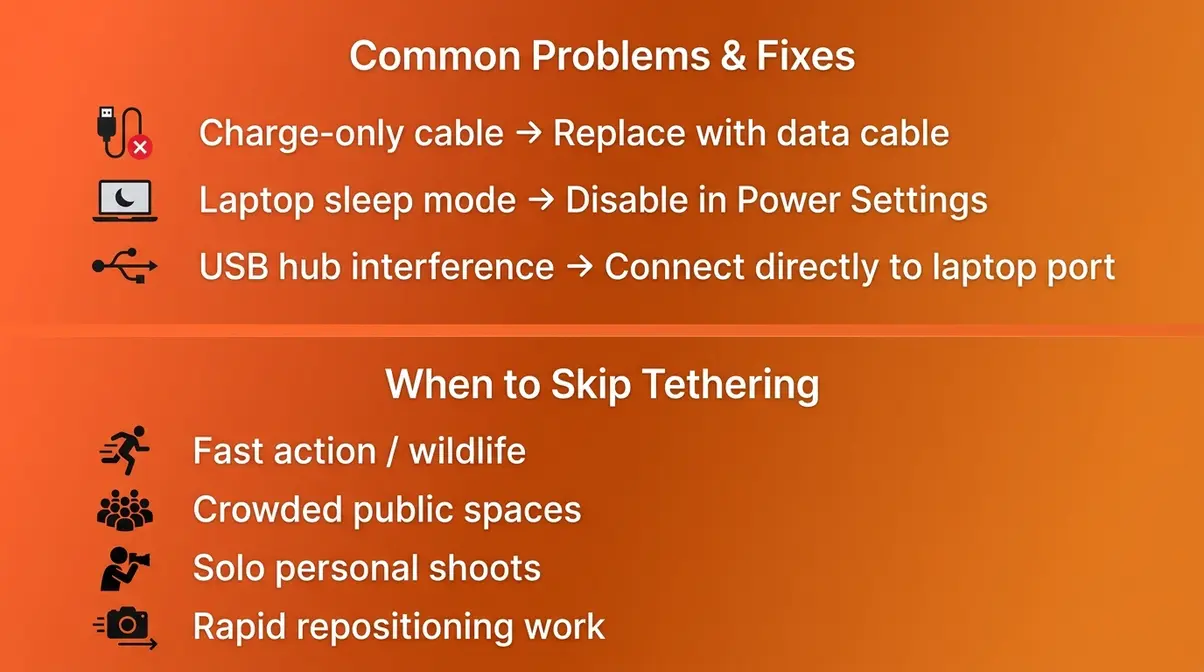
- No camera detected in software → Check that your cable is a data cable (not charge-only). Try a different USB port on your laptop. Restart the camera. Restart Lightroom. Reconnect.
- Camera was detected, then disappeared → The cable was likely stressed or partially disconnected. Check the port protector. Try a shorter cable (under 10 feet / 3 meters).
- Step 2 — Is the cable the right length?
- USB passive cables beyond 15 feet (4.5m) lose signal integrity. USB-IF specifications dictate that longer runs require active boosting. If your cable is longer, switch to an active USB extension cable (one with a built-in signal booster).
- Step 3 — Is the software up to date?
- Outdated versions of Lightroom Classic or Capture One Pro frequently lose compatibility with newer camera firmware. Check for updates in both your software and your camera’s firmware before each major shoot.
- Step 4 — Is the USB port itself the problem?
- USB hubs (multi-port adapters) can cause intermittent detection failures. Connect directly to a laptop port when possible. If you must use a hub, choose a powered USB hub (one with its own power supply).
- Step 5 — Is your computer running too many background processes?
- Close all non-essential apps. On a MacBook Pro, check Activity Monitor for processes consuming high CPU or RAM. On Windows, use Task Manager. Lightroom Classic performs best when it has exclusive access to available RAM.
- Common pain points reported by photographers across community forums include:
- Using a USB-C to USB-A adapter that supports charging but not data transfer
- Laptop going to sleep mid-session (disable sleep mode in System Preferences / Windows Power Settings)
- Camera set to “Mass Storage” mode instead of “PC Remote” or “Tether” mode in the camera menu
When Tethering Isn’t the Right Choice
Tethering is a powerful workflow tool — but it’s not the right choice for every shoot. Here’s an honest assessment of when to leave the cable at home.
- Skip tethering when:
- You’re shooting fast action or wildlife. The cable physically restricts your movement. Even wireless tethering adds latency that makes real-time review impractical for sports or wildlife work.
- You’re shooting in crowded or public spaces. A cable running between your camera and laptop is a tripping hazard — and a liability on a busy street or event floor.
- You’re working solo without a client. Much of tethering’s value comes from client collaboration. If you’re shooting personal work alone, reviewing on a large monitor during editing achieves the same focus-checking goal without the setup time.
- Your shoot requires rapid repositioning. Documentary, street, and event photographers move constantly. Tethering adds setup friction that slows you down more than it helps.
The honest truth: tethering adds 10–15 minutes of setup time. For a two-hour studio session with a paying client, that’s a worthwhile investment. For a 30-minute walk-around shoot, it probably isn’t. Match the workflow to the job.
Transition: Still have questions? Here are the answers photographers ask most often.
Frequently Asked Questions About Tethered Shooting
What is tethered shooting used for?
Tethered shooting is used primarily for studio, portrait, food, and product photography — any situation where checking critical focus and showing images to a client in real time adds value. Photographers connect their camera to a laptop so every image appears on a large screen the moment the shutter fires. This allows instant focus verification, real-time client feedback, and automatic file backup. It’s less useful for fast-action or documentary work where camera mobility matters more than immediate review.
Is tethered shooting only for professionals?
No — tethered shooting is genuinely useful for serious hobbyists and early-career photographers too. The core benefit — checking critical focus on a large screen before your subject moves — applies to anyone shooting portraits, food, or products. The setup costs are modest: a quality USB data cable runs $20–$40, and Lightroom Classic is available for approximately $9.99/month as part of Adobe Creative Cloud. The workflow skills you build tethering early in your career translate directly to professional studio work.
Can I shoot tethered wirelessly without a cable?
Yes — wireless tethering is supported on many modern cameras, including the Sony a7R V and Canon EOS R5. These cameras connect via 5GHz Wi-Fi to software like Sony Imaging Edge or Canon EOS Utility. The trade-off is latency: wireless tethering typically adds approximately 0.5–2 seconds of delay per image compared to the near-instant transfer of a wired USB connection (as reported across Sony and Canon user communities and manufacturer documentation). For studio work, wired USB remains the more reliable standard. Wireless tethering is a practical option for on-location shoots where cable management is impractical.
Build Your Tether-to-Trust Pipeline Today
Tethered shooting is not a complicated technology. Now that you know exactly what is tethered shooting, you can stop guessing whether your focus is sharp. It’s a three-stage workflow — Connect → Review → Approve — that gives you something every photographer wants: certainty. You stop guessing whether the focus is sharp. You stop hoping the client liked the expression. You know, frame by frame, before anyone leaves the room.
The Tether-to-Trust Pipeline works because it shifts quality control from post-production to the moment of capture. When you can see a 45-megapixel RAW file at 100% on a calibrated monitor seconds after pressing the shutter, you catch the problems that a 3-inch LCD hides. That’s not a marginal improvement — it’s a fundamentally different way of working.
Your next step is simple: check whether your camera is on the Lightroom Classic or Capture One Pro compatibility list, order a quality USB data cable and a port protector, and run through the seven-step setup walkthrough in this guide. Give yourself one session to get comfortable with the connection. Most photographers find that after a single tethered shoot, they can’t imagine going back. Our tethered shooting workflow guide walks you through advanced session management once you’ve nailed the basics.
