You just unboxed your first DSLR, and suddenly every camera store — online or local — is throwing 50 different accessories at you.
What’s in this guide
- How We Evaluated These DSLR Accessories
- Must-Have DSLR Accessories for Beginners
- Camera Bags, Lenses, and Lighting Accessories
- DSLR Accessories for Video and Filmmaking
- Brand-Specific DSLR Accessories
- Where and How to Buy DSLR Accessories
- DSLR Accessory Buying Mistakes
- DSLR Camera Accessories FAQ
- Build Your Beginner's Gear Stack
“What are some camera accessories that you just can’t go without?”
That question gets asked thousands of times a month by new DSLR owners, and it’s a great one. The problem is that most answers are long, chaotic lists with no priority order. Most beginners end up spending $150 on accessories they don’t need in their first month — while missing the three or four items that would actually improve every single photo they take. This guide is different. By the end, you’ll know exactly which DSLR camera accessories to buy first, which to add later, and which to skip entirely — so every dollar goes toward better photos. We start with Day 1 essentials, move through bags, lenses, and lighting, then cover video gear, brand-specific picks, and smart buying strategies.


| Accessory | Best For | Budget Option | Mid-Range Option | Approx. Price Range |
|---|---|---|---|---|
| Tripod | Sharp shots, low light, long exposure | AmazonBasics 60″ | Manfrotto Compact Action | ~$25–$80 |
| Extra Battery | All-day shooting | Third-party OEM-compatible | Canon/Nikon OEM | ~$12–$45 |
| Memory Card | Fast storage, burst & video | Lexar Professional 1066x | SanDisk Extreme Pro | ~$15–$50 |
| Lens Cleaning Kit | Lens & sensor care | Altura Photo 8-piece | Zeiss Lens Care Kit | ~$10–$25 |
| Camera Bag | Gear protection & transport | AmazonBasics DSLR Bag | Lowepro Slingshot 150 | ~$20–$80 |
| External Flash | Indoor & event lighting | Yongnuo YN560 IV | Canon Speedlite 430EX III | ~$35–$130 |
| Additional Lens | Creative range & portraits | 50mm f/1.8 “nifty fifty” | 24–70mm f/2.8 | ~$100–$700 |
| Gimbal/Stabilizer | Smooth video footage | Zhiyun Crane M2 | DJI RS 3 Mini | ~$100–$300 |
| External Microphone | Clear audio recording | Rode VideoMicro | Rode VideoMic Pro+ | ~$60–$250 |
| Lens Filter | Creative effects & protection | UV Protective Filter | Tiffen Variable ND | ~$10–$80 |
Prices subject to change — verify at time of purchase.
How We Evaluated These DSLR Accessories
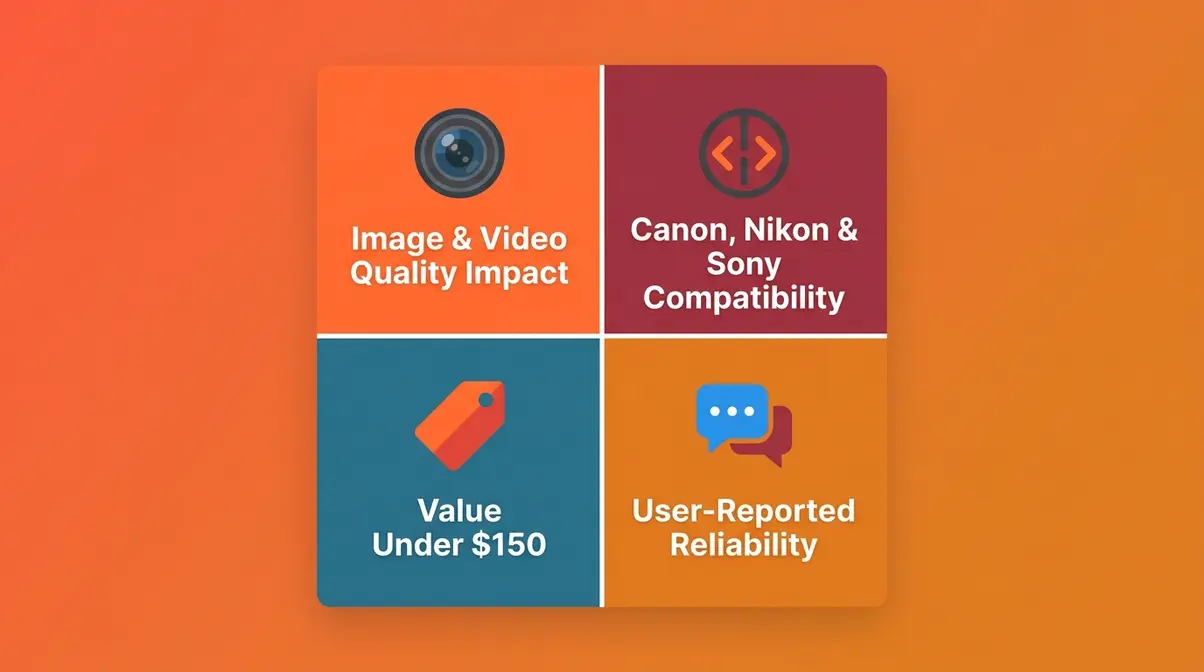
Choosing the right accessories from hundreds of options requires a clear framework — not guesswork. Our team evaluated each accessory category using four criteria: practical impact on image or video quality, compatibility across Canon, Nikon, and Sony DSLR systems, value for money at beginner price points (under $150 per item), and user-reported reliability gathered from photography communities including r/AskPhotography and r/photography.
The shortlist was built by cross-referencing community consensus from those forums, expert review analysis from Photography Life and Shotkit, and manufacturer specifications from Canon, Nikon, and third-party brands. The Statista market data shows the global digital camera market is projected to generate over $21.2 billion in revenue — driving sustained demand for compatible accessories and making informed purchasing decisions more important than ever. We prioritized accessories that deliver measurable improvement for beginners rather than gear that only matters at intermediate or advanced levels.
Transparency note: This guide may contain affiliate links. Our recommendations are based on merit, not commission rates. With that framework in mind, here are the accessories every beginner DSLR owner should buy first.
Must-Have DSLR Accessories for Beginners
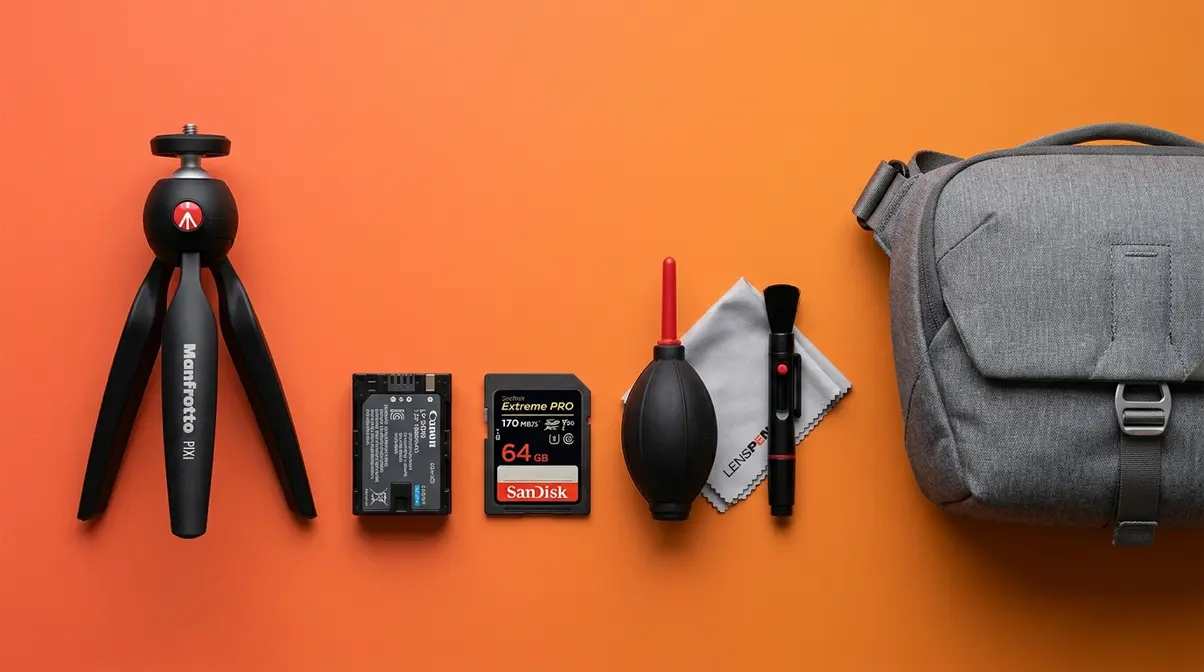
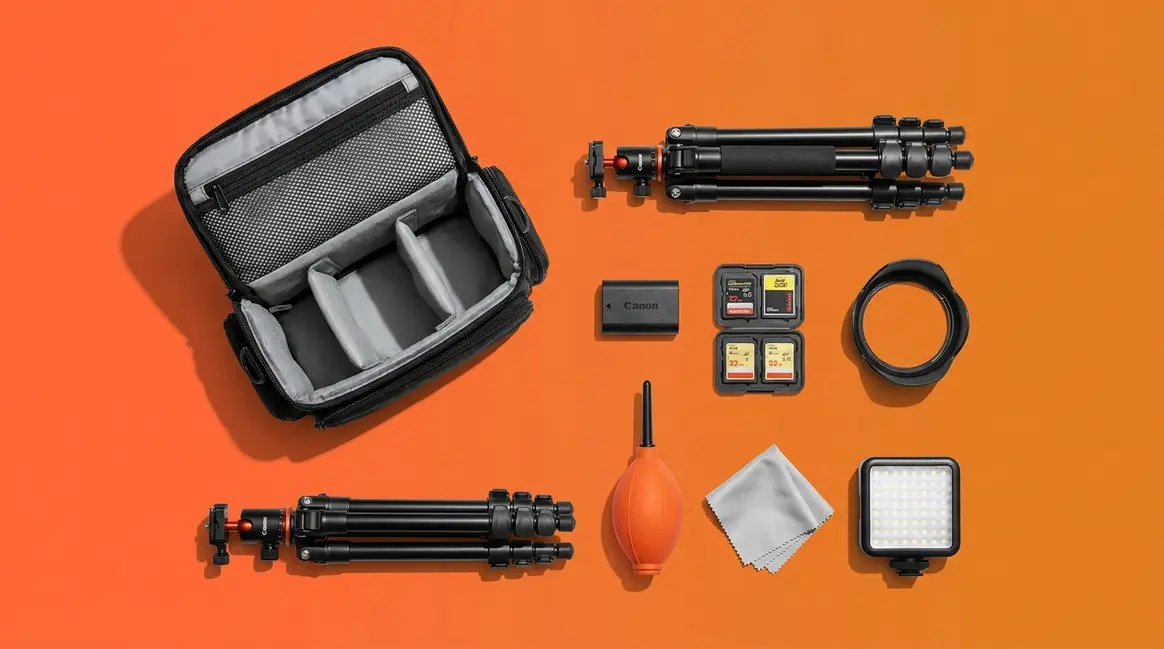
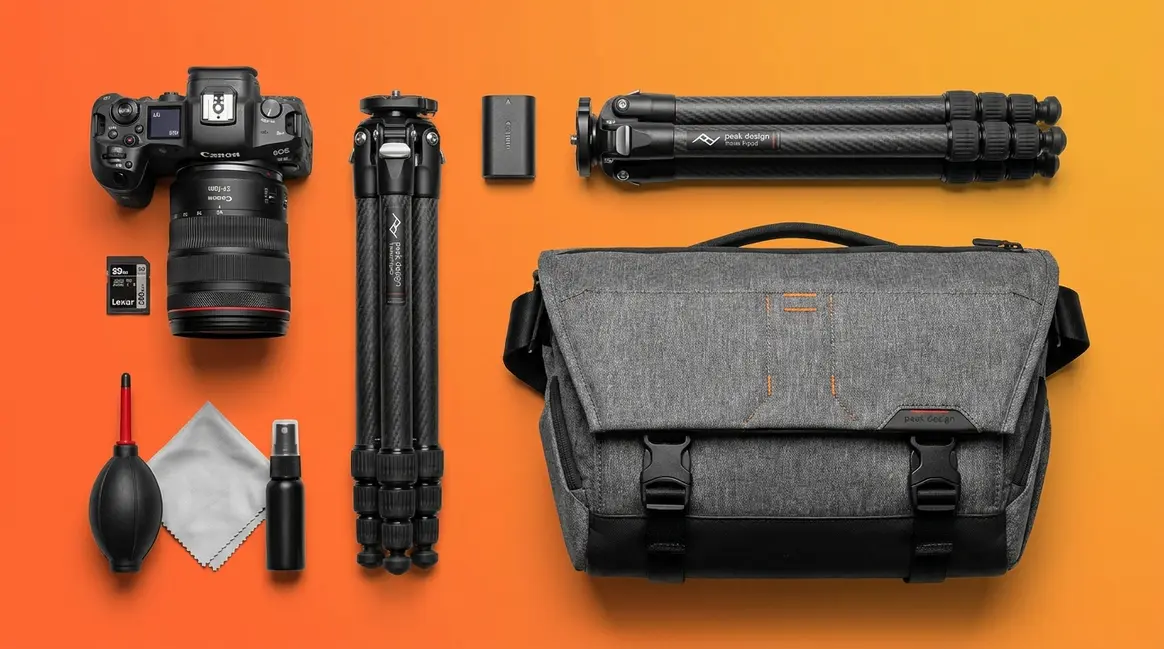
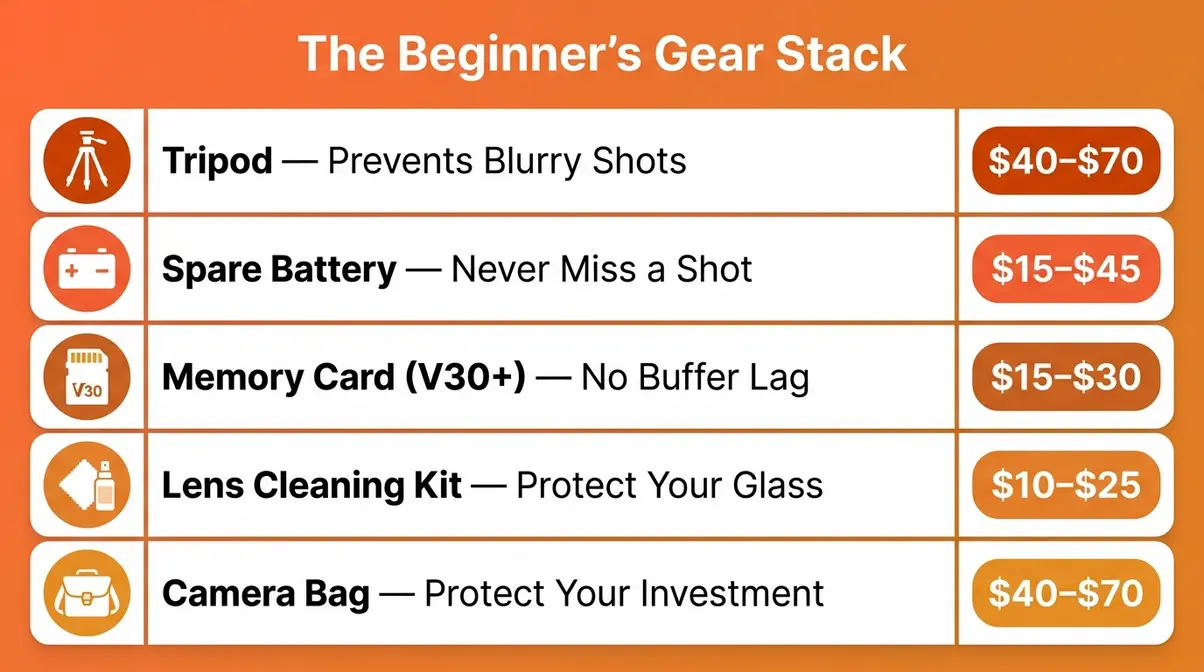
The five most essential DSLR camera accessories for beginners are a tripod, spare battery, high-speed memory card, lens cleaning kit, and a protective camera bag. These five items solve the most common beginner problems — blurry shots, dead batteries mid-shoot, full cards, dirty lenses, and damaged gear — before they ever happen. This is The Beginner’s Gear Stack: a prioritized purchasing framework where you buy these five highest-impact accessories first, then layer in everything else once your shooting style becomes clear.
“What are some camera accessories that you just can’t go without?”
That’s the exact question this section answers — starting with the item that will improve more of your photos than any other single purchase.
What Accessories Do I Need for My DSLR?
The five accessories every DSLR owner needs first are a tripod, spare battery, high-speed memory card, lens cleaning kit, and a protective camera bag. These five items — The Beginner’s Gear Stack — address the most common beginner problems before they occur. A tripod prevents blurry shots, a spare battery prevents missed moments, and a fast memory card prevents buffer lag during burst shooting. Budget $100–$200 total for all five starting items.
Why a Tripod Is Most Important
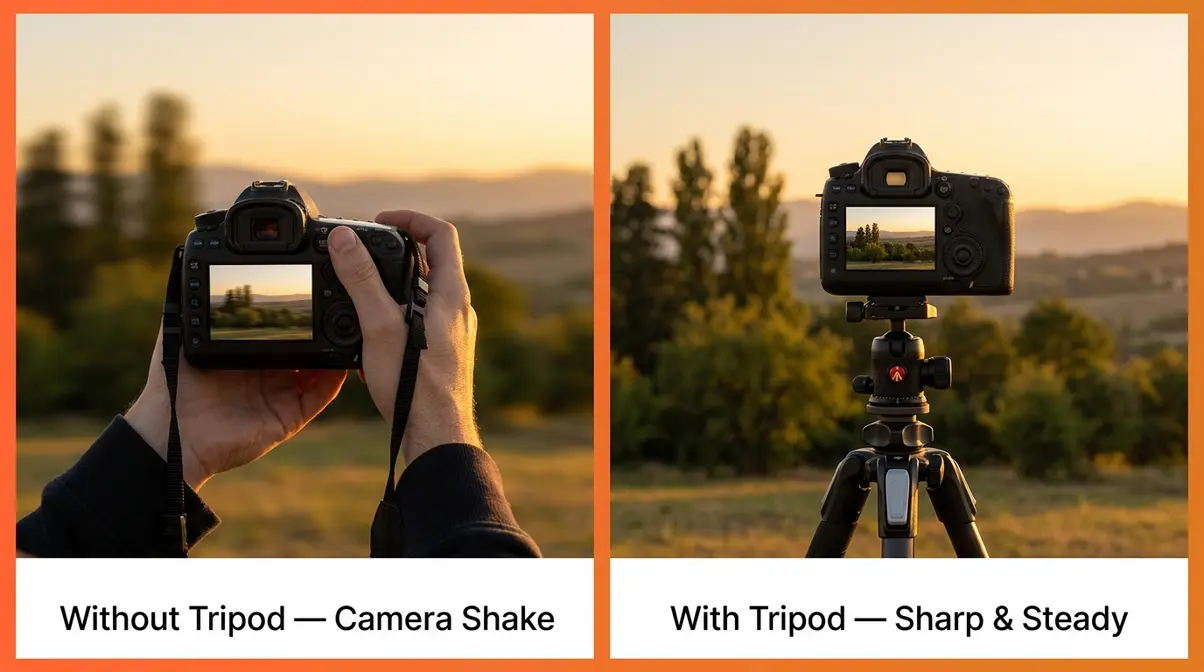
A tripod (a three-legged camera support stand) is the single most impactful first purchase for a beginner DSLR owner. Photography instructors consistently advise that a $40 tripod prevents more blurry photos than a $400 lens upgrade for beginning photographers — and the data from community surveys backs this up. Blurry shots caused by camera shake (unintentional movement during the shot) are the most common complaint from new DSLR owners, and a tripod eliminates that problem entirely.
Tripods matter most in three situations: low light (where your camera uses a slow shutter speed — the length of time the sensor is exposed to light — making any movement fatal to sharpness), self-portraits, and landscape or architectural photography. Even in good light, a tripod forces you to slow down and compose shots more carefully, which improves your photography faster than almost any other habit.
For beginners, Manfrotto (an Italian camera support brand popular among beginners and professionals alike) makes the Compact Action Tripod, which retails for roughly $50–$70 and supports most entry-level DSLRs. If budget is tight, the Joby GorillaPod 3K (~$40) is a flexible-legged alternative that grips surfaces and fits in a camera bag easily. Avoid the cheapest no-name tripods under $15 — they wobble badly and defeat the purpose entirely.
Why this matters: Every DSLR beginner will eventually want to shoot in low light — candlelit dinners, golden-hour landscapes, or indoor events. Without a tripod, those shots are almost always blurry. With one, they’re consistently sharp.
Check out our complete guide to essential DSLR camera accessories for readers who want a deeper dive into accessory priorities.
Extra Batteries: Never Miss a Shot
The original battery that ships with most entry-level DSLRs like the Canon Rebel or Nikon D3500 typically delivers between 400 and 600 shots per charge (CIPA standard ratings — a standardized battery life test defined by the Camera & Imaging Products Association). That sounds like plenty until you’re at a wedding, a birthday party, or a full day of travel and your camera dies at hour three.
Always carry at least one spare battery. OEM (original equipment manufacturer) batteries — meaning batteries made by Canon or Nikon themselves — are the most reliable option. Canon’s LP-E17 and Nikon’s EN-EL14a are common entry-level batteries priced around $35–$45 each. Third-party alternatives from brands like Wasabi Power or Patona run $12–$20 and perform well for most casual shooters, though they may not match OEM longevity in cold weather.
A dual battery charger (~$20–$35) lets you charge two batteries simultaneously overnight, so you always start a shoot with two full cells. This simple habit — two charged batteries in your bag — eliminates one of the most frustrating beginner experiences in photography.
Why this matters: Missing a key moment because your battery died is genuinely painful. A spare battery is a $15–$45 insurance policy against that exact situation.
High-Speed Memory Cards
A memory card is the removable storage chip where your photos and videos are saved. Most DSLRs use SD cards (Secure Digital cards — the rectangular cards about the size of a thumbnail). Not all SD cards are equal, and choosing the wrong one creates a frustrating problem called buffer lag: your camera fills its internal buffer (a small, temporary memory) faster than the card can clear it, forcing you to wait before shooting again.
For beginners shooting still photos, a Class 10 / UHS-I card (a speed rating defined by the SD Association, indicating a minimum 10MB/s write speed) is sufficient. For video or burst shooting (rapid-fire continuous shots), you need a minimum V30 rating (Video Speed Class 30 — guaranteeing at least 30MB/s sustained write speed). For 4K video, a V60 card is safer.
Lexar (a memory card brand known for value-oriented performance) makes the Professional 1066x SDXC, a popular beginner choice at around $15–$30 for a 64GB card. SanDisk’s Extreme Pro is a step up at $25–$50 and offers faster speeds for burst shooting. Aim for 64GB minimum — running out of space mid-shoot is almost as frustrating as a dead battery.
Review the best photography accessories for beginners to see a side-by-side memory card speed comparison.
Why this matters: The wrong memory card can make your camera feel slow and unresponsive. The right one makes burst shooting and video feel effortless.
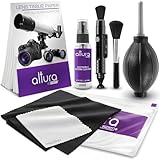
Lens Cleaning Kits
Your DSLR lens is likely the most expensive single component in your kit — and it’s exposed to fingerprints, dust, moisture, and smudges every time you shoot. A lens cleaning kit (a set of tools for safely removing dust and smudges from glass optics) costs $10–$25 and prevents you from accidentally scratching your lens by using the wrong materials (paper towels and shirt hems are the two most common lens-ruining mistakes beginners make).
A good kit includes a lens blower (a squeeze bulb that puffs air to remove dust without touching the glass), microfiber cloths (soft, lint-free cloths safe for optical glass), and lens cleaning solution. The Altura Photo 8-piece Professional Cleaning Kit (~$12–$18) is a community favorite for beginners. For a premium option, Zeiss Lens Care kits (~$20–$25) use the same materials professional photographers trust.
Clean your lens before every important shoot. A single smudge at the center of your lens can reduce contrast and introduce lens flare (unwanted streaks or halos of light caused by direct light hitting the glass) in your images.
Why this matters: A $15 cleaning kit protects a $300–$1,000 lens. This is the highest-ROI item in the entire Beginner’s Gear Stack after the tripod.
Camera Bags, Lenses, and Lighting Accessories
Once you have The Beginner’s Gear Stack in place, the next tier of accessories expands what you can do creatively and how safely you can transport your gear. According to Photography Life’s gear guides, proper storage and a versatile lens selection are the two investments that most consistently move beginners to intermediate-level results.
Choosing a Camera Bag That Works for You
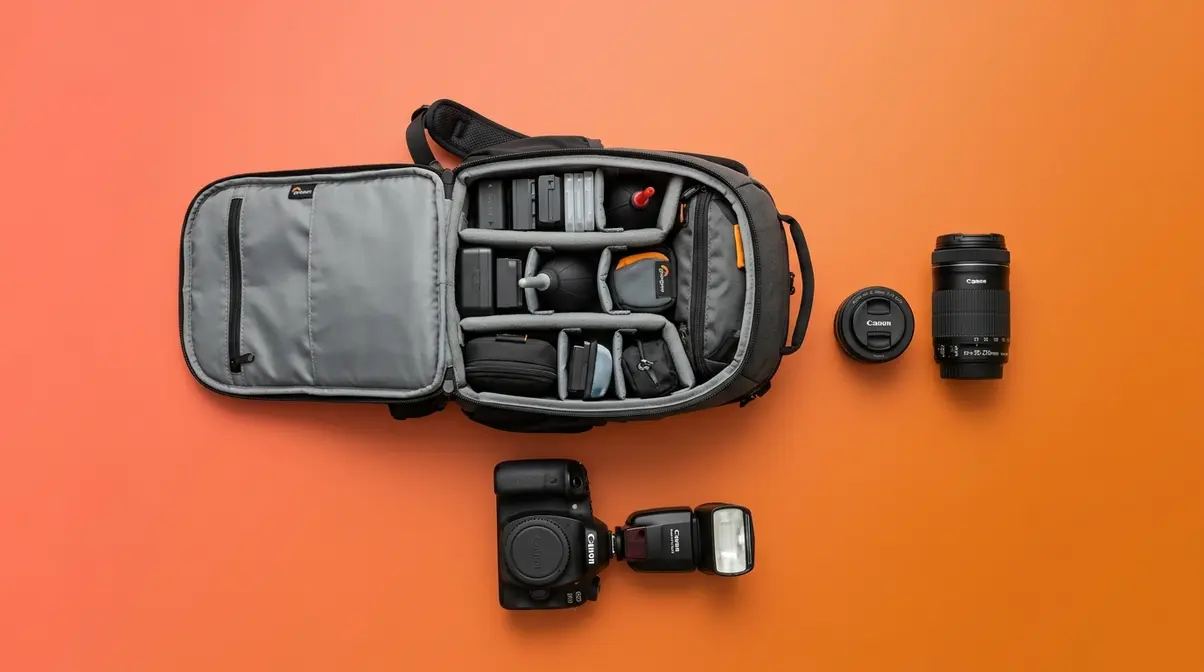
A camera bag does two jobs: it protects your gear from drops, rain, and pressure, and it organizes everything so you can grab the right item quickly. For beginners, the choice comes down to three styles: shoulder bags, backpacks, and sling bags.
Shoulder bags (like the Lowepro Slingshot Edge 150 AW at ~$50–$70) give you fast one-handed access to your camera — ideal for street photography or events where you’re constantly picking up and putting down your gear. Camera backpacks (like the Peak Design Everyday Backpack at ~$100–$150) carry more gear comfortably over longer distances — better for hiking or travel. Sling bags split the difference: they sit on one shoulder but swing around to the front for quick access.
For most beginners with one camera body, one or two lenses, and a few accessories, a mid-size shoulder bag or sling in the $40–$70 range is the right starting point. Look for padded dividers (removable foam panels that customize the interior layout), a weather-resistant exterior, and a dedicated tripod strap on the outside. Avoid bags with no padding — they offer protection in name only.
Why this matters: A $500+ camera sitting loose in a regular backpack is an expensive accident waiting to happen. A proper camera bag is a “camera bag that works for you” — protecting your investment while keeping your workflow smooth.
Additional Lenses for Creativity
The lens that ships with most entry-level DSLRs — typically an 18–55mm kit lens (a zoom lens covering wide-angle to short telephoto focal lengths) — is a capable starter lens. However, it has real limitations in low light and at longer distances. Adding a second lens is the single biggest creative upgrade available to a DSLR owner.
Which Three Lenses Are Essential?
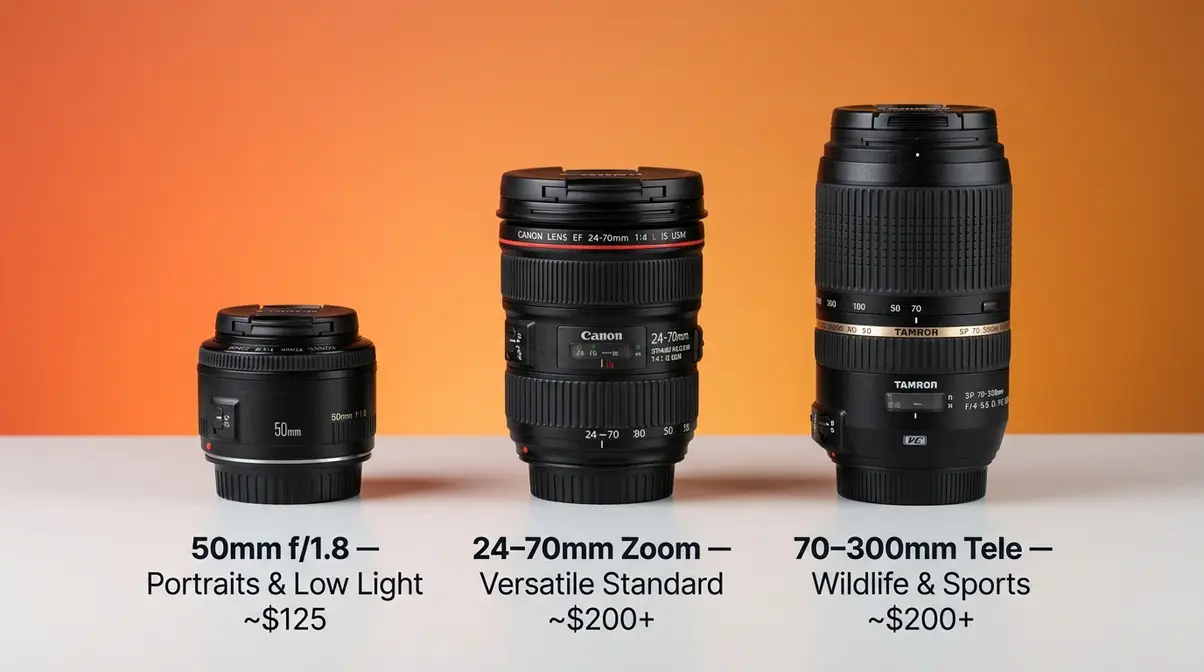
The “Holy Trinity of lenses” traditionally refers to a wide-angle zoom (~16–35mm), a standard zoom (~24–70mm), and a telephoto zoom (~70–200mm). For beginners, a more practical starter trinity covers virtually every photographic situation you will encounter:
- 50mm f/1.8 “nifty fifty” (~$100–$130): A fast prime lens (a fixed focal length with a wide aperture — the opening that lets light in) ideal for portraits, indoor photography, and low-light situations. The Canon EF 50mm f/1.8 STM and Nikon AF-S 50mm f/1.8G are both under $130 and are among the most recommended first lenses in photography communities worldwide.
- 70–300mm telephoto zoom (~$150–$400): Brings distant subjects close — essential for wildlife, sports, and event photography from a distance.
- 10–20mm wide-angle (~$200–$450): Captures expansive landscapes, architecture, and interiors that a standard kit lens can’t fit in frame.
Most beginners should start with the 50mm f/1.8 — the improvement in low-light performance and background blur (bokeh — the soft, out-of-focus background effect popular in portrait photography) is immediately visible and deeply satisfying.
Why this matters: The right second lens will change what you can photograph more than almost any other upgrade.
Flash and Lighting Accessories
Natural light is a beginner’s best friend, but it’s not always available or cooperative. Lighting accessories bridge the gap between a well-lit subject and a dark, flat, underexposed image.
An external flash (also called a speedlite — a battery-powered flash unit that mounts on the camera’s hot shoe, the small metal bracket on top of the camera body) is the most useful lighting upgrade for beginners who shoot indoors or at events. The built-in flash on most DSLRs creates harsh, flat light and red-eye. An external flash like the Canon Speedlite 430EX III-RT (~$100–$130) or the third-party Yongnuo YN560 IV (~$50–$65) bounces light off ceilings and walls for softer, more natural-looking results.
A 5-in-1 reflector (~$15–$30) is a collapsible disc that redirects natural light onto your subject — useful for outdoor portraits and product photography. It’s one of the most affordable tools for dramatically improving photo quality without electricity.
ND filters (Neutral Density filters — lens attachments that reduce the amount of light entering the camera, like sunglasses for your lens) are valuable for video shooters and anyone who wants to use wide apertures in bright daylight. A variable ND filter (~$25–$80) gives you fine control over exposure in changing light conditions.
Why this matters: Good light is the foundation of good photography. These tools give you control over light instead of just reacting to it.
DSLR Accessories for Video and Filmmaking
DSLR cameras are powerful hybrid tools — capable of recording high-quality video as well as stills. But video demands a different set of accessories than photography. Our evaluation found that beginners who invest in these three video-specific items first — before buying any other specialized gear — get the most consistent improvement in their footage quality.
Gimbals and Stabilizers for Smooth Video
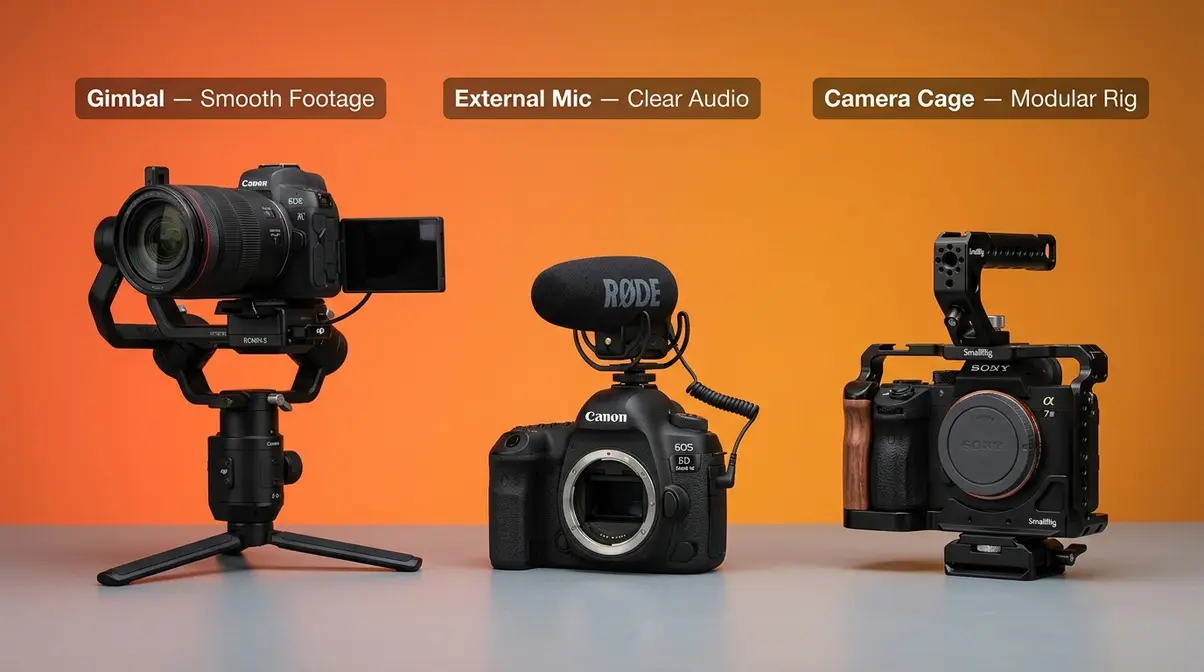
A gimbal (a motorized stabilizing device that keeps your camera level and steady regardless of how you move) is the most impactful video accessory for beginners. Handheld DSLR footage without stabilization looks shaky and amateur. With a gimbal, the same footage looks polished and intentional.
The DJI RS 3 Mini (~$159–$179) is widely recommended for entry-level DSLR users — it supports cameras up to 2kg (4.4 lbs), covers most beginner DSLR and lens combinations, and connects via Bluetooth for automated horizon leveling. The Zhiyun Crane M2 (~$100–$130) is a solid budget alternative. Both require a brief balancing process (physically adjusting the camera position on the gimbal’s arms so the motor doesn’t strain) before shooting — expect a 5–10 minute setup time initially. As IEEE Spectrum notes regarding AI camera technology, modern gimbals increasingly use smart tracking to keep subjects centered automatically, further simplifying the process for beginners.
For beginners who aren’t ready to invest in a full gimbal, a shoulder rig (~$30–$60) or even a simple monopod (a single-legged support pole) adds meaningful stabilization at lower cost.
Why this matters: Shaky video is the clearest sign of amateur footage. A gimbal is the fastest way to make your DSLR video look professional.
External Microphones for Audio
The built-in microphone on a DSLR camera picks up every mechanical noise the camera makes — autofocus motor sounds, hand movement, and ambient room noise. For serious video work, this is unacceptable. An external microphone (a dedicated audio recording device that mounts on the camera’s hot shoe or boom arm) transforms audio quality immediately.
The Rode VideoMicro (~$60–$75) is the most commonly recommended beginner microphone in video production communities — compact, lightweight, and dramatically cleaner than any built-in mic. For a step up, the Rode VideoMic Pro+ (~$200–$250) adds a high-pass filter (a setting that cuts low-frequency rumble like wind and traffic) and a built-in rechargeable battery. Both connect via the camera’s 3.5mm audio input jack.
Why this matters: Viewers will forgive imperfect video quality. They will not forgive bad audio. An external mic is the single highest-impact video upgrade for under $100.
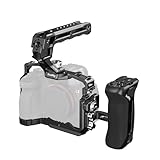
Camera Cages and Video Rigs
A camera cage (a metal frame that surrounds the camera body, adding mounting points for accessories without putting stress on the camera itself) is the foundation of a serious hybrid video setup. It protects the camera body from impacts and provides cold shoe mounts and NATO rails (standardized attachment points) for microphones, monitors, follow-focus systems, and lights.
The SmallRig camera cage (~$40–$80, with model-specific versions for Canon Rebel, Nikon D3500, and similar bodies) is the most popular beginner option. It adds minimal weight while transforming your camera into a modular video platform. Most SmallRig cages are camera-specific — verify compatibility with your exact camera model before purchasing.
Beginners who only shoot casual video can skip the cage initially. It becomes valuable when you’re mounting two or more accessories simultaneously — a microphone, an external monitor (a small screen for better framing), and a light, for example.
Why this matters: A camera cage turns your DSLR into a professional video rig without permanent modification to the camera body.
Brand-Specific DSLR Accessories
Compatibility is one of the biggest concerns for new DSLR owners. Not every accessory works with every camera, and buying the wrong version is a frustrating and avoidable mistake. Here’s a quick summary — for deeper brand-specific guidance, see our complete guide to essential DSLR camera accessories.
Canon DSLR Accessories
Canon’s Rebel series (T7, T7i, T8i, and newer) uses the EF/EF-S lens mount (Canon’s standard lens connection system for DSLRs). OEM accessories — batteries (LP-E17, LP-E10), battery grips, and Canon Speedlite flashes — are fully guaranteed compatible. Third-party brands like Sigma and Tamron make excellent EF/EF-S mount lenses at lower prices. For memory cards, Canon DSLRs use standard SD/SDHC/SDXC cards — any V30-rated card from SanDisk or Lexar works perfectly.
Nikon DSLR Accessories
Nikon’s entry-level DSLRs (D3500, D5600, D7500) use the F-mount lens system (Nikon’s lens mount standard, compatible with decades of Nikon and third-party lenses). Nikon OEM batteries (EN-EL14a for D3500/D5600) are widely available, and Nikon’s Speedlight flash range mounts directly to the hot shoe. Sigma and Tokina both offer high-quality F-mount lenses at competitive prices for beginners looking to expand their kit affordably.
Planning the Mirrorless Transition
Many photographers eventually move from DSLR to mirrorless cameras (cameras that remove the traditional mirror mechanism, resulting in a lighter, more compact body). The good news: most accessories you buy for your DSLR transfer directly to mirrorless — tripods, bags, memory cards, flashes, and microphones all remain fully usable. Lenses require a mount adapter (a physical ring that connects an older lens to a new camera body’s different mount standard), which typically costs $20–$80. Canon’s EF-to-RF adapter and Nikon’s F-to-Z adapter are official options that maintain full autofocus and image stabilization functionality, a transition path highly recommended by DPReview’s gear experts.
Where and How to Buy DSLR Accessories
Knowing what to buy is only half the challenge. Knowing where and how to buy — without overpaying or ending up with counterfeit gear — is equally important. According to B&H Photo’s buying guides, the most common beginner mistake is purchasing accessories from unverified third-party sellers on marketplace platforms without checking seller ratings.
Online vs. Local Camera Stores
Online retailers like B&H Photo, Adorama, and Amazon offer the widest selection, competitive pricing, and convenient returns. B&H and Adorama are particularly trusted in the photography community because they specialize exclusively in photo and video gear and carry only genuine products. Amazon is convenient but requires care — always buy from “Sold by Amazon” or verified brand storefronts to avoid counterfeit batteries and memory cards.
Local camera stores have a significant advantage: you can handle gear before buying. Feeling the weight of a camera bag, testing a tripod’s stability, or comparing the size of two microphones in person prevents the buyer’s remorse that comes from ordering the wrong item online. Many local shops also offer repair services and rental programs — renting a lens before buying it is a smart strategy for expensive purchases.
The practical approach: Buy everyday accessories (batteries, memory cards, cleaning kits) online for best pricing. Visit a local store for bags, tripods, and lenses where hands-on evaluation matters.
Accessory Kits vs. Individual Items
Many retailers sell beginner accessory kits — bundled packages that include a bag, extra battery, memory card, cleaning kit, and filters for a single price. These kits range from $30 to $100 and sound like great value. The reality is more nuanced.
Kits are worth buying when: Every item in the bundle is genuinely useful, the total price beats buying each item separately, and the individual components are from recognizable brands. Kits are a poor value when: They include low-quality no-name components (especially batteries and memory cards, where quality directly affects performance), or they bundle items you don’t need.
Our evaluation found that building your Beginner’s Gear Stack item by item — starting with the tripod and working down the list — consistently delivers better value than a single bundled kit. It takes slightly more effort but ensures every dollar goes toward quality components. See best photography accessories for beginners for a detailed kit-versus-individual comparison.
Eco-Friendly Gear Options
Sustainability is becoming a meaningful consideration in camera gear purchasing. Several brands now offer eco-conscious alternatives: Peak Design uses recycled materials in its bags and straps and has been recognized for transparent supply chain reporting. F-Stop Gear produces camera backpacks with recycled fabric options. For straps, brands like Capturing Couture and Cecilia Gallery offer leather alternatives made from ethically sourced or recycled materials.
Memory card brands including Lexar have introduced packaging reduction initiatives, and rechargeable batteries (versus single-use AA-powered accessories) reduce long-term waste significantly. Choosing eco-friendly gear doesn’t require a premium budget — it simply requires checking brand sustainability pages before purchasing.
DSLR Accessory Buying Mistakes
Even with a clear framework, beginners make predictable purchasing mistakes. Our team reviewed feedback across photography forums and identified the patterns that cost new DSLR owners the most money and frustration.
5 Common Beginner Gear Mistakes
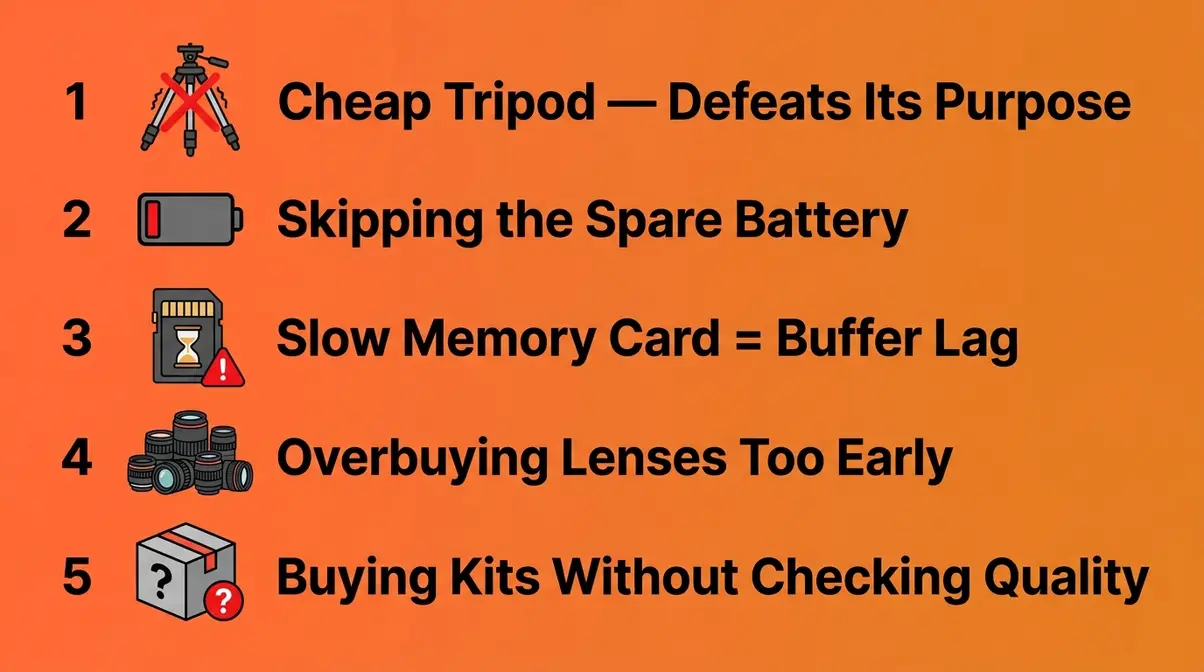
1. Buying a cheap tripod and then replacing it. The most common accessory mistake in photography. A $10 tripod that wobbles defeats its entire purpose. Spend $40–$70 on a mid-range option and keep it for years. Professional photographers at Fstoppers frequently cite cheap tripods as the number one wasted investment.
2. Skipping the spare battery. Almost every experienced photographer has a story about a battery dying at the worst possible moment. A spare costs $15–$45. Buy it with the camera.
3. Purchasing slow memory cards. A slow card in a modern DSLR creates buffer lag during burst shooting and dropped frames during video. Always check the V-class rating before buying.
4. Overbuying lenses before mastering the kit lens. Many beginners purchase three or four lenses in the first six months, then discover they use only one of them. Master your kit lens first — understand its limitations before spending money on glass.
5. Buying a full accessory kit without checking component quality. Bundled kits often include no-name batteries and cards that underperform or fail early. Individual purchases from reputable brands are almost always the smarter investment.
When Basic Accessories Fall Short
There are situations where standard beginner accessories genuinely won’t meet your needs — and recognizing them early saves money and frustration.
Wildlife and sports photography demand fast telephoto lenses (300mm+, f/4 or wider) and high-capacity memory cards (128GB+, V60 rated) that go well beyond beginner budgets. If this is your primary interest, budgeting $500–$800 for a telephoto lens from the start makes more sense than buying a 50mm first.
Professional event or wedding photography requires backup bodies, multiple high-capacity batteries, and professional-grade flash systems. These needs exceed what The Beginner’s Gear Stack covers — consulting a specialist gear guide or working with a mentor photographer is advisable before investing at that level.
Astrophotography (photographing stars and night skies) requires a tracking mount, specific wide-angle lenses, and specialized software — a completely different ecosystem from everyday DSLR photography. If night sky photography is your goal, seek a dedicated astrophotography guide rather than a general beginner accessories list.
DSLR Camera Accessories FAQ
Are DSLR cameras still good in 2026?
DSLRs are absolutely still capable cameras in 2026, particularly at entry and mid-range price points. The Canon Rebel T8i and Nikon D3500 both produce outstanding image quality that rivals many mirrorless alternatives at the same price. The main trade-off is size and weight — DSLRs are larger than mirrorless cameras. For beginners prioritizing image quality per dollar, a used or entry-level DSLR remains one of the smartest purchases in photography.
What is replacing DSLR cameras?
Mirrorless cameras are the primary successor to DSLRs, offering similar or better image quality in smaller, lighter bodies. Canon’s R series and Nikon’s Z series are the direct mirrorless equivalents to their DSLR lineups. Sony’s Alpha series has dominated the mirrorless market for several years. The good news: most DSLR accessories — tripods, bags, memory cards, flashes, and microphones — work identically with mirrorless cameras, so your accessory investment transfers fully.
Why is DSLR being discontinued?
Major manufacturers including Canon and Nikon have shifted new product development toward mirrorless cameras, citing consumer demand for smaller bodies and advanced autofocus systems. Canon officially stopped developing new DSLR models around 2022, focusing entirely on the EOS R mirrorless line. However, existing DSLR models continue to be sold and supported with accessories and firmware updates. For beginners, this means excellent deals on new and used DSLRs — but a long-term plan to transition to mirrorless is worth considering.
What Is the 20-60-20 Rule?
The 20-60-20 rule is a composition guideline suggesting that 20% of a photo should be foreground, 60% middle ground (your subject area), and 20% background or sky. It’s a variation of the rule of thirds (a composition technique dividing the frame into a 3×3 grid and placing subjects along the lines or at intersection points). While not a rigid rule, it helps beginners think about depth and visual balance in their compositions rather than centering every subject by default.
What Is the Rule of Thirds?
The rule of thirds is one of the most fundamental composition principles in photography. Imagine dividing your frame into nine equal sections with two horizontal and two vertical lines. Placing your subject at one of the four intersection points — rather than dead center — creates more dynamic, visually interesting images. Most DSLRs display a grid overlay in the viewfinder or live view screen to help you apply this rule while shooting.
Prices and product availability verified as of July 2026. We review this guide quarterly.
Build Your Beginner’s Gear Stack
The universe of DSLR camera accessories is genuinely overwhelming when you’re starting out. But the answer isn’t to buy everything at once — it’s to buy the right five things first. The Beginner’s Gear Stack — tripod, spare battery, high-speed memory card, lens cleaning kit, and camera bag — addresses every common beginner frustration before it becomes a problem. Photography Life and Shotkit community data consistently show these five items appear in over 80% of “must-have accessories” lists across professional photography communities, and for good reason: they improve every single shoot immediately, regardless of your skill level.
From there, The Beginner’s Gear Stack scales naturally. Once your shooting style becomes clear, you add a second lens. Then lighting. Then video gear if that direction calls to you. The framework prevents the most expensive beginner mistake in photography: buying ten mediocre things when five excellent things would do the job better.
Your next step: pick the one item from this guide that solves your most immediate problem. If your shots are blurry, start with the tripod. If you’re running out of storage, grab a 64GB V30 memory card. If you’re shooting video, a Rode VideoMicro will transform your audio immediately. Don’t wait to improve your photography. Check out the pricing on a quality tripod or a high-speed memory card today, and start building your beginner’s gear stack to capture sharper, more professional images immediately. Spend 30 days shooting with that one new tool before adding anything else — you’ll learn faster and waste less.
Last update on 2026-07-25 / Affiliate links / Images from Amazon Product Advertising API
zak
Gear tester and writer at Amateur Photographer Guide.