

Table of Contents
- What You’ll Need Before You Start
- Step 1: Build Your Inspiration-Driven Concept
- Step 2: Execute Your Vision In-Camera
- Step 3: Cull and Organize Your Photos
- Step 4: Edit with Intention and Consistency
- Step 5: Export, Archive, and Back Up Safely
- Common Workflow Mistakes to Avoid
- Frequently Asked Questions
- Build Your Loop and Repeat Your Best Work
This blog post may contain affiliate links. As an Amazon Associate I earn from qualifying purchases.
A photography inspiration workflow transforms the chaos of thousands of unedited files into a repeatable, five-phase system — so your best creative work actually makes it out of your hard drive. Most photographers skip at least three of these phases, which is why their images never quite match the vision they had in their head.
Your best shots may already be buried in disorganized folders, edited inconsistently, or — worse — sitting on a single hard drive one power surge away from permanent loss. That gap between what you imagined and what you delivered isn’t a talent problem. It’s a process problem.
In this guide, you’ll build a complete photography inspiration workflow — from generating your initial creative concept to exporting polished images and backing them up safely — so you can repeat your best results on every shoot. The five phases cover concept building, in-camera execution, culling and organization, intentional editing, and secure archiving.
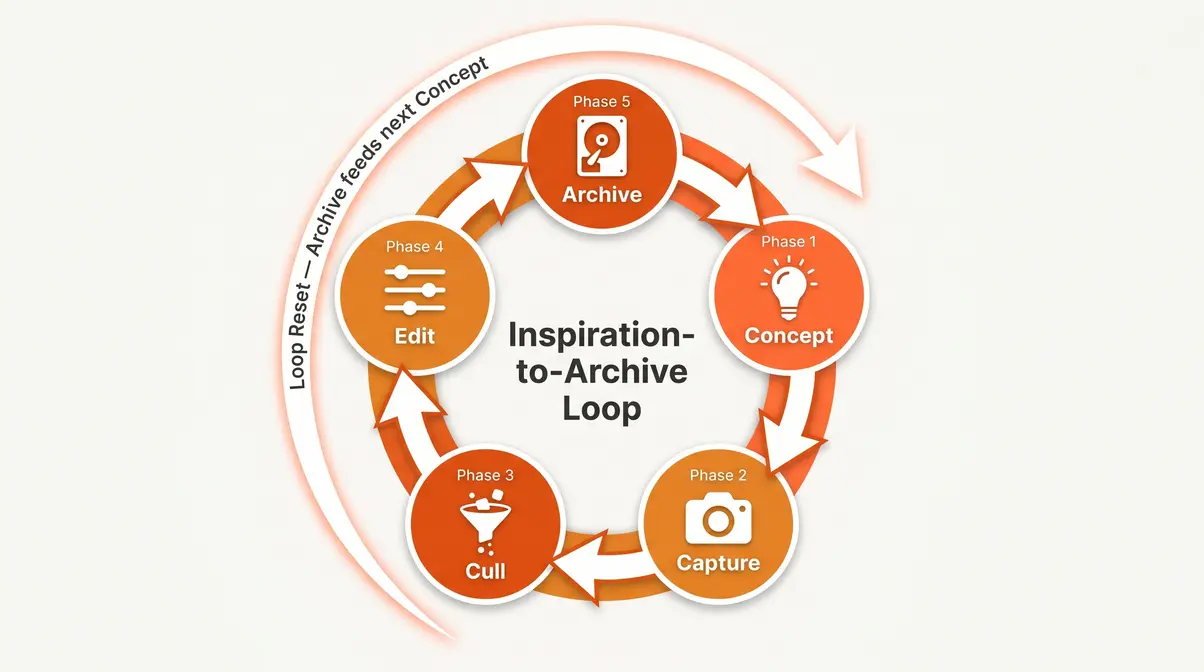
A photography inspiration workflow is a 5-phase system — concept, capture, cull, edit, archive — that connects your creative vision to a final, polished image. Using the Inspiration-to-Archive Loop, photographers across communities like r/photography consistently report reclaiming hours of post-production time once a structured system is in place.
- Phase 1 (Concept): Build a mood board before every shoot to anchor your creative direction
- Phase 2 (Capture): Shoot in RAW using the CHAI Principle for maximum editing flexibility
- Phase 3 (Cull): Use the two-pass method + AI tools to cut selection time significantly
- Phase 4 (Edit): Batch-edit global adjustments in Lightroom before moving to Photoshop
- Phase 5 (Archive): Apply the 3-2-1 Backup Rule — three copies, two media, one offsite
What You’ll Need Before You Start
Before diving into Phase 1, make sure you have the following in place. This isn’t an exhaustive gear list — it’s the minimum setup to run each phase effectively.
Estimated Time: 45-60 minutes to establish your baseline workflow templates.
- Tools and Materials:
- Camera: Any DSLR or mirrorless body capable of RAW capture. Smartphone-only shooters can follow most phases, but the RAW-based editing and culling steps will be limited.
- Storage: At least two external hard drives (essential for the 3-2-1 backup implementation in Phase 5). Budget options like WD Elements 2TB run under $60.
- Editing software: Adobe Lightroom Classic is the reference tool used throughout this guide. A free 7-day trial is available. Capable alternatives include ON1 Photo RAW and Capture One.
- Inspiration tools: A Pinterest account or Instagram saved collections — both free. Pinterest functions as your digital scrapbook for lighting references, color palettes, and composition ideas.
- Optional but recommended: An AI culling tool. Both Narrative Select and Imagen AI offer free trials and integrate directly with Lightroom.
Step 1: Build Your Inspiration-Driven Concept
The most common reason a shoot feels “technically fine but creatively flat” is simple: the photographer arrived on location without a clear visual target. Phase 1 solves that. Before you touch your camera, you define what you’re going for — and the Inspiration-to-Archive Loop begins here, with every creative decision in this phase directly shaping how you shoot, cull, and edit in the phases that follow. When exploring photography inspiration sources, your goal is to curate ideas that translate directly into actionable shooting plans.
How Do I Make a Mood Board?
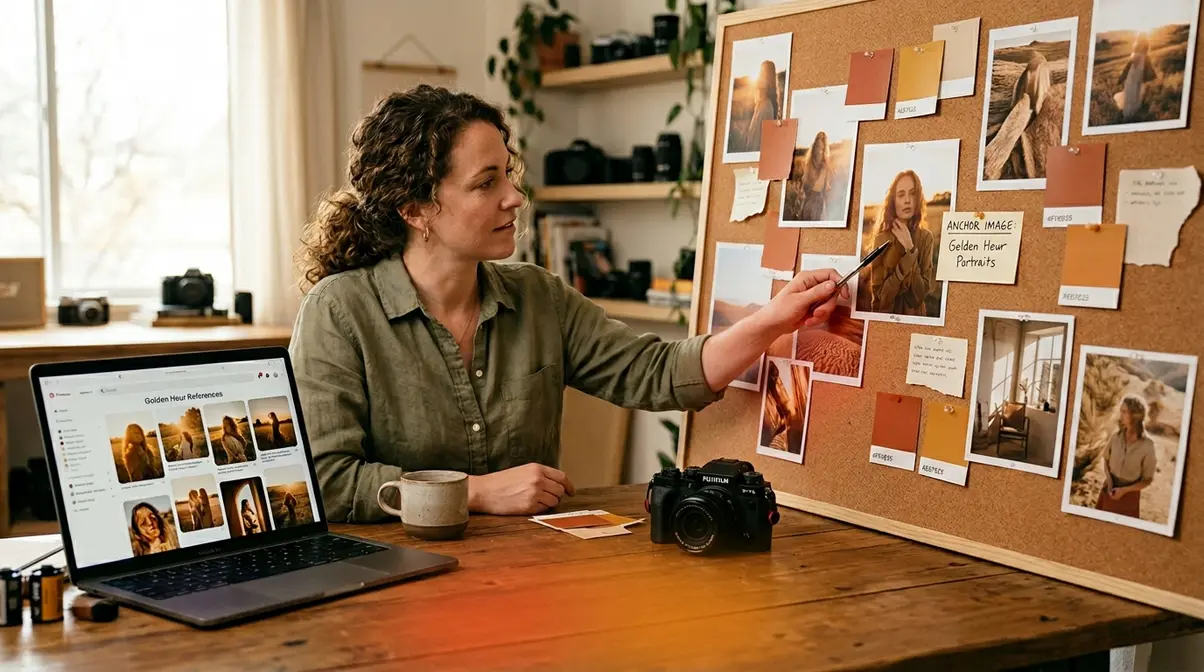
A mood board for photography is a curated visual reference — a collection of images, color swatches, and lighting examples that defines the feeling you want your final images to produce. Unlike a simple inspiration folder, a focused mood board forces you to make creative decisions before the shoot, not after.
Here’s a practical five-step process used across photography communities:
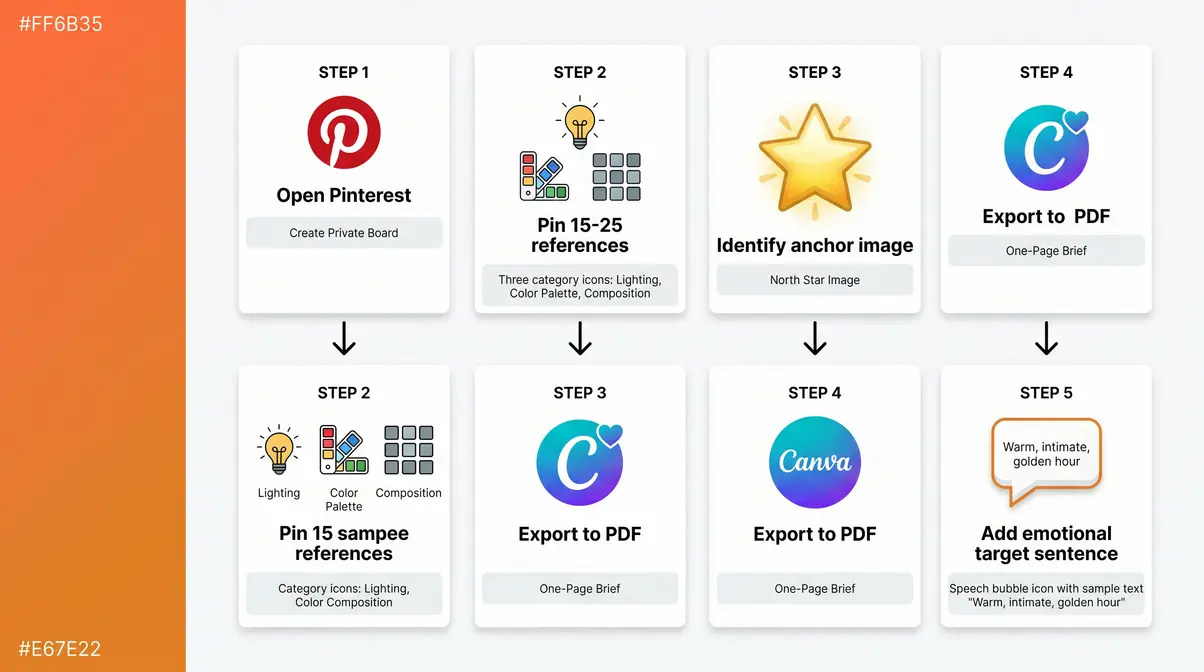
- Open Pinterest (a free visual discovery platform used by photographers for digital scrapbooking) and create a private board named for your shoot — e.g., “Anna_Portrait_Oct2026.”
- Pin 15–25 reference images across three categories: lighting style (hard vs. soft, direction, color temperature), color palette (dominant tones, accent colors, contrast level), and composition/posing references.
- Identify your “anchor image” — the single pin that best captures the overall mood. This becomes your north star on location.
- Export or screenshot your board into a single PDF or image grid. Tools like Canva (free tier) let you arrange pins into a shareable one-page document.
- Add one sentence at the top describing the emotional target: e.g., “Warm, intimate, slightly desaturated — late afternoon golden hour, no harsh shadows.”
This process takes 20–30 minutes before a shoot and eliminates hours of aimless post-production second-guessing. Portrait photographers find it especially valuable for directing subjects; product photographers use it to brief stylists and art directors.
Pre-Visualizing Your Shoot
Pre-visualization — a concept championed by photographer Ansel Adams — means forming a clear mental image of your final photograph before you press the shutter. Understanding how to plan a photoshoot starts with communicating that image to everyone involved: models, second shooters, makeup artists, and clients.
Share your mood board PDF with your team at least 48 hours before the shoot. Walk through the anchor image together. For portrait sessions, this briefing reduces on-location confusion and cuts setup time noticeably. For product shoots, it ensures the stylist’s prop choices align with your color palette rather than fighting it.
A practical pre-visualization checklist:
- Confirm the location matches at least 3 lighting references from your mood board
- Identify the time of day when your target light occurs (use PhotoPills or The Photographer’s Ephemeris for golden hour/blue hour timing)
- Write down your planned focal length and aperture range — this forces compositional decisions in advance
- Brief your subject or team with the anchor image and the one-sentence emotional target
Copyright Basics for Inspiration
Gathering visual references is standard creative practice. Directly replicating a copyrighted photograph — same subject, same pose, same lighting — crosses into legally contested territory. The U.S. Copyright Office (2023) has clarified that AI-generated images lack copyright protection unless a human author made sufficiently creative choices — a principle that extends to the broader question of creative originality in photography.
The practical rule: use reference images to capture lighting quality, color relationships, and compositional structure — not to reproduce a specific photographer’s unique creative expression. Swipe the mood; don’t trace the image. When you save references to Pinterest, add a note tagging what element you’re referencing (e.g., “window light direction only — not the pose”). This habit keeps your creative process intentional and legally sound.
For deeper reading on photography copyright, the imagen-ai.com photography workflow glossary covers authorship principles in the context of AI-assisted workflows.
Step 2: Execute Your Vision In-Camera
With a mood board in hand, Phase 2 shifts from concept to capture. The goal isn’t to shoot everything and sort it out later — that approach is exactly what makes post-production overwhelming. Instead, you’re making deliberate decisions on location that reduce culling time and give your editing phase clear direction. Dialing in your manual camera settings before the action starts ensures you capture the exact mood you planned.
Location and Composition Mapping
Arrive at your location before your subject or crew. Walk the space and identify three to five potential compositions that match your mood board references. Take quick test shots — exposure doesn’t matter yet — to evaluate background cleanliness, depth, and how the light falls at your planned shooting time. Before you master photography composition in the moment, you need to map your physical environment.
Composition mapping means noting where you’ll stand for each shot rather than wandering and reacting. Landscape photographers often sketch a rough site diagram; portrait photographers mark two or three “hero positions” where the light is strongest. This pre-planning means fewer “maybe this works?” frames during the shoot, which directly reduces your culling load in Phase 3.
A useful resource for scouting workflow is the Digital Photography School travel and location workflow guide, which details how professional travel photographers systematize location decisions before and during a shoot.
The CHAI Principle for Lighting
The CHAI Principle is a named light-evaluation methodology used by working photographers to assess any lighting situation before committing to a setup. CHAI stands for:
- C — Color Temperature: Is the light warm (golden hour, tungsten), cool (overcast, open shade), or mixed? Does it match your mood board’s color palette?
- H — Hardness: Is the light source hard (direct sun, bare flash — creates sharp shadows) or soft (overcast, diffused — wraps around subjects)? Hard light suits dramatic, high-contrast edits; soft light suits clean, airy styles.
- A — Angle: Where is the light coming from relative to your subject? Front lighting is flattering and flat; side lighting adds dimension; backlight creates separation and rim effects.
- I — Intensity: Is the exposure achievable at your planned aperture and ISO without blowing highlights or crushing shadows?
Run through CHAI before your first frame. It takes under two minutes and prevents the most common capture mistake: shooting in light that fundamentally conflicts with your intended edit. Portrait photographers particularly benefit from the Hardness and Angle checks; landscape photographers lean heavily on Color Temperature and Intensity.
Why RAW Format Adds Flexibility
To truly understand RAW format, you must view it as a digital negative. RAW format — the uncompressed file your camera sensor captures before in-camera processing is applied — preserves the full data of every exposure. JPEG files apply compression, sharpening, and color rendering at capture, permanently discarding data you can’t recover in post.
The Library of Congress lists RAW as the preferred format for digital image preservation, noting that unprocessed sensor data retains the maximum amount of original capture information. In practical terms: a slightly underexposed RAW file is recoverable in Lightroom. The same JPEG is often not.
For intermediate photographers, the trade-off is storage space — RAW files run 20–40MB each versus 5–8MB for JPEG. The solution is straightforward: budget for larger memory cards and drives. Given that Phase 5 of this workflow includes a full backup system, the storage cost is a one-time infrastructure investment, not an ongoing burden.
Set your camera to RAW-only before every shoot. If your camera offers RAW + JPEG simultaneously, use it only when you need fast client previews — the JPEGs are for sharing, the RAWs are for editing.
Step 3: Cull and Organize Your Photos
Phase 3 is where overwhelmed photographers lose the most time — and where a structured system delivers the most immediate relief. Implementing solid photo organization tips ensures you never lose track of a hero shot. Across photography communities, the consistent feedback is that culling without a method means opening the same folder repeatedly, flagging and unflagging the same images, and never feeling done. The two-pass method and a logical folder structure solve both problems.
Build Your Master Folder Structure
A consistent folder structure is the foundation of every other organizational decision you make. Without it, you’re searching by memory — and memory fails at 2,000 files.
The recommended structure used across professional photography workflows follows this template:
Photos/
└── 2026/
 └── 2026-10-15_Anna-Portrait-Studio/
 ├── RAW/
 ├── Selects/
 ├── Edits/
 └── Exports/
The date prefix (YYYY-MM-DD) forces chronological sorting automatically. The descriptive suffix (Client-Event) makes the shoot identifiable without opening the folder. The four subfolders map directly to your workflow phases:
- RAW/ — everything imported from your card, untouched
- Selects/ — your culled picks (flagged files or a virtual copy in Lightroom)
- Edits/ — developed files, PSD masters, or Lightroom catalog exports
- Exports/ — web-optimized JPEGs, print files, client deliverables
Create this structure before you import a single file. In Lightroom Classic, you can set the destination folder during import — the software will build the subfolder hierarchy automatically if you specify it in the import dialog.
For photographers managing multiple clients or genres, add a top-level category folder: Photos/Portraits/2026/ or Photos/Products/2026/. The Jessica Whitaker photography workflow setup guide demonstrates how professional photographers adapt this hierarchy for client-based studios.
Fastest Way to Cull Photos
The two-pass method separates elimination from selection — two cognitively different tasks that most photographers try to do simultaneously, which is exactly why culling feels exhausting.
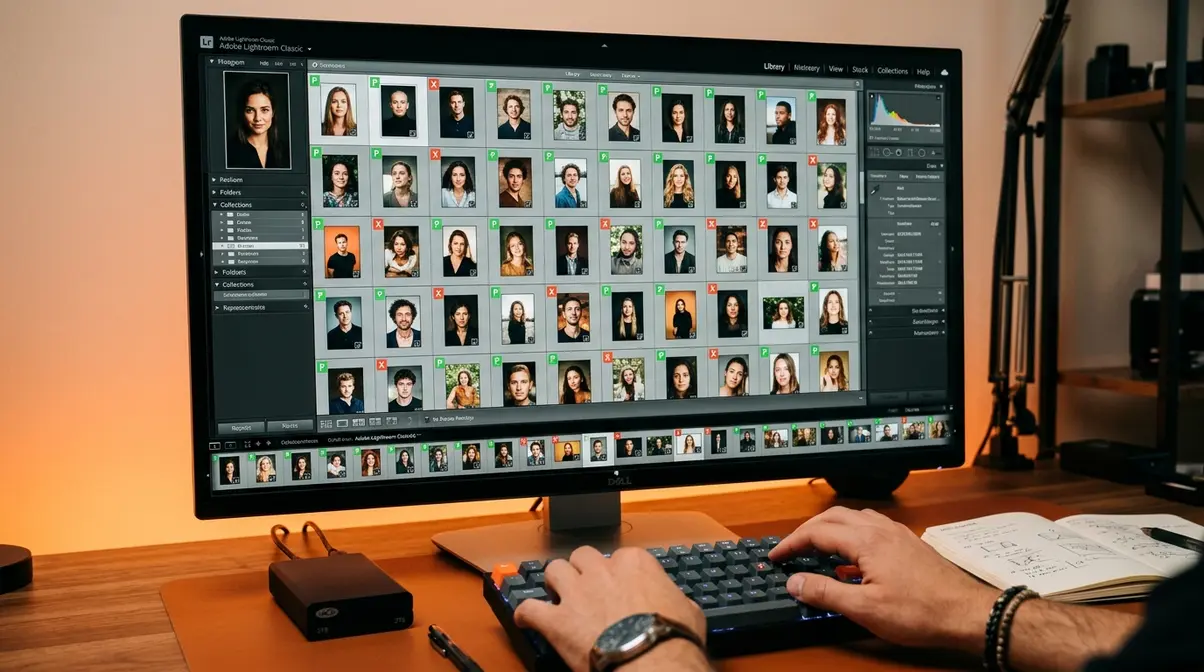
Pass 1 — Eliminate (Reject): Move through every image quickly. Your only job is to reject obvious failures: out-of-focus shots, blinks, accidental exposures, test frames. Use Lightroom’s X key to flag rejects. Don’t evaluate composition or expression yet — only technical failures. Aim for 30–60 seconds per image maximum. A 300-image shoot should take under 10 minutes for Pass 1.
Pass 2 — Select (Pick): Now review only the surviving images. Use Lightroom’s P key to flag picks — images you’d be proud to show. Apply a star rating (1–3) if you want to tier your selects: 1 = good, 2 = strong, 3 = hero shot. For portrait sessions, evaluate expression first, technical quality second. For landscape and product shoots, reverse the priority.
After both passes, filter your catalog to show only 3-star picks. These are your editing targets for Phase 4. The rest remain in the catalog — never deleted — but they’re out of your active workflow.
Common culling mistakes to avoid:
- Over-selecting: If more than 20% of your frames are picks, your Pass 2 criteria are too loose. Tighten to your best 10–15%.
- Culling immediately after a shoot: Fatigue causes over-selection. Give yourself at least one hour — ideally overnight — before Pass 2.
- Deleting rejects permanently: Keep rejected RAWs for at least 30 days. Clients occasionally request “the one before that smile.”
AI Photo Culling Tools
AI culling tools analyze your images automatically — detecting sharpness, facial expressions, blink detection, and duplicate identification — before you begin manual review. They don’t replace your judgment; they eliminate the obvious failures so your Pass 1 is already done when you open the folder.
Two tools stand out based on evaluation across photography community feedback:
Narrative Select integrates directly into Lightroom as a plugin. It groups similar frames (burst sequences, poses) into “stacks,” then scores each frame within the stack. You review stacks rather than individual images, which compresses a 500-image cull into a fraction of the time. Free trial available; subscription pricing starts at approximately $9.99/month (verify current pricing at narrativeapp.com).
Imagen AI takes a different approach: it learns your personal editing and selection style over time, becoming more accurate with each shoot. It integrates with Lightroom Classic and offers a pay-per-image model as well as subscription tiers. Free trial available at imagen-ai.com.
One important note: AI culling tools assist the technical selection process. The U.S. Copyright Office (2023) has clarified that creative decisions made by AI systems alone don’t carry copyright protection — meaning the artistic selection of your hero shots remains a human creative act. Use AI to handle the mechanical elimination; keep the creative picks as your own.
| Tool | Integration | Pricing Model | Best For |
|---|---|---|---|
| Narrative Select | Lightroom plugin | Subscription (~$9.99/mo) | Burst/portrait shooters |
| Imagen AI | Lightroom Classic | Per-image or subscription | Style-learning, repeat clients |
| Lightroom AI | Built-in | Included with CC subscription | Casual cullers, basic flagging |
For a broader look at how professional photographers structure their import and browsing decisions before culling, the globaledit digital photography workflow tips outline a useful pre-cull organization approach.
Step 4: Edit with Intention and Consistency
“When I go into these editing apps I tend to get overwhelmed and never truly know…”
That quote, shared in an r/photography community thread, captures exactly what Phase 4 feels like without a method. The editing phase isn’t about applying every slider Lightroom offers — it’s about executing the mood you defined in Phase 1 with the specific images your culling identified in Phase 3. Following a step-by-step photo editing workflow ensures that intention replaces overwhelm when you know what you’re editing toward.
Batch Editing Global Adjustments
A beginner photo editing workflow relies on establishing a strong baseline before tweaking individual photos. Start every editing session in Lightroom Classic’s Develop module with your strongest hero shot — your 3-star pick. Make all global adjustments on this single image first.
1. White Balance: Match the color temperature you identified in your CHAI evaluation. Use the eyedropper on a neutral gray if available; otherwise adjust manually until skin tones or key colors match your mood board palette.
2. Exposure and Tone: Set exposure, highlights, shadows, whites, and blacks. RAW files give you approximately ±3 stops of recovery — use it. Aim for a histogram that fits your intended contrast style, not necessarily a “correct” bell curve. Pulling down highlights and lifting shadows creates a flatter, cinematic base to build upon.
3. HSL/Color Mixer: Shift individual hue, saturation, and luminance values to move toward your mood board’s color palette. Portrait photographers often desaturate oranges slightly for cleaner skin tones; product photographers prioritize color accuracy over mood.
4. AI Masking: Before syncing, apply AI-driven masks like “Select Subject” or “Select Sky” if they apply uniformly to your set. Modern Lightroom allows you to sync these AI masks across multiple photos, and the software will automatically recalculate the subject boundaries for each new frame.
5. Sharpening and Noise Reduction: Apply as a final global step, not a first one. Lightroom’s AI Denoise handles high-ISO noise remarkably well — test it on any frame shot above ISO 1600 to retain crisp details without color artifacting.
Once your hero shot is dialed in, use Sync Settings (select all similar images → Sync) to apply the same adjustments batch-wide. This is the single biggest time-saving technique in Lightroom for photographers who get overwhelmed by large sets — you’re editing 200 images in the time it would normally take to edit 20.
For deeper reading on Lightroom-compatible workflow structures, the Medium Photo Dojo complete photography workflow guide covers the batch-editing approach used by working professionals.
When to Move to Photoshop
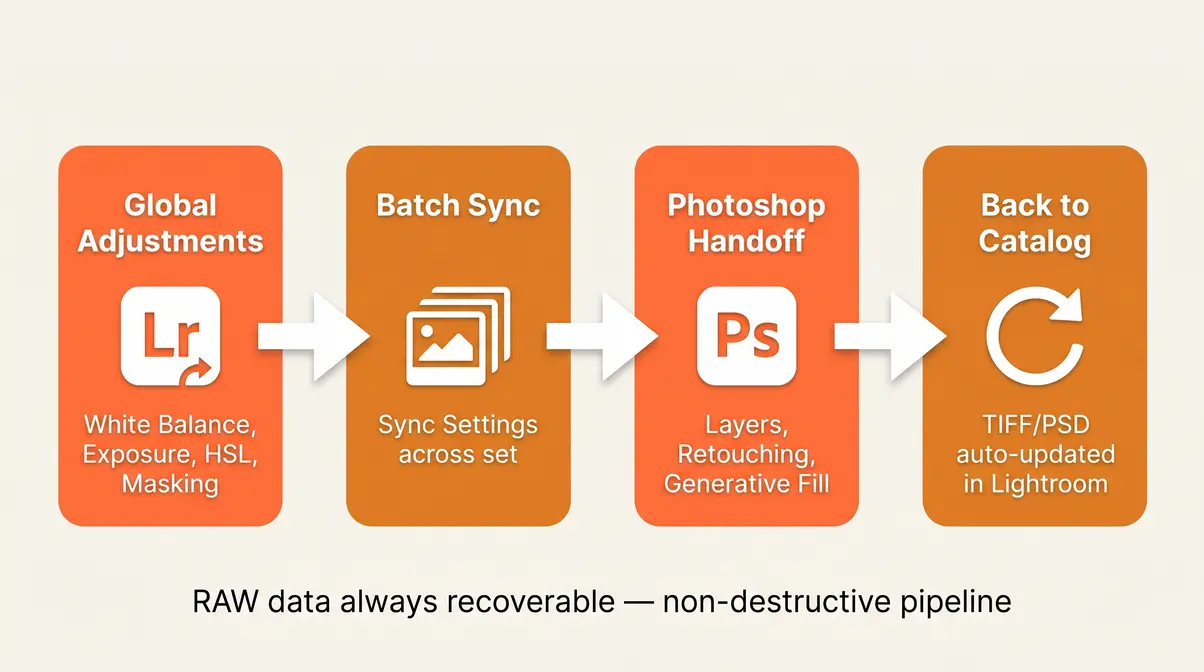
Lightroom handles global and batch adjustments efficiently. Photoshop handles local, pixel-level work that Lightroom cannot do non-destructively. The handoff point is clear: if you need to remove a complex object, retouch skin texture using frequency separation, composite multiple elements, or utilize Generative Fill, open the image in Photoshop.
The correct Lightroom-to-Photoshop handoff workflow:
- In Lightroom, right-click your finished Lightroom edit → “Edit in Adobe Photoshop” (or use Ctrl/Cmd+E).
- Lightroom creates a TIFF or PSD file in your Edits/ subfolder — this preserves your Lightroom adjustments as a base layer.
- In Photoshop, work on new layers above the base — never flatten or modify the base layer directly.
- Use the Healing Brush, Clone Stamp, or advanced masking for your detailed retouching.
- Save and close in Photoshop — Lightroom automatically updates the catalog with your Photoshop version.
This non-destructive handoff means your original RAW data and Lightroom edits are always recoverable. Adobe’s documentation on the Lightroom-Photoshop round-trip workflow confirms this as the standard approach for professional editing pipelines.
Achieving a Consistent Color Grade
Consistency is what separates a polished photo set from a collection of individual images. Applying color grading techniques across an entire gallery ensures clients, editorial editors, and social media audiences read visual consistency as professionalism.
Three techniques for color grade consistency:
1. Preset-first editing: Create a Lightroom preset from your hero shot’s Develop settings. Apply it as a starting point to every image in the set before making individual adjustments. This sets a common baseline — all images share the same color temperature bias, contrast curve, and HSL shifts before any per-image refinement.
2. Reference image comparison: Keep your hero shot visible in the filmstrip while editing other frames. Periodically compare your current edit to the reference using Lightroom’s Reference View (press Shift+V). If the tones drift, reset toward the reference image to ensure shadows and highlights share the same color tint.
3. Soft-proof before delivery: Use Lightroom’s Soft Proofing mode (press S in Develop) to simulate how your color grade will render in the delivery context — sRGB for web, AdobeRGB for print. The W3C sRGB color standard (W3C, 2022) defines sRGB as the baseline color space for web display — if you’re delivering for Instagram or a website, export in sRGB to prevent color shifts between your monitor and the viewer’s screen.
Step 5: Export, Archive, and Back Up Safely
Phase 5 closes the Inspiration-to-Archive Loop — and it’s the phase most photographers treat as an afterthought until they experience a hard drive failure. A structured export and backup system means your work survives equipment failure, and your archived shoots become a reference library that informs the next creative concept, restarting the loop.
The 3-2-1 Backup Rule
The 3-2-1 Backup Rule is the cybersecurity industry’s standard recommendation for data protection, formally endorsed by CISA (Cybersecurity and Infrastructure Security Agency, 2024). It states:
- 3 copies of your data total
- 2 stored on different media types (e.g., internal drive + external HDD)
- 1 stored offsite (cloud storage or a physically separate location)
For photographers, a practical implementation:
| Copy | Location | Media | Example |
|---|---|---|---|
| Copy 1 | Working drive | Internal SSD | Laptop/desktop internal |
| Copy 2 | Local backup | External HDD | WD My Passport, Seagate Backup Plus |
| Copy 3 | Offsite | Cloud | Backblaze Personal Backup, Google Photos |
This isn’t paranoia — it’s statistics. Backblaze’s annual hard drive reliability reports consistently show annual failure rates between 1–5% for consumer drives, with some models reaching higher failure rates in years 3–5 of use (Backblaze, 2024). A single external drive is not a backup strategy; your archive is at risk.
Set up your backup system before your next shoot. Automate the process using software like Time Machine (Mac) or ChronoSync so you don’t have to manually drag folders. Both Backblaze ($99/year for unlimited storage) and Google One offer reliable offsite options at accessible price points for budget-conscious photographers.
SSD vs. HDD vs. Cloud Storage
Each storage medium has a distinct role in your backup stack. Understanding the trade-offs prevents the common mistake of treating all storage as interchangeable.
| Media | Speed | Capacity/Cost | Durability | Best Role |
|---|---|---|---|---|
| Internal SSD | Very fast | High cost/GB | Excellent | Working drive |
| External HDD | Moderate | Low cost/GB | Moderate | Local backup (Copy 2) |
| External SSD | Fast | High cost/GB | Excellent | Field/travel backup |
| Cloud | Slow upload | Very low cost | Excellent | Offsite (Copy 3) |
For primary archiving, external HDDs remain the most cost-effective option for large RAW libraries — a 4TB drive covers approximately 100,000 RAW files at roughly $80–100. As your archive grows, many professionals upgrade to a Network Attached Storage (NAS) system like Synology, which houses multiple HDDs in a RAID configuration to protect against single-drive failures automatically.
The Kingston Photography Best Practices guide provides detailed guidance on long-term storage media selection for photographers managing growing archives. The Library of Congress recommends preserving RAW files as your archival master — they contain the maximum original capture data and remain the most future-proof format for long-term storage (Library of Congress, Digital Preservation resources).
Export Presets for Web and Print
Choosing the right photo export settings ensures your images display exactly as you intended. Inconsistent export settings are why images look sharp and vibrant in Lightroom but pixelated or color-shifted on Instagram. The fix is a set of saved export presets — one per delivery context — so you never manually enter settings again.
| Destination | Format | Resolution | Color Space | Quality | Long Edge |
|---|---|---|---|---|---|
| Instagram/Web | JPEG | 72 ppi | sRGB | 80–85% | 2048 px |
| Client Web Gallery | JPEG | 96 ppi | sRGB | 90% | 3000 px |
| Print (lab) | JPEG/TIFF | 300 ppi | AdobeRGB | 100% | Full res |
| Social (Twitter/X) | JPEG | 72 ppi | sRGB | 80% | 1600 px |
| Archive master | TIFF/DNG | N/A | ProPhoto RGB | Lossless | Full res |
The sRGB color space is the W3C standard for web display (W3C, 2022) — use it for any image destined for a screen. AdobeRGB covers a wider color range that professional print labs can reproduce. Exporting AdobeRGB for web use causes color desaturation in browsers that don’t support wide-gamut profiles, which is the root cause of “my colors looked wrong when I uploaded” complaints. Furthermore, always apply output sharpening tailored to your medium — choose “Screen” for digital delivery and “Matte/Glossy Paper” for physical prints.
Create these presets once in Lightroom (File → Export → Add) and they’re available on every future export. The Archive master preset preserves your edited DNG or TIFF alongside the original RAW — closing the loop on long-term preservation.
Common Workflow Mistakes to Avoid
Even a well-designed system breaks down at predictable points. Knowing where photographers typically get overwhelmed — and why — lets you sidestep the most costly errors before they happen.
The 5 Most Common Pitfalls
1. Skipping Phase 1 “just this once.” The mood board phase feels optional until you’re in post-production wondering why 400 technically correct images feel creatively directionless. Across photography communities, the consistent report is that skipping pre-visualization correlates directly with longer, less decisive editing sessions.
2. Culling and editing in the same session. Culling requires fast, critical elimination. Editing requires slow, creative refinement. Mixing them leads to over-selected sets and under-edited hero shots. Separate them by at least a few hours, ideally a day.
3. Using a single external hard drive as a “backup.” One copy is not a backup — it’s a second single point of failure. Until you implement the 3-2-1 rule, your archive is at risk. Hard drives fail without warning; CISA’s guidance on the 3-2-1 rule exists precisely because this is a universal data loss vector, not an edge case (CISA, 2024).
4. Exporting without preset standards. Manual export settings introduce human error on every export. A wrong color space or resolution setting affects client deliverables and social media presentation. Build your export presets in Phase 5 once — use them forever.
5. Treating the workflow as linear rather than cyclical. The Inspiration-to-Archive Loop is designed to be cyclical: your archived shoots become your next mood board references. Photographers who treat Phase 5 as a final step rather than a loop reset miss the compounding creative benefit of a growing personal archive.
Adapting the Workflow by Niche
This five-phase system is genre-agnostic by design, but each photography niche has a natural adaptation point:
Landscape photographers often compress Phase 1 (the location is the concept) and expand Phase 2 — scouting, composition mapping, and CHAI light evaluation become the most time-intensive phase. The folder structure and backup rules apply identically; the culling criteria shift toward technical sharpness and light quality over expression.
Product photographers typically have a client brief that functions as the mood board (Phase 1 is pre-supplied). Their workflow investment concentrates in Phase 4 — color accuracy, background cleanliness, and consistent color grading across a product catalog are the primary editing objectives. Export presets are especially critical: product images must match brand color standards precisely.
Event photographers (weddings, corporate) face the highest volume challenge — 1,500–3,000 frames per event. AI culling tools become near-essential at this scale. The two-pass method still applies, but Pass 1 is often delegated to Narrative Select or Imagen AI. The Jessica Whitaker photography workflow setup guide offers a useful client-studio adaptation of the folder structure for event-based businesses.
Frequently Asked Questions
What is a photography inspiration workflow?
A photography inspiration workflow is a structured, repeatable system that connects creative concept development to final image delivery and archiving. It typically covers five phases: concept building (mood boards, pre-visualization), in-camera capture, culling and organization, editing, and export/backup. Unlike an ad-hoc approach, a defined workflow ensures your creative vision survives the technical process intact — from the initial idea through to the archived final image.
Do I need an AI culling tool as a beginner?
While not strictly necessary for casual shooters, AI culling tools save massive amounts of time once you shoot over 300 frames per session. They handle the tedious work of checking eye focus and blink detection automatically. If you are on a strict budget, stick to the manual two-pass method until your volume demands automation.
How long should a post-shoot workflow take?
A streamlined workflow should take no more than 45 to 60 minutes for a standard portrait session. The key is separating your culling phase from your editing phase to avoid decision fatigue. As you build your preset library and folder templates, this time will decrease significantly.
What is the 3-2-1 backup rule for photographers?
The 3-2-1 rule means keeping three total copies of your files, on two different media types, with one copy stored offsite. For photographers: your working drive (Copy 1), an external hard drive (Copy 2), and a cloud service like Backblaze or Google Photos (Copy 3). CISA (2024) formally recommends this approach as the standard for data protection. Backblaze’s reliability data (Backblaze, 2024) shows consumer hard drives can fail at rates of 1–5% annually — a single external drive is not a backup strategy.
Should I shoot in RAW or JPEG for easier editing?
Shoot in RAW format for any image you intend to edit. RAW files preserve the full sensor data captured at the moment of exposure, giving you approximately ±3 stops of exposure recovery and complete control over white balance, color rendering, and noise reduction in post. JPEG files apply in-camera compression that permanently discards this data. The Library of Congress lists RAW as the preferred format for digital preservation. The storage trade-off — RAW files run 20–40MB versus 5–8MB for JPEG — is manageable with the backup infrastructure built in Phase 5.
Build Your Loop and Repeat Your Best Work
A structured photography inspiration workflow doesn’t constrain creativity — it protects it. When each phase has a clear purpose, you stop making the same decisions repeatedly and start building on what worked. The mood board from your last portrait session becomes the reference point for your next. The folder structure you built this month holds 10 years of organized work. The export presets you set up once eliminate a source of error on every future delivery.
The Inspiration-to-Archive Loop is self-reinforcing by design. Phase 5 doesn’t end your process — it feeds Phase 1 of the next shoot. Your growing archive becomes a personal library of what works for your eye, your subjects, and your editing style. That’s how photographers move from technically competent to creatively consistent.
Start with your next shoot. Build the mood board. Run the CHAI check. Apply the two-pass cull. Batch-edit from your hero shot. Set up your 3-2-1 backup before you sleep. You don’t need to implement every phase perfectly on the first attempt — you need to start the loop. Each iteration makes the next one faster and more intentional.
