

Table of Contents
- Before You Start: What You Need to Know
- Step 1 — C1: Cull Your Photos
- Step 2 — C2: Crop Your Composition
- Step 3 – C3: Correct Exposure & White Balance
- Step 4 — C4: Enhance Your Color
- Step 5 — C5: Clean Your Final Image
- Choosing Your First Editing Tools
- Common Mistakes Beginners Make
- Frequently Asked Questions
- Your Next Editing Session Starts Here
This blog post may contain affiliate links. As an Amazon Associate I earn from qualifying purchases.
“Lightroom editing overwhelms me — I need a beginner workflow I can actually follow.”
If that sounds familiar, you’re not alone — and you’re not doing anything wrong. Most editing guides drop you into a list of sliders with no system behind them. Without a repeatable process, every editing session starts from scratch, and your results stay inconsistent.
In this guide, you’ll learn the 5 C’s Framework — a five-step photo editing workflow for beginners that works in any software, on any device. We’ll walk through each step in order, with before/after examples and both free and paid tool options at every stage.
What is a photo editing workflow for beginners? It’s a repeatable series of steps you follow every time:
- Cull — select your best images and delete the technical failures
- Crop — fix your composition and straighten the frame
- Correct — adjust exposure and white balance
- Color — enhance colors and set the mood
- Clean — sharpen, retouch, and export your final image
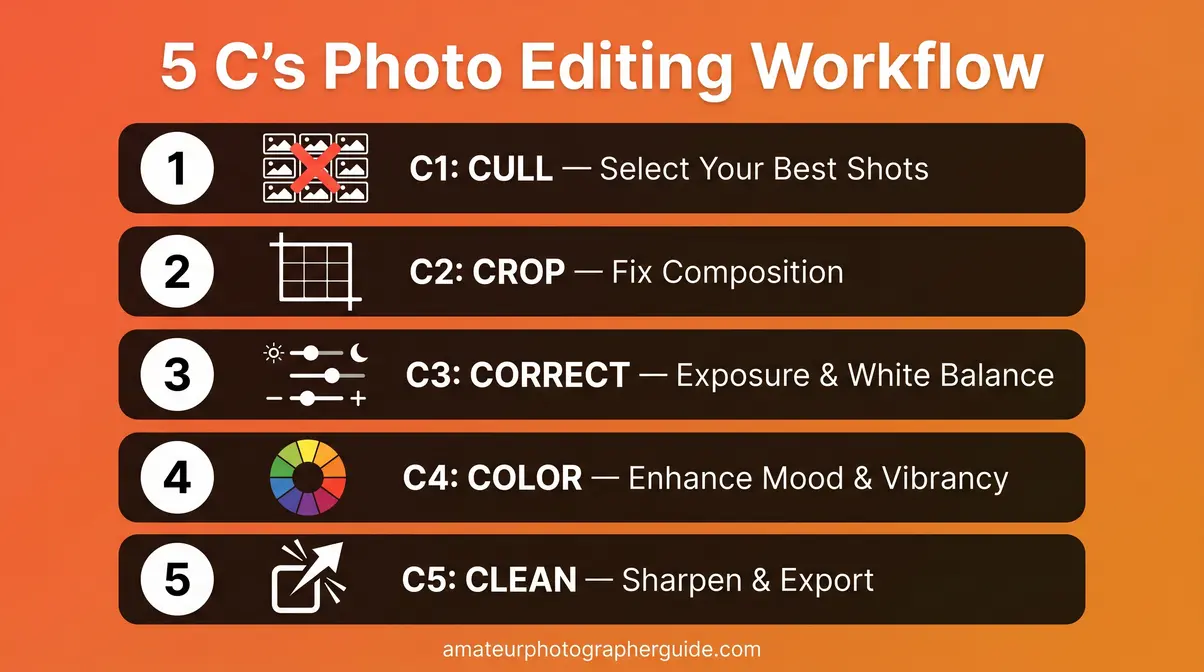
A beginner photo editing workflow becomes simple when you follow the 5 C’s Framework — Cull, Crop, Correct, Color, Clean — in the same order every time for consistent, professional-looking results.
- Cull first: Delete technical failures before editing a single photo
- Global before local: Fix exposure and white balance before touching color
- The 5 C’s Framework works in any software — Lightroom, Snapseed, or Apple Photos
- Free tools (Snapseed, Photopea) handle every step in this guide
- Over-editing is the #1 beginner mistake — the goal is natural, not processed
Before You Start: What You Need to Know

A strong foundation prevents the most common beginner headaches. Before you open any editing software, two decisions will shape everything that follows: understanding what a workflow actually is, and choosing the right file format to edit.
- Estimated Time: 15-30 minutes per session
- Tools Needed:
- A computer, tablet, or smartphone
- Photo editing software (e.g., Lightroom, Snapseed, or Photopea)
- Unedited photos (preferably RAW files)
What Is a Photo Editing Workflow?
A photo editing workflow is a repeatable series of steps you follow every time you edit a photo — so you always know what to do next and never stare at a blank screen wondering where to begin.
Without a system, every session feels like reinventing the wheel. Beginners consistently report spending more time deciding what to adjust than actually adjusting anything. A workflow removes that paralysis entirely.
The framework you’ll follow in this guide is the 5 C’s Framework: Cull, Crop, Correct, Color, Clean. Each step builds on the last. You’ll also want to understand non-destructive editing (a method that lets you undo any change at any time without damaging your original file) — it’s the safety net that makes experimenting feel safe.
The American Society of Media Photographers recommends a 3-2-1 backup strategy — three copies of every file, on two different media, with one stored off-site — before any editing begins (ASMP digital workflow best practices, ASMP, 2026). Set that up once, and you’ll never lose a photo to a hard drive failure.
What are the 5 basics of photo editing?
The 5 basics of photo editing are culling (selecting your best images), cropping (fixing composition), exposure correction (brightness, contrast, highlights, shadows), white balance correction (removing color casts), and sharpening/export. These five fundamentals correspond directly to the 5 C’s Framework — Cull, Crop, Correct, Color, Clean — and cover every adjustment a beginner needs to produce consistent, professional-looking results without advanced techniques.
RAW vs. JPEG: Which Format to Edit?
Your camera saves photos in two main formats. RAW is a large, uncompressed file format that preserves maximum editing flexibility — every shadow detail, every highlight, every color nuance is stored and recoverable. JPEG is a compressed format that’s smaller and easier to share, but the camera has already processed and discarded data you can’t get back.
For editing, RAW wins every time. Correcting a slightly overexposed JPEG often produces a washed-out, blotchy result. The same correction on a RAW file looks clean and natural.
Our recommendation: If your camera offers RAW shooting (most DSLRs, mirrorless cameras, and even some smartphones do), turn it on now. If you’re shooting on a smartphone with no RAW option, JPEG is perfectly workable — just be more careful with exposure in-camera.
Before you open your editing software, there’s one more important decision to make: which tool to use. We cover that in the Tools section — but first, let’s walk through the 5 C’s Framework step by step.
Step 1 — C1: Cull Your Photos

Culling (selecting your best images and discarding the rest) is the step most beginners skip — and it’s the one that wastes the most time. Editing a blurry photo to perfection is effort spent on something you’ll never use. Photographers who cull before editing consistently report faster sessions and more consistent final results. If you want to expand upon this foundation later, you can always consult our step-by-step photo editing guide for a deeper 12-step approach.
How to Import and Organize Your Photos
Good organization before editing saves hours of frustration later. Here’s the process our team of photographers uses consistently:
- Create a dated folder on your computer or in your app (e.g., 2026-07-14_Beach_Shoot). Consistent naming means you can find any session in seconds.
- Copy (don’t move) your files from your memory card to your computer. Moving risks data loss if the transfer is interrupted.
- Import into your editing software. In Lightroom, go to File → Import Photos. In Snapseed (mobile), tap the + icon and select your photo from your camera roll. In Apple Photos, simply connect your camera or select images from your library.
- Back up before you edit. Apply the 3-2-1 rule: one copy on your computer, one on an external drive, one in cloud storage (Google Photos or iCloud both work).
This setup takes about five minutes per session. Skip it once and you’ll understand why it matters.
How to Cull: Picking Your Winners
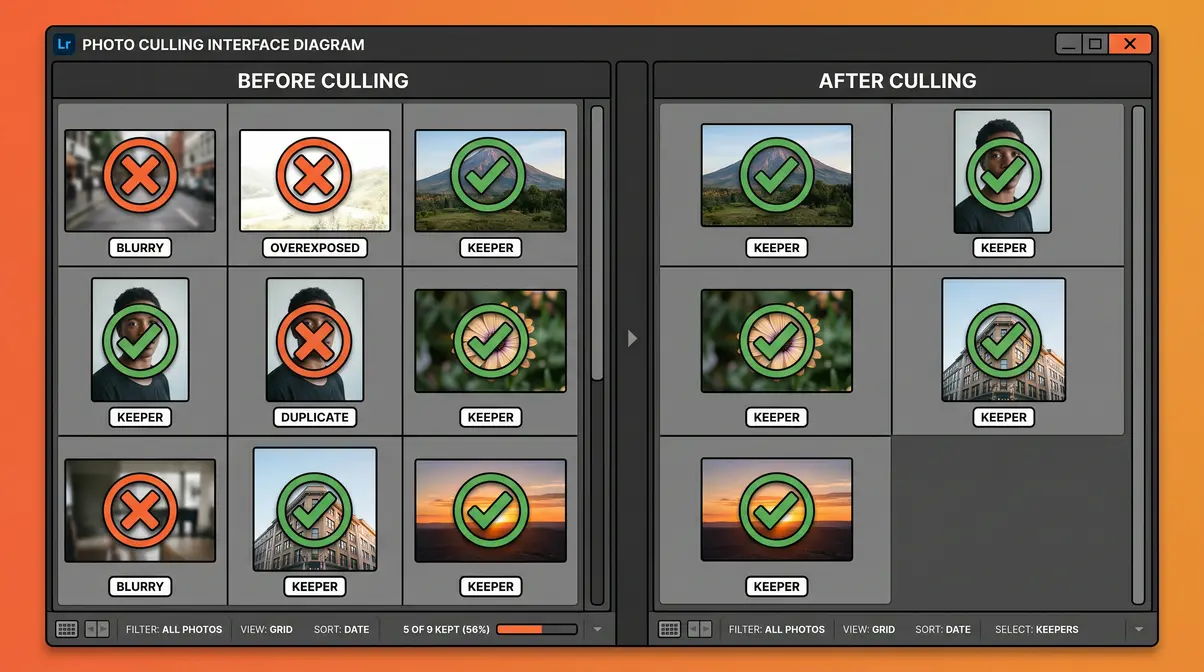
Open your folder and go through every image quickly — don’t linger. You’re looking for technical failures to eliminate, not photos to admire yet.
- Reject these immediately:
- Out-of-focus shots (check the eyes in portraits, the subject edge in landscapes)
- Motion blur you didn’t intend
- Severe overexposure (pure white areas with no recoverable detail)
- Duplicate near-identical shots — keep only the sharpest one
- Flag these as keepers:
- Sharp focus on your main subject
- Correct or recoverable exposure
- A composition you like (even roughly)
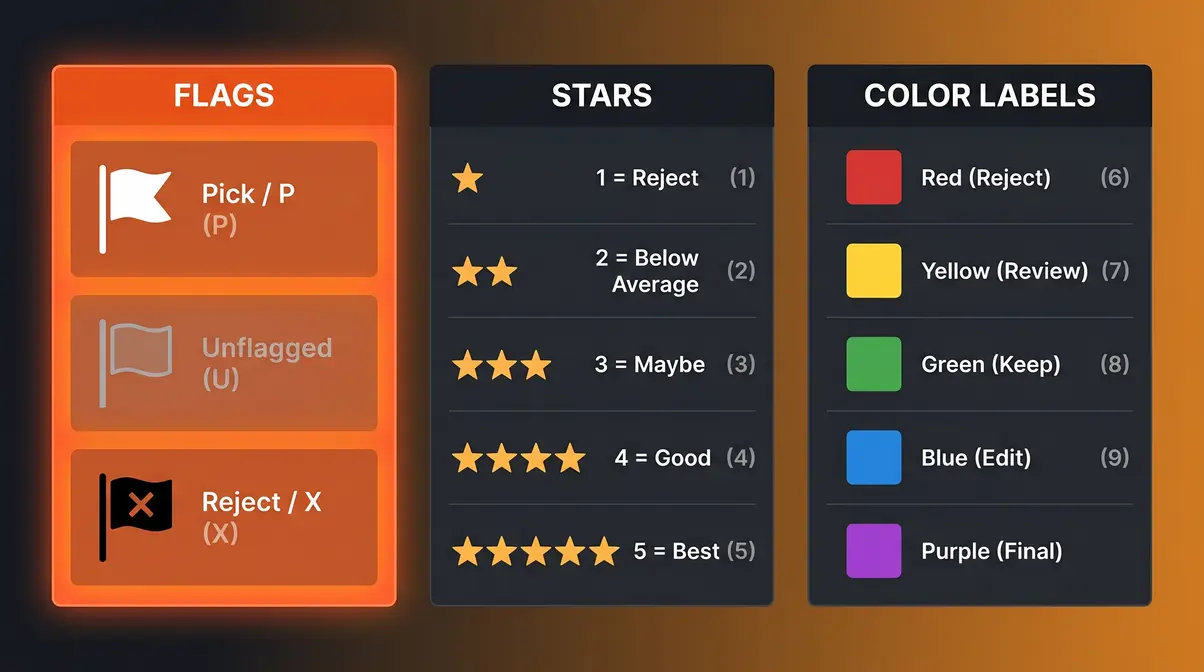
In Lightroom, press P to flag a keeper and X to reject. After culling, press Ctrl+Backspace (PC) or Cmd+Delete (Mac) to remove all rejected images. In Snapseed or Apple Photos, simply delete the obvious failures from your camera roll before opening any image to edit.
Modern AI culling tools have also entered the beginner space. Aftershot AI and Lightroom’s “Select” AI feature (available in Lightroom 2026+) can scan a burst of photos and automatically surface the sharpest, best-exposed shot. These are genuinely useful for beginners who struggle to evaluate sharpness on a small screen.
Quick Culling Tips for Beginners
- Zoom to 100% before deciding if a photo is sharp. What looks sharp at thumbnail size is often blurry at full resolution.
- Aim to keep 10-20% of a large shoot. If you shot 200 photos at a birthday party, editing 20-40 strong ones is realistic. Editing all 200 is how editing sessions become a chore.
- Cull in one sitting. Splitting culling across multiple sessions leads to duplicate keepers and lost context about what you were trying to capture.
Where the 5 C’s Framework shines is in this first step: by culling ruthlessly, every photo you edit deserves your attention. That shifts editing from a slog into something genuinely enjoyable.
Step 2 — C2: Crop Your Composition
Cropping isn’t just about making a photo smaller — it’s about guiding the eye to your subject and removing distractions from the frame. Beginners often skip or rush this step, then spend time on color corrections that won’t matter because the composition is still pulling attention to the wrong place.
What is the golden rule of photography?
The golden rule of photography most commonly refers to the rule of thirds — placing your main subject at one of the four intersection points of an imaginary 3×3 grid over your frame. It creates natural visual tension and makes compositions feel balanced without being symmetrically static. Adobe’s composition guide identifies it as the single most reliable compositional principle for photographers at any level (Adobe, 2026). While some photographers also prefer to understand the Golden Ratio in photography for spiral-based framing, the rule of thirds remains the practical everyday standard.
Using the Rule of Thirds to Crop
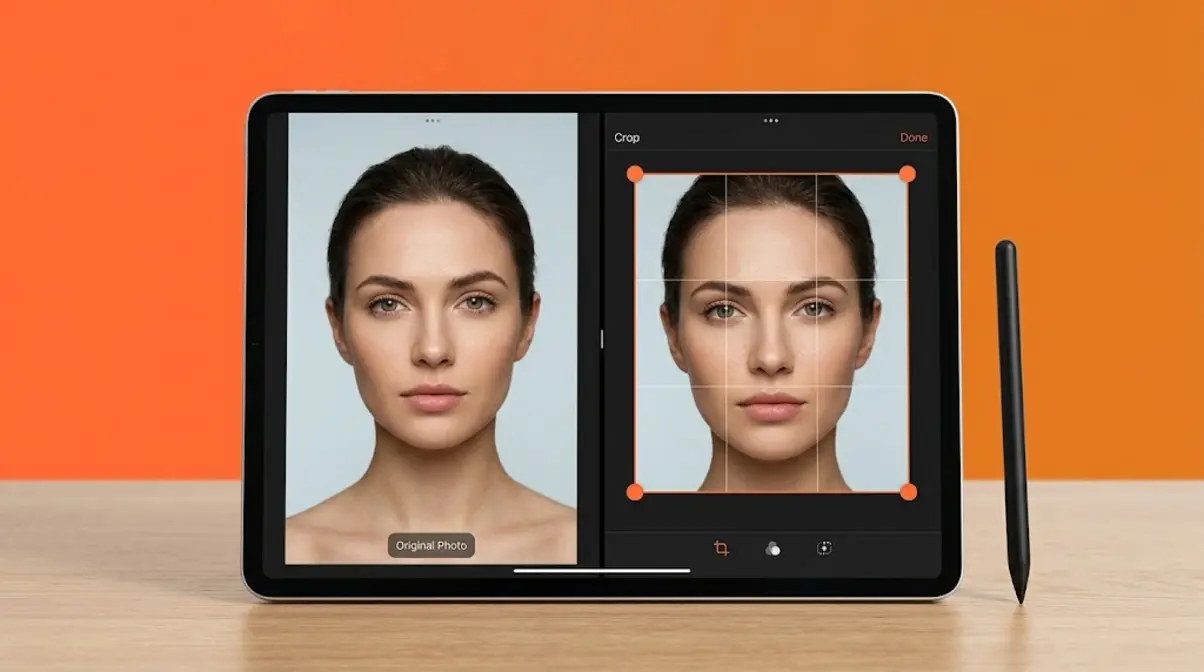
The rule of thirds is the foundational composition principle in photography. Imagine your photo divided by two horizontal lines and two vertical lines — creating a 3×3 grid with nine equal sections. Place your main subject at one of the four intersection points of those lines, and your photo will immediately look more intentional. Taking the time to master the Rule of Thirds for better composition is the fastest way to elevate your imagery.
Adobe’s rule of thirds guide explains this as one of the most reliable composition tools available to photographers at any level (Adobe, 2026).
How to apply it in your editing software:
- Select the Crop tool (keyboard shortcut R in Lightroom; tap the crop icon in Snapseed).
- Enable the grid overlay — in Lightroom, press O to cycle through overlay options until you see the thirds grid.
- Drag the crop handles or reposition the image until your subject sits near one of the four grid intersections.
- Press Enter (Lightroom) or tap the checkmark (Snapseed) to confirm.
The rule of thirds isn’t a rigid law — it’s a starting point. Once you understand why it works (it creates visual tension and movement), you’ll know when to break it intentionally.
How to Straighten a Crooked Horizon
A crooked horizon is the single most common beginner composition mistake — and it’s one of the easiest to fix. A slightly tilted horizon makes a photo feel unstable, even when the viewer can’t identify exactly why.
- In Lightroom:
- Open the Crop tool (R).
- Hover just outside a crop corner until the cursor becomes a rotation arrow.
- Drag to rotate until the horizon aligns with the horizontal grid line.
- Alternatively, use Auto in the Transform panel — Lightroom’s AI will detect and correct the horizon automatically.
- In Snapseed:
- Tap Tools → Rotate.
- Use the angle slider at the bottom to rotate until the horizon is level.
- Tap the checkmark to confirm.
A quick check: hold your finger horizontally against the screen (or use the grid overlay) and compare it to your horizon line. Even a 1-degree tilt is visible in a printed photo.
Choosing the Right Aspect Ratio
Aspect ratio (the proportional relationship between a photo’s width and height) determines how your photo looks on different screens and in print. The most common ratios are:
| Aspect Ratio | Best For | Example |
|---|---|---|
| 4:3 | Default camera output, tablets | Most DSLR/mirrorless default |
| 3:2 | Full-frame cameras, 4×6 prints | Standard photo print |
| 1:1 | Instagram square posts | Social media |
| 16:9 | YouTube thumbnails, widescreen | Video covers, website banners |
| 9:16 | Instagram/TikTok Stories | Vertical mobile content |
In Lightroom, find aspect ratio options in the Crop tool panel. In Snapseed, the crop tool offers preset ratios via the aspect ratio icon at the top of the screen. Choose based on where the photo will live — don’t crop to 1:1 if you’re printing a 4×6.
Step 3 – C3: Correct Exposure & White Balance
Corrections are the technical foundation of every good edit. Before you touch color, mood, or creative effects, your photo needs to be technically sound: properly exposed and color-neutral. Beginners consistently report that fixing these two things alone transforms a flat, dull photo into something that looks intentional.
How to Fix Exposure and Contrast
Exposure (how bright or dark your photo is overall) is controlled by four main sliders you’ll find in every editing app:
- Exposure/Brightness: Raises or lowers the overall brightness of the entire image
- Contrast: Increases the difference between the darkest and lightest areas — adds “punch”
- Highlights: Controls the brightest parts of the image (skies, windows, skin in bright light)
- Shadows: Controls the darkest parts (interior details, hair, shaded areas)
The workflow within this step:
- Adjust Exposure first — get the overall brightness roughly correct.
- Recover Highlights by dragging left if bright areas are blown out (pure white with no detail).
- Open Shadows by dragging right to reveal detail in dark areas.
- Add Contrast last — a small boost (10-20 points) adds dimension without looking processed.
Cambridge in Colour’s digital editing workflow guide notes that tonal adjustments — exposure, contrast, highlights, and shadows — should always precede color work, because color perception is directly influenced by luminosity (Cambridge in Colour, 2026). This is the “global before local” principle: fix the whole image before touching any specific area.
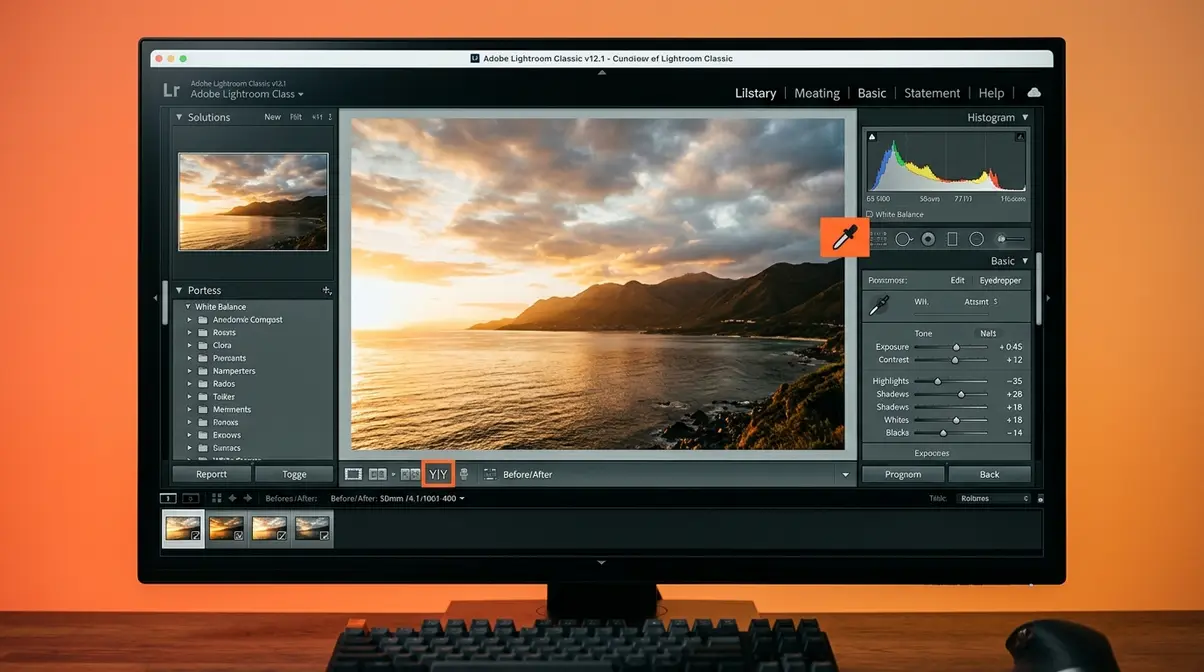
How to Correct White Balance
White balance (the overall color temperature of your photo — whether it looks warm/orange or cool/blue) is one of the most powerful corrections you can make. Indoor photos shot under artificial light often look orange or green. Overcast outdoor shots can look cold and blue.
- Two sliders control white balance:
- Temperature: Drag left for cooler (bluer) tones, right for warmer (more orange) tones
- Tint: Drag left to remove green cast, right to remove magenta cast
The fastest method for beginners:
- In Lightroom, click the eyedropper tool in the White Balance panel.
- Click on something in your photo that should be neutral gray or pure white — a white wall, a gray sidewalk, a white shirt.
- Lightroom calculates and applies the correct white balance automatically.
In Snapseed, go to Tools → White Balance and use the Temperature and Tint sliders. A quick visual check: does skin look like skin? Does a white wall look white? If yes, your white balance is correct.
Why Global Adjustments Come First
This sequencing — exposure and white balance before everything else — is what separates consistent editors from beginners who get different results every session. Here’s why it matters: if you color-grade a photo that’s still too dark, your colors will look muddy and wrong. When you then fix the exposure, the entire color grade shifts and you have to redo it.
Fix the technical problems first. Then build the creative layer on top. Every professional editing workflow follows this order, and it’s baked into the 5 C’s Framework by design.
Step 4 — C4: Enhance Your Color
Color is where your photo gets its personality. This step is also where most beginners go wrong — they crank saturation until everything looks neon, then wonder why their photos look flat and fake instead of vibrant and natural. The goal isn’t to maximize color. The goal is to make color feel intentional.
Vibrancy vs. Saturation Differences
Both sliders increase color intensity — but they work very differently, and understanding the distinction will save your photos from looking processed.
- Saturation boosts ALL colors in the image equally and aggressively. Drag it too far and skin tones turn orange, skies turn electric blue, and grass looks like a cartoon.
- Vibrancy is a smarter, gentler slider. It boosts muted, under-saturated colors while protecting colors that are already vivid (especially skin tones). It’s the “not overdoing it” slider.
The beginner rule: Use Vibrancy first. Drag it to +15 to +30 and see how the photo responds. Only reach for Saturation if the image still feels flat after Vibrancy — and even then, keep it under +20.
Photographers consistently report that switching from Saturation to Vibrancy as their primary color slider was one of the single biggest improvements in the naturalness of their edits. Digital Photography School’s beginner editing guide echoes this: Vibrancy is specifically designed to avoid the “oversaturated skin” problem that plagues beginner edits (Digital Photography School, 2026).
Intro to Color Grading for Beginners
Color grading is the creative step beyond color correction — it’s where you give your photo a mood or a visual style. A warm orange-and-teal grade feels cinematic. A cool, desaturated grade feels moody and editorial. A bright, airy grade with lifted shadows feels like lifestyle photography. If you want to dive deeper into this specific art form, you can learn about color grading and editing principles to truly master your aesthetic.
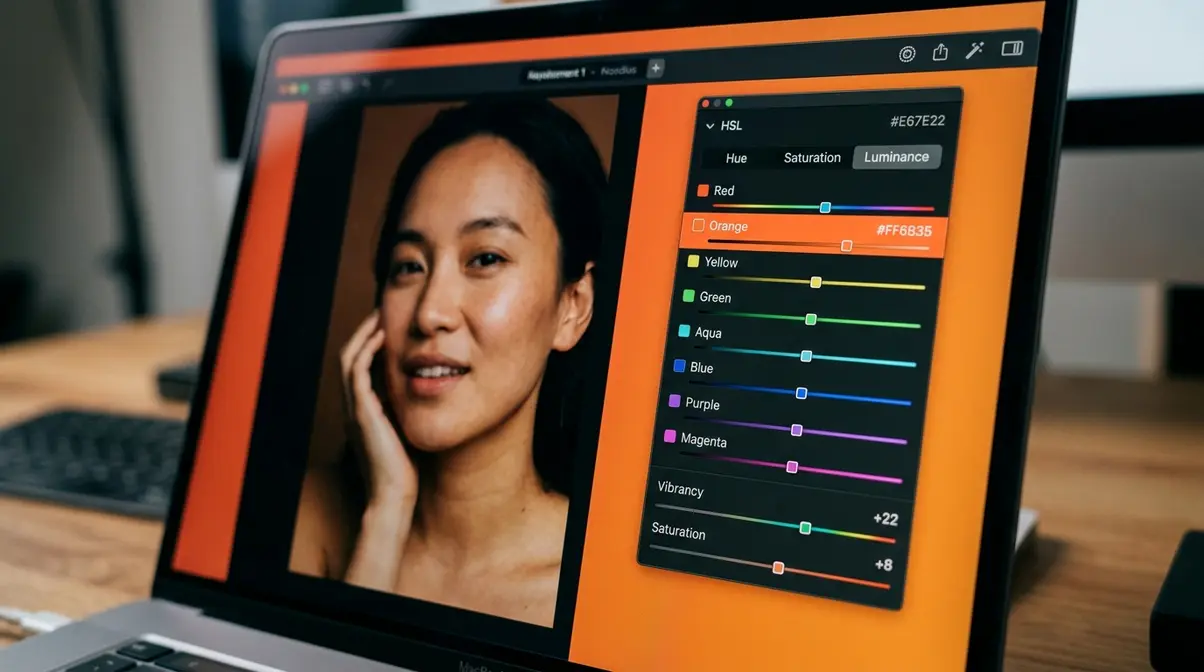
For beginners, the simplest entry point is the Color Mixer (called HSL in Lightroom — Hue, Saturation, Luminance):
- Hue: Shifts a specific color toward a neighboring color (makes greens more yellow or more teal)
- Saturation: Controls the intensity of one specific color only (not the whole image)
- Luminance: Makes a specific color brighter or darker
A practical starting point: In portraits, increase the Luminance of the Orange channel by +10 to +20. This brightens skin tones without affecting anything else in the frame — one of the most widely recommended beginner adjustments across photography communities.
Color grading is a skill that develops over time. At this stage, subtle is always better. If someone looks at your photo and immediately says “that’s heavily edited,” you’ve gone too far.
Should You Use Presets?
A preset (a saved collection of editing settings you can apply to any photo in one click) can be a genuinely useful learning tool — or a crutch that prevents you from understanding what you’re actually doing.
Use presets if: You want a starting point to study. Apply a preset you like, then look at every slider it changed. That’s a free color grading lesson.
Avoid presets if: You’re applying them blindly without understanding why the photo looks the way it does. A preset built for golden-hour outdoor portraits will look wrong on an indoor flash photo — because the white balance and exposure are completely different.
Our recommendation: use the free presets built into Lightroom or Snapseed as learning references, not final solutions. Build your own preset once you’ve edited 20-30 photos you’re proud of. It will reflect your actual style.
Step 5 — C5: Clean Your Final Image
The final step is about removing distractions and preparing your photo for the world. This includes targeted local adjustments (shaping light in specific areas), sharpening, and exporting at the right settings. Beginners often skip this step or over-apply it — the goal is invisible refinement, not visible processing.
Local Adjustments: Dodge and Burn
Local adjustments (edits applied to a specific part of your photo, not the whole image) are how you pull focus inward and guide the viewer’s eye exactly where you want it.
Three tools matter most at this stage:
- Dodge (brighten a specific area): Lighten your subject’s face in a portrait, or brighten a foreground element that’s too dark. In Lightroom, use the Brush tool with Exposure set to +0.3 to +0.5.
- Burn (darken a specific area): Darken bright corners or a distracting background to draw attention toward the center. In Lightroom, use the Radial Filter with Exposure set to -0.3 to -0.5 outside the selected area.
- Healing/Clone Stamp: Removes unwanted elements — a dust spot on the lens, a stray hair across a face, a piece of litter in the corner. In Lightroom, use the Spot Removal tool (keyboard shortcut Q). In Snapseed, use Tools → Healing and paint over the distraction.
The light falloff technique (gradually darkening the edges of a photo, also called a vignette) is one of the most effective ways to pull focus inward without the viewer noticing. In Lightroom, go to Effects → Vignetting and set Amount to -10 to -20 for a subtle, natural result.
Sharpen Without Over-Processing
Sharpening adds definition to edges in your photo — it makes your subject look crisp and detailed. Over-sharpening creates a crunchy, artificial “HDR” look that signals heavy editing immediately.
- In Lightroom:
- Go to Detail → Sharpening.
- Set Amount to 40-60 for most photos (default is 25).
- Hold Alt/Option while dragging the Masking slider — the image turns black and white, and white areas show where sharpening will be applied. Drag until only edges (not smooth sky or skin) are white. This prevents sharpening from amplifying noise in flat areas.
- In Snapseed:
- Go to Tools → Details.
- Use Sharpening at 20-40 and Structure at 10-25.
- Zoom to 100% to check — if you see halos (bright lines) around edges, reduce the amount.
A general principle from photography communities: sharpen last, and sharpen less than you think you need to. The viewer’s eye will fill in perceived sharpness if the contrast and color are correct.
How to Export Your Final Photo
Exporting is the last decision in your editing workflow — and the wrong settings can undo hours of careful work with a blurry, color-shifted, or oversized file.
Choose the right format:
| Format | Best For | Notes |
|---|---|---|
| JPEG | Sharing online, social media, email | Universal compatibility; some quality loss per save |
| TIFF | Printing, archiving, professional delivery | Lossless; large file size |
| WebP | Website use | Smaller than JPEG at same quality; growing browser support |
| PNG | Graphics with transparency | Not ideal for photos (large file size) |
The Library of Congress recommends TIFF as the archival standard for photographic images requiring long-term preservation, while JPEG remains the standard for web distribution (Library of Congress, 2026).
- Export settings for most beginners (Lightroom → File → Export):
- Format: JPEG
- Quality: 85-90 (visually indistinguishable from 100, half the file size)
- Color Space: sRGB (correct for screens and most print labs)
- Resolution: 300 PPI for print, 72 PPI for web/social
In Snapseed, tap the Export button and choose Save a Copy (not “Save” — saving overwrites your original).
Choosing Your First Editing Tools
Choosing software is one of the most common decision-paralysis points for beginners. The honest answer: the tool matters far less than the workflow. The 5 C’s Framework works in every app listed below. Start with what’s free, and upgrade only when you hit a specific limitation. If you want a comprehensive breakdown, you can explore the best photo editing software for beginners in our dedicated guide.
Best Beginner Software (Free & Paid)
Our team evaluated each tool using the same set of RAW and JPEG files — a portrait, a landscape scene, and an indoor low-light shot — to compare ease of use, available tools, and output quality for beginner-level editing tasks.
| Software | Cost | Platform | Best For | RAW Support |
|---|---|---|---|---|
| Snapseed | Free | iOS/Android | Mobile editing, quick fixes | Yes (limited) |
| Apple Photos | Free | macOS/iOS | iPhone shooters, basic edits | Yes |
| Photopea | Free | Web browser | Desktop editing without download | Yes |
| Darktable | Free | Windows/Mac/Linux | Full RAW workflow, Lightroom alternative | Yes |
| Adobe Lightroom | $9.99/month | All platforms | Professional workflow, presets, organization | Yes (full) |
| Luminar Neo | ~$69/year | Windows/Mac | AI-powered editing, beginner-friendly | Yes |
For absolute beginners on mobile: Start with Snapseed. It’s free, it covers all five steps of the 5 C’s Framework, and its non-destructive editing stack means you can undo any change at any time. Fstoppers’ photo editing workflow guide notes that beginners who start with a mobile-first workflow often develop better editing instincts because the simplified interface forces deliberate choices (Fstoppers, 2026).
For beginners on desktop: Photopea (free, browser-based) or Darktable (free, desktop) cover everything in this guide without a subscription. Upgrade to Lightroom when you need its organizational features (collections, synced presets, cloud backup) — not before.
Best Mobile Apps for Editing on the Go
Beyond Snapseed, a handful of mobile apps cover specific steps exceptionally well:
- VSCO — strong preset library and film-emulation color grades; excellent for Step 4 (Color). Free with paid preset packs.
- Lightroom Mobile — the free version includes most tools from the desktop app, including RAW editing and the Masking tool. Ideal for Step 3 (Correct) and Step 5 (Clean).
- Facetune 2 — specialized healing and portrait retouching tools; useful for Step 5 (Clean) on portrait photos. Use sparingly to avoid over-processing.
- A Color Story — beginner-friendly color grading app with a clean interface; excellent for Step 4 (Color) on lifestyle and food photography.
The best app is the one you’ll actually use consistently. Across beginner photography communities, Snapseed and Lightroom Mobile are consistently cited as the most complete free options for following a full editing workflow on a smartphone.
Common Mistakes Beginners Make
Even with a clear framework, certain patterns trip up almost every new editor. Recognizing them early saves months of frustration.
Over-Editing and the Flat Look
The most common beginner mistake isn’t under-editing — it’s over-editing. The temptation to crank saturation, push contrast to the maximum, and add heavy sharpening is real, especially when you first discover how much sliders can change a photo.
The result is a photo that looks processed rather than photographed. Skin turns orange. Skies look electric. Shadows become pure black with no detail. The image loses the depth and naturalness that made the original scene worth photographing.
The fix: After finishing an edit, step away for five minutes. Return and look at the photo fresh. Ask: does this look like a real scene, or does it look like a filter? If you can see the editing, reduce every slider by 20-30% and reassess. Less is almost always more.
When to Stop Editing and Reshoot
Editing can fix a lot — but it can’t fix everything. If a photo is severely out of focus, no sharpening tool will recover it. If the exposure is so far off that highlights are completely blown out (pure white with no data), no recovery slider will bring back detail that wasn’t captured.
Common pain points reported by beginners include spending 30+ minutes trying to rescue a photo that should have been culled in Step 1. The honest answer: if you’ve spent more than five minutes on a single correction and the photo still looks wrong, it’s likely a capture problem, not an editing problem.
The best editing decision you can make is sometimes to reshoot. That’s not failure — it’s the judgment that separates editors who improve from editors who spin their wheels.
Frequently Asked Questions
What are the 5 C’s of editing?
The 5 C’s of editing are Cull, Crop, Correct, Color, and Clean. Cull means selecting your best images and deleting failures. Crop means fixing composition using tools like the rule of thirds. Correct means adjusting exposure and white balance. Color means enhancing vibrancy, saturation, and mood. Clean means applying local adjustments, sharpening, and exporting at the right settings. Following them in order produces consistent results in any editing software.
What is the 80/20 rule in photography?
The 80/20 rule in photography suggests that roughly 80% of your best images come from 20% of your shooting time or effort — meaning a small number of decisive moments, locations, or techniques produce most of your strongest work (Digital Photography School). Applied to editing, it reinforces the culling step: ruthlessly selecting your best 10-20% of shots and editing only those produces better final results than trying to rescue every image from a session.
What are the 7 C’s of photography?
The 7 C’s of photography is a broader creative framework that expands beyond editing into the full photographic process. While variations exist, common versions include: Concept (your creative idea), Composition, Camera settings, Capture, Cull, Correct, and Color. The 5 C’s Framework in this guide focuses specifically on the editing workflow (post-capture steps), making it a focused subset designed for beginners who already have photos and need a repeatable editing system — not a full shooting methodology.
Do I need an expensive computer for photo editing?
No, you do not need an expensive computer to start editing photos. Most modern smartphones, tablets, and entry-level laptops are more than capable of running beginner-friendly software like Snapseed, Photopea, or Lightroom Mobile. As long as your device has a reasonably accurate screen and enough storage space to hold your image files, you can successfully execute the entire 5 C’s Framework without upgrading your hardware.
How long should it take to edit one photo?
A beginner should aim to spend no more than 3 to 5 minutes editing a single photo once they are familiar with the 5 C’s Framework. While your first few attempts may take 10 to 15 minutes as you learn where the sliders are, a structured workflow drastically reduces decision fatigue. If you find yourself spending more than 10 minutes on basic corrections, you are likely over-editing or trying to rescue a photo that should have been culled.
Your Next Editing Session Starts Here
For beginner photographers, a photo editing workflow becomes consistent and enjoyable the moment you stop improvising and start following a repeatable system. The 5 C’s Framework — Cull, Crop, Correct, Color, Clean — gives you exactly that: five steps that work in Lightroom, Snapseed, Photopea, or any other tool you choose. Photographers who apply a structured workflow consistently report faster sessions, more natural-looking results, and a genuine sense of progress with every edit.
The 5 C’s Framework is designed to be your permanent editing companion — not something you outgrow, but something you get faster and more intuitive with over time. Each step builds on the last, and following the sequence prevents the most common beginner mistakes (editing color before fixing exposure, sharpening before healing distractions, exporting at the wrong settings).
Ready to get started? Open your editing software right now and run one photo through all five steps. Don’t aim for perfect — aim for finished. Your first complete 5 C’s edit will teach you more than reading ten more guides, and you can always discover a beginner photo editing workflow routine that sticks by practicing daily. Bookmark this page, return to any step when you need a refresher, and trust the process.
