40 Creative Photography Examples to Spark Your Creativity
Discover 7 real-world examples of creative photography and learn practical tips to boost your skills. Perfect for beginners and hobbyist photographers seeking inspiration.
Every photographer hits a wall. The shots start feeling predictable, the same angles keep appearing, and the spark that made picking up a camera feel exciting seems to have quietly slipped away. Here’s the thing: that creative block is almost never about your gear. It’s about how you’re seeing.
What’s in this guide
The problem isn’t your camera body, your lens, or your location. Photographers have made iconic images with borrowed equipment in unremarkable places for over a century. The real variable is perception — and that’s something you can shift right now. This guide delivers 40 creative photography examples, each with specific camera settings and a smartphone adaptation, so you can break your creative block today without buying a single new piece of equipment.
You’ll find four sections ahead: what creative photography actually means, 20 actionable ideas you can try at home, genre-specific examples across six key areas, and where to find lasting inspiration that keeps the creative juices flowing long after you close this tab.
What Is Creative Photography?

Creative photography is the practice of using unconventional techniques, perspectives, and everyday objects to tell visual stories that surprise the viewer. It’s about how you see a scene, not what you use to capture it. That distinction matters enormously — because it means anyone with any camera can start creating compelling images today.
The Ordinary-to-Extraordinary Framework
The most important thing to understand about creative photography is this: your camera is not the variable. Your eye is.
The Ordinary-to-Extraordinary Framework is the principle that any subject — in any location, with any camera — becomes visually compelling when the photographer applies a deliberate perceptual shift. That shift might be a change of angle, a different light source, an unexpected moment, or a tighter frame. The subject itself is almost irrelevant.
Consider Irving Penn, one of the twentieth century’s most celebrated photographers. He worked with plain white paper backdrops and available light in a minimalist studio — and produced some of the most enduring portrait and still-life images ever made. The constraint wasn’t an obstacle. It was the catalyst. Penn’s “corner portraits,” where he positioned subjects in narrow angles to reveal unseen personality, required nothing more than two studio flats and a camera (irvingpenn.org).
Try this with a coffee mug sitting on your desk. Shot straight-on at eye level, it’s furniture. Now place it on a windowsill with morning backlight, get down to mug-level, and shoot at f/2.8 with the background thrown into soft bokeh — it becomes a study in form and light. Same mug. Different eye. That is the Framework in action.
Once you internalise this idea, you stop waiting for a better camera and start looking for a better angle. That’s the shift. Everything else in this guide builds on it. To deepen your understanding of how different approaches shape a final image, exploring different photography styles gives you a practical vocabulary for what’s possible.
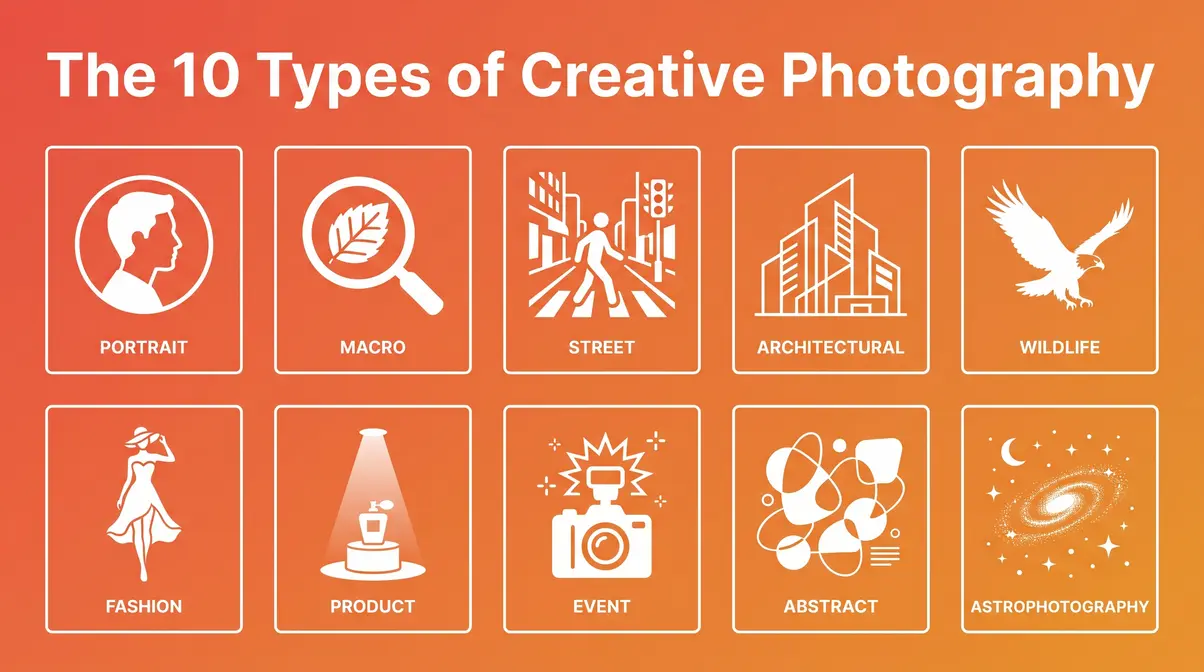
What are the 10 types of photography?
Understanding the photographic territory helps you choose where to focus your creative energy. Here are the 10 main types — each with a one-sentence creative application:
- Portrait — Reveals character by controlling what the background, light, and framing say about a person.
- Macro — Turns a dewdrop on a leaf into an alien world; shoot in bright window light if you lack a tripod.
- Street — Captures the unguarded moment; the decisive fraction of a second that tells a whole story.
- Architectural — Finds geometric abstraction inside buildings most people walk past without looking up.
- Wildlife — Demands patience, but your garden or a local park provides more subjects than you’d expect.
These first five genres focus heavily on capturing the world as it exists, requiring keen observation and timing. The next five allow for more direct manipulation of the scene.
- Fashion — Uses clothing and styling as storytelling props; works beautifully in a spare room with a sheet backdrop.
- Product — Transforms everyday objects into desirable subjects through controlled light and clean backgrounds.
- Event — Finds the emotional core of a moment — the laugh, the glance, the tear — not just the occasion.
- Abstract — Strips a subject down to colour, shape, and texture so the viewer discovers what it is slowly.
- Astrophotography — Requires dark skies and patience, but a clear night and a wide lens opens the universe.
For beginners at home, start with Portrait, Macro, or Product — all three are achievable in a single room with household lighting. The most effective creative exercise you can try is picking one type and committing to it for 30 days. The creative constraint forces you to solve problems rather than chase new subjects. As mastering photographic composition shows, the rules you learn within one genre transfer directly to every other.
According to Adobe’s guide to conceptual photography, conceptual photography — a genre where the idea behind the image matters as much as the technical execution — allows photographers at any level to express abstract ideas through portraits and still life, using technique to convey a specific message or emotion (Adobe). That principle applies across all 10 types listed above.
Now that you know the territory, here are 20 specific creative photography ideas you can try at home today — no exotic locations, no expensive upgrades.
20 Creative Photography Ideas You Can Try at Home
The best creative photography ideas for beginners at home require nothing more than what you already own. Nearly all US adults under 50 carry a capable camera in their pocket every day — more on that exact figure in the smartphone section below. These 20 ideas are organised into five technique families: light, perspective, macro, portraits, and mobile. Every idea includes specific settings and a smartphone adaptation.
“Make a book as a fun project. Pick a subject, any subject. A public park. A historical area. A family. Anything that you can put some meaning into.”
— Reddit r/photography community member
That advice cuts to the heart of long-term creative practice. Picking one subject and committing to it consistently is more powerful than chasing variety. The photographer who spends a month documenting the light in their kitchen will develop a sharper eye than the one who visits a new location every weekend.
Light & Long Exposure Techniques
Long exposure and light-based techniques produce some of the most dramatic results from the humblest setups. Across photography communities, the consistent finding is that the gap between the simple setup and the surprising result is exactly what makes these techniques so shareable and satisfying.
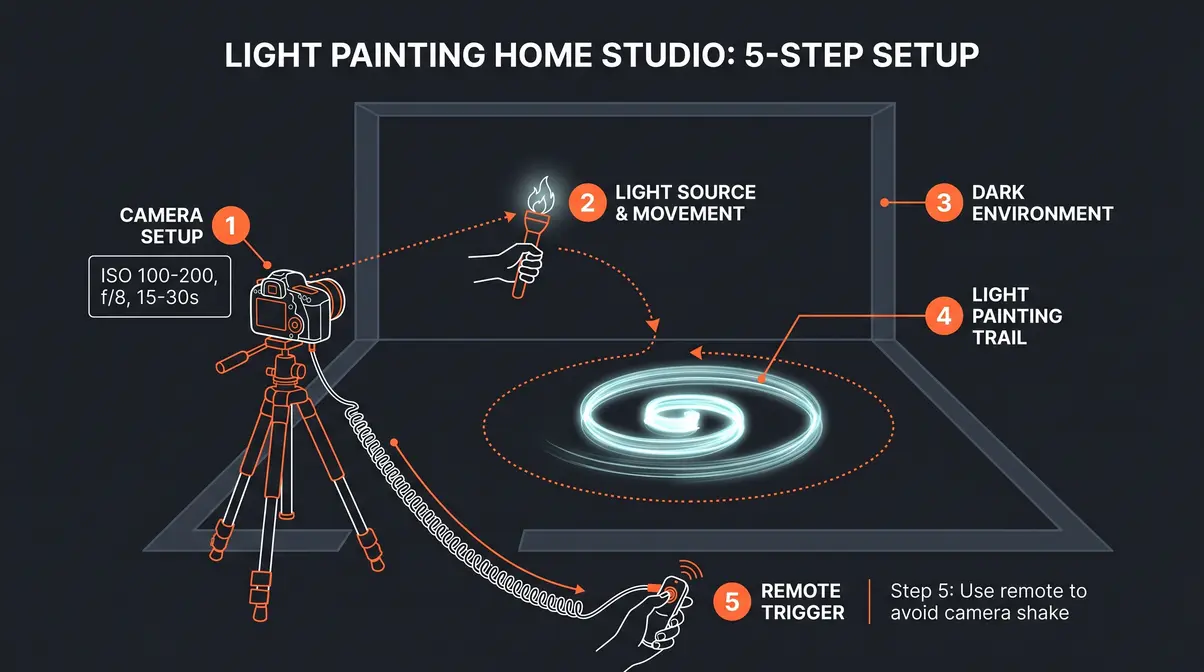
1. Light Painting
Turn off every light source in a room. Mount your camera on a tripod and use a torch or LED strip to draw shapes in the air during a long exposure. Settings: ISO 100–200, f/8, shutter speed 15–30 seconds. Smartphone: Use Adobe Lightroom Mobile’s manual shutter control or Slow Shutter Cam (iOS) / Long Exposure Camera (Android); set to 15 seconds minimum.
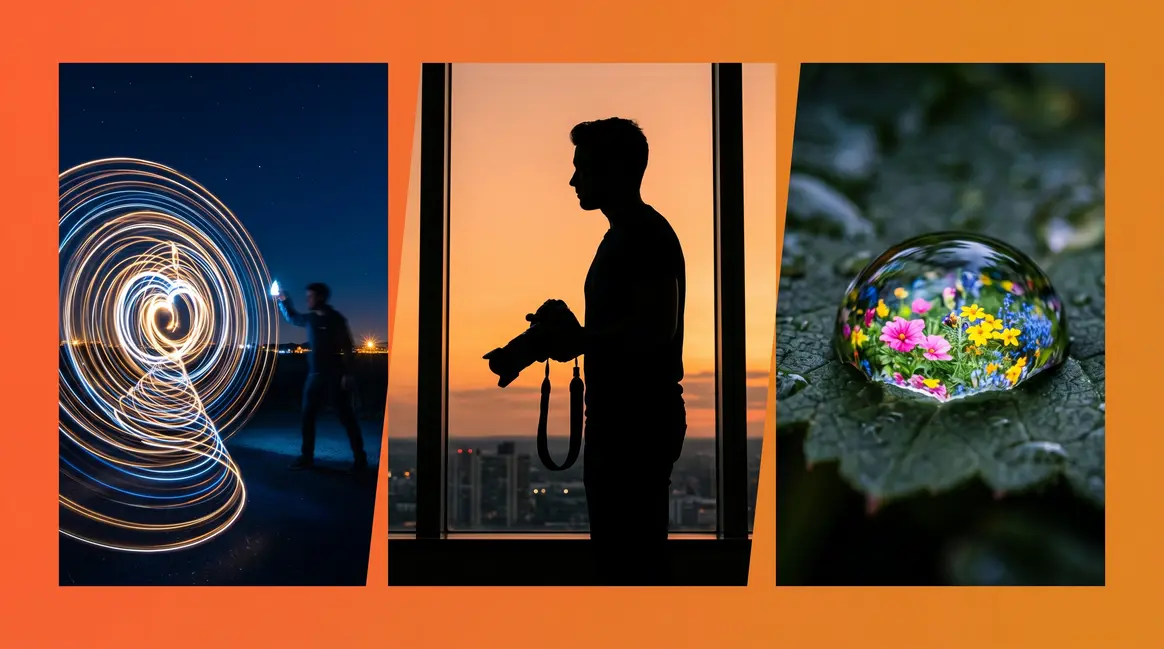
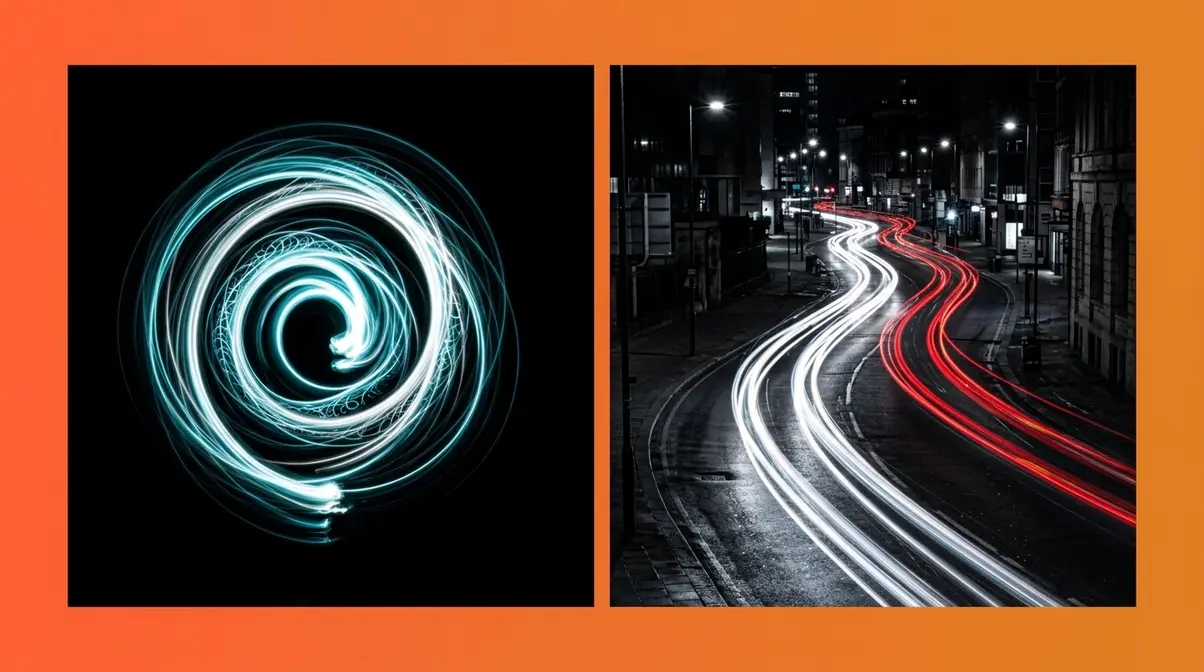
2. Kinetic Light Painting (Spiral Light)
Attach a small LED to a length of string. In a dark room, swing it in circles in front of your static camera. Geometric patterns appear without any editing. Settings: ISO 100, f/11, 8–15 seconds. Smartphone: Same Pro Mode approach as light painting — the LED’s brightness compensates for smaller sensors.
3. Shadow Photography
Position a subject — a plant, a hand, a figurine — between a bright desk lamp and a plain white wall. Photograph the shadow, not the object. The result is graphic, abstract, and often more interesting than the original subject. Settings: ISO 200, f/5.6, 1/125s. Smartphone: Use Portrait Mode off; switch to standard camera and expose for the wall, not the lamp.
4. Long Exposure Water
Position your camera on a tripod near a running tap, a garden hose, or even a glass of water being poured. The motion blur transforms water into silk. Settings: ISO 50–100, f/16, 1–4 seconds (use a neutral density filter in daylight). Smartphone: Slow Shutter Cam app; set blur mode to “Motion Blur” at maximum sensitivity.
5. Window Light Time Study
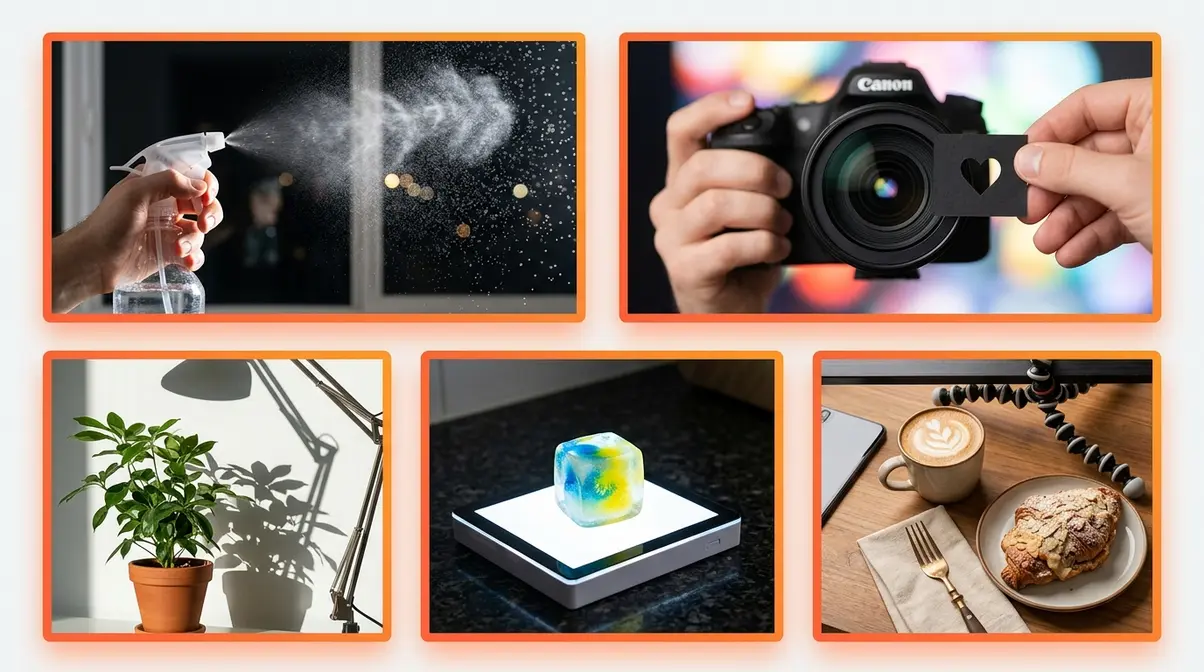
Photograph the same object every hour as daylight shifts across a window. The series reveals how dramatically light transforms a subject — without moving the camera or the object. Settings: ISO 400, f/4, auto shutter. Smartphone: Lock focus and exposure by long-pressing the subject in your camera app; disable auto-brightness.
Perspective & Optical Illusion Shots
Changing where you stand — and where you point your lens — is the fastest, cheapest creative upgrade available to any photographer.
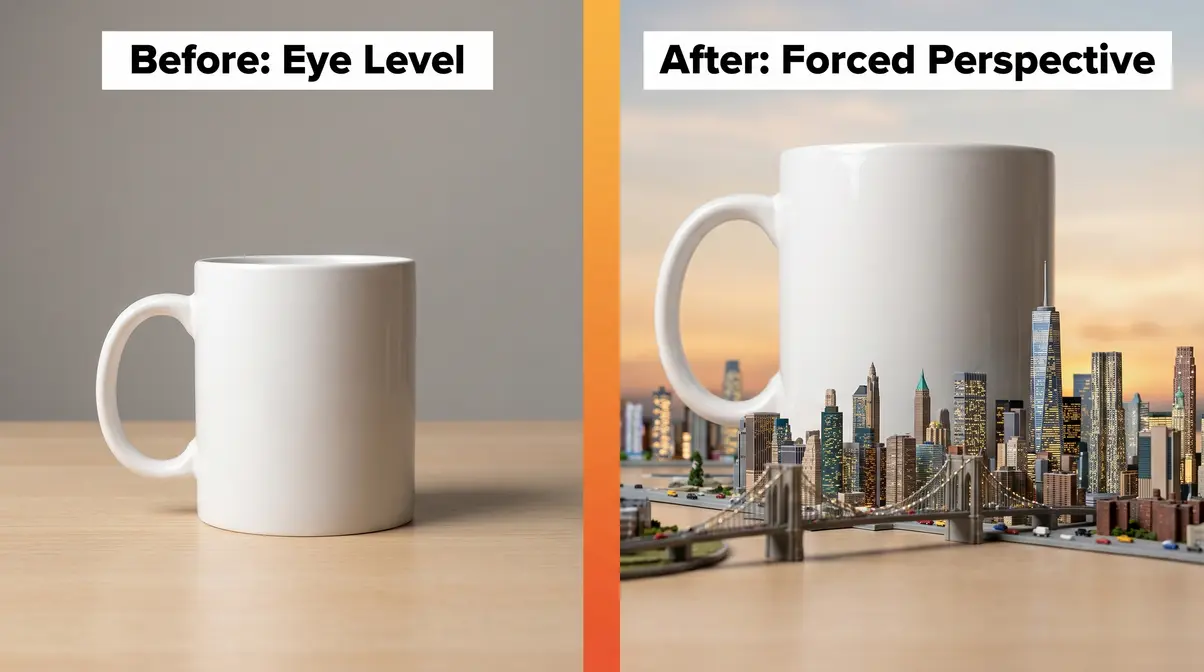
6. Forced Perspective
Place a small object close to the lens and a larger object far away so they appear the same size. A toy car “parked” next to a real building. A thumb “holding” the moon. The effect is entirely optical — no editing needed. Settings: ISO 200, f/11–f/16 (deep depth of field keeps both objects sharp), 1/200s. Smartphone: Use the standard wide lens; avoid Portrait Mode (it separates planes artificially).
7. Shoot-Throughs
Shoot through a foreground element — a frosted glass, a bunch of flowers, a chain-link fence — to frame your subject with organic blur. The foreground element creates context and depth simultaneously. Settings: ISO 400, f/2.8–f/4, 1/250s. Smartphone: Tap the background subject to focus; the foreground blurs naturally on any lens wider than 28mm equivalent.
8. The Reflection Shot
A puddle, a mirror, a phone screen, a spoon — any reflective surface becomes a second canvas. Shoot downward into a puddle to capture an inverted cityscape. Tilt a mirror to frame a portrait from an unexpected angle. Settings: ISO 200–400, f/8, 1/125s. Smartphone: Flip the phone upside down and shoot into a puddle to avoid your own reflection in the frame.
9. Bokeh Shapes
Cut a shape — a heart, a star, a crescent — into a piece of black card and hold it over your lens. Background light sources take on that shape in the bokeh. Settings: ISO 800, f/1.8–f/2.8, 1/60s (the wider the aperture, the more pronounced the shape). Smartphone: Use Portrait Mode with the card held 2–3cm from the lens; results vary by phone model.
10. The Worm’s Eye View
Place your camera directly on the ground and shoot upward. Architecture becomes monumental. Flowers become forests. Pets become giants. This angle is almost never used — which is exactly why it works. Settings: ISO 200, f/8, 1/200s. Smartphone: Enable a grid in your camera app to keep the horizon intentionally straight or intentionally tilted.
Macro & Close-Up Photography at Home
The most overlooked creative photography territory is the one closest to you. Across photography communities, macro work consistently produces the most surprised reactions — because viewers genuinely cannot identify the subject at first.
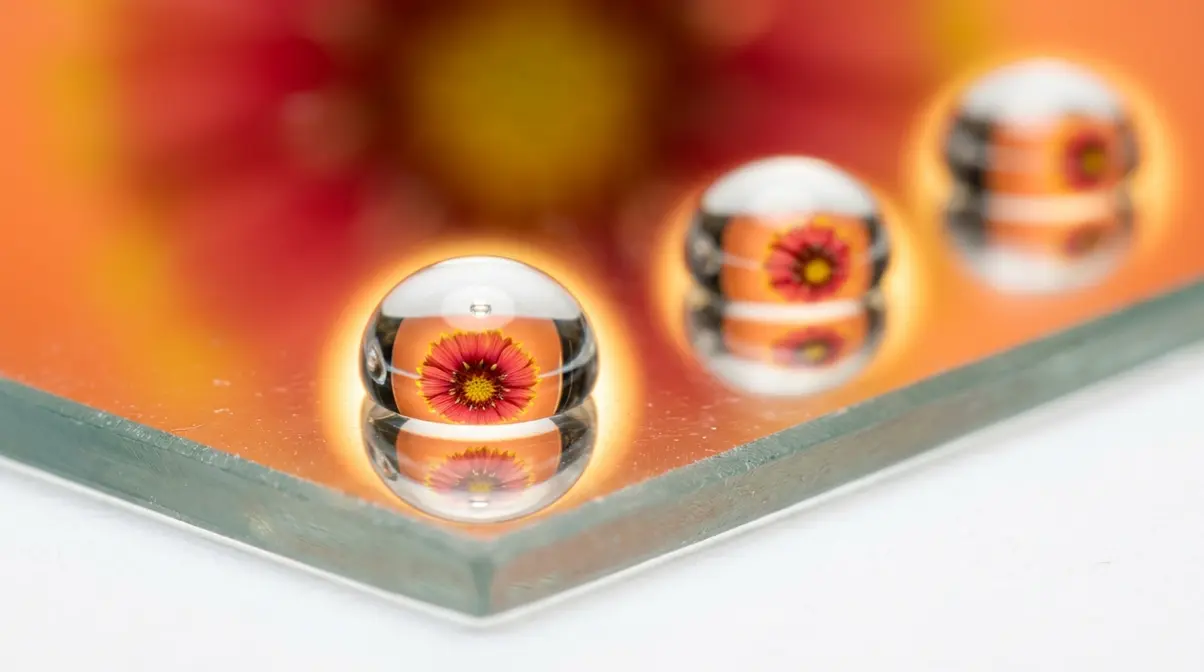
11. Water Droplet Refraction
Place a colourful image (a flower photo, a printed pattern) behind a glass of water. Use an eyedropper to place individual droplets on a glass surface in front of the image. Each droplet acts as a lens, refracting and inverting the image behind it. Settings: ISO 800, f/8–f/11, 1/200s with flash or bright continuous light. Smartphone: Use the macro lens on newer iPhone or Android models; tap the droplet to lock focus.
12. Spray Bottle Bokeh
Mist a dark window or mirror with a spray bottle. Backlight it with a lamp or torch. The droplets catch the light and create a field of glowing orbs. Settings: ISO 400, f/2.8, 1/125s. Smartphone: Tap the background light source to expose for highlights; the droplets will glow against the dark surface.
13. Food Photography Flat Lay
Arrange food — a breakfast bowl, coffee and pastry, cut fruit — on a plain background and shoot directly overhead. The challenge is intentional composition: negative space, colour contrast, and texture. Settings: ISO 200, f/5.6, 1/160s near a window. Smartphone: Use the top-down angle with your phone’s standard lens; avoid the ultra-wide (it distorts the edges).
14. Everyday Object Abstract
Choose a single household object — a fork, a crumpled piece of foil, the inside of a cardboard tube — and fill the entire frame with it. Shoot so close that context disappears and only texture and form remain. Settings: ISO 400, f/8, 1/200s with a macro lens or extension tubes. Smartphone: Use the dedicated macro mode if available; otherwise, get as close as focus allows and crop in post.
15. Ice and Light
Freeze coloured water in an ice cube tray. Place the cubes on a light box or a window with backlight and photograph as they melt. The colour shifts and internal cracks create abstract images that are impossible to replicate. Settings: ISO 100, f/8, 1/200s. Smartphone: Place the phone flat on the light box and shoot straight down; disable flash entirely.
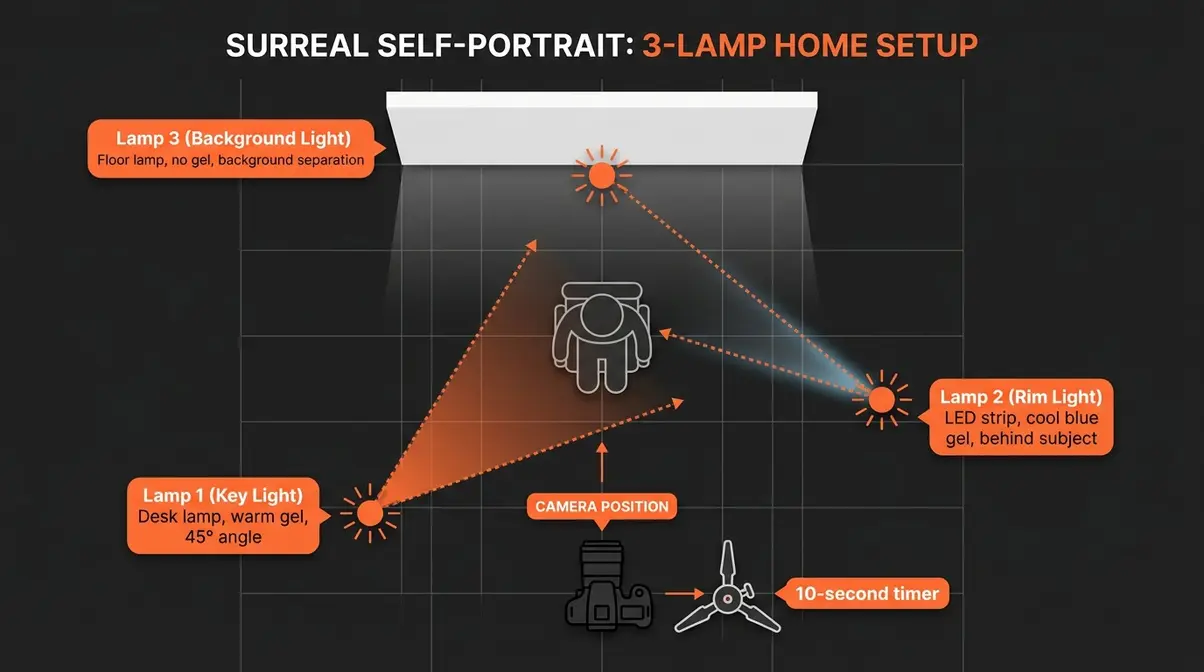
Surreal Conceptual Portraits at Home
If you are looking for creative portrait photography ideas at home, surreal portrait photography is among the most engaging techniques to explore. This is The Ordinary-to-Extraordinary Framework operating at its most direct: a bedroom, a sheet, some household props, and a deliberate concept become images that stop a scroll.
16. Floating Objects Portrait
Have your subject hold objects at arm’s length and toss them gently into the air. Shoot in burst mode at the peak of the toss. In the final image, the subject appears surrounded by levitating objects. Settings: ISO 400, f/5.6, 1/500s minimum (freeze motion). Smartphone: Use burst mode (hold shutter button); select the frame with maximum air time.
17. The Double Exposure Portrait
Photograph your subject against a plain white background. Then, in-camera or in editing, overlay a second image — a forest, a cityscape, clouds — so it appears to exist within the silhouette. Settings: ISO 200, f/8, 1/200s for both exposures. Smartphone: Use Snapseed’s “Double Exposure” tool or Lightroom Mobile’s blend mode to composite the two images.
18. The Faceless Portrait
Remove the face from the equation entirely. Shoot the back of a head, hands around a coffee cup, feet in an interesting location, or a figure silhouetted against a window. The absence of a face invites the viewer to project themselves into the image. Settings: ISO 400, f/2.8, 1/250s. Smartphone: Any camera mode works; the composition carries the image.
19. Underwater in a Bathtub
A transparent plastic bag sealed around your phone (or a waterproof case) opens up underwater portraiture in your own bathtub. Hair floating, fabric billowing, bubbles rising — the bathtub becomes a studio. Settings (smartphone only): Use Halide, an iOS camera app designed for RAW capture and manual control; set ISO to 400 and let shutter speed auto-adjust to available light.
20. The Mirror Multiplication
Hold two mirrors at angles to each other and photograph a small object placed between them. The infinite reflection creates a tunnel effect. Flowers, candles, and geometric objects work best. Settings: ISO 400, f/8, 1/125s. Smartphone: Set focus manually using Adobe Lightroom Mobile, the free smartphone app that gives manual control over ISO, shutter speed, and white balance; tap the first reflection to set focus depth.
Essential Smartphone App Stack
These four apps cover every creative technique in this section:
- Adobe Lightroom Mobile — Free; manual ISO, shutter speed, and white balance; DNG RAW capture on Android and iOS
- Halide — iOS; RAW capture, manual focus, depth visualiser; best for macro and portrait work
- Slow Shutter Cam — iOS; dedicated long-exposure modes for light trails and motion blur
- ProCamera — iOS/Android; deliberate workflow with full manual exposure control; best for deliberate, considered shooting
These 20 ideas span light, perspective, detail, and concept — the four dimensions of The Ordinary-to-Extraordinary Framework. The next section takes these techniques and shows you how they apply across specific photography genres, from portraits to products to abstract work. For more ideas specifically in the macro space, creative macro photography ideas is worth exploring alongside these techniques.
According to the Pew Research Center, 97% of US adults under 50 own a smartphone — meaning at-home creative photography is accessible to virtually every aspiring photographer, regardless of budget.
Creative Photography Examples Across 6 Key Genres
Creative photography examples don’t exist in a vacuum — they live inside specific genres, each with its own visual language and creative conventions. Understanding those conventions is what lets you break them intelligently. The Ordinary-to-Extraordinary Framework applies to every genre: the perceptual shift is the constant; the subject changes.
Portrait & Self-Portrait Photography
Portrait photography is where most photographers begin, and where many get stuck shooting the same three-quarter angle in the same window light. The creative examples below push past that default.
21. The Silhouette Environmental Portrait — Place your subject in a doorway or window at golden hour. Expose for the bright background. The subject becomes a pure shape — identity stripped away, gesture and posture doing all the communicative work. Settings: ISO 100, f/8, 1/800s. Smartphone: Tap the bright sky to set exposure; your subject will naturally underexpose to a silhouette.
22. The Tilt-Shift Miniature Portrait — Use a tilt-shift lens (or the Snapseed “Lens Blur” tool on mobile) to apply a horizontal blur band across a portrait taken from above. The subject appears miniaturised, as if part of a model village. Settings: ISO 400, f/8, 1/200s shot from a height of 3–5 metres. Smartphone: Snapseed → Tools → Lens Blur → Linear mode; adjust the blur intensity to taste.
23. The Brenizer Method Portrait — The Brenizer Method is a panoramic stitching technique where you shoot multiple frames of a subject at a wide aperture and stitch them together, creating an image with the field of view of a wide lens but the shallow depth of field of an 85mm f/1.4. Settings: ISO 200, f/1.8–f/2.8, 1/500s; shoot 15–20 overlapping frames. Smartphone: Moment, a lens and app ecosystem for smartphone photographers, offers clip-on portrait lenses that partially replicate this effect; stitch in Lightroom Mobile.
24. The Colour Gel Portrait — Place a coloured gel (or a sheet of coloured cellophane from a craft store) over a desk lamp. Use it as your key light. One warm gel and one cool gel on opposite sides of the face creates a dramatic split-tone portrait that looks post-produced but requires no editing. Settings: ISO 400, f/2.8, 1/125s. Smartphone: Standard camera mode; the gel does all the work.
25. The Self-Portrait Series — Set up a tripod, use a 10-second timer, and commit to photographing yourself in the same spot every day for a week. Vary expression, clothing, and light source only. The constraint forces creative problem-solving within tight parameters — which is exactly how professional portrait photographers develop their eye. Settings: ISO 400, f/5.6, 1/160s. Smartphone: Use the front or rear camera; rear camera produces significantly higher resolution.
Creative Product Photography
Product photography is one of the most commercially valuable creative skills you can develop — and a kitchen table is a perfectly adequate studio. These examples of creative photography in a product context focus on light control and background management.
26. The Invisible Box — Build a light box from a white cardboard box and tissue paper over the opening. Place a single desk lamp outside the tissue paper. The diffused light eliminates harsh shadows and makes any object look professionally lit. Settings: ISO 200, f/8, 1/125s. Smartphone: Use the standard lens; avoid flash entirely. For detailed technique, still life photography tips covers the complete setup.
27. The Dark and Moody Product Shot — Place a product on a dark surface (black velvet, a dark wooden board) and use a single sidelight to skim across the surface, revealing texture. This approach works exceptionally well for food, perfume bottles, and jewellery. Settings: ISO 400, f/8, 1/125s. Smartphone: Tap the highlight on the product to set exposure; the background falls naturally into shadow.
28. The Overhead Flat Lay with Props — Arrange a product with contextually relevant props on a plain background and shoot directly overhead. The key is intentional negative space — not filling every inch. Settings: ISO 200, f/5.6, 1/160s near a north-facing window (diffused, shadowless light). Smartphone: Use a step ladder or mount your phone overhead with a flexible tripod arm.
29. The Water Splash Product Shot — Place a product (a fruit, a drink can, a bar of soap) in a shallow tray of water and drop an ice cube beside it to create a natural splash. Use a fast shutter speed to freeze the water mid-air. Settings: ISO 800, f/8, 1/2000s with a flash unit triggered simultaneously. Smartphone: Use burst mode at 1/2000s in Pro Mode; select the frame with the most dramatic splash shape.
30. The Smoke and Haze Product Shot — Light a stick of incense beside your product and use a backlight to make the smoke visible. The smoke adds atmosphere and mystery to otherwise static product images. Settings: ISO 400, f/8, 1/200s with a sidelight or backlight. Smartphone: Use Pro Mode; set ISO to 400 manually and let shutter auto-adjust.
Abstract & Conceptual Photography
Abstract photography strips a subject down to its essential visual elements — colour, texture, pattern, and form — so the viewer encounters the image before they identify the subject. This is where The Ordinary-to-Extraordinary Framework operates most purely.
31. The Macro Texture Abstract — Choose a surface with strong texture: tree bark, corrugated cardboard, the back of a leather jacket, a crumpled aluminium sheet. Fill the frame completely and eliminate all context. Settings: ISO 400, f/8, 1/200s with a macro lens or extension tubes. Smartphone: Macro mode or maximum zoom-and-crop.
32. The Double Exposure Concept — Combine two images in-camera or in post: a portrait layered with an architectural texture, a hand overlaid with a map, a face merged with a night sky. The conceptual photography principle here — the idea matters as much as the execution — means the pairing should communicate something, not just look interesting. Settings: ISO 200, f/8 for both base images; use in-camera multiple exposure mode (available on most DSLRs and mirrorless cameras) or Snapseed’s Double Exposure tool. Smartphone: Snapseed or Lightroom Mobile blend modes.
33. The Photomontage Triptych — Shoot three images of the same subject from radically different distances: full environment, mid-range, extreme close-up. Print or display them as a triptych. The series teaches viewers to see at multiple scales simultaneously. Settings: Consistent ISO 200, f/8 across all three. Smartphone: Maintain consistent white balance by locking it in Pro Mode.
34. Colour Field Abstract — Find a large area of a single colour — a painted wall, a field of flowers, a blue tarpaulin — and fill the frame with nothing else. Introduce a single contrasting element: one red flower in a green field, one dark doorway in a white wall. Settings: ISO 200, f/5.6, 1/200s. Smartphone: Standard mode; the composition is everything.
35. Intentional Camera Movement (ICM) — During a long exposure, deliberately move your camera — pan, tilt, rotate, or zoom — to create abstract motion trails. Trees become vertical brushstrokes. Street lights become horizontal streaks. Settings: ISO 100, f/16, 1/4–1 second. Smartphone: Use Slow Shutter Cam’s “Motion Blur” mode; move the phone smoothly during exposure.
Night & Urban Creative Photography
Night and urban photography rewards patience and observation — two skills that cost nothing and develop quickly. These examples of creative photography in urban environments work in any city, town, or suburb.
36. Light Trail Photography — Position your camera on a tripod beside a road and use a long exposure to capture the trails of passing headlights and taillights. Settings: ISO 100, f/11, 15–30 seconds. Smartphone: Slow Shutter Cam or ProCamera in long-exposure mode; use a mini tripod or prop the phone against a solid surface.
37. Pano Stitching / The Brenizer Method (Urban) — Apply the panoramic stitching technique to a wide urban scene. Shoot 20–30 overlapping frames at 85mm equivalent and stitch in Lightroom. The result has a field of view impossible to achieve with a single frame, with natural depth and perspective. Settings: ISO 400, f/5.6, 1/200s. Smartphone: Use the built-in Panorama mode or stitch manually in Lightroom Mobile.
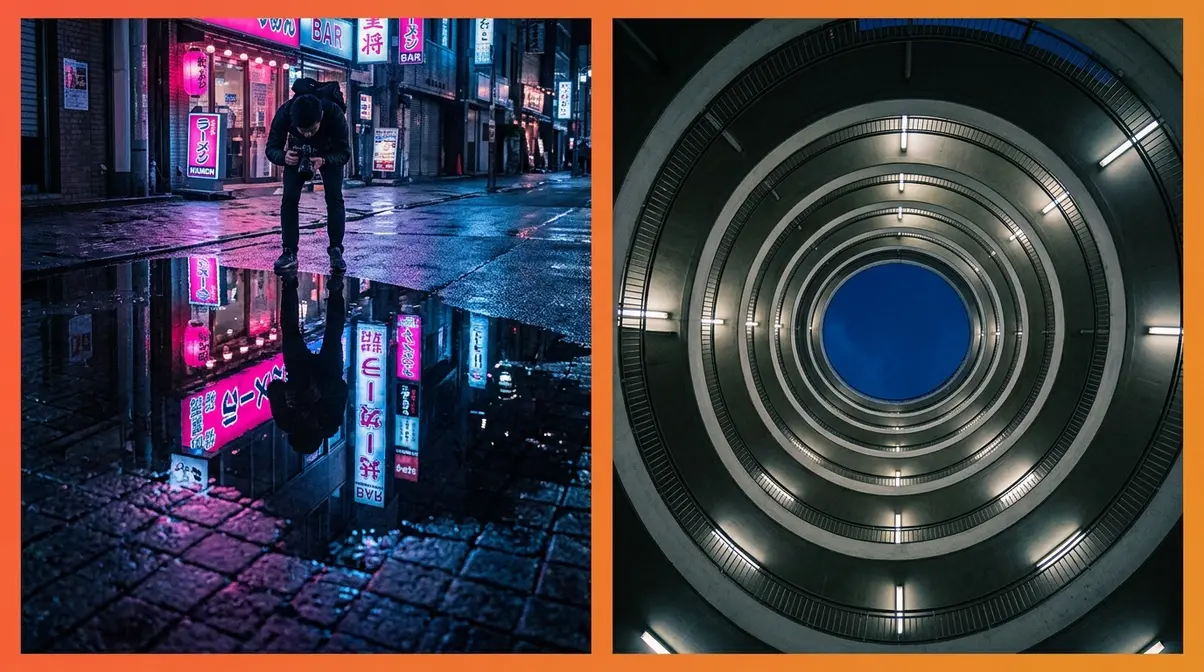
38. Neon Reflection Puddle — After rain, find a street puddle near neon signage or illuminated storefronts. Shoot downward at the reflection. The inverted image of the city creates a surreal, dreamlike quality. Settings: ISO 800, f/8, 1/60s. Smartphone: Flip upside down and shoot into the puddle to eliminate your own reflection.
39. Architecture Geometry — Look up inside any multi-storey building, car park, or spiral staircase and shoot directly upward. The converging lines and repeating patterns create abstract geometric compositions from entirely ordinary structures. Settings: ISO 400, f/8, 1/200s. Smartphone: Use the ultra-wide lens for maximum drama; apply a straightening correction in Lightroom Mobile afterward.
40. The Golden Hour Silhouette Series — In the 20 minutes after sunset, photograph three to five different subjects — a person, a tree, a bicycle, a building edge — as pure silhouettes against the gradient sky. The consistent light conditions create a naturally cohesive series. Settings: ISO 100, f/11, 1/500s (expose for the sky). Smartphone: Tap the bright sky area to set exposure; subjects will silhouette automatically.
Where to Find Ongoing Photography Inspiration

Breaking a creative block once is satisfying. Building a system that keeps the creative juices flowing consistently is more valuable. The sources below are where working photographers return repeatedly — not just when they feel stuck.
Online Platforms and Communities
The most effective inspiration sources combine visual examples with community feedback — seeing what others create AND understanding how they made it.
Reddit r/photography and r/itookapicture are among the most active photography communities online, with thousands of posts daily ranging from technical questions to project showcases. The comment sections are unusually detailed — photographers explain their settings, their setups, and their intentions, which makes them valuable learning resources, not just inspiration galleries. Search for specific techniques (light painting, forced perspective, water droplets) and you’ll find real-world examples with real-world explanations.
Pinterest remains the most efficient visual search engine for creative photo ideas, particularly for product photography, portrait lighting setups, and flat-lay compositions. Search “creative photography ideas” and use the visual similarity tool to follow aesthetic threads across thousands of images. The limitation is that Pinterest rarely surfaces technical context — pair it with Reddit for the complete picture.
500px and Flickr still maintain active communities of serious photographers sharing high-quality work with EXIF data intact. Seeing the exact settings behind an image you admire is one of the fastest ways to understand how a particular look was achieved.
Who is the most famous photographer?
No single photographer holds universal claim to the title, but several names recur consistently in critical and historical assessments. Henri Cartier-Bresson is frequently cited for defining street photography’s visual grammar, while Ansel Adams is widely recognised for landscape photography. Studying these famous photographers who worked within constraints—and produced extraordinary results—is one of the most direct applications of The Ordinary-to-Extraordinary Framework.
Irving Penn (1917–2009) defined minimalist studio photography. His plain backdrop portraits of Picasso, Stravinsky, and Duchamp — shot in a corner with two studio flats and available light — proved that simplicity, not equipment, creates timeless images. His still-life work applied the same principle to cigarette butts and discarded objects, finding beauty in the overlooked (irvingpenn.org).
James Maher is a lifelong New Yorker whose street and documentary work focuses on the changing character of New York City’s neighbourhoods. His long-form project Luxe City documented seven years of post-9/11 transformation through candid street portraits. Maher’s approach — placing himself in a location and waiting for moments to emerge rather than chasing subjects — is a practical model for any photographer developing their street photography practice (jamesmaherphotography.com).
David Bailey — full name David Royston Bailey, born January 2, 1938, in East London — began his photography career after purchasing a camera during Royal Air Force service in Singapore. His work for British Vogue from 1960 onward defined the visual language of Swinging London. Bailey’s earliest published portrait was of Somerset Maugham, shot for Today magazine in 1960 (Britannica). His career demonstrates that creative vision, not formal training, is the primary qualification.
Vivian Maier spent decades photographing Chicago’s streets on a Rolleiflex — without ever showing her work publicly. Her posthumously discovered archive of 150,000 negatives is now considered one of the great bodies of street photography. Maier’s work is a reminder that creative photography is fundamentally about seeing — not about audience, equipment, or credentials.
Common Mistakes That Kill Creative Photography
Balanced creative development requires understanding not just what to do, but what quietly undermines progress. These are the most consistent patterns observed across photography communities.
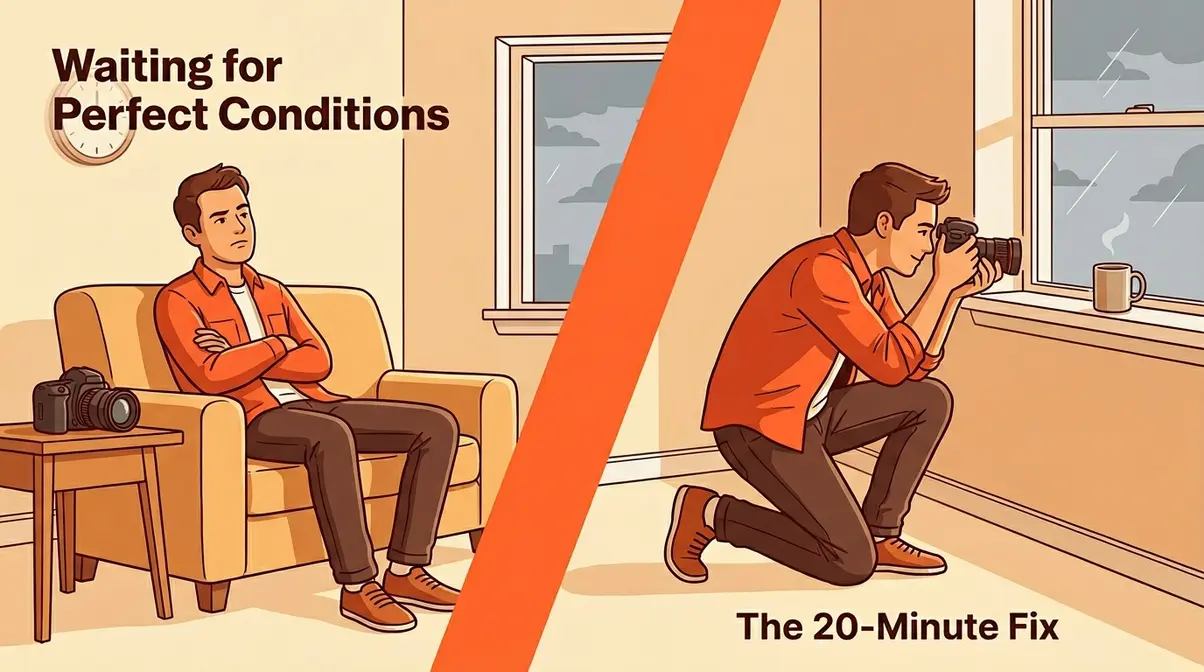
Chasing Perfect Conditions
The single most common creative block isn’t a lack of ideas — it’s waiting. Waiting for better light. A more interesting location. A new lens. A specific season. The problem is that perfect conditions don’t produce creative photographs. Creative decisions do.
Irving Penn shot some of his most celebrated work in a tent in natural light in remote locations — not because the conditions were ideal, but because he made deliberate creative decisions within whatever conditions existed. The constraint of imperfect light forced compositional and tonal choices that perfect studio light would have made unnecessary.
The fix: Set a 20-minute timer. Photograph whatever is in the room you’re currently sitting in. The constraint forces creative problem-solving. Across photography communities, photographers who complete this exercise consistently report that the images surprise them — and that the practice breaks the waiting habit more effectively than any amount of inspiration browsing.
When to Try a Different Approach
Not every technique works for every photographer. If you’ve tried light painting three times and feel no connection to the results, that’s useful data — not failure. Creative photography is a process of discovering which visual languages feel native to your eye.
- Signs you need a genre shift:
- You’re executing techniques correctly but feel no emotional investment in the results
- You’re comparing your work to others in the same genre and feeling deflated rather than motivated
- You haven’t made an image you’d want to look at again in the past two weeks
The alternative approach: Return to the 10 types list above and pick the genre that produced the strongest gut reaction — positive or negative. Strong reactions, in either direction, indicate creative energy. Follow that energy rather than the technique that seems most popular or most impressive.
If you’re consistently struggling with the compositional decisions that underpin all of these techniques, a structured approach to mastering photographic composition addresses the foundational skills that make every creative technique more effective.
Frequently Asked Questions
What is an example of being creative in photography?
One of the clearest creative photography examples is light painting — drawing shapes with a torch during a 15-to-30-second exposure in a dark room. The setup requires a camera on a tripod, a torch, and a dark space. The creative decision is entirely about what you draw and how you move. No editing is required. Smartphone users can replicate this with the Slow Shutter Cam app set to 15 seconds, making it one of the most accessible creative techniques available today.
What are 5 examples of creativity skills?
Five core creativity skills in photography are: (1) observational awareness — noticing light, shadow, and pattern before raising the camera; (2) compositional instinct — deciding what to exclude as much as what to include; (3) technical problem-solving — knowing which settings serve which creative intention; (4) conceptual thinking — forming a clear idea before shooting rather than discovering it afterward; and (5) creative persistence — returning to a subject or technique until it yields something unexpected. These skills develop through practice, not talent.
What was Irving Penn’s style of photography?
Irving Penn’s style was defined by refined minimalism — plain backdrops, controlled light, and meticulous attention to composition. He used white paper backdrops and available or studio light to strip away environmental context, placing the entire communicative weight on the subject’s form and expression. His “corner portraits,” where subjects were positioned in narrow angles, created psychological pressure that revealed character. Penn worked across portraiture, still life, and fashion for over six decades, primarily for Vogue (irvingpenn.org).
What kind of photography does James Maher do?
James Maher specialises in street and documentary photography focused on New York City. His work documents the social and architectural transformation of NYC’s neighbourhoods, particularly the effects of post-9/11 gentrification and luxury development. His seven-year project Luxe City captures this shift through candid street portraits and environmental images. Maher also teaches photography through customised NYC walking tours and workshops, and has written The Essentials of Street Photography (jamesmaherphotography.com).
When did David Bailey start photography?
David Bailey began photography during his Royal Air Force National Service in Singapore in the mid-1950s, where he purchased his first camera — a Rolleiflex, later replaced by a Canon rangefinder. He returned to London and became an assistant to fashion photographer John French in 1959. His first published portrait — of Somerset Maugham — appeared in Today magazine in 1960, the same year he began his long association with British Vogue (Britannica).
What is David Bailey’s real name?
David Bailey’s full name is David Royston Bailey. He was born on January 2, 1938, in Leytonstone, East London, England. Despite becoming one of Britain’s most celebrated photographers — central to the visual identity of Swinging London in the 1960s — he left school at 15 and received no formal photography education. His career is one of the clearest illustrations that creative vision, not academic training, determines photographic success (Wikipedia).
How can I practice creative photography at home?
Practicing creative photography at home involves using everyday objects and available light to experiment with new perspectives. Techniques like macro water droplet refraction, shadow photography, and forced perspective require minimal space. The key is applying the Ordinary-to-Extraordinary Framework to familiar surroundings.
What camera settings are best for creative photography?
There are no universal camera settings for creative photography, as settings depend entirely on the specific technique. Long exposure light painting requires a slow shutter speed (15-30 seconds) and low ISO (100-200). Conversely, freezing a water splash requires a fast shutter speed (1/2000s) and higher ISO (800).
The Framework That Changes Everything
Creative photography — across all 40 examples in this guide — comes down to a single repeatable principle: The Ordinary-to-Extraordinary Framework. Any subject, any camera, any room becomes a creative opportunity when you apply a deliberate perceptual shift. The research supports this: 97% of US adults under 50 already own a smartphone capable of executing every technique covered here (Pew Research Center). The barrier is never equipment. It’s always the decision to see differently.
The photographers who changed visual culture — Penn with his plain backdrops, Maier with her Rolleiflex, Bailey with his working-class East London eye — all worked within constraints that should have limited them. Instead, those constraints sharpened their vision. The creative block you’re feeling right now is not a sign that you lack talent. It’s a sign that you haven’t yet found the constraint that will force your best work.
Pick one idea from this guide — just one — and try it before the end of the week. Light painting in your bedroom. A forced perspective shot in your kitchen. A silhouette in a doorway at sunset. The creative block breaks faster than you expect, and amateurphotographerguide.com has the techniques and genre guides to keep you moving when it does.
Dave King
Hi, I'm Dave, the founder of Amateur Photographer Guide. I created this site to help beginner and hobbyist photographers build their skills and grow their passion. Here, you’ll find easy-to-follow tutorials, gear recommendations, and honest advice to make photography more accessible, enjoyable, and rewarding.