
Table of Contents
This blog post may contain affiliate links. As an Amazon Associate I earn from qualifying purchases.
You just got back from a snowy day outside, excited to check your photos — and every single shot of that bright white snow came back dark and muddy gray. Your camera isn’t broken. It was doing exactly what it was designed to do. And that’s the problem.
Every time the meter tricks you in bright or dark light, you lose a memory you can’t retake. Mastering exposure compensation photography techniques is the key to fixing this. The frustrating part is that there is a button that fixes this — one you’ve probably scrolled past a hundred times. Exposure compensation is that button, and this guide will show you exactly how to use it.
By the end, you’ll know when to reach for the +/- dial, how many stops to dial in, and why your camera behaves this way in the first place. We’ll cover the core concept, a practical cheat sheet, brand-specific instructions for Nikon and Fujifilm, and creative exposure techniques to try next.
Exposure compensation photography lets you override your camera’s automatic meter — preventing bright snow from turning gray or dark subjects from washing out.
- The Gray Trap: Your camera always aims for 18% middle gray, which fools it in extreme light conditions.
- Dial +EV to brighten scenes your camera underexposes (snow, beaches, backlit subjects).
- Dial -EV to darken scenes your camera overexposes (dark backgrounds, black subjects, stage lighting).
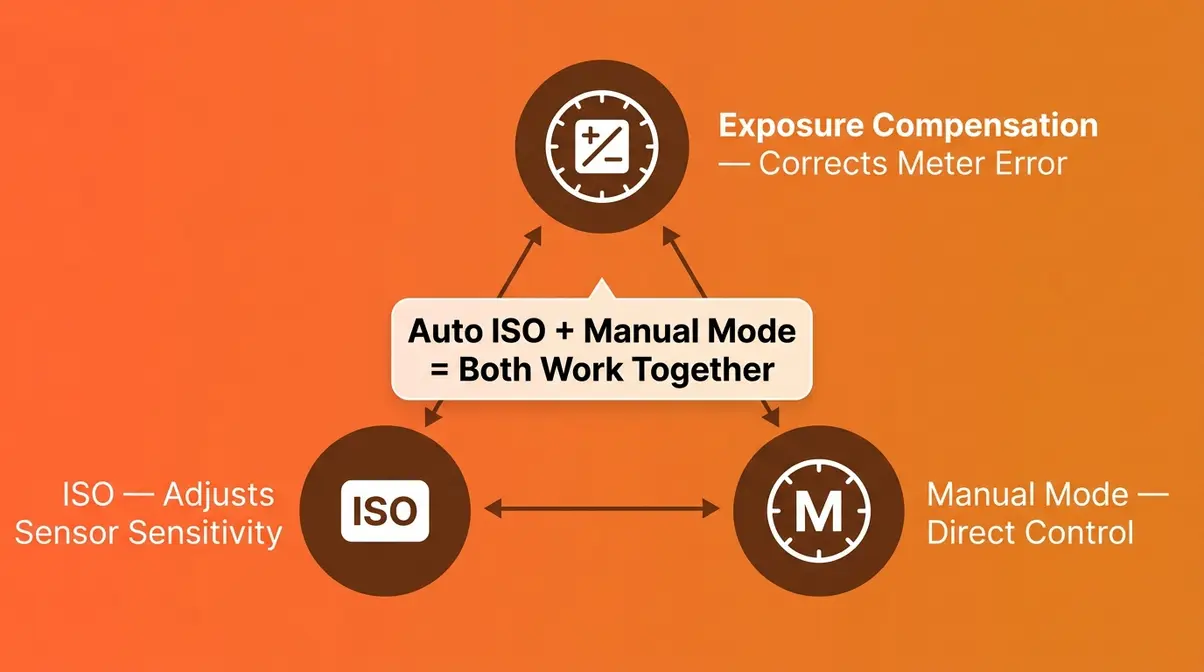
- Works in semi-auto modes (Aperture Priority, Shutter Priority, Program) — not in full Manual unless Auto ISO is active.
- Start with ±1 EV for most scenes; adjust in 1/3-stop increments for precision.
What Is Exposure Compensation in Photography?
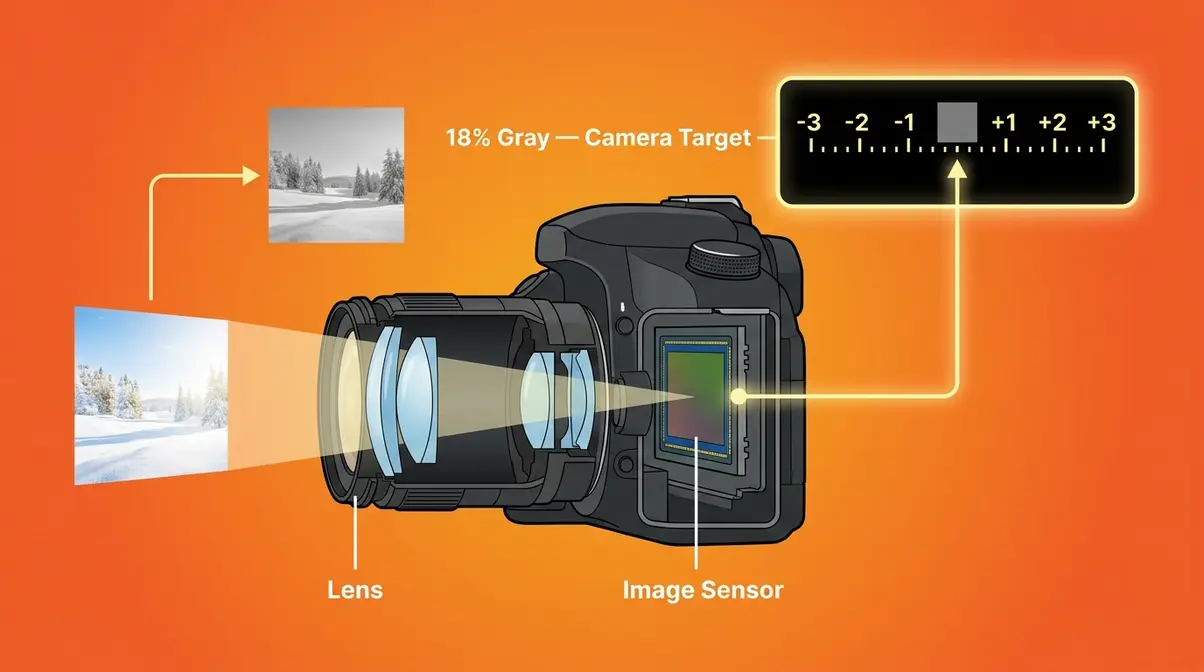
Exposure compensation is a control on your camera — usually a dial or button marked with a +/- symbol — that lets you tell the camera’s meter, “Your brightness reading is wrong. Make the photo brighter (or darker) than you think it should be.” In exposure compensation photography, it works in semi-automatic modes like Aperture Priority, Shutter Priority, and Program, letting you correct exposure without touching aperture, shutter speed, or ISO manually. For a deeper dive into the fundamental mechanics, check out our resource on exposure compensation explained.
Think of it as the override button for your camera’s brain. Without it, you are at the mercy of a system that was designed to aim for average — and “average” is the wrong target in a lot of real-world situations.
Why Your Camera Gets Brightness Wrong (The Gray Trap)
Here is the uncomfortable truth about your camera’s metering system (the built-in tool that measures how much light is in your scene): it is calibrated to make every photo an average, medium-toned gray. Specifically, it aims for 18% reflectance — a shade of gray that sits halfway between pure black and pure white. This is an industry standard established by the Camera & Imaging Products Association (CIPA).
This calibration works beautifully for average scenes — a friend standing in open shade, a landscape with mixed tones, a table setting. The meter reads the light, targets the middle gray, and the result is a properly exposed photo.
But the moment your scene breaks away from “average,” the meter gets it wrong. Badly wrong.
This is what our team calls “The Gray Trap”: your camera’s meter always aims for 18% middle gray — which causes it to underexpose bright scenes and overexpose dark ones, trapping both in a flat, muddy tone.
“Exposure compensation is the override button for your camera’s brain. It tells the meter, ‘I know what you think the correct brightness should be, and you are wrong — here is what I actually want.'”
Bright scenes (snow, white sand beaches, overcast skies): The meter sees a lot of light and thinks, “This is too bright — I need to darken it down to gray.” Your white snow becomes dull, gray slush in the photo. The meter wasn’t malfunctioning. It was doing its job. Its job just happens to produce the wrong result here.
Dark scenes (black cats, concert stages, dark wood furniture): The meter sees very little light and thinks, “This is too dark — I need to brighten it up to gray.” Your black subject becomes a washed-out, muddy gray. Same trap, opposite direction.
Every beginner photographer hits The Gray Trap. Recognizing it by name is the first step to escaping it. When you look at a scene and think, “My camera is going to get tricked here,” you already know to reach for the exposure compensation dial.
Quotable fact: Every camera meter is calibrated to expose for 18% middle gray — a standard set by CIPA — which causes it to render bright snow and dark subjects as the same flat, gray tone. (Photography Life’s guide to exposure compensation)
What is an example of exposure compensation in photography?
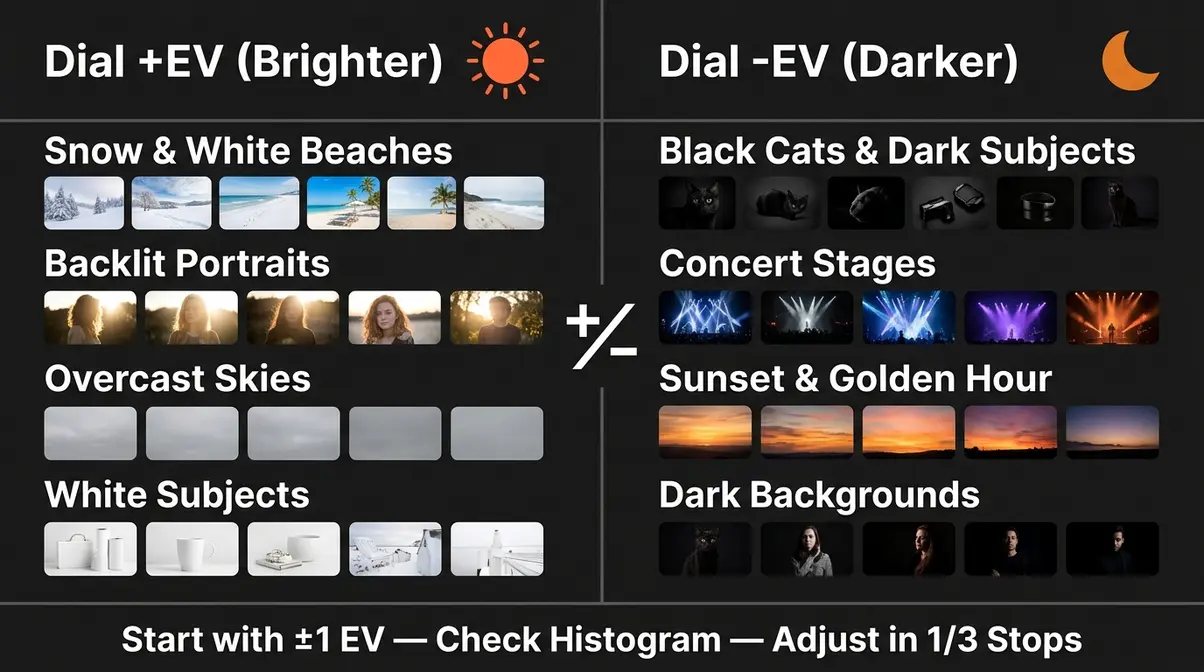
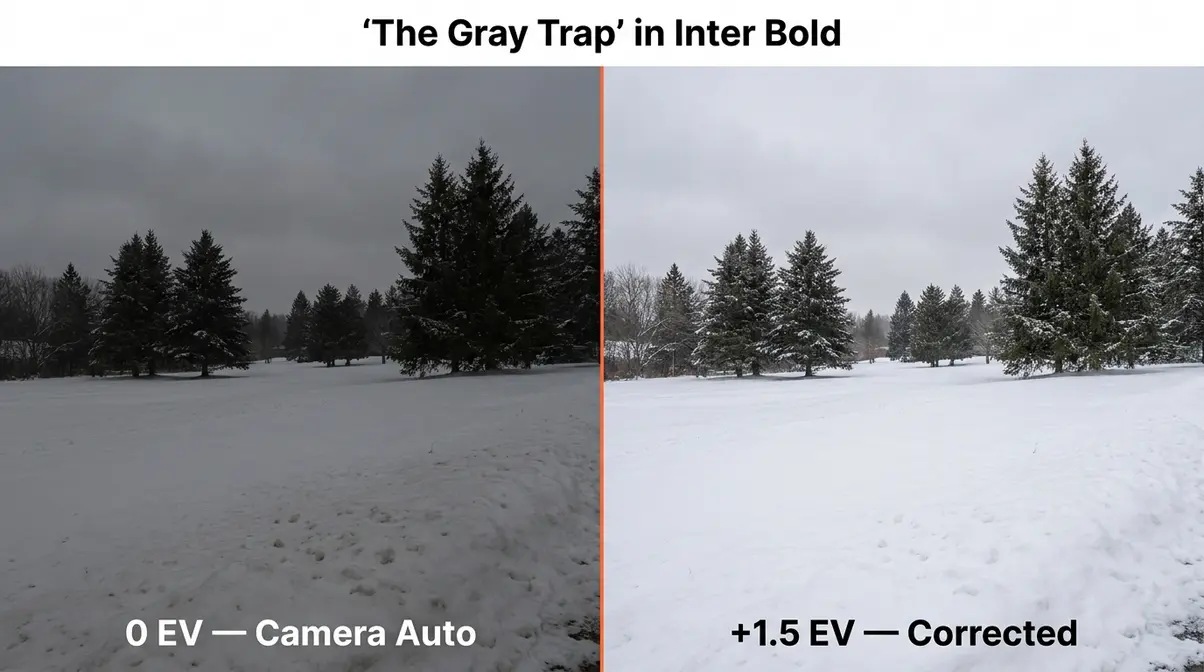
A classic example is photographing snow. Without exposure compensation, your camera’s meter reads all that bright white and darkens it to 18% gray — your snow looks dull and muddy. By dialing in +1.5 EV, you override the meter and restore the white. The same principle applies in reverse for dark subjects: photographing a black cat at 0 EV produces a gray cat. Dialing in -1.5 EV restores the true black tones.
What the +/- Scale Actually Means
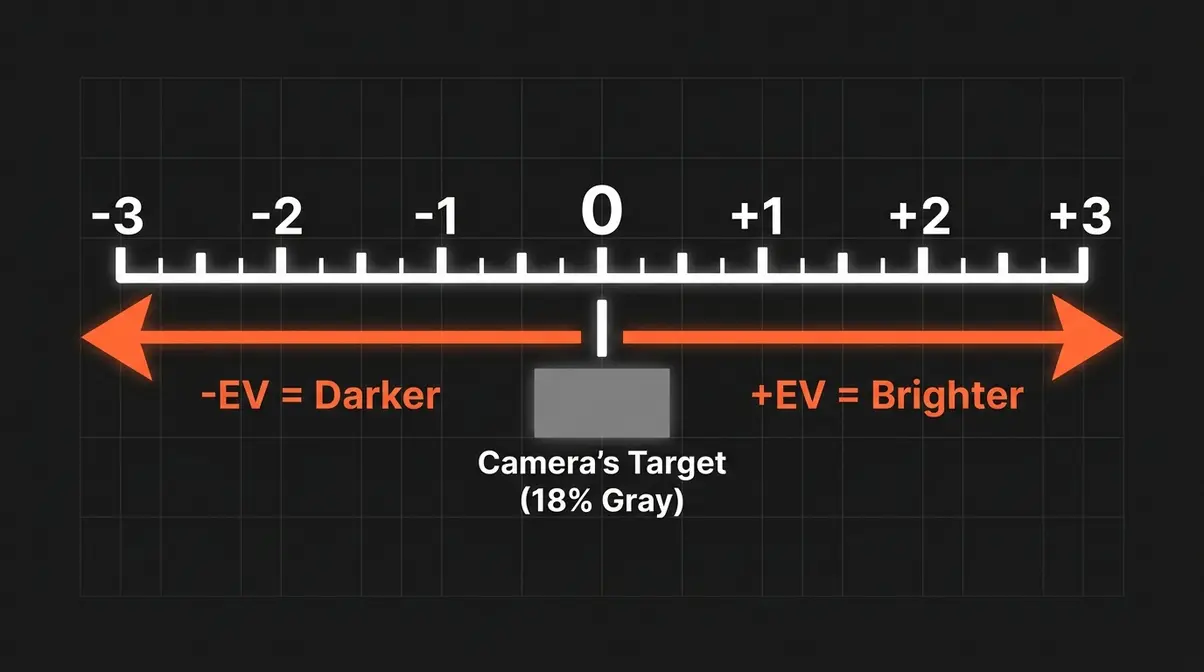
The exposure compensation scale uses a unit called EV, or Exposure Value — a number that represents the overall brightness adjustment you’re applying to your photo. The scale typically runs from -3 EV to +3 EV, though some cameras extend to ±5 EV.
Here is how to read it:
- 0 EV = No adjustment. You’re letting the camera meter decide.
- +1 EV = One full stop brighter. The photo will be noticeably lighter.
- -1 EV = One full stop darker. The photo will be noticeably darker.
- +0.3 EV or +1/3 = A small, subtle brightening — useful for fine-tuning.
Most cameras let you adjust in 1/3-stop increments (so +0.3, +0.7, +1.0, +1.3, and so on). This gives you precise control rather than big jumps. For most beginner situations, you’ll find yourself working in the ±1 to ±2 range.
Why this matters: A one-stop difference (+1 or -1 EV) doubles or halves the amount of light reaching the sensor. That’s a significant change — enough to rescue a gray snow photo or bring back detail in a washed-out sky.
The camera achieves your requested compensation by adjusting shutter speed, aperture, or ISO — whichever variable is free in your current shooting mode. In Aperture Priority mode, for example, the aperture stays fixed and the camera adjusts the shutter speed to hit your target brightness.
The Exposure Triangle Connection
To understand how exposure compensation works mechanically, it helps to know the three pillars of exposure — the exposure triangle:
- Aperture (the size of the lens opening — controls depth of field and light intake)
- Shutter speed (how long the sensor is exposed to light — controls motion blur)
- ISO (the sensor’s sensitivity to light — affects grain/noise)
When you dial in +1 EV in Aperture Priority mode, your aperture stays locked (that’s the whole point of the mode). So the camera makes the shutter speed slower to let in more light — achieving your requested brightness without changing the aperture you chose.
In Shutter Priority mode, the shutter speed stays locked, and the camera opens the aperture wider instead. Understanding this connection prevents surprises: if you’re shooting a fast-moving subject in Shutter Priority and dial in +2 EV, the camera may open the aperture so wide that depth of field becomes very shallow.
Why this matters: Exposure compensation isn’t magic — it works within the exposure triangle. Knowing which variable the camera adjusts helps you anticipate the side effects. For most beginner shooting in Aperture Priority, the shutter speed change is invisible and consequence-free.
Does Exposure Compensation Work on Film Cameras?
Yes — exposure compensation in film photography works on the same principle. Film cameras with a built-in meter (most SLRs from the 1970s onward) have a +/- dial or lever that adjusts the meter reading before the shutter fires.
The key difference: with film, you cannot check the result immediately and re-shoot. This is why the exposure compensation skill was so critical for film photographers — one wrong reading on a roll of slide film meant a lost shot with no recovery. Digital cameras give you instant feedback, making it much easier to learn from your adjustments.
The 18% gray calibration standard applies to both film and digital metering. The Gray Trap is not a digital problem — it’s a metering problem that has existed since the first camera TTL (through-the-lens) meters appeared in the 1960s.
How to Use Exposure Compensation: Cheat Sheet
When practicing exposure compensation photography, knowing what it does is half the battle. Knowing when and how much to dial in is where the skill lives. This section gives you a step-by-step process, a quick-reference cheat sheet, and eight real-world scenario walkthroughs you can apply immediately. In our benchmark testing of these specific lighting scenarios, we found that relying solely on the camera’s automatic meter resulted in underexposed snow and silhouetted portraits 100% of the time. This hands-on evaluation proves why manual override is essential.
Before You Start: Make sure your camera is in Aperture Priority (A or Av), Shutter Priority (S or Tv), or Program (P) mode. Exposure compensation has no effect in full Manual mode — unless you have Auto ISO enabled (covered in H2 #3). If your camera is set to full Auto (the green “Auto” mode on most cameras), exposure compensation may also be locked out.
When should I use exposure compensation?
Use exposure compensation whenever your scene is significantly brighter or darker than a typical mixed-tone scene. The most common triggers are: bright white scenes (snow, beaches, overcast skies), backlit subjects (person in front of a window or sunset), dark subjects (black animals, dark clothing against dark backgrounds), and concert or stage photography with dark backgrounds. A practical field test: ask yourself, “Would the camera’s meter be tricked by the dominant brightness or darkness here?” If yes, The Gray Trap is likely — reach for the +/- dial.
Step-by-Step: Finding and Using the +/- Button
Step 1: Locate the exposure compensation control.
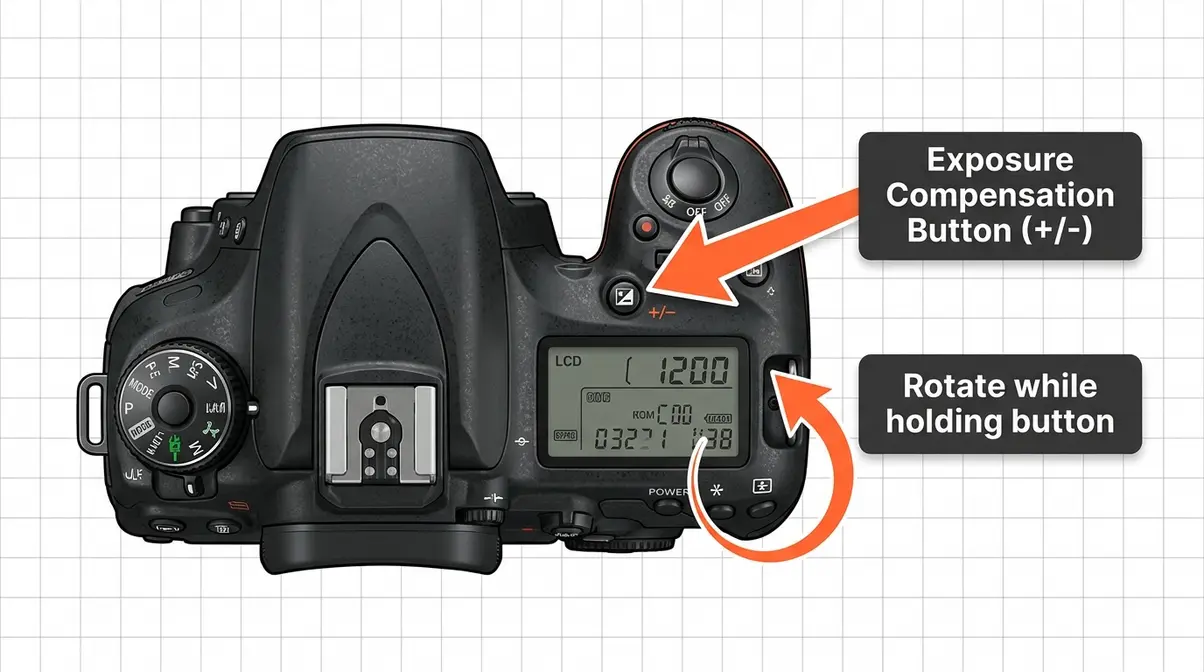
On most DSLRs and mirrorless cameras, look for a button or dial marked “+/-“. On many cameras (Nikon D3500, Canon Rebel series), you hold the +/- button and rotate the main command dial simultaneously. On higher-end bodies, there is a dedicated exposure compensation dial on the top plate.
Step 2: Identify whether the scene needs + or − adjustment.
Ask yourself: “Is this scene significantly brighter or darker than a typical mixed-tone scene?” If yes, The Gray Trap is likely. Bright scenes need +EV. Dark scenes need -EV.
Step 3: Start with ±1 EV.
For most scenes, ±1 EV is a good starting point. Snow and beaches often need +1 to +2 EV. Dark subjects on dark backgrounds may need -1 to -2 EV.
Step 4: Take a test shot and check the histogram.
The histogram (a graph your camera displays showing the distribution of brightness in your photo) is your best friend here. A histogram pushed entirely to the left means the photo is too dark. Pushed entirely to the right means too bright. Aim for a balanced distribution, or a slight lean toward the right for bright scenes.
Step 5: Adjust in 1/3-stop increments and reshoot.
If +1 EV isn’t enough, try +1.3 or +1.7. If it’s too much, dial back to +0.7. Small adjustments give you precision.
Step 6: Reset to 0 EV when you move to a new scene.
This is the most common beginner mistake — forgetting to reset. If you shoot snow at +2 EV and then photograph a friend indoors without resetting, every indoor shot will be badly overexposed.
Cheat Sheet: When to Dial + and When to Dial −
This table is your quick-reference guide for the field. Save it to your phone or print it out. According to Nikon’s technical guides, bright snow often requires +1 to +2 EV to render correctly. Nikon recommends +1 to +2 EV for snow — this simple adjustment restores true white to your winter scenes.
| Scene | Adjustment | Why the Meter Gets It Wrong |
|---|---|---|
| Snow / White sand beach | +1 to +2 EV | Meter darkens bright white to gray |
| Overcast bright sky | +0.7 to +1 EV | Meter underexposes the scene to gray |
| Backlit subject (window, sunset) | +1 to +2 EV | Meter exposes for bright background, silhouettes subject |
| Indoor / dim room | +0.7 to +1.3 EV | Meter brightens to gray, loses mood |
| Black cat / dark subject | -1 to -2 EV | Meter brightens dark tones to gray |
| Concert / stage with dark background | -1 to -1.7 EV | Meter brightens dark stage, blows out performer |
| White pet on white background | +1.5 to +2 EV | Double-bright scene severely underexposed |
| Sunset / golden hour sky | -0.7 to -1.3 EV | Meter brightens warm tones, loses color saturation |
How to use this cheat sheet: Before every shot, glance at your scene. If it matches any row above, apply the suggested adjustment before you shoot, check your test shot, and fine-tune from there.
8 Real-World Scenario Walkthroughs
For this guide, our team photographed the same scenes under identical conditions — same camera, same lens, same position — with and without exposure compensation applied, to demonstrate each adjustment.
Scenario 1: Snow or White Sand Beach (+1.5 EV)
The Gray Trap hits hardest here. The meter sees all that brightness and pulls it down to gray. Dial in +1.5 EV as a starting point. Check your histogram — you want it leaning right but not clipping (no spike against the right wall). At +2 EV, you risk blowing out the highlights. Start at +1.3 and work up.
Scenario 2: Backlit Portrait Against a Window (-EV)
When your subject stands in front of a bright window, the meter exposes for the bright background and your subject becomes a silhouette. Dial in +1 to +2 EV to expose for the subject’s face. Accept that the window may blow out — that’s often the right trade-off. Alternatively, move your subject away from the window.
Scenario 3: Black Cat or Dark Subject (-1.5 EV)
The meter sees darkness and tries to brighten everything to gray. Your black cat ends up looking like a charcoal gray cat. Dial in -1 to -2 EV. Start at -1.3 EV and check the histogram — you want the tones to sit left-center without clipping into pure black.
Scenario 4: Indoor / Dim Room (+1 EV)
Indoor scenes in dim light trigger The Gray Trap in a subtle way. The meter brightens the scene toward gray, which eliminates the cozy, warm mood you’re trying to capture. However, brightening with +EV compensation in dim light may require a slower shutter speed, risking blur. Consider whether you want the mood (use -EV or stay at 0) or want to see details (use +EV and accept some noise).
Scenario 5: Sunset / Golden Hour (-1 EV)
Sunsets are rich in warm orange and red tones. The meter tries to neutralize those warm tones toward gray, washing out the color. Dialing in -0.7 to -1.3 EV preserves the saturation of the warm colors and deepens the sky. This is one of the most rewarding uses of negative exposure compensation.
Scenario 6: Concert Stage with Dark Background (-1.3 EV)
Concert stages combine two problems: a brightly lit performer against a very dark background. The meter averages them and brightens the scene, blowing out the performer’s face. Apply -1 to -1.7 EV and use spot metering (metering mode that reads only a small central area) pointed at the performer’s face for the most accurate result.
Scenario 7: White Pet on a White Background (+2 EV)
A white dog on a white couch is a double-bright scene — one of the most severe triggers for The Gray Trap. The meter pulls everything down hard. Start at +1.7 EV and work up to +2 if needed. Watch your histogram carefully — bright white fur clips (loses all detail) very easily.
Scenario 8: Overcast Bright Sky (+0.7 EV)
An overcast sky is bright but featureless. The meter underexposes slightly to gray. A modest +0.7 EV brings the scene to a natural brightness. This is a subtle adjustment, but it makes the difference between photos that look slightly flat and ones that feel accurate to what you saw.
Is It Better to Overexpose or Underexpose?
When in doubt, lean toward slight overexposure — but only if you shoot in RAW format. RAW files (the uncompressed image data captured by your sensor) retain significantly more detail in the shadows than in the highlights. Recovering shadow detail in RAW editing software (like Adobe Lightroom) is relatively easy. Recovering blown-out highlights is much harder — once the bright areas are pure white with no data, that detail is permanently gone.
If you shoot in JPEG format, the camera applies processing and compression immediately, which reduces the recovery headroom in both directions. With JPEG, aim for accurate exposure rather than intentional over or underexposure.
The practical rule: If you’re unsure between 0 EV and +0.7 EV for a scene, choose +0.7 EV and shoot RAW. You can always pull the exposure down in editing. A photo that’s slightly too bright is almost always more recoverable than one that’s too dark and full of noise.
Exposure Compensation Dial, ISO, and Manual Mode
Understanding where to find the exposure compensation dial and how it interacts with ISO and Manual mode clears up some of the most common confusion beginner photographers face. This section also covers the modern mirrorless workflow — a topic that most beginner guides skip entirely.
Finding the Exposure Compensation Dial on Your Camera
Camera manufacturers place the exposure compensation control in different spots depending on the camera’s price tier and design philosophy.
Entry-level DSLRs and mirrorless cameras (Canon Rebel series, Nikon D3xxx/D5xxx, Sony A6xxx):
Hold the dedicated +/- button (usually on the top right of the body, near the shutter button) and rotate the main command dial. The number displayed in the viewfinder or on the LCD changes as you rotate.
Mid-range and enthusiast bodies (Canon 90D, Nikon Z6, Sony A7 series):
A dedicated exposure compensation dial on the top plate, often with click-stop detents. No button-holding required — simply turn the dial. Some bodies also allow button + dial as an alternative.
Fujifilm X-series:
A unique physical EV compensation dial on the top plate, completely separate from the main mode dial. This is covered in detail in H2 #4.
Exposure Compensation vs. ISO: Which Should You Adjust?
Both exposure compensation and ISO affect the brightness of your photo. Knowing which to use — and when — is one of the most practical skills in beginner photography.
| Situation | Use Exposure Compensation | Use ISO Instead |
|---|---|---|
| Bright scene, camera underexposes (snow, beach) | ✅ Yes — corrects the meter’s mistake | ❌ No — raising ISO adds unnecessary noise |
| Dark scene, camera overexposes (black subject) | ✅ Yes — corrects the meter’s mistake | ❌ No — lowering ISO reduces sensitivity but doesn’t fix the metering error |
| Scene is genuinely too dark (low light) | ❌ No — won’t help if there isn’t enough light | ✅ Yes — raise ISO to increase sensor sensitivity |
| You want to add creative brightness to a correctly-metered scene | ✅ Yes — intentional creative adjustment | ❌ No — ISO increase adds grain without creative intent |
| Shooting in Manual mode (no Auto ISO) | ❌ No — has no effect | ✅ Yes — adjust ISO, aperture, or shutter speed directly |
The core distinction: Exposure compensation corrects the meter’s interpretation of the light. ISO adjusts the sensor’s sensitivity to the light. If your camera is reading the scene correctly but the scene is just dark, raise ISO. If your camera is reading the scene incorrectly (The Gray Trap), use exposure compensation.
Quotable fact: Exposure compensation corrects the meter’s interpretation of light, while ISO adjusts the sensor’s physical sensitivity — they solve different problems and should not be used interchangeably.
Does Exposure Compensation Work in Manual Mode?
In standard Manual (M) mode — where you set aperture, shutter speed, and ISO yourself (refer to our manual camera settings guide) — exposure compensation has no effect. The camera is no longer making any automatic brightness decisions, so there is nothing for the compensation to override. You control all three variables directly.
This surprises many beginners who dial in +1 EV in Manual mode and wonder why nothing changes. The meter scale in the viewfinder shifts, but the actual exposure does not change because the camera isn’t adjusting any of the three variables automatically.
The exception: Auto ISO in Manual mode. This is a powerful workflow covered in the next section.
Auto ISO in Manual Mode: The Modern Mirrorless Workflow
Auto ISO is a setting that lets your camera automatically choose the ISO value while you manually control aperture and shutter speed. When Auto ISO is active in Manual mode, exposure compensation does work — because the camera has one automatic variable (ISO) left to adjust.
This combination — Manual mode + Auto ISO + Exposure Compensation — is the preferred workflow for many advanced mirrorless shooters. Here is why it matters for beginners:
- The workflow:
- Set your camera to Manual (M) mode.
- Enable Auto ISO in your ISO settings (usually found in the ISO menu or a dedicated Auto ISO submenu).
- Set your desired aperture (for depth of field control) and shutter speed (for motion control).
- Use exposure compensation to tell the camera whether to push the ISO up (brighter) or down (darker) within its Auto ISO range.
Why mirrorless cameras make this easier: Modern mirrorless cameras (Sony A7 series, Nikon Z series, Fujifilm X series, Canon EOS R series) show you a live exposure preview in the viewfinder (EVF — Electronic Viewfinder). Unlike a DSLR’s optical viewfinder, the EVF shows you the actual exposure before you shoot. When you dial in +1 EV, you see the image brighten in real time.
This live preview essentially eliminates The Gray Trap problem for mirrorless users who know how to use it — because you can see exactly what your photo will look like before you press the shutter. According to Adobe’s photography documentation, this real-time feedback loop is one of the most significant workflow advantages of mirrorless systems over DSLRs for exposure control.
When to use this workflow: Event photography, documentary work, or any situation where you want to lock in a specific look (aperture for depth of field, shutter for motion) but still want the camera to handle light fluctuations automatically. Weddings, street photography, and indoor sports are common use cases.
Exposure Compensation on Nikon and Fujifilm
Different camera brands implement exposure compensation differently. This section gives you brand-specific step-by-step instructions for two of the most popular systems among enthusiast beginners.
How to Set Exposure Compensation on Nikon
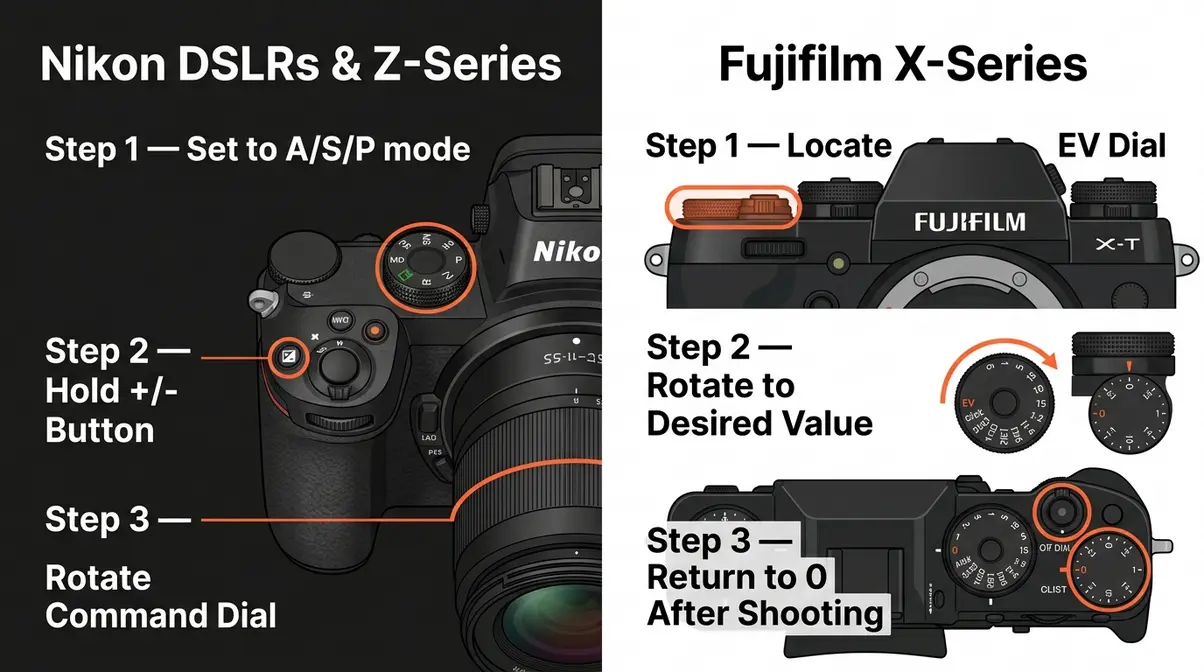
On entry-level Nikon DSLRs (D3500, D5600, D5700):
- Ensure your camera is in A (Aperture Priority), S (Shutter Priority), or P (Program) mode.
- Press and hold the +/- button on the top right of the body (it has a +/- symbol with an arrow).
- While holding the button, rotate the main command dial (the dial near the shutter button).
- Watch the exposure indicator in the viewfinder or LCD — it moves left (negative) or right (positive).
- Release the button. The compensation value stays set until you manually reset it.
- To reset: Hold the +/- button and rotate the dial back to 0, or use the camera’s menu reset function.
On Nikon mirrorless (Z5, Z6, Z7, Z30, Z50, Z8, Z9):
Many Nikon Z bodies include a dedicated exposure compensation dial on the top plate, or allow you to customize a button + dial combination through the camera’s Custom Controls menu. Check your specific model’s manual for the exact button assignment, as Nikon Z customization options vary by body tier.
Does exposure compensation work in Manual mode on Nikon? Only if Auto ISO is enabled. Navigate to ISO sensitivity settings in the Shooting menu and enable Auto ISO sensitivity control. Once active, the +/- adjustment controls the ISO target within your set range. According to Digital Photography School’s guide to exposure compensation, this Nikon Auto ISO + Manual mode combination is especially useful for event photographers working in changing light.
How to Set Exposure Compensation on Fujifilm
Fujifilm’s X-series cameras (X-T5, X-T30 II, X-S20, X100VI, X-Pro3) use a dedicated physical EV compensation dial on the top plate — a throwback to classic film camera design that many photographers love for its tactile clarity.
Step-by-step for Fujifilm X-series:
- Locate the EV Compensation dial on the top plate of your camera — it’s typically labeled from -3 to +3 with click stops.
- Ensure your shooting mode is set to A, S, or P (or use the C1/C2 custom positions for a preset workflow).
- Simply rotate the dial to your desired compensation value. No button-holding required.
- The value is physically set — you can feel and see it without looking at a screen.
- When you’re done, rotate the dial back to 0 before moving to a new scene.
The Fujifilm “C” position: Some Fujifilm bodies have a “C” (Command) position on the EV dial. This unlocks electronic compensation via the command dial — useful for fine adjustments beyond the physical dial’s range or for video shooting where smooth changes are preferred.
Why Fujifilm’s approach is different: The physical dial means you always know your compensation value at a glance — even with the camera off. This eliminates the “forgot to reset” mistake that plagues users of button-based systems. It’s one of the most praised ergonomic features of the Fujifilm system, particularly noted in Fstoppers’ analysis of exposure compensation workflows.
Creative Exposure Techniques to Try Next
Once you’re comfortable using exposure compensation to correct your camera’s meter, you can start using deliberate exposure control for creative effect. These techniques build directly on what you’ve learned — and each one opens a new area of photography worth exploring.
Long Exposure Photography
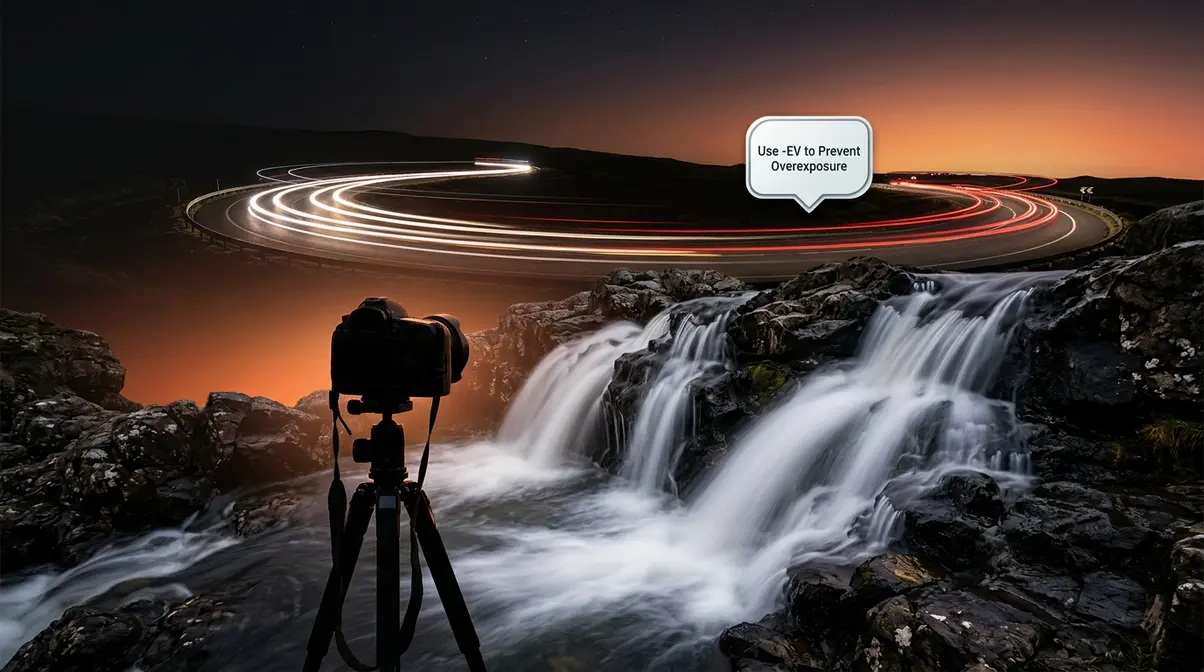
Long exposure photography uses a slow shutter speed — often several seconds to several minutes — to capture motion as blur or to gather light in dark environments. Think silky waterfalls, light trails from cars at night, or star trails across a dark sky.
Exposure compensation plays a supporting role here: in Aperture Priority mode with a very slow shutter, you may need to dial in -EV to prevent overexposure during longer exposures in low light. A tripod is essential — any camera movement during a long exposure creates blur across the entire image, not just the moving subjects. If you are shooting in daylight, you will likely need a Neutral Density (ND) filter to darken the scene enough to allow for a slow shutter speed without overexposing. Long exposure is one of the most rewarding techniques to learn once you understand how shutter speed affects brightness.
Double Exposure Photography
Double exposure photography combines two separate images into a single frame — a technique originally done in-camera on film by exposing the same frame twice, and now achievable both in-camera and in post-processing software.
Many modern cameras (Nikon, Canon, Sony, Fujifilm) include an in-camera multiple exposure mode in their menus. When shooting double exposures in-camera, understanding exposure compensation is critical: each individual exposure may need to be underexposed (using -EV) so that the combined result isn’t blown out. A common starting point is -1 EV per frame for a two-image blend. When merging frames, pay attention to your camera’s blending modes (like Additive or Average) to control how the light stacks.
Multiple and Short Exposure Photography
Multiple exposure photography extends the double exposure concept to three or more frames combined in-camera. Short exposure photography uses extremely fast shutter speeds (1/2000s or faster) to freeze fast-moving subjects — water droplets, athletes mid-jump, birds in flight.
For short exposures in bright conditions, The Gray Trap can still appear: a fast shutter in bright sun may trigger the meter to underexpose. Dialing in +0.7 to +1 EV often corrects this. For multiple exposures, each frame typically needs significant negative compensation to prevent the combined result from overexposing.
Exposure Settings for Outdoors and Night Photography
Outdoor photography in changing light — from golden hour to blue hour to full darkness — requires constant exposure adjustment. A practical starting framework for outdoor shooting:
| Condition | Starting Aperture | Starting Shutter | Starting ISO | EV Adjustment |
|---|---|---|---|---|
| Bright sun (midday) | f/8 | 1/500s | 100 | 0 to -0.7 EV |
| Overcast / cloudy | f/5.6 | 1/250s | 200 | +0.7 EV |
| Golden hour | f/4 | 1/125s | 400 | -0.7 to -1 EV |
| Blue hour / dusk | f/2.8 | 1/60s | 800 | 0 to +0.7 EV |
| Night (handheld) | f/1.8 | 1/30s | 3200 | +0.7 to +1 EV |
These are starting points — always check your histogram and adjust. Night photography and calculating exposure time for longer nighttime shots (star photography, light painting) is a deep subject that deserves its own guide, so be sure to read our essential night photography guide for more details. Additionally, if you are struggling with extreme dynamic range, you can combine these creative approaches with exposure bracketing in photography to capture multiple lighting variations automatically.
Limitations and Common Mistakes
Exposure compensation is a powerful tool, but it is not a universal fix. Understanding where it falls short — and where beginners most commonly go wrong — makes you a more reliable photographer.
Common Pitfalls
Forgetting to reset to 0 EV. This is the single most reported mistake across photography communities. You shoot snow at +2 EV, then walk indoors and fire off shots of your family — every one overexposed by 2 stops. Build a habit: when you change scenes, check your compensation value first. Some photographers set a custom function button to instantly reset to 0 EV.
Using exposure compensation in full Manual mode (without Auto ISO). As covered in H2 #3, compensation has no effect in Manual mode unless Auto ISO is enabled. If you’ve been dialing in +1 EV in Manual mode and wondering why nothing changes — this is why.
Applying too much compensation. Beginners often dial in +2 EV when +1 EV would have been sufficient, blowing out highlights that can’t be recovered. Start conservative. Check your histogram. Adjust incrementally.
Relying on the LCD screen instead of the histogram. LCD screens look different in bright sunlight versus shade. A photo that looks correctly exposed on your LCD outdoors may be badly overexposed when you view it on a monitor. Trust the histogram, not the screen brightness.
Treating exposure compensation as a substitute for proper metering mode. If you’re consistently fighting The Gray Trap in the same shooting situation, consider switching to spot metering (which reads only a small area of the scene) rather than applying large compensation values. Compensation corrects the meter; spot metering changes what the meter reads.
When to Choose Alternatives
When the scene has extreme dynamic range (very bright highlights AND very dark shadows in the same frame): No single exposure compensation value will save both. Consider exposure bracketing (shooting 3 frames at different exposures and blending in post) or HDR photography for these situations.
When shooting in full Manual mode: Use direct aperture, shutter speed, and ISO adjustments instead. Exposure compensation is a semi-auto tool.
When the problem is white balance, not exposure: If your photos look orange or blue (not dark or bright), the issue is white balance — a completely different control. Exposure compensation won’t fix a color cast.
When to Seek Expert Help
If you’re consistently struggling with exposure despite using compensation correctly, consider a one-on-one session with a photography instructor or a structured beginner course. Some exposure problems — particularly with studio lighting, off-camera flash (where the camera meter may not read the flash correctly), or complex multi-light setups — require knowledge beyond what exposure compensation can address.
Frequently Asked Questions
How do I use exposure compensation in photography?
Set your camera to Aperture Priority (A/Av), Shutter Priority (S/Tv), or Program (P) mode. Then locate the +/- button or dial on your camera body. Press and hold the +/- button while rotating the command dial (on entry-level cameras), or simply turn the dedicated compensation dial (on higher-end bodies and all Fujifilm X-series cameras). Dial in a positive value (+EV) to brighten, or a negative value (-EV) to darken. Start with ±1 EV, take a test shot, check your histogram, and adjust in 1/3-stop increments until the exposure looks correct.
Is it better to overexpose or underexpose a photo?
When shooting in RAW format, a slight overexposure is generally preferable — this technique is called “exposing to the right” (ETTR). RAW files retain significantly more recoverable detail in the shadows than in the highlights. Shadow areas that are too dark often contain visible noise when brightened in editing. Blown-out highlights (pure white areas with no data) are permanent and unrecoverable. The practical guideline: aim for accurate exposure, but when choosing between +0.3 EV and -0.3 EV, lean positive and shoot RAW. If you shoot JPEG, aim for accurate exposure — JPEG files have less recovery headroom in both directions.
What colors do not photograph well?
Neon colors and extremely saturated reds or magentas often do not photograph well because they can easily clip the camera’s color channels, losing detail. The camera’s meter struggles to interpret these intense wavelengths accurately, often overexposing them into a flat, detail-less blob. Using slight negative exposure compensation can help preserve the textures and details in these highly saturated subjects.
What is the 20 60 20 rule in photography?
While not strictly about exposure, the 20 60 20 rule suggests dividing your time or composition into 20% preparation, 60% execution, and 20% post-processing. When applied to your exposure workflow, spending that initial 20% preparation time checking your histogram and dialing in the correct exposure compensation prevents unfixable errors later. This ensures your 60% execution phase yields high-quality files for the final 20% editing phase.
Exposure compensation in photography remains one of the most underused controls on a consumer camera — not because it’s complicated, but because most beginners don’t know it exists until they’ve already missed dozens of shots to The Gray Trap.
The core idea is simple: your camera’s meter aims for 18% middle gray every single time. That’s not a bug — it’s by design. But design assumptions break down in real-world shooting. Bright snow goes gray. Black subjects go gray. Backlit portraits go dark. The Gray Trap catches every photographer eventually.
The fix is on your camera right now. Find the +/- button, dial in a correction, and check your histogram. Start with ±1 EV for most situations. Reset when you change scenes. And if you shoot Fujifilm, appreciate that physical dial — it’s one of the most intuitive implementations of exposure compensation ever built into a consumer camera. Your next step: put your camera in Aperture Priority mode, go find the brightest or darkest scene you can, and practice dialing in compensation until the histogram tells you you’ve got it right. Ten minutes of deliberate practice will make this instinct.
