
Table of Contents
- Table of Contents
- What Is HDR Photography? Definition & Science
- Benefits, Pitfalls, and Common Myths
- How to Take HDR Photos Step-by-Step
- Essential Gear and Camera Settings
- Best HDR Photography Software
- HDR Photography for Real Estate
- HDR Examples Across Genres
- Common Mistakes & When to Skip HDR
- Frequently Asked Questions
- Conclusion
This blog post may contain affiliate links. As an Amazon Associate I earn from qualifying purchases.
You’ve found the perfect shot. The sky is a deep, dramatic blue. The foreground is rich and detailed. You raise your camera, press the shutter — and the result is either a washed-out white sky or a ground so dark it looks like a silhouette cutout. Neither photo looks anything like what your eyes saw.
That gap between what you see and what your camera captures is real, and it happens to every photographer. Every time it does, you’re leaving a potentially great photo on the table. The fix already exists in your camera — you just need to know how to use it.
In this guide, you’ll learn exactly what HDR photography is, how to shoot it step by step, which software to use, and how to avoid the “cartoonish” results that give HDR a bad reputation. We cover everything from the basic definition through gear, editing software, real estate applications, and creative genres — so you finish this guide ready to shoot your first HDR image.
HDR photography merges 3–5 shots taken at different exposures into one image that reveals detail in both bright highlights and dark shadows — mimicking what the human eye naturally sees.
- HDR works best for high-contrast scenes: landscapes, real estate interiors, sunsets, and architecture
- The HDR Spectrum ranges from fake, over-processed tone-mapping to modern, natural-looking exposure blending — knowing where you are on that spectrum determines your results
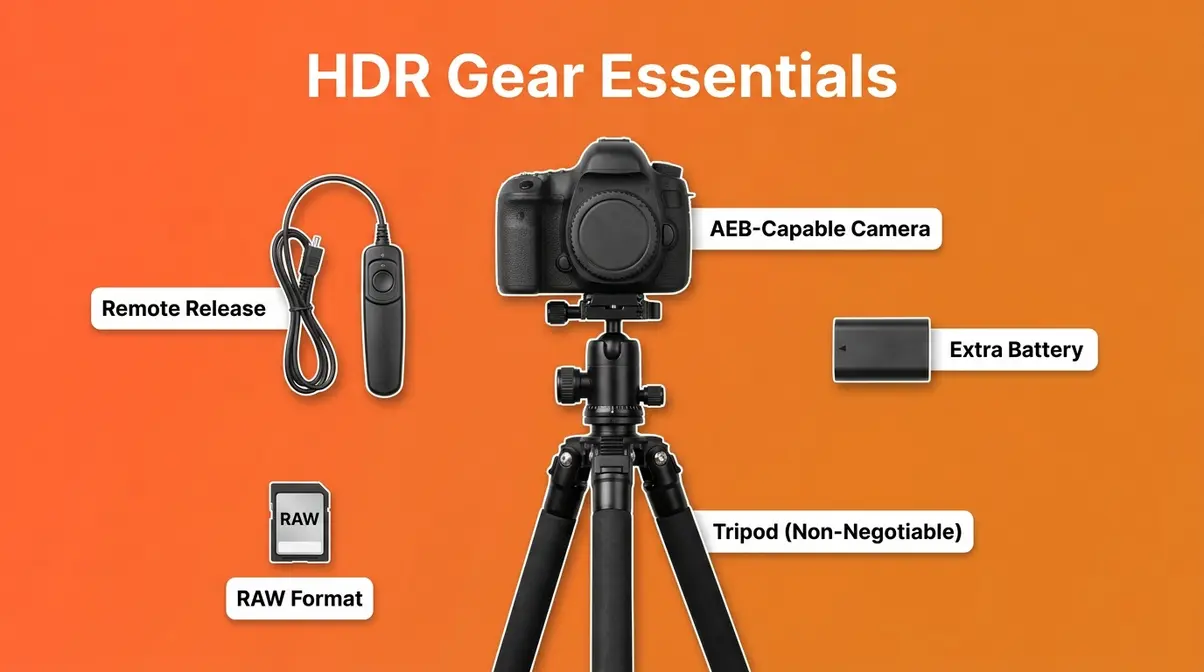
- You need 3 things: a tripod, your camera’s AEB (Auto Exposure Bracketing) mode, and merging software
- Lightroom Classic is the best starting point for beginners — included with an Adobe Creative Cloud subscription
- Bad HDR comes from over-processing; good HDR looks exactly like a scene your eyes would actually see
Table of Contents
- What Is HDR Photography?
- Benefits, Pitfalls, and Common Myths
- How to Take HDR Photos
- Essential Gear and Camera Settings
- Best HDR Photography Software
- HDR Photography for Real Estate
- HDR Examples Across Genres
- Common Mistakes & When to Skip HDR
- Frequently Asked Questions
- Read our conclusion
What Is HDR Photography? Definition & Science
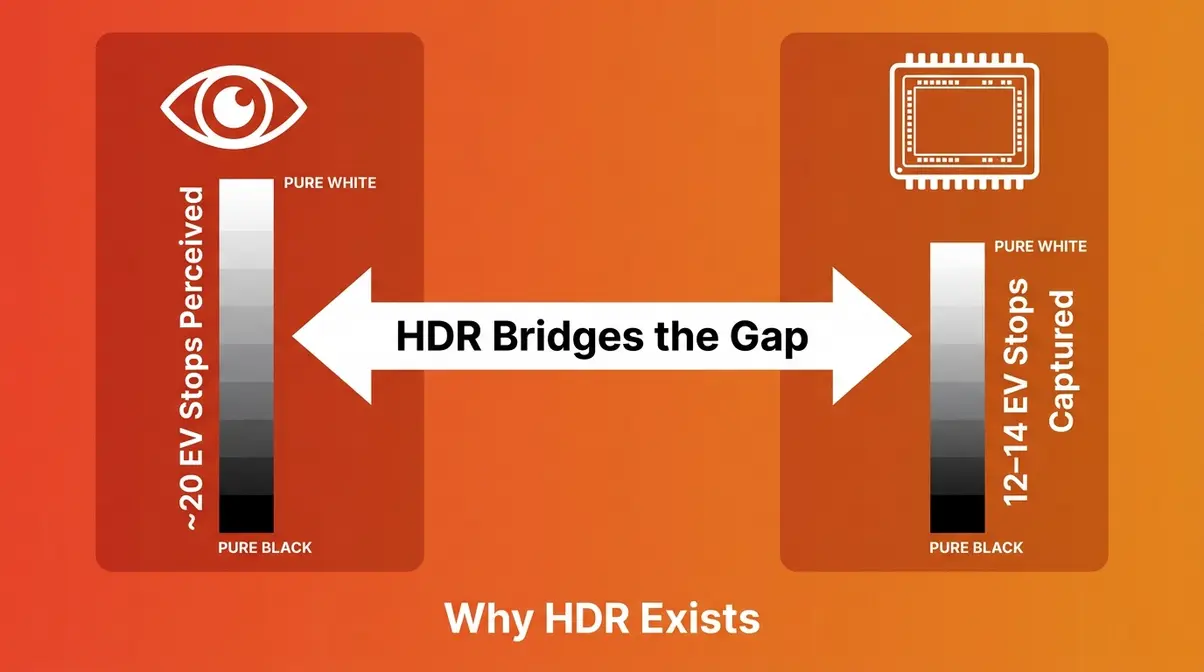
HDR photography — short for High Dynamic Range — is a technique that merges multiple photos of the same scene into one image that captures detail in both the brightest highlights and darkest shadows. The human eye perceives roughly 20 stops of dynamic range (stops — units of light measurement where each stop doubles or halves brightness); most camera sensors capture only 12–14 stops (Stanford University’s explanation of HDR imaging). HDR photography bridges that gap, letting your final photo look more like what you actually saw.
To understand high dynamic range photography, you first need to understand why your camera struggles in the first place — and why the solution is simpler than most beginners expect.
Why Your Camera Needs HDR
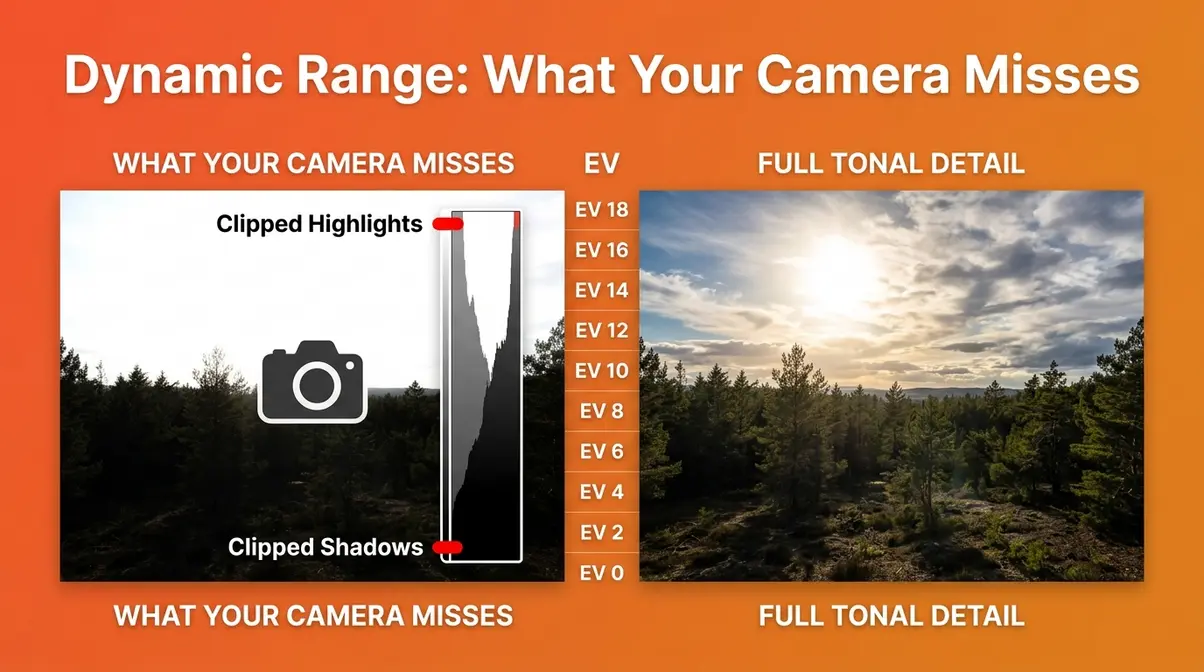
HDR stands for High Dynamic Range. “Dynamic range” is the difference in brightness between the lightest and darkest parts of a scene — like a bright, sunlit window in a dim room.
Your eyes handle this automatically. When you glance at that window and then at the dark corner of the room, your pupils and visual cortex adjust within milliseconds, letting you see detail everywhere. Your camera can’t do that. It takes one fixed reading of the light — one exposure — and everything outside that range either goes completely white (“blown out”) or completely black (“solid black”).
Think of it like this: your camera is wearing sunglasses it can’t take off. It can protect the brightest areas from being overexposed, but the shadows go dark. Or it can lift the shadows, but then the bright sky turns into a featureless white smear.
EV stops (Exposure Value stops) measure this limitation precisely. A camera sensor with a 13-stop dynamic range simply cannot record a scene that spans 18 stops of brightness — no matter how skilled the photographer. HDR is not a stylistic choice. It’s a technical solution to a hardware limitation.
The Three-Exposure Method
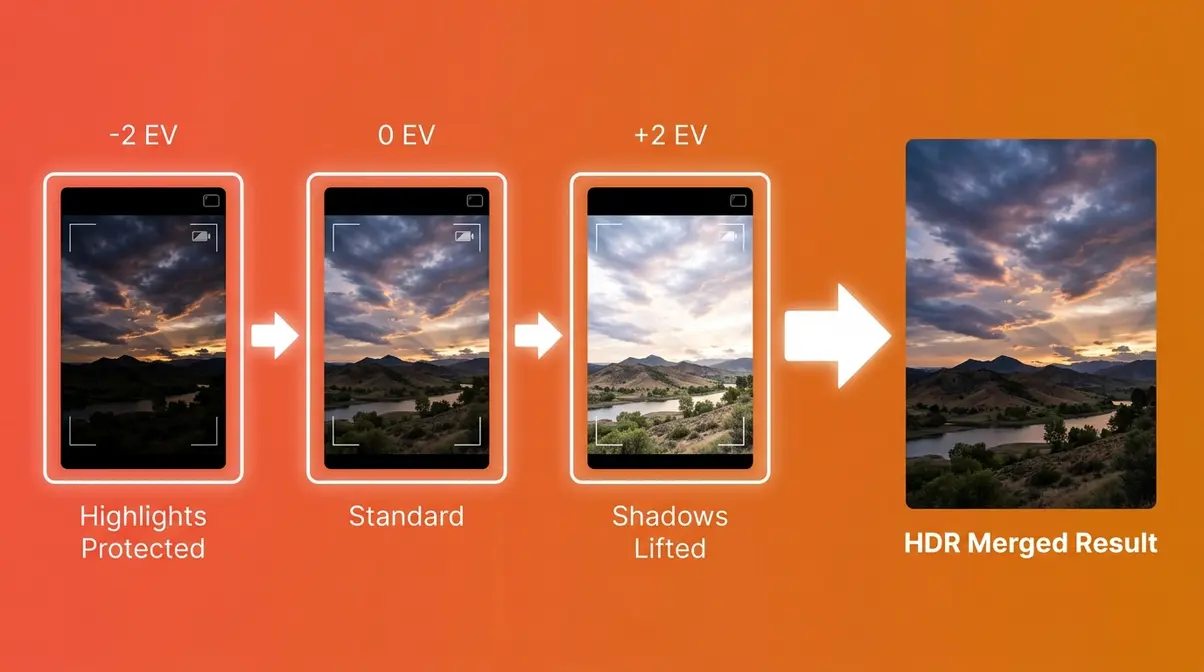
Here’s how it actually works: instead of taking one photo, you take three (or five, or seven). Each photo is exposed for a different brightness level — one for the highlights, one for the shadows, and one somewhere in the middle. Software then analyzes all the images and combines the best-exposed pixels from each into a single, balanced result.
This is called exposure bracketing — shooting the same scene at multiple exposure values (EV). Most cameras automate this through a feature called AEB (Auto Exposure Bracketing) — a mode that automatically fires multiple shots at different exposures in rapid sequence.
The basic three-shot sequence looks like this:
- Shot 1 (–2 EV): Underexposed — protects the bright sky from blowing out
- Shot 2 (0 EV): Standard exposure — your camera’s best guess
- Shot 3 (+2 EV): Overexposed — lifts the dark shadows to reveal hidden detail
Merging software (like Adobe Lightroom Classic) then stacks these frames, reads the well-exposed pixels from each one, and blends them into a single image. The result: a photo where the sky is correctly exposed and the ground is fully visible — simultaneously.
User consensus across photography communities consistently confirms that the three-shot bracket is the right starting point for beginners. Five or seven shots add detail in extreme contrast situations, but three exposures handle the vast majority of real-world scenes effectively.
True HDR vs. Legacy Tone-Mapping
Here’s where most guides get it wrong — and where modern technology changes everything.
When most people hear “HDR photography” and picture over-saturated, alien-like images with glowing halos around trees, they’re thinking of legacy tone-mapping — the HDR technique dominant from roughly 2005 to 2015. Tone-mapping is a software process that compresses a wide range of light into a standard screen’s limited brightness range. When pushed too hard, it creates that cartoonish, unrealistically bright look that photographers still mock today.
But The HDR Spectrum — the framework that organizes everything in this guide — shows that tone-mapping is just one point on a much broader range:
| Stage | Era | What It Looks Like | Tools |
|---|---|---|---|
| Legacy Tone-Mapping | 2005–2015 | Over-saturated, halos, alien-like glow | Photomatix (heavy presets) |
| Realistic Exposure Blending | 2015–present | Natural, balanced, true to the scene | Lightroom, Aurora HDR (subtle settings) |
| True HDR Displays | 2026+ | Full luminance output on HDR-capable screens | Lightroom Classic HDR Output (PQ/HLG) |
The 2026 shift is significant. PQ (Perceptual Quantizer) and HLG (Hybrid Log-Gamma) are display standards — the technical specifications that allow HDR-capable monitors, TVs, and phones to show images with genuinely wider brightness ranges. Adobe Lightroom’s true HDR output (introduced in recent updates) now exports images in these formats, meaning a photo can display peak highlights at 1,000+ nits of brightness on a compatible screen — instead of being compressed into the 200–300 nit range of a standard display.
For beginners in 2026: you don’t need a special monitor to get started. Realistic Exposure Blending — Stage 2 of The HDR Spectrum — is your target. It produces natural-looking photos that look great on any screen. True HDR display output is the next frontier, worth understanding but not a prerequisite.
Benefits, Pitfalls, and Common Myths
HDR photography delivers real, measurable benefits — but only when used in the right situations. Understanding when it helps and when it hurts is the skill that separates a natural-looking result from a cartoonish disaster. To dive deeper into the nuances, review our hdr photography explained guide.
When HDR Makes Photos Better
HDR improves photos when the scene’s contrast exceeds what a single exposure can handle. That threshold is roughly 14+ EV stops of brightness difference — more than any current camera sensor can capture in one shot.
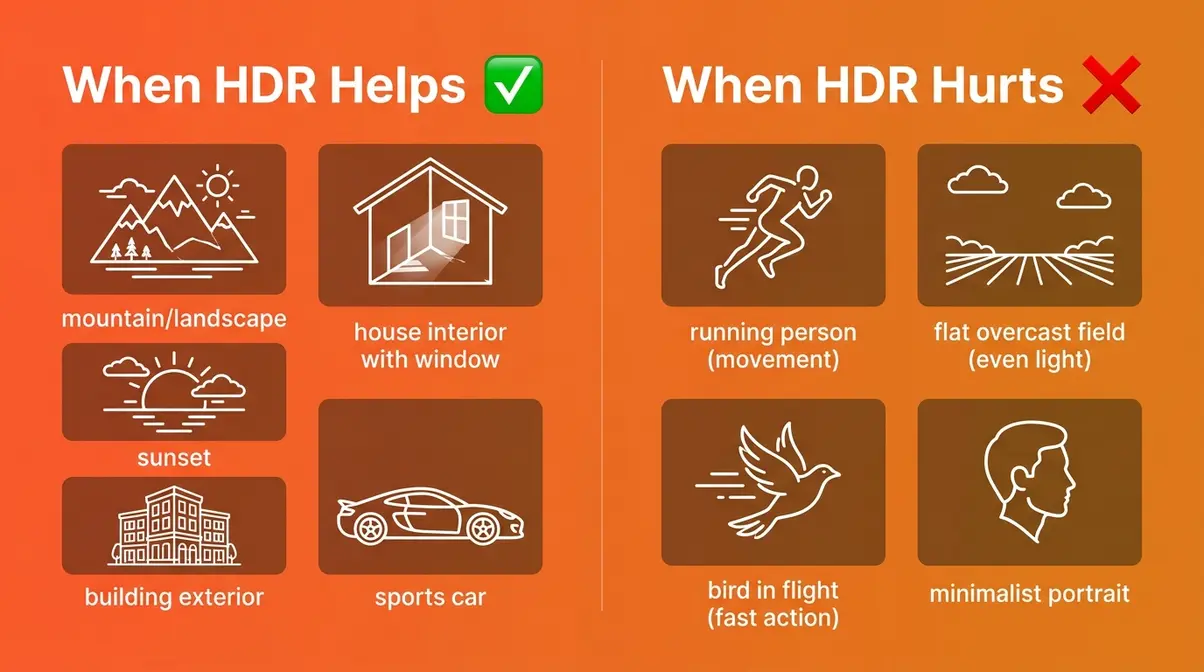
HDR works best for:
- Landscape photography — bright skies above dark foreground terrain
- Real estate interiors — rooms with large windows flooding in daylight
- Sunset and sunrise — the sky is often 5–8 stops brighter than the ground
- Architecture — both interior and exterior, especially with mixed lighting
- Automotive photography — reflective surfaces and dark interiors together
HDR is the wrong tool when:
- Your subject is moving (people, animals, wind-blown foliage) — the multiple exposures create “ghosting” artifacts
- The scene has flat, even lighting — HDR adds complexity without adding value
- You’re shooting fast-moving action — bracketed sequences take time and blur is inevitable
- You want a clean, minimalist aesthetic — HDR naturally adds tonal richness that can feel heavy
The honest answer is that roughly 60–70% of everyday photography situations do not benefit from HDR. Knowing when to skip it is just as important as knowing how to use it.
How to Avoid Bad HDR
The criticism of HDR is real. This quote from a photography community captures exactly what anxious beginners fear:
“I see people in r/pics and other image-heavy subreddits complain about it all the time, but I don’t really get what it is, other than some kind of editing…”
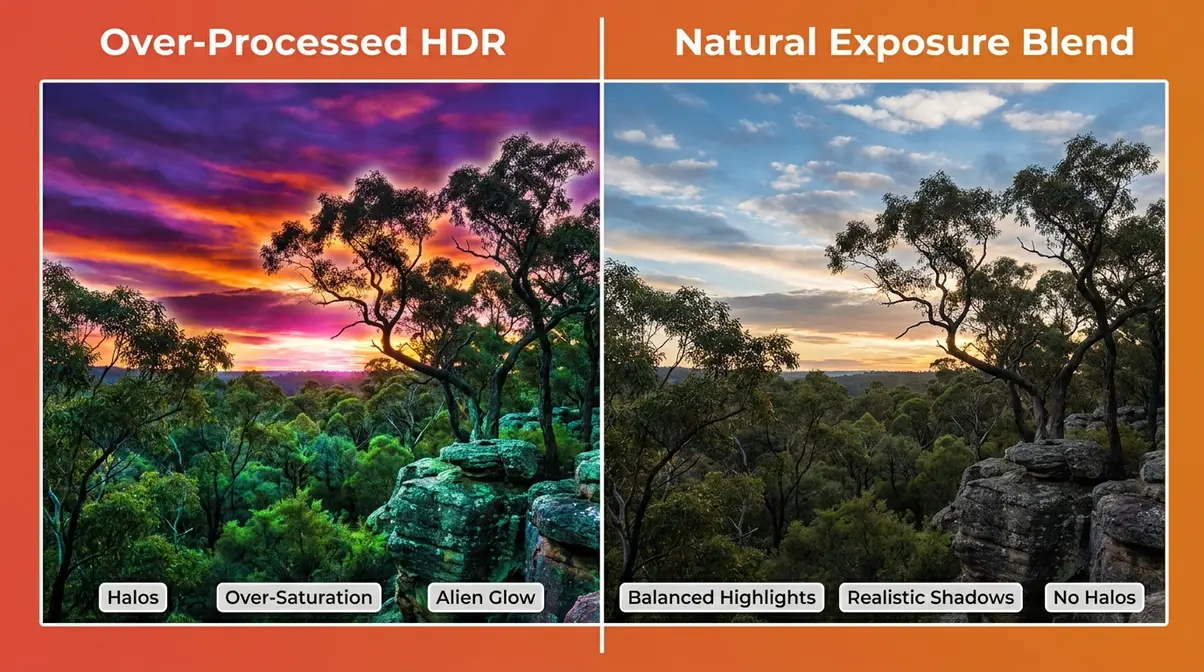
That confusion is understandable. The over-processed HDR images that earned the technique its bad reputation share specific, recognizable flaws. Common pain points reported by beginner photographers include:
- Halos — bright glowing rings around high-contrast edges (trees against sky, building edges)
- Over-saturation — colors so vivid they look painted rather than photographed
- Excessive noise — shadow areas lifted too aggressively, revealing digital grain
- Unrealistically bright shadows — dark areas that glow with an eerie, alien-like quality
- Flat midtones — local contrast crushed until the image looks like a painting
Every one of these problems comes from the same source: over-processing. The tone-mapping slider was pushed too far. The fix is straightforward — use subtler settings and ask yourself, “Does this look like a scene a human eye could actually see?” If the answer is no, pull back.
Do Professionals Use HDR?
Yes — but selectively, and almost never with the heavy tone-mapping style that defined early HDR. Across professional photography forums and communities, the consistent feedback is that HDR (specifically realistic exposure blending) is a standard tool in real estate photography, architectural photography, and landscape work. It’s used quietly, without announcement, precisely because the results look natural.
Real estate photographers rely on HDR as a core workflow element — the combination of bright windows and dark room interiors makes HDR nearly mandatory for marketable property images. Landscape photographers use exposure blending (a refined form of HDR) as standard practice. Portrait and wedding photographers, however, largely avoid it — moving subjects and the need for clean, flattering light make bracketing impractical.
The professional consensus: HDR is a tool, not a style. Use it when the scene demands it, process it subtly, and no viewer will ever know it was used.
How to Take HDR Photos Step-by-Step
This section walks you through your first HDR shoot from setup to final shot. Follow these steps in order — each one builds on the last. This is the core principle of exposure bracketing in photography.
Prerequisites for HDR
Before touching your camera settings, gather these three things:
- Required:
- A camera with AEB mode — most DSLRs and mirrorless cameras from the last 10 years include this. Check your manual for “Auto Exposure Bracketing” or “AEB.”
- A sturdy tripod — this is non-negotiable. Even a small shift between frames creates misalignment that ruins the merge. A budget tripod works fine; any stable surface works in a pinch.
- HDR merging software — Lightroom Classic is the recommended starting point (covered in H2 #5). Download and install it before your shoot.
- Helpful but optional:
- A remote shutter release or your camera’s self-timer (2-second delay) — eliminates camera shake from pressing the button
- RAW shooting enabled — captures more tonal data per frame, giving the merging software more to work with
If you have all three required items, you’re ready.
Camera Setup for Bracketing
Tools needed: Camera, tripod, your camera’s menu system. Estimated time: 5–10 minutes.
Follow these steps exactly:
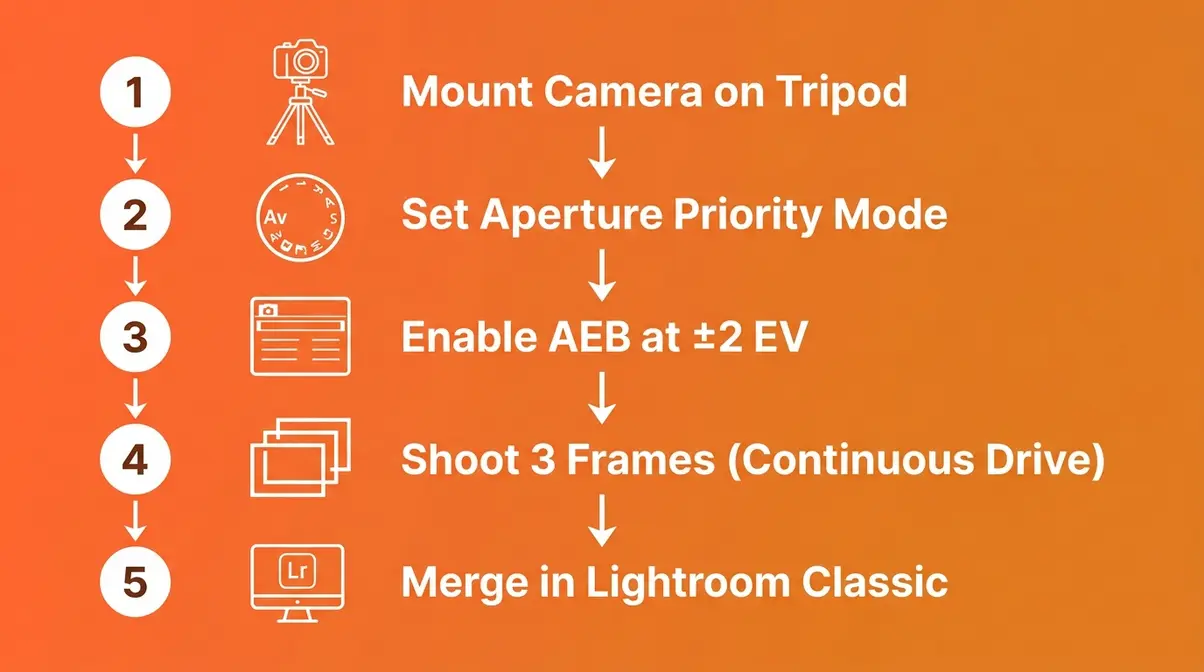
- Mount your camera on the tripod. Frame your shot carefully — you won’t be able to reframe between exposures without ruining the merge.
- Switch your camera to Aperture Priority mode (Av or A on the mode dial). This keeps your depth of field consistent across all bracketed shots while the camera adjusts shutter speed automatically.
- Set your ISO as low as possible — ISO 100 or 200 on most cameras. Low ISO reduces excessive noise, which becomes more visible when shadows are lifted during HDR merging.
- Enable AEB (Auto Exposure Bracketing). On Canon cameras: Menu → Shooting Settings → Expo.comp./AEB. On Nikon: Menu → Photo Shooting Menu → Auto Bracketing Set. Set the bracket spread to ±2 EV (two stops apart). This gives you three shots: –2 EV, 0 EV, and +2 EV.
- Set your drive mode to Continuous Shooting. This fires all three bracketed frames in rapid sequence when you hold the shutter — minimizing the time between exposures and reducing ghosting risk.
- Enable your camera’s self-timer (2-second delay) if you don’t have a remote shutter release. This eliminates the vibration from pressing the shutter button.
| Setting | Recommended Value | Why |
|---|---|---|
| Mode | Aperture Priority (Av/A) | Consistent depth of field across all frames |
| ISO | 100–200 | Minimizes noise in lifted shadow areas |
| AEB Spread | ±2 EV | Captures full highlight-to-shadow range |
| Drive Mode | Continuous | Fires all frames rapidly, reduces ghosting |
| Shutter Release | Self-timer (2s) or remote | Eliminates camera shake |
| File Format | RAW | Maximum tonal data for merging software |
Taking Your Bracketed Shots
Estimated time: 1–2 minutes per scene.
- Double-check your composition. Look at the edges of the frame — are any moving elements (leaves, people, water) in the shot? If so, consider whether ghosting will be an issue.
- Press the shutter once (or trigger your remote). In Continuous mode with AEB enabled, your camera fires all three frames automatically. You’ll hear three distinct shutter clicks in quick succession.
- Do not touch the camera between clicks. Even a light touch causes micro-movement that misaligns frames.
- Review your three shots on the LCD screen. Check that:
- Shot 1 (darkest) shows a well-exposed sky with no blown-out white areas
- Shot 3 (brightest) shows detail in the darkest shadow areas
- Shot 2 (middle) looks like a reasonable standard exposure
- If the sky is still blown out in your darkest frame, increase your AEB spread to ±3 EV and reshoot. Extremely high-contrast scenes (direct sun, dark interiors) sometimes need a wider bracket.
Tips for Ghost-Free HDR
Ghosting — the blurry double-image effect caused by movement between frames — is the most common technical problem in HDR. Here’s how to minimize it:
- Shoot in calm conditions. Wind-blown foliage is the biggest ghosting culprit in landscape HDR. Shoot during still moments or at dawn when wind is typically lighter.
- Use the fastest possible shutter sequence. Continuous drive mode minimizes time between exposures. At 5 fps, three frames take less than 0.6 seconds — fast enough to handle minor movement.
- Most merging software includes deghosting tools. Lightroom Classic’s HDR merge dialog includes an automatic deghosting option (Low, Medium, High). Enable it when people or foliage are in the frame.
- Shoot in RAW format. RAW files contain significantly more tonal data than JPEGs, giving the merging algorithm more information to work with. Common pain points reported by beginners who shoot JPEG include banding and color posterization in merged results — RAW eliminates both.
Essential Gear and Camera Settings
Good HDR photography doesn’t require expensive equipment. The right approach matters far more than the gear you’re using.
The Gear You Actually Need
Non-negotiable:
- Any DSLR or mirrorless camera with AEB mode — virtually every interchangeable-lens camera made after 2010 qualifies. Entry-level bodies like the Canon EOS Rebel series or Nikon D3500 work perfectly.
- A tripod — even a $30 budget tripod produces sharp results for static scenes. Brands like K&F Concept or Vanguard offer excellent entry-level options under $100 that provide the necessary stability without breaking the bank. The key is stability, not brand. If you are debating stability options, read our comparison on tripod vs monopod which is better for HDR work.
Worth having:
- A remote shutter release ($15–$30) — eliminates all camera shake. Wired or wireless both work.
- Extra batteries — bracketing fires the shutter more frequently, draining batteries faster on cold-weather shoots.
Not necessary:
- A full-frame camera — APS-C sensors handle HDR bracketing just as effectively
- A fast lens — aperture consistency matters more than maximum aperture for HDR
- Expensive filters — HDR replaces the need for graduated ND filters in most situations
Camera Settings Checklist
Use this checklist before every HDR shoot:
- ☐ Camera mounted on tripod, composition locked
- ☐ Mode set to Aperture Priority (Av/A)
- ☐ ISO set to lowest native value (100 or 200)
- ☐ AEB enabled, spread set to ±2 EV (adjust to ±3 EV for extreme contrast)
- ☐ Drive mode set to Continuous
- ☐ Self-timer (2s) or remote shutter enabled
- ☐ File format set to RAW
- ☐ In-camera HDR mode: OFF — your camera’s built-in HDR mode produces JPEGs with limited control. Always bracket manually and merge in software for better results.
A note on in-camera HDR: Most modern cameras include a built-in HDR mode that does the merging automatically. It’s convenient but limiting — the output is a JPEG with no editing flexibility, and the processing tends toward the over-saturated end of The HDR Spectrum. Use it to practice the concept, but switch to manual bracketing + software merging as soon as you’re comfortable.
HDR Photography on iPhone
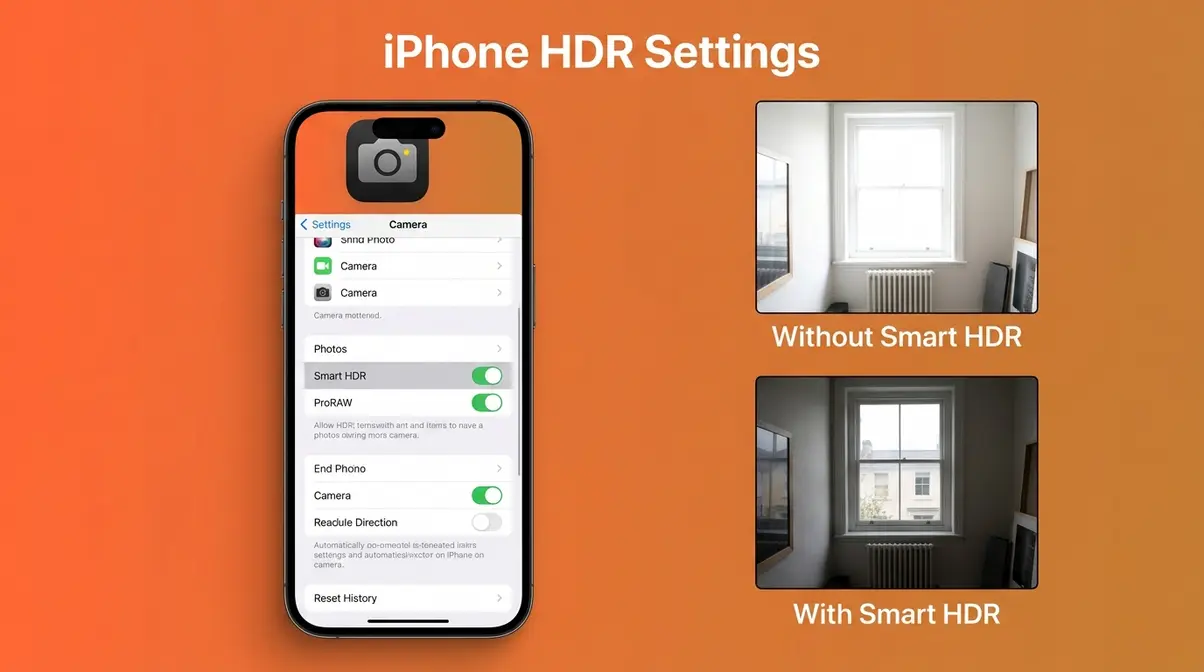
Yes — with important limitations. iPhones have included computational HDR processing since the iPhone 4, and modern models (iPhone 15 and later) use multi-frame exposure fusion that genuinely qualifies as HDR. The results are impressive for casual photography.
However, iPhone HDR differs fundamentally from DSLR/mirrorless bracketing. The phone’s software makes all tone-mapping decisions automatically, giving you no control over the final look. You cannot adjust the blend, pull back the processing, or export a 32-bit HDR file for advanced editing. For real estate, architecture, and landscape work where precise control matters, a camera with manual AEB and RAW output remains the right tool.
- iPhone HDR best practices:
- Leave Smart HDR enabled in Settings → Camera → Smart HDR
- Shoot in ProRAW (iPhone 12 Pro and later) for more editing flexibility in Lightroom Mobile. When shooting in ProRAW, the device captures a 12-bit file that retains significantly more dynamic range data than a standard JPEG. You can then import this ProRAW file directly into Lightroom Mobile, where you have the flexibility to recover blown-out skies and lift dark shadows manually, bypassing Apple’s automated tone-mapping algorithms. Understanding what is RAW format photography is crucial because RAW files contain significantly more tonal data than JPEGs.
- Avoid using iPhone HDR for interiors with windows — the automatic processing often creates unrealistic shadow brightness
Best HDR Photography Software
Choosing the right software determines whether your merged HDR lands in the “natural” or “cartoonish” zone of The HDR Spectrum. The options below cover every budget and skill level. When processing your photos using software, Lightroom Classic is the recommended starting point.
Top HDR Software Compared
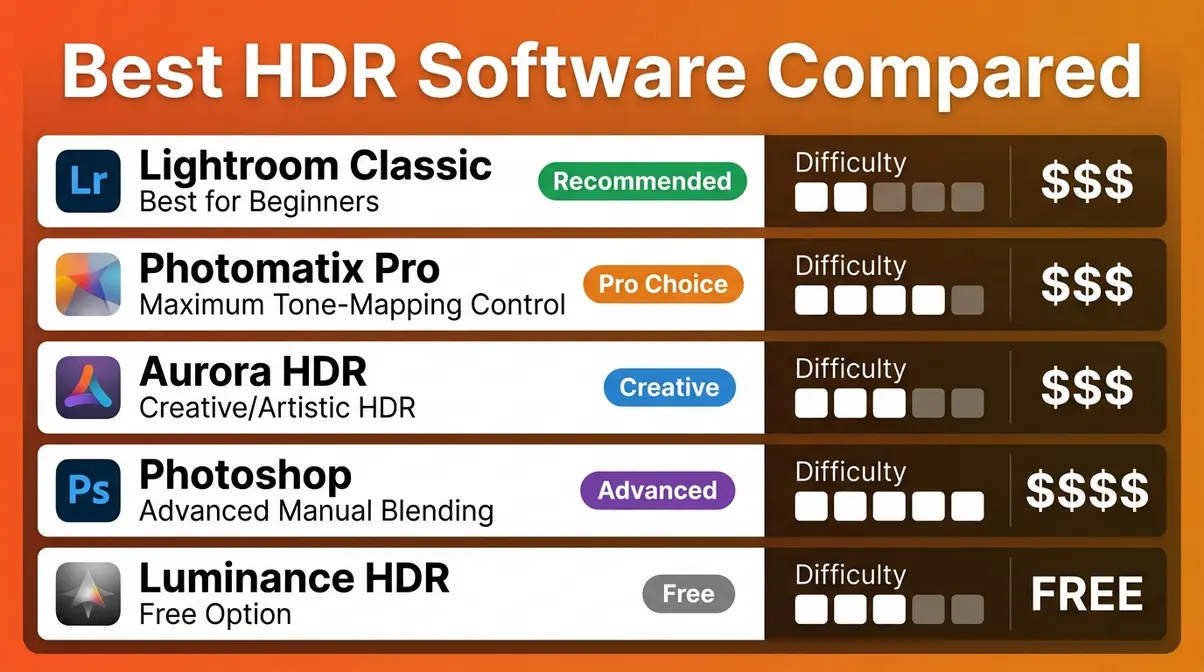
Across photography communities, four tools dominate the HDR workflow conversation for beginners and professionals alike.
| Software | Best For | HDR Quality | Price (as of Q1 2026) | Learning Curve |
|---|---|---|---|---|
| Lightroom Classic | Beginners, all-in-one workflow | Excellent (natural) | ~$9.99/mo (CC) | Low |
| Photomatix Pro | Maximum tone-mapping control | Excellent (flexible) | ~$99 one-time | Medium |
| Aurora HDR | Creative/artistic HDR | Very Good | ~$99 one-time | Low–Medium |
| Photoshop | Advanced manual blending | Excellent | Included with CC | High |
| Luminance HDR | Free option, open source | Good | Free | Medium |
(Prices as of Q1 2026 — verify current pricing at each vendor’s website before purchasing.)
Lightroom Classic is the recommended starting point. It handles the full workflow — import, AEB merge, editing, and export — without switching applications. The HDR merge dialog is straightforward, the results default to the natural end of The HDR Spectrum, and the software’s non-destructive editing means you can always go back and adjust.
Photomatix Pro (Photomatix Pro HDR software features) offers more tone-mapping presets and finer control over the HDR look. It’s worth considering once you’ve outgrown Lightroom’s merge options and want to experiment with more dramatic processing styles.
Merging in Lightroom Classic
Time required: 5–10 minutes. Prerequisites: Three bracketed RAW files imported into Lightroom Classic.
Follow these steps to merge your bracketed shots into a single HDR image:
- Select all three bracketed frames in the Library module. Click the first frame, hold Shift, click the last. All three should be highlighted.
- Right-click → Photo Merge → HDR. Alternatively, use the keyboard shortcut Ctrl+H (Mac: Cmd+H). The HDR Merge Preview dialog opens.
- Review the Auto Deghost setting. If your scene contained any movement (leaves, water, people), select Medium deghosting. For completely static scenes, leave it on None.
- Enable “Auto Settings” in the dialog. This applies Lightroom’s automatic tonal adjustment to the merged file — a useful starting point you can adjust afterward.
- Click Merge. Lightroom processes the three frames and creates a new DNG file (a high-bit-depth RAW format) in your catalog. This takes 30–90 seconds depending on your computer.
- Edit the merged DNG like any RAW file. Open the Develop module. The key sliders to adjust:
- Drag Highlights left (toward –50 to –80) to recover sky detail
- Drag Shadows right (toward +30 to +50) to lift dark areas naturally
- Keep Vibrance and Saturation conservative — this is where over-processing begins
- Ask the critical question: “Does this look like a scene a human eye could see?” If shadows glow with an alien-like brightness or colors look over-saturated, reduce your Shadows lift and Vibrance.
For a deeper dive, Photography Life’s HDR tutorial walks through advanced Lightroom editing adjustments with specific before/after examples.
Best Free HDR Software
If you’re not ready to commit to a paid subscription, two free options are worth using:
Luminance HDR (Windows/Mac/Linux) — an open-source HDR merging tool with multiple tone-mapping algorithms. The interface is dated but functional. It exports 32-bit HDR files compatible with Photoshop and other editors. Best for beginners who want to experiment with tone-mapping without spending money.
Darktable (Windows/Mac/Linux) — a free, open-source RAW editor with basic exposure fusion capability. Less powerful than Lightroom for HDR specifically, but a capable all-around editing tool.
Google Photos / iPhone Photos — both platforms apply automatic HDR processing to compatible images. No control, but no cost — useful for understanding what HDR looks like before investing in dedicated software.
The honest trade-off: free tools require more manual effort and produce less polished results than Lightroom Classic. For most beginners, the $9.99/month Creative Cloud Photography plan (which includes both Lightroom Classic and Photoshop) is worth the investment once you’re committed to HDR as part of your workflow.
HDR Photography for Real Estate
Real estate photography is arguably the highest-value application of HDR for working photographers. The combination of bright windows, artificial lighting, and dark room interiors creates exactly the high-contrast conditions HDR was built to handle.
Why Real Estate Relies on HDR
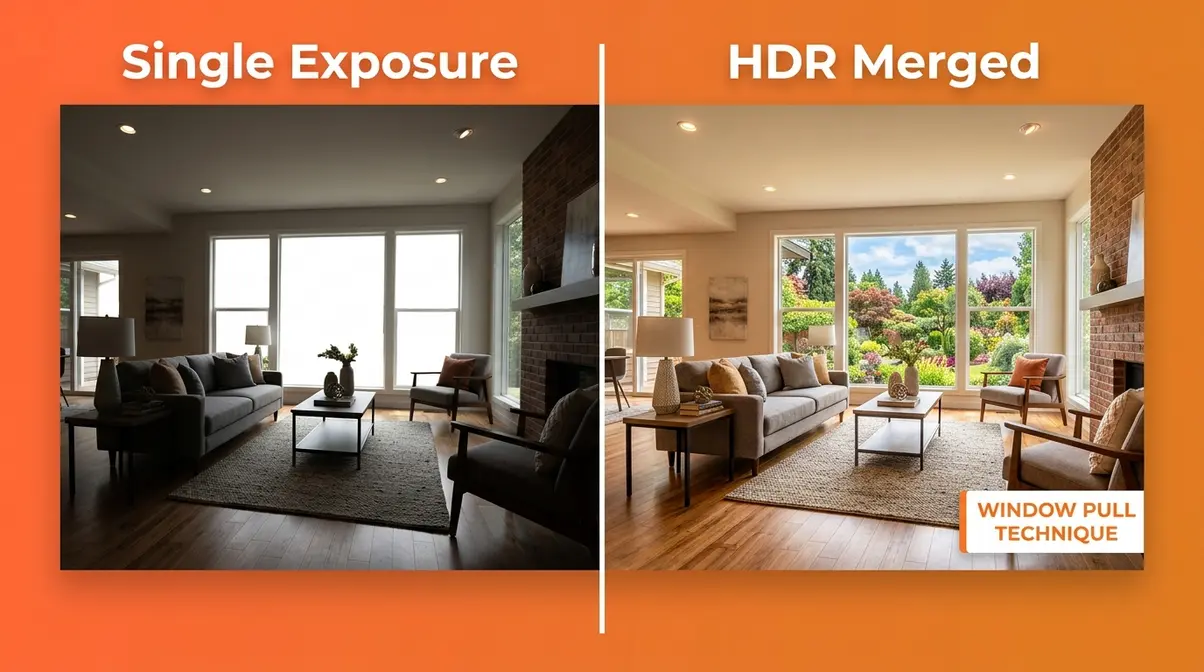
A standard single-exposure interior photo forces an impossible choice: expose for the bright window (and the room becomes a dark silhouette) or expose for the room (and the window blows out to solid white). Neither result is usable for a property listing.
HDR solves this directly. By bracketing across the full tonal range — typically five frames at ±1.5 EV intervals for interior work — real estate photographers capture both the room’s furnishings and the outdoor view through the window in one merged image. The result looks like what a buyer standing in that room would actually see.
User-reported workflows from real estate photography communities indicate that HDR (often combined with flash or ambient light techniques) is used in the majority of professional property shoots. A single well-executed HDR interior image can show a room’s true size, natural light quality, and outdoor view simultaneously — details that sell properties.
The Window Pull Technique
The window pull technique combines HDR bracketing with a targeted exposure specifically for the window view. Here’s the workflow:
Gear needed: Tripod, camera with AEB, wide-angle lens (16–24mm recommended for interiors). Time: 10–15 minutes per room.
- Position your camera on the tripod at roughly chest height, facing the room’s most important feature (usually the window or the main living area). Frame to show both the window and the room interior.
- Set your AEB to 5 frames at ±1.5 EV intervals (–3 EV, –1.5 EV, 0 EV, +1.5 EV, +3 EV). The extra frames help with the extreme contrast of interior-to-window transitions.
- Shoot your bracketed sequence using continuous drive and self-timer. Five frames, five clicks.
- Shoot one additional frame at –3 EV (the darkest possible setting) specifically to capture the outdoor view through the window. This is your “window pull” frame — it gives the merging software or your manual blending a clean, detail-rich window image.
- In Lightroom Classic, merge your five bracketed frames as described in the software section. After merging, use a gradient mask over the window area and blend in detail from your dedicated window frame if the automatic merge doesn’t fully resolve the window.
Editing Real Estate HDR
Real estate HDR has a specific aesthetic goal: the image should look inviting and realistic, not dramatic. Over-processing is a common problem — agents and buyers respond negatively to images that look over-saturated or alien-like.
Key editing principles for real estate HDR:
- Keep color temperature neutral — mixed artificial and natural light creates color casts. Use a grey card or the Lightroom eyedropper on a neutral white wall to set accurate white balance on your merged file.
- Lift shadows conservatively — aim for visible shadow detail without the “glowing shadows” effect that signals over-processing
- Recover highlights gently — windows should show outdoor detail, but not look artificially dark
- Avoid heavy local contrast (Clarity) adjustments — real estate HDR should look clean and bright, not textured and dramatic
- Straighten verticals — use Lightroom’s Transform panel to correct converging vertical lines from wide-angle lenses
For a targeted workflow, Greg Benz Photography’s HDR guide provides a useful comparison of tone-mapping vs. exposure blending for interiors specifically. For broader advice on buildings, explore these architectural photography tips and techniques.
HDR Examples Across Genres
HDR applies across a surprisingly wide range of photography genres. Here’s how the technique adapts to different subjects — and where it delivers the most value.
Landscape and Nature HDR
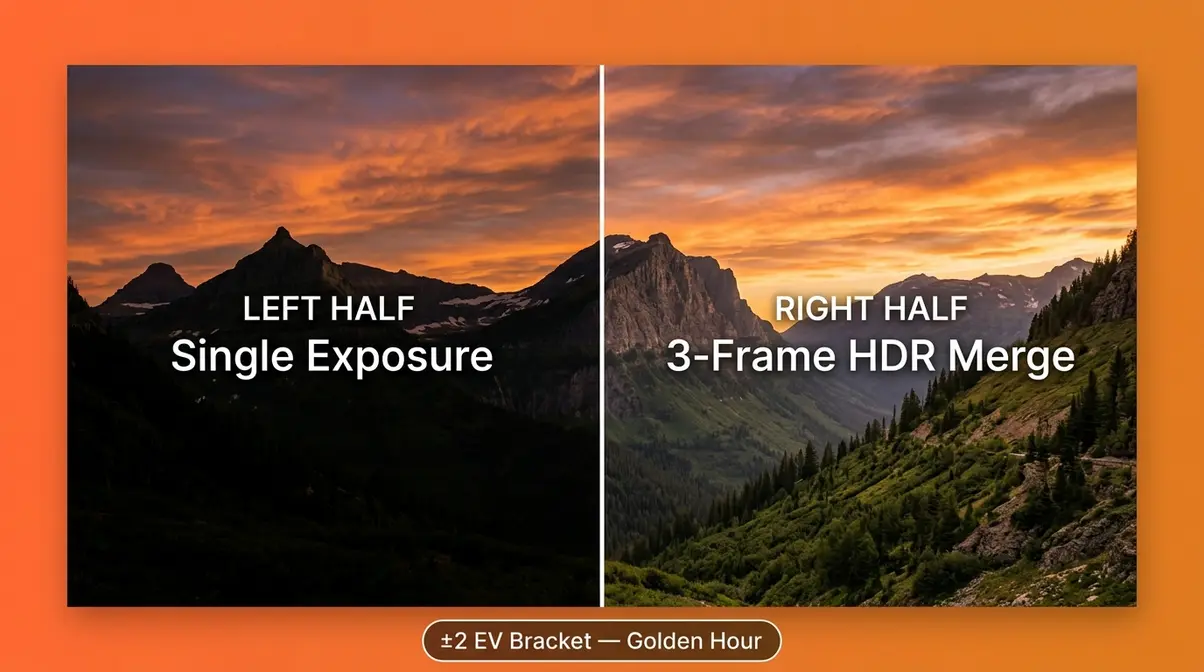
Landscape HDR is the genre most people picture when they hear the term. The classic scenario: a dramatic sky with clouds and color above a shadowed foreground — mountains, forests, or desert terrain. A single exposure can’t hold both. Combine this with landscape photography easy techniques for stunning results.
- Effective landscape HDR technique:
- Shoot at golden hour (the hour after sunrise or before sunset) — contrast is naturally lower and colors are warmer, which makes the HDR merge look more natural
- Use a 3-frame bracket at ±2 EV for most landscapes; increase to 5 frames for scenes with direct sun in frame
- In editing, prioritize Highlights recovery over Shadow lift — letting some shadows remain slightly dark looks more natural than lifting everything equally
Nature photography adds the ghosting challenge — wind-blown foliage between frames creates blurry edges in the merged result. Shoot in calm conditions, use the fastest continuous drive speed available, and enable Lightroom’s deghosting for any foliage-heavy compositions.
Portrait and Automotive HDR
Portrait HDR is a niche application — most portrait photographers avoid it because subject movement between frames creates ghosting. However, for environmental portraits in high-contrast outdoor settings (a person in front of a bright sky, or inside a dark building with a bright doorway), HDR can reveal both the subject and the environment simultaneously.
The technique requires the subject to remain completely still for 0.5–1 second across the bracket sequence. Practical approach: shoot 3 frames at ±1.5 EV (a narrower bracket than landscapes to minimize the time window), and use Lightroom’s deghosting set to High for the subject area.
Automotive HDR is a growing application. Car photography presents extreme contrast challenges — polished paint reflects the bright sky while wheel wells and undercarriage fall into deep shadow. HDR reveals both the car’s surface detail and its darkest recesses in a single frame. Automotive photographers typically shoot 5-frame brackets in shaded outdoor locations to minimize the reflective complexity of direct sunlight.
Night and Architectural HDR
Night HDR addresses a counterintuitive problem: nighttime scenes often have extremely high contrast — bright artificial lights against very dark surroundings. A city skyline at night, a lit building against a dark sky, or a street scene with illuminated storefronts all benefit from HDR. For more on shooting after dark, consult our essential night photography guide.
- For night work, the standard settings change significantly:
- Use a wider bracket spread (±3 EV) to capture both bright light sources and dark surroundings
- Set ISO to 400–800 rather than 100 — some noise is acceptable to avoid extremely long shutter speeds that blur moving elements
- Use a 5- or 7-frame bracket to smooth the tonal transitions in artificial light
Architectural HDR — both interior and exterior — is one of the most consistent professional applications. Exterior architectural photography faces the same sky-vs-building contrast challenge as landscape work. Interior architectural work mirrors real estate HDR but with greater emphasis on geometric precision and color accuracy.
For architectural and interior HDR specifically, Canon’s guide to HDR photography techniques covers exposure strategies for mixed-light environments.
Common Mistakes & When to Skip HDR
Understanding where HDR fails is as important as knowing where it succeeds. Balanced perspective — knowing the tool’s limits — is what separates an experienced practitioner from someone who applies HDR to every shot.
Common Pitfalls
1. Over-processing the merge
The most common mistake. Beginners push Clarity, Vibrance, and tone-mapping sliders too far, producing the cartoonish, alien-like look that gives HDR its bad reputation. Fix: Keep Clarity under +20 and Saturation under +15 in your first edits. Start conservative and add gradually.
2. Forgetting to use a tripod
Even minor camera movement between frames creates misalignment. Software alignment tools can partially correct this, but a tripod prevents the problem entirely. Fix: Non-negotiable — use a tripod for every HDR shoot.
3. Shooting moving subjects without deghosting
Wind-blown trees, flowing water, and people in frame create ghosting artifacts. Fix: Enable Lightroom’s Auto Deghost (Medium or High) for any scene with movement. For extreme cases, manually blend frames using layer masks in Photoshop.
4. Using JPEG instead of RAW
JPEG files have already been processed and compressed by the camera, discarding tonal data the HDR merge needs. Fix: Always shoot RAW for HDR work. The difference in merge quality is immediately visible.
5. Applying HDR to flat-light scenes
HDR adds complexity without adding value when the scene’s contrast is already within a single sensor’s range. The result often looks muddy or artificially textured. Fix: If a standard single exposure looks good, use it. HDR is a solution to a specific problem, not a universal improvement.
When to Choose Alternatives
Use exposure compensation instead: For scenes that are slightly overexposed or underexposed but not dramatically contrasty, a single RAW file with careful editing in Lightroom often produces cleaner results than HDR.
Use flash or constant lighting instead: For real estate interiors, some photographers prefer a flash-lit approach (bouncing light off ceilings to fill shadows) combined with a single exposure. This produces cleaner results than HDR in situations where the window view isn’t important to the image.
Use a graduated ND filter instead: For landscapes where the sky-to-foreground transition is a clean horizontal line, a physical graduated neutral density filter achieves similar results in-camera without requiring merging software.
When to Seek Expert Help
If you’re shooting HDR for commercial real estate listings, architectural clients, or product photography, the stakes of a technically flawed image are higher. Consider consulting with a professional architectural or real estate photographer if you’re producing work for paying clients and struggling with consistent results. Specific scenarios where professional guidance matters: extreme mixed-light situations (daylight + fluorescent + tungsten simultaneously), large commercial properties with dozens of rooms to shoot efficiently, and HDR workflows for print output where color accuracy requirements are strict.
Frequently Asked Questions
What is HDR in photography?
HDR photography — High Dynamic Range — is a technique that merges multiple exposures of the same scene into one image with detail in both bright highlights and dark shadows. A standard camera sensor captures roughly 12–14 stops of dynamic range (Stanford University). Most real-world scenes span a wider range than that, causing either blown-out highlights or solid black shadows in a single shot. HDR solves this by combining a dark exposure (for highlights), a standard exposure, and a bright exposure (for shadows) into one balanced result.
Is HDR good or bad for photography?
HDR is a powerful tool when used correctly — and a liability when overused. The technique genuinely improves high-contrast scenes like landscapes, real estate interiors, and sunsets by capturing detail a single exposure cannot. The “bad HDR” reputation comes from over-processed images with halos, over-saturation, and alien-like glowing shadows — all symptoms of excessive tone-mapping. Modern exposure blending in software like Lightroom Classic produces natural-looking results that most viewers would never identify as HDR. Used subtly, HDR is simply good photography.
Do professional photographers use HDR?
Yes — real estate, architectural, and landscape photographers use HDR regularly, though rarely with the heavy processing style that defined early HDR. Across professional photography communities, the consistent feedback is that realistic exposure blending is a standard workflow tool for property photography and architectural work. The professional standard is to process HDR subtly enough that viewers never notice it was used.
How do you take good HDR photos?
Good HDR photos require three things: a tripod, your camera’s AEB mode, and restraint in editing. Set your camera to Aperture Priority, enable AEB at ±2 EV, and shoot three frames in continuous drive mode. Import the RAW files into Lightroom Classic, and use Photo Merge → HDR with Auto Deghost enabled. Then, edit conservatively by pulling Highlights down, lifting Shadows gently, and keeping Saturation and Clarity restrained. The ultimate test is simple: if the result looks like a scene a human eye could actually see, you’ve succeeded.
Does HDR make photos look better?
HDR makes photos look better specifically when the scene’s contrast exceeds what a single exposure can handle. For evenly lit scenes, HDR typically adds no improvement and can introduce unwanted texture or color shifts. The improvement is real and significant in high-contrast situations; in flat-light situations, it’s unnecessary.
What is the downside of HDR?
The main downsides of HDR are ghosting from movement, longer shooting time, and the risk of over-processing. Moving subjects — people, foliage, water — create blurry ghosting artifacts between frames, and bracketing requires a tripod and multiple shots, which slows your workflow. Furthermore, the editing process has a steep learning curve where it’s easy to push tone-mapping too far and produce the over-saturated, cartoonish look that critics of HDR point to. Software deghosting tools reduce the first problem; practice and restraint address the others.
How many shots do you need for HDR?
Three shots is the standard starting point for most HDR situations — one underexposed (–2 EV), one standard (0 EV), and one overexposed (+2 EV). For extreme situations like direct sun in frame, real estate interiors with very bright windows, or night photography, five frames at ±1.5 EV intervals provides a smoother tonal transition. Seven-frame brackets exist but are rarely necessary outside of specialized architectural or fine art work.
Conclusion
For photographers who have struggled with blown-out skies and solid black shadows, HDR photography provides a direct, learnable solution. The human eye perceives roughly 20 stops of dynamic range; camera sensors capture 12–14. That gap is real, and merging three bracketed exposures in Lightroom Classic closes it effectively for landscapes, real estate interiors, sunsets, and architecture. The result — when processed with restraint — looks exactly like a scene your eyes would actually see.
The HDR Spectrum is the framework that keeps your results on the right side of that line. Legacy tone-mapping (Stage 1) produces the cartoonish, over-saturated images that earned HDR its bad reputation. Realistic exposure blending (Stage 2) is the current professional standard — natural, balanced, and invisible to most viewers. True HDR display output (Stage 3) is the modern frontier, enabled by PQ/HLG display standards and Lightroom’s evolving true HDR export capability. Knowing where you are on that spectrum determines whether your HDR looks like a masterpiece or a mistake.
Start with your next high-contrast scene: set up your tripod, enable AEB at ±2 EV, shoot three frames, and merge them in Lightroom Classic. Give yourself 30 days of practice before judging the results. The technique that once seemed complicated becomes second nature quickly — and the photos you’ve been failing to capture will finally look the way you imagined them.
