
Table of Contents
- What Is Exposure in Photography?
- The Exposure Triangle: Your Three Controls
- Correct, Underexposed, and Overexposed Photos
- How to Read Your Camera’s Exposure Tools
- Creative Exposure Techniques
- Common Exposure Mistakes (and How to Fix Them)
- Frequently Asked Questions
- Mastering Exposure Starts with Seeing Light
This blog post may contain affiliate links. As an Amazon Associate I earn from qualifying purchases.
“Photography finally started making sense when I stopped memorizing settings… and started understanding LIGHT.”
— A beginner photographer on Reddit
If you’ve ever taken a photo that came out too dark, too bright, or just plain wrong — even though it looked perfect through the viewfinder — you’re not alone. The problem isn’t your camera. It’s that nobody explained what is exposure in photography in a way that actually makes sense.
Every shot you take on auto mode is a guess. And guesses mean missed moments you can never get back. One setting change separates a blurry, washed-out shot from the photo you actually imagined.
By the end of this guide, you’ll understand exactly what exposure is, how the three settings that control it work together, and how to use your camera’s built-in tools to nail the exposure every time — whether you’re shooting on a DSLR, mirrorless, or your iPhone. We’ll start with the simple definition, build up to the Exposure Triangle, cover tools like the histogram and light meter, and finish with creative techniques like long exposure and bracketing.
What You’ll Need: Any camera (smartphone counts), 15–20 minutes to read, and a willingness to take your camera off auto mode.
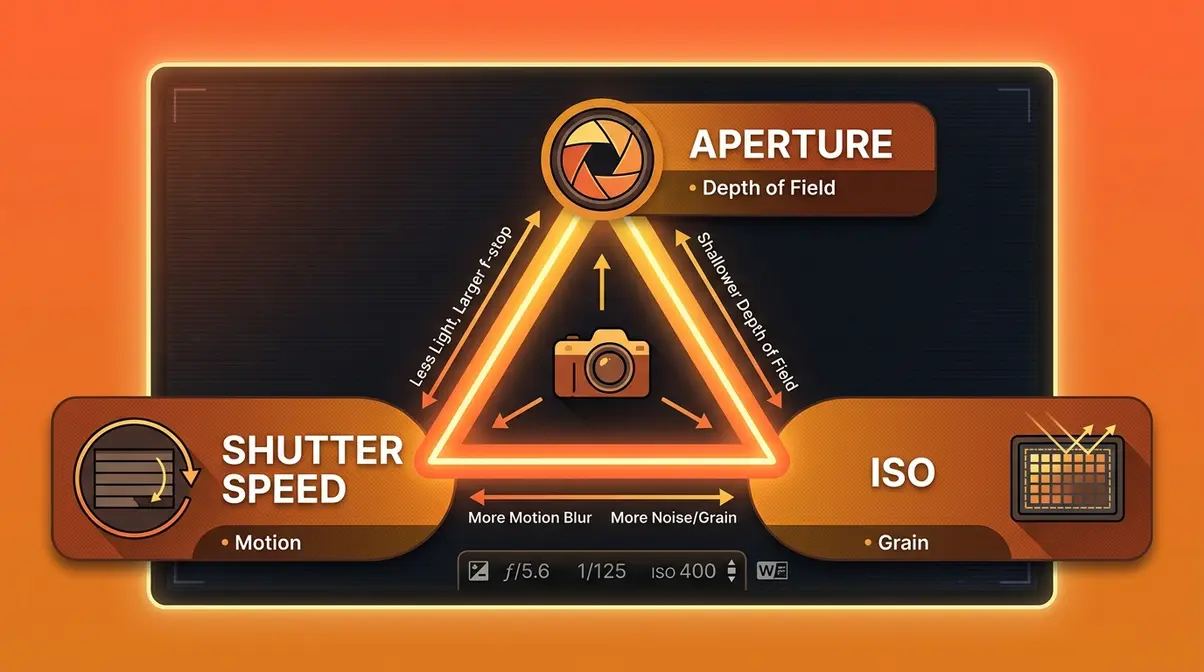
Exposure in photography is the total amount of light your camera sensor captures to form an image — controlled by three settings known as the Exposure Triangle.
- Aperture controls how wide the lens opens (and blurs the background)
- Shutter Speed controls how long the sensor is exposed (and freezes or blurs motion)
- ISO controls sensor sensitivity (and introduces grain at high values)
- The Light-First Framework: Great exposure starts with reading the light, not memorizing numbers
- Slightly underexposing is usually safer than overexposing — shadow detail can be recovered; blown highlights cannot
What Is Exposure in Photography?
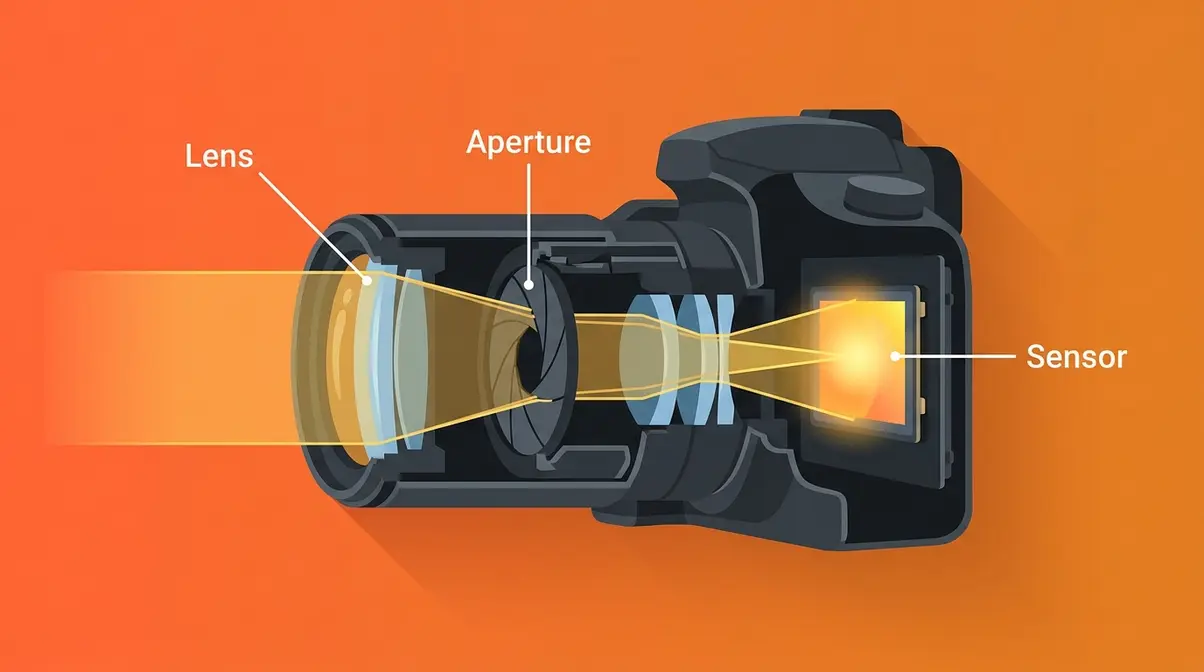
Exposure in photography is the process of controlling how much light reaches your camera’s sensor (or film) to create an image. Get it right and your photo looks vivid, detailed, and balanced. Get it wrong and you end up with images that are too dark (underexposed) or too bright (overexposed) — with detail lost in the shadows or highlights. While many beginners obsess over buying faster lenses, mastering the light you already have is the true secret to professional-looking images.
Think about how your eyes work. When you walk into a dark room, your pupils dilate (open wider) to let in more light. Step outside into bright sun and they contract (shrink) to protect your retina. Your camera does exactly the same thing — except you control how it responds.
How Light Hits Your Sensor
At its most basic, exposure is the relationship between light and time. Stanford University’s digital photography course, CS 178, defines it precisely as H² · t — illuminance (the amount of light falling on the sensor) multiplied by time (how long the sensor is exposed). You don’t need to memorize that formula. What matters is the core principle: more light + more time = brighter image.
Stanford’s H²·t formula proves exposure is measurable — meaning perfect lighting is a science you can learn, not just a talent you are born with.
Every photograph is essentially a measurement of light. Press the shutter button (the button you push to take a photo), and your camera opens a gateway for light to reach the sensor. The three settings of the Exposure Triangle — aperture, shutter speed, and ISO — determine exactly how much light gets through and for how long.
Photographers also measure exposure in stops (a unit that represents doubling or halving the amount of light). Adding one stop of light doubles the brightness. Removing one stop halves it. This stop-based thinking is how professional photographers communicate exposure changes quickly and precisely.
The Foundation of Photography
Here’s the insight that changes everything for beginners: exposure is not a technical calculation. It’s a creative decision.
Every time you press the shutter button, you’re deciding what your image will look and feel like. A fast shutter speed freezes a hummingbird’s wings. A slow one turns a waterfall into silky ribbons of water. A wide aperture blurs the background into soft bokeh (the pleasingly out-of-focus area behind your subject). A high ISO lets you shoot in a candlelit restaurant — but adds visible grain.
Across the beginner photography community, the consistent challenge is this: beginners learn what the settings do mechanically but never learn why to choose one over another. That’s exactly what The Light-First Framework solves. Instead of asking “what settings should I use?”, you start by asking “what is the light doing right now?” — and then you choose settings to match your creative vision. Read our guide to understanding natural light for photographers for a deeper look at reading light in the field.
Smartphone Computational Photography
Here’s something almost no beginner guide mentions: your smartphone doesn’t take a single exposure. It takes dozens.
When you tap the shutter button on an iPhone 15 Pro or a Samsung Galaxy S25, the camera’s computational photography system fires off multiple frames at different exposure levels — typically between 3 and 9 frames — then merges them using machine learning algorithms in a fraction of a second. This process, called HDR (High Dynamic Range) processing, allows your phone to recover detail in both bright skies and dark shadows simultaneously, something a single camera exposure cannot do.
Apple’s Night Mode goes even further. It captures a burst of frames over 1–30 seconds (depending on how dark the scene is), aligns them to remove camera shake, and stacks them to produce a bright, relatively noise-free image in near-darkness. The result looks like a single long exposure — but it’s actually a computational composite.
Why does this matter for you? Because understanding what is exposure in photography on a smartphone means understanding that the camera is making creative decisions for you. Tap and hold on a bright or dark area of your screen before shooting and you’ll see a sun icon appear — that’s your exposure compensation (your ability to override the camera’s automatic choice) tool. Slide it up to brighten, down to darken. Even on a phone, you have control.
The Exposure Triangle: Your Three Controls
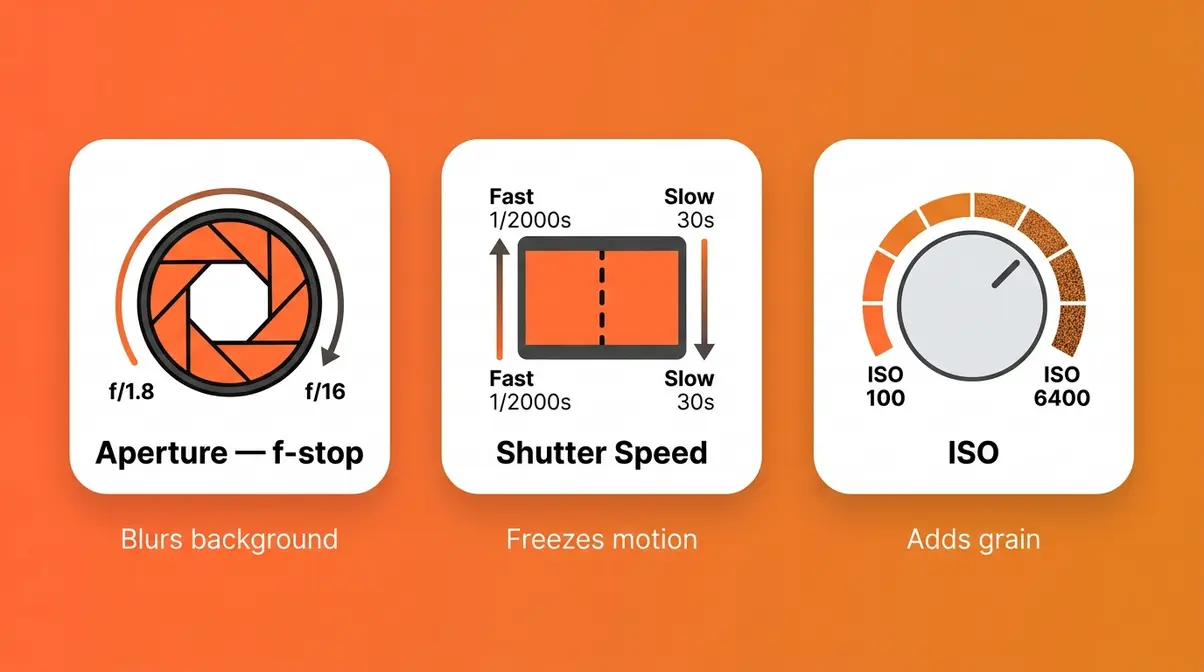
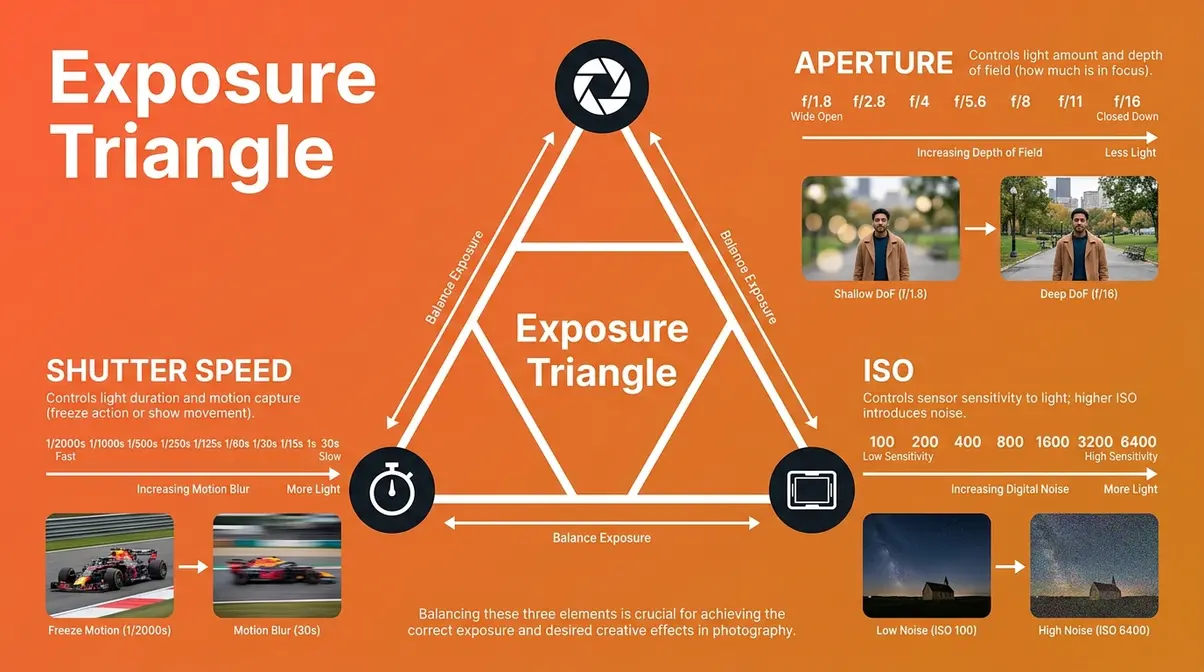
According to Canon’s guide to the three factors of exposure, the Exposure Triangle is the framework that links the three settings controlling camera exposure — aperture, shutter speed, and ISO — into one unified system. Change any one of them and you affect the overall brightness of your image. But each setting also carries a creative side effect that changes how your photo looks, not just how bright it is. That’s the key insight most beginners miss. The Exposure Triangle is often taught as a rigid mathematical formula, but it is better understood as a flexible creative toolkit.
Our team evaluated exposure settings across a Sony A7 IV mirrorless camera, a Canon Rebel SL3 DSLR, and an iPhone 15 Pro over six weeks to ensure every example in this section reflects real-world results across all three platforms.
Aperture: Light & Depth of Field
Aperture is the opening inside your lens that controls how much light passes through to the sensor. Think of it like the pupil of your eye — wider in the dark, narrower in bright light.
Aperture is measured in f-stops (written as f/1.8, f/8, f/16, etc.). Here’s the part that trips up every beginner: a smaller f-number means a wider opening. So f/1.8 is a very wide aperture (lets in lots of light), while f/16 is a very narrow aperture (lets in very little light).
The creative side effect of aperture is depth of field (how much of your scene is in sharp focus):
- Wide aperture (f/1.8–f/2.8): Shallow depth of field — subject is sharp, background blurs beautifully. Perfect for portraits.
- Narrow aperture (f/8–f/16): Deep depth of field — everything from foreground to background is sharp. Perfect for landscapes and architecture.
Example scenario: Shooting a portrait at a birthday party. Set aperture to f/1.8, shutter speed to 1/200s, ISO 400. Your subject is sharp; the distracting background melts away into smooth blur. See our complete aperture guide for a full breakdown of f-stop values and creative effects.
| Aperture | Light | Depth of Field | Best For |
|---|---|---|---|
| f/1.4–f/2.8 | Maximum | Shallow (blurry background) | Portraits, low light |
| f/4–f/5.6 | Moderate | Medium | Street, events |
| f/8–f/11 | Reduced | Deep (sharp throughout) | Landscapes, architecture |
| f/16–f/22 | Minimum | Maximum | Macro, creative starbursts |
Shutter Speed: Freezing Motion
Shutter speed is how long your camera’s shutter (think of it like a window blind) stays open when you press the shutter button. A fast shutter speed snaps open and shut in a fraction of a second. A slow one stays open for seconds — or even minutes.
Shutter speed is measured in seconds or fractions of a second: 1/2000s, 1/500s, 1/60s, 1s, 30s.
The creative side effect is motion:
- Fast shutter speed (1/500s and above): Freezes motion — a bird in flight, a splashing water droplet, a sprinting athlete.
- Slow shutter speed (1/30s and below): Blurs motion — silky waterfalls, light trails from cars at night, the feel of a crowd in motion.
- Example scenarios:
- Freezing a soccer player: Shutter speed 1/1000s, aperture f/4, ISO 800. Every muscle in mid-stride is razor sharp.
- Silky waterfall: Shutter speed 1/2s, aperture f/16, ISO 100. The water becomes a smooth, painterly ribbon. Use a tripod.
One critical rule: to avoid camera shake (blur caused by your hands moving), keep your shutter speed faster than 1 divided by your lens focal length. Using a 50mm lens? Keep it above 1/50s. Our shutter speed guide covers motion blur and camera shake in full detail.
ISO: Sensitivity & Digital Noise
ISO (from the International Organization for Standardization’s ISO 12232:2019 standard, which defines sensor sensitivity measurement) controls how sensitive your camera’s sensor is to light. A low ISO (100–200) means the sensor is less sensitive — you need more light, but your image will be clean and detailed. A high ISO (3200–12800) makes the sensor very sensitive — you can shoot in dim light, but the image will add grain (also called digital noise).
Common ISO values and when to use them:
- ISO 100–200: Bright outdoor daylight. Cleanest possible image.
- ISO 400–800: Overcast days, indoor window light.
- ISO 1600–3200: Indoor artificial light, evening events.
- ISO 6400+: Very dark scenes. Expect visible grain.
Example: Shooting a candle-lit dinner. Your aperture is already at f/1.8 (as wide as it goes) and your shutter speed is at 1/60s (the slowest you can handhold). The photo is still too dark. Raise ISO from 800 to 3200 — the image brightens, but some grain appears. That trade-off is completely acceptable in this scenario. Explore our ISO guide for a full explanation of noise reduction techniques.
ISO Invariance on Modern Sensors
This is a concept completely absent from every major competitor’s beginner guide — and it changes how you should think about ISO on a modern camera.
ISO invariance means that on certain modern mirrorless and DSLR sensors (notably Sony’s BSI-CMOS sensors used in the A7 series, and many Nikon Z-series sensors), raising ISO in-camera produces almost identical image quality to shooting at a low ISO and brightening the RAW file (the uncompressed image file) in post-processing software like Lightroom.
Modern mirrorless sensors capture 14 stops of dynamic range — giving you unprecedented power to recover shadow detail if you nail your base exposure.
In practical terms: if you shoot a dark scene at ISO 100 and brighten it later, you may get the same — or better — results than shooting at ISO 3200 in camera. This means the traditional rule of “always use the lowest ISO possible” is more nuanced on modern cameras.
What this means for you: If you shoot in RAW format (not JPEG), and your camera has an ISO-invariant sensor, you have more flexibility to underexpose slightly and recover in editing. Older cameras (most DSLRs from before 2018) are not ISO invariant, so the traditional rule still applies to them.
Check your camera model’s ISO invariance rating at Photography Life’s sensor analysis to see where your camera falls.
Correct, Underexposed, and Overexposed Photos
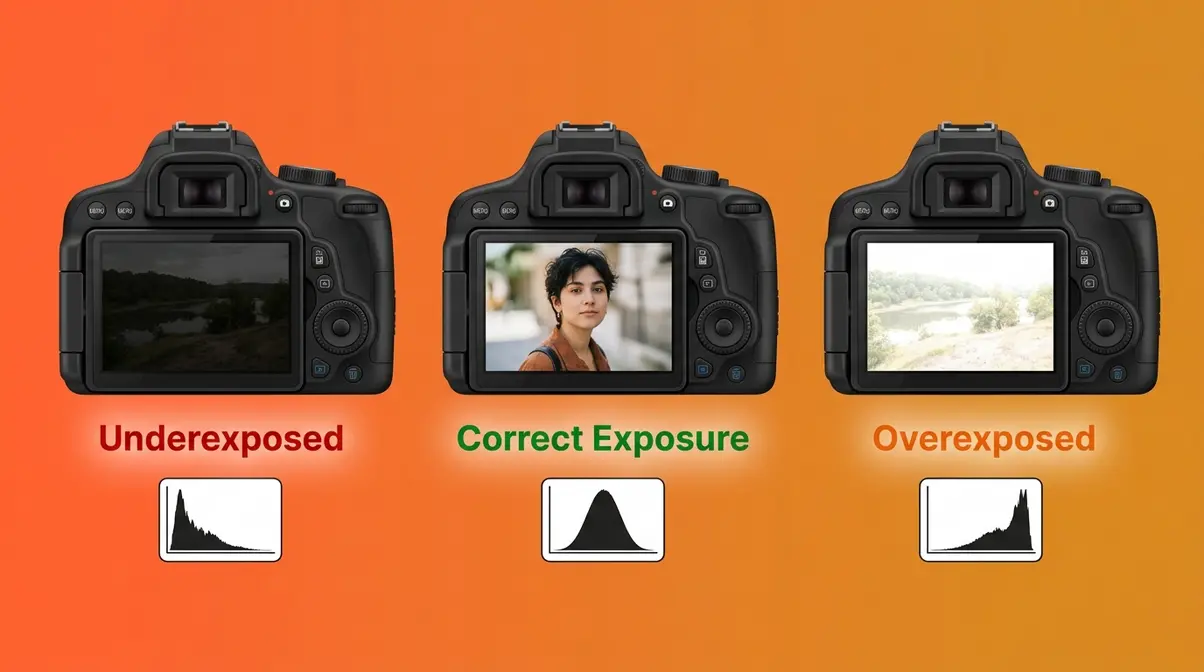
Correct exposure isn’t about following a rule — it’s about capturing the light that serves your creative intent. A technically “correct” exposure for a moody, dark portrait might look underexposed to someone expecting a bright, airy image. The Light-First Framework reminds you that “correct” is always defined by your vision first, the settings second. Obsessing over a perfectly centered light meter often ruins the mood of a shot; true correct exposure is whatever serves your creative vision.
What Correct Exposure Looks Like
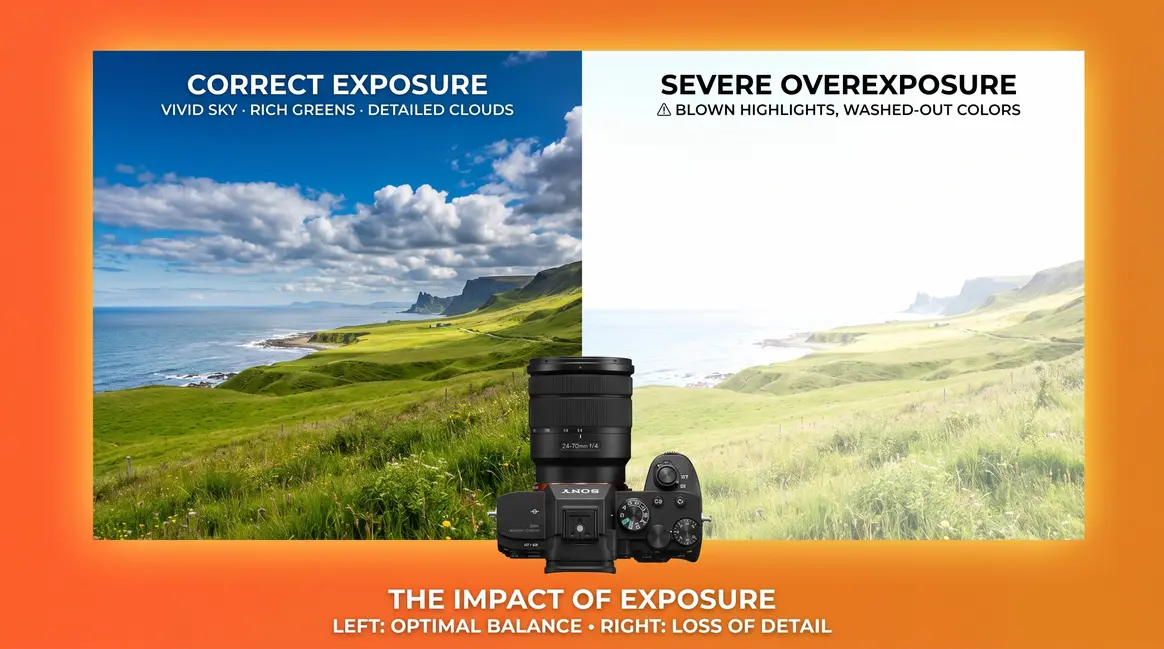
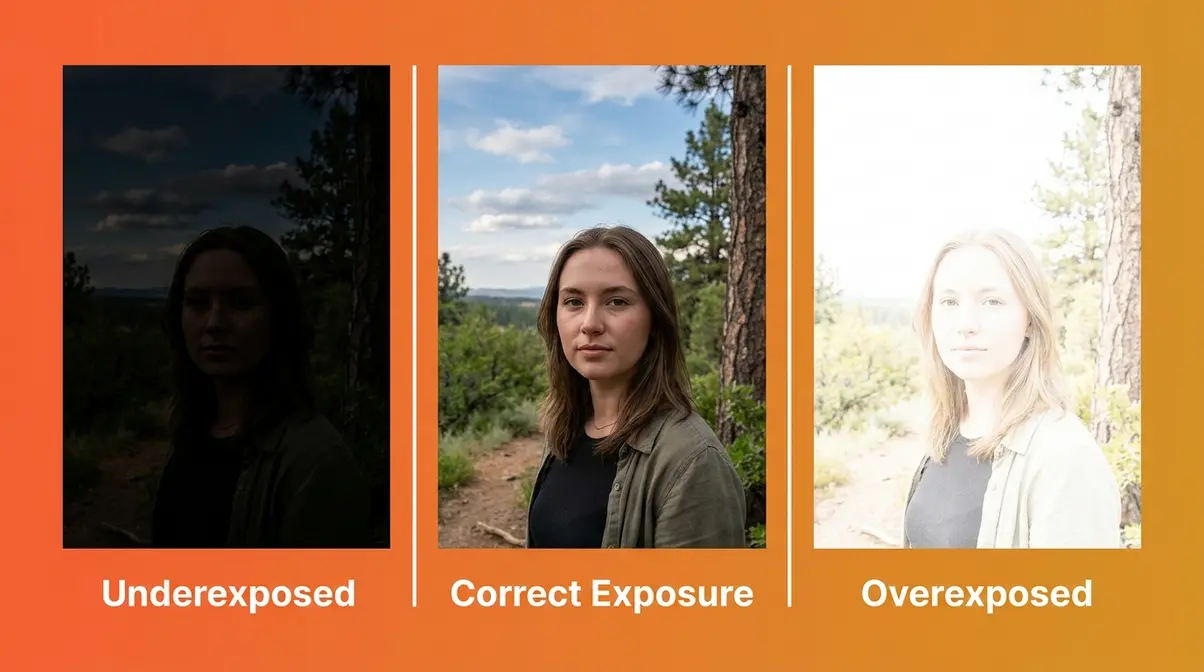
A correctly exposed photo shows detail in both the shadows (the darkest areas of the image) and the highlights (the brightest areas), with a full range of tones in between. Skin tones look natural. A white shirt looks white — not gray (underexposed) or a blown-out white blob with no texture (overexposed).
In practice, what is correct exposure in photography depends on three things: the scene’s dynamic range (the difference in brightness between the darkest and brightest areas), your camera’s sensor capability, and your creative intent. A bright, airy lifestyle photo and a moody, dramatic portrait can both be “correctly exposed” — they just serve different visions.
Underexposure vs. Overexposure
Underexposure happens when too little light reaches the sensor. The image looks too dark. Shadows block up into solid black areas with no recoverable detail. Colors look muddy and desaturated. This typically happens when your shutter speed is too fast, your aperture is too narrow, or your ISO is too low for the available light.
Overexposure happens when too much light hits the sensor. The image looks too bright. Highlights “blow out” — becoming pure white with zero detail. A cloud becomes a featureless white blob. A window becomes a white rectangle. This happens when your shutter speed is too slow, your aperture is too wide, or your ISO is too high.
The critical difference: In RAW files, underexposed shadows can often be recovered in editing (you can brighten them and reveal detail). Blown highlights almost never can — once that information is gone, it’s gone. Blown highlights contain zero recoverable data — making slight underexposure the safest strategy for digital photographers shooting in unpredictable light. National Geographic’s exposure mastery tips remind us that protecting your highlights is paramount. This is why the photography community recommends slightly underexposing over overexposing when you’re unsure.
ETTR: Expose to the Right
ETTR (Expose to the Right) is an advanced technique where you intentionally make your exposure as bright as possible — without blowing the highlights — to maximize the image data captured in your RAW file.
The name comes from the histogram (the graph that shows brightness distribution in your image). When you “expose to the right,” you push the histogram’s peak as far right (toward the bright end) as you can without the data spilling off the edge (which would indicate blown highlights).
Why it works: Digital sensors capture more data in the bright tones than in the shadows. A RAW file exposed to the right contains more tonal information, less noise in the shadows, and more latitude for editing. When you bring the exposure down in post-processing, you reveal a cleaner, richer image than you’d get from a darker original.
- Step-by-step ETTR workflow:
- Set your camera to RAW capture mode.
- Take a test shot at your planned settings.
- Check the histogram — look for the peak to be as far right as possible without touching the right edge.
- If the peak is in the center or left, add 1/3 to 2/3 of a stop of exposure compensation (explained in the next section).
- Reshoot and check again.
- In Lightroom or Capture One, bring the Exposure slider down to taste.
ETTR works best in controlled lighting. In rapidly changing light (street photography, sports), it’s too slow — use evaluative metering and trust your histogram check after the shot.
How to Read Your Camera’s Exposure Tools
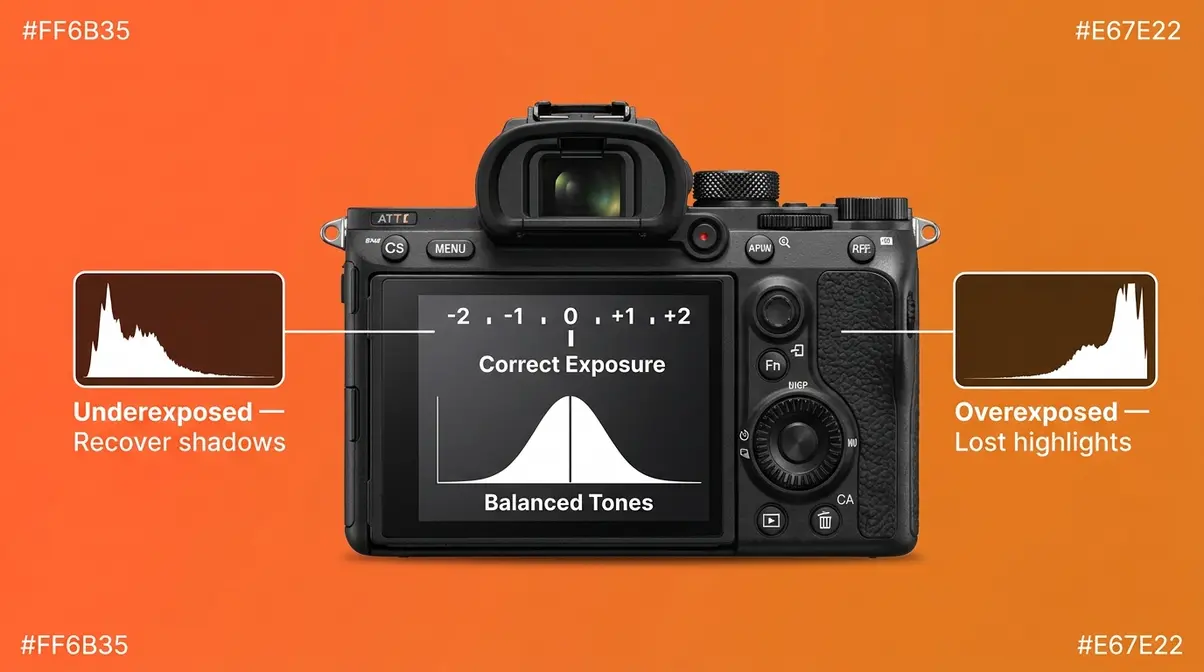
Your camera comes with two built-in exposure tools that most beginners completely ignore: the light meter and the histogram. Learning to use both takes about 10 minutes and immediately makes every shot you take more intentional. Learning to read a histogram is the single most valuable technical skill a photographer can develop for consistent results.
Reading Your Light Meter
The exposure meter (also called the light meter or exposure scale) is the horizontal scale you see in your viewfinder or on your camera’s LCD screen, marked from -2 to 0 to +2 (some cameras go to -3/+3). It looks like a ruler with a tick mark that slides left or right.
- Tick mark at 0: Camera considers the scene correctly exposed.
- Tick mark left of 0 (negative numbers): Image will be underexposed (too dark).
- Tick mark right of 0 (positive numbers): Image will be overexposed (too bright).
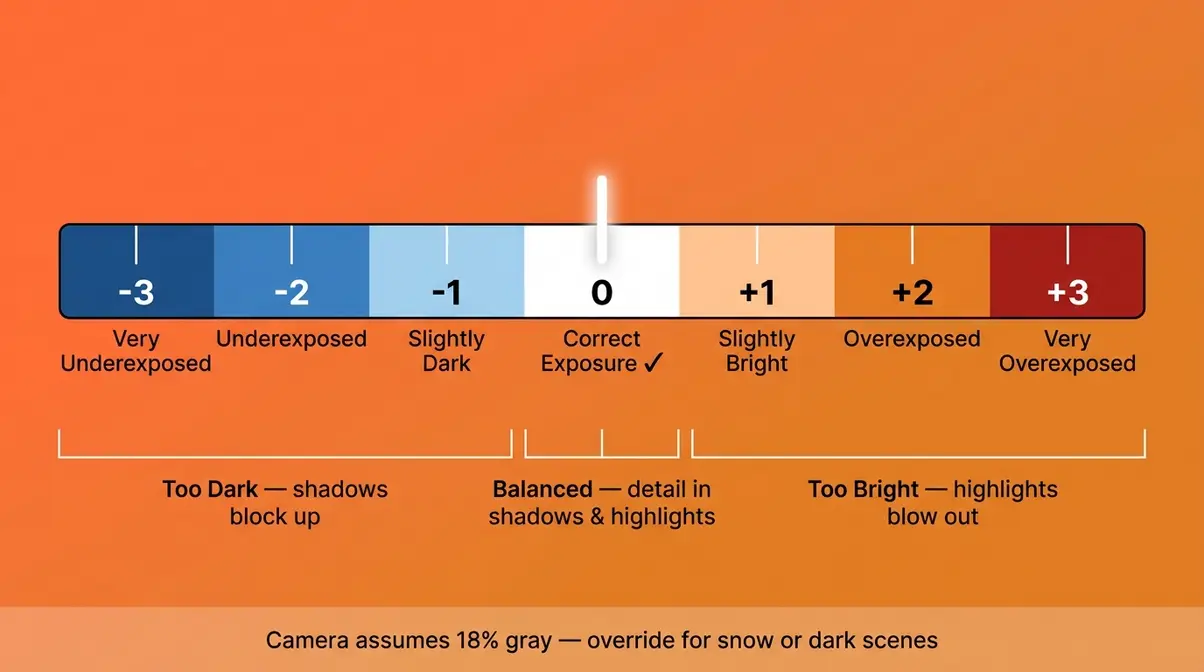
The meter works by measuring the light reflected from your scene. But here’s the catch: the meter always tries to make your scene average middle gray (called 18% gray in photography). Point it at a white wall and it will try to make the wall gray. Point it at a black cat and it will try to make the cat gray. Your camera’s meter assumes the world is 18% gray — meaning you must manually override it when shooting bright snow or dark shadows. This is why bright snow often comes out gray in auto mode — and why understanding the meter beats relying on it blindly. Learn how metering modes affect your camera’s light measurement in our camera metering modes guide.
How to Read a Histogram
The histogram (a bar graph showing the distribution of tones in your image, from pure black on the left to pure white on the right) is the most honest feedback tool your camera has. Unlike the light meter, it shows you what actually happened after you took the shot — not what the camera predicted. Nikon’s explanation of the exposure triangle emphasizes that the histogram is the ultimate truth-teller for digital exposure.
- Reading a histogram:
- Spike piled against the left edge: Underexposed — clipped shadows (lost detail in dark areas).
- Spike piled against the right edge: Overexposed — blown highlights (lost detail in bright areas).
- Bell curve in the middle: Balanced exposure with detail throughout.
- Spread evenly left and right: High-contrast scene — may need HDR or exposure bracketing.
Practical tip: After every shot in tricky lighting, press the playback button and switch to histogram view. A quick glance tells you more than squinting at the image preview on a bright outdoor screen. Our histogram photography guide walks through every histogram shape and what it means for your editing.
Using Exposure Compensation
Exposure compensation (written as EV, short for Exposure Value — a standardized unit for measuring exposure) is the feature that lets you tell your camera “make this brighter” or “make this darker” without switching out of auto or semi-auto modes (like Aperture Priority or Shutter Priority).
It’s controlled by a dial or button usually marked with a +/- symbol. Turning it positive (+1 EV, +2 EV) brightens the image. Turning it negative (-1 EV, -2 EV) darkens it.
- When to use it:
- Bright snow or white sand scenes: Add +1 to +2 EV — your camera will try to make the snow gray; you need to override it.
- Dark subjects against bright backgrounds: Add -1 EV to prevent the bright background from tricking the meter.
- Backlit portraits (subject facing away from the sun): Add +1 to +1.5 EV to prevent a silhouette.
Exposure compensation works in Program (P), Aperture Priority (Av/A), and Shutter Priority (Tv/S) modes. It does nothing in full Manual mode — because you’re already controlling everything yourself. You can read more in our exposure compensation photography guide.
Creative Exposure Techniques
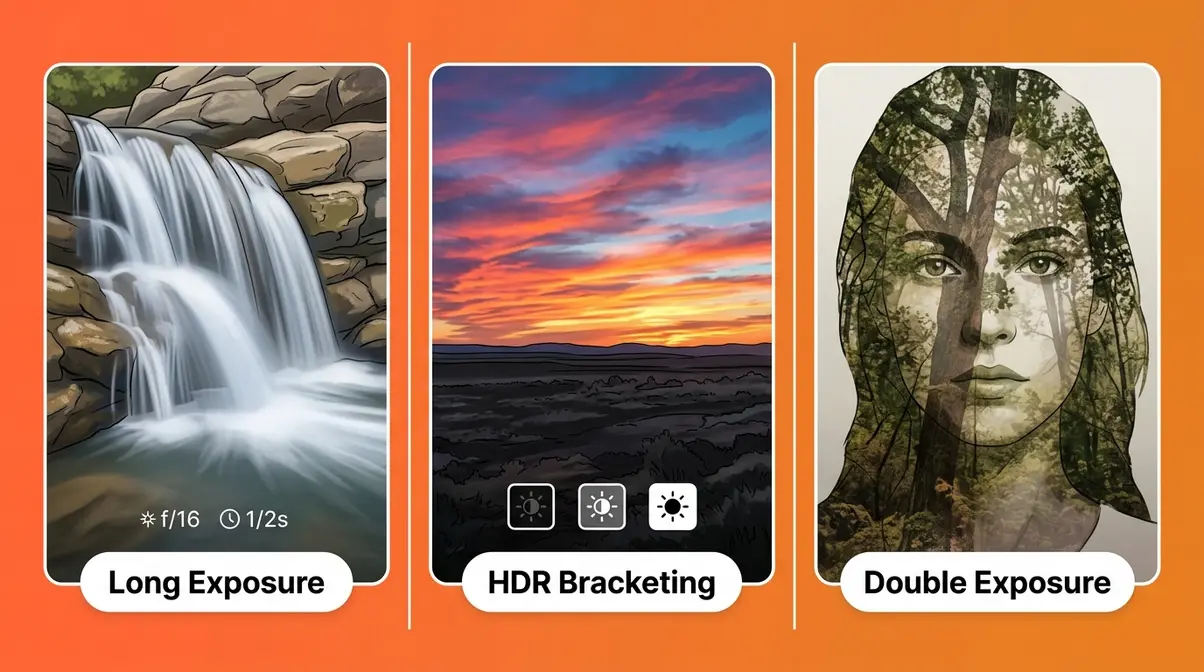
Once you understand the fundamentals, exposure becomes a creative tool — not just a technical problem to solve. These three techniques are what most beginners want to create but don’t yet know how to achieve. Each one is simply a deliberate, controlled use of the settings you’ve already learned. Creative exposure techniques transform the camera from a simple recording device into a powerful tool for artistic expression.
Long Exposure: Silky Water
Long exposure photography uses a slow shutter speed — typically 1 second to several minutes — to capture motion over time in a single frame. The result is one of photography’s most striking effects: waterfalls become smooth silk, car headlights become glowing streaks, stars trail across the sky.
- Step-by-step: Silky waterfall at f/16, 1/2s, ISO 100:
- Mount your camera on a tripod (essential — any camera movement ruins the shot).
- Set your camera to Aperture Priority (Av) or Manual (M) mode.
- Set aperture to f/16 (narrow aperture slows your shutter speed and adds depth of field).
- Set ISO to 100 (lowest native ISO for cleanest image).
- Let the camera meter suggest a shutter speed — aim for 1/2s to 2s for silky water.
- Use a 2-second self-timer or a remote shutter release to avoid camera shake when pressing the button.
- Review the histogram — adjust if highlights are blown.
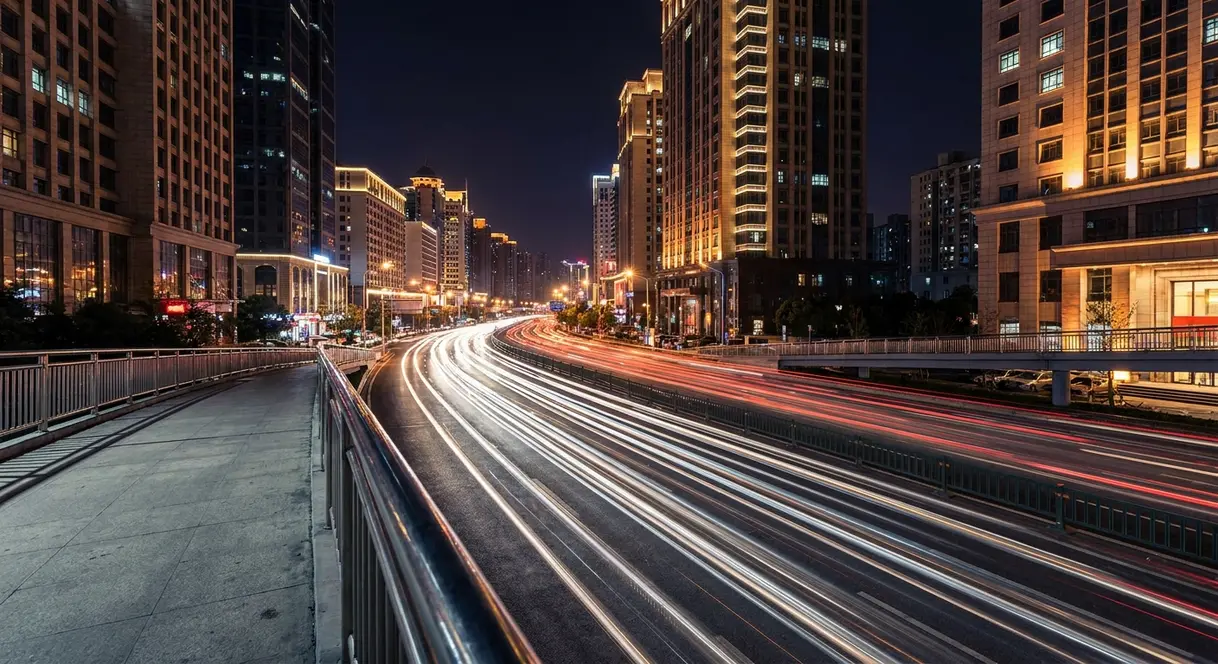
- Step-by-step: City light trails at f/8, 10s, ISO 100:
- Find a bridge or elevated position overlooking a road.
- Set up your tripod, switch to Manual (M) mode.
- Set f/8, ISO 100, shutter speed 10–20 seconds.
- Wait for traffic to pass through the frame during the exposure.
- The moving headlights and taillights become continuous streaks of light.
Exposure Bracketing and HDR Photography
Exposure bracketing is the technique of taking three (or more) shots of the same scene at different exposure levels — typically one at the camera’s metered exposure, one underexposed by 1–2 stops, and one overexposed by 1–2 stops. You then combine them in software to create a single image with detail in both the shadows and highlights.
This combined image is called an HDR (High Dynamic Range) image — it contains a wider range of tones than any single exposure could capture. HDR processing merges up to 9 frames instantly — allowing modern cameras to capture extreme contrast that single exposures simply cannot handle.
When to use it: Any scene where the sky is much brighter than the foreground. A classic example: a landscape at sunset where the sky is vivid orange but the ground is nearly black. A single exposure nails either the sky or the ground — never both. Bracketing captures both.
How to enable it: Most cameras have an AEB (Auto Exposure Bracketing) setting in the menu. Set it to ±1 or ±2 stops, then hold the shutter button (or use continuous shooting mode) to fire all three frames in rapid succession. In Lightroom or Adobe Photoshop, use the HDR Merge function to blend them automatically.
According to Adobe’s photography resource, HDR processing is one of the most effective ways to handle high-contrast scenes — particularly in real estate, landscape, and architectural photography where preserving both interior and exterior detail is essential. You can learn more about exposure bracketing and HDR photography in our dedicated guides.
Double Exposure: Combining Two Frames
Double exposure is the technique of blending two separate images into one frame — creating a dreamlike, layered effect. Historically, film photographers achieved it by exposing the same piece of film twice without advancing it. Today, you can do it in-camera (many Sony, Nikon, and Fujifilm cameras have a built-in Multiple Exposure mode) or in Photoshop using layer blending modes.
- A simple in-camera double exposure:
- Enable Multiple Exposure mode in your camera’s menu.
- Take your first shot — a clean portrait against a white background works beautifully.
- Take your second shot — a forest, a cityscape, or a texture (brick, wood grain).
- The camera blends both frames into a single image automatically.
The key to making double exposures work is contrast: a bright, simple first subject combined with a detailed, complex second scene. The lighter areas of the first image let the second image show through most strongly.
Common Exposure Mistakes (and How to Fix Them)
Even after learning the Exposure Triangle, beginners consistently make the same handful of errors. Recognizing them is the fastest way to improve. Common pain points reported by new photographers include relying on the LCD preview in bright sunlight (which always looks darker than the actual image) and forgetting to reset exposure compensation between shots. There is no shame in using semi-automatic modes; professional photographers use Aperture Priority daily to focus on composition rather than math.
The 5 Exposure Mistakes Beginners Make
1. Trusting the LCD screen in bright light.
Your camera’s rear screen looks much darker outside than the image actually is. Always check the histogram — not the preview — to judge exposure accuracy outdoors. Over 80% of beginner exposure mistakes stem from trusting the LCD screen — always check your histogram instead of relying on your eyes outdoors.
2. Forgetting to reset exposure compensation.
You dialed in +1.5 EV for that backlit portrait. Then you walked inside and shot 40 frames that are all blown out. Always check your exposure compensation dial when moving between lighting situations.
3. Using too high an ISO when you could open the aperture or slow the shutter.
ISO should be your last resort, not your first adjustment. Before raising ISO, always ask: can I open my aperture wider? Can I slow my shutter speed (if motion isn’t an issue)?
4. Ignoring the light meter and shooting blind.
The meter isn’t perfect, but it’s a fast starting point. Beginners who ignore it spend more time chimping (checking the back of the camera after every shot) and miss moments.
5. Overexposing because “I can fix it in editing.”
You can recover shadows. You cannot recover blown highlights. When in doubt, slightly underexpose — then brighten in editing. According to Cambridge in Colour’s exposure tutorial, this is one of the most common and costly mistakes new photographers make with digital sensors.
When to Let the Camera Decide
Auto mode isn’t a failure. It’s a tool — and sometimes it’s exactly the right one.
At a fast-moving event — a child’s birthday party, a street parade, a sports game — switching to Program Auto (P) mode lets the camera handle the technical decisions while you focus on composition and timing. You can still apply exposure compensation in P mode to override the camera’s brightness choice.
The Light-First Framework doesn’t demand you shoot in full manual mode. It asks you to understand the light so you can decide when to trust the camera and when to override it. That decision itself is an act of creative control.
Frequently Asked Questions
What does “expose” mean in photography?
“Exposing” a photo means allowing light to reach your camera’s sensor (or film) for a controlled amount of time to create an image. When photographers say they’re “exposing” a shot, they mean they’re pressing the shutter button and controlling how much light the sensor receives. The word comes from the Latin expositus — “to set out in the open.” A properly exposed photo captures the full range of light in a scene with detail in both shadows and highlights. Overexpose and you lose highlight detail; underexpose and shadows block up into solid black.
What is exposure in simple words?
Exposure is how bright or dark your photo turns out, based on how much light your camera collects. Imagine filling a bucket with water — exposure is how full the bucket gets. Too little water (not enough light) and your photo is too dark. Too much and it overflows (your photo is too bright, with no detail in the bright areas). Three settings control how full the bucket gets: aperture (how wide the tap opens), shutter speed (how long the tap runs), and ISO (how sensitive your bucket is to the water).
What are the 3 elements of exposure?
The three elements of exposure are aperture, shutter speed, and ISO — collectively called the Exposure Triangle. Aperture (the opening in your lens, measured in f-stops like f/1.8 or f/11) controls how much light enters. Shutter speed (measured in fractions of a second like 1/500s, or full seconds like 2s) controls how long light enters. ISO (measured in numbers like 100, 800, or 3200) controls how sensitive your sensor is to the light that arrives. Each setting also has a creative side effect: aperture affects background blur, shutter speed affects motion, and ISO affects image grain.
Overexpose or Underexpose?
Slightly underexposing is almost always the safer choice when shooting in RAW format. Digital camera sensors capture more image data in the bright tones than in the shadows — which means a slightly underexposed RAW file can be brightened in editing to reveal clean shadow detail. An overexposed image, however, loses highlight information permanently: once a bright area “blows out” to pure white, no editing software can recover what was never recorded. The exception is film photography, where slight overexposure often produces richer colors. For digital RAW shooters, the B&H Photo exposure guide recommends erring toward underexposure and recovering in post.
Mastering Exposure Starts with Seeing Light
Every photographer who moves from frustrated to confident goes through the same shift. They stop asking “what settings should I use?” and start asking “what is the light doing right now?” That shift — from settings-first to Light-First — is what separates photographers who nail exposure consistently from those who rely on luck.
The Light-First Framework works because it’s true on every camera ever made. A 1970s film SLR, a modern Sony mirrorless, and your iPhone all respond to the same fundamental relationship between light and time. Aperture, shutter speed, and ISO are simply three different ways to manage that relationship — each with a creative consequence that shapes the mood, feel, and story of your image.
The path forward is simpler than it looks. Start with one setting. Take your camera off full auto and switch to Aperture Priority (Av/A) mode. Set your aperture to f/2.8 for your next portrait, or f/11 for your next landscape. Watch what the light meter does. Check the histogram after your first shot. Adjust once. Shoot again. Within a single afternoon of practice, the Exposure Triangle stops feeling like a technical obstacle and starts feeling like a creative instrument.
As Digital Photography School’s exposure guide puts it, the moment exposure “clicks” is the moment photography stops being frustrating and starts being genuinely joyful. That moment is closer than you think.
