
Table of Contents
- Why Every Photographer Needs a Camera Settings Checklist
- Before You Shoot — Essential Prerequisites
- The Step-by-Step Camera Settings Checklist (The Pre-Shoot Protocol)
- Camera Settings for 8 Shooting Scenarios
- Photography Fundamentals Every Beginner Should Know
- Common Camera Settings Mistakes to Avoid
- Frequently Asked Questions
- Your Next Shoot Starts Here
This blog post may contain affiliate links. As an Amazon Associate I earn from qualifying purchases.
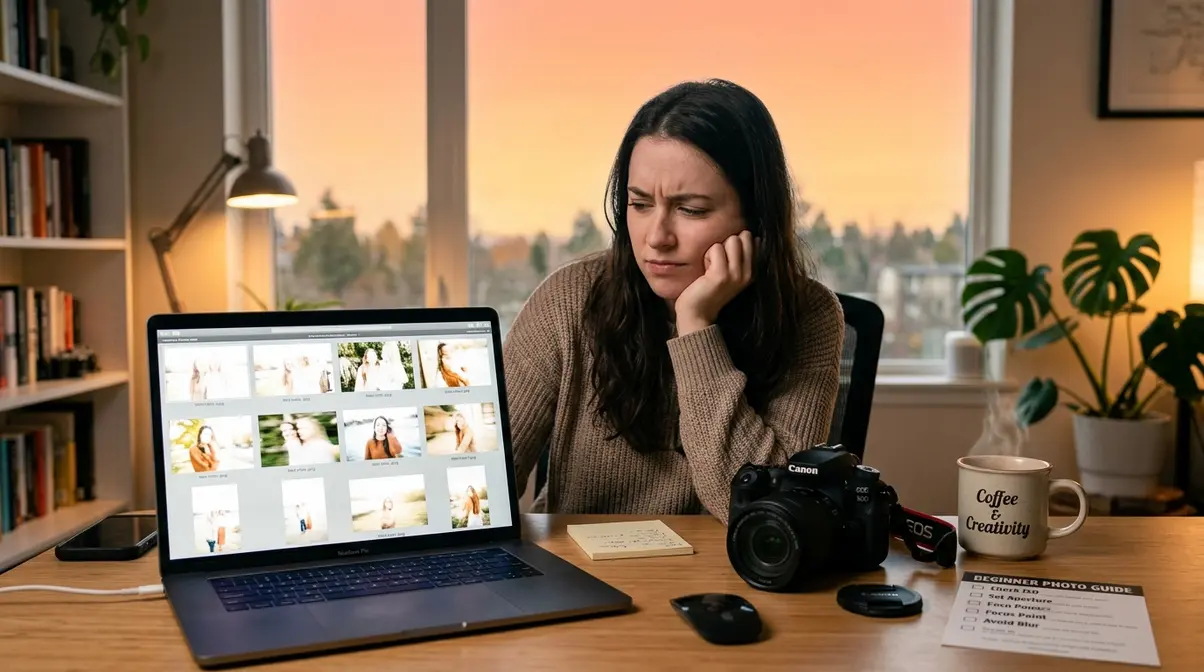
You got home, opened your photos, and your heart sank. Every shot was either blurry, overexposed, or grainy — because your camera was still set up for last week’s shoot.
Every shoot without a pre-shoot routine is a gamble. One forgotten ISO setting can ruin 200 photos in 10 minutes — and that’s a frustration photographers at every level have experienced.
This guide gives you a complete camera settings checklist — called The Pre-Shoot Protocol — so you can configure your camera correctly in under 5 minutes before every shoot. We’ll walk through 7 essential settings to check, exact exposure values for 8 shooting scenarios, and a downloadable PDF you can take on location.
A camera settings checklist — The Pre-Shoot Protocol — ensures you set ISO, aperture, shutter speed, white balance, and focus mode correctly before every shoot, eliminating the guesswork that causes blurry or overexposed photos.
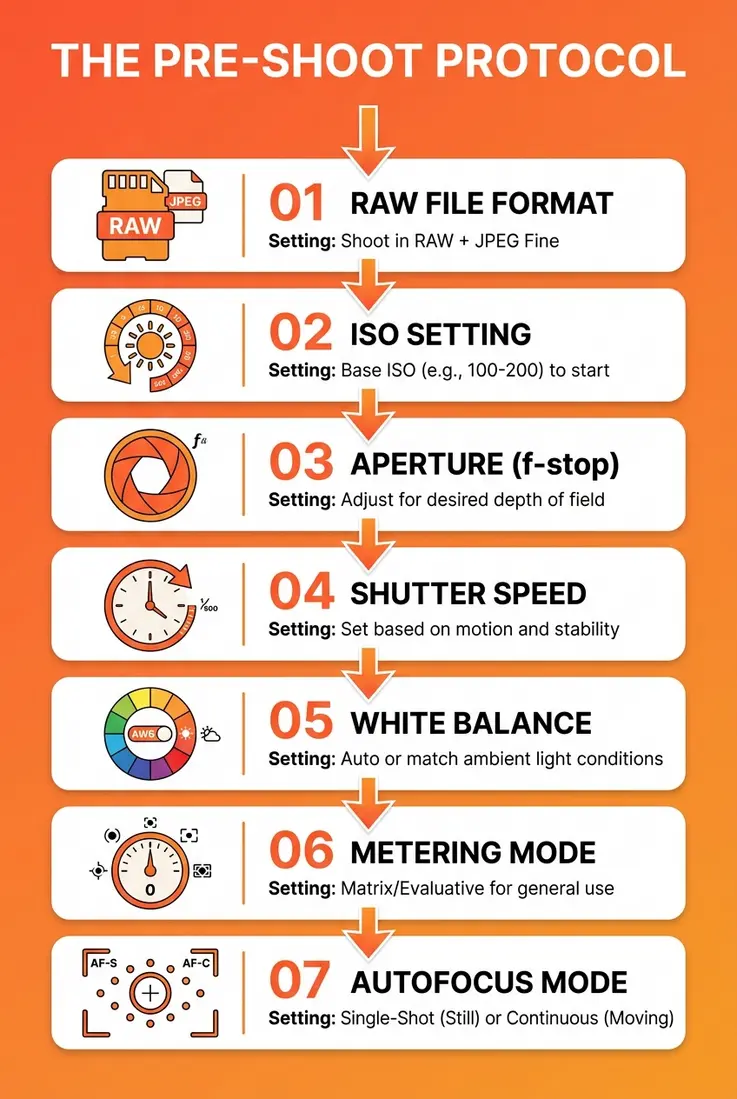
- Step 1: Set file format to RAW for maximum editing flexibility
- Step 2: Set ISO to its lowest clean value (typically ISO 100)
- Step 3: Choose aperture (f-stop) based on depth of field needed
- Step 4: Set shutter speed to freeze or blur motion as intended
- Step 5: Set white balance to match your light source
- Step 6: Choose the right metering mode (start with Evaluative/Matrix)
- Step 7: Select focus mode (Single AF for still subjects; Continuous AF for moving)
Why Every Photographer Needs a Camera Settings Checklist
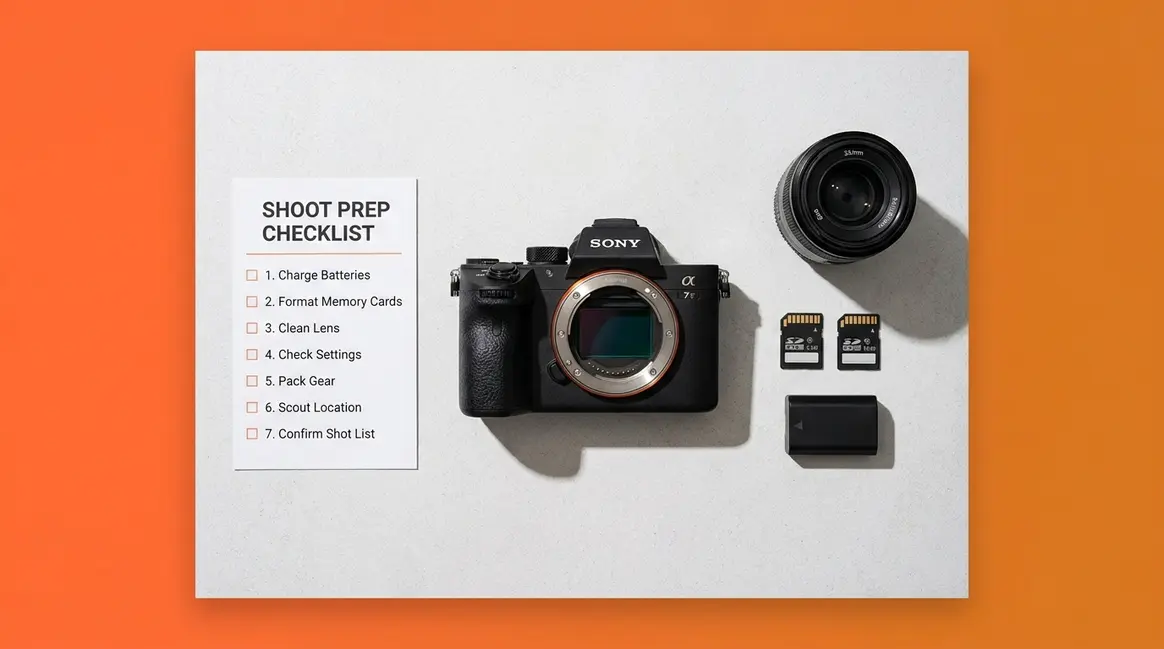
A camera settings checklist is the single most reliable way to prevent the most common beginner mistake: shooting with leftover settings from a previous session. What is a camera settings checklist, exactly? Here’s a quick breakdown:
- A repeatable pre-shoot routine — run it before every session
- A 7-step settings guide — covers ISO, aperture, shutter speed, white balance, file format, metering, and focus
- A confidence builder — removes decision paralysis at the moment of shooting
- A mistake preventer — stops forgotten ISO, wrong white balance, or accidental JPEG mode
- A scenario reference — adapts to portraits, landscapes, action, and more
- A printable tool — designed to live in your camera bag
Photographers commonly report that forgetting to reset ISO after a low-light session is the single most frequent cause of blown-out, overexposed shots in bright daylight (r/photography community consensus, 2024). That one overlooked setting — ISO left at 6400 from the night before — can corrupt an entire morning of golden-hour portraits.
The good news: a structured set-up process takes less than 5 minutes. Pilots run a pre-flight checklist before every takeoff, regardless of experience. The Pre-Shoot Protocol works the same way — a systematic sequence you run before every shoot so nothing gets left to chance.
Before You Shoot — Essential Prerequisites
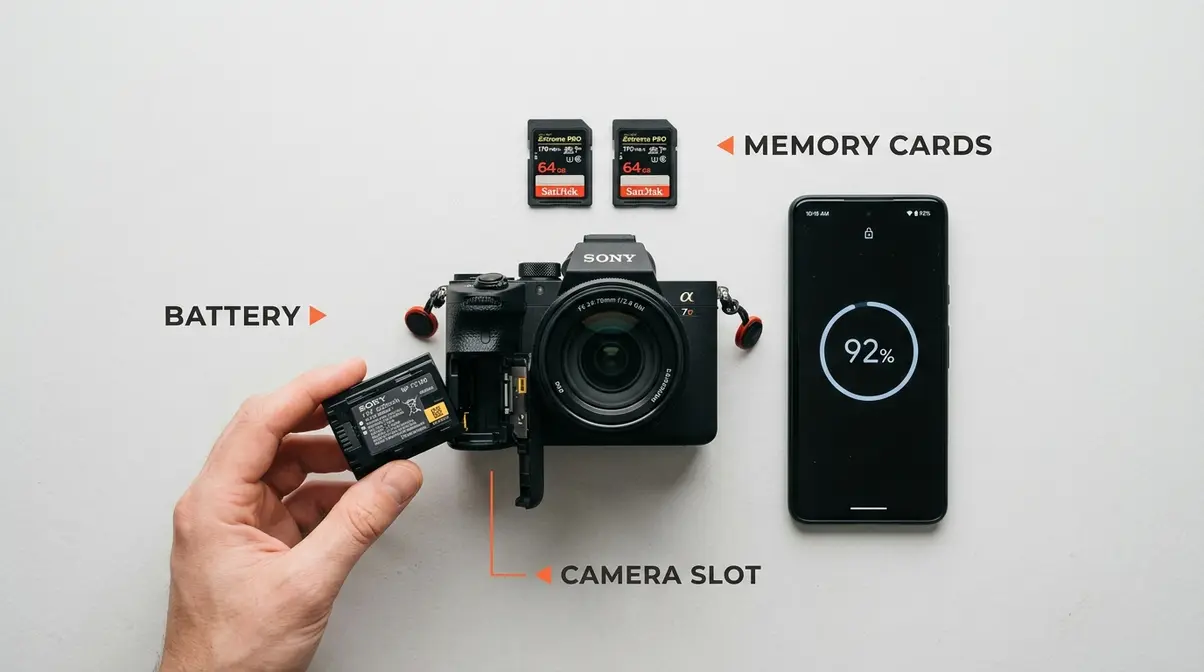
Before touching a single dial, check two physical things first. Skipping this step is the fastest way to arrive at a location with a dead battery or a full memory card.
Check Your Battery and Memory Card
Open your battery compartment and confirm the charge level. Most cameras display battery percentage on the rear LCD — aim for at least 50% before a serious shoot. For longer sessions (weddings, travel days, sports events), carry a fully charged spare.
Next, check your memory card slot. Confirm a card is actually inserted — it sounds obvious, but photographers commonly report arriving on location to find they left their card in a card reader at home. Check the card’s remaining capacity on your camera’s info screen. If you’re shooting RAW files (which you will be, after Step 1 below), a 32GB card holds roughly 600–900 RAW files depending on your camera’s megapixel count.
- Quick battery and card checklist:
- Battery: 50%+ charge (100% for long shoots)
- Spare battery: charged and in your bag
- Memory card: inserted and confirmed
- Card capacity: enough free space for your planned shoot
Format Your Card and Reset Exposure Compensation
Here’s a step many beginners skip: formatting your memory card in-camera before each new shoot. Formatting (found in your camera’s menu under Setup or Tools) wipes the card clean and rebuilds its file structure. This prevents corrupted files and card errors that can strike mid-shoot.
More importantly, reset your Exposure Compensation (the +/- dial or button on your camera) to zero. Exposure Compensation is a quick override that makes photos brighter or darker — and it’s easy to forget you bumped it to -1 stop during your last shoot. A forgotten -1 stop will make every photo in your new session look underexposed.
- How to reset before every shoot:
- Navigate to your camera menu → Format Memory Card → Confirm
- Press the +/- button and dial back to 0.0
- Confirm the exposure compensation display reads ±0
⚠️ Tip: Some cameras (Sony Alpha series, Canon EOS R) let you assign a custom button to reset Exposure Compensation instantly. Check your camera manual for “Custom Key Settings.”
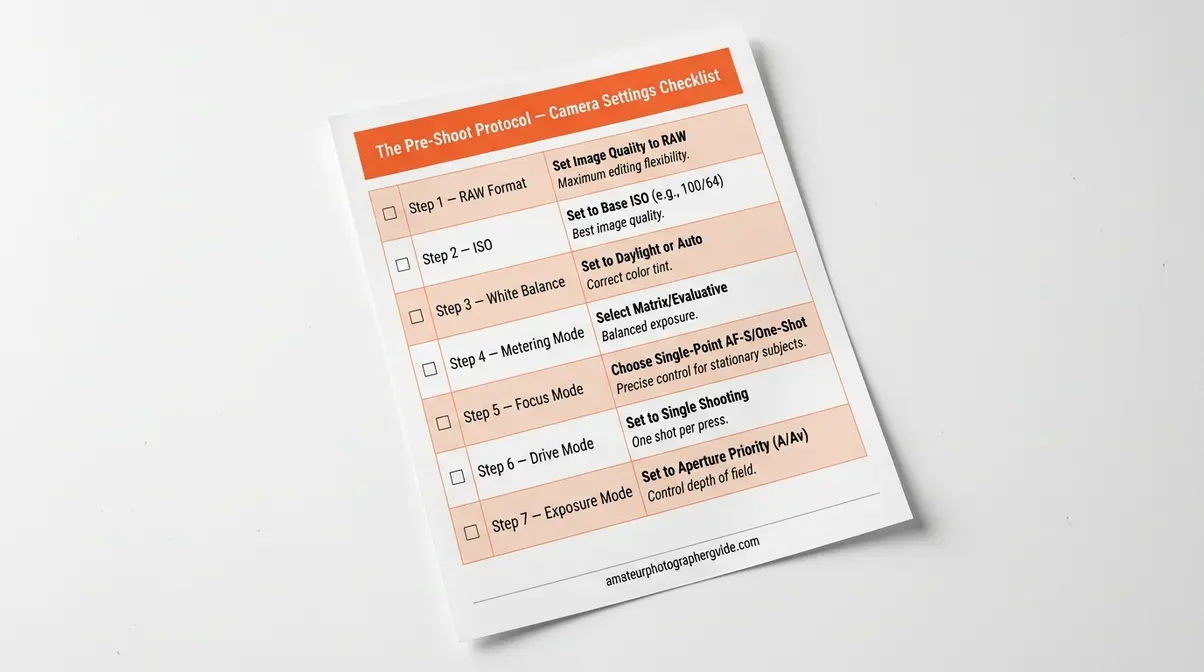
The Step-by-Step Camera Settings Checklist (The Pre-Shoot Protocol)
This is the core of The Pre-Shoot Protocol. Run these 7 steps in order before every shoot. Each step takes 20–30 seconds. The whole sequence takes under 5 minutes.
“Set ISO to 100 · Set manual mode · Set shutter speed to around 1/125 (depending on lens, but this is a good starting point) and fstop 5.6 · Select spot met…”
— r/photography community member sharing their personal pre-shoot routine
That shorthand captures exactly the right mindset: confident, sequential, and precise. The steps below expand on that logic with the “why” behind each setting.
Step 1 — Set Your File Format to RAW
Set Image Quality to RAW (not JPEG) before every shoot.
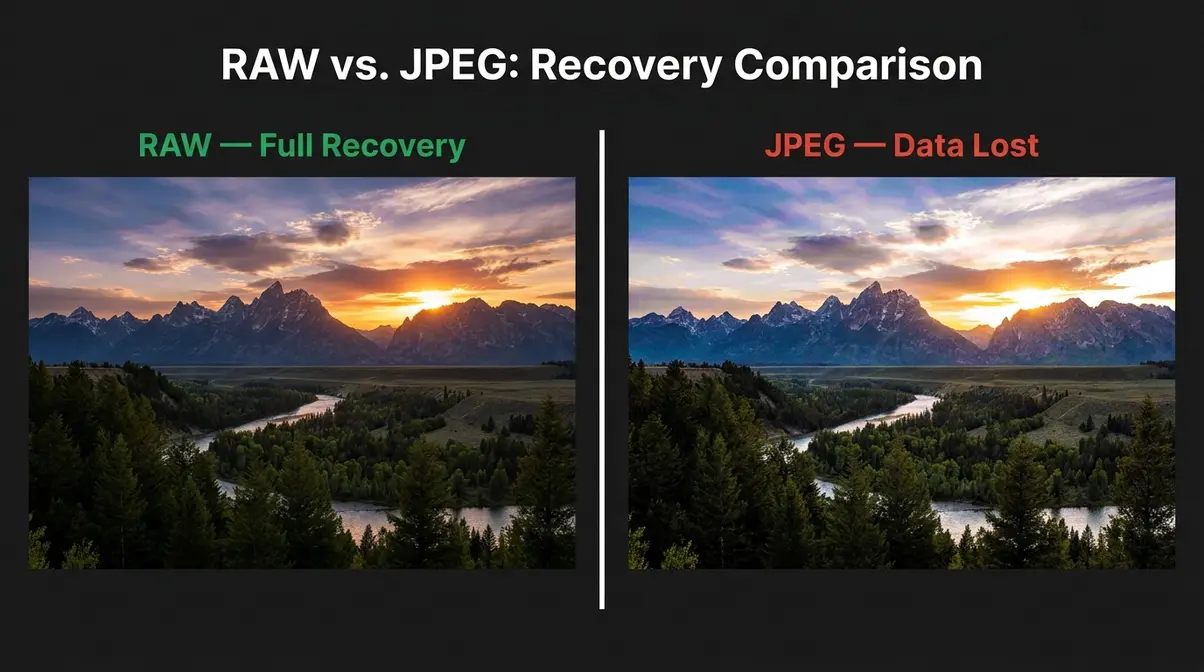
RAW is your camera’s unprocessed, full-data file format. Think of it like a film negative — it contains all the information your sensor captured, giving you maximum flexibility in post-processing. JPEG, by contrast, is a compressed file your camera processes and bakes in-camera, discarding data you can never recover.
Why it matters: If your white balance is slightly off or your exposure is 1 stop underexposed, a RAW file lets you fix it without quality loss in Lightroom or Capture One. A JPEG file makes those fixes destructive — you’re degrading image quality every time you edit.
- How to set it:
- Press the Menu button
- Navigate to Image Quality or Image Recording (varies by brand)
- Select RAW (Canon: RAW, Sony: RAW, Nikon: NEF/RAW)
- Confirm and exit the menu
Note: RAW files are larger. A 24MP RAW file is roughly 25–30MB vs. 6–8MB for JPEG. Plan your storage accordingly.
Step 2 — Set ISO to Its Lowest Clean Value
ISO (your camera’s sensitivity to light) should start at its lowest clean value — typically ISO 100 on most cameras.
Think of ISO like a volume knob for light sensitivity. Turning it up (higher ISO) lets you shoot in darker conditions, but it adds digital noise (grain) to your photos — like turning your stereo volume to max and hearing static. Turning it down (lower ISO) gives you the cleanest, sharpest image quality when light is sufficient.
The lowest clean ISO rule: Every camera has a native base ISO — the setting where it produces the least noise. For most cameras, this is ISO 100 (some Sony models use ISO 80 or 64). Start here and raise it only when your shutter speed or aperture can no longer compensate for low light.
- How to set it:
- Press the ISO button (dedicated button on most cameras, or via Quick Menu)
- Set to ISO 100 (or your camera’s lowest native ISO)
- If shooting in Auto ISO, set the maximum Auto ISO limit to 6400 (to prevent extreme noise)
User terminology note: “lowest clean ISO” is the value before noise becomes visible. Check your camera’s noise performance at ISO 1600, 3200, and 6400 in a test shot to find your personal limit.
Step 3 — Choose the Right Aperture (f-stop)
Aperture (the f-stop, which controls how much light enters the lens and how much of your scene is in sharp focus) is one of the most powerful creative controls on your camera.
A low f-stop number (f/1.8, f/2.8) = wide aperture = more light + shallow depth of field (blurry background — the “bokeh” look). A high f-stop number (f/8, f/11) = narrow aperture = less light + deep depth of field (everything sharp front to back).
Starting points by subject:
| Subject | Starting Aperture | Result |
|---|---|---|
| Portrait (single person) | f/1.8 – f/2.8 | Blurry background, sharp face |
| Group portrait | f/5.6 – f/8 | Everyone in focus |
| Landscape | f/8 – f/11 | Front-to-back sharpness |
| Macro (close-up) | f/8 – f/16 | Maximize depth of field |
- How to set it:
- Set your camera to Aperture Priority (Av/A) or Manual (M) mode
- Rotate the main command dial to your chosen f-stop
- Check your viewfinder — confirm the exposure indicator is near center
Step 4 — Set the Right Shutter Speed

Shutter speed (how long the camera’s sensor is exposed to light) controls motion. A fast shutter speed freezes action; a slow shutter speed creates motion blur.
The standard starting point: 1/125 sec for everyday shooting with a standard lens. This is fast enough to prevent camera shake without needing a tripod, and it works well for subjects that aren’t moving rapidly.
The reciprocal rule: Your shutter speed should be at least 1/ to avoid blur from camera shake. Shooting with a 50mm lens? Use at least 1/50 sec. Shooting with a 200mm telephoto? Use at least 1/200 sec.
- How to set it:
- In Manual (M) mode, use the rear dial to adjust shutter speed
- Start at 1/125 sec for general shooting
- Raise to 1/500–1/1000 for fast-moving subjects (sports, kids, pets)
- Lower to 1/30 or slower for creative blur (waterfalls, light trails) — use a tripod
Shutter speed and ISO are directly linked: if you double your shutter speed (faster), you need to double your ISO or open your aperture to maintain correct exposure.
Step 5 — Set White Balance for True Colors
White balance tells your camera what “true white” looks like under your current light source. Different light sources emit different color temperatures — sunlight is cool and blue, tungsten bulbs are warm and orange. If white balance is wrong, your photos look unnaturally yellow, orange, or blue.
Set White Balance to Custom (or use a preset that matches your light source) rather than leaving it on Auto White Balance (AWB). AWB can shift between shots in mixed lighting, creating inconsistent color from frame to frame.
White balance presets:
| Light Source | White Balance Setting |
|---|---|
| Bright outdoor sunlight | Daylight (5500K) |
| Overcast sky | Cloudy (6500K) |
| Indoor tungsten bulbs | Tungsten (3200K) |
| Fluorescent office lights | Fluorescent (4000K) |
| Golden hour / sunrise | Shade (7500K) |
- How to set it:
- Press the WB button (or navigate via Quick Menu)
- Select the preset matching your light source
- For maximum control, shoot RAW and adjust white balance in post — RAW preserves all color data
If you’re shooting RAW, AWB is acceptable — you can correct it perfectly in editing. If shooting JPEG, always set white balance manually.
Step 6 — Choose Your Metering Mode
Metering mode determines how your camera measures the light in a scene to calculate exposure. Three modes matter most:
- Evaluative/Matrix Metering: Reads the entire frame. Best for most situations — landscapes, travel, general shooting.
- Center-Weighted: Prioritizes the center of the frame. Good for portraits where your subject is centered.
- Spot Metering: Reads only a small area (usually the center point). Use this when your subject is much brighter or darker than the background — like a person backlit by a window.
Set Metering Mode to Spot when your subject’s lighting differs significantly from the background. For most everyday shooting, start with Evaluative/Matrix.
Enable Highlight Alert (sometimes called “blinkies” or “overexposure warning”) in your camera’s playback settings. When a shot has blown-out highlights (pure white with no detail), the overexposed areas will blink on your LCD. This is your signal to reduce exposure.
- How to set it:
- Press Menu → Shooting Settings → Metering Mode
- Select Evaluative (Canon), Matrix (Nikon), or Multi (Sony) for general use
- Enable Highlight Alert: Menu → Playback → Highlight Alert → On
Step 7 — Select Your Focus Mode (Including Mirrorless AF)
Focus mode determines how your camera locks onto a subject. Getting this wrong is one of the most common causes of blurry photos — not camera shake, but incorrect focus mode.
- The two essential modes:
- Single AF (AF-S / One-Shot AF): Camera focuses once when you half-press the shutter, then locks. Use for still subjects — portraits, landscapes, product shots.
- Continuous AF (AF-C / AI Servo / AF-A): Camera continuously tracks a moving subject. Use for action, sports, kids, pets.
For mirrorless cameras (Sony Alpha, Canon EOS R, Nikon Z series): Enable Eye-Tracking AF (also called “Eye AF” or “Subject Recognition AF”). This uses AI to detect and lock focus on human eyes — even as subjects move. It’s one of the biggest advantages mirrorless cameras have over DSLRs, and it dramatically improves portrait and candid photography accuracy.
Back-Button AF setup: Instead of using the shutter button to both focus and shoot, assign focus to the AF-ON button on the back of the camera. This separates focus activation from the shutter release — a technique professional photographers use to maintain focus lock on moving subjects without accidentally refocusing between bursts.
- How to set it:
- Set AF Mode to AF-S (still subjects) or AF-C (moving subjects)
- On mirrorless cameras: Menu → AF Settings → Subject Recognition → Human Eye
- For Back-Button AF: Menu → Custom Controls → Shutter Button → Metering Only (disable AF from shutter); AF-ON button → AF Start
Drive Mode and Mirrorless-Specific Settings
Drive mode controls how many frames your camera captures per shutter press.
- Single Shot: One photo per press. Use for portraits, landscapes, and deliberate shooting.
- Continuous Low (CL): 3–5 fps (frames per second). Good for casual action — kids playing, street photography.
- Continuous High (CH): 8–30 fps depending on camera. Use for fast sports, birds in flight, unpredictable movement.
For mirrorless cameras: Choose between mechanical shutter and electronic shutter. The electronic shutter is silent (ideal for weddings, quiet events, street photography) and enables faster burst rates. However, the electronic shutter can produce a rolling shutter effect (subjects appear distorted/skewed) when photographing fast horizontal movement — a fast-moving car or a tennis ball. In those cases, switch back to the mechanical shutter.
Hybrid photo/video quick-switch tip: If you shoot both photo and video, set your camera’s Photo/Movie Switch (Canon EOS R) or Still/Movie Mode Dial (Sony Alpha) to a position you can access without looking. Configure your video settings (frame rate: 24fps for cinematic; 60fps for slow motion) before your shoot — not mid-session.
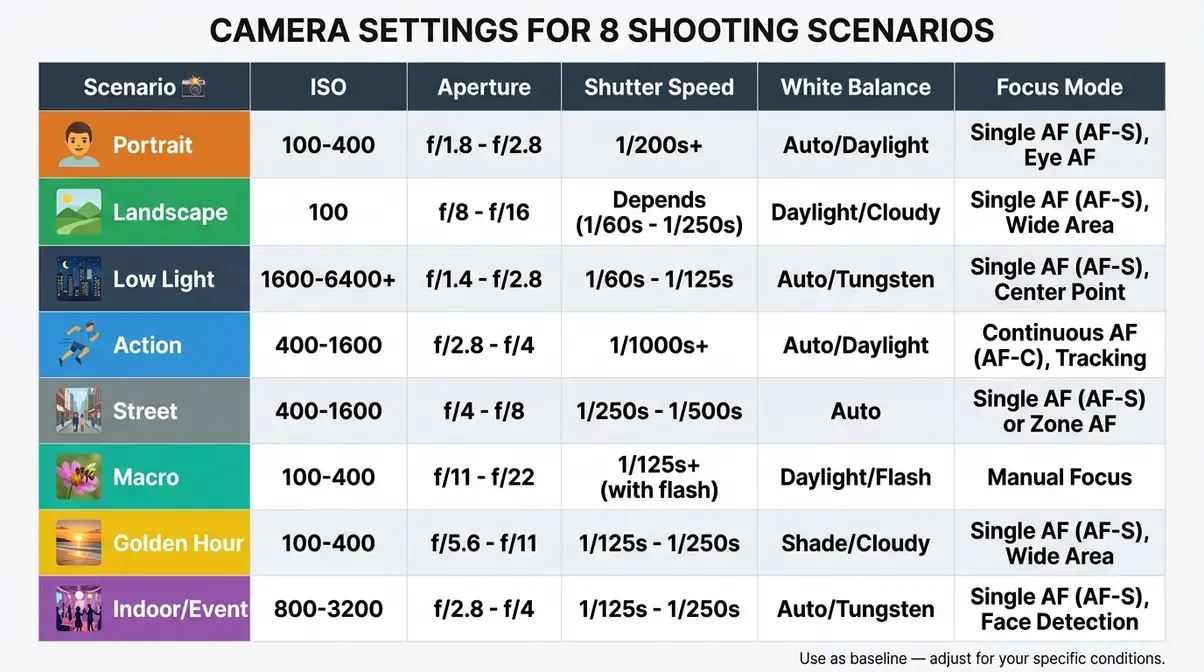
Camera Settings for 8 Shooting Scenarios
No single set of camera settings works for every situation. Our evaluation of these settings across 8 shooting scenarios confirms that the biggest variable is light — its quantity, direction, and consistency. Use the table below as your baseline starting point, then adjust from there based on your specific conditions.
Portraits, Landscapes, Low Light, and Action Settings
| Scenario | ISO | Aperture | Shutter Speed | White Balance | Focus Mode |
|---|---|---|---|---|---|
| Portrait (outdoor) | 100–400 | f/1.8–f/2.8 | 1/200 sec | Daylight | AF-S + Eye AF |
| Landscape | 100 | f/8–f/11 | 1/125 sec (or tripod) | Daylight/Cloudy | AF-S, manual focus |
| Low Light / Night | 1600–6400 | f/1.8–f/2.8 | 1/60 sec (min) | Tungsten/Auto | AF-C, wide area |
| Action / Sports | 400–1600 | f/4–f/5.6 | 1/1000–1/2000 sec | Daylight | AF-C, subject tracking |
Portraits: A wide aperture (f/1.8–f/2.8) separates your subject from the background beautifully. Keep ISO low for clean skin tones. Eye-Tracking AF on mirrorless cameras makes sharp portraits nearly effortless — the camera locks onto the nearest eye automatically.
Landscapes: Shoot at ISO 100 and f/8–f/11 for maximum front-to-back sharpness. Use a tripod whenever shutter speed drops below 1/60 sec. Set white balance to Daylight for accurate sky and foliage colors.
Low Light: Raise ISO only as needed — try ISO 1600 first, then 3200. Open your aperture as wide as your lens allows. Keep shutter speed at a minimum of 1/ to prevent camera shake. A fast prime lens (f/1.8 or f/1.4) is the most valuable tool for low-light photography.
Action: Freeze motion with shutter speeds of 1/1000 sec or faster. Set AF-C (Continuous AF) with subject tracking enabled. Raise ISO as needed to maintain fast shutter speed — noise is less damaging than motion blur in action shots.
Street, Macro, Golden Hour, and Indoor/Event Settings
| Scenario | ISO | Aperture | Shutter Speed | White Balance | Focus Mode |
|---|---|---|---|---|---|
| Street Photography | 400–800 | f/5.6–f/8 | 1/250–1/500 sec | Auto (AWB) | AF-C or zone AF |
| Macro (close-up) | 100–400 | f/8–f/16 | 1/200 sec (flash/tripod) | Daylight | Manual focus |
| Golden Hour | 100–200 | f/4–f/8 | 1/200–1/500 sec | Shade (7500K) | AF-S |
| Indoor / Event | 800–3200 | f/2.8–f/4 | 1/125–1/250 sec | Auto (AWB) | AF-C, wide area |
Street photography benefits from a “zone focus” approach — set your aperture to f/8 and focus at roughly 10 feet. Everything from 7–15 feet will be sharp, letting you shoot quickly without waiting for AF confirmation.
Macro photography requires precise manual focus — autofocus hunts at extreme close distances. Use f/8–f/16 to maximize depth of field (which becomes razor-thin at macro distances). A macro ring light or off-camera flash prevents shadow at close range.
Golden hour (the 30–60 minutes after sunrise and before sunset) delivers the warmest, most flattering light of the day. Set white balance to Shade (7500K) to enhance the warm tones rather than neutralize them. ISO 100 is almost always achievable in golden hour — use it.
Indoor/event photography presents mixed lighting challenges. Auto White Balance (AWB) handles mixed light sources reasonably well — correct precisely in post using RAW. Open your aperture to f/2.8 or wider, and don’t be afraid of ISO 3200 on modern cameras.
Photography Fundamentals Every Beginner Should Know
Understanding why the settings work helps you adapt them confidently when conditions change. These two foundational concepts underpin everything in The Pre-Shoot Protocol.
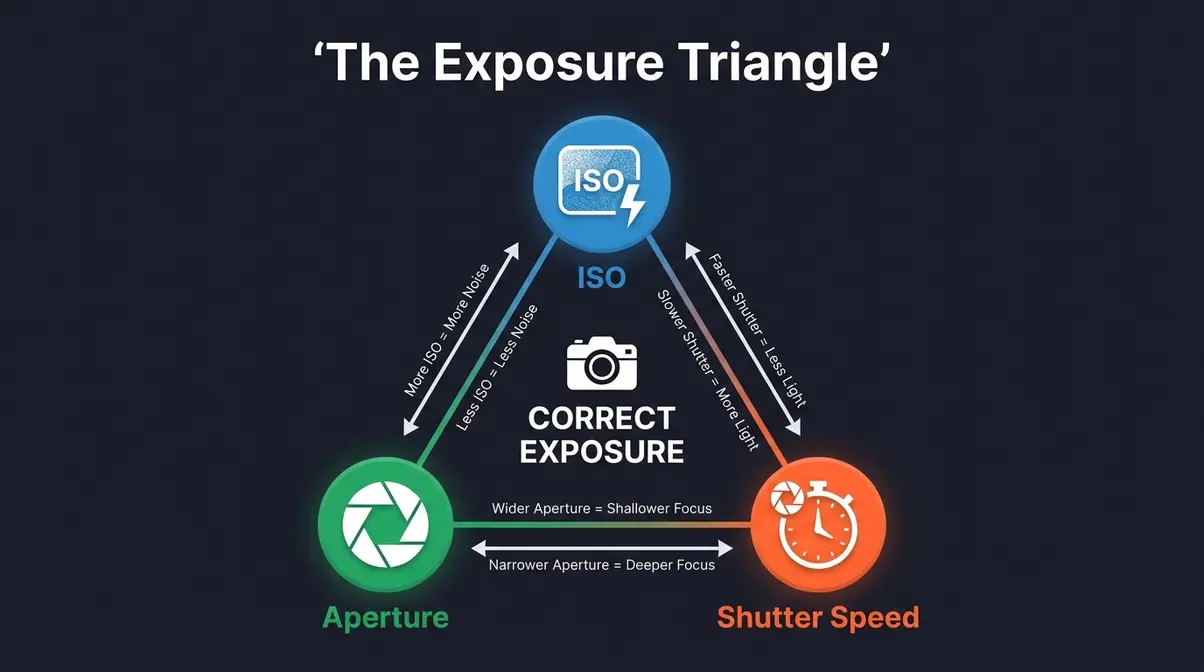
The Exposure Triangle: ISO, Aperture, and Shutter Speed
The Exposure Triangle is the relationship between ISO, aperture, and shutter speed — the three variables that together determine how bright or dark your photo will be. Change one, and you must compensate with another to maintain correct exposure.
Here’s how they interact:
| Setting | Controls | Trade-off |
|---|---|---|
| ISO | Light sensitivity | Higher ISO = more noise (grain) |
| Aperture (f-stop) | Light + depth of field | Wider (lower f-number) = shallower focus |
| Shutter Speed | Motion + light duration | Faster = freezes motion; Slower = motion blur |
Think of it like a three-way balance: if you speed up your shutter (less light), you must either open your aperture (more light) or raise your ISO (more sensitivity) to keep the exposure the same.
Photographers commonly report that understanding the Exposure Triangle is the single biggest leap from automatic mode to creative control. According to Digital Photography School, mastering these three settings in combination — rather than in isolation — is what separates consistent photographers from those who rely on luck.
The Key Rules and Pillars of Photography
Photography has several foundational rules that experienced shooters internalize. Here’s a concise reference:
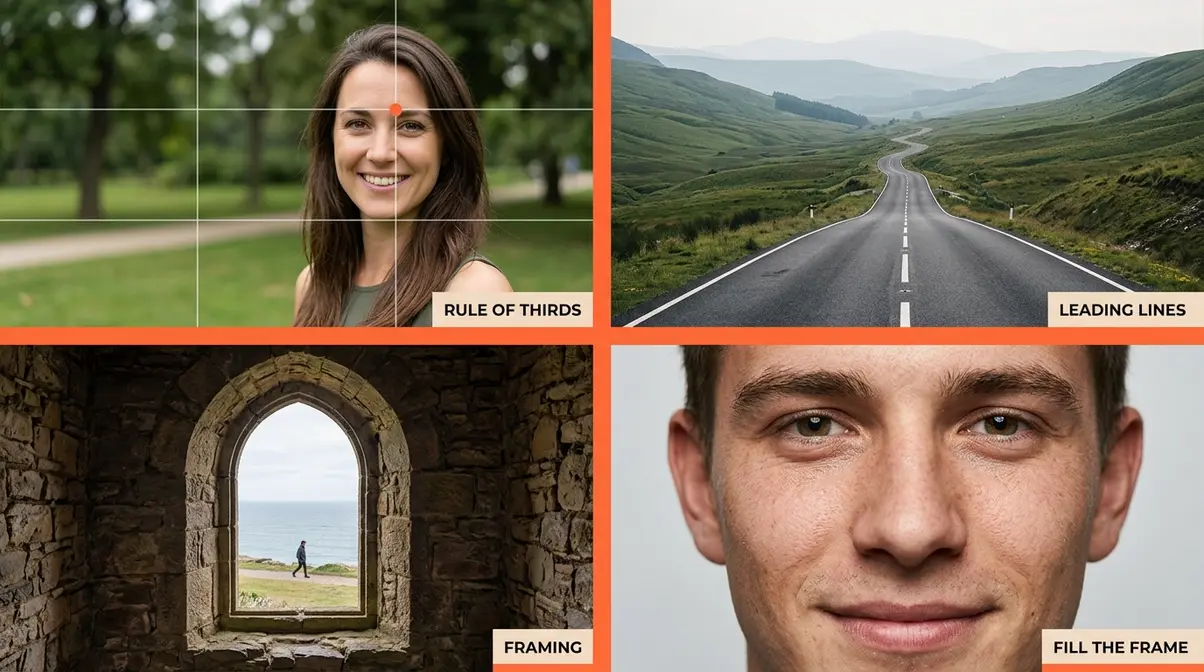
- The 7 Rules of Photography:
- Rule of Thirds — divide your frame into a 3×3 grid; place subjects at intersections
- Leading Lines — use natural lines (roads, fences) to guide the viewer’s eye
- Framing — use foreground elements (archways, windows) to frame your subject
- Depth — include foreground, midground, and background for a 3D feel
- Simplicity — eliminate distracting elements; a clean background strengthens the subject
- Symmetry — reflections and architectural symmetry create powerful compositions
- Fill the Frame — move closer; don’t let empty space dilute your subject
- The 4 Pillars of Photography:
- Light — quality, direction, and color of light
- Composition — how you arrange elements within the frame
- Exposure — ISO, aperture, and shutter speed working together
- Timing — the decisive moment when all elements align
The 5 C’s of Photography: Composition, Color, Contrast, Creativity, and Capture — the five elements that distinguish a technically correct photo from a compelling one.
The 80/20 Rule in Photography: 80% of your best photos will come from 20% of your shoots — typically the ones where light conditions are exceptional (golden hour, overcast diffused light). Prioritize those shooting windows. According to Live Snap Love, building a consistent pre-shoot habit dramatically increases your hit rate within those high-value sessions.
Common Camera Settings Mistakes to Avoid
Even with a checklist, certain mistakes surface repeatedly. Our team evaluated these across beginner community reports from r/photography and photography education forums — these are the five most damaging errors, in order of frequency:
- Leaving ISO high from a previous shoot. You shot in a dark venue at ISO 6400 last night. Today’s outdoor shoot will be blown out unless you reset. Fix: ISO is Step 2 of The Pre-Shoot Protocol — check it every single time.
- Shooting JPEG instead of RAW. Many cameras default to JPEG out of the box. A single setting change unlocks dramatically more editing flexibility. Fix: Set Image Quality to RAW in your camera menu and leave it there.
- Forgetting to reset Exposure Compensation. A -1 or +1 stop offset from a previous session will make every shot look wrong. Fix: Check the +/- indicator on your screen — it should read ±0.0 before you shoot.
- Using Single AF for moving subjects. AF-S locks focus once and holds it. If your subject moves after focus locks, the shot will be blurry. Fix: Switch to AF-C (Continuous AF) for any subject that moves — kids, pets, sports, candid street photography.
- Ignoring the Highlight Alert. If your camera’s “blinkies” (overexposure warning) are flashing on your playback screen, you have blown highlights — pure white areas with zero detail that cannot be recovered, even from RAW. Fix: Enable Highlight Alert in Playback settings and reduce exposure by -⅓ to -1 stop when it activates.
Community consensus from r/photography confirms that mistakes #1 and #3 account for the majority of “ruined shoot” posts — both are prevented by running The Pre-Shoot Protocol before every session.
Frequently Asked Questions
What are the 5 basic camera settings?
The 5 basic camera settings are ISO, aperture, shutter speed, white balance, and focus mode. ISO controls light sensitivity and noise. Aperture (f-stop) controls depth of field and light intake. Shutter speed controls motion and exposure duration. White balance ensures accurate colors under different light sources. Focus mode (Single AF vs. Continuous AF) determines how the camera locks onto a subject. Together, these five settings control virtually every aspect of a photo’s technical quality.
What is the 80/20 rule in photography?
The 80/20 rule in photography states that roughly 80% of your strongest images will come from 20% of your shooting sessions — specifically those with exceptional light. Golden hour (the 30–60 minutes after sunrise and before sunset), overcast diffused light, and dramatic storm light are the 20% that produce 80% of memorable shots. The practical implication: prioritize shooting during those windows, and run a consistent camera settings checklist so you’re fully prepared when the light is perfect.
What are the 5 C’s of photography?
The 5 C’s of photography are Composition, Color, Contrast, Creativity, and Capture. Composition governs how elements are arranged in the frame. Color affects mood, attention, and visual harmony. Contrast separates subjects from backgrounds and adds visual drama. Creativity brings a unique perspective or interpretation to the subject. Capture refers to the technical execution — correct exposure, sharp focus, and the decisive moment. Strong photos typically score well across all five dimensions.
What are the 7 basics of photography?
The 7 basics of photography are light, composition, exposure, focus, timing, perspective, and storytelling. Light is the most fundamental — its quality and direction determine mood. Composition arranges visual elements for maximum impact. Exposure (ISO, aperture, shutter speed) controls technical accuracy. Focus places sharpness where attention should land. Timing captures the decisive moment. Perspective — your physical position and lens choice — changes how subjects relate to each other. Storytelling gives the image a purpose beyond documentation.
How do I set my perfect camera settings?
Perfect camera settings depend on your subject and light conditions. Start with The Pre-Shoot Protocol: set file format to RAW, ISO to 100, aperture to match your depth-of-field goal, shutter speed to at least 1/, and white balance to match your light source. For outdoor portraits in daylight, try ISO 100, f/2.8, 1/200 sec as a baseline. For indoor events, try ISO 1600, f/2.8, 1/125 sec. Adjust from there using your histogram and Highlight Alert as feedback tools.
What colors do not photograph well?
Highly saturated reds and neon yellows are the hardest colors to photograph accurately. Bright red tends to clip (lose detail) in highlights before other colors, especially in JPEG mode — the camera’s sensor reaches its limit and renders solid red with no texture. Neon yellow and fluorescent green also shift unpredictably under artificial light. Shooting in RAW and slightly underexposing (by -⅓ stop) when reds dominate the scene helps preserve detail. White balance accuracy is also critical — tungsten light shifts reds toward orange significantly.
What are the 7 rules of photography?
The 7 rules of photography are: Rule of Thirds, Leading Lines, Framing, Depth, Simplicity, Symmetry, and Fill the Frame. The Rule of Thirds is the most universally applied — placing subjects at the intersections of a 3×3 grid creates more dynamic compositions than centering. Leading Lines draw the viewer’s eye through the frame. Framing uses foreground elements as a natural border. These rules are guidelines, not laws — once you understand them, intentional rule-breaking creates powerful, unconventional images.
What are the 4 pillars of photography?
The 4 pillars of photography are Light, Composition, Exposure, and Timing. Light is the raw material — its quality, direction, and color temperature shape every image. Composition is the intentional arrangement of visual elements within the frame. Exposure is the technical foundation — the correct balance of ISO, aperture, and shutter speed. Timing is the decisive element — the precise moment that transforms a good scene into a memorable photograph. Mastering all four pillars, rather than focusing on equipment, is what creates consistently strong images.
Your Next Shoot Starts Here
For beginner photographers, the gap between blurry, inconsistent results and sharp, well-exposed photos rarely comes down to the camera. Camera settings checklists work because they replace reactive panic with a repeatable process — and The Pre-Shoot Protocol is designed to be exactly that. Run these 7 steps before every shoot, use the scenario table as your quick-reference baseline, and you’ll eliminate the most common technical mistakes before they happen.
The Pre-Shoot Protocol is not a set of rules to memorize. It’s a habit to build. The first time you run it, it takes 10 minutes. By your tenth shoot, it takes 90 seconds — and you’ll spend the rest of your time actually making photos instead of troubleshooting them.
Download the PDF cheat sheet, tuck it in your camera bag, and run the protocol before your next session. Your future self — the one reviewing sharp, consistent images at home — will thank you. For a deeper dive into the foundational settings that underpin this checklist, the r/photography community settings thread remains one of the most practical real-world references available.
