

Table of Contents
- Key Takeaways
- What Is Chromatic Aberration In Photography
- Main Types: Axial Versus Lateral Aberration
- How Chromatic Aberration Affects Images
- Common Causes And When It Occurs
- Practical Solutions And Prevention Methods
- Master Your Photos by Tackling Chromatic Aberration Today
- Frequently Asked Questions
- Recommended
This blog post may contain affiliate links. As an Amazon Associate I earn from qualifying purchases.
Every photographer knows the frustration of seeing vibrant colors spoiled by strange purple or green fringes at the edges of their photos, especially after capturing a sharp landscape or architectural scene. Chromatic aberration is more than just a technical term—it is a common optical challenge that can blur details and distract from your creative vision. Gain practical insights into this phenomenon and learn simple, effective methods to reduce color fringing and sharpen your images with confidence.
Key Takeaways
| Point | Details |
|---|---|
| Understanding Chromatic Aberration | Chromatic aberration occurs due to lens failure in focusing all colors at the same point, leading to color fringing and blurred edges. |
| Types of Chromatic Aberration | There are two main types: axial, which causes overall color bleeding, and lateral, which affects only the edges of high-contrast areas. |
| Minimizing Effects | Using high-quality lenses with low-dispersion glass and avoiding maximum aperture settings can significantly reduce chromatic aberration. |
| Post-Processing Solutions | Employ lens correction tools and color grading techniques during editing to address remaining chromatic aberration issues. |
What Is Chromatic Aberration In Photography
Chromatic aberration represents an optical phenomenon that can dramatically impact the quality and clarity of photographic images. At its core, this visual distortion occurs when a camera lens fails to focus all colors of light precisely onto the same convergence point, resulting in unexpected color fringing and blurred edges.
Understanding the mechanics behind chromatic aberration requires exploring how light behaves when passing through camera lenses. Light refraction happens differently for various wavelengths, causing colors like red, green, and blue to bend at slightly different angles. This means that instead of all colors focusing exactly at the same point, they spread out marginally, creating noticeable color distortions around high-contrast edges in photographs.
Photographers encounter two primary types of chromatic aberration:
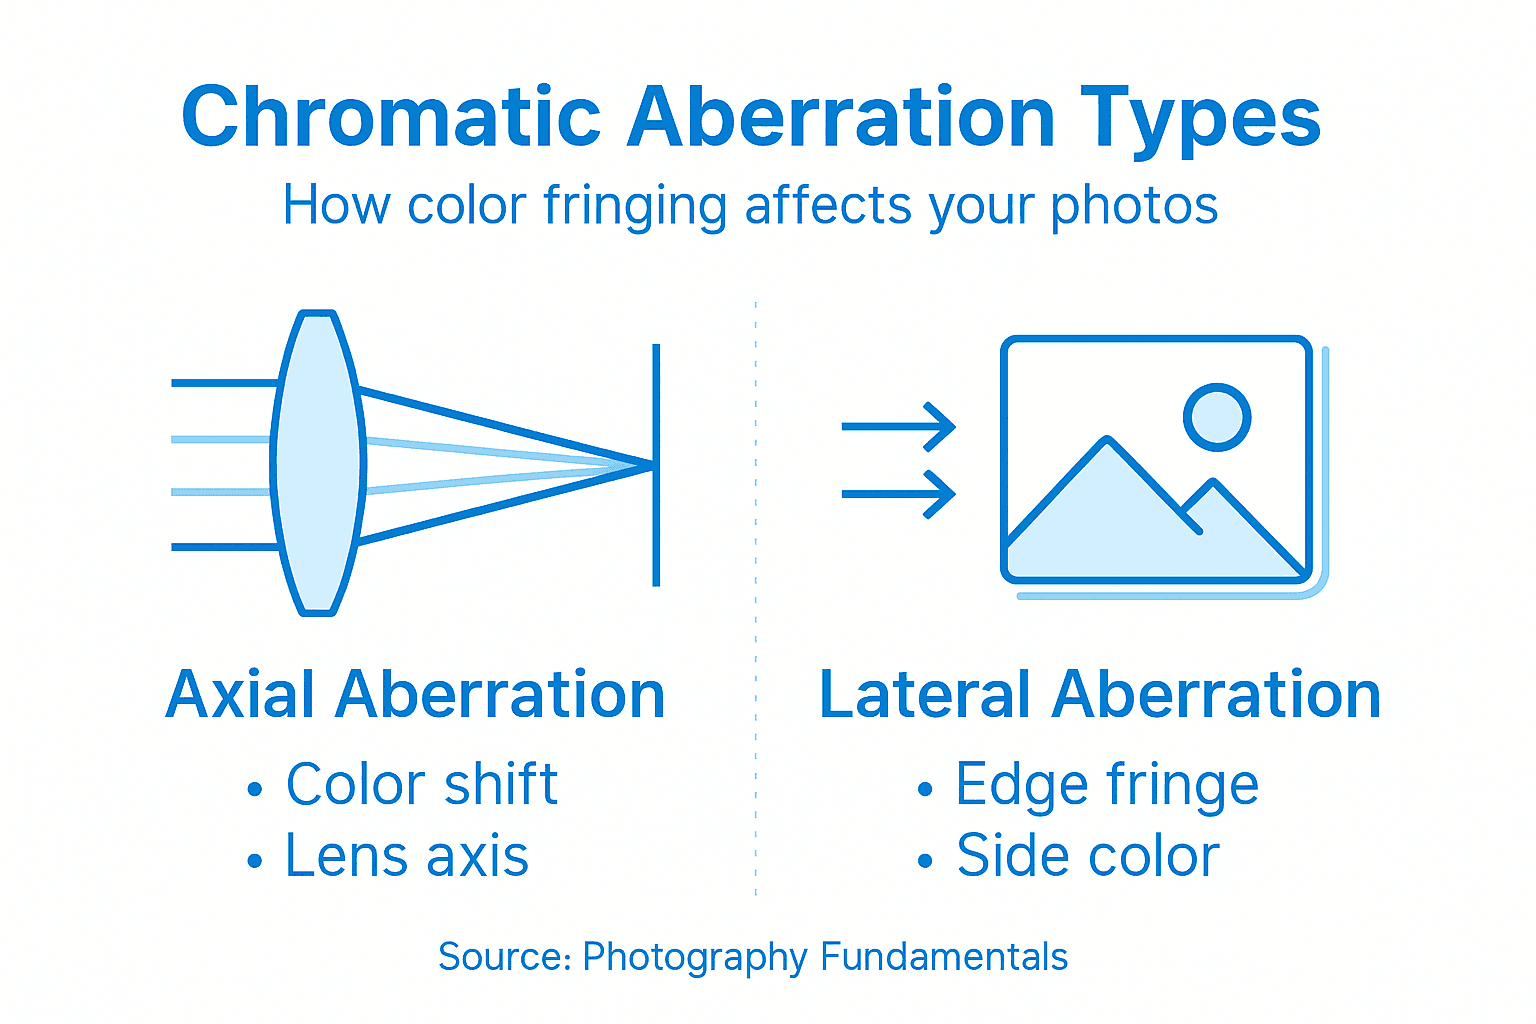
- Axial (Longitudinal) Chromatic Aberration: Colors focus at different distances from the lens, causing color bleeding across the entire image
- Transverse (Lateral) Chromatic Aberration: Colors are displaced sideways, creating colored fringes along high-contrast boundaries
While chromatic aberration might sound complex, its visual impact is quite straightforward. Imagine taking a landscape photograph with sharp tree branches against a bright sky – you might notice purple or green outlines around those branch edges. Those colored fringes are classic signs of chromatic aberration working its optical magic.
Chromatic aberration transforms crisp images into slightly blurred, color-frayed representations of what your eye originally saw.
Interestingly, chromatic aberration is more pronounced in certain scenarios, particularly when using wide-angle lenses or shooting high-contrast scenes. Lens distortion dynamics play a significant role in determining how dramatically this optical phenomenon will manifest in your photographs.
Pro tip: To minimize chromatic aberration, choose high-quality lenses with special low-dispersion glass elements and avoid shooting at your lens’s maximum aperture.
Main Types: Axial Versus Lateral Aberration
Chromatic aberration isn’t a one-size-fits-all optical phenomenon. Photography enthusiasts need to understand the nuanced differences between axial and lateral chromatic aberration to effectively diagnose and address image quality issues.
In axial (longitudinal) chromatic aberration, different wavelengths of light converge at different distances along the lens’s optical axis. This means red, green, and blue light will actually focus at slightly different points behind the lens. The result? A somewhat blurry image where color fringing appears not just at edges, but potentially across the entire photograph.
Key characteristics of axial chromatic aberration include:
- Colors appear to bleed and spread throughout the image
- Most noticeable in areas of high contrast
- Typically more prevalent in longer focal length lenses
- Can be partially mitigated by adjusting lens aperture
Lateral (transverse) chromatic aberration operates differently. Instead of colors focusing at different distances, this type causes colors to be displaced sideways at the image plane. Imagine color edges being stretched horizontally or vertically, creating distinct colored outlines along high-contrast boundaries.
Lateral chromatic aberration transforms sharp edges into rainbow-like color fringes, disrupting the image’s intended crispness.
Unlike axial aberration, lateral chromatic aberration remains consistent regardless of aperture settings. This makes it particularly challenging to correct during shooting. White balance techniques can help minimize some color distortions, but they won’t completely eliminate lateral chromatic aberration.
Photographers can differentiate between these types by observing specific image characteristics:
- Axial aberration shows color bleeding across the entire image
- Lateral aberration displays colored fringes only at image edges
- Axial aberration changes with aperture adjustments
- Lateral aberration remains consistent across different aperture settings
Pro tip: Use manual lens correction tools in post-processing software to specifically target and reduce both axial and lateral chromatic aberration effects.
Here’s a concise comparison of axial and lateral chromatic aberration effects:
| Aberration Type | Image Impact | Correction Difficulty | Best Mitigation |
|---|---|---|---|
| Axial (Longitudinal) | Blurred image, color bleed | Easier (via aperture settings) | Stop down aperture |
| Lateral (Transverse) | Fringes along edges | Harder (needs post-processing) | Use software correction tools |
How Chromatic Aberration Affects Images
Chromatic aberration transforms photographs from crisp, professional-looking images into visually compromised compositions. This optical phenomenon creates subtle yet significant visual distortions that can dramatically reduce the perceived quality and accuracy of photographic work.

The most immediate and noticeable impact of chromatic aberration is color fringing. When light passes through a camera lens, different wavelengths fail to converge perfectly, resulting in colored halos or outlines around high-contrast edges. These unintended color boundaries appear most prominently in areas with sharp transitions between light and dark regions.
Key visual effects of chromatic aberration include:
- Colored edges around object boundaries
- Reduced overall image sharpness
- Loss of fine detail in high-contrast areas
- Decreased color accuracy and fidelity
- Visible color bleeding across image regions
Professional photographers recognize that chromatic aberration can significantly compromise image quality, especially in scenarios requiring precise color reproduction. Landscape and architectural photography suffer most, where crisp edges and color accuracy are paramount. Color grading techniques can help mitigate some post-production color inconsistencies, but they cannot fully correct optical aberrations.
Chromatic aberration transforms sharp photographic details into blurry, color-shifted representations that deviate from the scene’s actual visual characteristics.
Some photographic genres experience more pronounced chromatic aberration effects:
- Landscape photography with high-contrast scenes
- Architectural photography featuring sharp structural lines
- Macro photography with intricate details
- Astrophotography involving bright celestial objects
Technical image quality metrics demonstrate how chromatic aberration reduces spatial resolution and introduces unwanted color distortions. The phenomenon can decrease image sharpness by creating artificial color boundaries that fragment visual information.
Pro tip: Invest in high-quality lenses with low-dispersion glass elements to minimize chromatic aberration and maintain superior image clarity.
Common Causes And When It Occurs
Chromatic aberration isn’t random – it’s a predictable optical phenomenon rooted in fundamental physics of light and lens design. Understanding its core causes helps photographers anticipate and mitigate this image-degrading effect before it compromises their visual storytelling.
Lens Material Dispersion represents the primary culprit behind chromatic aberration. Different wavelengths of light travel at varying speeds through optical glass, causing colors to bend and focus at slightly different points. Cheaper lens materials with less sophisticated glass compositions exacerbate this problem, creating more pronounced color fringing.
Key scenarios that trigger chromatic aberration include:
- Wide-angle lens configurations
- High-contrast scenes with sharp light transitions
- Shooting at maximum lens aperture
- Photographing bright objects against dark backgrounds
- Using older or budget-friendly lens designs
- Capturing images with intricate, high-detail elements
The physical properties of lens glass directly impact chromatic aberration intensity. Optical glass quality determines how effectively different wavelengths can be controlled and focused. Lens manufacturers combat this issue by using specialized low-dispersion glass elements that minimize color separation.
Chromatic aberration is less about equipment failure and more about the inherent challenges of manipulating light through optical systems.
Photographic conditions most prone to chromatic aberration involve specific technical characteristics:
- Shooting scenarios with extreme light contrast
- Using lenses with larger focal lengths
- Capturing images at wide-open aperture settings
- Photographing reflective or highly detailed surfaces
Color grading techniques can help minimize some post-production color inconsistencies, but they cannot completely eliminate optical aberrations caused by lens physics.
Pro tip: Invest in professional-grade lenses with extra-low dispersion (ED) glass to significantly reduce chromatic aberration and improve overall image quality.
Practical Solutions And Prevention Methods
Addressing chromatic aberration requires a multi-pronged approach that combines strategic shooting techniques and intelligent post-processing interventions. Photographers can dramatically reduce color fringing through careful equipment selection and technical adjustments.
Optical Prevention starts with selecting the right equipment. High-quality lenses featuring extra-low dispersion (ED) glass or apochromatic lens designs inherently minimize chromatic aberration. These specialized lenses use advanced glass combinations that more effectively manage light wavelengths, reducing color separation at the image’s edges.
Key strategies for preventing chromatic aberration include:
- Avoid shooting at maximum lens aperture
- Use prime lenses with fewer glass elements
- Select lenses with specialized low-dispersion glass
- Stop down the aperture to increase depth of field
- Minimize shooting in high-contrast lighting conditions
- Center primary subjects to reduce edge distortions
Digital correction techniques offer powerful post-processing solutions. Color grading techniques can help mitigate some color inconsistencies, allowing photographers to fine-tune images after capture. Modern editing software provides sophisticated tools for detecting and removing chromatic aberration automatically.
Technological advancements have transformed chromatic aberration from an unavoidable optical limitation to a manageable photographic challenge.
Post-processing correction methods involve several precise interventions:
- Use automatic lens correction profiles
- Manually adjust color channel alignment
- Apply selective color fringe removal
- Utilize advanced computational image warping techniques
Understanding your specific lens characteristics becomes crucial. Different lenses exhibit unique chromatic aberration patterns, making it essential to learn your equipment’s particular optical behaviors.
Pro tip: Develop a habit of shooting test images at various apertures to understand your specific lens’s chromatic aberration characteristics and develop personalized correction strategies.
To help photographers choose the best approach, here’s a summary of practical prevention and correction methods:
| Solution Type | Technique | Ideal Situation | Benefit |
|---|---|---|---|
| Optical | Use ED glass lenses | During shooting | Minimize aberration naturally |
| Shooting Technique | Avoid max apertures | Scenes with high contrast | Reduce color fringing |
| Post-processing | Lens correction tools | After image capture | Remove fringes digitally |
| Equipment Choice | Prime lenses | Detailed subjects | Less optical distortion |
Master Your Photos by Tackling Chromatic Aberration Today
Chromatic aberration can blur your vision of perfect images and leave unwanted color fringes that steal the sharpness you crave. If you are frustrated by those purple or green outlines ruining your shots and want to truly understand how to reduce this optical challenge, our Amateur Photographer Guide is here to help. Learn practical tips on lens selection, shooting techniques, and post-processing methods that empower you to regain control and enhance your photography skills.

Start improving your images now by exploring expert advice on shooting tips and discovering camera buying guides to find lenses that minimize chromatic aberration naturally. Don’t wait for your photos to fall short of your creative vision. Visit Amateur Photographer Guide and take the next step toward sharper, cleaner, and more professional-looking pictures.
Frequently Asked Questions
What is chromatic aberration in photography?
Chromatic aberration is an optical phenomenon that occurs when a camera lens fails to focus all colors of light onto the same convergence point, resulting in color fringing and blurred edges in photographs.
What are the types of chromatic aberration?
The two primary types are axial (longitudinal) chromatic aberration, where colors focus at different distances, and transverse (lateral) chromatic aberration, where colors are displaced sideways, creating colored fringes along high-contrast edges.
How does chromatic aberration affect image quality?
Chromatic aberration decreases image sharpness, reduces fine detail in high-contrast areas, and can produce noticeable color fringing, which ultimately compromises the overall quality and accuracy of photographs.
What can be done to minimize chromatic aberration when shooting?
To minimize chromatic aberration, use high-quality lenses with low-dispersion glass, avoid shooting at maximum aperture, and stop down the aperture when possible.
Recommended
- Lens Distortion: How It Shapes Your Photos – Amateur Photographer Guide
- What is Color Grading and Why Photographers Need It
- What is Color Grading and Why Photographers Need It
- Color Profile Basics: Enhancing Image Accuracy – Amateur Photographer Guide
- Οδηγός φωτογραφικού μακιγιάζ: Τεχνικές και λάθη – MakeUp Closet