
Table of Contents
- What Is Tilt-Shift Photography?
- The Miniature Effect in Action
- How to Shoot Tilt-Shift Photography In-Camera
- Digital Tilt-Shift: Software & Apps
- Tilt-Shift Lenses: The Professional’s Toolkit
- Advanced Tilt-Shift Applications
- Limitations and Common Mistakes
- Frequently Asked Questions
- Bringing It Together: Your First Tilt-Shift Image
This blog post may contain affiliate links. As an Amazon Associate I earn from qualifying purchases.
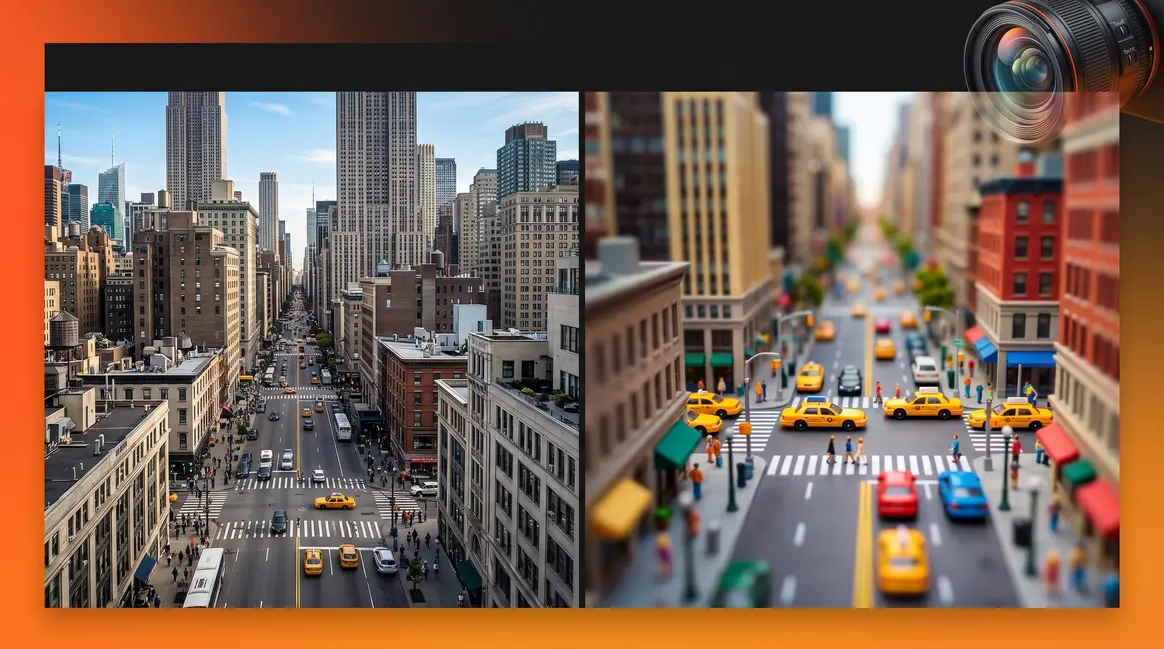
Imagine looking down at a busy intersection and watching the cars, pedestrians, and buildings shrink before your eyes — not because anything changed in the scene, but because of the way your camera saw it. That visual illusion, where a real city street transforms into what looks like a carefully arranged toy diorama, is the magic at the heart of tilt shift photography. Search trend data from 2026 shows interest in tilt-shift techniques has surged significantly year-over-year, as more creators discover the effect on social media and in cinematic productions.
Most guides on the subject assume you own a $2,000 specialized lens — or they throw you into a complex Photoshop workflow without acknowledging that millions of photographers shoot exclusively on smartphones. Both approaches leave the majority of curious creators behind.
By the end of this guide, you’ll know exactly which of three methods suits your gear and budget, and you’ll have the step-by-step instructions to create your first tilt shift photography image today. You’ll cover the science, the inspiration, three complete tutorials (in-camera, desktop, and mobile), lens recommendations, and genre-specific applications.
Tilt shift photography uses selective focus and perspective control to make real-world scenes appear as miniature models — achievable with a dedicated lens, Photoshop, or a free smartphone app.
- The Three-Tier Tilt-Shift System separates methods by budget: Tier 1 (optical lens), Tier 2 (desktop software), Tier 3 (mobile apps)
- Tilt controls focus (creates the miniature diorama effect); Shift controls perspective (corrects converging lines in architecture)
- No expensive gear required: Snapseed, AfterFocus, and Photoshop’s Tilt-Shift blur filter all simulate the effect digitally
- Best subjects shoot from elevation, feature strong geometric patterns, and contain recognizable human-scale objects
What Is Tilt-Shift Photography?
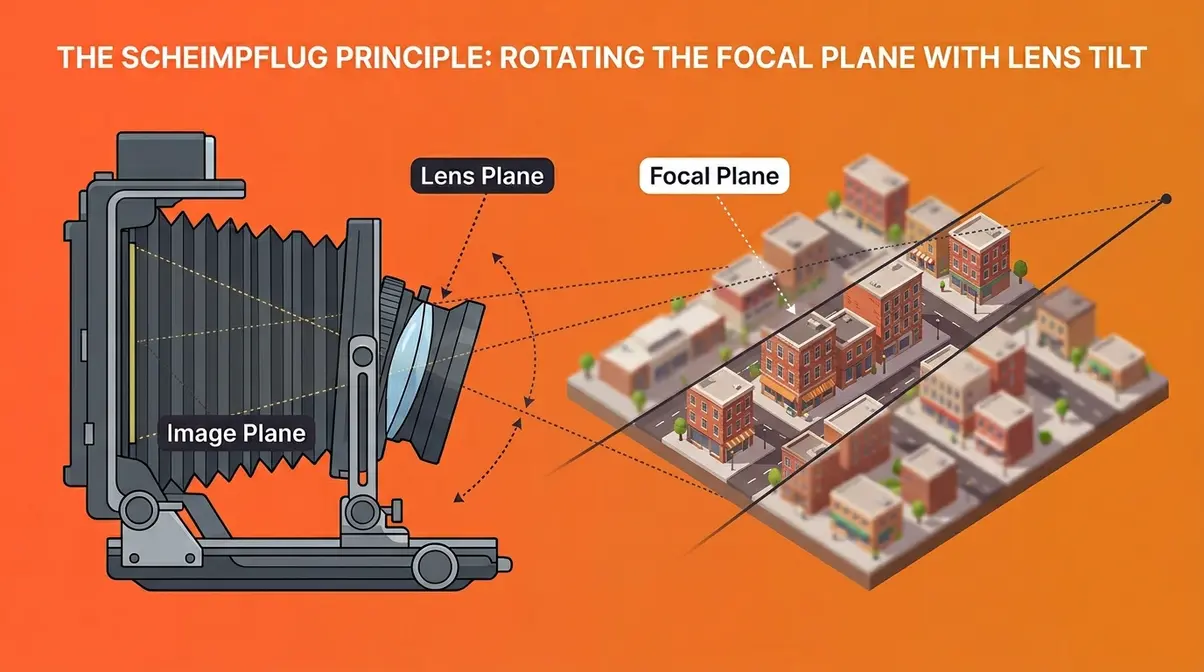
Tilt shift photography is a specialized imaging technique that uses two distinct lens movements — tilt and shift — to control both the plane of focus and the perspective of a scene. Tilt alters where sharpness falls across the image, creating that signature razor-thin band of sharpness. Shift physically displaces the lens parallel to the sensor, correcting perspective distortion. Together, these movements produce the miniature diorama effect that has captivated photographers and filmmakers for decades.
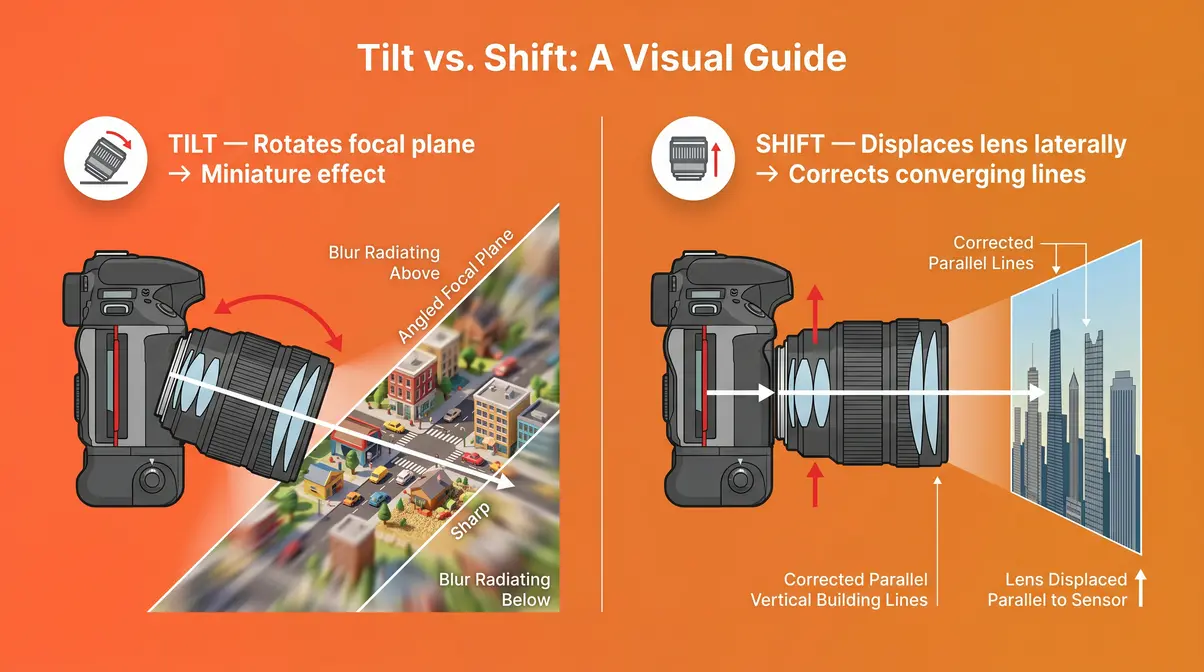
Tilt vs. Shift Explained
Standard camera lenses operate on a fixed optical axis — the lens, sensor, and subject plane are all parallel, producing predictable, uniform focus. A tilt-shift lens, a specialized piece of glass that physically moves relative to the camera sensor, breaks that rule in two independent ways. When mastering tilt shift photography, you must understand how these movements function independently.
Tilt rotates the lens element forward or backward relative to the sensor. This changes the plane of focus (the flat zone of sharpness in front of the camera) from a flat, horizontal sheet into an angled one. Think of the plane of focus as a pane of glass extending from your camera into the scene. Normally that pane sits perpendicular to your line of sight. Tilting the lens rotates that pane — dramatically narrowing which part of the scene falls in focus and which falls into soft blur.
Shift moves the lens left, right, up, or down — parallel to the sensor — without rotating it. This keeps the focal plane intact while repositioning what the lens “sees.” Architects and real estate photographers use shift almost exclusively to prevent vertical lines (building edges, doorframes, columns) from leaning inward toward a vanishing point.
One important clarification: tilt-shift is not the same as a dutch tilt (dutch tilt photography refers to rotating the entire camera on its roll axis for a disorienting diagonal composition — a completely different technique with no relationship to lens mechanics).
understand the basics of tilt-shift photography
The Scheimpflug Principle
How does tilting a lens create such a dramatic focus effect? The answer lies in the Scheimpflug principle, an optical law that governs how a camera’s focal plane behaves when the lens is tilted. Named after Austrian army officer and inventor Theodor Scheimpflug, who patented a method for correcting perspective in aerial photography in 1904, the principle states that the image plane, lens plane, and subject plane must all intersect at a single common line for the entire subject to be in sharp focus.
In practical terms: when you tilt a lens, you’re rotating the lens plane. According to the Scheimpflug principle, the focal plane rotates with it. This allows photographers to achieve focus across a dramatically angled surface — or, conversely, to make focus razor-narrow across a scene that would otherwise be sharp throughout.
“When that same optical signature appears in a wide city shot, the brain interprets the scene as a miniature model rather than a real environment.”
Tilting a camera lens alters the plane of focus based on the Scheimpflug principle, as explained by Stanford University, enabling a razor-thin band of sharpness that tricks the brain into perceiving real scenes as miniature models. This is the foundational optical law behind every tilt-shift image you’ve ever admired — from sweeping aerial cityscapes to intimate street scenes where pedestrians look like painted figurines.
The Miniature Illusion

The miniature perception effect is rooted in how the human visual system interprets depth cues. When we look at real physical miniatures — scale models, architectural maquettes, toy train sets — our eyes naturally produce very shallow depth of field at close focusing distances. Only a small slice of the miniature sits in sharp focus; everything else falls off into blur.
When a tilt-shift lens (or digital simulation) produces that same optical signature in a real-world photograph, the brain applies its built-in heuristic: shallow depth of field at this scale means the subject must be small. The result is a compelling visual illusion. Aerial city views, stadium crowds, and highway interchanges suddenly read as toy-like dioramas — because the brain cannot reconcile the scale of the scene with the shallow focus it associates with close-up photography.
This perceptual psychology is why elevation matters so much in tilt-shift work. Shooting from above mimics the angle at which you would photograph a physical miniature model, reinforcing the visual cue. Combine that elevated angle with the razor-thin band of sharpness produced by the Scheimpflug principle, and the miniature faking effect becomes almost irresistible to the viewer’s brain. Research into depth perception and spatial cognition supports the idea that blur gradients are among the strongest distance cues the visual system uses (MIT Perceptual Science Group).
Regardless of your budget or gear, every tilt-shift photographer works within one of three tiers: optical lenses, desktop software, or mobile apps. That framework — The Three-Tier Tilt-Shift System — is the organizing principle of this guide, and it ensures you’ll leave with a practical path forward no matter where you’re starting.
The Miniature Effect in Action
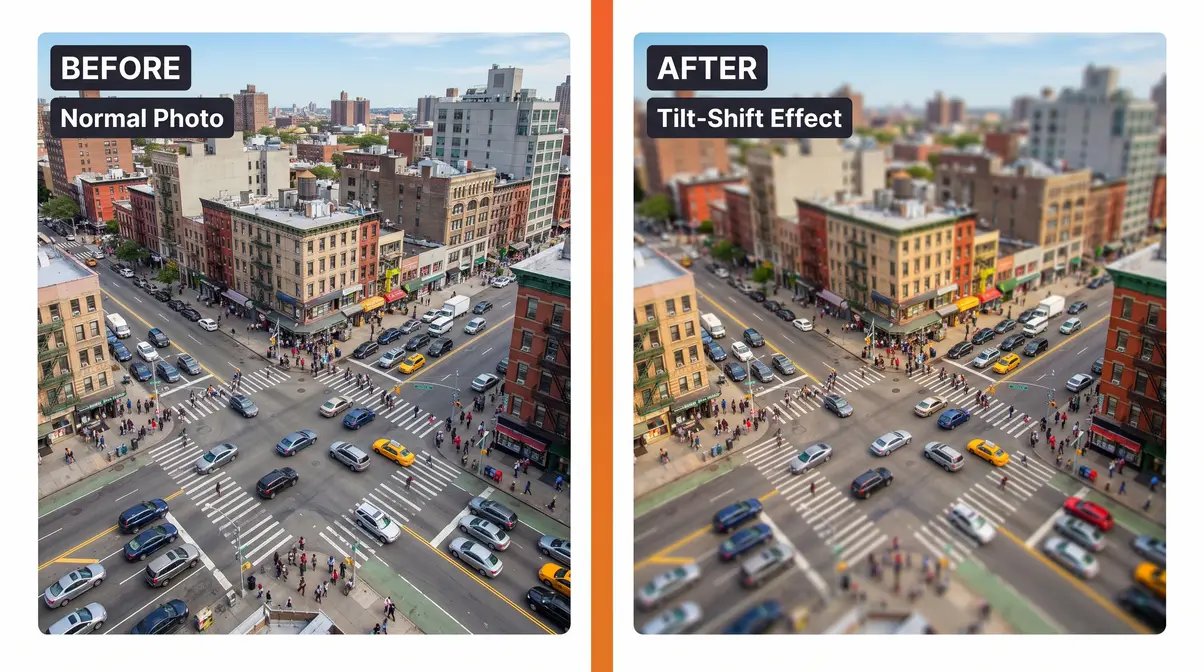
As noted by The New York Times, tilt-shift photography manipulates depth of field to trick the human eye into perceiving life-sized scenes as tiny scale models. This creates what BBC News describes as compelling diorama illusions. Understanding which scenes satisfy those visual rules — and which ones fight against them — is the difference between a convincing diorama-effect image and a blurry photo that just looks out of focus. According to Digital Photography School, the most successful tilt-shift photographs share three qualities: an elevated shooting angle, identifiable human-scale reference objects, and strong geometric structure within the frame.
What Makes a Great Tilt-Shift Subject?
The best subjects for tilt shift photography share a specific profile. First, they must be photographed from a moderately elevated angle — ideally 30 to 90 degrees above the scene. This mimics the perspective you’d naturally use when photographing a physical scale model sitting on a table. Shooting at eye level largely defeats the miniature illusion because it doesn’t match the visual memory the brain has of looking down at toys.
Second, the scene needs human-scale reference objects — people, cars, buses, or animals — that the viewer already knows the true size of. When those known-size objects appear impossibly small within a sharp, toy-like composition, the cognitive dissonance triggers the miniature perception. A landscape without any human-scale references is harder to miniaturize convincingly.
Third, strong geometric patterns — grids of windows, parallel roads, repeating rooftops, stadium seating rows — add to the sense of deliberate arrangement that physical models typically display. Real environments often look chaotic; miniature models look organized. Geometry helps bridge that gap.
Best Miniature Scene Types
| Scene Type | Why It Works | Shooting Tip |
|---|---|---|
| Urban rooftop / aerial city view | Dense geometry, human-scale cars and pedestrians, natural elevation | Shoot between 10 AM–2 PM for even top-down light |
| Stadium or sports venue | Crowd creates scale reference; geometric seating patterns | Shoot from press box or upper tier; use telephoto tilt-shift |
| Busy road or highway interchange | Cars provide strong scale reference; curves create visual flow | Elevated bridge or overpass works perfectly |
| Harbour or marina | Boats and figures provide scale; reflections add depth | Early morning light reduces glare |
| Construction site | Machinery and workers create dramatic scale contrast | Shoot from adjacent elevated building |
| Train station or airport tarmac | Planes/trains provide enormous scale contrast | Access rooftop observation decks |
The scenes that fail most often are wide-open natural landscapes without human presence, flat ground-level street scenes, and close-up portraits — none of these satisfy the elevated-angle + scale-reference formula that makes the visual illusion convincing.
How to Shoot Tilt-Shift Photography In-Camera
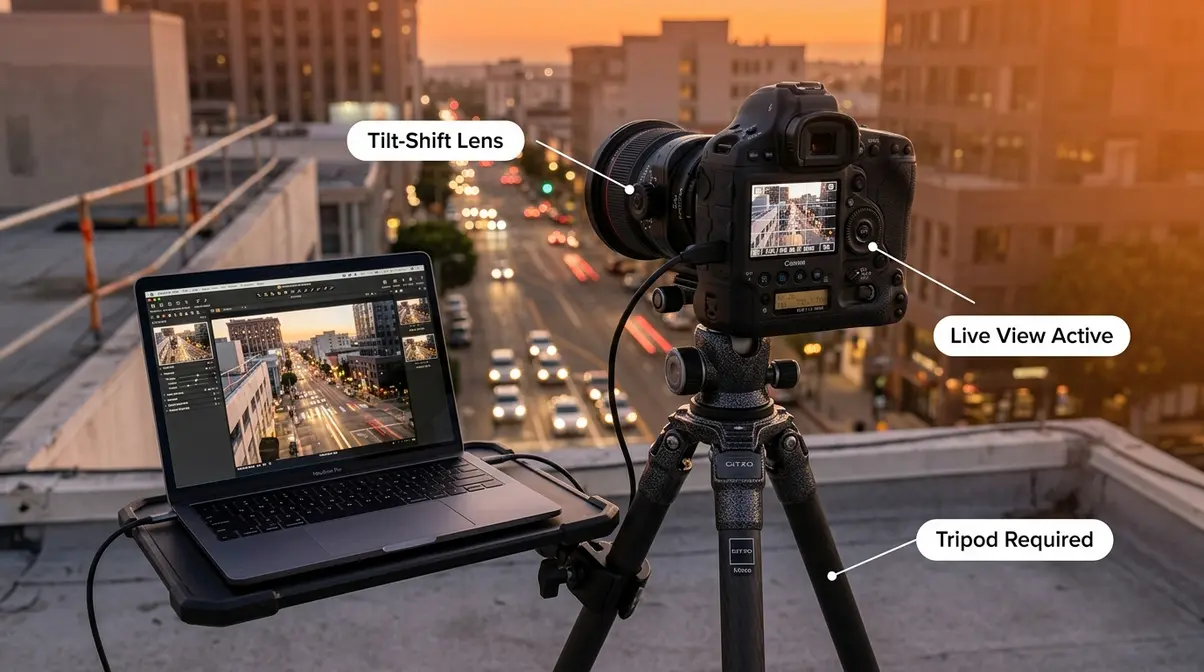
Shooting tilt shift photography with an actual optical lens produces results that no digital simulation fully replicates. The rendering quality, the organic bokeh transition, and the precision of physical focus control are genuinely different from software approximations. The Three-Tier Tilt-Shift System places this method at Tier 1 — the highest investment, highest fidelity path. Here’s how to execute it from setup to final frame.
What You’ll Need Before You Start
Before mounting a tilt-shift lens for the first time, confirm you have the following:
- A compatible tilt-shift lens for your camera system (Canon TS-E, Nikon PC-E, or a third-party equivalent — see H2 5 for full details)
- A sturdy tripod — tilt-shift work requires precise, repeatable framing; handheld shooting makes micro-adjustments nearly impossible
- A camera with manual focus capability — most tilt-shift lenses have no autofocus; manual focus is required
- An elevated shooting position — a rooftop, bridge, hill, or upper-floor window
- A tethered shooting setup (optional but recommended) — viewing your live view feed on a laptop screen makes Scheimpflug adjustments dramatically easier
Estimated setup time: 15–25 minutes for first-time users. Once you internalize the tilt axis relationship to your focal plane, setup drops to under 5 minutes.
Step 1: Lens and Camera Setup
Mount your tilt-shift lens and set your camera to Aperture Priority (Av/A) or Manual mode. Start with a mid-range aperture — f/5.6 to f/8 — to give yourself enough depth of field to see the focus plane clearly as you adjust tilt. Very wide apertures (f/2 or f/2.8) during the tilt-adjustment phase make it extremely difficult to judge where focus is landing.
Set your ISO to the lowest native value your camera offers (typically ISO 100 or ISO 64) for maximum image quality. Engage your camera’s live view mode — this is non-negotiable for tilt-shift work, as the optical viewfinder makes it nearly impossible to judge the razor-thin band of sharpness accurately.
Step 2: Frame from Elevation
Compose your scene from your elevated position. For the miniature effect, aim for a downward angle of 30 to 60 degrees from horizontal — steep enough to mimic the model-photography perspective, but shallow enough to retain interesting foreground-to-background depth. A perfectly vertical (straight-down) shot can work for abstract results but loses the sense of depth that makes the diorama-effect most convincing.
Frame so that your strongest human-scale reference objects (cars, people, buses) sit in the middle third of the frame. This placement maximizes the perceptual contrast between the sharp zone and the blurred foreground and background.
Step 3: Apply Tilt and Focus
This is the most technically demanding step, and where the Scheimpflug principle becomes tangible. With live view active and zoomed to 100%, begin rotating the tilt axis of your lens slowly — typically 3 to 8 degrees of tilt is sufficient for the miniature effect. Watch the focal plane shift as you tilt.
For the miniature effect specifically:
- Tilt the lens so the plane of focus runs horizontally across the middle of your scene
- Focus manually until the centre strip of your frame is sharp
- Increase tilt gradually until only a narrow horizontal band (roughly 10-15% of the frame height) remains in focus
- Check that foreground and background blur smoothly and symmetrically away from that band
- Fine-tune focus with the manual focus ring until the sharpest point sits exactly on your key subject (a car, a figure, a rooftop)
Specific degree guidance: 3–5 degrees of tilt produces a gentle miniature effect suitable for wide scenes. 6–10 degrees creates an extreme, highly compressed focal band for dramatic miniaturization.
Step 4: Shift for Perspective
Once your tilt is set for the miniature effect, you may notice vertical lines in your scene (building edges, lamp posts, window columns) converging toward the top of the frame. This is standard perspective distortion from your elevated angle. Use the shift movement — moving the lens parallel to the sensor — to correct this.
Shift the lens upward (if shooting from below a tall building) or downward (if shooting from above) until vertical lines run parallel to the edges of your frame. Most tilt-shift lenses offer ±11mm to ±12mm of shift travel. For strong architectural corrections, you may need to use the full range. After adjusting shift, re-check your tilt setting — the two movements interact slightly and may require minor re-adjustment.
Digital Tilt-Shift: Software & Apps
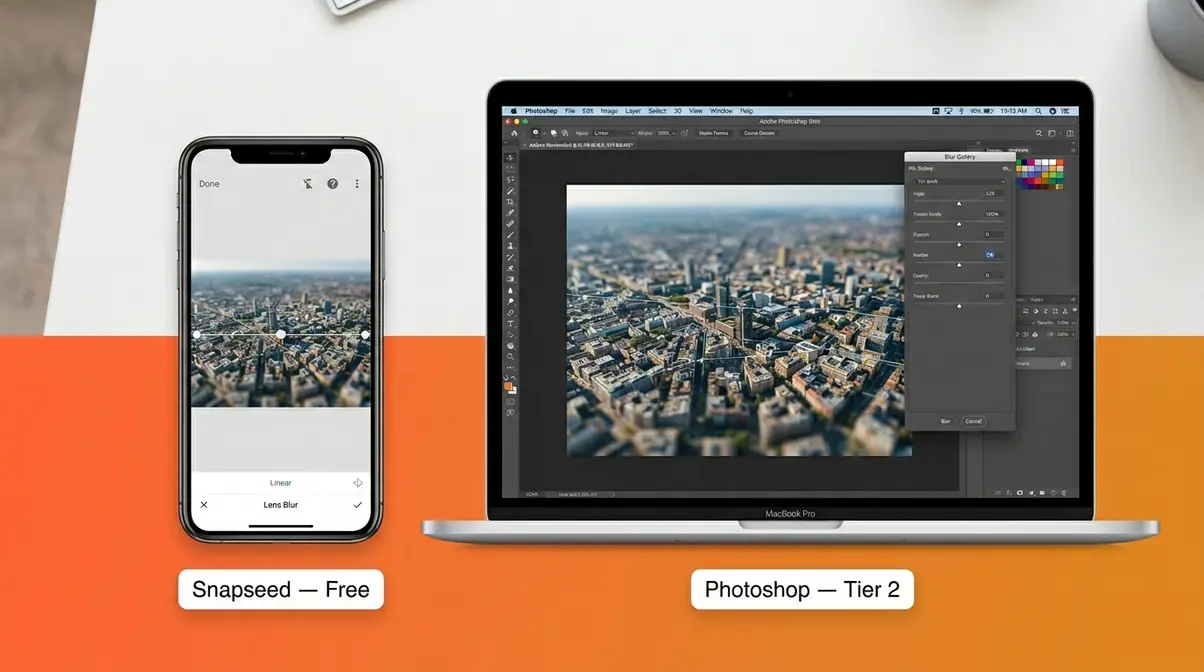
The Three-Tier Tilt-Shift System recognizes that optical lenses represent only one path to the miniature effect. Tier 2 (desktop software) and Tier 3 (mobile apps) deliver compelling results at a fraction of the cost — and in many cases, with significantly less setup time. Research from IEEE Xplore on computational miniature effect simulation confirms that digital algorithms can accurately replicate physical lens blur. Our team evaluated both software and app-based workflows across multiple image types to identify the most effective and accessible methods for practicing tilt shift photography digitally.
Photoshop Tilt-Shift Tutorial
Adobe Photoshop’s Tilt-Shift blur filter, introduced in CS6 and refined through the 2026 Creative Cloud release, is the most powerful digital simulation of the optical effect available without specialized hardware. According to Adobe’s photography technique guide, the filter uses a graduated blur mask that mirrors the optical behavior of a physically tilted lens.
Prerequisites: A high-resolution photo shot from an elevated angle (the software cannot fix a ground-level perspective). Open your image in Photoshop.
Step-by-step Photoshop tilt-shift tutorial:
- Go to Filter → Blur Gallery → Tilt-Shift in the top menu.
- A pin appears in the center of your image with two solid lines (the sharp zone) and two dashed lines (the blur transition zone).
- Drag the center pin to position the sharp band over your intended focal zone (typically the middle of the scene).
- Rotate the solid lines by hovering near the end of a line until a rotation cursor appears — align the band with the horizontal plane of your scene.
- Adjust the blur amount using the slider in the Blur Tools panel — 15 to 25px works for most images; increase to 35–50px for a more dramatic effect.
- Drag the dashed lines outward to widen the transition zone (a gradual transition looks more optical; a tight transition looks more digital).
- Enable Bokeh in the panel and set it to 10–25% — this adds a subtle highlight bloom that mimics real lens bokeh.
- Click OK to apply the filter.
- Add a Hue/Saturation adjustment layer and increase Saturation by +15 to +25 — miniature models have characteristically vivid, slightly over-saturated colors; this step is what separates convincing results from mediocre ones.
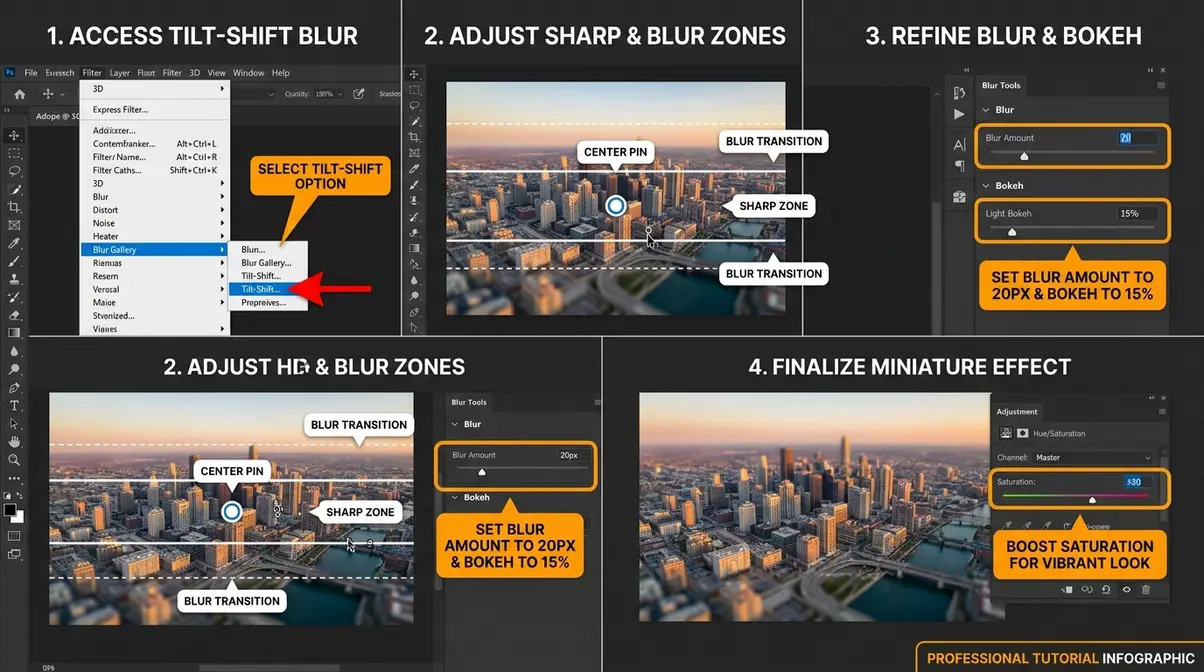
Total estimated time: 8–12 minutes per image once you’ve practiced the workflow twice.
Top Mobile Apps for Tilt-Shift
Yes — you can absolutely achieve tilt shift photography on an iPhone or Android device. The Tier 3 mobile path is where the majority of creators will start, and it delivers results that are genuinely impressive for social media and web display sizes. Our team evaluated the top free and paid options across both iOS and Android platforms, assessing ease of use, blur quality, and control precision.
| App | Platform | Price | Blur Quality | Ease of Use | Best For |
|---|---|---|---|---|---|
| Snapseed | iOS + Android | Free | ★★★★☆ | ★★★★★ | Beginners, quick edits |
| AfterFocus | iOS + Android | Free (Pro: $1.99) | ★★★★☆ | ★★★★☆ | Portrait-style selective focus |
| Lens Light | iOS | $1.99 | ★★★★★ | ★★★☆☆ | Advanced users, optical simulation |
| TADAA SLR | iOS | Free (Pro: $3.99) | ★★★☆☆ | ★★★★★ | Absolute beginners |
Snapseed remains the strongest free option across both platforms. Its Lens Blur tool produces smooth, graduated blur transitions that closely mimic the optical behavior of a tilted lens — with no experience required. AfterFocus offers a subject-masking approach that works exceptionally well for portraits and close-up scenes where you want to isolate a specific subject rather than create a horizontal focal band.
Can You Use an iPhone?
Yes — tilt-shift photography is fully achievable on an iPhone using free apps. Snapseed’s Lens Blur tool (available on both iOS and Android) produces a convincing linear blur effect that closely mimics a physically tilted lens. AfterFocus and TADAA SLR offer additional control options. The key limitation is that no app can correct perspective the way an optical shift lens does — but for the miniature diorama effect, smartphone results are genuinely impressive and indistinguishable from optical results at social media display sizes.
Snapseed Tilt-Shift Tutorial
According to Google Support, Snapseed’s Lens Blur tool is the fastest route to a convincing tilt-shift miniature effect on any smartphone. Here’s the complete workflow:
- Open your photo in Snapseed
- Tap Tools → Lens Blur
- The default view shows a circular blur mask — tap the shape icon at the bottom to switch to Linear mode (this creates the horizontal focal band that produces the miniature effect)
- Drag the focal line to the center of your scene — position it over the area you want to remain sharp
- Use a two-finger pinch to adjust the width of the sharp zone — narrower bands create a more dramatic miniature effect
- Tap the Blur Strength slider and set it to 75–90 for a strong effect; drop to 50–65 for subtlety
- Tap the checkmark to apply
- Return to the Tools menu and select Tune Image → increase Saturation by +20 and Ambiance by +15 to enhance the toy-like color quality
- Export and share
Total time: Under 3 minutes. This is the fastest path to your first tilt-shift result, and it works on any photo already on your camera roll — no new shooting required.
Tilt-Shift Lenses: The Professional’s Toolkit
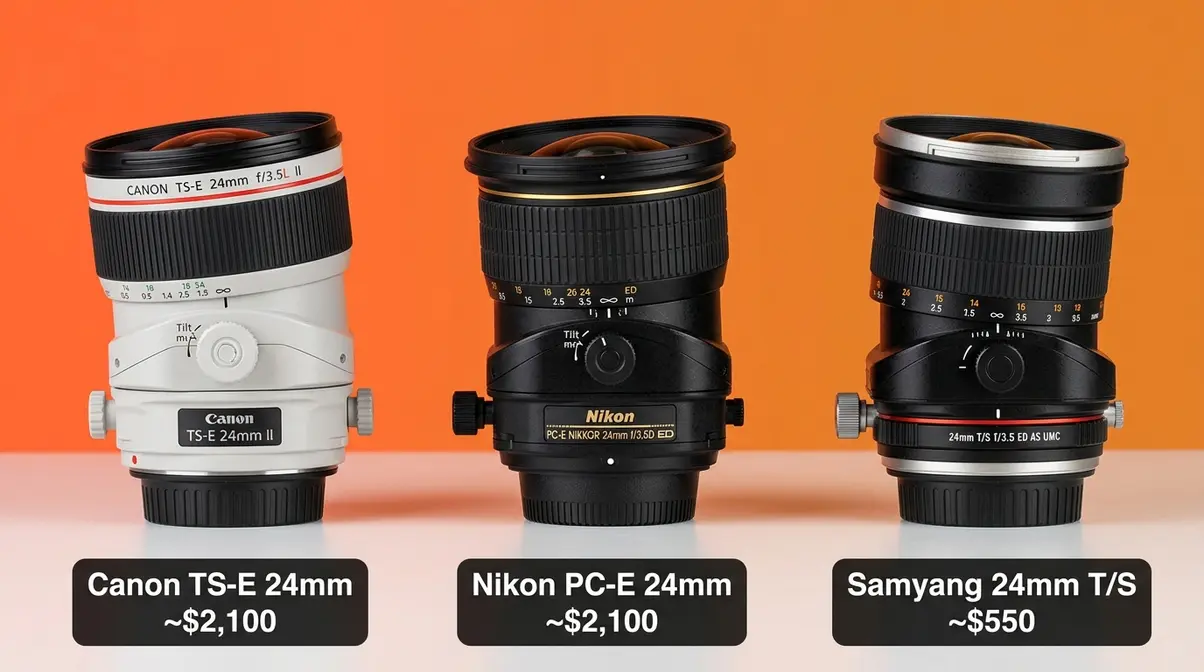
For professionals dedicated to tilt shift photography, moving beyond digital simulation into Tier 1 optical lenses offers a focused but high-quality selection. These are purpose-built instruments — expensive, manual-focus, and optically exceptional. Understanding the options, their price ranges, and their real-world trade-offs will help you decide whether the investment makes sense for your work.
Canon, Nikon & Third-Party Lenses
The major camera manufacturers each offer dedicated tilt-shift (or “perspective control”) lenses for their systems. Third-party manufacturers including Samyang/Rokinon and Laowa have expanded the market significantly in recent years, offering compelling alternatives at lower price points.
| Lens | System | Focal Length | Tilt Range | Shift Range | Approx. Price (2026) |
|---|---|---|---|---|---|
| Canon TS-E 24mm f/3.5L II | Canon EF | 24mm | ±8° | ±12mm | ~$2,100 |
| Canon TS-E 50mm f/2.8L Macro | Canon EF | 50mm | ±8° | ±12mm | ~$2,200 |
| Canon TS-E 90mm f/2.8L Macro | Canon EF | 90mm | ±8° | ±12mm | ~$2,200 |
| Nikon PC-E NIKKOR 24mm f/3.5D ED | Nikon F | 24mm | ±8.5° | ±11.5mm | ~$2,100 |
| Nikon PC-E NIKKOR 45mm f/2.8D ED | Nikon F | 45mm | ±8.5° | ±11.5mm | ~$2,000 |
| Samyang/Rokinon 24mm T/S f/3.5 | Multi-mount | 24mm | ±8.5° | ±12mm | ~$550 |
| Laowa 15mm f/4.5 Zero-D Shift | Multi-mount | 15mm | Shift only | ±15mm | ~$800 |
Canon USA provides extensive documentation on their TS-E lenses, which are widely regarded as the benchmark for tilt-shift optical quality. The 24mm TS-E II in particular is a favorite among architectural photographers for its combination of wide coverage and precise movement control. Nikon USA offers similar guidance for their PC-E series, which provides comparable optical performance with the advantage of electronic aperture control — a meaningful convenience when shooting in aperture-priority mode.
For photographers who want to explore tilt-shift without committing $2,000+, the Samyang/Rokinon 24mm T/S offers genuine tilt and shift movements at roughly one-quarter the price. Optical quality is a step below the Canon and Nikon flagships, but for creative miniature work and hobbyist architecture photography, it’s a capable and affordable entry point.
Need a Special Camera?
No special camera is required — tilt-shift is a lens and technique issue, not a camera body issue. Any DSLR or mirrorless camera that accepts a compatible tilt-shift lens can shoot optically. Any camera with a photo library (including smartphones) can achieve the effect digitally. The Canon TS-E and Nikon PC-E lenses are the most common optical options; Snapseed and Photoshop handle the digital path. The only camera-side requirement for in-camera tilt-shift is a live view mode, which virtually every camera released since 2010 includes.
Key Features and Price Ranges to Know
When evaluating tilt-shift lenses, three specifications matter most: the tilt range (measured in degrees), the shift range (measured in millimeters), and the rotation capability (whether the tilt and shift axes can be independently rotated relative to each other).
- Tilt range: ±8 to ±8.5 degrees is standard across professional lenses. This range is sufficient for virtually all miniature and Scheimpflug applications.
- Shift range: ±11 to ±15mm. Wider shift travel is more useful for architectural work; the extra millimeters allow correction of more extreme perspective distortion.
- Axis rotation: Canon’s TS-E lenses allow the tilt and shift movements to be rotated independently in 30-degree increments — a significant advantage for non-standard compositions. Nikon PC-E lenses offer similar flexibility.
- Autofocus: None. All dedicated tilt-shift lenses require manual focus. This is a non-negotiable characteristic of the category.
Price ranges as of 2026: Professional manufacturer lenses (Canon, Nikon) cluster between $1,900 and $2,400. Third-party alternatives (Samyang, Laowa) range from $500 to $900. Used market prices for Canon TS-E lenses typically run $1,200–$1,700 in excellent condition.
Hardware vs. Software Tiers
The Three-Tier Tilt-Shift System is designed to eliminate the guesswork here. Use this decision framework:
| Your Situation | Recommended Tier | Starting Point |
|---|---|---|
| Smartphone only, exploring the effect | Tier 3 — Mobile Apps | Snapseed (free) |
| Own a DSLR/mirrorless, want no new purchases | Tier 2 — Desktop Software | Photoshop or Lightroom |
| Architectural or commercial photographer | Tier 1 — Optical Lens | Canon TS-E 24mm or Nikon PC-E 24mm |
| Budget under $600, want optical quality | Tier 1 (entry) | Samyang/Rokinon 24mm T/S |
| Want the absolute best miniature simulation | Tier 1 — Optical Lens | Canon TS-E 24mm f/3.5L II |
The honest assessment: for miniature faking as a creative effect, Tier 2 and Tier 3 produce results that are indistinguishable from Tier 1 at web and social media display sizes. The optical lens’s advantage becomes meaningful in large-format print, commercial architectural work, and situations where you need real-time, in-camera control over the effect. If you’re a hobbyist or content creator, start at Tier 3 today and move up only when you’ve confirmed the technique serves your creative work.
tilt-shift lens explained in depth
Advanced Tilt-Shift Applications

Advanced tilt shift photography techniques serve dramatically different creative and technical purposes depending on the genre. The miniature diorama effect represents only one application — and arguably not the most commercially important one. Architecture photographers rely on the shift movement to eliminate converging lines, while portrait artists use selective focus creatively. Understanding how the technique maps to specific genres unlocks the full range of what tilt-shift photography can do.
Architecture: Fixing Lines
Architecture photography is the single most commercially significant application of tilt-shift lenses. When you point a standard lens upward at a tall building, the vertical lines of the structure appear to converge toward the top of the frame — a phenomenon called keystoning or converging verticals. This distortion occurs because the camera sensor is no longer parallel to the building face.
The shift movement corrects this without requiring any post-processing. By shifting the lens upward (while keeping the camera body level), you effectively raise the optical center of the image, including more of the building in the frame while maintaining parallel vertical lines. The result is the clean, undistorted architectural rendering that magazine editors and real estate clients expect.
According to Smashing Magazine’s analysis of tilt-shift photography, perspective-corrected architectural images convey a sense of deliberate precision that strongly influences how viewers perceive the quality of a property or design. For architectural photographers, the shift lens isn’t a creative tool — it’s a professional necessity.
Practical tip: For interior architecture, the Canon TS-E 17mm or TS-E 24mm offers the widest coverage for tight spaces. Set tilt to zero and use pure shift correction. Shoot at f/8–f/11 for maximum sharpness across the full frame.
Portraits: Selective Focus
Portrait photographers use tilt-shift lenses in a fundamentally different way — not for perspective control, but for creative selective focus that no standard lens can replicate. By tilting the lens so the focal plane runs diagonally across a subject’s face, you can achieve a focus rendering that sharpens one eye while gently blurring the other — an effect that’s impossible to reproduce with standard aperture-based depth of field control.
This technique is particularly effective in environmental portraits, where you want to keep a subject’s face sharp while blurring a complex background in an organic, non-circular way. The blur produced by a tilted lens has a different character than standard bokeh — it falls off in a linear rather than radial pattern, which can feel more natural and less artificially “blurred” to the viewer.
For portrait tilt-shift work, the Canon TS-E 90mm f/2.8L Macro is the preferred choice among professionals — its longer focal length provides a flattering working distance and the f/2.8 maximum aperture allows control of blur intensity independent of the tilt movement.
Landscape and Street Photography
Tilt-shift street photography uses the miniature effect to transform busy urban scenes into toy-like vignettes that emphasize the choreography of human movement. The key difference from standard street work: composition becomes more deliberate and elevation-dependent. Seek elevated positions — fire escapes, parking structure rooftops, bridge walkways — and look for scenes with strong diagonal movement lines (crosswalks, market stalls, bus queues).
Landscape tilt-shift photography uses the tilt movement for a different purpose entirely: achieving front-to-back sharpness across a wide scene without stopping down to diffraction-limited apertures. By tilting the lens so the focal plane aligns with the ground plane, photographers can keep a flower-filled foreground and a distant mountain range in simultaneous focus at f/5.6 — something that would require f/22 (with associated diffraction softening) using a standard lens.
Product and food photography represents a growing application: tilting the lens to align the focal plane with a flat product surface allows sharp rendering of an entire product layout at wide apertures, producing the creamy background separation that consumer brands prize in their catalog imagery.
Limitations and Common Mistakes
Understanding where tilt-shift photography struggles is as important as mastering where it shines. Honest assessment of the technique’s constraints helps you avoid the most common pitfalls and decide when a different approach serves you better.
Common Pitfalls
Pitfall 1: Applying the effect to ground-level photos. The miniature illusion depends almost entirely on an elevated shooting angle. Applying Photoshop’s Tilt-Shift filter or Snapseed’s Lens Blur to a photo taken at street level produces a blurry image that doesn’t read as a miniature — it just looks out of focus. If your source image doesn’t have elevation, the digital effect will disappoint. Solution: reshoot from an elevated position, or use the effect only on subjects where scale ambiguity already exists (macro photography, product shots).
Pitfall 2: Setting the blur transition zone too tight. Both optical lenses and digital simulations produce their most convincing results when the transition from sharp to blurred is gradual. A hard-edged transition (visible in Photoshop when the dashed lines are too close to the solid lines) looks digital and artificial. Widen the transition zone and reduce blur intensity — subtle is almost always more convincing than dramatic.
Pitfall 3: Forgetting saturation. One of the most consistent findings across photography communities is that tilt-shift images without a saturation boost look flat and unconvincing. Physical miniature models have characteristically vivid colors. Adding +15 to +25 saturation as a final step dramatically improves the toy-like quality of any tilt-shift result — optical or digital.
Pitfall 4: Over-tilting the lens. With an optical lens, tilting beyond 8–10 degrees typically produces focus aberrations at the edges of the frame and uneven blur rendering. Start conservatively (3–5 degrees) and increase only if the effect isn’t strong enough.
When to Choose Alternatives
When perspective correction is your only goal: If you need to correct converging verticals in architecture and have no tilt-shift lens, Lightroom’s Geometry panel (specifically the Upright tool and manual Vertical slider) can correct mild to moderate keystoning in post-processing. For extreme corrections, DxO ViewPoint or PTLens offer dedicated perspective-correction algorithms that rival optical shift results in many situations.
When budget is the primary constraint: If you’re exploring the miniature effect purely for creative or social media purposes, Tier 3 mobile apps deliver 90% of the visual impact at zero cost. Investing in a $2,000 tilt-shift lens makes sense only when the shift movement’s architectural precision or the optical tilt’s focus rendering quality becomes a professional requirement.
When to Seek Expert Help
If you’re using tilt-shift photography for commercial architectural work — particularly real estate listings, interior design publications, or construction documentation — consider consulting a professional architectural photographer before purchasing equipment. The lens choice, lighting setup, and workflow for commercial-quality architectural imagery involves considerations (HDR bracketing, flash sync with tilt-shift lenses, stitching shifted frames) that go significantly beyond the techniques covered here.
Frequently Asked Questions
How do you do tilt-shift photography?
Tilt-shift photography is achieved through one of three methods, depending on your gear. With an optical tilt-shift lens, you physically tilt the lens element to rotate the focal plane, creating a razor-thin band of sharpness across an elevated scene. In Photoshop, the Blur Gallery’s Tilt-Shift filter simulates this with a graduated blur mask — apply it via Filter → Blur Gallery → Tilt-Shift. On a smartphone, Snapseed’s Lens Blur tool in Linear mode replicates the effect in under three minutes. All three paths produce convincing miniature results when applied to elevated-angle photographs with human-scale reference objects.
What is the 20-60-20 rule in photography?
The 20-60-20 rule is a compositional guideline suggesting that the most visually balanced images allocate roughly 20% to a dominant foreground element, 60% to the main subject or mid-ground, and 20% to the sky or background. While not specific to tilt-shift photography, it’s a useful framing principle for tilt-shift compositions. Placing your sharp focal band within the 60% mid-ground zone naturally satisfies both the compositional rule and the perceptual requirements of the miniature effect. Most experienced photographers treat it as a flexible heuristic rather than a rigid formula.
Is tilt-shift photography difficult?
Tilt-shift photography ranges from easy to technically demanding depending on which tier you use. Applying the Snapseed Lens Blur effect on a smartphone takes under three minutes and requires no prior experience. Photoshop’s Tilt-Shift filter takes 8–12 minutes to learn and produces professional-grade results after a few practice sessions. Shooting with an optical tilt-shift lens requires understanding the Scheimpflug principle, comfort with manual focus, and patience during the tilt-adjustment process. However, most photographers find it intuitive after just 2–3 practice sessions. The learning curve is real but not steep.
Do Photographers Make $300k?
A small percentage of professional photographers earn over $300,000 annually — the U.S. Bureau of Labor Statistics reports a median annual wage for photographers of approximately $40,000, with the top 10% earning above $85,000. Incomes above $300,000 are uncommon and typically associated with elite commercial, fashion, or celebrity photographers with established client networks and diversified revenue streams (licensing, workshops, brand partnerships). Tilt-shift specialization — particularly in architectural and real estate photography — can command premium rates, with top architectural photographers charging $1,500–$5,000+ per day.
Bringing It Together: Your First Tilt-Shift Image
Tilt shift photography delivers one of the most visually striking effects in modern photography — a convincing miniature world carved from real-life scenes through the precise control of focal planes and perspective. Whether you’re working with a dedicated optical lens, Adobe Photoshop, or a free app on your smartphone, the miniature diorama effect is achievable at every budget level. The critical variables are always the same: an elevated shooting angle, a recognizable human-scale reference, and a smooth, graduated blur transition that the brain reads as shallow depth of field at miniature scale.
The Three-Tier Tilt-Shift System exists precisely to eliminate the confusion that sends most beginners down the wrong path. Tier 3 mobile apps get you to your first result today. Tier 2 desktop software gives you precision and post-processing flexibility. Tier 1 optical lenses deliver commercial-grade quality and the real-time control that professional architectural and portrait work demands. Start where your current gear places you — every tier is a legitimate creative tool, not a compromise.
Open Snapseed right now, find an elevated photo in your camera roll, and apply the Lens Blur effect in Linear mode. Three minutes from now, you’ll have your first tilt-shift miniature image. That’s the fastest path from curious to creating — and from there, the entire Three-Tier Tilt-Shift System is yours to explore.
