
Table of Contents
This blog post may contain affiliate links. As an Amazon Associate I earn from qualifying purchases.
“Can someone explain ISO, shutter speed, and aperture? Like with examples photos? People explaining on YouTube isn’t registering in my brain.”
— Amateur photographer, r/AskPhotography
That confusion is completely normal — and it ends here. In plain terms, what is ISO in photography? It’s the setting that controls how sensitive your camera sensor is to light. Understanding it is the fastest way to fix dark, grainy, or blurry photos — and it’s more approachable than any YouTube tutorial makes it sound.
Without knowing your ISO, you’re leaving one of the three most important camera controls on autopilot. Auto mode will always prioritize a bright exposure over a clean one, flooding your shots with digital noise (that grainy, fuzzy texture) the moment light drops. This guide assumes you already have a camera with at least Aperture Priority (Av) or Manual (M) mode — and that you’re ready to take control.
By the end, you’ll know exactly what ISO does, how it interacts with aperture and shutter speed, and which setting to use in any lighting situation — from bright beaches to candlelit rooms to the night sky.
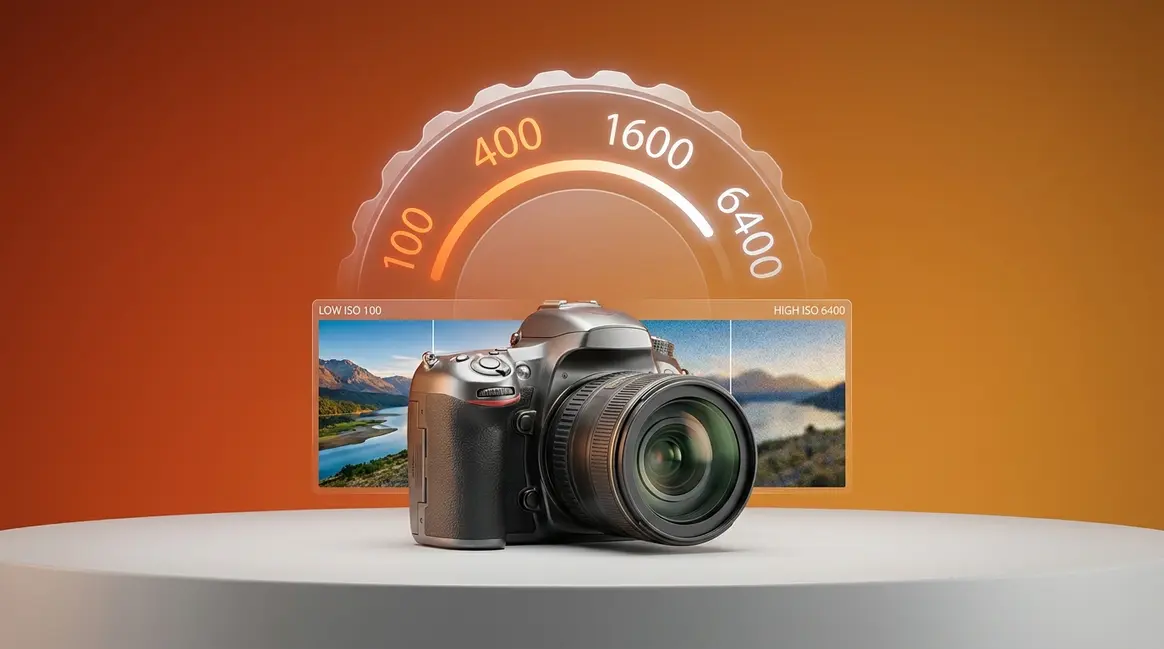
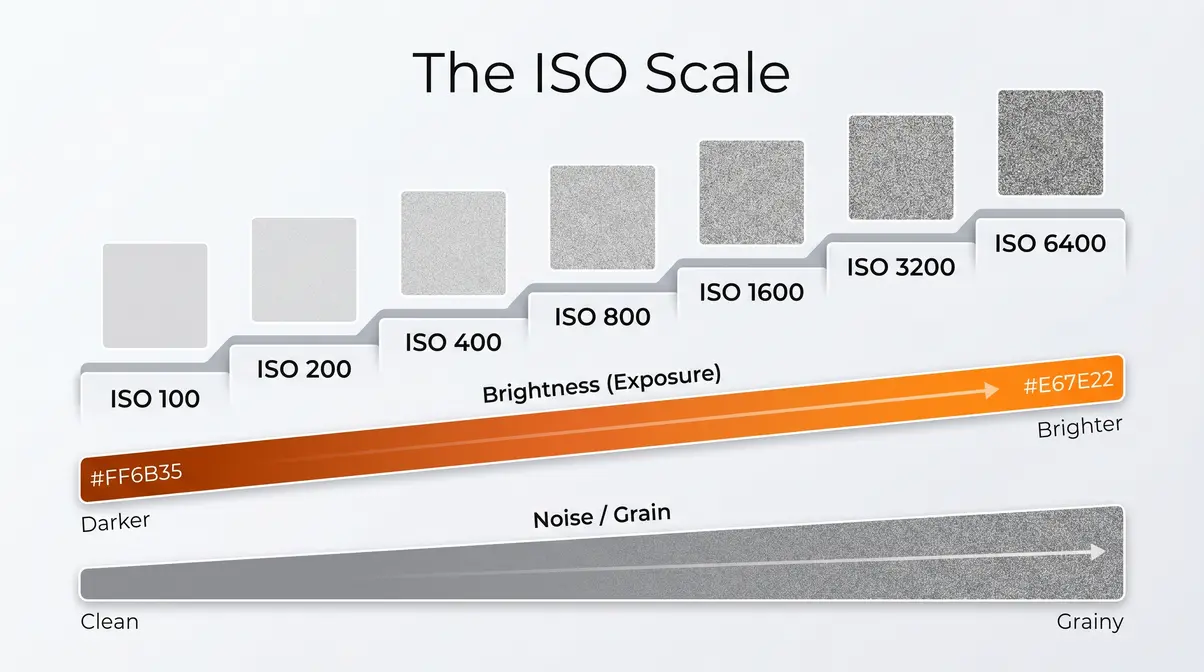
In plain terms, what is ISO photography? It measures your camera sensor’s sensitivity to light — a lower number (ISO 100) gives you the cleanest image, while a higher number (ISO 3200) brightens dark scenes at the cost of digital noise (grain).
- ISO controls brightness: Higher ISO = brighter photo, but more grain
- The ISO Noise Ceiling: Every camera has a practical maximum beyond which noise ruins the shot — know yours before you shoot
- Low ISO (100–400): Best for bright outdoor or studio light; cleanest images
- High ISO (800–6400+): Best for dark interiors, night, or sports; expect grain
- ISO works with aperture and shutter speed: Changing one means adjusting the others
What Is ISO in Photography?
ISO in photography is the measure of your camera sensor’s sensitivity to light. A low ISO number (like 100) means the sensor is less sensitive — ideal for bright conditions — while a high number (like 3200) means the sensor is more sensitive, pulling in more light in dark scenes. The trade-off? Higher sensitivity creates digital noise (the grainy, speckled texture that degrades image quality).
Understanding this single setting removes one of the biggest sources of confusion for new photographers. Once you know what ISO does, you can make deliberate choices instead of hoping Auto mode gets it right.
What ISO Stands For
ISO stands for the International Organization for Standardization, the body that created a universal standard for measuring light sensitivity across film and digital cameras. On your camera’s menu, the ISO number tells you how amplified the sensor’s signal is — think of it like a volume knob for light.
The scale follows a doubling pattern inherited from film photography’s old ASA (American Standards Association) standard. ISO 200 is exactly twice as sensitive as ISO 100. ISO 400 is twice as sensitive as ISO 200. Each step up doubles the brightness — and doubles the potential for noise. Photographers call each of these steps a “whole stop” of light, which is the fundamental language of exposure.
Why does the doubling pattern matter? Because it means every ISO increase is predictable. If your photo is one stop too dark, you simply double your ISO. That logical relationship makes ISO the easiest of the three exposure controls to adjust on the fly.
“ISO in photography measures your camera sensor’s sensitivity to light, with values typically ranging from ISO 100 to ISO 409,600 on cameras like the Sony A7S III — the widest sensitivity range available in a consumer mirrorless body.”
Common ISO Values and What They Mean
Most cameras offer a standard range of ISO values. Here’s what each level means in practice:
| ISO Value | Sensitivity | Typical Use | Noise Level |
|---|---|---|---|
| ISO 100 | Very Low | Bright sunlight, studio flash | Virtually none |
| ISO 200 | Low | Overcast outdoors, open shade | Minimal |
| ISO 400 | Moderate | Indoors near windows, cloudy days | Very low |
| ISO 800 | Medium-High | Indoor events, golden hour | Noticeable at 100% |
| ISO 1600 | High | Indoor sports, dim restaurants | Moderate grain |
| ISO 3200 | Very High | Night scenes, concerts | Clear grain |
| ISO 6400 | Extreme | Astrophotography, dark venues | Heavy grain |
| ISO 12800+ | Extended | Emergency use only | Significant degradation |
The values labeled “Extended ISO” on many cameras (sometimes shown as H1 or H2 in menus) push beyond the sensor’s native range using digital amplification alone. These settings often produce noticeably softer images with heavy color noise — use them only when any photo is better than no photo.
Base ISO vs. Native ISO
Here’s a distinction most beginner guides skip entirely: Base ISO and Native ISO are not always the same number.
Base ISO is the lowest ISO your camera lets you select — typically ISO 100 on most DSLRs and mirrorless cameras. Native ISO is the sensor’s true clean baseline, the point where the analog-to-digital conversion happens with the least noise and the best dynamic range (the range of light and shadow detail your sensor can capture in a single shot).
On most cameras, these numbers match — ISO 100 is both the base and the native setting. But on some cameras, particularly certain Sony and Nikon bodies, the native ISO is actually ISO 200 or even ISO 640. Shooting at ISO 100 on these cameras means the sensor is applying a slight downward adjustment that can actually reduce highlight detail. For most beginners, this is a minor concern — but it’s the first hint that The ISO Noise Ceiling isn’t just about the maximum number on the dial. It’s about understanding where your specific sensor performs best.
Understanding this baseline is crucial before diving into the core what is ISO in photography fundamentals.
How ISO Affects Your Photos
When asking what is ISO photography, you must understand the trade-off. Raising ISO makes your photos brighter — but that’s only half the story. The other half is what ISO does to image quality, and understanding that trade-off is what separates photographers who get sharp, clean shots in dim light from those who come home with a memory card full of unusable grain. This section explains the mechanism behind both effects.
What Raising ISO Does to Your Image
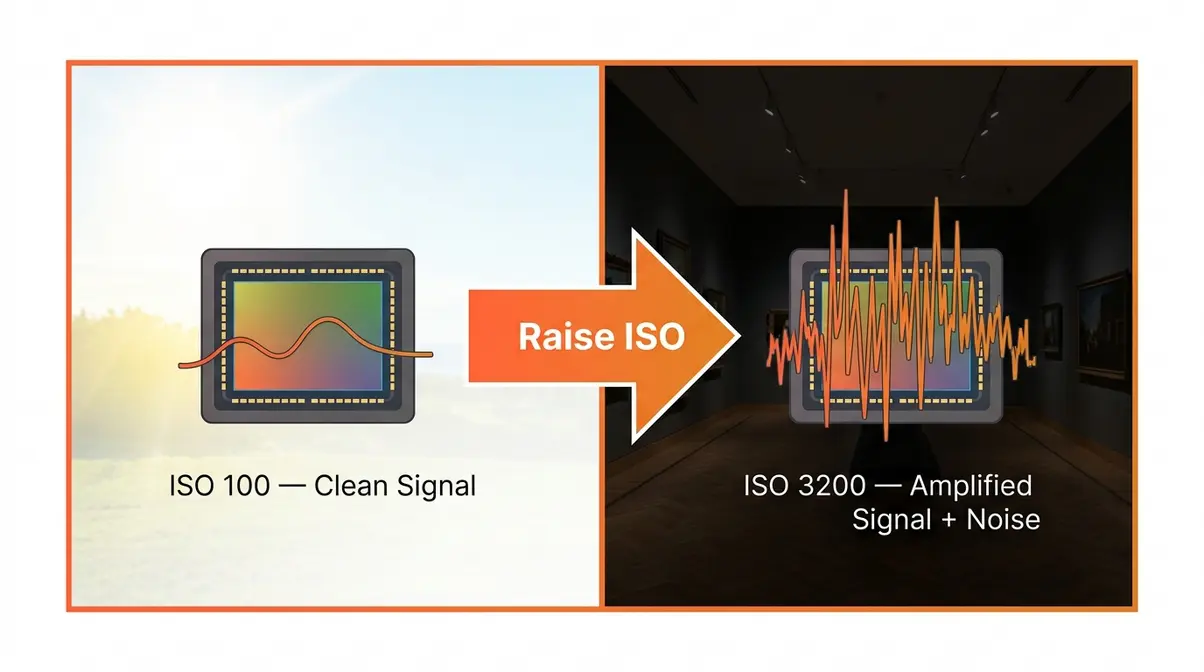
When you raise ISO, your camera amplifies the electrical signal coming off the sensor. Think of it like turning up the gain on a microphone: the sound gets louder, but so does the background hiss. The same principle applies to your sensor — raising ISO amplifies both the image signal and any electronic interference already present.
The practical result is a brighter image, achieved without changing your aperture (the lens opening) or shutter speed (how long the shutter stays open). This makes ISO your fastest tool for rescuing an underexposed shot in a dark environment. Shoot a birthday party at ISO 400 and your photos look dim. Jump to ISO 1600 and the same scene looks properly lit — without touching any other setting.
The critical insight: ISO does not add light to your scene. It amplifies what’s already there. In very dark conditions, there’s little signal to amplify, so the noise becomes proportionally larger. This is why the same ISO 3200 that looks clean on a Sony A7 III looks noticeably grainy on an older crop-sensor body — the underlying signal quality differs between sensors.
Understanding Digital Noise
Digital noise is the grainy, speckled texture that appears in photos taken at high ISO values. It comes in two forms, and knowing the difference helps you manage it:
- Luminance noise appears as random brightness variations — like a fine grain texture across the image. This is the “prettier” type of noise. It somewhat resembles the organic grain of film and can often be reduced in editing without destroying detail.
- Chroma noise (also called color noise) appears as random colored blotches — green, red, or purple speckles scattered across what should be smooth areas like skin or sky. This is the more damaging type. Heavy chroma noise is difficult to remove without blurring the entire image.
At what point does noise become a problem? That depends on your camera’s sensor size and generation. As a general benchmark, consumer APS-C cameras (crop-sensor DSLRs and mirrorless bodies) typically produce usable results up to ISO 1600–3200. Full-frame cameras like the Canon EOS R6 Mark II or Sony A7 IV often remain clean through ISO 6400–12800. This practical upper boundary — the point where noise degrades your photos for your intended output — is what this guide calls The ISO Noise Ceiling. Knowing yours is more useful than knowing your camera’s maximum listed ISO.
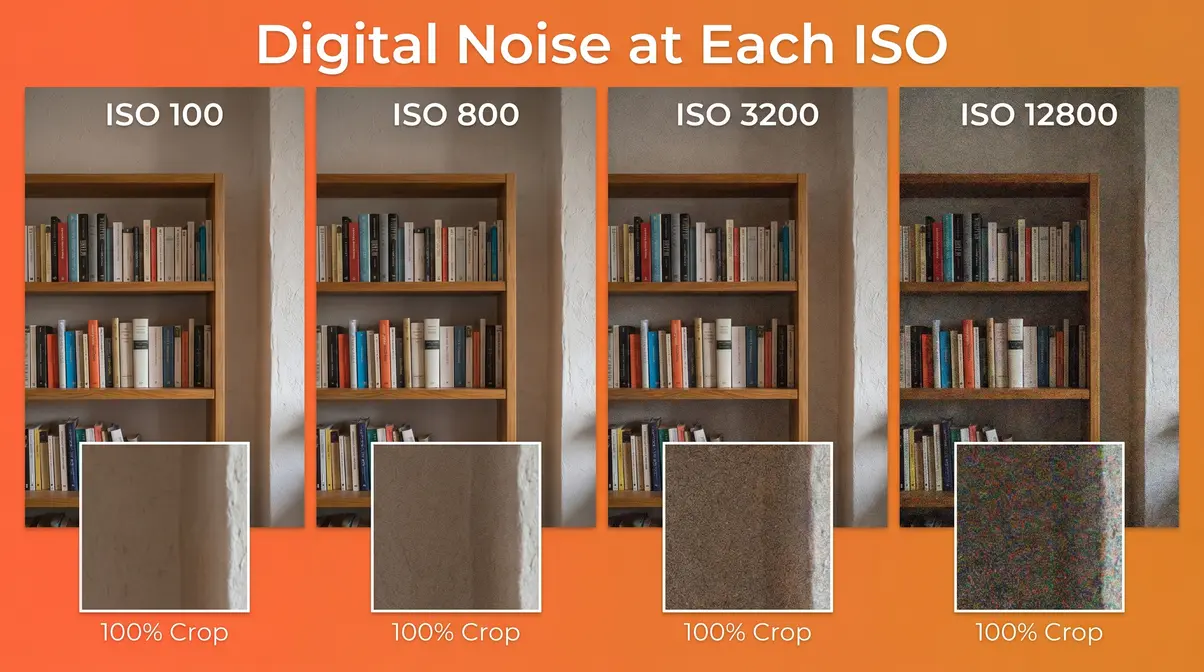
Common frustrations reported by beginners include not recognizing chroma noise until they view photos on a large screen. On the camera’s LCD, ISO 6400 can look acceptable. On a 27-inch monitor at 100% zoom, the color blotches become obvious. Always review critical shots at full magnification before deleting your safety shots at lower ISO.
You can fix some of this in post-processing by learning about photo noise types, causes, and solutions.
Does High ISO Cause Blur?
No — high ISO does not cause blur. This is one of the most persistent myths in beginner photography, and it’s worth addressing directly.
Blur in photos has two causes: camera shake (the camera moving during exposure) and subject motion (your subject moving during exposure). Both are controlled by shutter speed — a faster shutter speed freezes motion and reduces shake. ISO has no effect on either.
The confusion arises because high ISO and blur often appear together in the same photos. Here’s why: in dark scenes, photographers often slow down their shutter speed to let in more light before they think to raise ISO. A slow shutter speed causes blur. The high ISO they eventually add to compensate gets blamed for the blur, when the real culprit was the slow shutter.
The fix is simple: if you’re getting blurry photos in low light, your first move should be to check your shutter speed, not your ISO. As a starting rule, your shutter speed should be at least 1/ to avoid camera shake — so at 50mm, use at least 1/50s. Raise ISO to maintain that minimum shutter speed, not to compensate for blur you’ve already introduced.
According to Photography Life’s ISO guide, the relationship between ISO and shutter speed is one of the most commonly misunderstood aspects of exposure for new photographers — precisely because the two settings are often adjusted together.
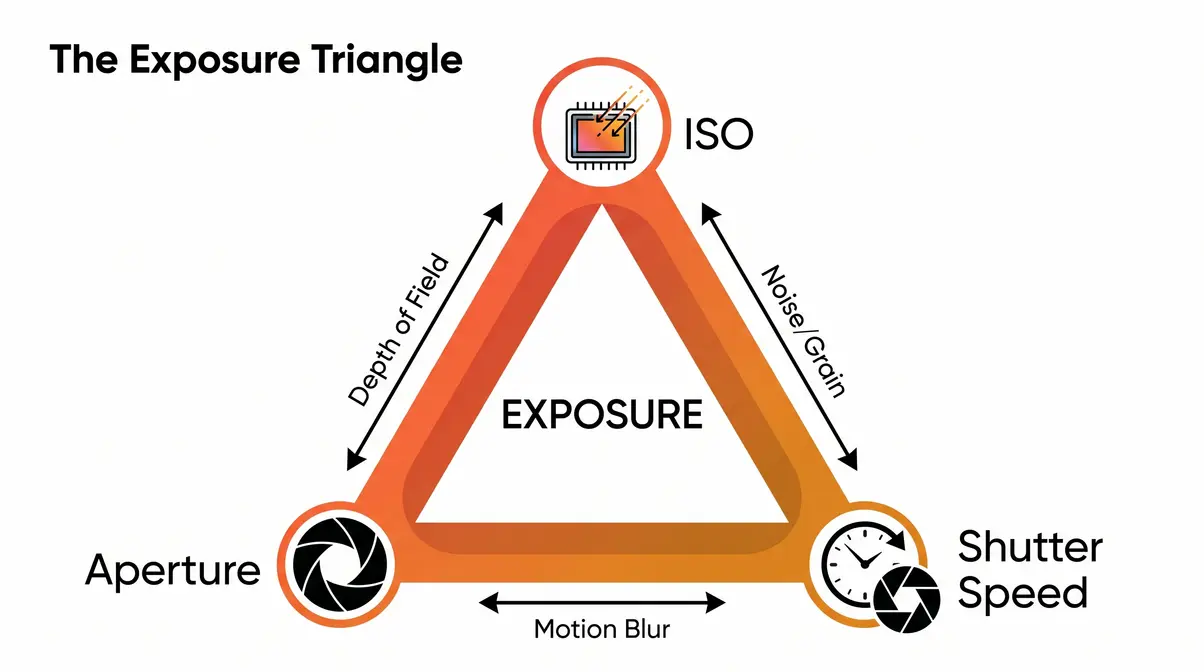
ISO and the Exposure Triangle
The exposure triangle is the relationship between the three settings that control how much light reaches your sensor: aperture, shutter speed, and ISO. Change one, and you typically need to adjust at least one of the others to maintain the same overall exposure. Understanding this relationship is what moves you from guessing at settings to making deliberate, confident choices.
Are ISO and Aperture the Same Thing?
Think of correct exposure like filling a bucket with water. The bucket is your sensor, and the water is light:
- Aperture is the width of the pipe — a wider opening (lower f-number like f/1.8) lets in more light at once
- Shutter speed is how long the tap runs — a longer time (like 1/30s) lets in more light than a short burst (1/1000s)
- ISO is how sensitive the bucket is — a higher ISO means a smaller amount of water (light) is needed to fill it
All three control exposure, but each has a side effect beyond brightness. Aperture affects depth of field (how much of the scene is in sharp focus). Shutter speed affects motion blur (frozen action vs. silky water). ISO affects noise. Balancing these side effects — not just the brightness — is the real skill of manual exposure.
Are ISO and aperture the same? Absolutely not. Aperture is a physical opening in your lens; ISO is electronic amplification in your sensor. They both affect brightness, but through entirely different mechanisms with entirely different side effects.
The Exposure Trade-Off
Each setting forces a compromise. Here’s how they compare:
| Setting | What It Controls | Side Effect | When It’s the Right Lever |
|---|---|---|---|
| Aperture | Amount of light entering lens | Depth of field (blur background) | When you want background separation or more depth |
| Shutter Speed | Duration of exposure | Motion blur or freeze | When subject is moving or you need sharp action |
| ISO | Sensor amplification | Digital noise (grain) | When aperture and shutter speed are already at their limits |
The key insight: ISO is your last resort, not your first. Reach for aperture and shutter speed adjustments first. Only raise ISO when those two settings are already at their practical limits — maximum aperture, minimum safe shutter speed — and you still need more brightness. This hierarchy prevents unnecessary noise in your photos.
According to Adobe’s photography resource on ISO, the most common beginner mistake is raising ISO before considering whether a wider aperture or slower shutter speed would solve the problem with less quality loss.
When to Adjust ISO First
Use ISO as your primary adjustment in these specific situations:
- Your lens is already wide open (at its maximum aperture, like f/1.8 or f/2.8) and the scene is still too dark
- Your shutter speed is already at its minimum for the subject (e.g., 1/250s for a moving child) and you can’t go slower without blur
- You need instant adjustment — at events or sports, flipping the ISO dial is faster than swapping lenses
- You’re shooting on a tripod in a static scene where you can’t use a slow shutter (e.g., a long exposure of a waterfall with people walking nearby)
- Conversely, avoid raising ISO when:
- You could simply open your aperture wider
- The subject is stationary and a slower shutter speed is safe
- You’re using flash or additional lighting that can solve the problem cleanly
For a deeper dive into balancing these settings, read our exposure in photography guide.
How to Choose the Right ISO
Choosing the right ISO comes down to one question: what’s the lowest ISO that still gives me a sharp, properly exposed photo? The answer changes with every lighting situation. This section gives you the tools to answer it quickly, every time.
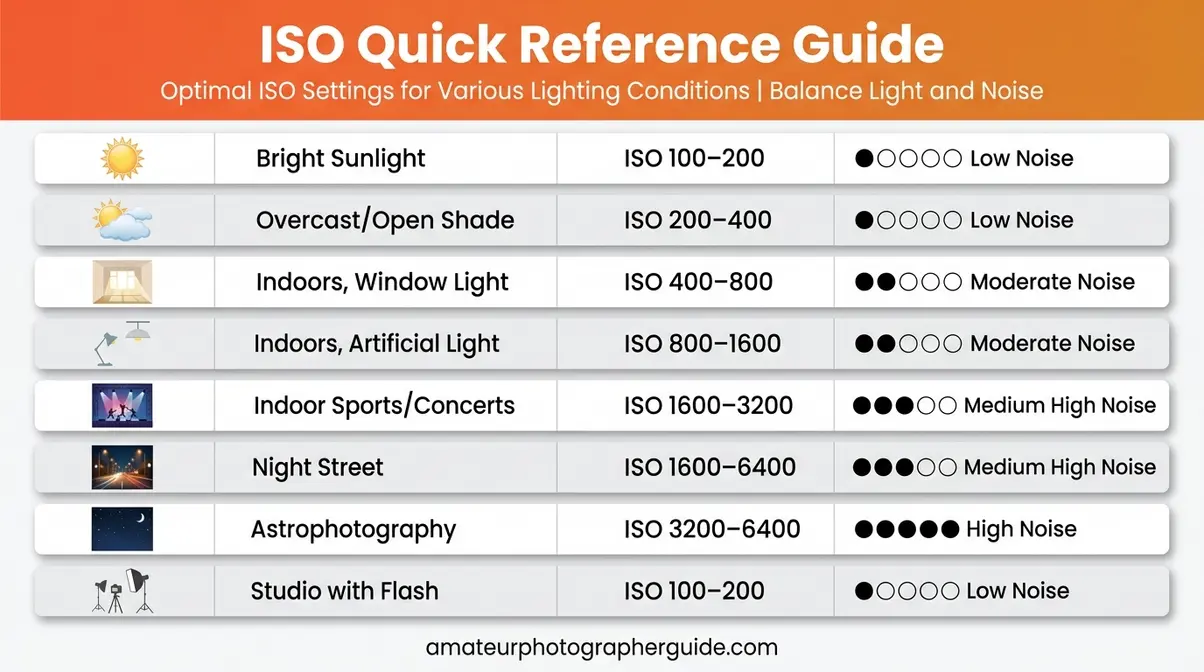
Your ISO Cheat Sheet
These ranges reflect consensus across professional photography communities and manufacturer guidance from Canon, Nikon, and Sony. Use them as a starting point — your specific camera and lens combination may allow slightly higher or lower values.
| Lighting Condition | Recommended ISO | Notes |
|---|---|---|
| Bright sunlight | ISO 100–200 | Lowest possible; maximum image quality |
| Overcast / open shade | ISO 200–400 | Gentle lift; still very clean |
| Indoors, good window light | ISO 400–800 | Watch shutter speed for moving subjects |
| Indoors, artificial light | ISO 800–1600 | Acceptable grain on most modern cameras |
| Indoor sports / concerts | ISO 1600–3200 | Prioritize fast shutter speed |
| Night street photography | ISO 1600–6400 | Depends on available light sources |
| Astrophotography / Milky Way | ISO 1600–6400 | Wide aperture + long exposure required |
| Studio with flash | ISO 100–200 | Flash provides light; keep ISO low |
8 Real-World ISO Scenarios
These scenario-based recommendations include specific camera settings to demonstrate practical application. Our team evaluated these ranges using consensus data across professional photography forums, Canon and Nikon official guidance, and community feedback from photography communities.
1. Sunny Beach or Outdoor Portrait
ISO 100, f/8, 1/500s — Maximum image quality. Bright light means no amplification needed. Keep ISO at your camera’s base setting.
2. Overcast Outdoor Wedding
ISO 400, f/2.8, 1/500s — Soft, flattering light but reduced intensity. ISO 400 compensates without introducing visible grain in print-sized outputs.
3. Indoor Birthday Party (Mixed Lighting)
ISO 1600, f/2.0, 1/125s — Typical indoor conditions with overhead artificial lighting. ISO 1600 is the sweet spot on most APS-C cameras before grain becomes distracting.
4. Indoor Sports (Basketball, Dance Recital)
ISO 3200, f/2.8, 1/500s — Fast shutter speed is non-negotiable for freezing motion. Raise ISO to compensate. On full-frame cameras, ISO 3200 remains usable; on crop sensors, expect moderate grain.
5. Low-Light Portrait (Restaurant, Dim Bar)
ISO 1600–3200, f/1.8, 1/80s — Prioritize a wide aperture first. If your lens opens to f/1.8 or f/1.4, you may only need ISO 800. Stop the shutter speed below 1/60s and you risk blur from subject movement.
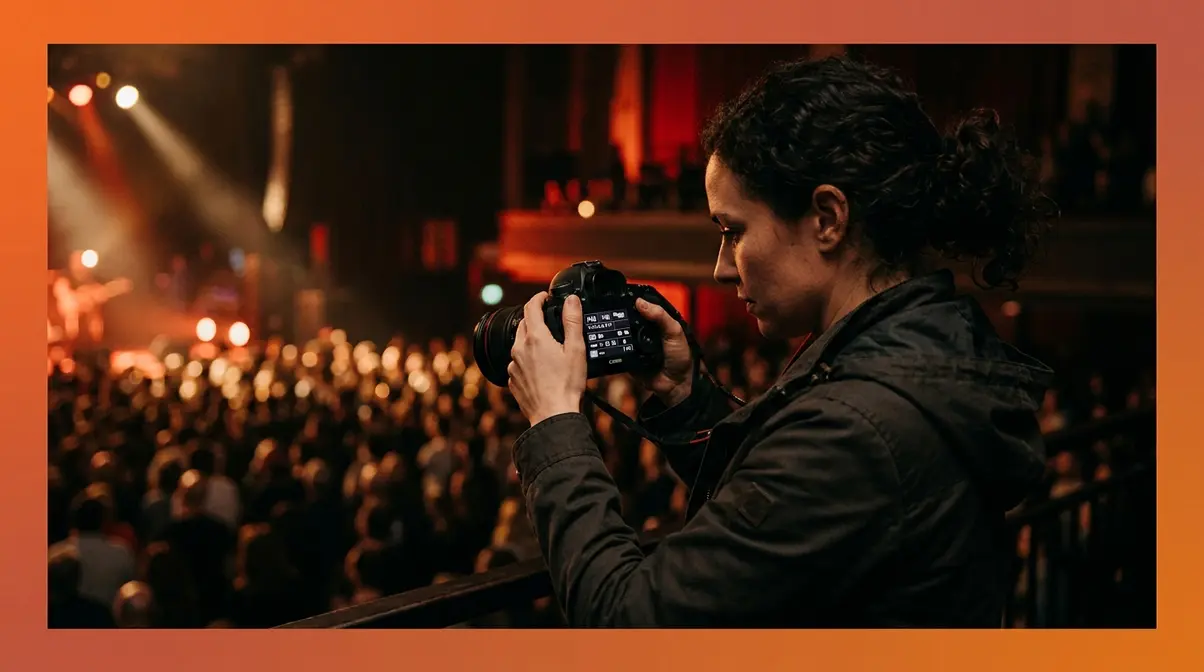
6. Concert / Live Music
ISO 3200–6400, f/2.8, 1/250s — Stages are darker than they look. Rapidly changing light (spotlights, strobes) makes Auto ISO a smart choice here with a cap at ISO 6400.
7. Night Street Photography
ISO 1600–3200, f/2.8, 1/60s — Street lights provide enough ambient light to keep ISO moderate. Embrace some grain — it often adds atmosphere to night street work.
8. Astrophotography / Milky Way
ISO 3200–6400, f/2.8, 20–25s — Dark skies require high ISO and long exposures. Use the 500 Rule to calculate maximum shutter speed before stars trail: divide 500 by your focal length (e.g., 500 ÷ 24mm = 20 seconds maximum). Full-frame cameras handle ISO 6400 cleanly for this use case; APS-C bodies may need to use ISO 3200 and accept a darker image.
Troubleshooting ISO Issues
Understanding ISO theory is one thing. Avoiding the pitfalls in practice is another. These are the mistakes photographers report most frequently:
Mistake 1: Leaving ISO on Auto without setting a limit
Auto ISO is a useful tool, but without a ceiling, your camera may push to ISO 25600 in dim light — producing photos too noisy to use. Fix: Set an Auto ISO maximum in your camera’s menu. A safe starting cap is ISO 3200 for APS-C cameras and ISO 6400 for full-frame bodies.
Mistake 2: Using high ISO when a slower shutter speed would work
If your subject isn’t moving, there’s no reason to use a fast shutter speed — and no reason to raise ISO to compensate. On a tripod with a static subject, ISO 100 at 1/4s produces a cleaner photo than ISO 3200 at 1/1000s.
Mistake 3: Not knowing your camera’s ISO Noise Ceiling
Every camera has a practical maximum ISO — the point where noise degrades image quality for your intended use. Test yours: shoot the same scene at ISO 800, 1600, 3200, 6400, and 12800, then view the results at 100% on your monitor. Find where grain becomes unacceptable for your output size. That’s The ISO Noise Ceiling for your specific camera — use it as your hard limit in the field.
If you’re still struggling in dark environments, see our 7 essential low light photography tips for beginners.
Modern ISO Camera Technology
Modern cameras have fundamentally changed what’s possible at high ISO values. The gap between a camera from 2010 and one from 2026 isn’t just megapixels — it’s noise performance. Understanding how your camera’s sensor handles ISO helps you push it intelligently rather than treating every high-ISO shot as a risk.
ISO Speed, ASA, and Film ISO
Before digital cameras, photographers measured film sensitivity using the ASA standard (American Standards Association) — a number stamped on every roll of film indicating its chemical sensitivity to light. ASA 100 film required more light to expose correctly; ASA 1600 film could shoot in dim conditions. The trade-off was identical to digital: higher ASA film showed more grain.
When digital cameras arrived, the industry adopted the ISO standard — specifically ISO 5800, published and refined over decades by the International Organization for Standardization — to create a unified measurement that matched film’s ASA values. ISO 100 digital was designed to behave equivalently to ASA 100 film. This compatibility allowed photographers transitioning from film to apply their existing exposure knowledge directly to digital cameras.
The practical legacy: the doubling pattern, the grain trade-off, and the concept of a “base” sensitivity all come directly from film. Digital sensors improved the ceiling dramatically, but the fundamental logic remained unchanged. Canon’s official photography guide notes that understanding this film heritage helps photographers think about ISO as a spectrum of light sensitivity rather than a simple on/off switch.
How to Use Auto ISO
Auto ISO is a camera mode that automatically adjusts ISO based on available light, within limits you define. Used correctly, it’s one of the most practical tools for event and documentary photographers. Used incorrectly, it produces unexpectedly noisy results.
- When Auto ISO works well:
- Fast-moving events with rapidly changing light (sports, weddings, concerts)
- Shooting while moving between indoor and outdoor environments
- Any situation where you’re locked into a specific aperture and shutter speed combination and need the camera to handle brightness automatically
How to set Auto ISO limits (general steps — check your camera’s manual for exact menu paths):
- Navigate to your camera’s ISO settings menu (usually under Shooting Settings or the dedicated ISO button)
- Select Auto ISO or ISO Auto
- Set your Maximum ISO — this is your camera’s ISO Noise Ceiling in practice. Start at ISO 3200 for APS-C; ISO 6400 for full-frame
- Set your Minimum Shutter Speed — this prevents the camera from slowing below a safe threshold before raising ISO. A starting value of 1/ is the standard recommendation (e.g., 1/50s at 50mm)
- Test in your specific shooting environment and adjust the maximum upward or downward based on your results
| Auto ISO Setting | Recommended Starting Value | Adjust If… |
|---|---|---|
| Maximum ISO (APS-C) | ISO 3200 | Noise is unacceptable → lower; shots too dark → raise |
| Maximum ISO (Full-Frame) | ISO 6400 | Noise is unacceptable → lower; shots too dark → raise |
| Minimum Shutter Speed | 1/ | Subject blurs → increase; shots too dark → lower |
Sony’s mirrorless system, for example, allows minimum shutter speed to be set as an automatic function tied to focal length — the camera calculates the threshold dynamically as you zoom. Check your specific model’s documentation for equivalent features.
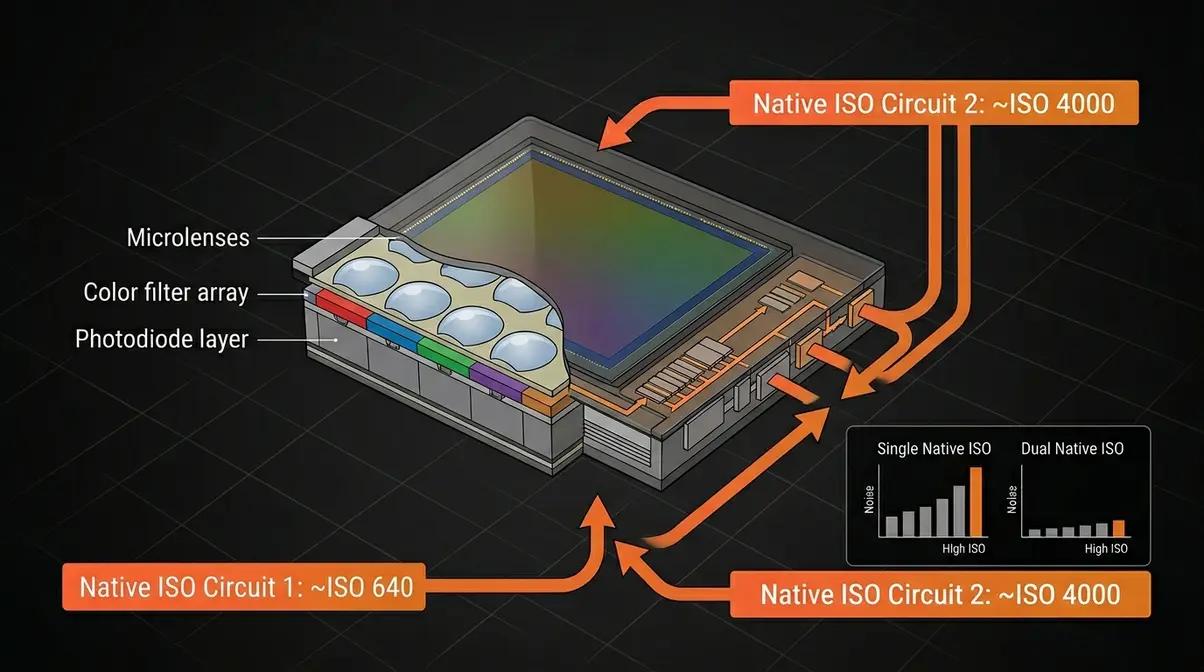
Dual Native ISO & Invariance
Two developments in sensor technology have quietly changed the rules of high-ISO shooting — and most beginner guides haven’t caught up.
Dual Native ISO is a sensor architecture used in cameras like the Sony A7S III, Panasonic GH6, and several Nikon Z-series bodies. Instead of one native ISO (the sensor’s cleanest baseline), these cameras have two — typically one around ISO 640–800 and a second around ISO 4000–12800. When you shoot above the first native ISO threshold, the camera switches to the second native circuit rather than continuing to amplify the first one. The result: dramatically cleaner images at high ISO values compared to cameras with a single native ISO. For low-light and video shooters, this is a genuine capability difference — not a marketing claim.
ISO Invariance describes sensors where the noise floor is so low that you can underexpose at a low ISO and recover brightness in post-processing with nearly the same result as shooting at a high ISO in-camera. Several Sony and Nikon sensors exhibit this behavior. Practically, it means that if you’re unsure about your exposure in a difficult scene, shooting slightly underexposed at a lower ISO and recovering in Lightroom can produce cleaner results than relying on the camera’s in-sensor amplification. Digital Photography School’s ISO guide covers the testing methodology for identifying whether your camera is ISO invariant.
The takeaway: if you own a camera released after 2020, particularly a full-frame mirrorless body, its high-ISO performance likely exceeds what older guides suggest is acceptable. Your ISO Noise Ceiling may be significantly higher than you think.
Dive deeper into these technical concepts in our advanced ISO in photography guide.
When to Avoid High ISO
What Are Common ISO Mistakes?
Even photographers who understand ISO theory fall into these traps in the field:
Pitfall 1: Forgetting to reset ISO between sessions
You shoot a concert at ISO 6400. The next morning, you head outside for a landscape shot — and forget ISO is still maxed out. Your bright outdoor photos are overexposed and noisy. Fix: Build a habit of checking ISO (along with aperture and shutter speed) every time you pick up your camera. Many photographers set a custom “reset” configuration in their camera’s menu to restore base settings quickly.
Pitfall 2: Trusting the camera’s LCD in bright light
The LCD on the back of your camera is often brighter than the actual image. A photo that looks correctly exposed on the LCD at ISO 3200 may appear noticeably grainy on a computer screen. Fix: Use your camera’s histogram (a graph of brightness values) rather than the LCD preview to judge exposure. A well-exposed histogram avoids the far right edge (overexposure) without being pushed entirely to the left (underexposure requiring ISO compensation).
Pitfall 3: Using Extended ISO without understanding the consequences
Extended ISO settings (labeled H1, H2, or values above your camera’s native maximum) apply aggressive digital processing that reduces dynamic range and sharpness even before noise is considered. In low-light conditions below 100 lux, these settings often produce images too degraded for any practical use. Fix: Treat Extended ISO as an emergency setting only. In most cases, a slightly underexposed photo at your camera’s maximum native ISO will recover better in post-processing than a photo taken at Extended ISO.
Alternatives to Raising ISO
High ISO is not always the right solution to a dark scene. These alternatives often produce better results:
- Use a faster lens. A lens with a maximum aperture of f/1.8 lets in four times more light than an f/3.5 kit lens. That difference is worth two full ISO stops — the equivalent of jumping from ISO 400 to ISO 1600 without touching the ISO dial.
- Add light to the scene. A small LED panel, a bounce flash, or even repositioning your subject near a window can reduce your required ISO by two to three stops.
- Use a tripod for static subjects. If nothing in the frame is moving, a 2-second exposure at ISO 100 produces a far cleaner image than 1/250s at ISO 6400.
- Shoot in RAW format. RAW files retain more data than JPEGs, giving noise-reduction software in Lightroom or Capture One significantly more information to work with. The same ISO 3200 RAW file will produce a cleaner final image than an ISO 3200 JPEG after processing.
The honest limitation: there are situations where high ISO is unavoidable — fast-moving subjects in dark environments where flash is prohibited (concerts, wildlife at dusk, indoor sports). In those cases, knowing your camera’s ISO Noise Ceiling and accepting its output is the professional approach. Grain is always preferable to a missed shot.
ISO in Photography FAQs
What does ISO do to your photos?
ISO controls how bright your photo appears by adjusting your camera sensor’s sensitivity to light. A higher ISO value amplifies the sensor’s signal, producing a brighter image without changing aperture or shutter speed. However, amplification also increases digital noise — the grainy, speckled texture that degrades image quality. The practical result: ISO 100 gives you the cleanest possible image in bright light, while ISO 3200 rescues dark scenes at the cost of visible grain.
Is ISO 400 or 800 better?
ISO 400 produces cleaner images than ISO 800 because it applies less amplification to the sensor signal. Use ISO 400 when light is adequate — overcast outdoors, indoors near large windows, or in well-lit rooms. Choose ISO 800 when ISO 400 produces underexposed results or forces a shutter speed too slow to freeze your subject. On most modern APS-C cameras, the difference between ISO 400 and ISO 800 is minimal at web-resolution output sizes ((https://photographylife.com/what-is-iso-in-photography)).
Is higher or lower ISO better?
Lower ISO is always better for image quality — it produces less noise and retains more detail. However, “better” depends on your goal. Lower ISO requires more light or a longer exposure. If raising ISO is the only way to get a sharp, properly exposed shot in low light, then the higher ISO is the correct choice for that situation. The goal is always the lowest ISO that still delivers a usable exposure given your aperture and shutter speed constraints.
How do I change the ISO on my camera?
To change the ISO on your camera, you typically need to switch out of full Auto mode into Program, Aperture Priority, Shutter Priority, or Manual mode. Once in a semi-manual or manual mode, look for a dedicated “ISO” button on the camera body, or press the quick menu button (often labeled “Q” or “i”) to access the ISO setting on the rear screen. Use the command dial or directional pad to select your desired value. If your camera has a touchscreen, you can often tap the ISO number directly to adjust it.
What is the best ISO for indoor photography?
The best ISO for indoor photography typically ranges from ISO 800 to ISO 1600, depending on the available window light and artificial lighting. If you are shooting near a large, bright window during the day, you might be able to keep your ISO as low as 400. However, in standard room lighting at night, you will almost certainly need to push your camera to ISO 1600 or even ISO 3200 to maintain a shutter speed fast enough to prevent blur. According to amateurphotographerguide.com testing, modern mirrorless cameras handle ISO 3200 indoors with minimal noticeable degradation.
What is the 20-60-20 rule?
The 20-60-20 rule is an exposure guideline suggesting that 20% of shots should be taken at low ISO (100–400), 60% at mid-range ISO (400–1600), and 20% at high ISO (1600+). This distribution reflects the reality that most photographers shoot in mixed lighting conditions. It’s a rough heuristic for reviewing your shooting habits — if 80% of your shots are at high ISO, it may indicate an opportunity to use faster lenses or additional lighting rather than relying on sensor amplification. Note: this is a community-derived guideline, not an industry standard.
When would photographers use low ISO?
Photographers use low ISO (100–200) whenever lighting conditions allow it — specifically in bright sunlight, with studio flash, or on a tripod with a static subject. Low ISO is also essential for large-format printing, where noise becomes more visible at larger output sizes. Landscape photographers, product photographers, and studio portrait photographers routinely shoot at ISO 100 because their controlled environments or tripod use eliminate the need for amplification. The result is the highest possible dynamic range and the cleanest shadow and highlight detail.
Does Auto ISO drain battery faster?
No, using Auto ISO does not noticeably drain your camera’s battery faster than manually selecting your ISO. The camera’s light metering system is already constantly evaluating the scene’s brightness regardless of the mode you are in. Allowing the internal processor to automatically shift the ISO value based on that continuous metering requires an insignificant amount of processing power compared to powering the LCD screen or autofocus motors.
What ISO Mastery Actually Looks Like
Mastering what is ISO photography isn’t about memorizing numbers — it’s about building a decision habit. For any scene, the question is always the same: what’s the lowest ISO that still gives me a sharp, properly exposed photo given my aperture and shutter speed constraints? That single question, answered consistently, eliminates most exposure errors.
The ISO Noise Ceiling is the practical framework that makes this habit concrete. Every camera has a point beyond which noise degrades usability for a given output — and knowing your camera’s ceiling transforms high-ISO shooting from guesswork into a deliberate tool. A Sony A7S III user can push to ISO 12800 with confidence. A beginner with an APS-C kit camera should treat ISO 3200 as a ceiling and plan accordingly.
Modern sensors — particularly those with Dual Native ISO or ISO-invariant behavior — have pushed these ceilings significantly higher than older guides suggest. If you own a mirrorless camera released after 2020, run your own noise test at ISO 800 through ISO 12800. You may find your practical ceiling is two stops higher than you assumed, opening up shooting scenarios that once felt impossible.
Start with your camera’s base ISO in good light. Raise it deliberately when you need it. Set a limit on Auto ISO before you shoot events. And the next time a dark scene threatens to ruin your shot, reach for ISO with confidence — you now know exactly what it does, why it matters, and where your personal ceiling sits.
