Portrait Lighting Techniques: 6 Patterns Every Beginner Needs
Discover this portrait lighting techniques guide for amateur photographers. Follow step-by-step instructions to master professional portraits with the right lighting setup.

“I use a built in flash and natural light but I can never get the lighting fully right.”
If that sounds familiar, you’re not alone — and the fix is simpler than you think.
The problem isn’t your camera, your location, or even your subject. It’s that nobody handed you the six lighting patterns that professional photographers rely on for every single shoot. Without that vocabulary, every attempt at flattering photos feels like guesswork — moving a lamp an inch left, hoping something changes.
This guide teaches you the 6 core portrait lighting techniques — with overhead diagrams, step-by-step setup instructions, and a simple framework called The Pattern-to-Mood Map for choosing the right look every time — so you can stop guessing and start creating portraits you’re proud of. We’ll cover the foundational patterns, how to build setups with 1, 2, or 3 lights, how to use natural window light like a pro, and how to create moody dramatic portraits — plus a free cheat sheet to keep at your side during every shoot.
The 6 Essential Portrait Lighting Patterns
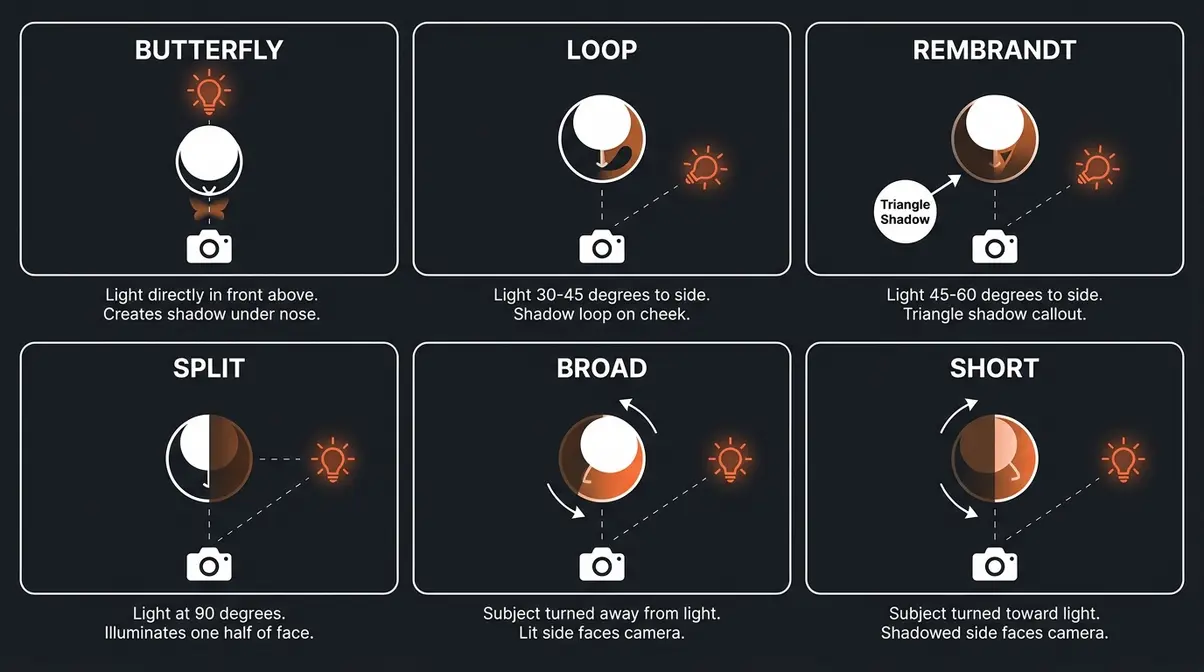
Portrait lighting techniques give photographers a shared vocabulary for shaping light intentionally. The New York Film Academy identifies six foundational patterns — Butterfly, Loop, Rembrandt, Split, Broad, and Short — as the starting point for all studio portraiture (NYFA, 2026). Knowing these patterns means you’ll never set up a light randomly again. Every placement becomes a deliberate choice that shapes your subject’s face and communicates a specific mood.
According to Stanford University’s digital photography curriculum, the relative size of a light source directly dictates shadow softness — with larger sources yielding more flattering, wrapping results. That single principle underpins every pattern below.
“Professional portrait photographers rely on six classic lighting patterns — Butterfly, Loop, Rembrandt, Split, Broad, and Short — each producing a distinct shadow shape that defines the mood of the image.” (New York Film Academy, 2026)
What Is a Portrait Lighting Pattern?
A lighting pattern is the specific arrangement of light and shadow on your subject’s face — determined entirely by where you place your light source relative to them. Move the light left, and the shadows shift. Raise it higher, and the shadows lengthen. These named arrangements are called portrait lighting patterns, and they give photographers a repeatable, communicable system for building any look they’ve seen in a magazine or a film.
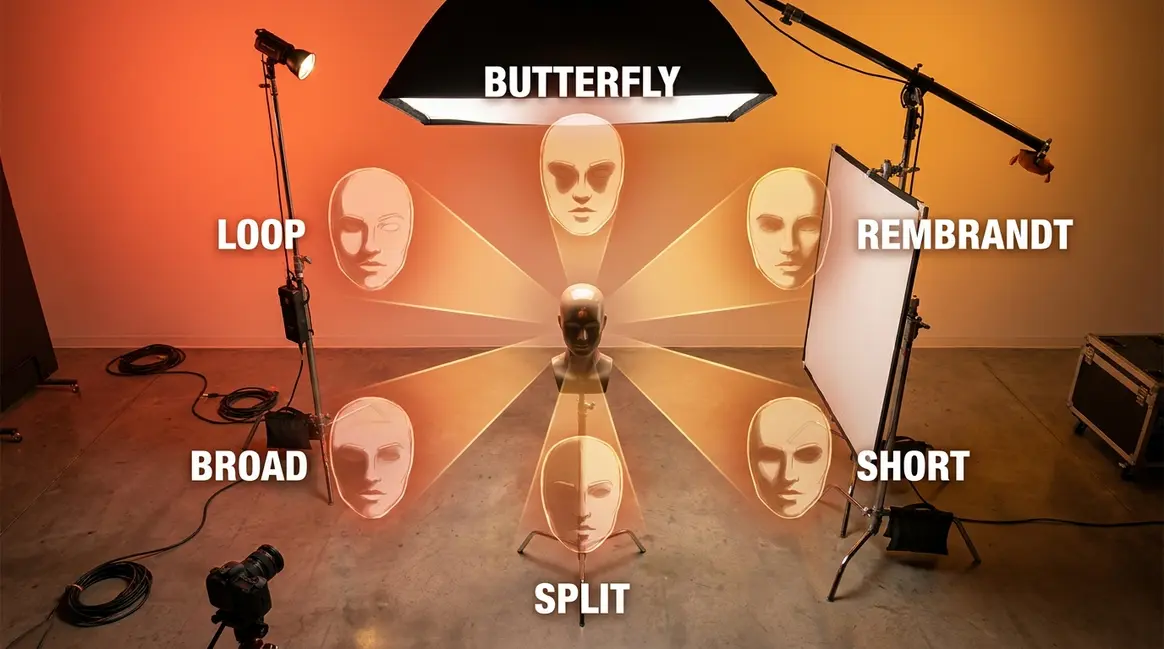
Here are the 6 core portrait lighting patterns every beginner should know:
- Butterfly — Light placed directly above and in front of the subject, creating a small butterfly-shaped shadow beneath the nose
- Loop — Light placed slightly to the side and above, creating a small looping shadow beside the nose
- Rembrandt — Light placed to the side and higher, creating a small triangle of light on the shadowed cheek
- Split — Light placed directly to one side, illuminating exactly half the face
- Broad — A relational term: the subject’s lit side faces the camera
- Short — A relational term: the subject’s shadowed side faces the camera
Knowing these six names means you can look at any professional portrait and immediately identify what the photographer did — and then replicate it yourself.
Butterfly Lighting: Classic Beauty
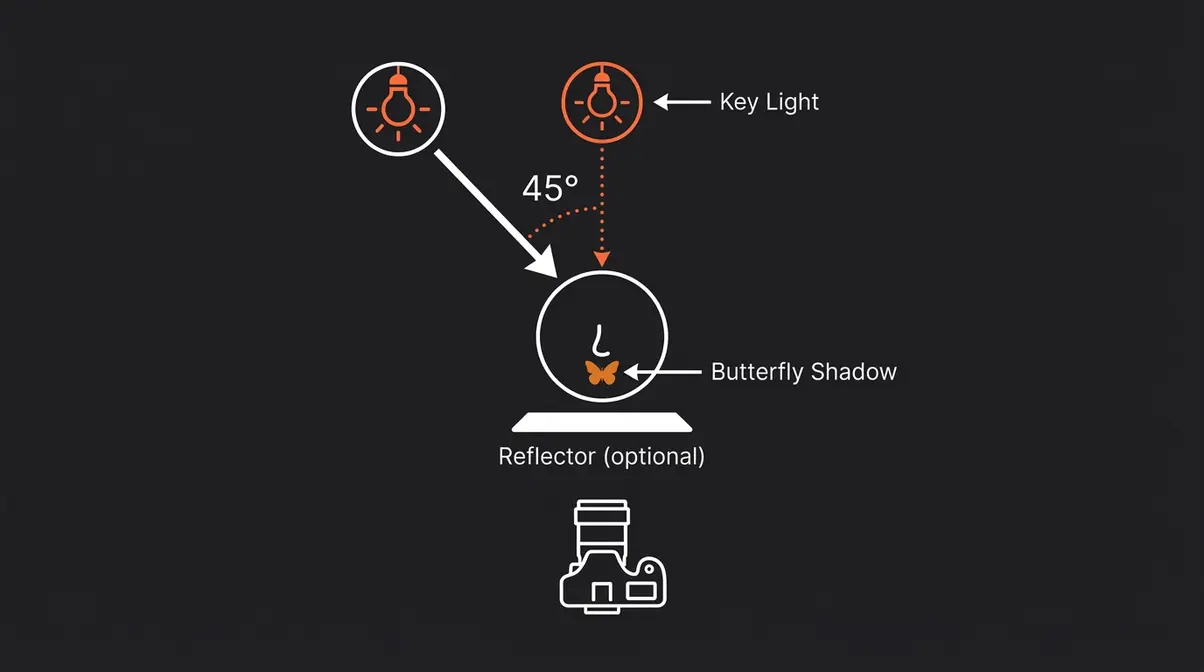
Butterfly lighting (also called Paramount lighting) is the most flattering pattern for most subjects, and it’s where many professional beauty and fashion photographers start every shoot. Place your light source directly in front of your subject and raise it above their eye line — typically 45 degrees above the face. This creates the pattern’s signature: a small, butterfly-shaped shadow directly beneath the nose.
Why this works: The downward angle of the light sculpts the cheekbones and slims the face by creating gentle shadows under the cheekbones and chin. It also produces beautiful catchlights (the small white reflections visible in the subject’s eyes that signal your light source position) — giving portraits that bright, open, engaging quality you see in magazine covers.
Best face shapes: Butterfly lighting is most flattering for oval and heart-shaped faces. For round faces, it can be combined with a slight side angle to add more dimension.
Mood it creates: Clean, glamorous, aspirational. Think beauty editorial, headshots, and any portrait where you want the subject to look their absolute best.
- How to set it up:
- Position your subject facing directly toward the light
- Raise the light to approximately 45 degrees above their eye line
- Check for the butterfly shadow — it should appear small and centered under the nose
- Add a reflector beneath the subject’s chin to bounce light back up and soften under-eye shadows
Loop Lighting: Versatile Studio Setup
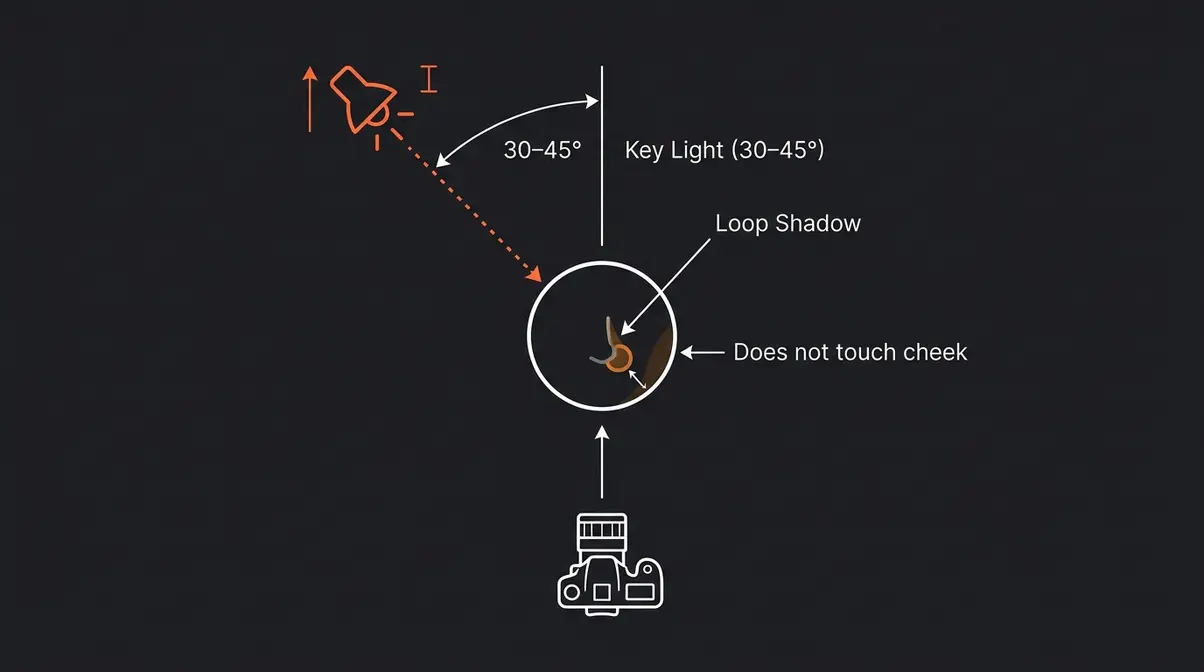
Loop lighting is the most commonly used portrait pattern in professional studios — and for good reason. It’s forgiving, flattering, and works on almost every face shape. Move your light source slightly to the side (roughly 30–45 degrees from the subject’s center line) and raise it just above eye level. The result is a small, looping shadow that drops from the side of the nose toward the corner of the mouth — without fully separating from the cheek shadow.
Why this works: Loop creates gentle dimension without the drama of Rembrandt or Split. The nose shadow is small and contained, which reads as natural rather than theatrical. For beginners, it’s the most forgiving pattern to nail — slight positioning errors still produce flattering results.
Best face shapes: Loop is universally flattering. It adds definition to round faces and doesn’t exaggerate features on angular faces.
Mood it creates: Natural, approachable, professional. Loop is the default pattern for headshots, corporate portraits, and lifestyle photography where you want the subject to look real and relatable.
- How to set it up:
- Position the light roughly 30–45 degrees to one side of the subject
- Raise it slightly above eye level
- Look for the loop shadow — it should point downward from the nostril, not connect to the cheek shadow
- If the shadow connects to the cheek shadow, you’ve crossed into Rembrandt territory — back the light toward center
Rembrandt Lighting: Depth & Gravitas
Rembrandt lighting is named after the Dutch master painter Rembrandt van Rijn, whose 17th-century portraits are famous for their dramatic use of shadow. It’s created by placing your light to the side and slightly above the subject — far enough that only a small triangle of light falls on the shadowed cheek (roughly the size of the eye above it). That triangle is the signature. When you see it, you know you’ve achieved Rembrandt.
Why this works: The deep shadow across one side of the face creates instant depth and drama. It’s particularly effective for conveying seriousness, thoughtfulness, or gravitas — qualities that flat, even lighting can never produce.
Best face shapes: Rembrandt works beautifully for stronger, more angular faces. It can make softer, rounder faces look more defined — but test carefully, as the shadow can sometimes read as unflattering on very round face shapes.
Mood it creates: Deep, serious, artistic, introspective. Think character portraits, author photos, and any image where the goal is to convey weight and presence.
- How to set it up:
- Position the light 45–60 degrees to one side of the subject
- Raise it above eye level until the triangle of light appears on the far cheek
- The triangle should be no wider than the eye and no longer than the nose
- Use no fill light, or a very weak fill (4:1 ratio) to preserve the dramatic effect
Split Lighting: Drama and Tension
Split lighting is the most dramatic of the classic patterns. Place your light source directly to one side of the subject — at a 90-degree angle from the camera — and you’ll illuminate exactly half the face while leaving the other half in near-complete shadow. No gradual transition. No soft middle ground. Just a clean, hard line dividing light from dark.
Why this works: Split lighting creates immediate visual tension. The stark contrast forces the viewer’s eye to work across the image, creating a sense of mystery and edge that softer patterns simply can’t replicate.
Best face shapes: Split lighting works on most face shapes, but it’s particularly powerful on faces with strong bone structure. On very round faces, the strong shadow can exaggerate roundness — in those cases, slight adjustment toward Loop or Rembrandt territory helps.
Mood it creates: Dramatic, mysterious, edgy, intense. Split lighting is the go-to for musicians, artists, and any portrait where you want the subject to project power or unpredictability.
- How to set it up:
- Position the light at exactly 90 degrees to the side of the subject
- Keep the light at roughly eye level (raising it creates a more cinematic effect)
- Check that the shadow line falls directly down the center of the nose
- Avoid fill light entirely — or use only a very faint fill (8:1 ratio) to preserve the drama
Broad vs. Short Lighting
Broad lighting and short lighting aren’t standalone patterns like the four above — they’re relational terms that describe which side of the face is turned toward the camera. Understanding them unlocks a powerful tool for shaping your subject’s face without moving your light at all.
- Broad lighting: The subject’s face turns slightly away from the light, so the lit side of the face is the larger, broader area facing the camera. This makes faces appear wider and fuller — useful for subjects with narrow faces who want to appear more substantial.
- Short lighting: The subject turns toward the light, so the shadowed side of the face is the larger area facing the camera. This slims the face significantly — one of the most requested adjustments in portrait photography. Short lighting is the secret behind the “slims the face” effect you’ve seen in professional portraits.
How to switch between them: Simply ask your subject to turn their head. The light doesn’t move. When the lit cheek faces the camera, that’s broad. When the shadowed cheek faces the camera, that’s short.
Choosing the Right Pattern
This is where The Pattern-to-Mood Map comes in. Instead of memorizing technical rules, use this framework: choose your lighting pattern by the emotion you want to create first, then set up the light to match.
Here’s the full map:
| Pattern | Mood Created | Best For | Face Shape Tip |
|---|---|---|---|
| Butterfly | Glamorous, clean, aspirational | Beauty, fashion, headshots | Best for oval/heart faces |
| Loop | Natural, approachable, professional | Headshots, lifestyle, editorial | Works on all face shapes |
| Rembrandt | Serious, artistic, introspective | Character portraits, authors | Adds definition to round faces |
| Split | Dramatic, mysterious, intense | Musicians, artists, edgy editorial | Strong bone structure shines |
| Broad | Full, warm, open | Subjects wanting to appear fuller | Narrow or slim faces |
| Short | Slim, defined, elegant | Most commercial portraits | Round faces especially |
The Pattern-to-Mood Map makes lighting feel creative rather than intimidating. Before your next portrait session, ask yourself: what do I want the viewer to feel when they look at this image? That answer tells you exactly which pattern to reach for.
Beyond the core six, three additional patterns are worth knowing as you advance: catchlight positioning (controlling where the light reflection appears in the eyes), Paramount lighting (an alternate name for Butterfly, used in Hollywood studio photography), and profile lighting (where the subject is lit from directly behind for a silhouette or rim-light effect).
Now that you know what each pattern looks like, the next step is learning how to physically set them up — with one light, two lights, or a full three-point rig. Check out our step-by-step portrait photography guide for a companion walkthrough.
Portrait Lighting Setups (1 to 3 Lights)
Most beginners assume professional portraits require expensive multi-light studios. They don’t. Our team evaluated each of the following setups against beginner-friendly criteria: simplicity of setup, forgiving margin for error, and flattering results across different face shapes. The consistent finding across photography education communities is clear — a single well-placed light outperforms three poorly placed lights every time.
What You’ll Need Before You Start
Before you touch a single light, gather these essentials. You don’t need all of them — but knowing what each item does helps you make smart substitutions.
Estimated Time: 30-45 minutes for initial setup and testing.
- Essential gear (or free substitutes):
- Key light (your main, brightest light source): A window, a speedlight, a continuous LED panel, or even a desk lamp
- Reflector (bounces light back into shadow areas): A piece of white foam board works perfectly — no purchase required
- Light stand or clamp (holds your light at the right height): A stack of books or a helpful friend can substitute
- Diffusion material (softens harsh light): A white bedsheet over a window, or a shower curtain in front of a lamp
- Nice-to-have additions:
- A fill light (second, weaker light source)
- A hair light or rim light (adds separation from the background)
- A lightmeter app (free on most smartphones — measures exposure accurately)
For a comprehensive gear list, check out our home photography lighting expert tips to build your studio on a budget.
The One-Light Setup
One light is not a compromise. It’s the foundation of portrait photography, and many working photographers shoot one-light setups by choice — not necessity.
- How to set it up:
- Position your subject 3–6 feet away from the background (this prevents the shadow of your subject from falling on the background)
- Place your key light 2–4 feet from the subject’s face, at roughly a 45-degree angle to one side and slightly above eye level
- This naturally produces Loop lighting — the most universally flattering pattern
- Add a white reflector on the opposite side of the subject, angled to bounce light back into the shadow side
- The distance between subject and reflector controls how much shadow you preserve — closer means softer shadows, further means more dramatic
Why one light works: A single light creates natural depth by illuminating one side more than the other. This dimensional quality is exactly what’s missing from built-in flash, which fires straight at the subject and flattens everything.
The Two-Light Setup: Key + Fill
Adding a second light gives you explicit control over your shadows. In a two-light setup, you use a key light (your main, brightest source) and a fill light (a weaker secondary source placed on the opposite side to soften shadows without eliminating them entirely). If you need more help balancing these shadows, read our detailed guide on what is fill light explained.
- How to set it up:
- Place your key light at 45 degrees to one side, slightly above eye level — exactly as in the one-light setup
- Place your fill light on the opposite side, at roughly the same height as the subject’s face
- Make the fill light significantly weaker than the key — either by moving it further away, reducing its power, or pointing it at a reflector instead of directly at the subject
- A 3:1 ratio (key three times brighter than fill) is the most commonly used starting point in professional studios — it preserves shadow depth while keeping both sides of the face visible
The key difference from one-light: A reflector bounces whatever light hits it. A fill light gives you independent control — you can dial it up or down without touching the key light.
The Three-Point Lighting Setup
Three-point lighting is the standard professional setup used in studio photography, film, and broadcast. It adds a third light — the hair light or rim light — to separate the subject from the background and add three-dimensional presence.
- The three lights are:
- Key light — your main source, positioned at 45 degrees
- Fill light — opposite the key, weaker, softens shadows
- Hair light — positioned above and slightly behind the subject, aimed at the hair and shoulders
Why the hair light matters: Without a hair light, subjects with dark hair against dark backgrounds disappear. The rim of light the hair light creates gives the portrait depth and separation that makes it look genuinely professional rather than flat.
What is the rule of 3 in portraits?
The rule of 3 in portrait photography most commonly refers to three-point lighting — the use of a key light, a fill light, and a hair (or rim) light as the baseline professional setup. The key light is your primary source; the fill light softens shadows on the opposite side; the hair light separates the subject from the background. Some instructors also use “rule of 3” to describe the 3:1 lighting ratio, where the key light is three times brighter than the fill — a starting point for natural-looking portrait shadows.
Understanding Lighting Ratios
A lighting ratio is simply the difference in brightness between the lit side and the shadow side of your subject’s face. It’s expressed as a ratio — and it’s the single most overlooked variable by beginners.
| Ratio | Shadow Depth | Best For | Mood |
|---|---|---|---|
| 2:1 | Very soft, minimal shadow | Beauty, glamour, even skin tones | Bright, open, commercial |
| 3:1 | Moderate shadow | Most headshots, editorial | Natural, professional |
| 4:1 | Noticeable shadow | Character portraits | Serious, defined |
| 8:1+ | Deep, dramatic shadow | Artistic, fine art | Intense, moody |
How to achieve a specific ratio: Move your fill light closer to increase its power (lowering the ratio toward 2:1) or further away to decrease it (pushing toward 4:1 and beyond). A 3:1 ratio is the most forgiving starting point — it produces flattering depth without looking theatrical.
Natural vs. Studio Light for Portraits
Natural light is free, beautiful, and available to every photographer on the planet — and it follows exactly the same rules as studio light. The Smithsonian Institution’s portrait photography collection includes some of the most celebrated natural-light portraits ever made, demonstrating that window light has been a primary portrait tool for centuries (Smithsonian, 2026). Understanding how to use it is not a compromise — it’s a fundamental skill.
How to Use Window Light as a Key Light
A window is one of the best portrait lights available. It’s large (which makes it soft and flattering), it’s directional (which creates dimension), and it’s free. The key is controlling it — not just standing near it and hoping for the best.
- How to set it up:
- Position your subject so the window is to one side — not directly behind them and not directly in front of them
- A 45-degree angle from the window produces natural Loop lighting
- Move your subject closer to the window to increase light intensity; move them back to decrease it
- Place a white reflector or foam board on the opposite side to bounce light into the shadows — this is your “fill light”
- Use a sheer curtain or white bedsheet over the window to diffuse harsh direct sunlight into soft, even light
What to avoid: Positioning your subject directly in front of a window creates a silhouette — the camera exposes for the bright background and leaves the face dark. This is the most common window-light mistake beginners make.
Best time of day: North-facing windows provide the most consistent, soft light throughout the day. East-facing windows produce warm morning light; west-facing windows give you warm afternoon light. South-facing windows can produce harsh, direct sun — diffuse it.
Outdoor Portrait Lighting
Outdoor light is abundant — but uncontrolled. The difference between a flattering outdoor portrait and a harsh, squinting mess often comes down to one decision: where you position your subject relative to the sun. To master this timing, explore what is golden hour for detailed scheduling tips.
Open shade is your best friend. Position your subject under a tree, in a doorway, or on the shaded side of a building. Open shade provides soft, diffused light from the open sky — which acts exactly like a giant softbox. National Geographic’s guide to portrait photography consistently recommends open shade as the most reliable outdoor lighting condition for beginners (National Geographic, 2026).
The golden hour advantage: The hour after sunrise and the hour before sunset produce warm, directional light at a low angle — naturally flattering because it wraps around the face rather than striking it from directly above. Midday sun from directly overhead creates harsh shadows under the eyes and nose — the most unflattering light of the day.
- How to handle direct sun when you can’t avoid it:
- Position the sun behind your subject (backlight) — this creates a warm rim of light around the hair and shoulders
- Use a reflector in front of the subject to bounce light back into the face
- Alternatively, use a speedlight (a small external flash) to add fill light to the face — this is called “fill flash” and it’s a powerful technique for balancing bright backgrounds
When to Choose Studio Light
Natural light is beautiful — but it has real limitations. Studio light gives you something natural light cannot: complete control, regardless of weather, time of day, or location.
- Choose studio light when:
- You’re shooting product-style headshots that require consistent, repeatable results
- You need to shoot at any time of day without worrying about weather
- You want to practice specific patterns (Rembrandt, Split) with precise shadow placement
- You’re building a portfolio and need identical lighting across multiple subjects
Natural light remains the better choice for lifestyle and environmental portraits where the location is part of the story. The distinction isn’t which is “better” — it’s which serves the specific portrait you’re trying to make.
What lighting is best for portraits?
Soft, directional light is generally best for portrait photography. Soft light (from large sources like windows, softboxes, or open sky) wraps around the subject and produces flattering, gradual shadow transitions. Directional light (coming from one side rather than straight on) creates the dimension that separates professional portraits from flat, built-in-flash snapshots. For most beginners, a single large window with a reflector on the opposite side produces excellent results — no additional equipment needed (Stanford University, 2026).
Creating Dramatic Portrait Lighting
Dramatic portrait lighting isn’t about expensive equipment — it’s about understanding two fundamental variables: light quality and light direction. According to BBC Culture’s analysis of portrait photography, the most celebrated portrait photographers throughout history have used deliberate manipulation of shadow — not elimination of it — as their primary creative tool (BBC Culture, 2018).
Hard vs. Soft Light for Drama
Soft light comes from large sources (big windows, softboxes, open sky) and wraps around the subject — creating gradual transitions from light to shadow. It’s flattering, forgiving, and the right choice for most commercial and beauty work. Conversely, if you want minimal shadows and an airy feel, you might explore what is high key lighting.
Hard light comes from small, distant sources (direct sun, a bare speedlight, a focused LED spot) and creates sharp, defined shadows with abrupt edges. It’s dramatic, intense, and the right choice when you want the portrait to feel edgy or theatrical.
The rule is simple: larger light source relative to your subject = softer light. Smaller source = harder light.
- You can control this without buying anything new:
- Move a window further away from your subject → harder light
- Diffuse a bare flash with a piece of white fabric → softer light
- Use a bare speedlight with no modifier → hard, dramatic shadows
- Bounce your flash off a ceiling → large, soft, wrapping light
“The difference between a flat portrait and a dramatic one is almost always shadow — specifically, how deliberately the photographer chose to create it.”
Black and White Portraits
Black and white portrait photography strips away color, which means lighting contrast carries the entire visual weight of the image. This is why the most celebrated black-and-white portraits use higher lighting ratios (4:1 or greater) than their color counterparts. For more tips on monochromatic editing and shooting, see our black and white photography guide.
- Key principles for B&W portrait lighting:
- Increase your lighting ratio: A 3:1 ratio that looks natural in color becomes subtle in black and white. Push to 4:1 or 5:1 for visible drama
- Use Rembrandt or Split lighting: These patterns produce the strongest tonal contrast — which is what makes black and white portraits sing
- Look for texture: Hard light reveals skin texture; soft light smooths it. For character portraits in B&W, slight hard light adds authenticity
- Control your background: A dark background with a bright subject, or vice versa, creates the tonal separation that makes B&W portraits compelling
Modifiers: Grids, Snoots, & Gels
Light modifiers are attachments that change how your light behaves. They’re not just for advanced photographers — even beginners can use them to immediately transform a flat portrait into something dramatic.
| Modifier | What It Does | Best For |
|---|---|---|
| Softbox | Diffuses light across a large surface area | Flattering beauty and headshot work |
| Umbrella | Bounces or diffuses light broadly | General studio portraits |
| Grid | Narrows the light beam, prevents spill | Precise pattern control, dark backgrounds |
| Snoot | Creates a narrow spotlight effect | Hair lights, dramatic character portraits |
| Reflector dish | Concentrates light for harder, more defined shadows | Dramatic black and white work |
| Gel | Adds color to the light | Creative, editorial, mood lighting |
How to use a grid: Attach it to the front of your softbox or reflector dish. It narrows the angle of light output — preventing spill onto the background and creating a more focused, intentional pool of light on the subject. Grids are one of the most underused beginner tools.
Continuous LED Lighting & RGB
Continuous LED lighting is the fastest-growing segment of portrait photography equipment — and it’s almost completely ignored in beginner photography guides. Unlike traditional flash (which fires in a brief burst), continuous LED lights stay on, letting you see your lighting effect in real time before you take a single shot. If you prefer traditional strobes, our flash photography tutorial covers the basics of syncing.
- Why LED lighting is beginner-friendly:
- What you see is what you get — no guessing about how the flash will look
- No sync speed limitations — shoot at any shutter speed
- Affordable entry point — quality LED panels start around $50–$150
- RGB color capability — many modern LED panels can produce any color, opening creative possibilities unavailable with traditional flash
- Using RGB color for mood lighting:
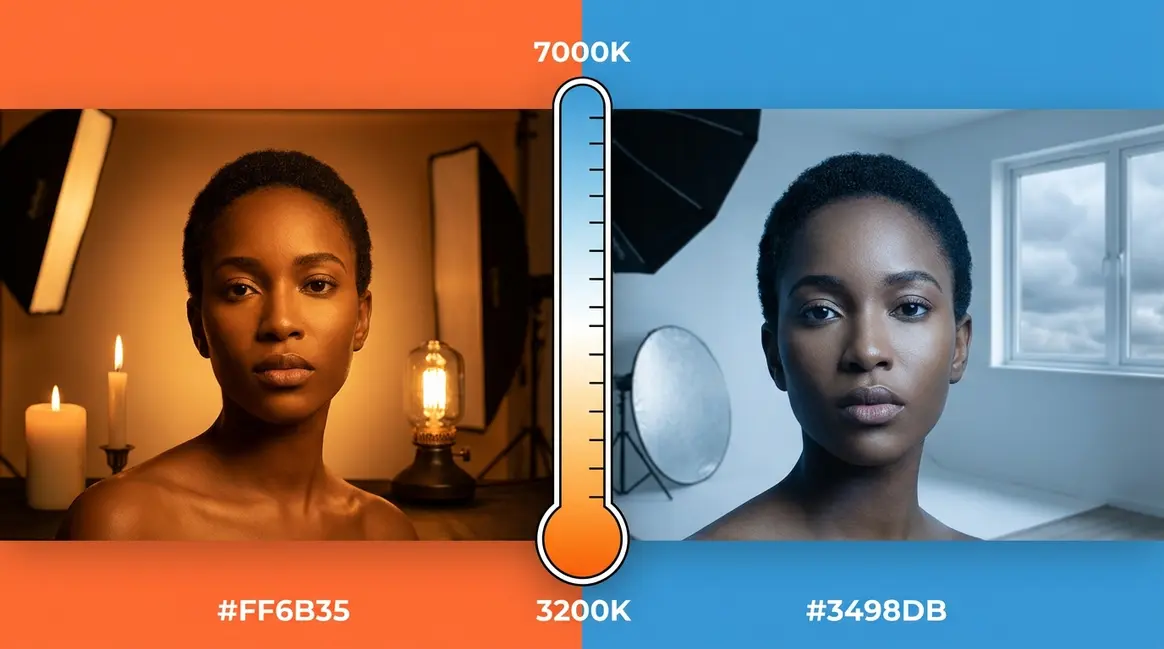
- Blue gels/LEDs (5,000–7,000K color temperature): Cool, cinematic, dramatic — popular for editorial and music photography
- Orange/amber LEDs (2,700–3,200K): Warm, intimate, golden-hour feel
- Complementary color splits (e.g., blue key + orange fill): Creates a cinematic split-tone effect popularized in film and TV production
- How to get started with LED portrait lighting:
- Choose a panel with adjustable color temperature (at least 3,200K–5,600K range)
- Set your camera to manual white balance and match it to the LED panel’s color temperature
- Start with the same 45-degree key light position you’d use for any other source
- Experiment with color only after you’ve mastered position — color is a creative layer, not a foundation
Portrait Lighting Cheat Sheet
The most common problem photographers report isn’t not knowing the patterns — it’s forgetting the details mid-shoot. You’ve read the guide, you understand the concepts, and then you’re standing in front of a subject and your mind goes blank. That’s what this section is for.
Free Portrait Lighting Cheat Sheet
The cheat sheet below consolidates everything in this guide into a single scannable reference. Print it, save it to your phone, or keep it open on a tablet during shoots. Pair this with our portrait photography checklist to ensure you never miss a step on set.
- Quick setup reminders:
- Butterfly: Light directly in front, 45 degrees above — look for the butterfly shadow under the nose
- Loop: Light 30–45 degrees to the side, slightly above — look for the small nose shadow that doesn’t touch the cheek
- Rembrandt: Light 45–60 degrees to the side, above — look for the triangle of light on the far cheek
- Split: Light at 90 degrees to the side — shadow line runs straight down the center of the nose
- Broad: Subject turns away from light — lit cheek faces camera
- Short: Subject turns toward light — shadowed cheek faces camera
Quick Reference: Pattern-to-Mood Map
The Pattern-to-Mood Map is the core framework of this guide — and the fastest way to make lighting decisions on set. Before every portrait session, answer one question: what do I want the viewer to feel? Then use the map below.
The Pattern-to-Mood Map works because lighting is fundamentally an emotional communication tool. Every shadow you place — or choose not to place — tells the viewer how to feel about the person in the frame. Once you internalize that principle, the technical details become secondary. The mood comes first. The setup follows.
Common Portrait Lighting Mistakes
Every photographer makes these mistakes — including professionals in their early work. The goal isn’t to avoid them entirely; it’s to recognize them quickly and know exactly what to adjust. Across photography education communities and beginner forums, these five issues appear more consistently than any others.
5 Common Lighting Mistakes
1. Using built-in flash as the primary light source
Built-in flash fires straight at your subject from the camera position — producing flat, shadowless light with harsh specular highlights and red-eye. The fix: turn it off and use a window, a reflector, or an external speedlight pointed at the ceiling instead.
2. Placing the light too far away
Light intensity falls off dramatically with distance (following the inverse square law — light intensity is inversely proportional to the square of the distance). A light placed 6 feet away is not “just a bit dimmer” than one at 3 feet — it’s four times less powerful. Move your light closer to your subject.
3. Ignoring the background
Beginners focus entirely on the subject and forget that the background receives light too. A cluttered or unevenly lit background immediately reads as amateur. Fix: position your subject at least 3–6 feet from the background, and use a separate background light or let the background fall into shadow naturally.
4. Chasing “even” light
Many beginners try to eliminate all shadows — placing lights on both sides at equal power. The result is the flattest, least interesting portrait light possible. Embrace controlled shadow. Shadow creates dimension. Dimension creates depth. Depth creates professional-looking portraits.
5. Not checking the catchlight position
The catchlight (the small white reflection in the subject’s eyes) reveals exactly where your light is. If the catchlight is in an unexpected position — or missing entirely — your light placement is off. Check the catchlight in every frame and use it as your positioning guide.
When Natural Light Is the Better Choice
Studio lighting gives you control — but natural light gives you something harder to manufacture: authenticity. For environmental portraits, lifestyle photography, and any situation where the location is part of the story, natural light often serves the image better than any artificial setup.
- Choose natural light when:
- Your subject is uncomfortable or distracted by equipment — natural light sessions feel more relaxed
- The location has beautiful, directional window light that would take significant equipment to replicate
- You’re photographing children or animals, where speed and simplicity matter more than precise control
- The “unpolished” quality of natural light serves the emotional intent of the portrait
The honest answer is that neither natural nor studio light is universally superior. The best photographers are fluent in both — and choose based on what serves the specific portrait, not what they happen to have available.
When to Seek Professional Guidance
If you’ve worked through this guide and still feel stuck on a specific technique, consider these next steps:
- Photography workshops: Many community colleges and photography schools (including programs modeled on MoMA’s photography education resources) offer hands-on lighting workshops where you can practice with real equipment and receive immediate feedback
- Online mentorship: Platforms like Skillshare, CreativeLive, and YouTube offer structured portrait lighting courses from working photographers — many free
- Shooting groups and photowalks: Local photography communities provide low-pressure environments to practice new techniques with real subjects
The most efficient path to improvement is deliberate practice with specific feedback — not more reading. Use this guide as your starting framework, then go shoot.
Frequently Asked Questions
What are the 6 main lighting techniques?
The six main portrait lighting techniques are Butterfly, Loop, Rembrandt, Split, Broad, and Short lighting. Each produces a distinct shadow pattern on the subject’s face that defines the mood of the image. Butterfly creates a glamorous beauty look; Loop is the most universally flattering; Rembrandt produces depth and gravitas; Split creates dramatic tension; Broad makes faces appear fuller; and Short slims the face. Professional photographers use these six as their complete foundational vocabulary (New York Film Academy, 2026).
What are the 4 C’s of lighting?
The 4 C’s of lighting are Contrast, Color, Coverage, and Continuity. Contrast describes the difference in brightness between lit and shadow areas — high contrast is dramatic, low contrast is soft and even. Color refers to the color temperature of your light source (warm or cool). Coverage describes how much of the scene your light illuminates. Continuity refers to maintaining consistent lighting across a shoot or series of images. These four variables give photographers a framework for evaluating and adjusting any lighting setup systematically.
What colors do not photograph well?
Neon and highly saturated colors often photograph poorly, particularly neon yellow, neon green, and very bright orange — they can cause color bleeding (where the color appears to bleed onto adjacent areas) and can confuse camera metering. Very fine patterns like thin stripes or herringbone can cause moiré (a distracting wavy pattern) in digital images. For portrait subjects, mid-toned, desaturated colors photograph most reliably. Skin tones are also affected by strongly colored light sources — a green gel, for example, will create unflattering casts on most skin tones.
What are the 5 C’s of photography?
The 5 C’s of photography are Composition, Color, Continuity, Camera angle, and Cutting — a framework originally developed for cinematography but widely applied in still photography education. In portrait photography specifically: Composition governs where the subject sits in the frame; Color addresses light temperature and subject palette; Continuity ensures consistency across a shoot; Camera angle determines the viewer’s relationship to the subject (low angles convey power, high angles convey vulnerability); and Cutting (or framing) describes how the image is cropped and what is excluded from the frame.
How to avoid glare in glasses?
To avoid glare in glasses, angle your key light slightly higher and further to the side. Glare occurs when the light source reflects directly off the lens into the camera. By shifting the light source roughly 45 degrees to the side and raising it slightly above the subject’s eye line, the reflection bounces downward or away from the lens. You can also ask the subject to tilt their chin down slightly or angle their glasses downward by lifting the arms of the frames slightly above their ears.
Can I mix natural and artificial light?
Yes, mixing natural and artificial light is a common professional technique. The easiest way to start is by using a large window as your primary key light and introducing a small, diffused LED panel or speedlight as a fill light to lift the shadows. When mixing sources, it is crucial to match the color temperature of your artificial light to the natural light (e.g., setting your LED to 5600K to match daylight) to prevent unwanted blue or orange color casts on the subject’s face.
Bringing It All Together
For beginner portrait photographers, the single most valuable shift is moving from random light placement to intentional pattern selection. Soft, directional light — whether from a window, a softbox, or an LED panel — consistently produces more flattering results than the flat, on-camera flash that most beginners start with. The six classic patterns (Butterfly, Loop, Rembrandt, Split, Broad, and Short) give you a complete vocabulary for every portrait you’ll ever make (New York Film Academy, 2026). Mastering them doesn’t require a studio — a single window and a piece of white foam board are enough to produce genuinely professional results.
The Pattern-to-Mood Map is the framework that makes all of this actionable. Instead of memorizing technical rules, you start with the emotion you want to create — glamorous, natural, dramatic, or intimate — and work backward to the setup that produces it. That creative-first approach is what separates photographers who feel confident on set from those who feel like they’re guessing. Every shadow you place is a decision, not an accident.
Your next step is simple: pick one pattern from this guide — Loop is the most forgiving starting point — set up a window and a reflector, and shoot 20 frames with a willing subject this week. Compare the results against your previous portraits. The difference will be immediate and visible. From there, work through each pattern in order, consulting the Pattern-to-Mood Map before each session. Within a month of deliberate practice, the patterns will feel as natural as any other creative decision you make behind the camera.

Dave King
Hi, I'm Dave, the founder of Amateur Photographer Guide. I created this site to help beginner and hobbyist photographers build their skills and grow their passion. Here, you’ll find easy-to-follow tutorials, gear recommendations, and honest advice to make photography more accessible, enjoyable, and rewarding.