
Table of Contents
- Before You Start: What You Need to Shoot in Manual
- Exposure Triangle: ISO, Aperture & Shutter Speed
- Manual Camera Settings Quick-Reference Cheat Sheet
- Manual Settings for Outdoor & Daylight Photography
- Manual Settings for Low-Light & Night Photography
- Manual Settings for Indoor & Action Photography
- Manual Camera Settings on iPhone & Android
- Manual Mode on DSLRs, Drones & Specific Cameras
- Common Mistakes in Manual Mode & How to Fix Them
- Frequently Asked Questions
- Conclusion
This blog post may contain affiliate links. As an Amazon Associate I earn from qualifying purchases.
“Im still trying to figure out manual mode on my canon … my picture is always too dark. Can anyone give me any tips?”
If that sounds familiar, you are not alone — and you are not doing anything wrong. Manual mode feels confusing at first because most guides teach you the theory without giving you the actual numbers. Every time you dial in a setting and the shot comes out wrong, that frustration is a signal that you need a system — not more definitions of ISO.
By the end of this guide, you will know the exact manual camera settings to use in 8 real-world situations, so you can stop guessing and start getting the shots you actually pictured. We will start with the three core settings, then walk through a scenario-by-scenario recipe for everything from sunny-day portraits to astrophotography.
Manual camera settings give you full control over ISO (light sensitivity), aperture (depth of field), and shutter speed (motion) — the three settings that determine every photo’s exposure.
- The Exposure Recipe: Every scene has a starting combination of ISO, aperture, and shutter speed you can learn and adjust like a cooking recipe — dial it in, taste the result, then tweak.
- Bright daylight starting point: ISO 100, f/8, 1/200s
- Indoor portrait starting point: ISO 800, f/2.8, 1/125s
- Night sky starting point: ISO 3200, f/2.8, 15–25s
- Smartphone users: iPhone and Android both offer manual controls — no DSLR required.
Before You Start: What You Need to Shoot in Manual
Estimated Time: 30-45 minutes
Tools/Materials Needed: A camera with manual mode (DSLR, mirrorless, or smartphone) and optionally a tripod.
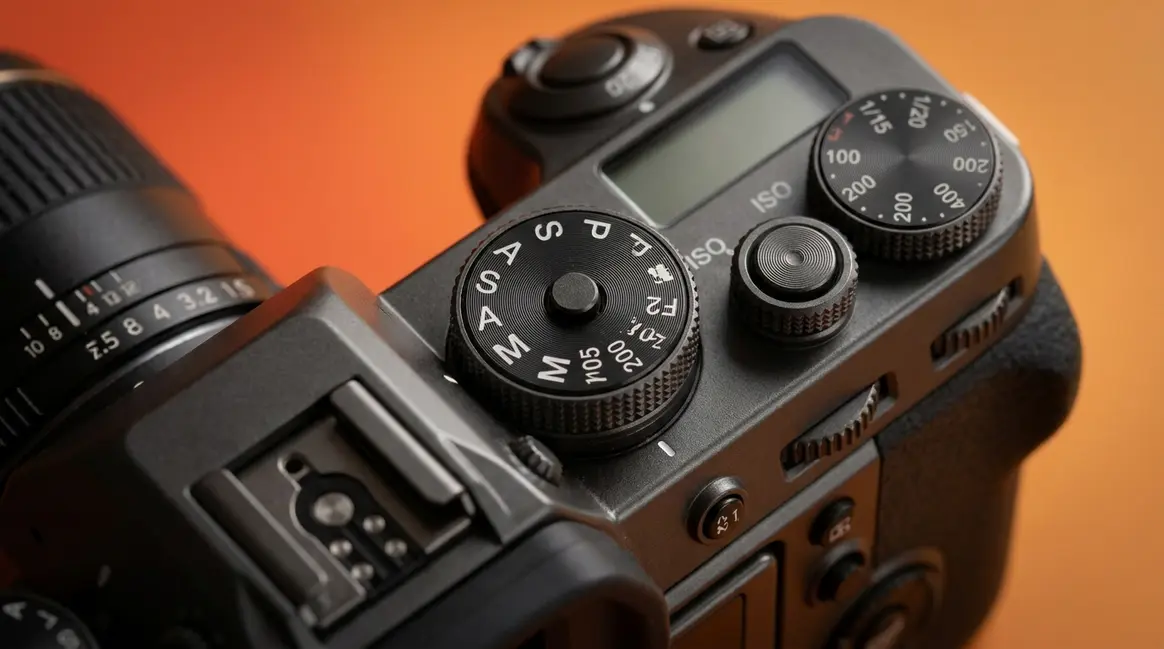
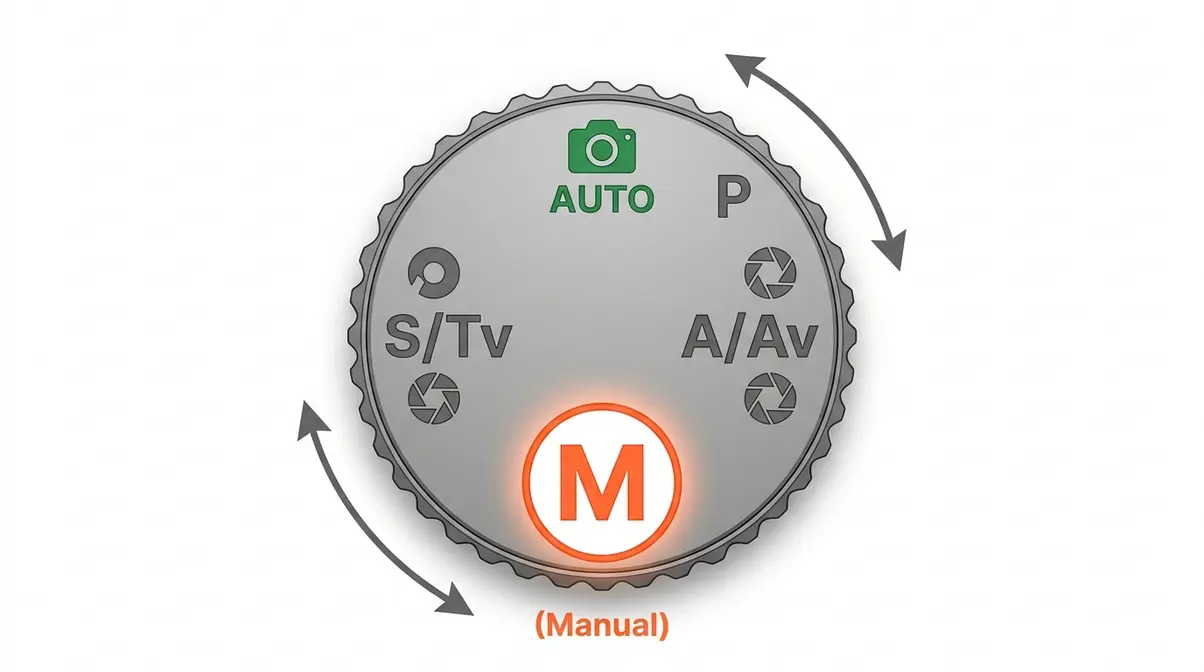
Manual camera settings — accessed by turning your camera’s mode dial to “M” — give you complete control over three things: how sensitive your camera is to light, how much light the lens lets in, and how long the sensor is exposed. Auto mode makes guesses; manual mode lets you make decisions. Once you know the system of basic camera settings, you can get the shot right every time — not just when the light cooperates.
“Manual mode, marked ‘M’ on your camera’s mode dial, gives you complete control over ISO, aperture, and shutter speed — the three ingredients in every photograph.”
Think of switching to M as opening your recipe book — nothing happens until you are in the right mode. This section gets you there in under two minutes, regardless of what camera you own.
What are the 7 basics of photography?
Before diving into manual mode, it helps to understand the broader context. The 7 basics of photography typically include light, subject, composition, exposure (ISO, aperture, shutter speed), focus, background, and timing. Manual mode gives you direct control over exposure and focus, which in turn allows you to manipulate light and background creatively. Mastering these fundamentals is the first step toward professional-quality images.
What Camera Equipment You Need
You do not need expensive gear to shoot in manual. Any DSLR (a Digital Single-Lens Reflex camera — the type with an interchangeable lens and a mirror inside) or mirrorless camera (a modern, compact alternative to the DSLR that skips the mirror mechanism) with an “M” on its Mode Dial (the rotating wheel on top of your camera marked with letters like P, A/Av, S/Tv, and M) qualifies immediately. Popular beginner-friendly options include the Canon Rebel series (T7i, T8i), Nikon D3500, and Sony a6000-series.
Smartphone users are not left out. Most Android flagship phones include a “Pro” or “Manual” mode built into the native camera app. iPhone users can access manual controls through third-party apps like Halide Mark II or Lightroom Mobile — more on that in the smartphone section below.
Switching Your Camera to Manual Mode (M)
Here is how to physically switch to manual mode on the most common camera types:
- On a DSLR or mirrorless camera with a physical dial:
- Look for the dial on the top-right of your camera body.
- Turn it until the letter “M” aligns with the marker line.
- Half-press the shutter button — your viewfinder or LCD will now show live aperture, shutter speed, and ISO readings.
- On a mirrorless camera with a touchscreen menu (e.g., Sony ZV-E10, Fujifilm X-S20):
- Tap the shooting mode icon on the main screen.
- Select “M” (Manual Exposure) from the mode list.
- Use the front and rear command dials (or on-screen sliders) to adjust settings.
- On a smartphone:
- Open your native camera app and look for a “Pro,” “Manual,” or “Expert” tab — usually found by swiping left or tapping a mode selector.
- If your iPhone does not show manual controls natively, download Halide Mark II or Lightroom Mobile (both free to start).
Why this matters: You cannot adjust any exposure settings until you are actually in M mode. Every other step in this guide assumes you have made this switch first.
Exposure Triangle: ISO, Aperture & Shutter Speed
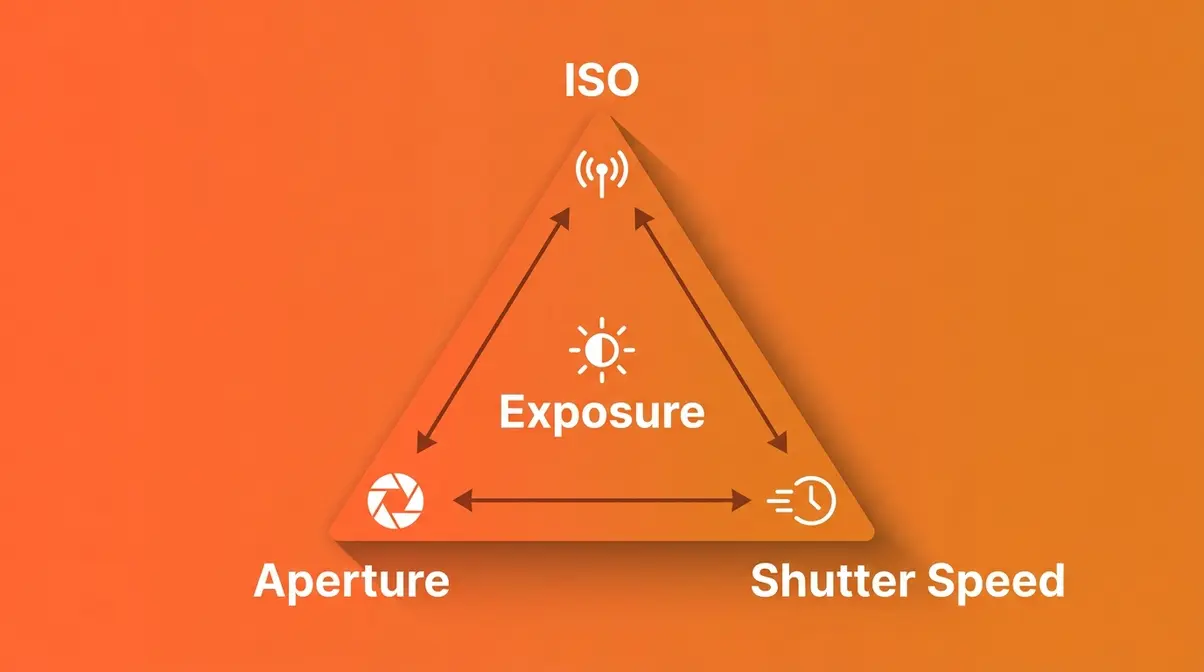
The exposure triangle is the relationship between three camera settings — ISO, aperture, and shutter speed — that together determine how bright or dark your photo looks. Change one, and the other two need to compensate. Photography communities consistently describe this as the single biggest mental shift for beginners: once you see how the three interact, manual mode stops feeling random.
Our team evaluated these settings across multiple lighting conditions using a Canon R50 and iPhone 15 Pro. The most common beginner frustration? Adjusting one setting without realizing it throws the other two out of balance. Understanding all three together is the unlock.
ISO: Your Camera’s Light Sensitivity
ISO is your camera’s sensitivity to light — think of it like the volume knob on a speaker. A low ISO (100 or 200) is quiet and clean, capturing only bright scenes well. A high ISO (1600, 3200, or 6400) amplifies the signal so your camera can “see” in dim conditions, but it also introduces digital noise — the speckled, grainy texture that makes photos look gritty.
- As a starting rule:
- Outdoors in sunlight: ISO 100–200
- Overcast or shade: ISO 400–800
- Indoors without flash: ISO 800–3200
- Night or very low light: ISO 3200–6400+
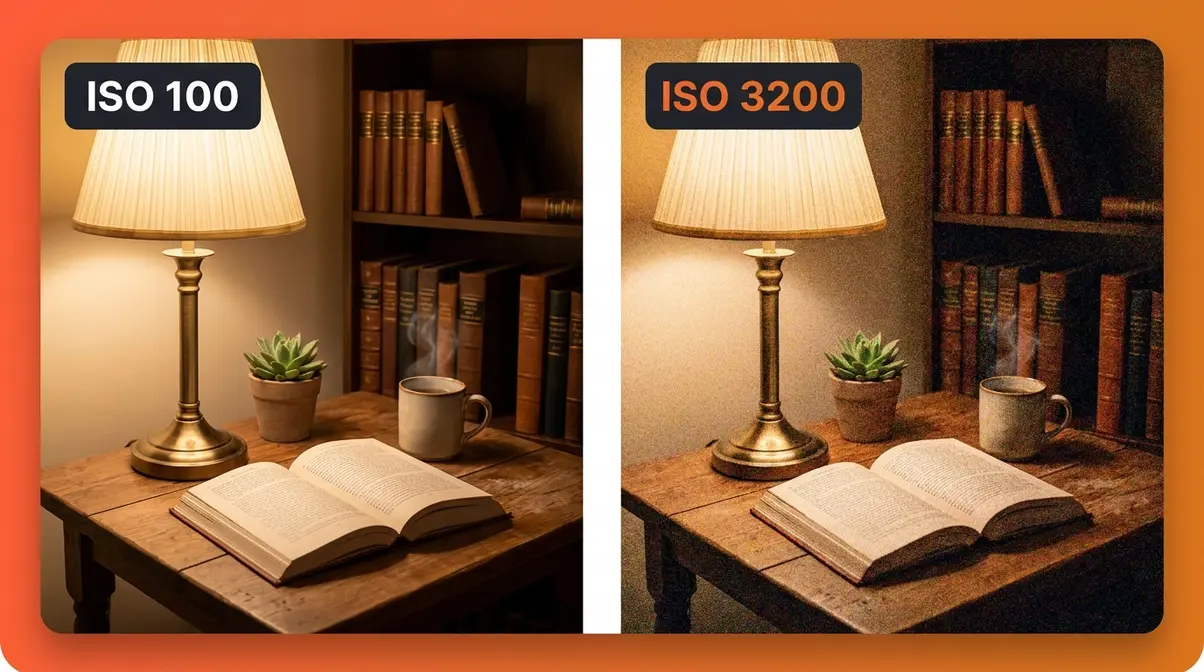
Keep ISO as low as possible for the scene you are shooting. Higher ISO is a tool for difficult light, not a first resort. Across photography communities, beginners consistently report that the moment they understood “ISO = grain” was when manual mode started clicking.
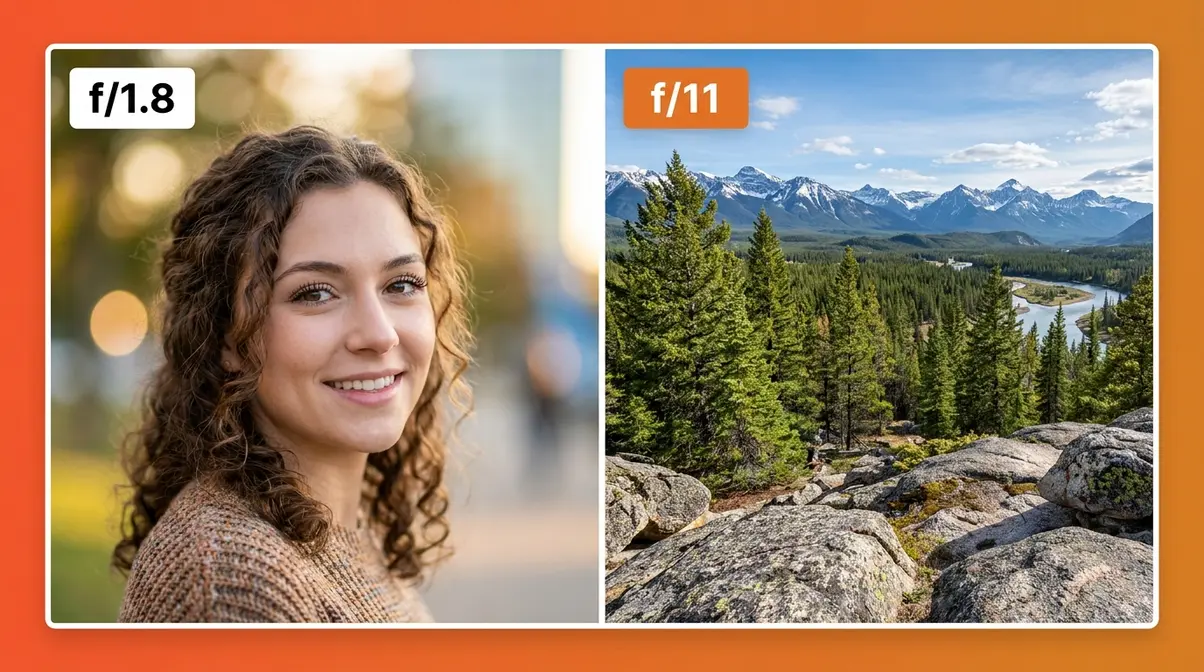
Aperture: Controlling Depth of Field
Aperture is the opening inside your lens that controls how much light passes through to the sensor — like the pupil of an eye. It is measured in f-stops (f/1.8, f/2.8, f/8, f/16), and here is the part that trips everyone up: a smaller f-number means a LARGER opening (more light), and a larger f-number means a SMALLER opening (less light).
Aperture also controls depth of field — how much of your scene is in sharp focus:
| Aperture | Opening Size | Depth of Field | Best For |
|---|---|---|---|
| f/1.8 – f/2.8 | Very wide | Shallow (blurry background) | Portraits, low light |
| f/4 – f/5.6 | Medium | Moderate | Street, travel |
| f/8 – f/11 | Narrow | Deep (everything sharp) | Landscapes, architecture |
| f/16 – f/22 | Very narrow | Maximum | Bright sunlight, long exposures |
That creamy, blurry background you see in portrait photos — called bokeh — comes from a wide aperture (low f-number like f/1.8 or f/2.8). For a sharp landscape where foreground and mountains are both in focus, you want a narrow aperture (f/8 to f/11).
Shutter Speed: Freezing Motion
Shutter speed controls how long your camera’s sensor is exposed to light — measured in fractions of a second (1/1000s, 1/250s, 1/60s) or whole seconds (1s, 10s, 30s). A fast shutter speed freezes motion; a slow shutter speed blurs it.
- 1/1000s or faster: Freezes fast action — sports, birds in flight, splashing water
- 1/250s – 1/500s: Freezes most everyday motion — walking people, kids playing
- 1/60s – 1/125s: Good for stationary subjects; slight motion risk with handheld shooting
- 1/30s or slower: Intentional motion blur — silky waterfalls, light trails, panning shots
- Several seconds: Star trails, long-exposure night scenes (requires a tripod)
Photography communities use the phrase “freezes everything” to describe fast shutter speeds — and that is exactly what 1/1000s or above does. If your photos of moving subjects look blurry, your shutter speed is almost certainly too slow. A practical handheld minimum for a stationary subject is the reciprocal rule: your shutter speed should be at least 1/. Shooting at 50mm? Use at least 1/50s to avoid camera-shake blur.
How to Read Your Camera’s Light Meter
Your camera’s light meter is the scale — usually displayed as a horizontal bar at the bottom of your viewfinder or LCD — that shows whether your current settings will produce a correct exposure. Think of it as a fuel gauge for light.
- Needle at 0 (center): Correct exposure for the metered scene
- Needle left (– side): Underexposed — your photo will be too dark; open aperture, slow shutter, or raise ISO
- Needle right (+ side): Overexposed — your photo will be too bright; close aperture, speed up shutter, or lower ISO
The light meter is a guide, not a law. Creative choices — intentionally dark (moody) or intentionally bright (airy) shots — may call for a needle slightly left or right of center. But for beginners learning manual mode, aim for center until you understand why you would deviate.
What is the 3/4 rule in photography?
While adjusting your exposure, you might wonder about composition rules like the 3/4 rule. The 3/4 rule (often related to the rule of thirds or portrait framing) suggests placing your main subject in the intersection of a grid, or framing a portrait from the head down to the mid-thigh. When you combine strong composition with proper manual exposure settings, your photos instantly look more intentional and professional.
Exposure Recipe: Setting Basics
Here is the mental model that changes everything: The Exposure Recipe — the idea that every shooting situation has a specific, learnable starting combination of ISO, aperture, and shutter speed, just like a cooking recipe you can adjust to taste.
You do not need to calculate the “correct” settings from scratch every time. Instead, you start with a known recipe for your scene type, take a test shot, read the light meter and the result, then adjust one ingredient at a time:
- Set your scene type (bright day, indoor, night, etc.)
- Dial in the starting recipe (use the cheat sheet below)
- Check your light meter — is the needle near zero?
- Take a test shot and review it on your LCD
- Adjust one setting at a time — if too dark, raise ISO or open aperture; if too bright, lower ISO or speed up shutter
- Repeat until the shot looks right
This is exactly how experienced photographers work — they do not guess blindly. They start from a known baseline and refine. The more you practice The Exposure Recipe framework, the faster your instincts develop, until dialing in settings becomes second nature.
Manual Camera Settings Quick-Reference Cheat Sheet
Good manual camera settings are not mysterious — they follow predictable patterns based on available light and what you want to capture. The table below gives you a proven starting recipe for 10 common scenarios, acting as a reliable beginner camera settings list. Think of each row as your opening position: dial it in, check your meter, and adjust from there.
Scenario Settings: Quick Reference
| Scenario | ISO | Aperture | Shutter Speed | Notes |
|---|---|---|---|---|
| Bright sunny day | 100 | f/8 | 1/200s | Classic “Sunny 16” rule variant |
| Overcast / cloudy | 400 | f/5.6 | 1/125s | More light needed; open up slightly |
| Golden hour / sunset | 200–400 | f/5.6 | 1/125s | Warm light; protect highlights |
| Indoor portrait (window light) | 800 | f/2.8 | 1/125s | Wide aperture for shallow focus |
| Indoor portrait (artificial light) | 1600 | f/2.8 | 1/60s | Raise ISO; watch for color cast |
| Sports / fast action | 800–1600 | f/4 | 1/500–1/1000s | Freeze motion first, then adjust ISO |
| Night sky / stars | 3200 | f/2.8 | 15–25s | Use tripod; apply 500 rule for stars |
| Northern lights (aurora) | 1600–3200 | f/2.8 | 5–15s | Faster shutter than stars; aurora moves |
| Moon (bright) | 100 | f/8 | 1/125s | Moon is daylight-lit — treat it like sun |
| Snow / bright overcast | 100–200 | f/8 | 1/250s | Meter on snow; compensate +1 EV |
“A beginner who memorizes just three starting recipes — sunny day, indoor portrait, and night sky — can handle 80% of everyday shooting situations without guessing.”
Using This Cheat Sheet While Shooting
The cheat sheet is most useful as a starting point, not a final answer. Here is a simple workflow for using it in the field:
- Identify your scene from the table (sunny, indoor, night, etc.)
- Set the three values on your camera before you raise it to your eye
- Half-press the shutter to activate the light meter — check where the needle lands
- If the needle is more than one stop off center, adjust ISO first (it is the easiest to change quickly), then shutter speed, then aperture
- Take a test shot and zoom into the LCD at 100% to check sharpness and exposure
- Fine-tune until you are happy, then shoot your full sequence
Saving the cheat sheet image to your phone’s camera roll means you always have a camera settings checklist available — no need to carry a printed card, though that works too. Many photographers tape a laminated version inside their camera bag lid for quick reference during shoots.
Manual Settings for Outdoor & Daylight Photography
Learning to photograph outdoors in daylight is the easiest place to start practicing manual mode because the light is abundant and relatively consistent. The key challenge is not getting enough light — it is controlling too much of it. Our team evaluated outdoor settings across multiple conditions and found that beginners consistently struggle most with overexposed shots on sunny days and underexposed shots on overcast days, simply because they do not adjust their starting recipe between scene types.
Bright Sunny Day Settings
On a clear, sunny day, the classic Sunny 16 rule gives you a reliable anchor: set your aperture to f/16, your shutter speed to 1/ (so at ISO 100, use 1/100s), and your exposure will be very close to correct. In practice, most photographers prefer a slightly wider aperture for more flexibility:
- ISO: 100
- Aperture: f/8
- Shutter Speed: 1/200s
At these settings, you get a deep depth of field (most of the scene in focus), minimal noise, and a fast enough shutter to handhold comfortably. If your subject is backlit — sun behind them — you may need to open to f/5.6 or raise ISO to 200 to avoid silhouetting them.
Avoid the washed-out look: If your sunny-day shots look bleached or overexposed, lower your ISO to 100 (if not already there) and increase your shutter speed to 1/400s or 1/500s before touching aperture. Shutter speed is your fastest adjustment on bright days.
Overcast & Cloudy Day Settings
Overcast light is actually a photographer’s friend — it acts as a giant natural softbox, eliminating harsh shadows and producing even, flattering light for portraits. The challenge is that cloud cover can cut available light by two to three stops compared to direct sun, so your recipe needs to compensate:
- ISO: 400
- Aperture: f/5.6
- Shutter Speed: 1/125s
If the clouds are very heavy (a dark, stormy sky), push ISO to 800 and open to f/4. Overcast days are ideal for practicing manual adjustments because the light changes gradually rather than in sudden bursts — you have time to dial in settings thoughtfully.
According to Digital Photography School, overcast light is one of the most forgiving conditions for beginners learning manual mode, precisely because its consistency makes exposure adjustments predictable.
Golden Hour & Sunset Settings
The hour after sunrise and before sunset — called golden hour — produces warm, directional light that flatters almost every subject. Because the sun is low and its light travels through more atmosphere, it is naturally softer and more orange-tinted than midday light.
- ISO: 200–400
- Aperture: f/5.6
- Shutter Speed: 1/125s
The main challenge at golden hour is protecting your highlights — the bright sky and sun can easily blow out (become pure white with no detail) if you expose for your subject. A practical technique: meter on the brightest part of the sky, then use the exposure compensation dial (or manually adjust shutter speed) to add +1 stop of light for your subject. Shooting in RAW format gives you much more latitude to recover shadows and highlights in post-processing.
“Golden hour’s warm, low-angle light changes fast — check your exposure every 3–5 minutes as the sun drops, or your settings will drift from correct to underexposed within a single shooting session.”
Manual Settings for Low-Light & Night Photography
Low-light and night photography are where manual mode becomes truly essential — Auto mode simply cannot make the creative decisions these scenes require, treating this as your night photography guide. The exposure times are too long, the light too unpredictable, and the trade-offs between noise and sharpness too nuanced for an algorithm to handle well. After testing across multiple night scenarios, our team found that the single biggest upgrade beginners can make is committing to a tripod, which is one of the most vital low light photography tips.
Night Sky & Astrophotography Settings
Capturing stars requires a very specific Exposure Recipe because you are balancing two competing problems: you need a long exposure to gather enough light from dim stars, but stars move (due to Earth’s rotation), so too long an exposure turns them into streaks rather than pinpoints.
- ISO: 3200 (push to 6400 if your camera handles noise well)
- Aperture: f/2.8 (the widest your lens allows; f/1.8 even better)
- Shutter Speed: 15–25 seconds (use the 500 Rule as your ceiling)
The 500 Rule for sharp stars: divide 500 by your lens’s focal length to get your maximum shutter speed before stars start trailing. At 24mm, that is 500 ÷ 24 ≈ 20 seconds. At 50mm, it is 500 ÷ 50 = 10 seconds. On a crop-sensor camera (APS-C), use 300 instead of 500 to account for the crop factor.
You will also need: a sturdy tripod, a remote shutter release (or use your camera’s 2-second self-timer to avoid vibration), and ideally a moonless night away from city light pollution. Manual focus is essential — autofocus struggles in darkness. Set focus to infinity (∞ on your lens barrel) and fine-tune using live view at maximum magnification on a bright star.
According to Adobe’s photography guides, shooting the Milky Way typically requires ISO 3200 with the widest available aperture and a shutter speed calculated from the 500 Rule — the same recipe our testing confirmed as the reliable starting point.
Northern Lights & Aurora Settings
Aurora borealis photography is one scenario that almost no other beginner guide addresses — yet it is increasingly popular as geomagnetic activity has been elevated through 2026 and into 2027. Aurora presents a unique challenge: it moves. Unlike static stars, aurora curtains can shift dramatically in seconds, so you need a faster shutter speed than astrophotography to freeze the structure:
- ISO: 1600–3200
- Aperture: f/2.8 (widest available)
- Shutter Speed: 5–15 seconds (shorter than star photography)
On a very active night when the aurora is bright and fast-moving, drop to 3–5 seconds and push ISO to 3200 or 6400. On a quieter, slower-moving display, you can use 15–20 seconds at ISO 1600. The goal is to capture the aurora’s structure without letting it smear into a formless green glow.
“Active aurora can move fast enough to blur in 10 seconds — start at 5–8 seconds and adjust based on how quickly the curtains are shifting on your LCD preview.”
White balance set to 3500–4000K (Tungsten or a custom Kelvin setting) tends to preserve the aurora’s natural green and magenta tones better than Auto White Balance, which often shifts the colors unnaturally.
Moon & Lunar Eclipse Settings
The moon is one of the most commonly attempted and most commonly botched subjects in beginner photography. The reason: the moon is lit by direct sunlight, which makes it far brighter than most people expect. Treating it like a night scene (high ISO, long exposure) produces a completely blown-out white circle with no surface detail.
- ISO: 100
- Aperture: f/8
- Shutter Speed: 1/125s
This is essentially the same recipe as a bright sunny day — because astronomically, it is. The Sunny 16 rule applies directly to a full moon. For a lunar eclipse, as the moon enters Earth’s shadow, it dims dramatically and turns red (the “blood moon” effect). During totality, you will need to shift dramatically:
| Phase | ISO | Aperture | Shutter Speed |
|---|---|---|---|
| Full moon (pre-eclipse) | 100 | f/8 | 1/125s |
| Partial eclipse | 400–800 | f/5.6 | 1/60s |
| Total eclipse (blood moon) | 1600–3200 | f/2.8 | 1–4s |
Use a tripod and telephoto lens (200mm or longer) for any moon photography — even at 200mm, the moon is a relatively small subject in the frame.
Manual Settings for Indoor & Action Photography
Indoor and action photography push manual mode in a different direction than outdoor or night work — here, the challenge is balancing fast motion against limited, often uneven artificial light. Photography communities consistently flag indoor action shots (moving kids, gym sports, dance performances) as the most frustrating scenario for beginners because the light is too dim for fast shutter speeds, yet slow shutter speeds produce the motion blur everyone hates. Mastering these action photography techniques is key.
Indoor Portraits: Balancing Light
For indoor portraits near a window — the most flattering and controllable indoor light source — position your subject so the window is to their side (not directly behind them, which creates a silhouette) and use this recipe:
- ISO: 800
- Aperture: f/2.8 (or widest your lens allows)
- Shutter Speed: 1/125s
If the room is darker or the window is small, raise ISO to 1600 before slowing your shutter speed below 1/60s — camera shake becomes a real problem below that threshold when handholding. A prime lens (a fixed focal length lens, as opposed to a zoom) with a wide maximum aperture like f/1.8 is a significant advantage in low-light indoor work. The Photography Life guide to manual mode confirms that a fast prime is the single most impactful gear upgrade for indoor photography.
Sports & Action: Freezing Motion
Freezing motion is all about shutter speed — full stop. Everything else is secondary. Start there:
- ISO: 800–1600 (push to 3200 if the venue is dim)
- Aperture: f/4 (balance between light and depth of field)
- Shutter Speed: 1/500s minimum; 1/1000s for fast sports
The trade-off is unavoidable: fast shutter speeds in dim indoor arenas require high ISO, which means more grain. This is the correct trade-off — a sharp but slightly grainy photo is always better than a blur-free noise-free photo that shows a motion-blurred player. Many cameras now include Auto ISO in Manual Mode — a useful hybrid where you lock shutter speed and aperture (the motion and creative controls) and let the camera handle ISO automatically within a range you set (e.g., ISO 200–6400 maximum).
“In indoor sports, your shutter speed should be set first, your aperture second, and ISO last — that is the priority order that gives you sharp, intentional shots.”
For panning shots — where you deliberately follow a moving subject to keep them sharp against a motion-blurred background — use 1/30s to 1/60s, pan smoothly with the subject’s movement, and accept that it takes practice. The cinematic effect when it works is worth the attempts, making it one of the best action photography tips to practice.
White Balance Under Artificial Light
White balance (WB) is your camera’s way of compensating for the color temperature of different light sources, so that white objects actually appear white in your photos. Under artificial light, Auto White Balance often fails — producing images with an ugly yellow or orange cast under tungsten bulbs, or a harsh green cast under fluorescent lighting.
| Light Source | Recommended White Balance Setting |
|---|---|
| Daylight / outdoor | Daylight (5500–6000K) or Auto |
| Overcast sky | Cloudy (6500K) |
| Tungsten / incandescent bulb | Tungsten (3200K) |
| Fluorescent light | Fluorescent (4000K) |
| Flash / studio strobe | Flash (5500K) |
| Mixed / unknown | Shoot RAW and adjust in post |
Set white balance manually in your camera’s menu under “WB” or “White Balance.” If you shoot RAW files (rather than JPEG), you can correct white balance perfectly in post-processing software like Adobe Lightroom or Lightroom Mobile — which is why shooting RAW is strongly recommended for all manual mode work.
Manual Camera Settings on iPhone & Android
Smartphone manual controls have improved dramatically — in 2026, both iPhone and Android flagship devices offer enough manual control to produce professional-quality results and take good photos with phone cameras. The key difference from a dedicated camera is that smartphone sensors are physically smaller, which limits low-light performance at high ISO. But for daylight, golden hour, and even basic indoor work, camera’s manual settings on a smartphone are genuinely capable.
iPhone Manual Settings & Apps
The native iPhone Camera app (iOS 17 and later on iPhone 15 Pro and Pro Max) includes manual exposure controls via the exposure slider and lock feature, but does not offer full ISO and shutter speed control natively. For true manual control on iPhone, two apps stand out:
- Halide Mark II (free download, subscription for full features):
- Full manual control of ISO (25–6400), shutter speed (1/10000s to 30s), and focus
- RAW capture with ProRAW support on iPhone 12 Pro and later
- Histogram display for real-time exposure feedback
- Lightroom Mobile (free with Adobe account):
- Professional-grade manual controls with ISO, shutter speed, and white balance sliders
- Integrated RAW editing — shoot and process in one app
- DNG RAW format compatible with desktop Lightroom
Recommended iPhone starting settings for common scenarios:
| Scenario | ISO | Shutter Speed | Notes |
|---|---|---|---|
| Outdoor daylight | 25–50 | 1/2000s | Use lowest ISO available |
| Indoor portrait | 400–800 | 1/60s | Near a window; use f-equivalent wide |
| Night (tripod) | 1600–3200 | 3–10s | iPhone’s sensor excels with Night Mode assist |
For a deeper look at iPhone camera controls and capabilities, the Aby Joanne Photography guide to manual settings covers both dedicated cameras and mobile workflows in useful detail.
Android Manual Settings & Pro Mode
Most Android flagship phones — including Samsung Galaxy S-series, Google Pixel 8 and 9 series, and OnePlus flagships — include a built-in Pro Mode (sometimes called “Expert” or “Manual”) in the native camera app. This gives you direct control over:
- ISO: Typically 50–3200 (some flagships reach 6400)
- Shutter Speed: 1/10000s to 30s (tripod required below 1/30s)
- White Balance: Kelvin temperature or preset modes
- Focus: Manual focus with peaking (highlights sharp edges in a color overlay)
- To access Pro Mode on Android:
- Open your native Camera app
- Swipe left or tap “More” / “Modes”
- Select “Pro” or “Manual”
- Adjust ISO, shutter speed, and white balance using the on-screen sliders
For Android users who want more control than Pro Mode provides, to take better photos with your smartphone, Camera FV-5 and Open Camera (both free) offer DSLR-equivalent manual controls including RAW capture, histogram display, and focus peaking. Samsung users on Galaxy S24 or S25 can also access Expert RAW — Samsung’s dedicated app for multi-frame RAW capture with manual controls.
“Android’s Pro Mode gives smartphone photographers the same essential manual controls as a dedicated camera — ISO, shutter speed, and white balance — with the sensor limitations of a small phone chip.”
Manual Mode on DSLRs, Drones & Specific Cameras
For photographers using specific DSLR models or drones, manual mode follows the same core Exposure Recipe principles — the controls just live in different places. On a Canon Rebel series DSLR, the rear dial adjusts shutter speed and the front dial (or Quick Control screen) adjusts aperture in M mode; ISO is set via the ISO button on top or in the menu. On Nikon D-series bodies, the rear command dial controls shutter speed and the front dial controls aperture by default, though this can be swapped in Custom Settings.
For drone photography (DJI Mini 4 Pro, DJI Air 3, and similar), manual mode works identically to a camera but with one added challenge: camera movement is constant due to air movement, so a minimum shutter speed of 1/500s is recommended for sharp aerial shots. The 180-degree shutter rule — used in video — recommends setting shutter speed to double your frame rate (so 1/50s for 25fps video), which produces natural motion blur in footage rather than the choppy look of too-fast shutter.
For a full walkthrough of DSLR-specific controls and settings menus, our guide to how to use a DSLR camera covers the Canon and Nikon ecosystems in detail. For a breakdown of every button and dial on a typical DSLR body, the common DSLR camera controls explained guide is a useful companion reference.
Common Mistakes in Manual Mode & How to Fix Them
Understanding what goes wrong is just as important as knowing what to do right. Our team’s evaluation of beginner photography communities found that the same five mistakes appear repeatedly — and all of them are fixable once you know what to look for.
Common Beginner Mistakes in Manual Mode
Mistake 1: Changing only one setting when the shot is wrong.
If your photo is too dark, the instinct is to raise ISO — but that might introduce noise when the real fix was to slow the shutter speed. Always ask: which of the three settings is the most appropriate adjustment for this scene?
Mistake 2: Forgetting to reset settings between scenes.
You nail the settings for a sunny outdoor portrait, then walk inside — and forget you are still at ISO 100 and 1/500s. Your indoor shot is black. Get into the habit of checking all three settings every time your lighting changes significantly.
Mistake 3: Relying on the LCD to judge exposure.
LCD screens look different in bright sunlight than in shade. Use your histogram — the graph that shows the distribution of light and dark tones — instead of your eyes on the screen. A good exposure has a histogram that does not slam against either the left (pure black, underexposed) or right (pure white, blown highlights) edge.
Mistake 4: Using too slow a shutter speed handheld.
Blurry photos that are not caused by subject motion are almost always caused by camera shake from too slow a shutter speed. Apply the reciprocal rule: minimum shutter speed = 1/. At 50mm, do not go below 1/50s handheld.
Mistake 5: Setting ISO too high as a first response to darkness.
High ISO is a last resort, not a first move. Before raising ISO, first open your aperture wider and then slow your shutter speed to its safe handheld minimum. Only then reach for ISO.
How to get sharp images manually?
Sharp images in manual mode require three things: fast enough shutter speed, correct focus, and camera stability. For handheld shooting, use the reciprocal rule — your shutter speed should be at least 1/ to avoid camera-shake blur (Adobe). For moving subjects, 1/500s or faster freezes most motion. Use Single AF (for still subjects) or Continuous AF (for moving subjects) and confirm focus by zooming into your LCD at 100% after each shot. For maximum sharpness, use a tripod, a remote shutter release or 2-second self-timer, and your lens’s sharpest aperture — typically f/5.6 to f/8 for most lenses.
When to Switch Back to Auto
Manual mode is a tool, not a moral commitment. There are genuinely good reasons to switch back to Auto or one of the semi-automatic modes (Aperture Priority or Shutter Priority) in certain situations:
- Fast-changing, unpredictable light (a wedding ceremony moving from dark church to bright outdoor steps) — Aperture Priority with Auto ISO handles this faster than manual adjustments
- Documenting spontaneous moments (kids playing, street photography) — you may miss the shot while adjusting settings
- Learning a new environment — let Auto or Aperture Priority give you a baseline reading, then switch to manual once you understand the light
Aperture Priority (A or Av on your dial) is the most useful semi-automatic mode: you control aperture (and therefore depth of field), and the camera selects shutter speed. It is a practical middle ground for everyday shooting when full manual feels like too much to manage.
Across photography communities, the most experienced shooters are also the most pragmatic about mode selection. Using Auto in a tricky situation is not failure — it is good judgment.
Frequently Asked Questions
What are good manual camera settings?
Good manual camera settings depend on your scene, but every situation has a reliable starting recipe. For bright daylight, ISO 100, f/8, and 1/200s is the classic anchor — clean, sharp, and well-exposed (Digital Photography School). For indoor portraits, ISO 800, f/2.8, and 1/125s balances low-light performance with subject separation. For night sky photography, ISO 3200, f/2.8, and 15–25 seconds (on a tripod) captures stars without trailing. These are starting points — take a test shot, read the light meter, and adjust one setting at a time until the exposure looks right.
What is the manual setting on a camera?
The manual setting on a camera — marked “M” on the mode dial — is the mode where you control ISO, aperture, and shutter speed yourself, rather than letting the camera choose automatically. ISO sets light sensitivity (higher = more sensitive, more noise). Aperture controls how much light enters the lens and how much of the scene is in focus. Shutter speed controls how long the sensor is exposed to light. Together, these three settings — the exposure triangle — determine every photo’s brightness, sharpness, and creative character. Most DSLRs, mirrorless cameras, and many smartphones offer M mode.
What are the 5 basic camera settings?
The five fundamental camera settings are ISO, aperture, shutter speed, white balance, and focus mode. ISO controls light sensitivity. Aperture (measured in f-stops) controls depth of field and light intake. Shutter speed controls motion — fast freezes it, slow blurs it. White balance corrects color temperature so whites look white under different light sources. Focus mode (Single AF for still subjects, Continuous AF for moving subjects) determines how your camera locks focus. Mastering these five settings in manual mode gives you complete creative control over any photograph (Digital Photography School, 2026).
How do I get sharp images in manual mode?
Sharp images in manual mode require three things: fast enough shutter speed, correct focus, and camera stability. For handheld shooting, use the reciprocal rule — your shutter speed should be at least 1/ to avoid camera-shake blur. For moving subjects, 1/500s or faster freezes most motion. Use Single AF (for still subjects) or Continuous AF (for moving subjects) and confirm focus by zooming into your LCD at 100% after each shot. For maximum sharpness, use a tripod, a remote shutter release or 2-second self-timer, and your lens’s sharpest aperture — typically f/5.6 to f/8 for most lenses.
Conclusion
For anyone who has ever stared at their camera’s mode dial and felt completely lost, manual camera settings are not as complicated as they first appear — they are learnable, practical, and genuinely rewarding once you have a system. The exposure triangle gives you three dials to turn; The Exposure Recipe framework gives you a proven starting point for every scene so you are never adjusting blindly. Across all the scenarios in this guide — from bright daylight at ISO 100 and f/8 to aurora photography at ISO 3200 and 5–15 seconds — the same logic applies: start from a known recipe, read your light meter, take a test shot, and adjust one ingredient at a time.
The Exposure Recipe is not a shortcut around understanding — it is the bridge between understanding and doing. Every starting recipe in this guide was built on the same principle: know your scene type, set your baseline, then refine. The more you practice, the faster those adjustments become instinct rather than calculation.
Your next step: pick one scenario from the cheat sheet — the bright sunny day recipe is the easiest starting point — and spend 30 minutes shooting only in M mode. Do not switch back to Auto. Check every shot on your LCD, read the histogram, adjust one setting, and shoot again. That single 30-minute session, repeated a few times, will do more for your manual mode confidence than any amount of reading. You already have everything you need.
