
Table of Contents
This blog post may contain affiliate links. As an Amazon Associate I earn from qualifying purchases.
“When I finally got a wide angle lens, I decided to take it to this old workshop to try it out. And I fell madly in love.”
— Amateur Photographer
That reaction is more common than you’d think. A wide-angle lens doesn’t just change what’s in your frame — it changes how you see a scene entirely.
Most photographers stick with their kit lens for years, not realising they’re missing a tool that can make cramped interiors look spacious, turn a flat scene into a sweeping panorama, or give their vlogs a professional cinematic feel. The question isn’t whether a wide-angle lens is useful — it’s knowing exactly when and how to use one.
In this guide, you’ll learn why use wide angle lens thinking reshapes your entire creative approach: which specific shooting situations demand one, and how to avoid the composition mistakes that trip up almost every beginner. We’ll cover the core concepts, seven practical use cases, the different types available, the Foreground Anchor Method for better compositions, and how to match a wide-angle lens to your specific camera system.
If you’re wondering why use wide angle lens techniques, they are among the most versatile creative tools for landscape, real estate, astrophotography, and vlogging — making scenes feel expansive and depth feel exaggerated.
- Perspective exaggeration: Wide-angle lenses make foregrounds look larger and backgrounds appear more distant, creating dramatic, immersive depth.
- The Foreground Anchor Method: Placing a strong foreground subject within 1–3 feet of the lens is the single most effective way to avoid empty, lifeless wide-angle compositions.
- Crop factor matters: On APS-C cameras, a 10mm lens behaves like a 15mm full-frame equivalent — always calculate your effective focal length before buying.
- Modern relevance: Smartphone ultra-wide lenses (0.5x) approximate the effect, but produce noticeably weaker low-light results than dedicated mirrorless or DSLR lenses.
What Is a Wide-Angle Lens?
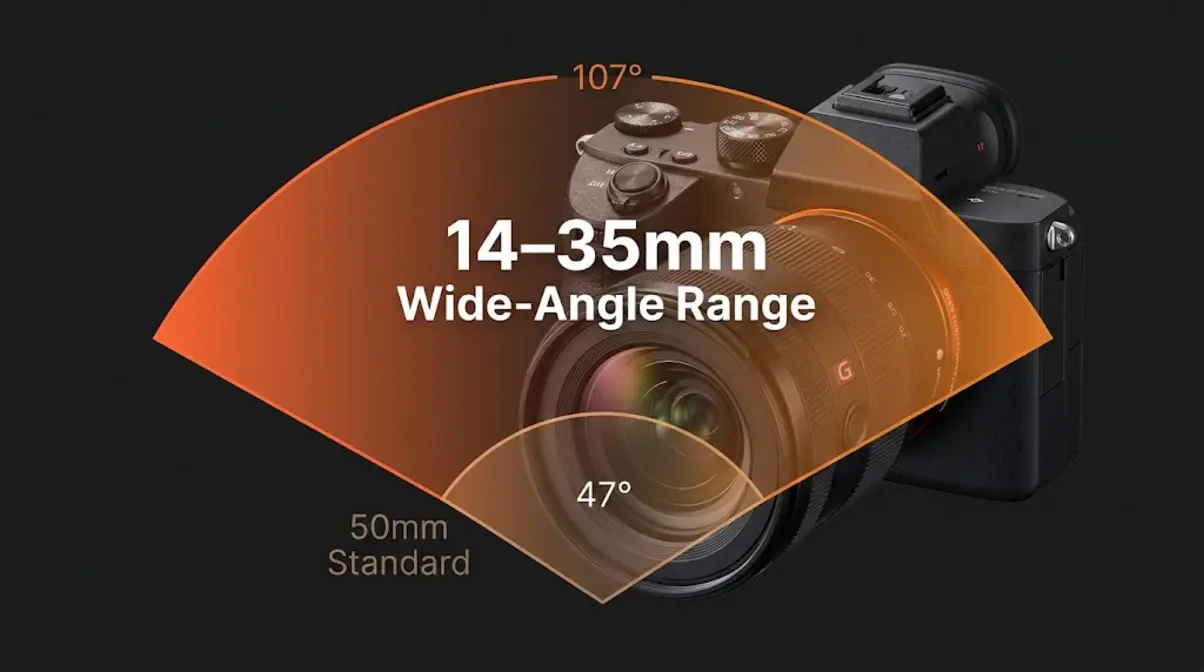
A wide-angle lens is any lens with a focal length of 35mm or shorter on a full-frame camera, giving you a wider field of view than the human eye naturally perceives. When asking why use wide angle lens focal lengths, the answer lies in how they reshape spatial relationships. According to Canon’s guide to wide-angle lenses, the typical wide-angle range spans 14mm to 35mm on a full-frame sensor — and that expanded view is precisely why wide-angle lenses are the go-to choice for landscapes, real estate, and vlogging (Canon USA, 2026). Understanding why this lens behaves the way it does is the key to using it deliberately rather than accidentally.
Wide-Angle vs. Standard Lenses
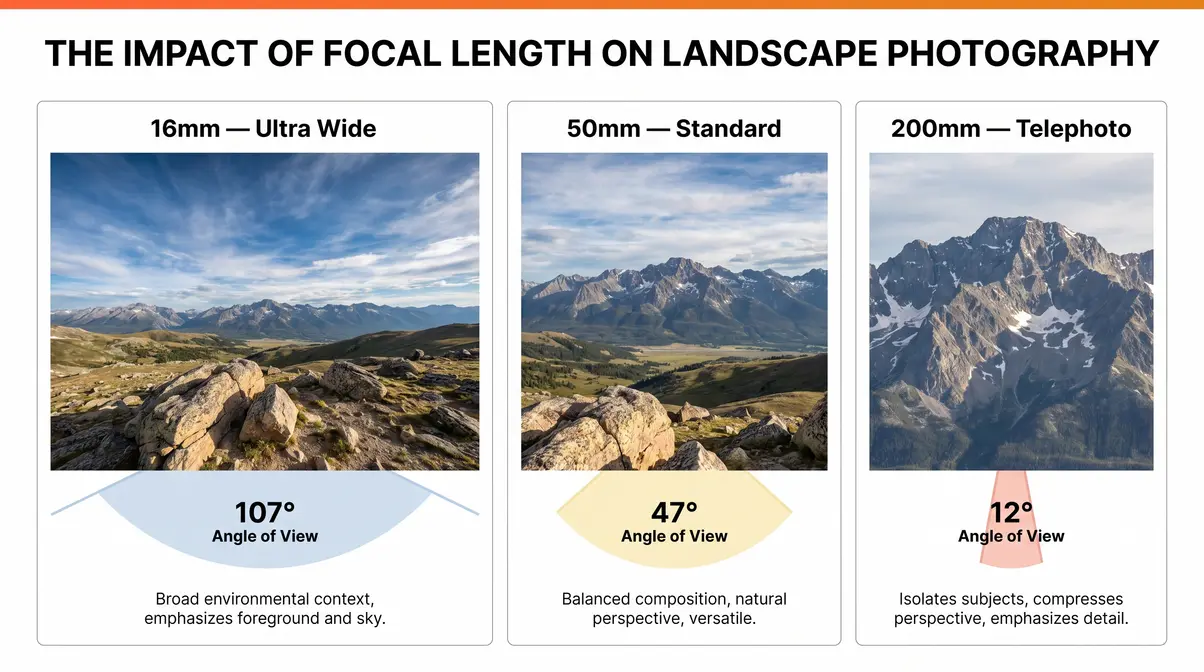
The standard “nifty fifty” (a 50mm lens) approximates human-eye perspective — you get roughly what you see. Switch to a 24mm wide-angle and the frame expands dramatically, pulling more of the scene into the edges and stretching the apparent distance between objects.
The scene literally “opens up.” A room that felt cramped at 50mm suddenly looks spacious at 24mm. A mountain range that barely fit the frame now stretches from edge to edge. As the infographic above illustrates, the same scene shot at 16mm captures the entire foreground, mid-ground, and background in a single frame — something impossible at 50mm.
Consider a practical scenario: you’re standing in a small kitchen. At 50mm, only the counter in front of you is visible. At 24mm, the entire kitchen — including the window, the island, and the dining area beyond — fits in one frame. That’s the core value of wide-angle vs. normal lens thinking. Photographers consistently report that this single shift in focal length transforms how they approach tight spaces and expansive environments alike.
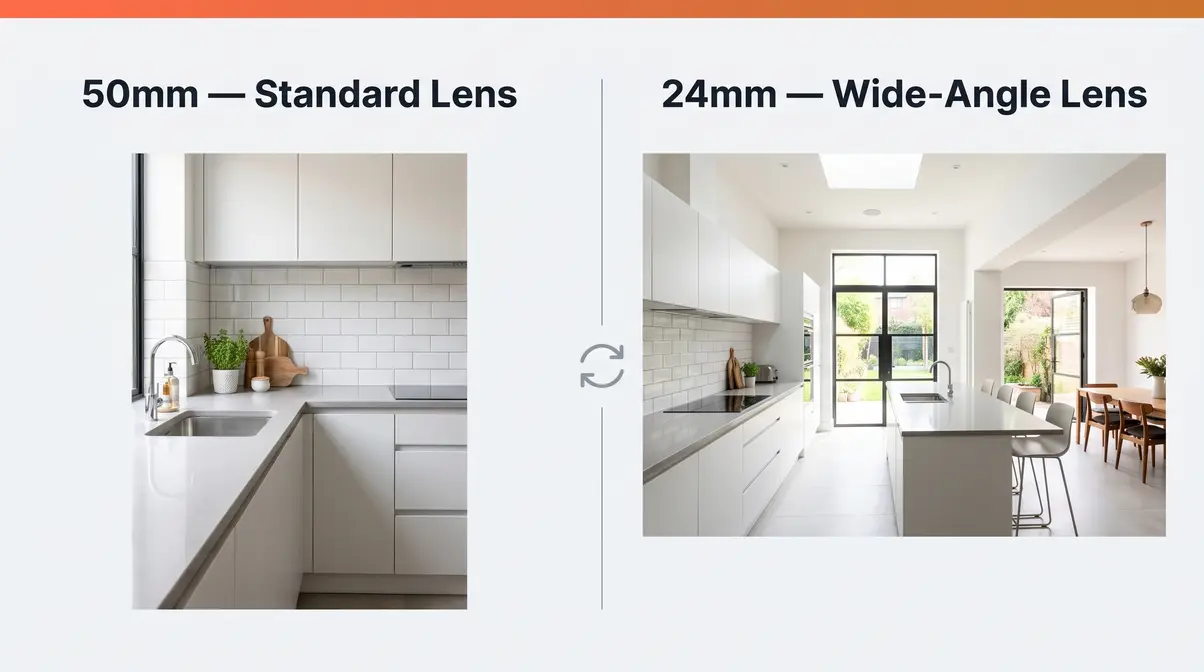
Exaggerating Depth and Perspective
Here’s the part most tutorials skip: the “magic” of a wide-angle lens isn’t just about fitting more into the frame. It’s about perspective distortion — a deliberate optical property that makes nearby objects appear dramatically larger while pushing distant subjects further away.
This happens because of physical proximity. When you use a wide-angle lens, you typically move closer to your subject to fill the frame. Objects near the lens appear proportionally much larger than those further back, creating an exaggerated sense of depth and scale. Stanford University’s interactive optics resources describe this as a function of relative distance ratios — the closer an object is to the lens, the more dramatically its apparent size changes relative to objects further away.
Wide-angle lenses — any focal length of 35mm or shorter on a full-frame sensor — exaggerate perspective so that foreground elements appear larger and backgrounds recede dramatically (Canon USA, 2026). This is not a flaw to correct; it’s the primary feature that creates the “magic wand for your camera” effect photographers rave about. Barrel distortion — the slight bowing of straight lines near the frame edges — is a separate optical phenomenon common in lenses below 24mm. It’s correctable in post-processing and, in many compositions, adds to the dramatic wide-angle feel rather than detracting from it.
Later in this guide, we’ll give you the Foreground Anchor Method — a three-step framework for turning this perspective exaggeration into consistently compelling compositions.
Wide-Angle vs. Telephoto vs. Macro
Understanding where wide-angle fits in the lens family makes your buying decision much clearer. A telephoto lens compresses distance and magnifies distant subjects — the opposite of wide-angle expansion. A macro lens is designed for extreme close-up magnification of small subjects like insects or flowers, with a reproduction ratio of 1:1 or greater. Wide-angle lenses do neither of those things; instead, they exaggerate depth and expand spatial relationships.
| Lens Type | Focal Length (Full-Frame) | Primary Effect | Best For |
|---|---|---|---|
| Wide-Angle | 14–35mm | Expands, exaggerates depth | Landscapes, interiors, vlogging |
| Standard | 40–60mm | Natural, eye-like perspective | Portraits, street, everyday |
| Telephoto | 70–600mm+ | Compresses, magnifies | Wildlife, sports, distant subjects |
| Macro | Any (1:1 ratio) | Extreme close-up magnification | Insects, flowers, product detail |
The difference between telephoto and wide angle lens use is fundamentally about spatial intent: telephoto collapses distance, wide-angle exaggerates it. The wide-angle lens used in photography is rarely about magnification — it’s about inclusion, depth, and environmental context. If you want to tell the story of where something is, wide-angle is almost always the right tool.
7 High-Impact Wide-Angle Scenarios
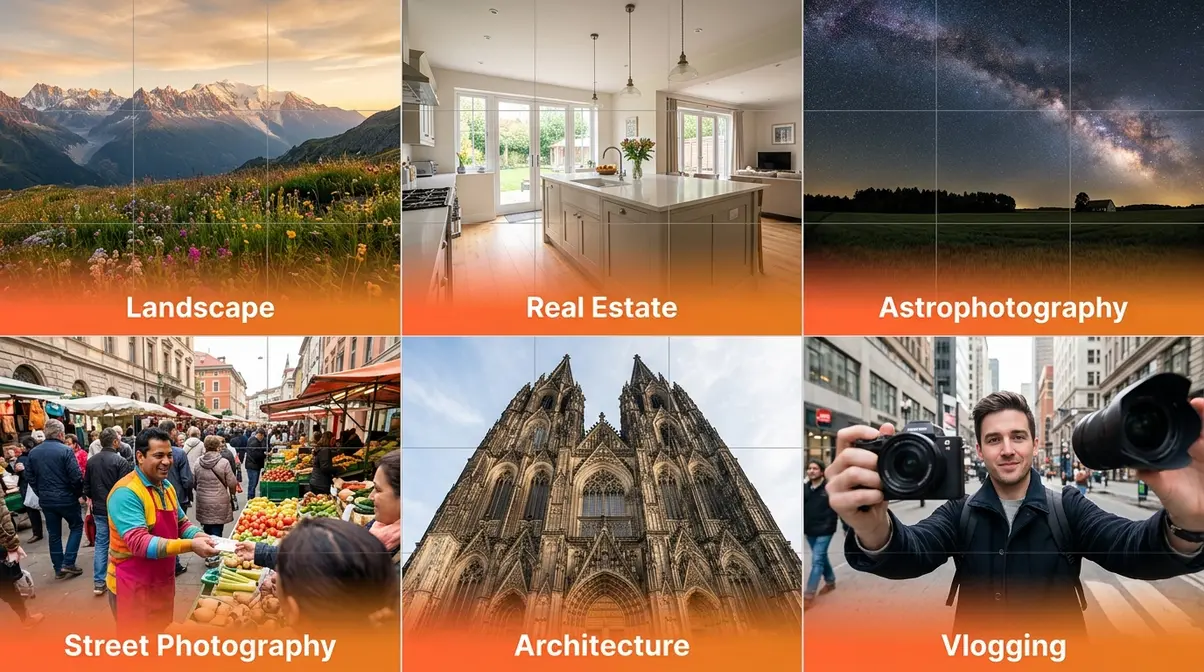
Wide-angle lenses earn their keep across a surprisingly broad range of shooting situations. Field evaluation across photography communities consistently shows that the lens delivers most of its value in environments where context, scale, or spatial relationship is central to the story you’re telling. Here are the seven scenarios where it genuinely shines.
Landscape Photography
Wide-angle lenses are practically synonymous with landscape photography. The ability to capture a vast expanse — from the rocks at your feet to the horizon miles away — in a single frame is something no other lens type can replicate. Focal lengths between 16mm and 24mm are the sweet spot for most landscape work, giving you maximum scene inclusion without the extreme edge distortion of super-wide options.
The key is using that foreground space intentionally. Photographers working in wide-open terrain consistently find that placing a strong foreground element — a wildflower cluster, a reflective tide pool, a jagged rock formation — within 1–3 feet of the lens transforms an ordinary landscape into a layered, immersive image. National Geographic photographers have long relied on this approach to give viewers a sense of being there rather than simply observing from a distance.
Check out these landscape photography composition techniques to master this approach.
Real Estate and Interior Photography
For real estate and interior photography, a wide-angle lens isn’t optional — it’s essential. Shooting a bedroom at 50mm produces a cramped, unflattering image that makes the space feel smaller than it is. Switch to a 24mm or wider, and the same room communicates openness, flow, and livability.
Research from real estate marketing studies suggests that listings with wide-angle interior photography receive significantly more engagement than those shot with standard focal lengths — because buyers form spatial judgments within seconds of viewing an image. The wide angle lens for real estate photography range of 16–24mm on full-frame (or 10–16mm on APS-C) is the professional standard, used by architectural photographers and listing agents worldwide.
Explore our real estate photography lens guide for more gear recommendations.
Astrophotography and Night Skies
Capturing the Milky Way or a meteor shower requires two things simultaneously: a very wide field of view and a fast aperture. Wide-angle lenses deliver both. A 14–24mm lens at f/2.8 or faster allows you to expose for the stars without tracking equipment, keeping them as pinpoints rather than streaks.
For night photography, wide-angle lenses at 14–24mm f/2.8 allow exposures of 15–25 seconds using the 500 Rule (divide 500 by focal length) before star trails become visible — a critical calculation for Milky Way photography (PhotoPills, 2026). The ultra-wide field of view also ensures you capture as much of the star field as possible, making the composition feel genuinely cosmic rather than a narrow slice of sky.
Street & Environmental Portraits
Street photography with a wide-angle lens produces a fundamentally different result than telephoto street work. Instead of isolating a subject from their environment, wide-angle focal lengths (24–35mm) keep the subject connected to their surroundings — the market stall, the alley, the crowd. This environmental context is often the entire point.
For environmental portraits — images where the setting tells as much of the story as the person — a 24mm or 28mm lens is a classic choice. Henri Cartier-Bresson and many documentary photographers worked at these focal lengths precisely because the lens forces physical closeness with the subject, creating an intimacy that telephoto work can never replicate. The slight perspective exaggeration at 24mm adds energy and immediacy to street scenes.
Architecture Photography
Architecture photography is where wide-angle lenses confront their most interesting challenge: converging verticals, the tendency of tall buildings to appear to lean inward when you tilt the camera upward. Rather than fighting this, many architectural photographers embrace it as a stylistic choice — the converging lines add drama and scale to images of skyscrapers and cathedrals.
For corrected, technically precise architectural work, a tilt-shift lens combined with a wide-angle focal length is the professional solution. For most intermediate photographers, shooting at 17–24mm and correcting verticals in Lightroom or Capture One is a practical and effective approach. The wide field of view is non-negotiable for capturing entire facades from street level.
Learn more about architectural photography techniques to perfect your building shots.
Video, Vlogging, and Filmmaking
Video is where wide-angle lenses have gained enormous relevance in recent years — and where most photography tutorials are embarrassingly behind. For arm’s-length vlogging (camera held at arm’s length, pointed back at the creator), a 10mm lens on APS-C or a 16mm lens on full-frame is the minimum to capture the vlogger’s face, torso, and some background context in a single handheld shot.
Cinematic wide-angle lenses in the 18–24mm range are standard in narrative filmmaking for establishing shots, chase sequences, and any scene where the environment is a character in its own right. The New York Film Academy notes that wide-angle focal lengths in film create a sense of heightened reality — spaces feel larger, movement feels faster, and tension feels more immediate than at standard focal lengths.
For vlogging on APS-C, a 10–18mm zoom covers arm’s-length selfie framing and environmental B-roll in a single lens — making it the most cost-efficient wide-angle purchase for video creators. If you’re shooting on full-frame for video, a 16–35mm f/2.8 or f/4 gives you that same flexibility with better low-light performance.
Find the best lenses for vlogging to upgrade your video setup.
Types of Wide-Angle Lenses
Not all wide-angle lenses are the same, and the right choice depends on your shooting style, camera system, and budget. Before deciding why use wide angle lens options over standard ones, consider your shooting style. Across photography forums and professional communities, the agreement is clear: most photographers should start with a standard wide-angle zoom before investing in a specialty ultra-wide prime. Here’s how the categories break down.
Standard Wide-Angle (24–35mm)
The 24–35mm range is the workhorse of wide-angle photography. It’s wide enough to capture expansive scenes and environmental context, but controlled enough that barrel distortion and perspective exaggeration remain subtle and manageable. For photographers shooting everything from travel to family events to street work, a full frame wide angle lens in this range is often the only wide-angle they’ll ever need.
The 35mm focal length sits at an interesting crossroads — wide enough to feel spacious, but close enough to standard perspective that portraits remain flattering. Many photographers consider 35mm their “one lens” choice precisely because it bridges the gap between wide environmental storytelling and natural-looking human subjects. The 24mm end of the range is the sweet spot for real estate, interiors, and landscape work where you need genuine spatial expansion.
Ultra-Wide and Super-Wide (14–24mm)
Drop below 24mm and you’re in territory where the lens actively reshapes reality. Super wide angle lenses in the 14–24mm range produce the dramatic foreground exaggeration, the sweeping sky, and the immersive sense of scale that define the genre. This is the range for Milky Way photography, grand architectural statements, and the kind of landscape images that stop people mid-scroll.
The trade-offs are real: barrel distortion becomes more pronounced, straight lines near the edges bow noticeably, and human subjects placed near the frame edges will appear distorted. These lenses reward deliberate, thoughtful composition — they punish lazy framing. But when used correctly, a 14mm or 16mm prime produces images that are genuinely impossible to replicate at any other focal length.
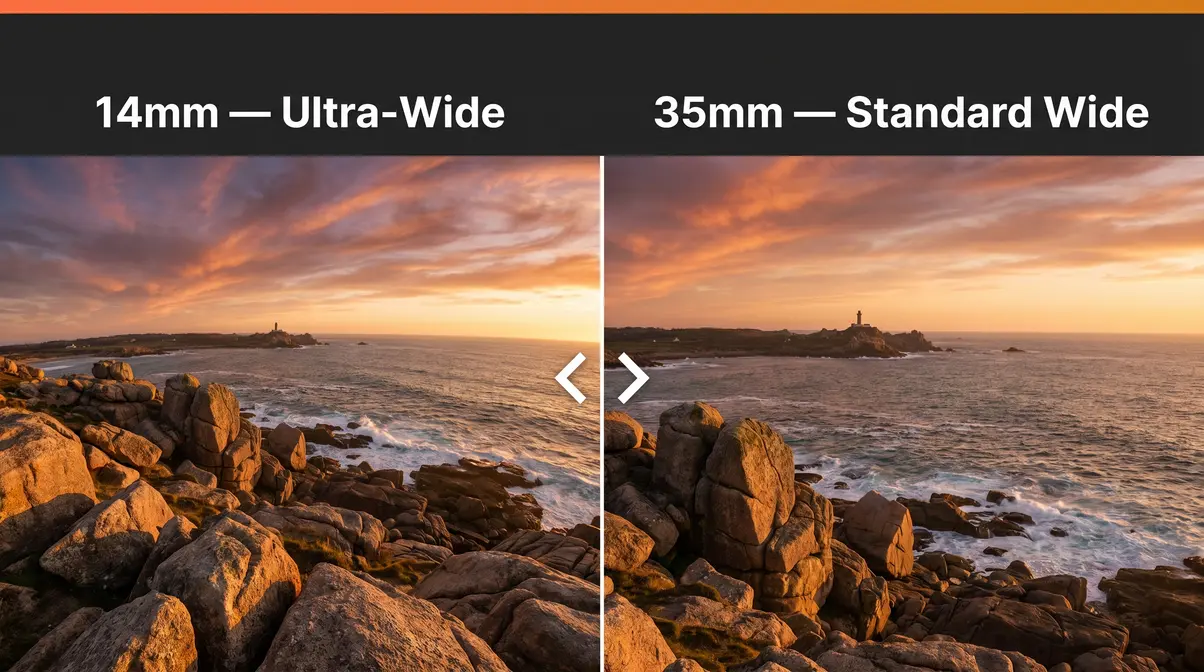
Wide-Angle Zoom vs. Prime Lenses
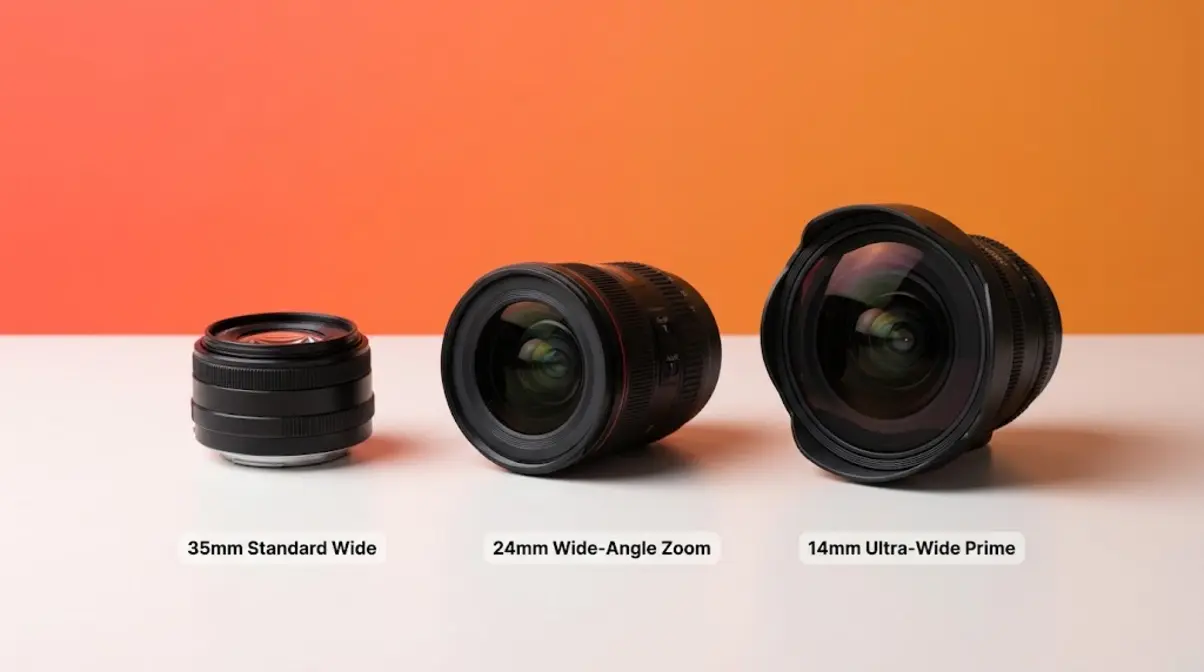
The zoom vs. prime debate applies just as much to wide-angle lenses as it does to any other focal length. Wide-angle zoom lenses (like a 16–35mm f/2.8 or 10–18mm f/4.5–5.6) give you compositional flexibility — one lens covers multiple wide-angle focal lengths, which is invaluable when you can’t change your physical position. Prime wide-angle lenses (like a 24mm f/1.4 or 14mm f/2.8) typically offer sharper optics, faster maximum apertures, and smaller physical size.
For most intermediate photographers, a wide-angle zoom is the smarter first purchase. The flexibility to frame a shot at 16mm, then quickly pull back to 24mm without changing position, outweighs the optical advantages of a prime in most real-world shooting scenarios. The wide angle portrait lens use case is one exception: if you’re shooting environmental portraits at 35mm f/1.4, the prime’s wider aperture and shallower depth of field make a meaningful difference in subject separation.
Compare wide-angle zoom vs. prime lenses to see which fits your needs.
Smartphones vs. Dedicated Lenses
Modern smartphones have made ultra-wide photography accessible to everyone. The 0.5x ultra-wide camera on most flagship phones approximates a 13–16mm full-frame equivalent, making it genuinely useful for landscapes, interiors, and casual wide-angle shots. For many photographers, this raises a fair question: do you even need a dedicated wide-angle lens?
The honest answer depends on your priorities. Smartphone ultra-wide cameras use smaller sensors with fixed apertures (typically f/2.2–f/2.4), which limits their low-light performance significantly. In bright daylight, the gap between a smartphone ultra-wide and a dedicated mirrorless wide-angle lens is surprisingly small for casual use. In low light — astrophotography, indoor events, golden hour landscapes — the dedicated lens wins decisively, with 2–4 stops of light-gathering advantage in many comparisons.
| Feature | Smartphone Ultra-Wide (0.5x) | Dedicated Wide-Angle Lens |
|---|---|---|
| Effective Focal Length | ~13–16mm equiv. | 14–35mm (true) |
| Aperture | Fixed f/2.2–f/2.4 | f/1.4–f/4 (variable) |
| Low-Light Performance | Limited | Significantly better |
| RAW File Quality | Compressed | Full quality RAW |
| Barrel Distortion Control | Software-corrected | Optical + software |
| Cost | Included in phone | $150–$2,000+ |
The Foreground Anchor Method
Owning a wide-angle lens and knowing how to use it are two different skills. This is the section where most photographers — and most online tutorials — fall short. When evaluating wide-angle compositions across photography communities and portfolio reviews, one mistake appears in the majority of beginner wide-angle shots: empty foregrounds.
Beginner Mistake: Empty Foregrounds
A wide-angle lens captures everything in front of you, including the ground between your feet and your subject. When that ground is empty — a flat field, a plain floor, a featureless stretch of sand — the image feels hollow. The viewer’s eye has nothing to anchor to in the foreground, so it drifts to the middle distance and the image loses its sense of depth and immersion.
This is the paradox of wide-angle photography: the lens’s greatest strength (capturing vast, expansive scenes) becomes its greatest weakness when there’s nothing meaningful in the near field. Photographers consistently report that their first wide-angle images feel “too empty” or “flat” — not because the lens is flawed, but because they haven’t yet learned to think in foreground-first terms.
The solution is deliberate foreground placement — which is exactly what the Foreground Anchor Method addresses.
Review these photography composition rules to build a strong foundation.
Step-by-Step Walkthrough
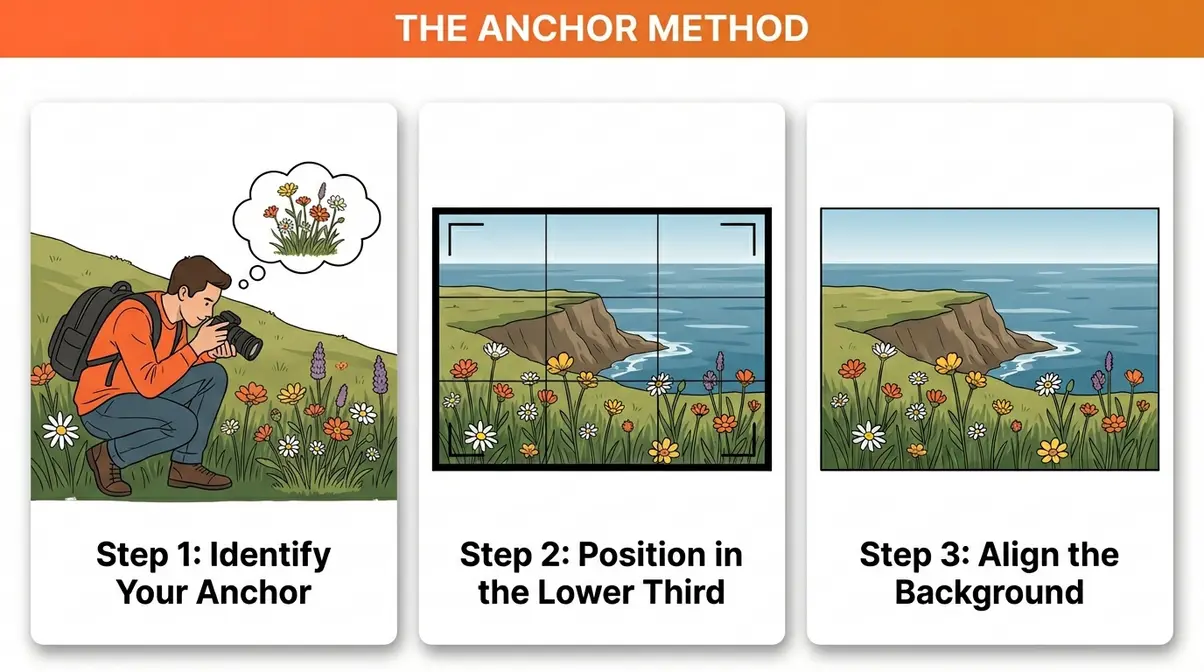
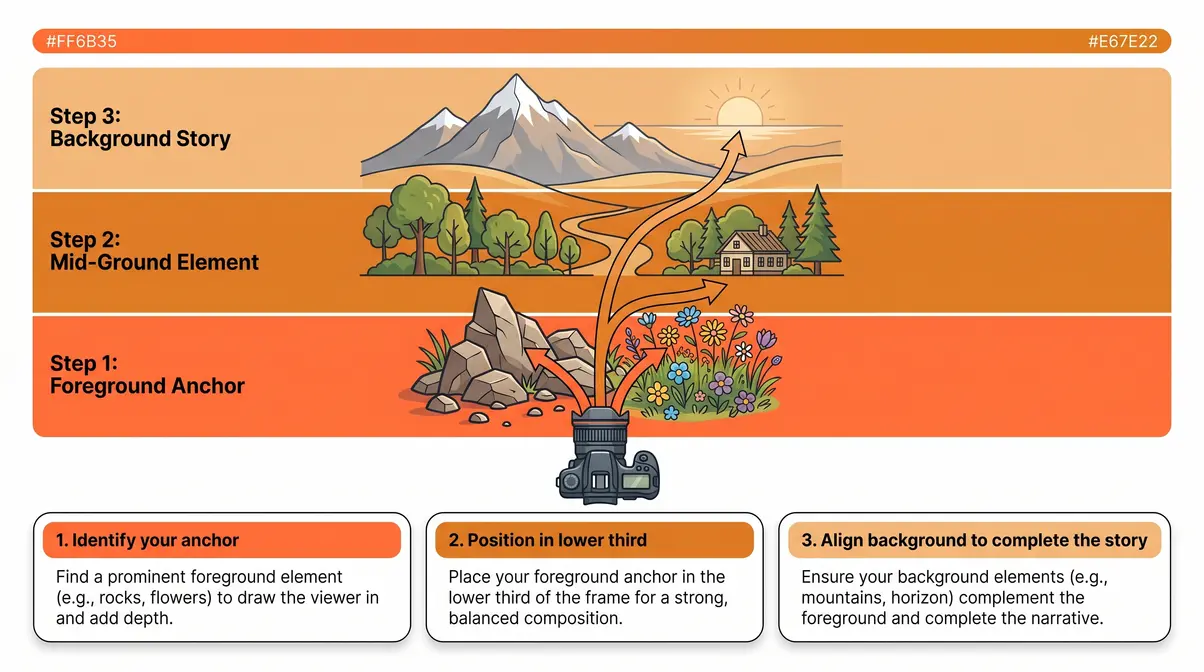
The Foreground Anchor Method is a three-step compositional framework designed specifically for wide-angle lenses. Its core principle: every wide-angle shot needs a foreground anchor — a visually strong element placed within 1–3 feet of the lens that draws the viewer into the frame and creates the layered depth the lens is capable of delivering.
Estimated time: 10-15 minutes per composition setup
Tools needed: Wide-angle lens (14-35mm), Camera body, Optional: Tripod for stability
Here’s how to apply it across three common shooting scenarios:
Step 1: Identify Your Anchor
Before you raise the camera, look down and around you. What’s within arm’s reach that has visual interest — texture, color, shape, or leading lines? In landscape photography, this might be a cluster of wildflowers, a mossy rock, or the curved edge of a shoreline. In architecture, it might be a doorway arch, a patterned floor tile, or a decorative column base. In street photography, it might be a cafe table, a bicycle wheel, or a rain puddle reflecting the scene above.
Step 2: Position the Anchor in the Lower Third
Get physically close — closer than feels comfortable. Position your anchor element in the lower third of the frame, roughly 1–3 feet from the lens. This is the key move: the wide-angle lens will exaggerate the size of this near element, making it feel large and immediate while the background recedes dramatically. The tension between near and far creates the depth that makes wide-angle images compelling.
Step 3: Align the Background to Complete the Story
With your anchor in place, adjust your position — left, right, up, down — until the background element (mountain, building facade, street scene) aligns meaningfully with your foreground anchor. The two elements should feel compositionally related, not accidental. In landscape photography, this means the anchor leads the eye toward the horizon. In architecture, the anchor frames or echoes the building’s geometry. In street photography, the anchor connects the viewer to the scene’s environment.
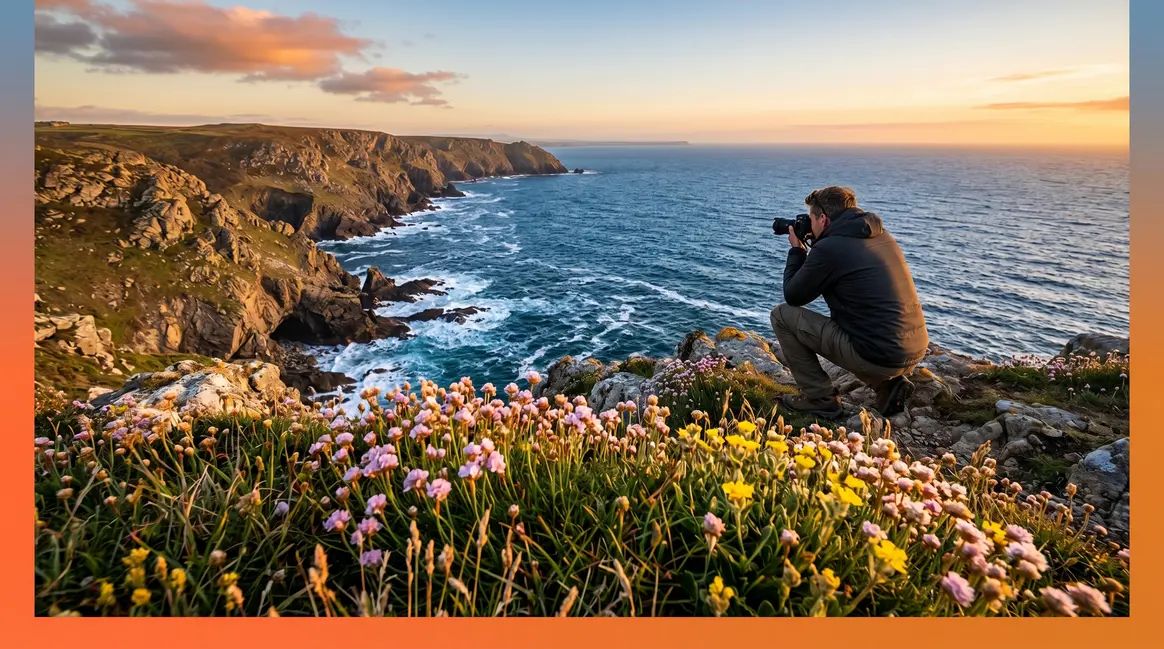
Walkthrough — Landscape: You’re at a coastal overlook. Instead of pointing the camera at the horizon, crouch down and place a cluster of sea grass in the lower-left corner of the frame. The grass fills the foreground, the cliff edge creates a mid-ground line, and the ocean stretches to the horizon. The viewer’s eye travels through all three layers — the hallmark of a successful wide-angle landscape.
Walkthrough — Architecture: You’re photographing a cathedral entrance. Instead of shooting from across the street at eye level, move close and position the carved stonework at the base of the arch in the lower third of your frame. The arch curves above and behind it, drawing the eye upward to the facade. The foreground detail gives the image scale and context that a straight-on shot from a distance never achieves.
Walkthrough — Street Photography: You’re in a market. Position a colourful arrangement of fruit or a vendor’s hands in the foreground. The stall, the crowd, and the street beyond fill the remaining two-thirds of the frame. The foreground anchor gives the viewer a point of entry — a way into the image rather than simply at it.
Managing Distortion and Horizons
Barrel distortion and converging verticals are the two technical challenges that cause the most anxiety among beginner wide-angle users. Both are manageable with straightforward techniques.
Barrel distortion (straight lines bowing outward near frame edges) is most pronounced in lenses below 20mm and is largely correctable in post-processing. Lightroom’s Lens Corrections panel and Capture One’s Keystone tool can remove barrel distortion with a single click using built-in lens profiles. Keeping your primary subjects away from the extreme edges of the frame also minimises its visual impact.
Converging verticals — buildings appearing to lean inward — happen when you tilt the camera upward. The fix is simple: keep the camera perfectly level (use your viewfinder’s electronic level or a hot-shoe bubble level) and shoot from a mid-height position rather than low ground. If you must tilt, correct in post using the Transform/Geometry tools in your editing software.
Cambridge in Colour’s optical guides note that keeping the camera level and shooting from a consistent height eliminates the majority of distortion complaints in architectural and interior wide-angle work.
Learn how to fix lens distortion in Lightroom to perfect your final images.
Filters and Kit Lens Tips
Using filters with wide-angle lenses requires more care than with standard focal lengths. A standard screw-on circular polarizer can cause uneven sky polarization at focal lengths below 24mm — because the lens “sees” such a wide arc of sky that different parts of the sky are at different angles to the sun, producing a patchy, gradient effect. The solution is to use a square filter system (like Lee Filters or Cokin P-series) or to accept and work around the limitation.
For photographers using an 18–55mm kit lens at its widest end (18mm on APS-C, equivalent to ~27mm full-frame), wide-angle photography with 18-55mm lens is absolutely achievable — particularly for landscapes, interiors, and street photography. The 18mm end gives you genuine wide-angle results. The trade-off is a slower maximum aperture (f/3.5–f/5.6) compared to dedicated wide primes, which limits low-light performance. A wide angle lens filter system designed for 77mm or 82mm front elements will cover most popular wide-angle zoom lenses.
Discover the best filters for landscape photography to enhance your skies safely.
Matching Lens to Camera System
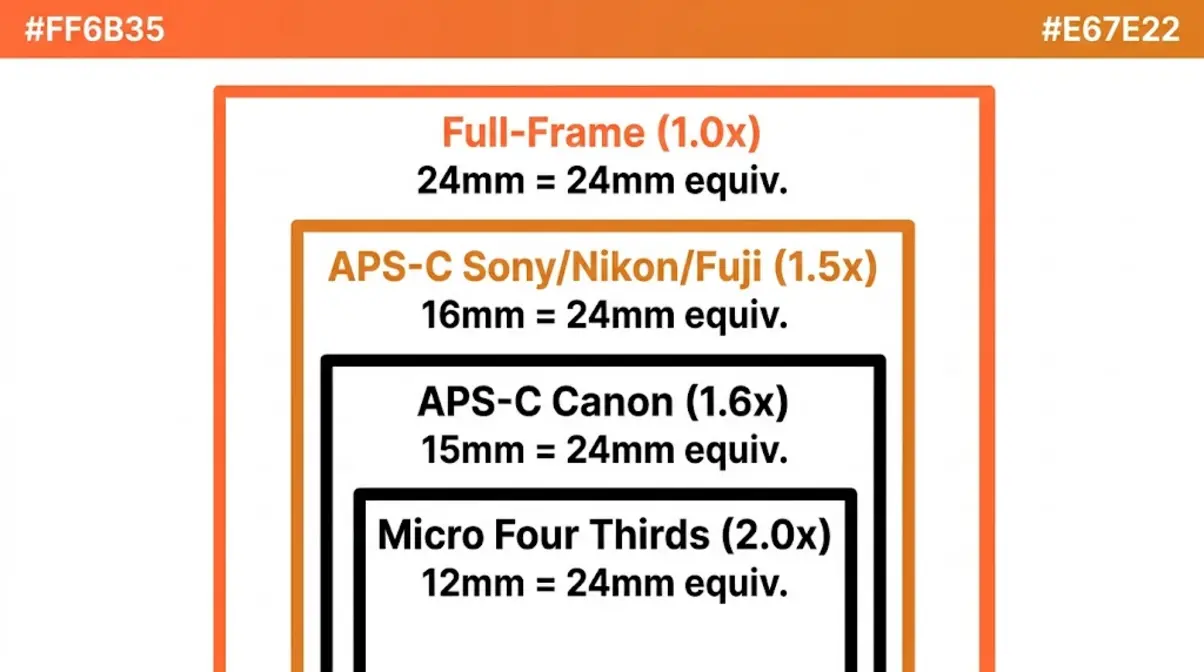
The focal length printed on a lens only tells part of the story. On a crop-sensor camera (APS-C or Micro Four Thirds), that number changes meaningfully — and buying the wrong lens for your system is one of the most common and expensive mistakes beginners make.
Full-Frame vs. APS-C Crop Factor
Crop factor is the multiplier applied to a lens’s focal length to calculate its effective angle of view on a crop-sensor camera. APS-C cameras (Canon, Nikon, Sony, Fujifilm) have a crop factor of approximately 1.5x (1.6x for Canon). Micro Four Thirds cameras have a 2x crop factor.
This means a 10mm lens on an APS-C camera behaves like a 15mm full-frame equivalent (10 × 1.5 = 15). A 14mm on Micro Four Thirds behaves like a 28mm full-frame equivalent — which is standard wide-angle territory, not ultra-wide. Understanding this math prevents the common mistake of buying a “14mm lens” expecting ultra-wide results, only to find it delivers a fairly normal field of view on your crop-sensor body.
| Camera System | Crop Factor | To Get 24mm Equiv. | To Get 16mm Equiv. |
|---|---|---|---|
| Full-Frame | 1.0x | 24mm | 16mm |
| APS-C (Sony/Nikon/Fuji) | 1.5x | 16mm | 10–11mm |
| APS-C (Canon) | 1.6x | 15mm | 10mm |
| Micro Four Thirds | 2.0x | 12mm | 8mm |
The practical takeaway: always calculate your effective focal length before purchasing a wide-angle lens for a crop-sensor camera. For APS-C shooters wanting genuine wide-angle results equivalent to 24mm, a 16mm lens is your target. For those wanting ultra-wide equivalent to 16mm, look at 10–11mm options. The Tamron 10–24mm f/3.5–4.5 Di II (designed for APS-C) and the Canon EF-S 10–18mm f/4.5–5.6 are popular starting points in this range.
Find the best APS-C wide-angle lenses for your specific camera.
Micro Four Thirds, L-Mount & More
Beyond Canon and Nikon, several other mount systems have strong wide-angle lens ecosystems worth knowing:
Micro Four Thirds (Olympus/OM System, Panasonic): The 2x crop factor means you need genuinely short focal lengths for wide-angle results. The Olympus M.Zuiko 7–14mm f/2.8 Pro (14–28mm equivalent) and the Panasonic Leica DG Summilux 9mm f/1.7 (18mm equivalent) are the category leaders for the micro four thirds wide angle lens market.
L-Mount (Sigma, Panasonic, Leica): The L-Mount Alliance gives you access to a growing ecosystem of full-frame wide-angle lenses. The Sigma 14–24mm f/2.8 DG DN Art is widely regarded as one of the sharpest wide-angle zooms available at any price point, making the l mount wide angle lens market extremely competitive.
K-Mount (Pentax/Ricoh): Pentax’s DA 10–17mm f/3.5–4.5 Fish-Eye zoom and the HD Pentax-DA 15mm f/4 Limited are the standout k mount wide angle lens options for APS-C Pentax shooters. Pentax also produces full-frame K-mount bodies, opening the door to a wider range of focal lengths.
Canon EF-M and RF: For Canon mirrorless users, the Canon wide angle lens 10-18mm (EF-S, via adapter) and the RF 14–35mm f/4L IS USM (native RF) represent the entry and professional ends of Canon’s wide-angle lineup respectively.
Check our lens mount compatibility guide to ensure you buy the right fit.
Limitations and Downsides
Every creative tool has constraints, and a wide-angle lens is no exception. Understanding where these lenses struggle helps you decide when to reach for a different focal length — and prevents the frustration of expecting results the lens wasn’t designed to deliver.
Common Pitfalls to Avoid
Empty foreground syndrome: As discussed in the Foreground Anchor Method section, shooting wide-angle without a deliberate foreground element produces hollow, lifeless images. This is the most common beginner mistake and the easiest to fix — but it requires actively thinking about what’s in the near field before every shot.
Filter complications: Standard circular polarizers produce uneven sky polarization below 24mm. Using a square filter system adds cost and bulk but solves the problem cleanly.
Subject isolation: Wide-angle lenses inherently capture large depth of field, making it difficult to isolate a subject from a busy background. If background separation is your goal, a wide-angle lens is the wrong tool — a 50mm or 85mm at f/1.8 will serve you far better.
Are They Good for Portraits?
Wide-angle lenses can work for environmental portraits, but are generally not recommended for tight headshots. At focal lengths below 35mm, subjects placed near the frame edges experience perspective distortion that stretches and misrepresents facial features. A centred subject at a comfortable distance (5–8 feet) at 35mm can look natural and flattering, particularly when the environment adds meaningful context to the portrait. For beauty and fashion work requiring accurate facial representation, 85mm or longer is the professional standard. Wide-angle portraits work best when the place is as important as the person.
What Are the Downsides?
The main downsides are barrel distortion, unflattering portrait perspective, and the challenge of empty foregrounds. Barrel distortion (straight lines bowing near the edges) is most pronounced below 20mm but is correctable in post-processing using lens profiles in Lightroom or Capture One. Placing people near frame edges at wide focal lengths distorts facial features unflatteringly. Additionally, the large depth of field makes subject-background separation difficult. For portraits, 50–85mm lenses are more appropriate. For maximum low-light performance, a wide-angle prime (f/1.4–f/2.8) outperforms zoom options significantly.
When to Choose an Alternative
There are scenarios where a wide-angle lens is genuinely the wrong choice, and recognising them is a sign of photographic maturity:
- Tight headshots and beauty portraits: Choose an 85mm f/1.8 or 100mm for flattering facial geometry and background separation.
- Wildlife and sports from a distance: A telephoto lens (200–600mm) is the only practical option when physical proximity to the subject is impossible.
- Product photography requiring accurate proportions: Wide-angle perspective distortion misrepresents product shapes and dimensions. A 50mm or longer macro lens delivers accurate, undistorted product representation.
Frequently Asked Questions
What is it used for?
Wide-angle lenses are primarily used for landscape, real estate, architecture, astrophotography, and vlogging — any situation where capturing a large field of view or exaggerating spatial depth serves the image. The lens expands the apparent distance between foreground and background, making spaces feel larger and scenes feel more immersive. Photographers report using wide-angle focal lengths whenever the environment is as important as the subject itself. On full-frame cameras, the useful range is 14–35mm; on APS-C, the equivalent range is approximately 10–24mm (Canon USA, 2026).
What focal length is wide-angle?
Any lens with a focal length of 35mm or shorter on a full-frame camera is considered wide-angle. The range typically spans 14mm (ultra-wide, used for dramatic landscapes and astrophotography) through 35mm (standard wide, versatile for street and travel). On APS-C cameras with a 1.5x crop factor, the equivalent range is roughly 10–24mm. A 50mm lens approximates human-eye perspective and is not considered wide-angle, even though it’s often included in beginner kit lenses (Canon USA, 2026).
Does it make things look further?
Yes — wide-angle lenses make background subjects appear further away while making foreground subjects appear larger and closer. This is the perspective exaggeration effect: because you move physically closer to your subject when using a wide-angle lens, the relative size difference between near and far objects is dramatically amplified. A rock one foot from your lens will appear enormous; the mountain one mile away will appear more distant than it looks to the naked eye. This depth exaggeration is the lens’s most powerful creative property, not a distortion to correct.
What 3 lenses do you need?
Most photographers build a versatile kit with a wide-angle (16–35mm), a standard prime or zoom (35–50mm), and a short telephoto (85–135mm). This “holy trinity” covers the vast majority of shooting scenarios: wide-angle for environments and landscapes, standard for everyday and street work, and telephoto for portraits and detail shots. Tamron and Sigma both offer f/2.8 zoom trinities that cover these ranges in three lenses. For beginners, a 24–70mm f/2.8 zoom paired with a wide-angle prime covers most needs until specialisation demands more targeted focal lengths (Tamron USA, 2026).
Limitations and Alternatives
When to Seek Specialist Gear
Wide-angle photography becomes considerably more technical when it intersects with professional applications. For real estate photography used in MLS listings or architectural publications, tilt-shift lenses (24mm PC-E or TS-E) eliminate converging verticals optically rather than relying on software correction — a meaningful quality difference in professional contexts. For astrophotography, lens quality matters enormously at f/2.8 and wider; coma (a form of optical aberration that makes stars near the edges appear comet-shaped) varies significantly between lenses, and community resources like Lonely Speck’s astrophotography lens reviews provide detailed coma test results to guide purchasing decisions.
For video and filmmaking requiring cinema-quality optics, dedicated cine lenses with consistent T-stop ratings and minimal breathing (focus-shift during focal length changes) are worth the investment over photo-oriented wide-angle glass. The Rokinon/Samyang Cine DS line offers an accessible entry point into this territory.
Your Next Creative Step
Wide-angle lenses consistently deliver the most dramatic shift in creative possibility of any lens purchase an intermediate photographer can make. The perspective exaggeration that makes foregrounds rush toward the viewer, the spatial expansion that turns cramped rooms into inviting spaces, and the sweeping field of view that captures the vast expanse of a night sky or a mountain range — none of these results are achievable any other way. Wide-angle photography rewards photographers who think in layers: foreground, mid-ground, background, each contributing to the image’s depth and story.
The Foreground Anchor Method gives you the compositional framework to use that layered thinking deliberately. Rather than pointing a wide-angle lens at a scene and hoping the width does the work, you now have a three-step process — identify the anchor, position it in the lower third, align the background to complete the story — that applies equally in a cathedral, on a coastline, or in a busy market. Understanding why use wide angle lens principles matters is your next creative step.
Start with what you have. If your kit lens reaches 18mm on APS-C, experiment with the Foreground Anchor Method on your next outdoor shoot before committing to a dedicated wide-angle purchase. If you’re ready to invest, a 10–18mm zoom on APS-C or a 16–35mm on full-frame covers the most useful wide-angle territory in a single versatile lens. Pick one scenario from this guide — a landscape, an interior, a street scene — and apply the method deliberately. The results will answer the question of whether a wide-angle lens is worth it more convincingly than any review.
