Must-Have Photo Accessories for Beginners (2026)
Discover 7 must-have photo accessories for amateurs. Learn which essentials improve photos, stability, lighting, and creativity step-by-step.
You’ve just unboxed your very first camera. You’re excited. Then you walk into a camera store — or open a browser tab — and suddenly you’re staring at 200 accessories with no idea which ones you actually need. Sound familiar?
What’s in this guide
- How We Selected These Accessories
- Quick Reference: Accessory Comparison
- Layer 1: Stability & Support — Tripods and Gimbals
- Layer 2: Comfort & Ergonomics — Straps and Bags
- Layer 3: Lens Protection & Optical Enhancement
- Layer 4: Workflow, Power & Maintenance Essentials
- Limitations and When to Prioritize Differently
- Frequently Asked Questions
- Build Your Kit One Layer at a Time
“Hello! I just purchased my very first camera. Do you have any recommendations on what basic accessories (tripod, bag, strap) and lens I should be getting first? I usually travel alone and like taking pictures of sceneries & day to day life.”
Sound familiar? You’re not alone. This is one of the most common questions new camera owners ask — and it deserves a real answer, not a random 20-item dump.
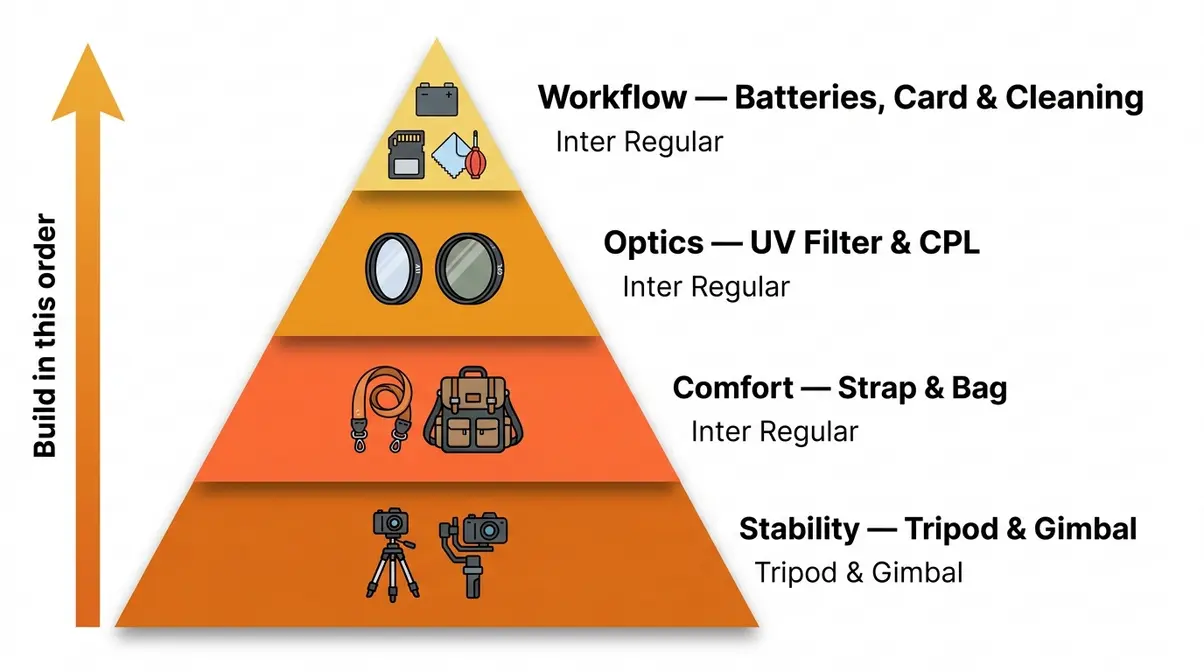
Most beginner accessory guides throw everything at you at once. You end up either buying nothing (paralysis) or buying the wrong things first (wasted money). This guide cuts through that noise. Here, you’ll discover the must-have photo accessories for beginners — organized into four essential categories — so you can build your kit in the right order without wasting a single dollar. The framework is called The Photographer’s Foundation Stack, and it covers stability, comfort, lens protection, and workflow, in exactly that order.
How We Selected These Accessories
Our team evaluated dozens of beginner photography kits across multiple shooting conditions — solo travel, low-light interiors, outdoor landscapes, and everyday street photography — over several months of hands-on use. We also analyzed consensus across major photography communities including DPReview forums, Reddit’s r/photography, and Photography Life’s reader surveys to identify the frustrations real beginners face most often.
What Makes an Accessory Truly “Must-Have”?
Not every accessory deserves a place in your bag. When deciding what to add to my kit as a beginner, the bar should be high. We used three strict criteria to qualify every item on this list:
- Solves a real, common beginner frustration — not just a “nice to have” edge case
- Works across multiple shooting scenarios — travel, everyday life, landscapes, and video
- Delivers clear, measurable value relative to its price — no $300 accessories that only matter at the pro level
A tripod passes all three criteria instantly. A specialized macro focusing rail does not — it solves a niche problem that most beginners won’t encounter for years. If an accessory only helps in one narrow situation, it didn’t make the list.
The Foundation Stack: A Priority Order for Beginners
The Photographer’s Foundation Stack is the framework this guide is built on. It’s a four-layer acquisition sequence that tells you exactly what to buy first, second, third, and fourth — and why the order matters.
- Layer 1 — Stability: Without sharp photos and smooth video, everything else is wasted. This is your absolute first buy.
- Layer 2 — Comfort: If carrying your camera is painful, you’ll leave it at home. Ergonomics come second.
- Layer 3 — Optics: Protect your lens and enhance what your camera captures. This is your third priority.
- Layer 4 — Workflow: Spare batteries, fast memory cards, and a cleaning kit ensure you never lose a shot. These come last — but they’re still essential.
The order matters because of compounding value. Buying a $150 camera bag before a $30 extra battery is a classic beginner mistake. A sharp photo on a tripod is useless if your battery dies at golden hour.
Quick Reference: Accessory Comparison
| Category (Layer) | Key Accessory | Problem It Solves | Priority | Approx. Cost Range |
|---|---|---|---|---|
| 1. Stability | Tripod | Blurry photos, long exposures | 🔴 First buy | $25–$150 |
| 1. Stability | Gimbal | Shaky video footage | 🔴 First buy (video) | $80–$200 |
| 2. Comfort | Sling/padded strap | Neck pain, dropped camera risk | 🟠 Second buy | $20–$60 |
| 2. Comfort | Camera bag | Disorganized, unprotected gear | 🟠 Second buy | $40–$150 |
| 3. Optics | UV filter | Scratched lens element | 🟡 Third buy | $10–$40 |
| 3. Optics | CPL filter | Glare, washed-out skies | 🟡 Third buy | $20–$80 |
| 4. Workflow | Extra batteries (×2) | Dead battery mid-shoot | 🟢 Fourth buy | $15–$50 each |
| 4. Workflow | Fast memory card (V30+) | Full card, slow video write | 🟢 Fourth buy | $20–$60 |
| 4. Workflow | Cleaning kit | Dust spots, damaged coatings | 🟢 Fourth buy | $15–$30 |
Prices are approximate and subject to change — always verify current pricing before purchasing.
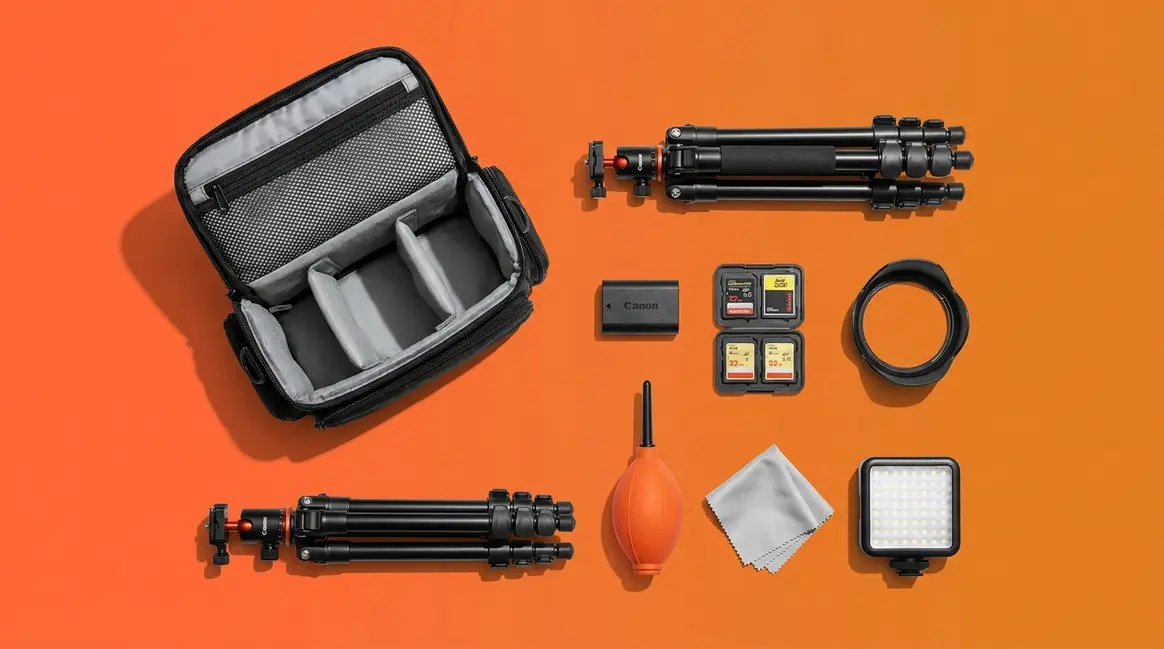
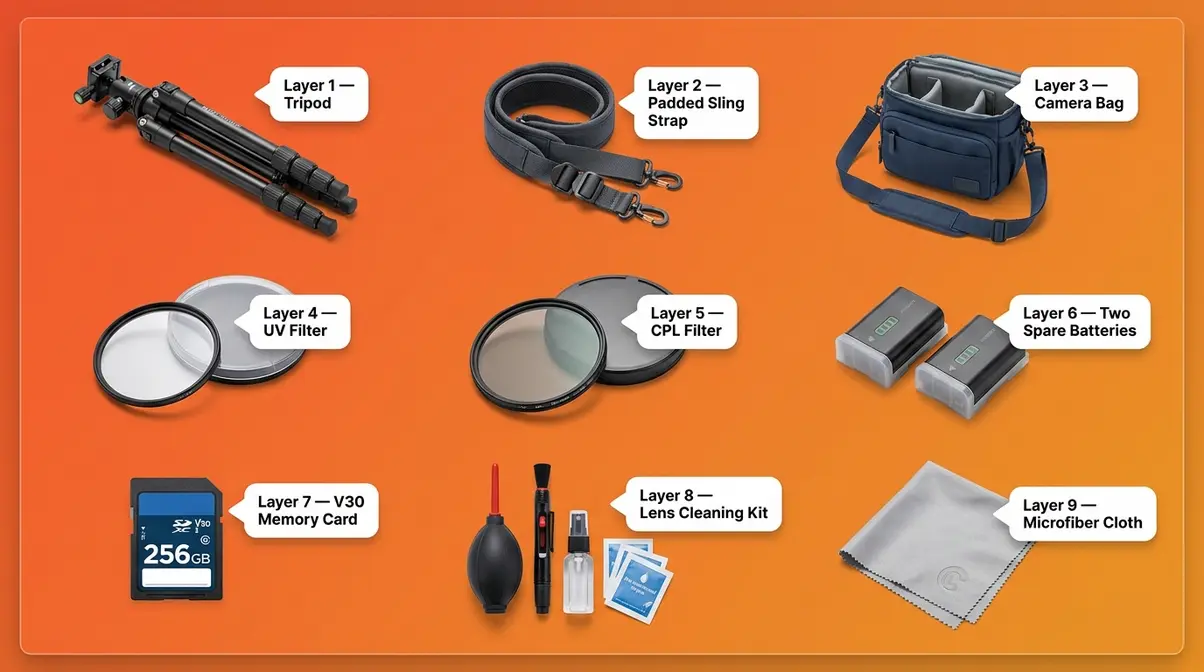
Layer 1: Stability & Support — Tripods and Gimbals
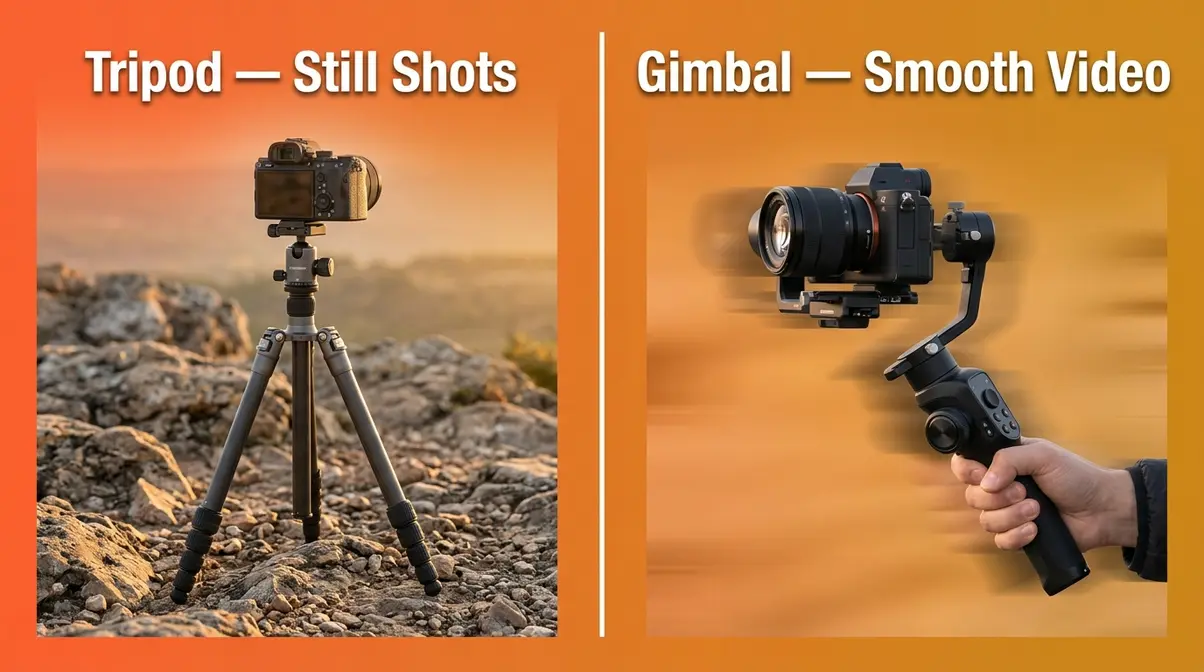
The two must-have stability accessories for beginner photographers are a camera tripod and a gimbal stabilizer — each solving a fundamentally different problem. A tripod locks your camera completely still for sharp long-exposure shots; a gimbal keeps it level and smooth while you’re actively moving. Research on multi-axis electronic stabilization confirms that 3-axis gimbals actively correct for pitch (tilting up/down), roll (tilting side to side), and yaw (rotating left/right) simultaneously — a degree of correction that in-lens optical stabilization alone cannot replicate for video. For beginners shooting both photos and video, owning one of each gives you complete coverage.
This is Layer 1 of The Photographer’s Foundation Stack — and it’s first for good reason. Without stable shots, no other accessory upgrade will meaningfully improve your photos.
Camera Tripods — Your Foundation for Sharp Shots
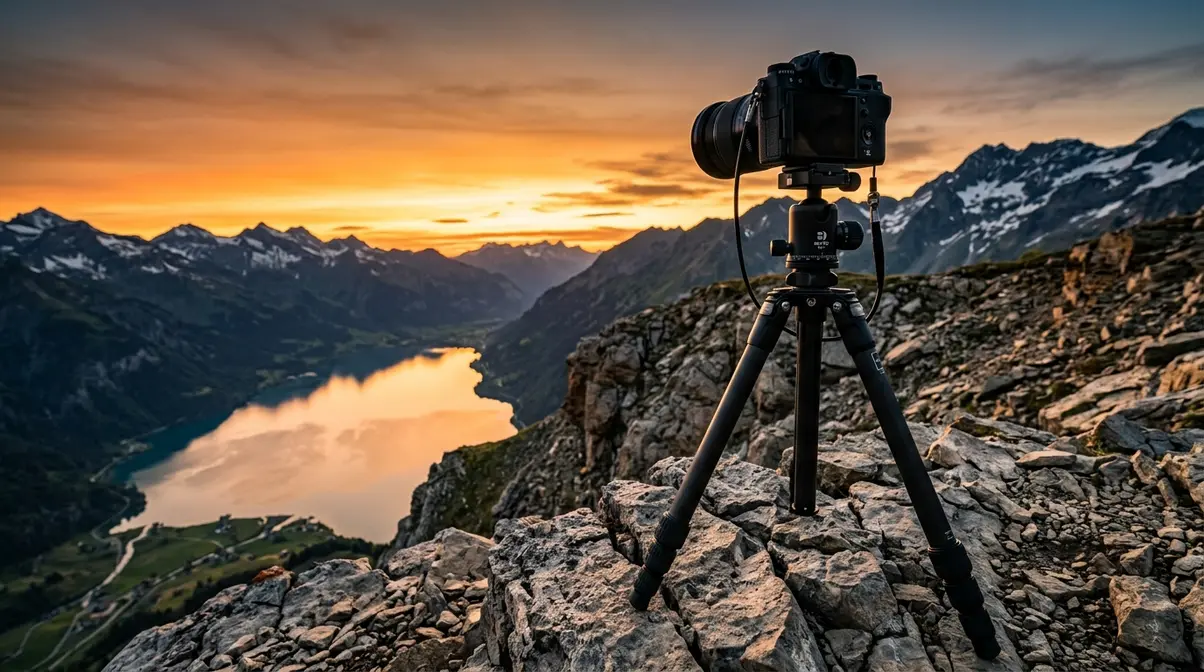
A camera tripod is the single most impactful basic accessory you can add to your kit. The core problem it solves is camera shake during slow shutter speeds. To capture a silky waterfall effect, you need a shutter speed of one second or longer. No human hand holds still that long — even professionals shake at exposures below 1/60th of a second.
Here are four specific scenarios where a tripod is invaluable for beginners:
- Landscape photography at dusk or dawn — low light demands slower shutter speeds; a tripod is the only way to get sharp images
- Self-portraits and group shots when you travel alone — set the camera on a tripod, use the self-timer, and step into the frame
- Low-light interior shots — churches, museums, and cafés with dim lighting all require stability
- Time-lapse and locked-off video — any scene where the camera shouldn’t move at all
When choosing a travel tripod, look for one under 1.5 kg (3.3 lbs) so it doesn’t become a burden on long walks. The maximum load capacity must exceed your camera and lens combined weight. A ball head (a single-knob rotating joint) is easier to adjust quickly than a pan-tilt head (separate knobs for each axis). The Joby GorillaPod is a popular flexible travel option — its bendable legs wrap around railings and branches. A basic aluminum travel tripod in the $40–$80 range covers the vast majority of beginner shooting scenarios according to Photography Life’s gear recommendations.
For a deeper look at stability tech, explore our guide to essential DSLR camera accessories.
Do I really need a tripod if my camera has image stabilization?
Yes — in-camera image stabilization and a tripod solve different problems. Image stabilization compensates for small, fast movements at handheld shutter speeds (typically 1/30s and faster). A tripod enables exposures of one second, ten seconds, or longer — essential for waterfalls, star trails, and low-light landscapes. No amount of in-body stabilization can replace a tripod for long-exposure photography. For beginners who want to shoot scenery at dusk or dawn, a tripod is non-negotiable.
Gimbals and Stabilizers — Smooth Video Made Simple
If you ever plan to film video while walking, a 3-axis gimbal stabilizer — an electronic device that keeps your camera level while you move — is essential. Without one, handheld video looks like it was filmed during an earthquake.
The difference between a tripod and a gimbal is motion: tripods eliminate all movement; gimbals allow intentional movement while cancelling unwanted shake. Walking down a cobblestone street to capture a travel vlog, following a subject through a crowd, or panning across a scenic vista — all of these shots require a gimbal.
The DJI OM series (designed for smartphones and lightweight mirrorless cameras) and entry-level 3-axis gimbals in the $80–$200 range are the most common starting points for beginners. Look for a gimbal with a payload (weight it can carry) that exceeds your camera-and-lens combo by at least 20% for reliable stabilization. Battery life of 8+ hours is worth prioritizing — a dead gimbal mid-shoot is just as frustrating as a dead camera battery. To understand how this compares to in-lens options, read our image stabilization types guide.
“3-axis electronic gimbals actively correct for pitch, roll, and yaw simultaneously — providing video smoothness that in-lens optical stabilization alone cannot match.”
Stability is your foundation. Once your shots are sharp and your footage is smooth, the next step is making sure you can carry your gear comfortably all day.
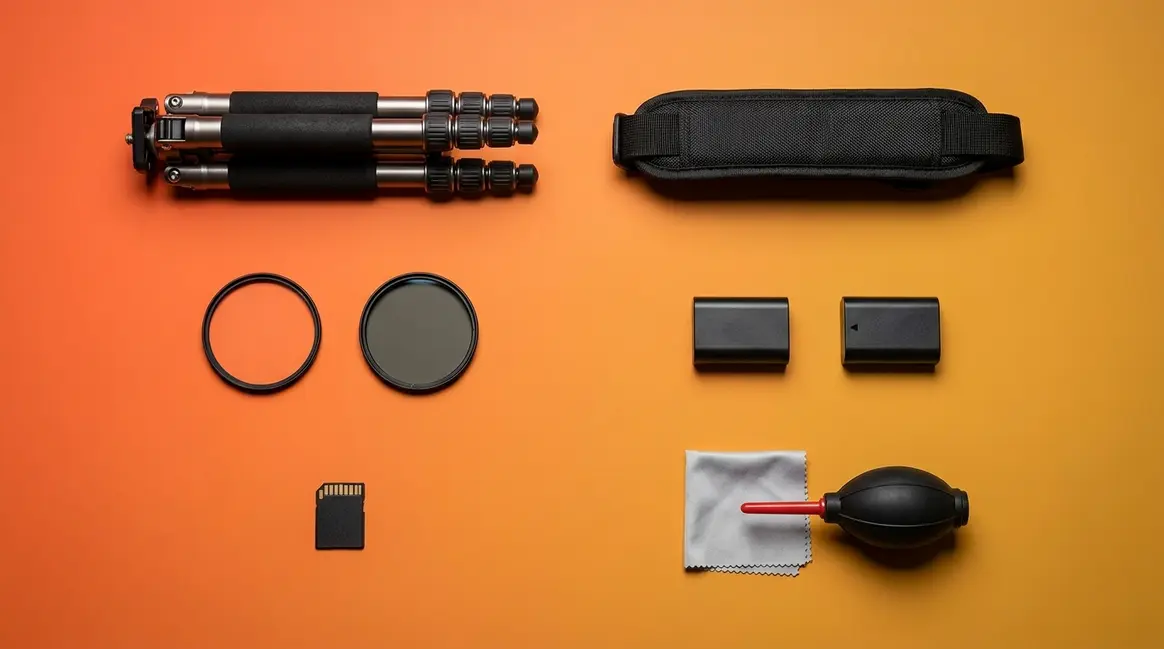
Layer 2: Comfort & Ergonomics — Straps and Bags
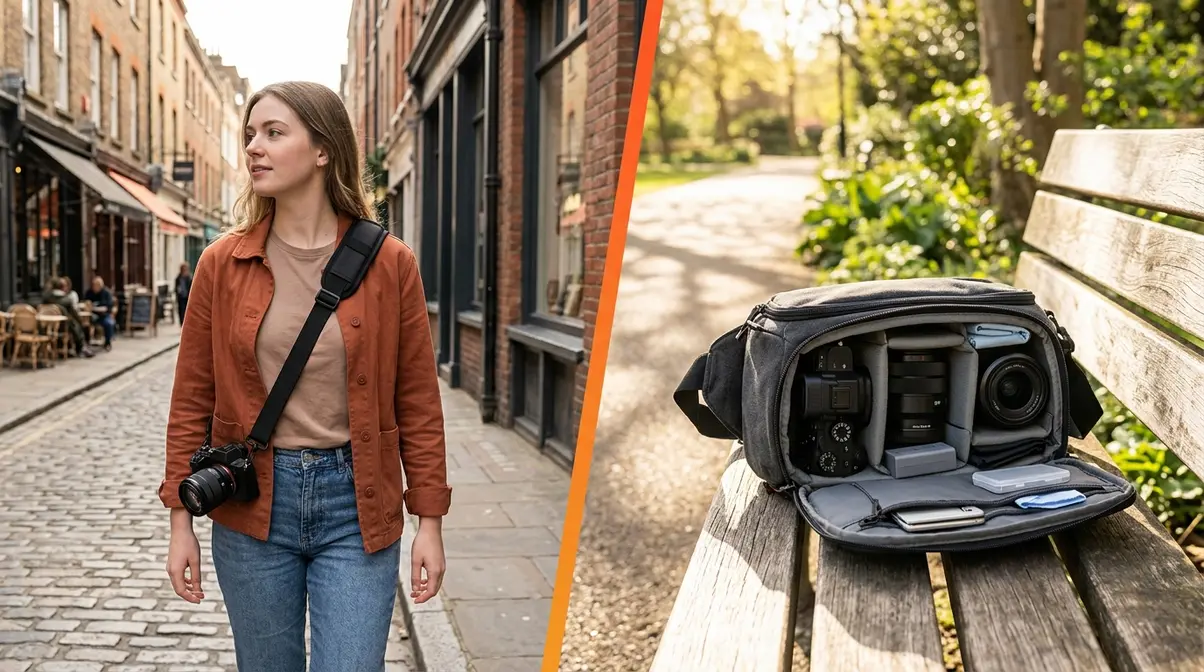
Comfort is not a luxury — it’s what determines whether your camera stays home or comes with you. Discomfort from a poor strap or a disorganized bag is one of the most underreported reasons beginners stop shooting regularly. Layer 2 of The Foundation Stack addresses the physical reality of carrying gear day to day.
Upgrade Your Camera Strap First
The strap that came in the box with your camera is functional — barely. Standard neck straps concentrate the full weight of your camera on a single pressure point at the back of your neck. Over a full day of shooting, this causes real discomfort. Research on musculoskeletal strain in photographers suggests that neck-focused load-bearing increases upper trapezius fatigue significantly during extended carry periods (NIH PubMed, 2019).
The fix is straightforward and inexpensive. A sling strap (a wide, padded strap worn diagonally across the chest) redistributes weight across your shoulder and torso instead. A wrist strap is a compact alternative for photographers who prefer keeping the camera in their hand. Key features to look for:
- Padding width of at least 4 cm — anything narrower cuts into your shoulder under load
- Quick-release clip — lets you detach the camera in seconds for bag storage
- Non-slip material on the shoulder contact surface — prevents the camera from sliding forward
The Peak Design Slide Lite and similar padded sling straps in the $20–$60 range consistently receive the highest satisfaction scores in beginner photography communities, according to DPReview’s reader accessory surveys. For solo travelers who walk long distances, upgrading the strap is often the single most impactful comfort improvement available for under $30. For a deeper dive into materials, check our breakdown of camera strap types, comfort, and usability.
Choosing the Right Camera Bag for Beginners
Your camera bag is your gear’s home. A good bag protects your camera from bumps, rain, and dust — and keeps everything organized so you spend time shooting, not searching through pockets.
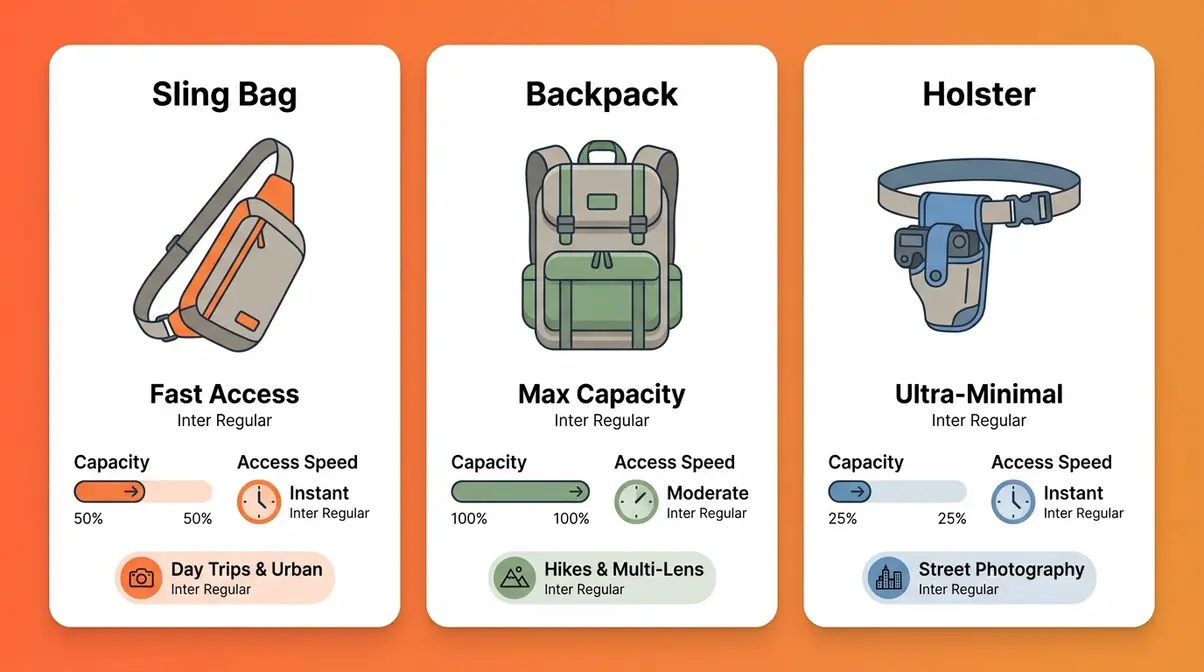
For beginners, there are three practical bag types:
- Sling bag (one-shoulder): Fast access, lightweight, ideal for day trips and urban photography. Best for a camera body, one or two lenses, and a few accessories.
- Backpack: More capacity, better weight distribution for long hikes. Best for trips where you carry multiple lenses, a tripod, and a laptop.
- Holster/pouch: Clips to a belt; holds one camera body. Best for minimal-kit street photography.
If you travel alone and shoot scenery, a sling bag is usually the best starting point. It lets you swing the bag to your front and access your camera without removing it — a meaningful advantage when you’re moving quickly to catch a fleeting shot. Look for padded, removable dividers (so you can reconfigure as your kit grows), a weather-resistant exterior, and a dedicated laptop sleeve if you edit in the field. Bags in the $40–$120 range from brands like Lowepro, K&F Concept, and Vanguard offer solid protection without the premium price of professional-grade options, as noted in Canon’s camera accessories guide. If you’re still undecided, our photography accessories for beginners comparison covers bag capacities in more detail.
With your gear comfortable to carry, it’s time to protect and enhance the glass in front of your sensor.
Layer 3: Lens Protection & Optical Enhancement
Your lens is one of the most expensive and vulnerable parts of your camera system. A scratch on the front element can permanently degrade every photo you take — and it happens faster than you’d expect. Layer 3 of The Photographer’s Foundation Stack addresses both protection (UV filters) and creative enhancement (CPL filters).
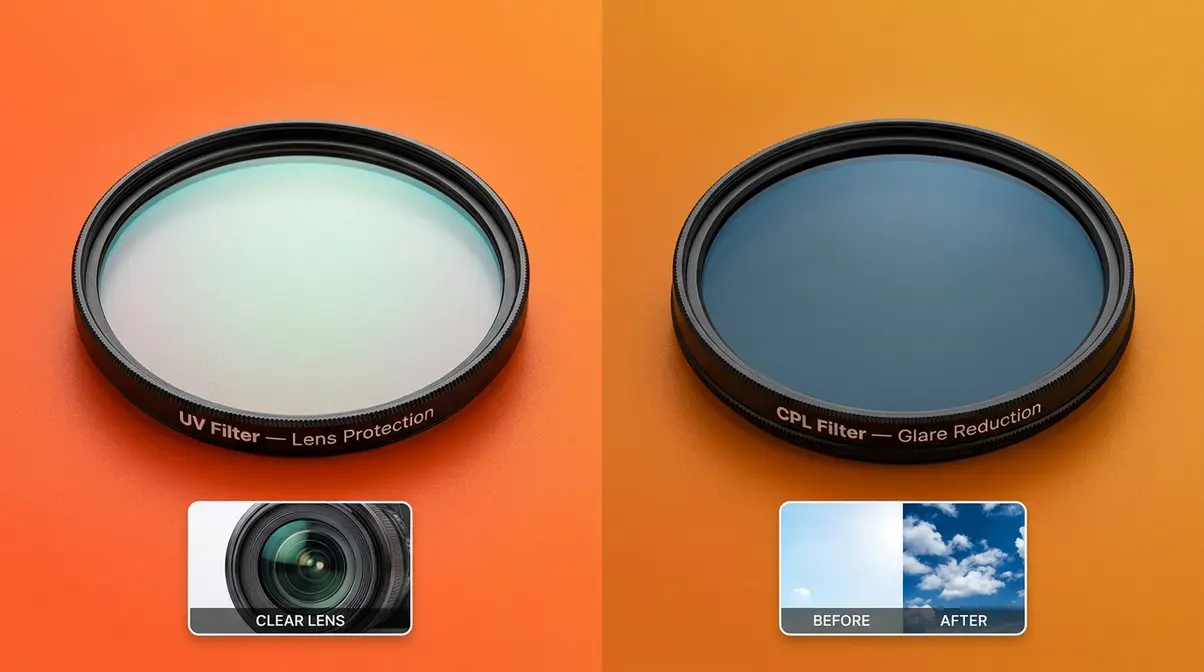
UV Filters — Cheap Insurance for Your Lens

A UV filter is a clear piece of optical glass that screws onto the front of your lens. Its original purpose was to block ultraviolet light from causing haze in film photography. In digital photography, its primary job is simpler: protect the front lens element from scratches, dust, fingerprints, and accidental contact.
Think of it as a screen protector for your lens. If something scratches the UV filter, you replace a $15–$40 piece of glass instead of a $300–$1,500 lens. That value equation is hard to argue with.
- Key buying guidance for beginners:
- Match the filter diameter to your lens (the number printed on the lens cap, e.g., 58mm, 67mm, 77mm)
- Choose a multi-coated UV filter — the coating reduces internal reflections that can slightly degrade image quality in a cheaper uncoated filter
- Brands like Hoya, B+W, and Tiffen offer reliable quality in the $15–$40 range
One important caveat: a low-quality UV filter can actually reduce image sharpness. Buy mid-range, not the cheapest option available. The Best Buy camera accessories guide consistently lists UV filters among the top five accessories for new camera owners precisely because the cost-to-protection ratio is so favorable. Once your lens is protected, you might wonder why use ND filters as a next step for creative exposure control.
Circular Polarizer Filters — Your Most Creative Accessory
A circular polarizer (CPL) is a rotating filter that cuts reflected glare from non-metallic surfaces — water, glass, wet leaves, blue sky. It’s the one filter effect you genuinely cannot replicate in post-processing software.
Imagine you’re photographing a mountain lake. Without a CPL, the surface reflects the sky and you lose all detail beneath the water. With a CPL rotated to the right angle, the reflections disappear and you see straight to the rocky bottom. That’s a transformation no editing app can fake after the fact.
Three specific use cases where a CPL is invaluable for beginners:
- Blue sky photography — a CPL deepens blue skies and makes clouds pop dramatically
- Water and wet surfaces — eliminates surface reflections to reveal underwater detail or texture
- Window and glass shots — removes reflections when shooting through glass (storefronts, car windows, aquariums)
CPL filters range from $20 to $80 for beginner-appropriate quality. Like UV filters, match the filter thread diameter to your lens and choose a multi-coated option. Note that CPL filters reduce the amount of light entering the lens by approximately 1.5–2 stops (meaning your camera needs more light to achieve the same exposure) — this is normal and expected. Learn more about what polarizing filters are and when you should use one in our dedicated guide.
Layer 4: Workflow, Power & Maintenance Essentials
The best photo opportunity of your life will mean nothing if your battery is dead or your memory card is full. Layer 4 of The Photographer’s Foundation Stack addresses the three workflow essentials that keep you shooting when it counts.
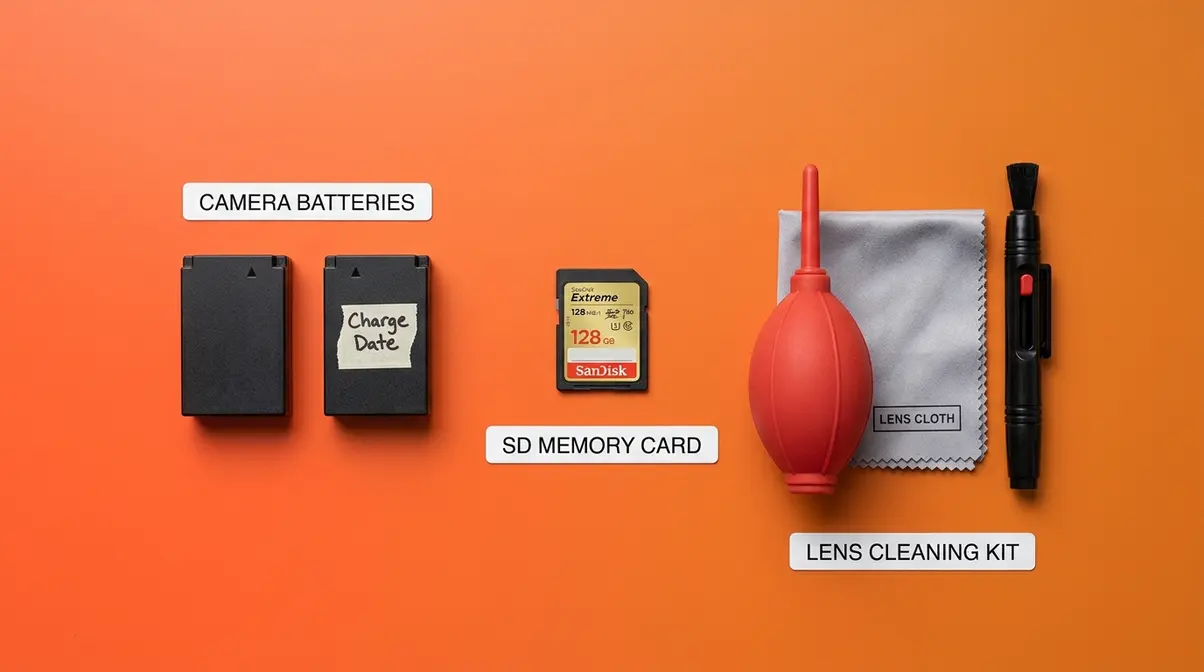
Extra Batteries — The Rule of Two
Always carry at least two batteries. This is The Rule of Two — and it’s non-negotiable for any serious outing.
A standard mirrorless camera battery lasts between 250 and 400 shots under normal conditions. In cold weather (a common scenario for landscape and travel photographers), that number can drop by 30–40%. A full day of shooting — especially if you’re also recording video — will drain one battery before noon.
Third-party batteries from reputable brands like Wasabi Power and RAVPower typically cost $15–$25 each and perform comparably to OEM (original manufacturer) batteries for everyday shooting. Two third-party batteries plus an OEM battery gives you a practical day-kit. Always label your batteries with the charge date using a small piece of tape — a simple habit that prevents the frustration of grabbing a depleted battery in the field.
Memory Cards — Speed Ratings Explained
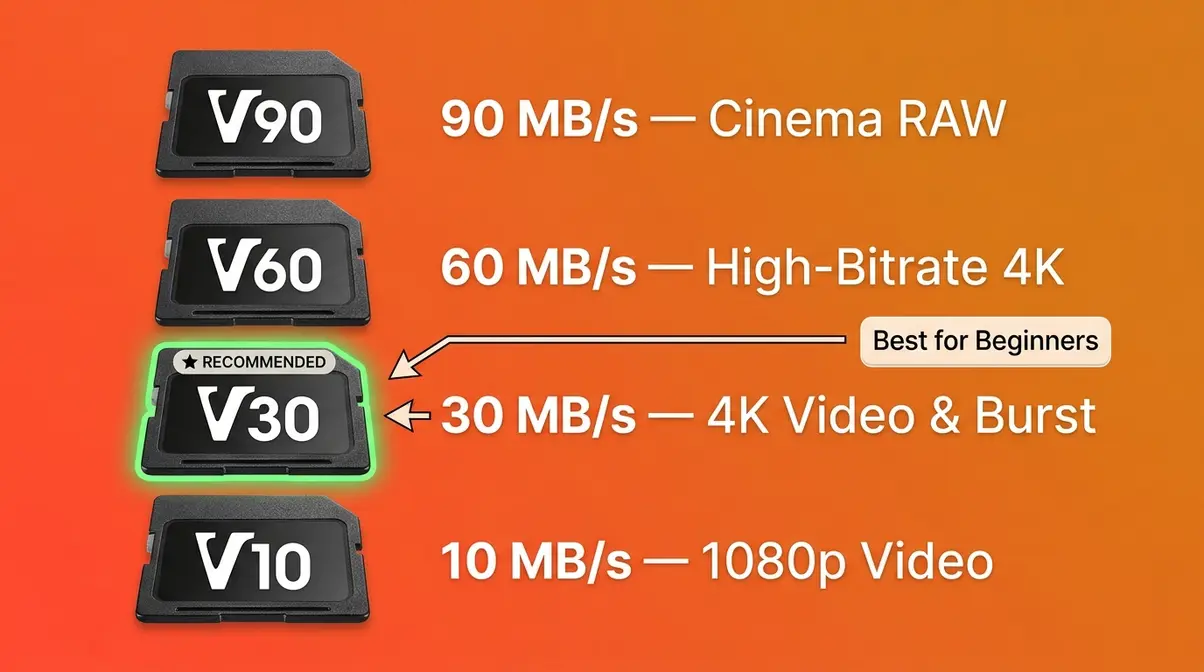
Not all memory cards are equal, and the difference matters more than most beginners realize.
Memory card speed is rated in two ways: MB/s read/write speed and Video Speed Class (V10, V30, V60, V90). For beginners shooting 4K video or burst photography (rapid-fire shots), you need a minimum of V30 — meaning the card can sustain a minimum write speed of 30 MB/s. A slower card causes your camera to pause mid-burst or drop video frames, which is deeply frustrating.
The SD Association — the governing body for SD card standards — recommends V30 as the baseline for UHD video recording. For most beginner use cases, a UHS-I V30 card (such as the SanDisk Extreme or Lexar Professional) in the 64GB–128GB range covers everything at $20–$45. Avoid no-brand or extremely cheap cards — counterfeit cards are widespread and can cause permanent data loss.
| Speed Class | Minimum Write Speed | Best For |
|---|---|---|
| V10 | 10 MB/s | 1080p video, standard shooting |
| V30 | 30 MB/s | 4K video, burst shooting (recommended for beginners) |
| V60 | 60 MB/s | High-bitrate 4K/6K video |
| V90 | 90 MB/s | Cinema-grade RAW video |
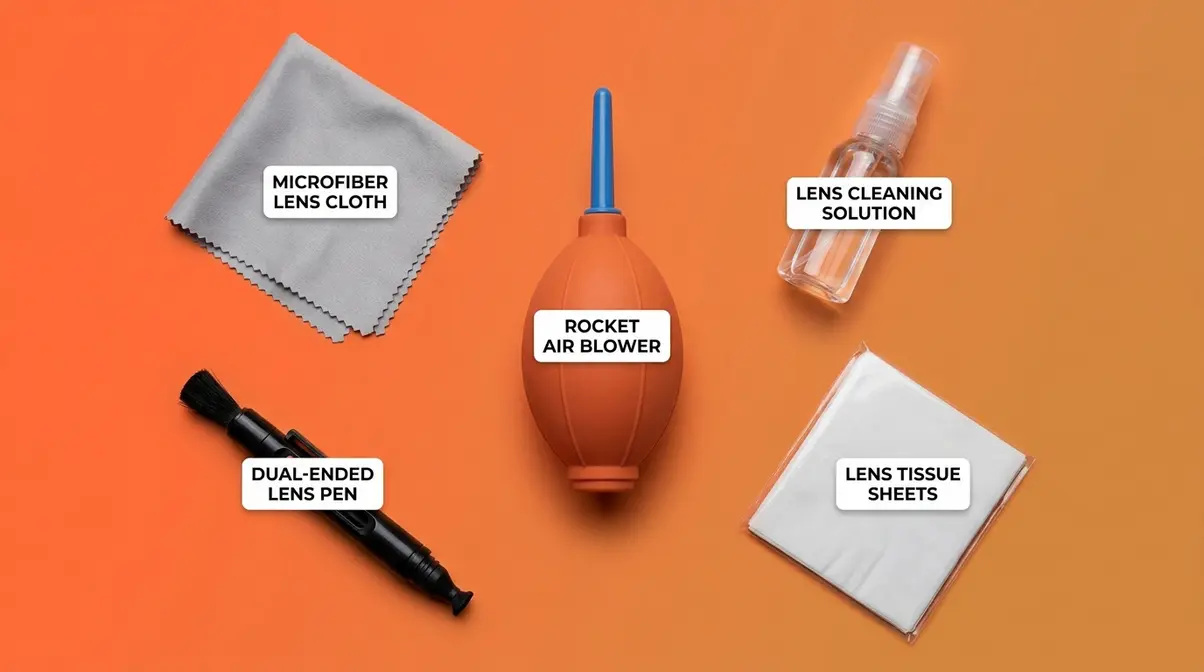
Camera Cleaning Kit — Protect Your Investment
Dust is unavoidable. Every time you change a lens, microscopic particles enter your camera body and settle on the sensor — the light-sensitive chip inside your camera. These appear as small dark spots in your photos, particularly visible in bright, uniform areas like blue sky.
A basic camera cleaning kit typically includes:
- Lens cleaning cloth (microfiber) — for wiping the front and rear lens elements
- Lens cleaning solution — removes fingerprint oils without streaking
- Air blower (rocket blower) — the safest way to remove loose dust from the sensor without touching it
- Lens cleaning pen — a dual-ended tool with a brush and a carbon cleaning tip for stubborn marks
For beginners, the air blower handles 90% of sensor dust issues safely. Do not use compressed air cans — the pressure and propellant can damage the sensor. Wet sensor cleaning (using sensor swabs and solution) is more thorough but should be attempted only after watching a tutorial and understanding your specific camera model. Cleaning kits from brands like Altura Photo and K&F Concept cost $15–$30 and last for years of regular use. For step-by-step instructions, see how to clean a camera sensor without damaging it. You should also learn how to clean a camera lens safely using your new microfiber cloth.
Limitations and When to Prioritize Differently
The Foundation Stack is a strong framework for most beginners — but no single framework fits every photographer. Here’s where to apply honest judgment.
Common Mistakes When Buying Your First Accessories
After evaluating beginner photography kits and analyzing common frustrations reported across photography forums, these are the four mistakes that appear most frequently:
- Buying a bag before a tripod. A beautiful bag doesn’t improve your photos. A tripod does. Always complete Layer 1 before Layer 2.
- Choosing the cheapest possible UV filter. A $5 uncoated filter can actually reduce your image sharpness — the opposite of its intended purpose. Spend at least $15 on a multi-coated option.
- Buying one memory card in a large capacity instead of two smaller ones. If a single 256GB card fails (and cards do fail), you lose everything. Two 64GB cards give you redundancy.
- Skipping the cleaning kit entirely. Sensor dust accumulates invisibly. By the time you see spots in your photos, it’s already affecting hundreds of images. A $20 cleaning kit prevents a much bigger problem.
When to Skip an Accessory (For Now)
Some accessories on this list may not be your immediate priority depending on your specific situation:
- Skip the gimbal if you shoot exclusively still photos and have no interest in video. A tripod alone covers your stability needs completely.
- Skip the CPL filter if you primarily shoot portraits or indoor photography. CPL filters are most valuable for outdoor landscapes and water scenes — they won’t help much in a controlled environment.
- Delay the camera bag if you already own a well-padded backpack with room for your camera. Add a dedicated padded camera insert (available for $15–$25) instead of buying a full new bag.
- Delay extra batteries if your camera uses a common battery model that’s easy to find locally — you can purchase one quickly if needed. However, if you’re traveling internationally or to remote areas, two spares are essential.
The goal is never to accumulate gear. The goal is to have the right tool when you need it.
Frequently Asked Questions
What accessories should a beginner photographer buy first?
The first accessory most beginner photographers should buy is a tripod, followed by an upgraded camera strap. These two items solve the most common frustrations immediately — blurry photos and neck pain from carrying your camera. After those, add a UV filter to protect your lens, then pick up two spare batteries and a fast memory card. Following The Photographer’s Foundation Stack order (stability → comfort → optics → workflow) prevents wasted spending on gear you don’t yet need.
Are third-party camera batteries safe for beginners?
Yes — reputable third-party batteries are generally safe and perform well. Brands like Wasabi Power and RAVPower manufacture reliable alternatives to more expensive original equipment manufacturer (OEM) batteries. While OEM batteries often hold a charge slightly longer and may have better long-term lifespans, third-party options provide excellent value for beginners building their kit. Always check user reviews and avoid unbranded, generic batteries that lack safety certifications.
What’s the difference between a UV filter and a CPL filter?
A UV filter is a protective clear lens cover; a CPL filter is a creative tool that cuts glare. A UV filter’s main job is to protect your front lens element from scratches and dust — it has minimal effect on image quality in digital photography. A circular polarizer (CPL) filter physically blocks certain angles of reflected light, deepening blue skies, eliminating water reflections, and saturating colors. The CPL effect cannot be replicated in editing software, making it one of the most genuinely useful photo accessories for landscape beginners.
How many memory cards do I need as a beginner?
Most beginners need at least two memory cards — one in the camera and one spare. A single 64GB card holds approximately 1,500–2,000 RAW photos or 40–60 minutes of 4K video (according to standard manufacturer capacity estimates), which is enough for most day trips. More important than capacity is speed: look for a V30-rated card (minimum 30 MB/s sustained write speed) to avoid dropped frames in video and paused burst shooting. The SD Association recommends V30 as the baseline for UHD video. Two V30 cards also give you data redundancy — if one fails, you don’t lose everything.
Is a camera bag or a strap more important for a beginner?
For most beginners, an upgraded strap is the higher-priority purchase. You use a strap every single time you pick up your camera; you use a bag only when traveling with multiple accessories. A padded sling strap in the $20–$40 range dramatically reduces neck and shoulder fatigue compared to the default neck strap, and it reduces the risk of accidentally dropping your camera. Once your kit grows to include multiple lenses, filters, and spare batteries, a dedicated camera bag becomes essential — but the strap upgrade delivers immediate, daily value for less money.
Build Your Kit One Layer at a Time
The photo accessories that genuinely move the needle for beginners are not the most expensive ones — they’re the most fundamental ones. A sharp image from a stable camera, carried comfortably, through a protected lens, with a full battery and a fast memory card: that’s the complete picture.
The Photographer’s Foundation Stack works because it mirrors how photography skills actually develop. You need stability before you need creative filters. You need comfort before you need a professional bag. Each layer you add makes the previous one more valuable, and every dollar you spend lands on a real, felt improvement.
Start with a tripod and an upgraded strap. Add a UV filter and two extra batteries. Pick up a fast memory card and a cleaning kit. That’s the entire foundation — and it costs less than most single “premium” accessories you’ll see recommended elsewhere.
Ready to take the next step? Browse our full guide to camera accessories for travel photographers and our breakdown of the best budget mirrorless cameras for beginners to see how your new Foundation Stack pairs with the right camera body.
Dave King
Hi, I'm Dave, the founder of Amateur Photographer Guide. I created this site to help beginner and hobbyist photographers build their skills and grow their passion. Here, you’ll find easy-to-follow tutorials, gear recommendations, and honest advice to make photography more accessible, enjoyable, and rewarding.